Carena ms TL User manual


INSTRUCTICI'JS MS
TL
ffi t- r-l

www.orphancameras.com

Congratulations . . . .
on the acquisitionof your CARENA msTL camera.
Before taking your first, pictures with the new camera,
we recommendthat you readthe directions ver), carefully.
Please
make sure when making your purchasethat the warranty and the registration card are filled in.
INDEX
Page
2f5 Descriptions
of parts 17 How to usethe selftimer
6 Filmloading 17 Exchanging
exposuremeter battery
9 How to adjustfilm speed 17 Flashphotography
How to usethe exposure meter 17 Unloadingthe film
9 a) By altering lens
aperture 18 How to change
lenses
10 b) By adjustingshutter speed 18 Useof SystemRings
13 Focusing 21 List of accessories
13 Depth of fiefd 22 Major specification
of the CARENA ms TL
14 Twin shutter release 23 Garantee
conditions
- ;n -'.". t*,:r{q

Description of Parts and the important operating controls of the CARENA m: TL
1. Fifmcounter 11.Shutter-speeddial
z. Lock
for
shurter-rerease shutter-speeds
B1 112
1lt+
118111511301160
1112s
& 112s0
U
s00
1/1000sec
3. Shutter-release
button
with thread
for cable
release 12. Notchedadjusting-dial
for
film
speedsin DIN
4. Quick
action
filmadvance
lever or ASA
13. M-contact
forflashbulbs
5' Film
planeindicator x-contacr
for elcctronicflash
6' Built-in pentapriim 14. shutter releaseon camera-front
7. Accessory-shoe
with centralflashcontact 15. operating rever for exposure merer with
8. Film-type
indicating
disc markings
indicating
functions
8a.
Filmindicator,showsRedwhencameraloaded, 16' Releasebutton for bayonet
lensmount
White when ernptY n. Lens
- interchangeablelenses
9. Film rewind knob with folding rewinding-
crank 18. Cocking-lever
for built-in
selftimer
10. Carrying-strap
eyelets
on both sidesof camera 19' Setting device for adiusting automatic or
manual
aperture setting
2
-r.!--.. .,i.,::
www.orphancameras.com


www.orphancameras.com

20' Viewfinder eyepiece.
Also has
slideat edgefor 29. outer back-coverlocking device
with pressure
plate for film spool
mounting accessories
21. Locking-device
for camera back 30. Lever for opening back cover
22' Film spool housing 31. Threaded cover for battery-housing
23. Focal
plane 32. Tripod bush
24. vertically operating metar focar plane shutter 33. Rewind button
25. Film transport sprockets g4. Lensaperture setting ring
26. Take-up spool 35. Focusing
ring
27' Back-cover
hinge , 96. (For picture see page12)
' Cable-release
sockei for shutter operation on
28' Film-pressure
plate Schneider
and Schacht
renses
to operate the
diaphragm-automatic
when usingbellowsand
extension tubes

I
II
Directions for preparing camera for use
Before loading
the camera
with film please
verify
whether the exposure meter battery Mallory RM
575 has been fitted and is in its proper position.
Open the cover (31) of the battery-housing by
meansof a coin and make sure that the battery
has
been
fitted with the side marked f upwards.
Close the battery-housing
by screwing down the
cover (31).
5
Loading the film
Push the lever of the back-cover locking-device
(30)in the direction of the arrow. The backcover
isthen unlocked
andwill open itself
automatically.
Pull out the rewind-knob (9) as far as possible,
insertthe film spool into the film spool housing
(22) and locate the spool by pushing in the re-
wind knob (9) Attention! Do not expose
the film
to direct sunlight
while loading.
lnsertthe protruding end of the film into the slot
of the take-up spool (26) and slowly advance
the
film by movingthe film-advance
lever (4) until the
sprocket of the film-transport drum engages
with
the perforationsof the film on both sides.
Then close the self-locking back-cover. . . The
filmcounter will automatically adjust itself to
S : Start. Then advancethe film by working the
film-advance lever (4) and the shutter release-
button at choice(3) or (14) until the filmcounter
showsthe number in its frame.
Set the film-type indicating dial (8) to the type
of film in use.
Now your CARENA msTL is ready
for use.
www.orphancameras.com


I
t
j
www.orphancameras.com

Exposure-measurement
For adjusting
the film speedpull out the notched
adjusting-dial (12) and turn same until the re-
quired
film speed
in DIN or ASA appears
in one
of the frames.
After releasing
the dist (12) it will
lock itself on rhe DIN or ASA value chosen.
Exposure-adjustment with the lens aperture
By turning the shutter speed dial (11) you can
adjust
the desired
shutter speed.
(Choice
of shuter
speeds:
B 1, 112,
114,
1lg,
1115,
1130,
1
160,
1
1125t 11250,
1/500, 1/1000
sec.)
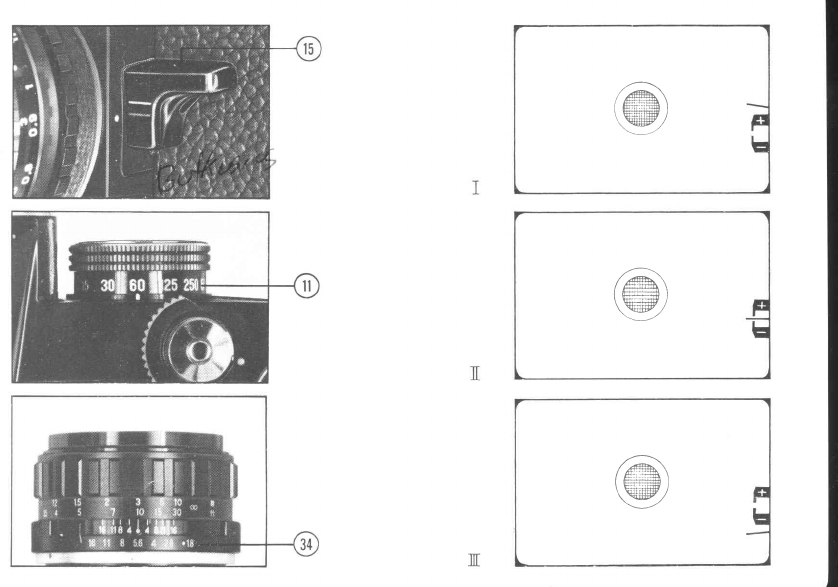
Then press
the exposure-meter key (15) (seepic-
ture on page
11) as
far as
the stop (position: iled
dash opposite White dot : Exposure-meter
dis-
connected
- Green Exposure-meter
switchedon).
Next turn the lens
aperture-scale
ring (34)
on the
lens until the exposure pointer is located in a
c_entralposition between the markings f and _
(Seepicture on next page).
In case
this central position cannot be achieved
correctly an alteration of the shutter speed will
be necessary.

II
Exposure-adjustment by alteration of the
shutter speed
Choosethe desired iinr-"p"rture by turning the
lens-aperture
scalering (34)on the lens-body.
Next press
the key of the exposure-meter(15)
as
far as the stop (Position of the exposure meter
key hasalready
beendescribedin detail) and turn
the shutter speed dial (11) until the exposure-
pointer is located in a central position between
the markings
f and
-. Incasethis central
position
cannot be achieved
correctly alterationof the lens
aperture will be necessary.
Markings for adjustment:
The movement of the exposure-pointer is visible
in the viewfinder.
Examplel: The pointer is located over the *
limit : over exposure.
Example
ll: The pointer is locatedin the central
position : coFr€ct exposure.
Examplelll: The pointer is locatedunder the -
limit : under
exposure.
10
Correct exposure
After adjustment of the correct exposure it is
advisableto check whether the chosen combi-
nation of shutter speed and aperture is suitable
for your needs.By changingthe combination of
shutter speed and aperture you will be able to
adjust
the correct exposureto your requirements.
Attention! When using
shutter speedof 1115
sec.
and longer the possibility
of unsharpnessdue to
camera movement arises. ln such cases use a
tripod and cable
release.
CARENA ms TL - Light measuring system
The measurement
of the light is effectedthrough
the lens. Two photographic CdS cells acting
independentlyscanthe entire field of the image.
The different light values of various portions of
the image
are then compensatedto give the best
light value. This precisesystem of measurement
guarantees
correct uniform exposure in all pic-
tures, also when using telephoto lenses
of grea-
ter focal lengths,filters, extension-rings,
and for
macro-and micro-photography.
i
t
I
www.orphancameras.com
,G\
I ffii;Fffi I
w
/ffi\
tHl
I Y.F----+t+ l
\ffi/
v
/A\
/ ie1:ri].-d \
l|i#l
lffi=ffil
\w/
][

I
I
f
www.orphancameras.com

Adjustment of sharpness -
Adjustment of distant shots
The fully automatic spring-diaphragm,the reflex-
finder with microprism and Fresnel lens make
possible simple, quick and dependably sharp
focusing,
with the diaphragm fully open. Choose
your view in the reflex-finderand turn the focu-
sing ring (35) until maximum sharpnessis ob-
tained.
The Fresnel
lensin the centre of the imagein the
finder will enable you to focus with absolute
sharpness.
Examples of adjustment:
Upper picture : corf€ct sharpnessand depth of
focus
- bestdefinition.
Lower picture : incorrect sharpness
anddepth of
focus
- poor definition.
Depth of Field
The Depth of Field is the distancebehind and in
front of the subject on which you are focused,
which is sharp. The Depth of Focus
of any lens
will vary according to the focal length of the
lens and aperture. The lens with a short focal
length will have more depth of field than a lens
with a longfocal
length.
When photographing subjects, with lots of im-
portant detail, as in architecture, use a small
aperture,i.e.
f 11 or f 16.To blur out unsightly
backgroundsuse
a wide aperture, i.e.t 1,8or f 2,8.
On the depth of fieldscaleof the lensthis distance
may be read from the identical figures shown to
the right and the left of the distance
in meters.
Checking the depth of field may be effected
through the reflexfinder.
Pressthe exposure
meter
key which in this caseperforms the function of
depth offield keyandin conjunctionwith the effect
on the Fresnel
lens it will allow you to ascertain
to what extent the depth of sharp focusextends
over the chosenview.
With the lens-adjustment
key (19)in position "A"
it will be possible
to operate
the automaticspring-
diaphragm. Before and after the exposure the
diaphragm is fully open. By switching over to
position "M" (Manual) the automatic spring-
diaphragmmay be cut out.
13
-,. ..U,..:1,;* ,

Shutter release - Twin shutter release
The CARENAmsTL isequipped
with two shutter
releases:
1. Shutter release
button (3) on the camera
top
. with threaded socket for cable release,and
14
locking-disc (2) for the usual rglease of the
shutter by handor by cablerelease.
Releasingis effdcted by pressing rhe release-
button (3) which may be locked by turning the
locking disc (2) from the white dot to the red
dot. Byturning the locking-disc
from the white
dot to the green dot the rilease is unlocked.
The front release
of the camera (14) has been
provided for lenses
with external release
such
as Exakta bayonet type with mount of 38 mm
diameter. Moreover it serves
as
an extra release
with normal lensesfor special"fast-shooting"
techniques,
or for left-handed
users.
The release
is operated by pressing
the release
lever (14) directly or by means of the lens
release-button (which is also fitted with an
additionalthread for cable-release).
When using lenses
with external release
the
camera release (3) should be locked by the
locking-disc(2) as the diaphragm mechanism
in lenses
with external release
canonly be put
in action by release(14). Inadvertent release
of (3) will not operate the diaphragm mecha-
nism of lenses
with external release.
2.
I
t,
v
www.orphancameras.com


www.orphancameras.com

Built-in selftimer
With the camera ready for shooting cock the
selftimer by pressing f,he cocking-lever (18) as
far asthe stop. When the shutter release
ispressed
the selftimer will be put into operation.
The time
elapsing
between pressing
the shutter release
and
the opening of the shutter is about ten seconds.
Exchanging the exposure meter battery
After opening the battery-housing
by unscrewing
the cover (31),by meansof a coin, place
the new
battery with the mark * upwards into the bat-
tery-housing and close the housing by screwing
down the cover. Please
useonly 1,3Volt batteries
of reputed brand, such as Ever Ready,
Mallory
RM 675.
Flash photography
M- and X-synchronization
The CARENA ms TL has been synchronized both
for M andX.
X : Electronic
flashfor all shutter speeds
up to
1
1125
sec(Redfigure125
on the shutter speed
dial.)
M : Flashbulbs for all shutter speeds up to
1/1000
sec.
n.-o"ing an"O,-
The film is completelyexposed
when the number
of shots
possible
with the film in use
appearsin the
frame (1)
of the film counter.
For rewinding the film the rewind release-button
(33) should be pressed.
Fold out the rewinding-
crank (9)
and rewind the film until the crankturns
freely;this is
the sign
that the exposedfilm isfully
rewound.
After pullint out the rewind-knob (9) unlock the
camera back (30) and take out the film.
17
Popular Digital Camera manuals by other brands

Mustek
Mustek G-SMART G-SMART LCD user manual

Cobra Digital
Cobra Digital DC1100 Specifications

Epson
Epson r-d1 - Rangefinder Digital Camera Specifications

Schäfter+Kirchhoff
Schäfter+Kirchhoff SK512CSD instruction manual

Pessl Instruments
Pessl Instruments CropVIEW user manual

Panasonic
Panasonic Lumix DMC-TZ30 operating instructions


Kamasa-TOOLS
Kamasa-TOOLS K 12170 manual

Nikon
Nikon Coolpix S200 user manual

Raptor Photonics
Raptor Photonics HAWK 252 user manual

Conrad
Conrad 750987 operating instructions

Sony
Sony DSCT77P - Cybershot 10.1MP 4x Optical Zoom Digital Camera 2GB... Specifications

Canon
Canon EOS M6 Mark II Advanced user's guide