manuals.online logo
Brands
  1. Home
  2. •
  3. Brands
  4. •
  5. Cariboni
  6. •
  7. Outdoor Light
  8. •
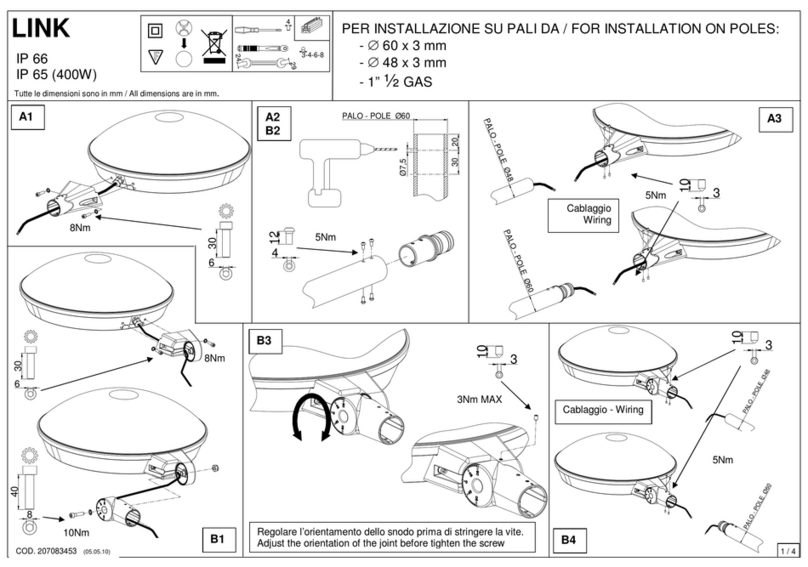
  9. Cariboni ORAO Pole side User manual

Cariboni ORAO Pole side User manual

1/2207083564 (05/02/2018)
ORAO
ACCESSORI / ACCESSORIES
3-4-6-8
Strumenti - Tools:
1. INSTALLAZIONE - INSTALLATION:
Testa palo - pole top: 01OR901C0
17
10
(2x)
Allentare le viti
Untighten the screws
10Nm (2x)
Installare l'apparecchio su palo e serrare i due grani con la
coppia di serraggio indicata
Install the luminaire on the pole and tighten the lateral screws
with the indicated tightening torque
0,2Nm (2x)
1.1 8
(16 Nm 2x)
1.2
8
A
B
C
Inserire il cavo attraverso l'attacco
palo; inserire l'attacco palo nel
prodotto; serrare le viti con la
coppia di serraggio indicata
Insert the cable through the pole
top fixture; insert the fixture in the
product; tighten the screws with
the indicated tightening torque
Se installato su pali cilindrici Ø60
usare l'accessorio di copertura
If used on cylindrical pole Ø60
use the cover accessory
SNAP! D
Effettuare la connessione elettrica
come mostrato in precedenza e
serrare il cordino con una pinza
Make the electrical connection as
shown before and
tighten the safety cord with a pincer
Ø60
1.3 1.4
4
2. INSTALLAZIONE - INSTALLATION:
Testa palo con antenna - pole top with antenna: 01OR902C0
(2x)
Allentare le viti
Untighten the screws
2.1 8
Cavo antenna
Antenna cable
Cavo linea
Line cable
(16 Nm 2x)
2.2
8
A
B
C
SNAP! D
Inserire il cavo attraverso l'attacco
palo (alimentazione di linea verso il
basso, antenna verso l'alto); inserire
l'attacco palo nel prodotto; serrare le viti
con la coppia di serraggio indicata.
Insert the cable through the pole top
fixture (line cable throught the bottom,
antenna cable through the top); insert the
fixture in the product; tighten the screws
with the indicated tightening torque.
COASSIALE: ALL'ANTENNA
COAXIAL: TO THE ANTENNA
4/5 POLI: ALLA LINEA
4/5 POLES: TO THE LINE
Se installato su pali
cilindrici Ø60 usare
l'accessorio di copertura
If used on cylindrical
pole Ø60 use the cover
accessory
8
Ø60
Ø60
www.caribonigroup.com TEL. +39 039.95211 FAX +39 039.587812 via G.A. Prato 22, I-38068 Rovereto (TN) via della Tecnica 19, I-23875 Osnago (LC) 2/2
IT L'installazione necessita l'intervento di personale specializzato. ATTENZIONE!! PERICOLO DI SCOSSA ELETTRICA, PRIMA DI EFFETTUARE OPERAZIONI DI MONTAGGIO O MANUTENZIONE TOGLIERE LA TENSIONE.
EN The installation must be carried out by qualified technicians.. WARNING!! DANGER OF ELECTRIC SHOCK, DISCONNECT FROM ELECTRICAL SUPPLY DURING INSTALLATION OR MAINTENANCE.
FR L'installation doit être faite par person nel compétent. ATTENTION!! DANGER DE CHOC ELECTRIQUE, COUPER L'ALIMENTATION ÉLECTRIQUE AVANT INSTALLATION OU ENTRETIEN.
DE Die Installation soll von Fachpersonal gemacht werden. ACHTUNG!! GEFAHR VON ELEKTRISCHER SCHLAG, STROMNETZ TRENNEN VOR INSTALLATION ODER BEI WARTUNGSARBEITEN.
ES La instalacion necesita la intervencion de personal especializado. ATTENCION!! POR PELIGRO DE DESCARGA ELECTRICA, ANTES DE EFFECTUAR UNA OPERACION DE MONTAJE O MANUTENCION, DESCONNECTAR LA CORRIENTE ELECTRICA.
0,2Nm (2x)
Effettuare la connessione elettrica
come mostrato in precedenza e
serrare il cordino con una pinza
Make the electrical connection as
shown before and
tighten the safety cord with a pincer
Ø60
2.3
10Nm (2x)
Installare l'apparecchio su palo e serrare i due grani con la
coppia di serraggio indicata
Install the luminaire on the pole and tighten the lateral screws
with the indicated tightening torque
2.4
4
2Nm (2x)
2Nm (2x)
A
B
C
D
Fissare il cavo sulla basetta plastica tramite
il dado; montare guarnizione e antenna;
fissare la base sul corpo con la coppia
indicata; chiudere il bicchiere e serrare le
due viti con la coppia indicata.
Mount the cableon the plastic base with the
nut; mount gasket and antenna; mount the
base on the main body and tighten the
screws with the indicated tightening torque;
close the tip and tighten the two screws with
the indicated tightening torque.
2.4

Other Cariboni Outdoor Light manuals

Cariboni Classic Link User manual

Cariboni

Cariboni Classic Link User manual

Cariboni DIELL User manual

Cariboni

Cariboni DIELL User manual

Popular Outdoor Light manuals by other brands

Kichler Lighting 39533 manual

Kichler Lighting

Kichler Lighting 39533 manual

edishine HSSL31A instruction manual

edishine

edishine HSSL31A instruction manual

7hSevenOn Home 09310 manual

7hSevenOn Home

7hSevenOn Home 09310 manual

NERI LIGHT 21 Installation guides

NERI

NERI LIGHT 21 Installation guides

Frontgate KANE 166715B BRO Assembly instructions

Frontgate

Frontgate KANE 166715B BRO Assembly instructions

Philips AeroScape ASW Assembly instructions

Philips

Philips AeroScape ASW Assembly instructions

SLV 1006327 instruction manual

SLV

SLV 1006327 instruction manual

Huntington Home TL-1674 user manual

Huntington Home

Huntington Home TL-1674 user manual

TEKA ILLUMINATION 1130 quick start guide

TEKA ILLUMINATION

TEKA ILLUMINATION 1130 quick start guide

LIGMAN OD-21052 installation manual

LIGMAN

LIGMAN OD-21052 installation manual

TFA 43.2034 instruction manual

TFA

TFA 43.2034 instruction manual

Reliance Foundry Concrete Bollard Installation

Reliance Foundry

Reliance Foundry Concrete Bollard Installation

Licatec Edgelight PLM III Series Assembly instruction

Licatec

Licatec Edgelight PLM III Series Assembly instruction

Linea Light MY WHITE BOND installation instructions

Linea Light

Linea Light MY WHITE BOND installation instructions

LIGMAN VANCOUVER 4 installation manual

LIGMAN

LIGMAN VANCOUVER 4 installation manual

Dale Tiffany TA100353 Assembly instructions

Dale Tiffany

Dale Tiffany TA100353 Assembly instructions

JONATHAN Y JYL6123A quick start guide

JONATHAN Y

JONATHAN Y JYL6123A quick start guide

Vynco VLWLED4 installation instructions

Vynco

Vynco VLWLED4 installation instructions

manuals.online logo
manuals.online logoBrands
  • About & Mission
  • Contact us
  • Privacy Policy
  • Terms and Conditions

Copyright 2025 Manuals.Online. All Rights Reserved.