manuals.online logo
Brands
  1. Home
  2. •
  3. Brands
  4. •
  5. Carina
  6. •
  7. Sewing Machine
  8. •
  9. Carina 8630M User manual

Carina 8630M User manual

Other Carina Sewing Machine manuals

Carina Classic User manual

Carina

Carina Classic User manual

Carina Easy User manual

Carina

Carina Easy User manual

Carina Diamond Operator's manual

Carina

Carina Diamond Operator's manual

Carina Classic II User manual

Carina

Carina Classic II User manual

Carina SNM 33 C1 User manual

Carina

Carina SNM 33 C1 User manual

Carina 8380B User manual

Carina

Carina 8380B User manual

Carina Sewing Machine User manual

Carina

Carina Sewing Machine User manual

Popular Sewing Machine manuals by other brands

Brother PE-180D Service manual

Brother

Brother PE-180D Service manual

Singer 569U1100 Operator's guide

Singer

Singer 569U1100 Operator's guide

ELNA 2002 instruction manual

ELNA

ELNA 2002 instruction manual

Siruba DL7200D-NM1 Instruction book

Siruba

Siruba DL7200D-NM1 Instruction book

Silver Viscount 9500e instruction manual

Silver

Silver Viscount 9500e instruction manual

Pfaff 3588-05/020 instruction manual

Pfaff

Pfaff 3588-05/020 instruction manual

JUKI DDL-9000A instruction manual

JUKI

JUKI DDL-9000A instruction manual

Pfaff 284 Instruction book

Pfaff

Pfaff 284 Instruction book

Reliable MSK-335B Specification sheet

Reliable

Reliable MSK-335B Specification sheet

Kenmore 385. 19000 owner's manual

Kenmore

Kenmore 385. 19000 owner's manual

Brother FD4-B271 instruction manual

Brother

Brother FD4-B271 instruction manual

Brother Computerized Embroidery Machine Operation manual

Brother

Brother Computerized Embroidery Machine Operation manual

Husqvarna Viking Designer SE user guide

Husqvarna Viking

Husqvarna Viking Designer SE user guide

Singer 645 owner's manual

Singer

Singer 645 owner's manual

Riccar RL634DE user manual

Riccar

Riccar RL634DE user manual

ZOJE ZJ9800 Operation manual

ZOJE

ZOJE ZJ9800 Operation manual

Siruba C007JP Instruction book

Siruba

Siruba C007JP Instruction book

IKEA SY user guide

IKEA

IKEA SY user guide

manuals.online logo
manuals.online logoBrands
  • About & Mission
  • Contact us
  • Privacy Policy
  • Terms and Conditions

Copyright 2025 Manuals.Online. All Rights Reserved.

When using an electrical appliance, basic safety always be
followed, including the following:
Read all instructions before using this sewing machine.
- To reduce the risk of electric shock:
1. n appliance should never be left unattended when plugged in.
2. lways unplug this appliance from the electric outlet
immediately after using and before cleaning.
3. lways unplug before re-lamping. Replace bulb with same type
rated 10 watts (110-120V area) or 15 watts (220-240V area).
- o reduce the risk of burns, fire, electric
shock, or injury to persons:
1. Do not allow to be used as a toy. Close attention is necessary
when this appliance is used by or near children.
2. Use this appliance only for its intended use as described in this
manual. Use only attachments recommended by the
manufacturer as contained in this manual.
3. Never operate this appliance if it has a damaged cord or plug,
if it is not working properly, if it has been dropped or damaged,
or dropped into water. Return the appliance to the nearest
authorized dealer or service center for examination, repair,
electrical or mechanical adjustment.
4. Never operate the appliance with any air openings block. Keep
ventilation openings of the sewing machine and foot controller
free from accumulation of lint, dust, and loose cloth.
5. Keep fingers away from all moving parts. Special care is
required around the sewing machine needle.
6. lways use the proper needle plate. The wrong plate can
cause the needle to break.
7. Do not use bent needles.
8. Do not pull or push fabric while stitching. It may deflect the
needle causing it to break.
9. Switch the sewing machine off ("O") when making any
adjustments in the needle area, such as threading needle,
changing needle, threading bobbin, or changing presser foot,
and the like.
10. lways unplug sewing machine from the electrical outlet when
removing covers, lubricating, or when making any other user
servicing adjustments mentioned in the instruction manual.
11.Never drop or insert any object into any opening.
12.Do not use outdoors.
13.Do not operate where aerosol spray products are being used
or where oxygen is being administered.
14.To disconnect, turn all controls to the off ("O") position, then
remove plug from outlet.
15.Do not unplug by pulling on cord. To unplug, grasp the plug,
not the cord.
This sewing machine is intended for household use only.
DANGER
WARNING
SAVE THESE INSTRUCTIONS
T
IMPORTANT SAFETY INSTRUCTIONS
Cuando se utiliza un dispositivo eléctrico, debe seguirse siempre
precuaiones de seguridad básica, incluyendo las siguientes:
Leer todaas las instrucciones antes de utilizar está máquina de
coser.
- Para reducir el riesgo de sacudidas eléctricas:
1. Un dispositivo eléctrico nunca debe dejarse desatendido
cuando está conectado.
2. Desenfucharse siempre la máquina de la toma de corriente
inmediatamente despues de utilizarla y antes de su limpieza.
3. Desconectar siempre antes de sustituir una bombilla. Sustituir la
bombilla con otra del mismo tipo de 10 vatios (110-120V área)
o 15 vatios (220-240 área).
- Para reducir el riesgo de
quemaduras, incendios, sacudidas eléctricas o lesiones corporales:
1. No permitir que se ultilice como un juguete. Prestar especial
atencion cuando se utilice por o cerca de niños.
2. Utilice está máquina solamente para su uso previsto, segun se
describe en este manual. Usar solamente accesorios
recomendados por el fabricante, indicados en este manual.
3. Nunca haga funcionar esta maquina si tiene un conector o
cable deteriorado, si no está funcionando adecuadamente o si
ha resulato deteriorada o expuesta a la acción del agua.
4. Nunca haga funcionar la máquina con ninguna apertura de aire
bloqueada. Mantenga la apertura de ventilación de la máquina de
coser y el dispositivo de control de pedal libre de acumulacionde
suciedad, polvo y ropa suelta.
5. Mantener los dedos alejados de todas las piezas móviles. Se
necesita especial cuidado entorno a la aguja de la máquina de
coser.
6. Utilice siemplre la placa de aguja adecuada. Una placa
incorrecta puede hacer que se rompa la aguja.
7. No utilizar agujas curvadas.
8. No empujar ni tirar de la tela mientras se cose. Puede desviar la
aguja originando su rotura.
9. Desconectar la máquina de coser (posición "O") cuando se
realice cualquier ajuste en la zona de la aguja, tal como
enhebrado de la aguja, cambio de aguja, enhebrado de la
canilla o cambio del prensatelas u operaciones similares.
10.Desconecte siempre la máquina de coser de la toma de
corriente cuando se retiren tapas, se engrase o cuando se
haga cualquier otro ajuste por el usuario mencionado en el
manual de instrucciones.
11.Nunca dejar caer ni insertar ningún objeto a través de ninguna
abertura.
12.No utilizar la máquina en exteriores.
13.No hacer funcionar la máquina en presencia de aerosol (si se
están utilizando productos pulverizados o donde se adminstre
oxígeno).
14.Para la desconexión, girar todos los mandos a la posición OFF
("O") y luego retirar el conector del enchufe de corriente.
15.No desenchufar tirando del cable. Para la desconexión, agarrar
el conector y no el cable.
Esta máquina de coser está prevista para uso doméstico
solamente.
PELIGRO
ADVERTENCIA
CONSERVAR ESTAS
INSTRUCCIONES
IMPORTANTE INSTRUCCIONES DE SEGURIDAD
Congratulation : E timado Cliente:
s the owner of a new sewing machine, you will enjoy
precision quality stitching on all types of fabrics, from
multiple layers of denim to delicate silks.
Your sewing machine offers the ultimate in simplicity
and ease of operation. For your safety and to fully
enjoy the many advantages and ease of operation of
your sewing machine, we recommend that you read all
the important safeguards and use and care
instructions in this instruction book.
May we suggest that before you start to use your
sewing machine, you discover the many features and
advantages by going through this instruction book,
step by step, while seated at your sewing machine.
Le felicitamos muy cordialmente por su nueva
máquina de coser.
Vd. acaba de comprar un producto de calidad que ha
sido fabricado con el máximo cuidado. Su máquina de
coser es fácil de usar pero naturalmente hay que
seguir las reglas. Y estas las hemos especificado en
este manual de instrucciones. Si Vd. Les presta
atención entonces realizará sus trabajos
perfectamente desde el comienzo.
Por supuesto que Vd. tendrá algunas preguntas que
en este manual no hemos podido agotar del todo. En
este caso el representante de nosotro estará siempre
a su disposición, para cualquier pregunta que Vd.
pueda tener.
Le deseamos buen divertimiento con su hobby. De
rienda suelta a su máquina de coser y a su fantasiá.
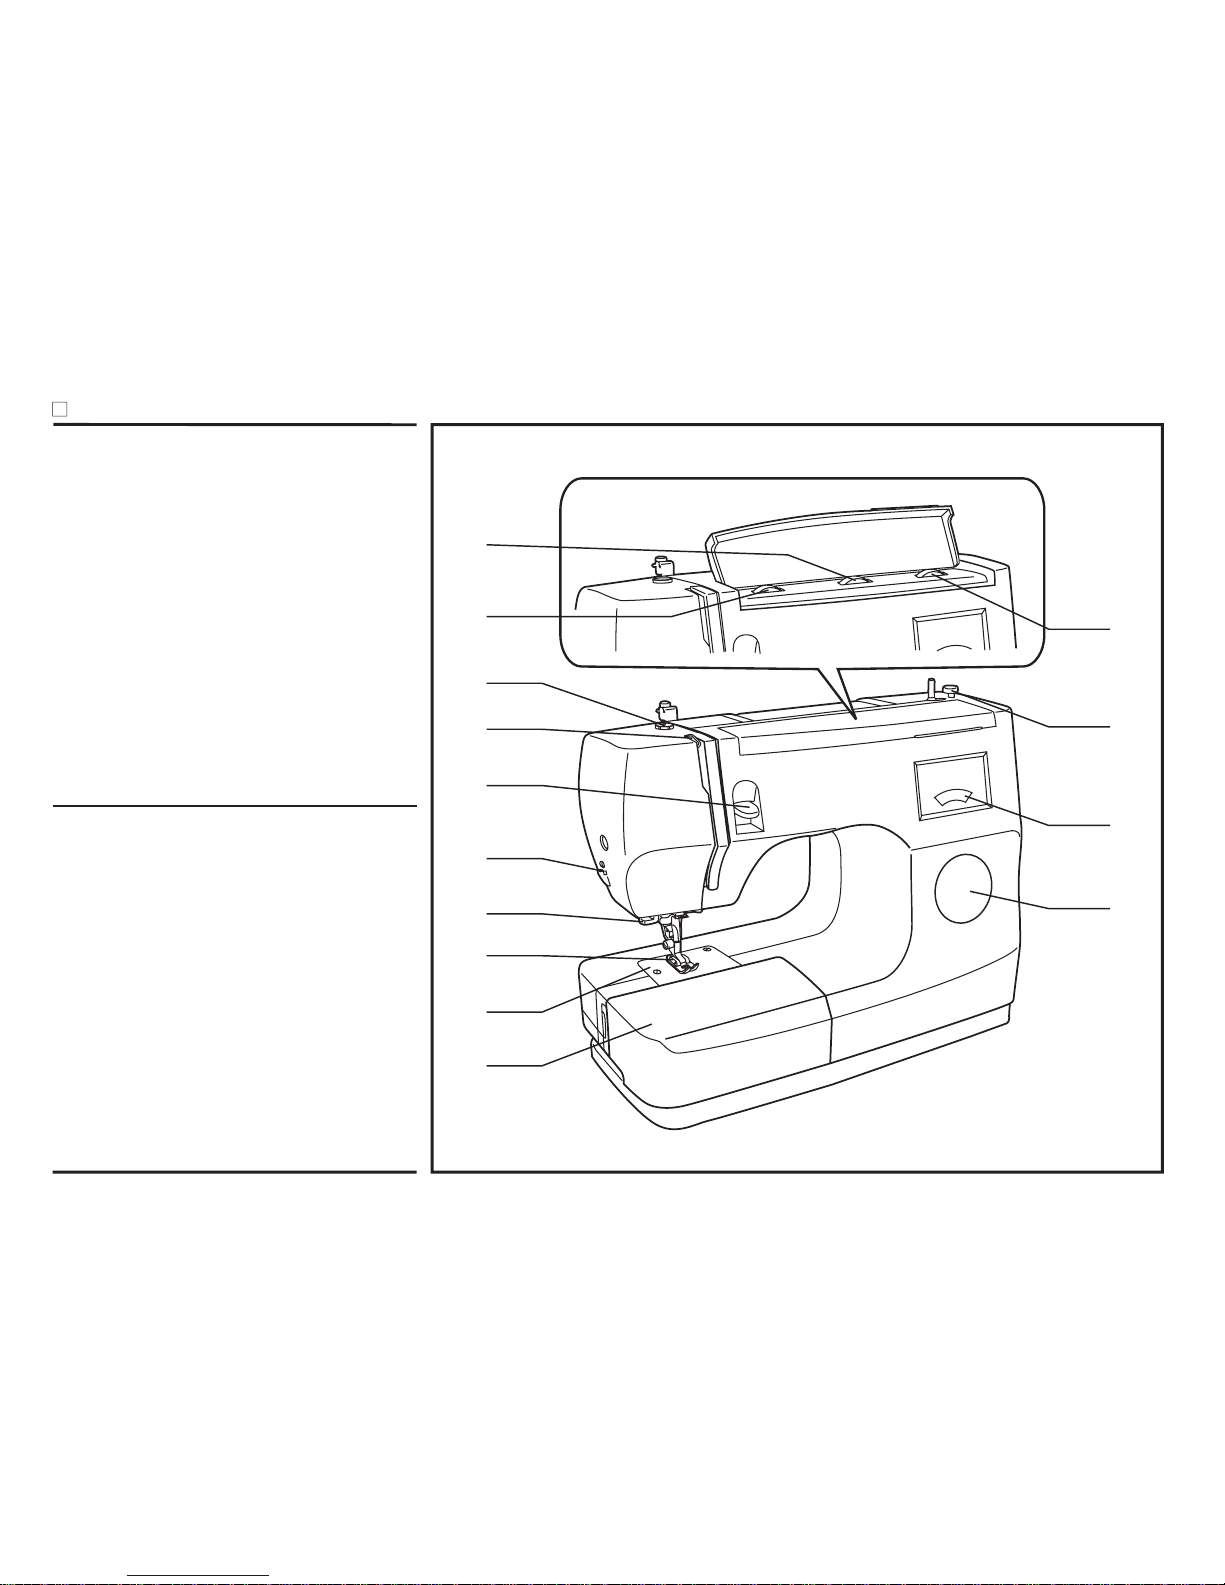
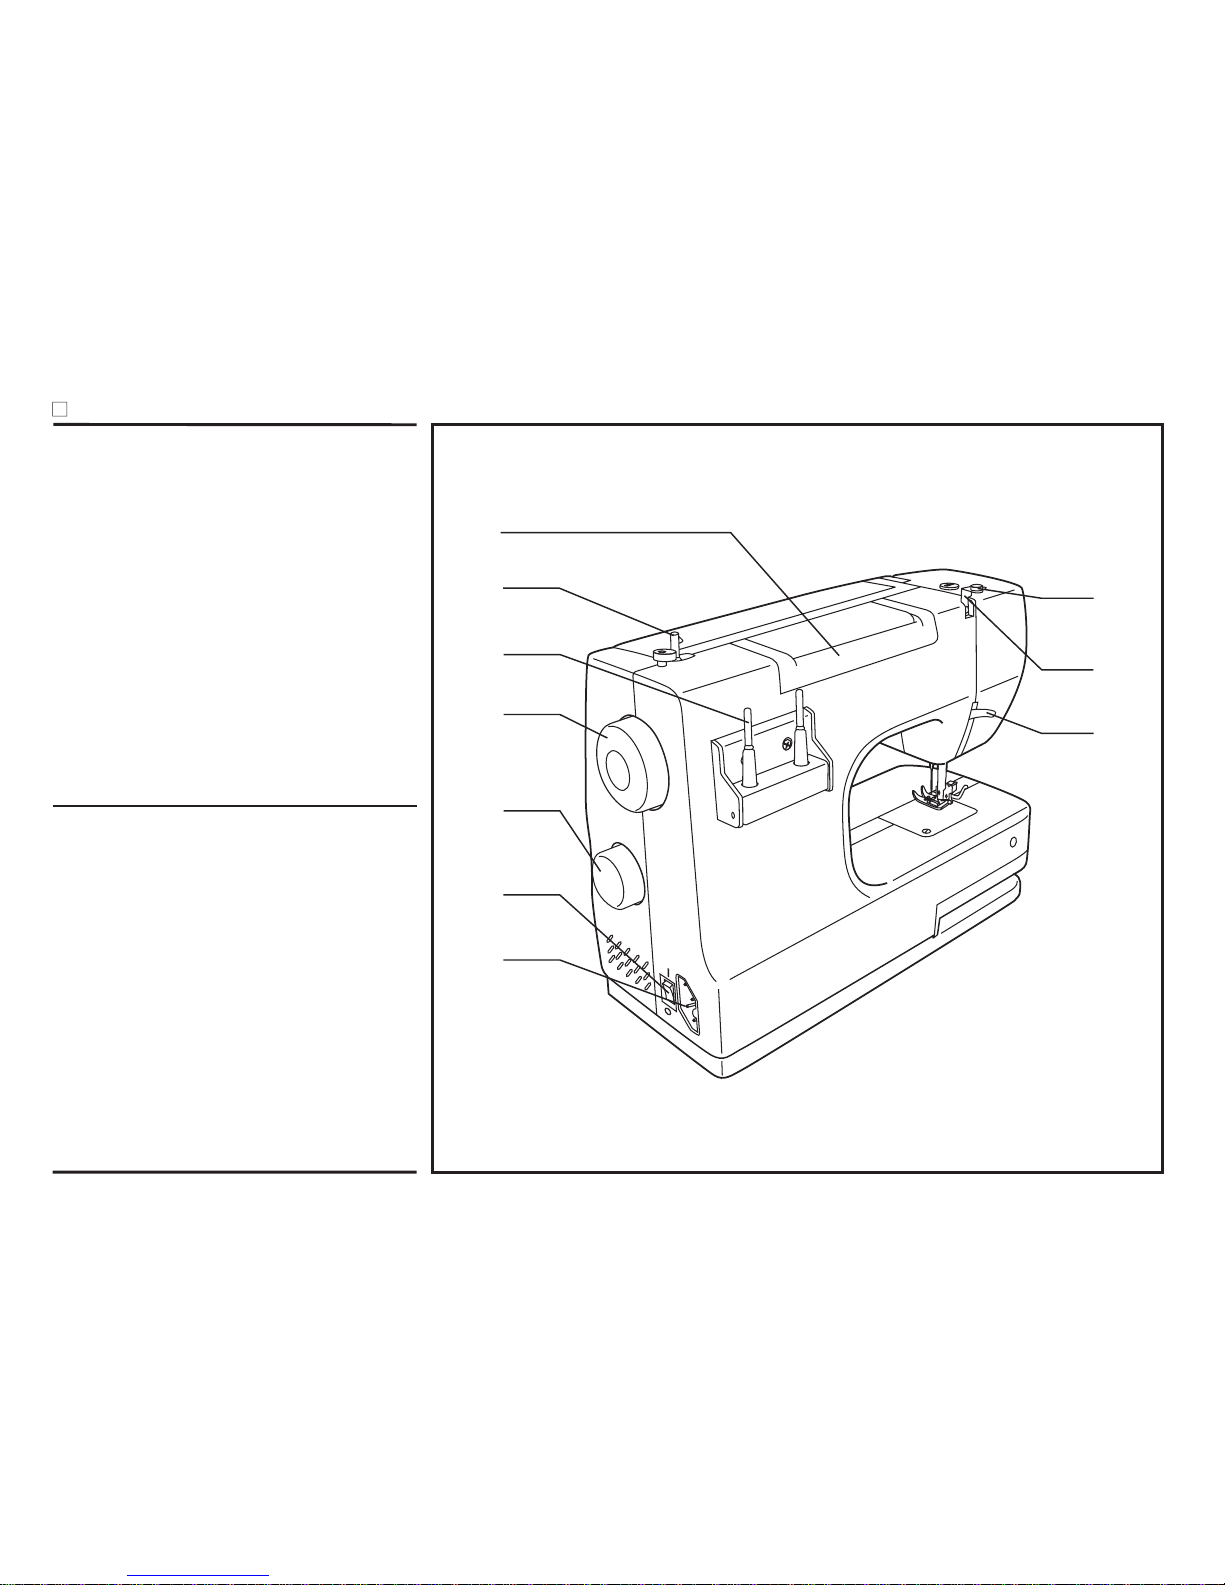
Details of the machine ................................................................................2/3
ccessories....................................................................................................4
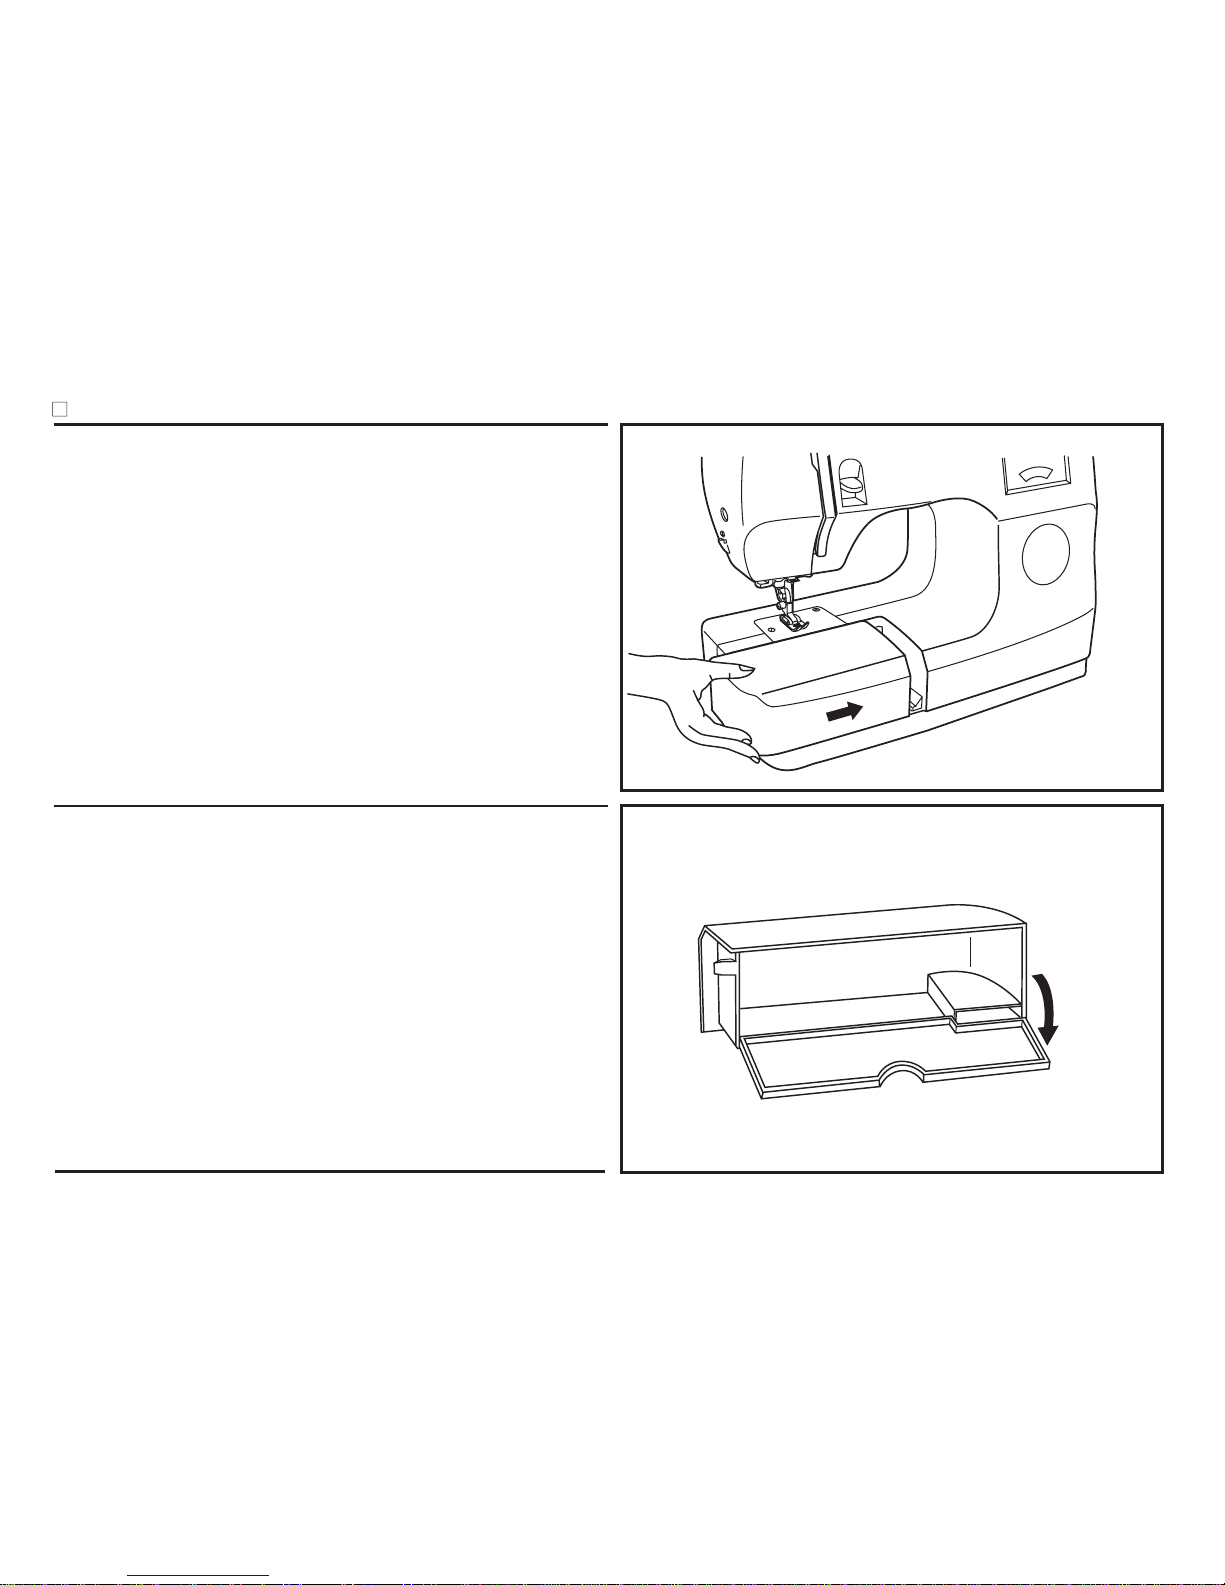
Fitting the snap-in sewing table .....................................................................5
Connecting machine to power source............................................................6
Changing the bulb..........................................................................................7
Two-step presser foot lever/
djust presser foot pressure .....................................................................8
ttaching the presser foot holder ...................................................................9
Winding the bobbin ......................................................................................10
Inserting the bobbin .....................................................................................11
Inserting the needle (System 130/705H) .....................................................12
Threading the upper thread .........................................................................13
utomatic needle threader (optional)...........................................................14
Thread tension .............................................................................................15
Bringing up the lower thread ........................................................................16
Reverse sewing/ Remove the work/ Cutting the thread...............................17
Matching needle/ fabric/ thread....................................................................18
How to choose your pattern .........................................................................20
Zigzag stitching ............................................................................................21
Blind hem/ lingerie stitch ..............................................................................22
Overlock stitches..........................................................................................23
Sewing on buttons .......................................................................................24
How to sew buttonholes...............................................................................25
Zippers and piping .......................................................................................27
Sewing with the hemmer foot.......................................................................28
3-step zig-zag ..............................................................................................29
Stitch selection.............................................................................................30
Smocking stitch............................................................................................31
Sewing with the cording foot ........................................................................32
Darning ........................................................................................................33
Practical stitches ..........................................................................................34
Infinitely variable needle position/ Quilting...................................................35
Gathering .....................................................................................................36
Patch work ...................................................................................................37
pplique .......................................................................................................38
Monogramming and embroidering with embroidery hoop* ..........................39
The walking foot accessory..........................................................................40
Maintenance ................................................................................................42
Trouble shooting guide ................................................................................44
Detalles de la máquina ...............................................................................2/3
ccesorios .....................................................................................................4
justa la snap-in mesa plana corrediza .........................................................5
Conecta la máquina al fuente eléctrico..........................................................6
Cambio de la bombilla ...................................................................................7
Palanca alza-prensatelas con dos escalones/
juste de la presion del pie prensatla .......................................................8
Montaje del porta-pie .....................................................................................9
Embobinado del hilo inferior ........................................................................10
Colocación de la canilla ...............................................................................11
Colocación de la aguja (Sistema 130/705H)................................................12
Enhebrado del hilo superior .........................................................................13
Enhebrador automático (optativo)................................................................14
Tensión del hilo............................................................................................15
Subir el hilo inferior ......................................................................................16
Coser hacia atrás/ Como sacar la labor de la máquina/ Cortar el hilo.........17
Guía de selección de aguja/ tejido/ hilo .......................................................19
Cómo seleccionar el diseño.........................................................................20
Zigzag ..........................................................................................................21
Costura invisible/ punto de lenceria .............................................................22
Puntos overlock ...........................................................................................23
Coser botones..............................................................................................24
Para coser ojales .........................................................................................26
Colocación de cremalleras...........................................................................27
Coser con el pie dobladillador......................................................................28
Zig-zag cosido..............................................................................................29
Elección del punto........................................................................................30
Punto de nido de abeja ................................................................................31
Coser con el pie cordoncillo.........................................................................32
Zurcir............................................................................................................33
Puntos útiles ................................................................................................34
Para acolchar...............................................................................................35
Para fruncir ..................................................................................................36
Patch work ...................................................................................................37
plicación.....................................................................................................38
Creación de monogramas y recamado con aro de bordar* .........................39
ccesorio de presión compacta opcional ....................................................41
Manutención de la máquina.........................................................................43
Eliminación de averías.................................................................................45
Li t of content Indice
1
2
6
8
10
11
12
3
13
4
7
1. Stitch width dial
2. Thread tension dial
3.
4.
5.
6.
7.
8. utomatic threader (optional)
9.
10.
11.
12.
13.
14. Magnet
Stitch length dial
Presser foot pressure
Thread take-up lever
Reverse sewing lever
Thread cutting
Presser foot
Needle plate
Sewing table and accessory box
Bobbin stopper
Pattern indicator window 5
2
1. Disco para puntada zigzag
2. Tensión del hilo
3. Disco de la longitud de puntada
4. Presiion de pie
5. Palanca tensora del hilo
6. Control de retroceso
7. Corta-hilos
8. Enhebrador automático (optativo)
9. Prensatela
10. Placa de la aguja
11. Mesa plana corrediza y coja de accesorios
12. Tapón de bobina
13. Botón indicator ventada
14. Iman
14
9
Detail of the machine/ Detalle de la máquina
15. Handle
16. Bobbin winder
17. Spool pin
18. Hand wheel
19. Patten selector dial
20. Power switch
21. Main plug socket
22. Bobbin thread guide
23.
24.
Upper thread guide
Presser foot lever
3
15. sa de transporte
16. Devanadera
17. Portabobinas
18. Volante
19. Bptón selector de puntos
20. Interrupto de puntos
21. Enchufe de conexión a la red
22. Guía de la devanada
23. Guía de devanadera
24. Palanca alza-Prensatelas
22
15
24
17
16
18
19
20
21
23
Detail of the machine/ Detalle de la máquina
4
Acce orie / Acce orio
Standard acce orie
a.
b.
c.
d.
e.
f.
g.
h.
i.
j.
k. Oil bottle
l.
m.
n.
o.
p.
q.
t.
ll purpose foot
Zipper foot
Buttonhole foot
Button sewing foot
L-screwdriver
Bobbin (3x)
Pack of needles (3x)
Darning plate
Seam guide
Seam ripper/ brush
Satin stitch foot
Hemmer foot
Cording foot
Quilting foot
Blind hem foot
Gathering foot
r. Darning/ Embroidery foot
s. Walking foot
Overcasting foot
u. Twin needle
Optional acce orie
(These 10 accessories are
not supplied with this machine;
they are however available as
special accessories from your
local dealer.)
Acce orio tandard Acce orio opcional
a.
b.
c.
d.
e.
f. Canillas
g.
h.
i.
j.
l.
m.
n.
o.
p.
q.
r.
t.
Pie universal
Pie para cremallera
Pie para ojales
Pie para coser botones
Destornillador grande
(3x)
gujas (3x)
Zurcida plancha
Regla de borde
Pincel/ Corta-ojales
k. ceitera
(Estos 10 pies no son
suministrados con las
máquinas sino que ellos
están disponibles en el
comercio de nuestros
distribuidores autorizados).
Pie para bordar
Pie para ruedos
Pie para hilo de cordon
Pie para acolchar
Pie para puntada ciega
Pie fruncidor
Pie para zurcido
s. Pie regular
Pie overlock
u. guja mellizo
ad
Standard accessories / ccesorios standard
006806008
b
006905008
c
006909008 006914008
eg
i
l
k
hf
006804008
006812008
006016008
006916008
006815008
j
Optional accessories / ccesorios opcional
006800008
m
006810008
no
pr
u
006803008
t
006917008
q
Keep the snap-in sewing table horizontal, and push it in the direction of
the arrow. (1)
The inside of the snap-in sewing table can be utilized as an accessory
box.
To open, lift up at the point of the arrow. (2)
Guarda la horizontalidad de la snap-in mesa plana corrediza y lo empuje
a la dirección de saeta. (1)
El interior de la snap-in puede utilizar como una caja accesoria.
Levante la tapa desde el punto de la saeta para abrir. (2)
5
Fitting the nap-in ewing table/ Aju ta la nap-in me a plana corrediza
1
2
1
Conecte la máquina a un fuente eléctrico según la ilustración. (1)
Este dispositivo tiene un enchufe polarizado para lo que le instale el toma
apropiado.
El pedal de control puede regular la velocidad de coser. (3)
Conectar el interruptor principal (C) para la electrico y la luz. (" l ")
Atención:
Atención:
Desenchufe la máquina del toma corriente cuando no la use.
Consulte a un electricista capacitado si tiene la duda cuando usted conecta
la máquina al fuente eléctrico.
Desenchufe la máquina del toma corriente cuando no la use.
El pedal debe ser usado con el dispositivo de enchufe 4C 316BP (110
120V área) / 4C 326GP (220 240V área) manufacturado por MATSUSHITA
ELECTRIC (TAIWAN) CO., LTD.
Pedal de control
Alumbrado del trabajo
6
3
2
Polarized attachment plug
/Enchufe polarizado
Conductor
lntended to be grounded
/Descarga tierra
IMPORTANT NOTICE
This appliance has a polarized plug (one blade is wider than the other).
To reduce the risk of electric shock, this plug will fit in a polarized outlet only
one way. If the plug does not fit fully in the outlet, reverse the plug. If it still
does not fit, contact a qualified electrician. Do not modify the plug in any way.
A
B
C
Connecting machine to power ource/ Conecta la máquina al fuente eléctrico
Connect the machine to a power source as illustrated. (1)
This appliance is equipped with a polarized plug which must be used with
the appropriate polarized outlet. (2)
Foot control regulates the sewing speed. (3)
Press main switch (C) for power and light on. (" l ")
Attention:
Attention:
Unplug power cord when machine is not in use.
Consult a qualified electrician if in doubt as to connect machine to power
source. Unplug power cord when machine is not in use.
The appliance must be used with the foot controller 4C 316BP (110 120V area)
/ 4C 326GP (220 240V area) manufactured by MATSUSHITA ELECTRIC
(TAIWAN) CO., LTD.
Foot control
Sewing light