CarNetix CNX-P1290 V1.0 Installation Manual
Table of Contents
1.0 CNX-P1290 Installation Instructions.............................................................................................. 4
1.1 Overview..................................................................................................................................... 4
1.2 Features....................................................................................................................................... 5
1.3 Before You Begin....................................................................................................................... 5
2.0 Installing Your CNX-P1290........................................................................................................... 7
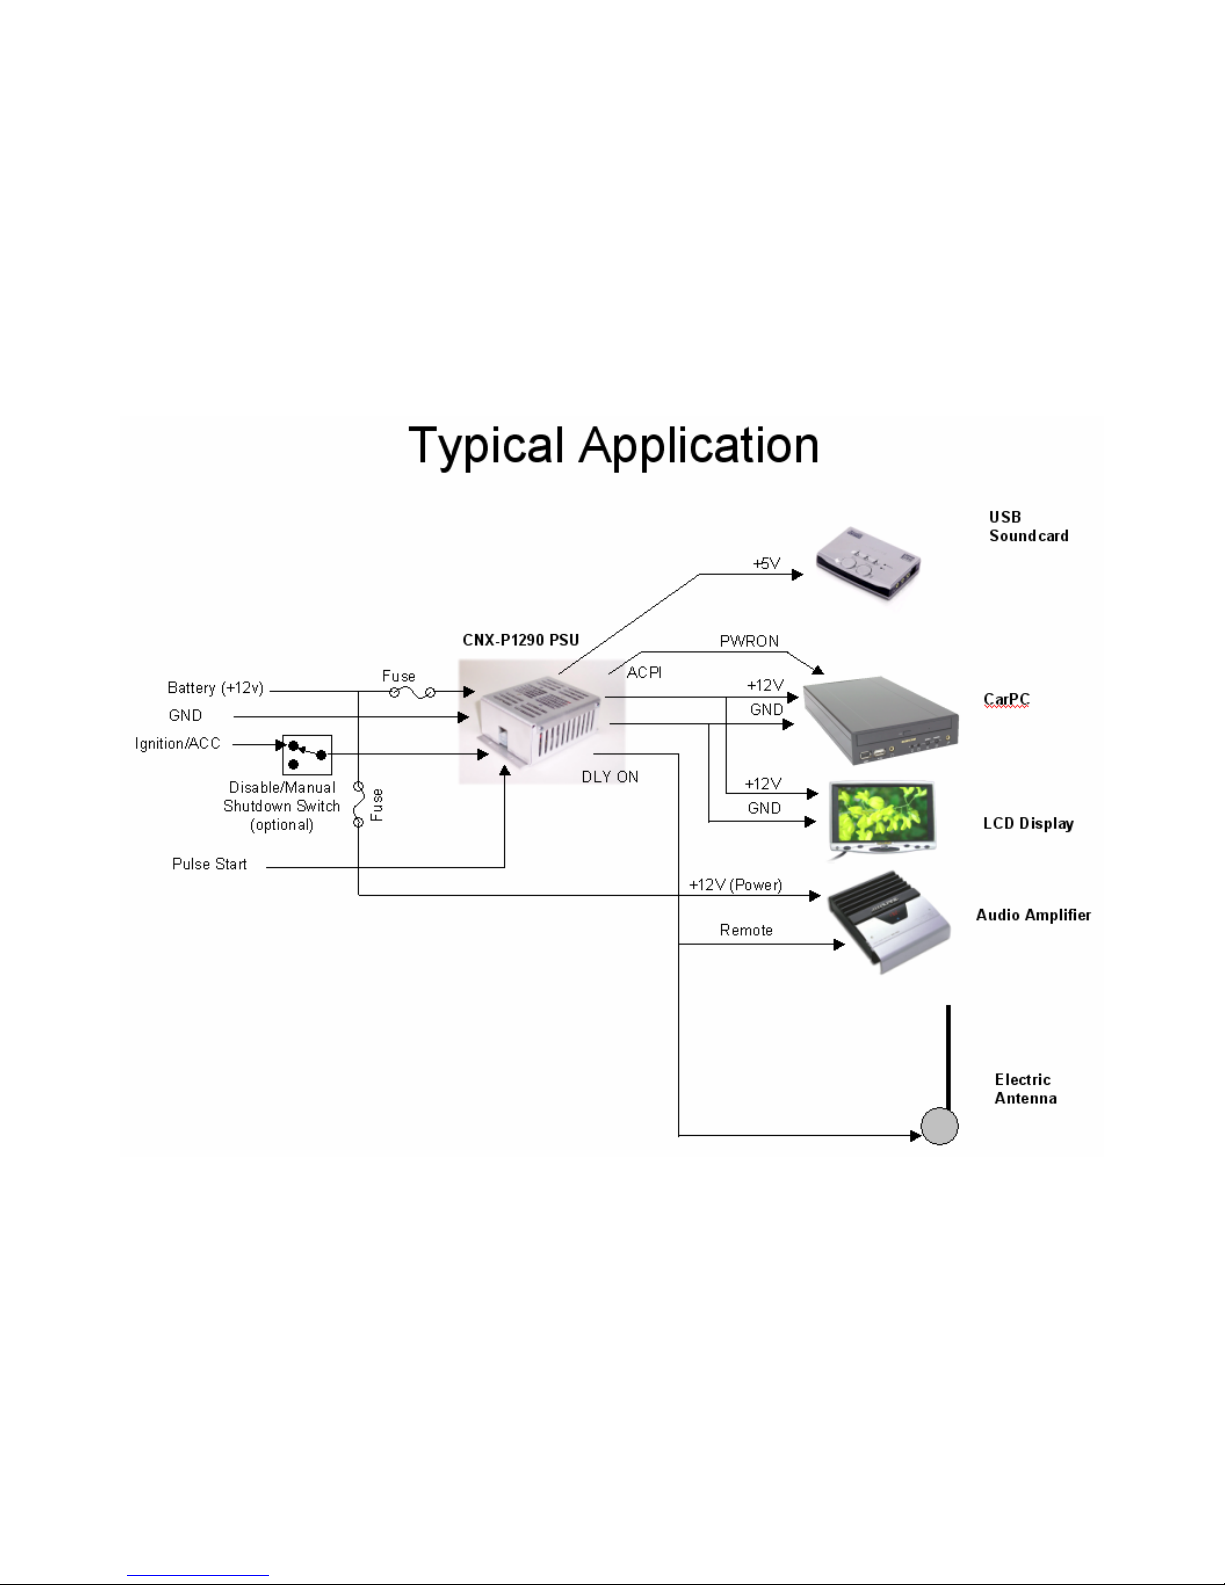
2.1 Identifying the connection points................................................................................................ 7
2.2 Setting the Jumpers..................................................................................................................... 9
JP1 Jumper Settings.................................................................................................................... 10
JP3 Jumper Settings (+5V Always ON)..................................................................................... 10
JP4 Jumper Settings (Secondary Output Control)...................................................................... 10
2.3 Connecting the Wires................................................................................................................ 12
Power Connection Options:........................................................................................................ 12
3.0 Option 1: “Power-only” to CarPC through existing case power plug.......................................... 13
3.1 Making the Connections (Option 1): ........................................................................................ 15
Step 1. Run the Power Cable (+12V Battery Cable) .................................................................. 15
Step 2. Run the Ground Wire...................................................................................................... 15
Step 3. Run the Ignition Wire..................................................................................................... 16
Step 4. Connect the output C134 Power Cable........................................................................... 16
Step 5. Connect the LCD Screen (optional)................................................................................ 17
Step 6. Connect auxiliary device(s) (optional). .......................................................................... 17
3.2 Applying power to the system (Option 1): ............................................................................... 18
Step 1. Test your +12V battery cable. ........................................................................................ 18
Step 2. Apply power to the CNX-P1290 .................................................................................... 18
Step 3. Applying Power to your CarPC and Screen ................................................................... 19
Step 4. Turning off your system. ................................................................................................ 20
4.0 Option 2: Power and SSC connection to case using existing case power plug ............................ 21
4.1 Making the Connections (Options 2):....................................................................................... 23
Step 1. Run the Power Cable (+12V Battery Cable) .................................................................. 23
Step 2. Run the Ground Wire...................................................................................................... 23
Step 3. Run the Ignition Wire..................................................................................................... 23
Step 4. Connect the output C134 Power Cable........................................................................... 23
Step 5. Connect the LCD Screen (optional)................................................................................ 23
Step 6. Connect auxiliary devices (s) (optional)......................................................................... 23
Step 7. Connect the ACPI/PWRON to the motherboard............................................................ 23
4.2 Applying power to the system (Option 2): ............................................................................... 26
Step 1. Test your +12V battery cable. ........................................................................................ 26
Step 2. Apply power to the CNX-P1290 .................................................................................... 26
Step 3. Applying Power to your CarPC and Screen ................................................................... 26
Step 4. Turning off your system. ................................................................................................ 26
5.0 Option 3: Power and SSC connection to case using internal power and SSC connections.......... 28
5.1 Making the Connections (Option 3): ........................................................................................ 31
Steps 1 through 3 are identical to Option 2 above...................................................................... 31
Step 4. Connect the output Case Power Cable............................................................................ 31
Steps 5 & 6 are identical to Option 2 above. .............................................................................. 32
5.2 Applying power to the system (Option 3): ............................................................................... 33
- 2 -