Carp Design T600 User manual

1
USER MANUAL
T600 Bait Boat Fish Finder
(Item number : 213627)

2
Menu
1. Vue d’ensemble
2. Comment fonctionne l’échosondeur
3. Spécifications
4. Production function
5. Production list
6. Key definition
7.Main interface display
8. Current single chart(Real-time single: RTS)
9. Setting of menu function
9.1. Menu composition
9.2.Setting of sonar menu function
1) Sensitivity setting
2)Depth range setting
3)Upper limit of depth range
4)Lower limit of depth range
5)Setting of fishing icon/Depth
6)Depth needle
7)Setting of presentation mode
9.3. Setting of set menu group
1)Screen back ground light setting
2)Volume setting
3)Unit setting
4)Refresh speed setting
5)Fishing alarm setting
6)Shallow alarm setting
7)Low voltage alarm setting
8)Transparency setting
9.4. Advanced menu group Settings
1) Compensation of transducer position
2)Mode of sonar scan setting
3) Surface clutter suppression Settings
4)Clutter filtering Settings
5) Language setting

3
1. Overview
The production is application to the angler who angle the fishing in the lake, river
or sea. It can help to know the depth, outline of the water bottom, and the qty and the
depth of fishing or fishing school.
2. How sonar works
1)Sonar technology uses sound propagation and reflection to determine the distance
and shape of an object. This product is the use of this technology, the use of sonar
sensors directly detect and identify the fish in the water and the depth of the bottom.
2)When working in the machine, the sonar sensor will send out an ultrasonic signal.
When the signal meets the underwater object, it will be reflected back. Then the host
computer calculates its distance and position according to the reflection time and waveform.
3. Product specifications
Content:
Receiver
Transmitter
Display mode:
5 inch LCD display
/
Resolution:
800*400RGB
/
Background light:
White light
/
Power
consumption:
2.5-3W
1.68-2W
Sonar frequency
125KHZ
Lower limit of probe
depth range
0.6-50M(±0.1M)
Upper limit of probe
depth range
0.6M
Operating
temperature:
-20-70℃
Radio frequency
2.4G
Communication
distance
In open environment, water:300M / land:500M
4. Production function
Bottom outline and water temperature display
Icon of big/small fishing and depth indicator switch
Fish situation and deep sound alarm
Automatic depth range
Clutter rejection
100 grade sensitivity settting
Automatic and manual selection of depth range

4
Customize the measurement unit meter or foot
5. Production list
1. Holder of receiver
2. Receiver
3. Transmitter
4. Sonar transducer
5. Battery cable (not necessary if you use the batteries holder)

5
6. Cable of antenna
7. Batteries holder
8. Remote control antenna
9. Transducer antenna
10. Velcro patchs
11. USB cable for the screen
12. Shockproof box (not illustrate)
6. Key definition
6.1 Horizontal/portrait display switch key
6.2 Right & left/Up & down
When pressing the On/Off button to enter the menu, the left and right buttons can move up and down to select the option
that needs to modify data. When the background color of the menu item is red after you confirm the selection, you can
modify the content of the selected option by left or right clicking.
After manual gain function is enabled, click the up and down button to adjust the value of the gain in the interface of
fishing finder.
6.3 Confirm/Enter key
Confirm: In the menu state, press the Confirm key to select the menu item. After the selection, the background color of
the menu item changes from black to red. Red indicates the menu item selection state, and the menu item is in the
adjustable state. You can use the left and right arrow keys to modify the settings of a menu item. Once the Settings of
a
menu item appear on the screen, the system immediately performs operations based on the new settings. Press the
"Confirm" button again to exit the selected state. The background color of the menu item changes from red to black. At
this time, the left and right arrows can be used to move the menu item up and down.
Exit: In the menu state, long press this key to exit the menu and display the main interface. Automatic gain/manual

6
gain
switch: Long press the "Confirm" button for 1 second to realize the switch between automatic gain and manual gain
6.4 Menu key
Menu switching:Press the On/Off button while power-on, and the menu will appear on the screen.
The menu system of this product consists of three menu groups, namely: "Sonar" "Settings" "Advanced" (as shown
below), the user can press the on/off button switch between three menu groups or close menus.
In each menu group, users can use the left, right, or down arrow keys to select the menu item which need to be
modified, and use the left & right, or up & down arrow keys to change the settings of menu items. Once the Settings of
menu items appear on the screen, the system immediately performs operations based on the new Settings.
Save: Long press the On/Off button for 3 seconds in the startup state to automatically save the data set in the current
menu
Note: *** When the product is improperly installed or out of the detection range, the depth value will display
"0.0", lasting 5 minutes then automatic shutdown.
6.5 Power key
Start-up:Long press the "On"/" Off "button in the shutdown state for 3 seconds, and the product will start up. Then the
system will automatically enter the mode and set value selected before the last normal shutdown。
Shutdown:Long press the On/Off button for 3 seconds in the startup state, and then "Off" will be displayed.
Save: Long press the On/Off button for 3 seconds in the startup state to automatically save the data set in the current
menu.
Pause: When the machine is working, press the pause key to lock the screen; Press Pause again and the lock
screen can be restored.
7. Main interface display

7
1. Water depth display
2. Water temperature display
3. Sensitivity display
4. Fish bow icon
5. Underwater outline
6. Upper limit of the depth scale(Default 0.1)
7. Water surface identification
8. Current signal chart window
9. Depth scale
10. Underwater identification
11. Lower limit of depth scale
12. Signal strength indication
13. Power display of the receiver
14. Power display of the sonar box
15. Presentation mode flag(Do not display when presentation mode close)
8. Current signal chart(real-time signal: RTS)
The current signal chart window displays the intensity of the latest echo as a horizontal line on the right side of the
display. The wider the horizontal line, the stronger the signal, and the depth at which the echo is located refers to the
depth scale.
9. Menu function Settings
9.1. Menu composition
The main menu of the system consists of three menu groups:
1)Sonar menu group 2)Setting menu group 3)Advanced menu group

8
Use the On/Off button to switch between the three menus or close the menu.
9.2. Function setting of sonar menu group
Press the On/Off button once to enter the sonar menu group, which has 4 setting items:
1) sensitivity setting; 2) Depth range; 3) Fish icon/depth; 4) Presentation mode.
1)Sensitivity setting
Press the menu key to select the "Sonar" menu group, and then press the Confirm key to select the sensitivity submenu.
The optional setting value is "1%" to "100%" or "Automatic". When the background color of the menu item is red, the left
and right clicks can be used to modify the selected options.
Users can show the signals they want on the screen by adjusting the sensitivity and display the signals. If the user
needs to see more echo signals, the sensitivity set value should be adjusted higher. In the case of high sensitivity, a lot
of underwater noise will inevitably be displayed on the screen. If the user does not want to see these underwater
noises, then the sensitivity setting should be lowered. Users can adjust the sensitivity settings according to their actual
needs. If the sensitivity is set to "automatic", the system will automatically select the sensitivity according to the
different underwater depth, and the user does not need to set the sensitivity manually.
This menu has a total of 1%~100% sensitivity levels for users to choose.
Sonar fish finder is a device that transmits ultrasonic waves and analyzes the reflected waves. All objects in the water,
whether large or small, soft or hard, will produce a certain amount of reflected waves. Larger or harder objects will
produce multiple reflected waves, so a "screen" is needed to filter out unnecessary information. Here the sensitivity is
the "sieve" of the "screen", the higher the sensitivity, the "sieve" "smaller".

9
Increasing sensitivity is equivalent to reducing the "sieve", so there is a little more left on the screen (the dots on the
screen), of course, which may result in a cluttered display.
Reducing the sensitivity, on the other hand, is equivalent to increasing the "sieve hole," so that less remains on the
screen (the dots displayed on the screen) and the system filters out some of the information, making the display
relatively simple. But be aware that you're filtering out potentially important information.
So, after you've used it for a while, choosing the right sensitivity and the right depth range (which we'll get to later)
becomes critical.
Generally, we recommend that you can increase the sensitivity when the water is deep or clear, and you can lower the
sensitivity when the water layer has more impurities or is turbidity or shallow. This reduces the number of false probes.
We can also use this function to distinguish between large and small fish when there are more fish. Turn down the
sensitivity, increase the "sieve", and the less reflective objects will be filtered out, leaving the relatively large fish
•2)Depth range setting
Press the On/Off key to select the "Sonar" menu group, press the up/Down key to select the depth range item, and
press the left/right key to select it
Set the unit as "FT" in depth (FT), value of "0-9 FT" respectively, "0-15 FT" "0 to 30 FT" "0-60 FT" "0-90 FT" "0-120
FT" "" automatic".
Unit set to "M" in depth (M), the value of 0 to 3 M, respectively "0 to 5 M" "0 to 10 M" "0-20 M" "0 to 30 M" "0 to 40 M"
"automatic".
When the depth range is set to a fixed value, the screen will adjust to the corresponding display range according to the
set value. Content outside the set range will no longer be displayed.
3)Upper limit of the depth range
Optional values: 0 to 120FT (0 to 40m)
4)The lower limit of the depth range is set
Optional value: 9FT to 120FT (3m to 40m)

10
*** Note: The minimum value between the upper limit and the lower limit of depth range is 3M (9FT).
*** Note: The value of the last operation performed by the system when the depth range and the upper and lower
limits of the depth range are different.
After the upper and lower limits of the depth range are adjusted, the upper and lower limits are automatically adjusted
to the depth range.
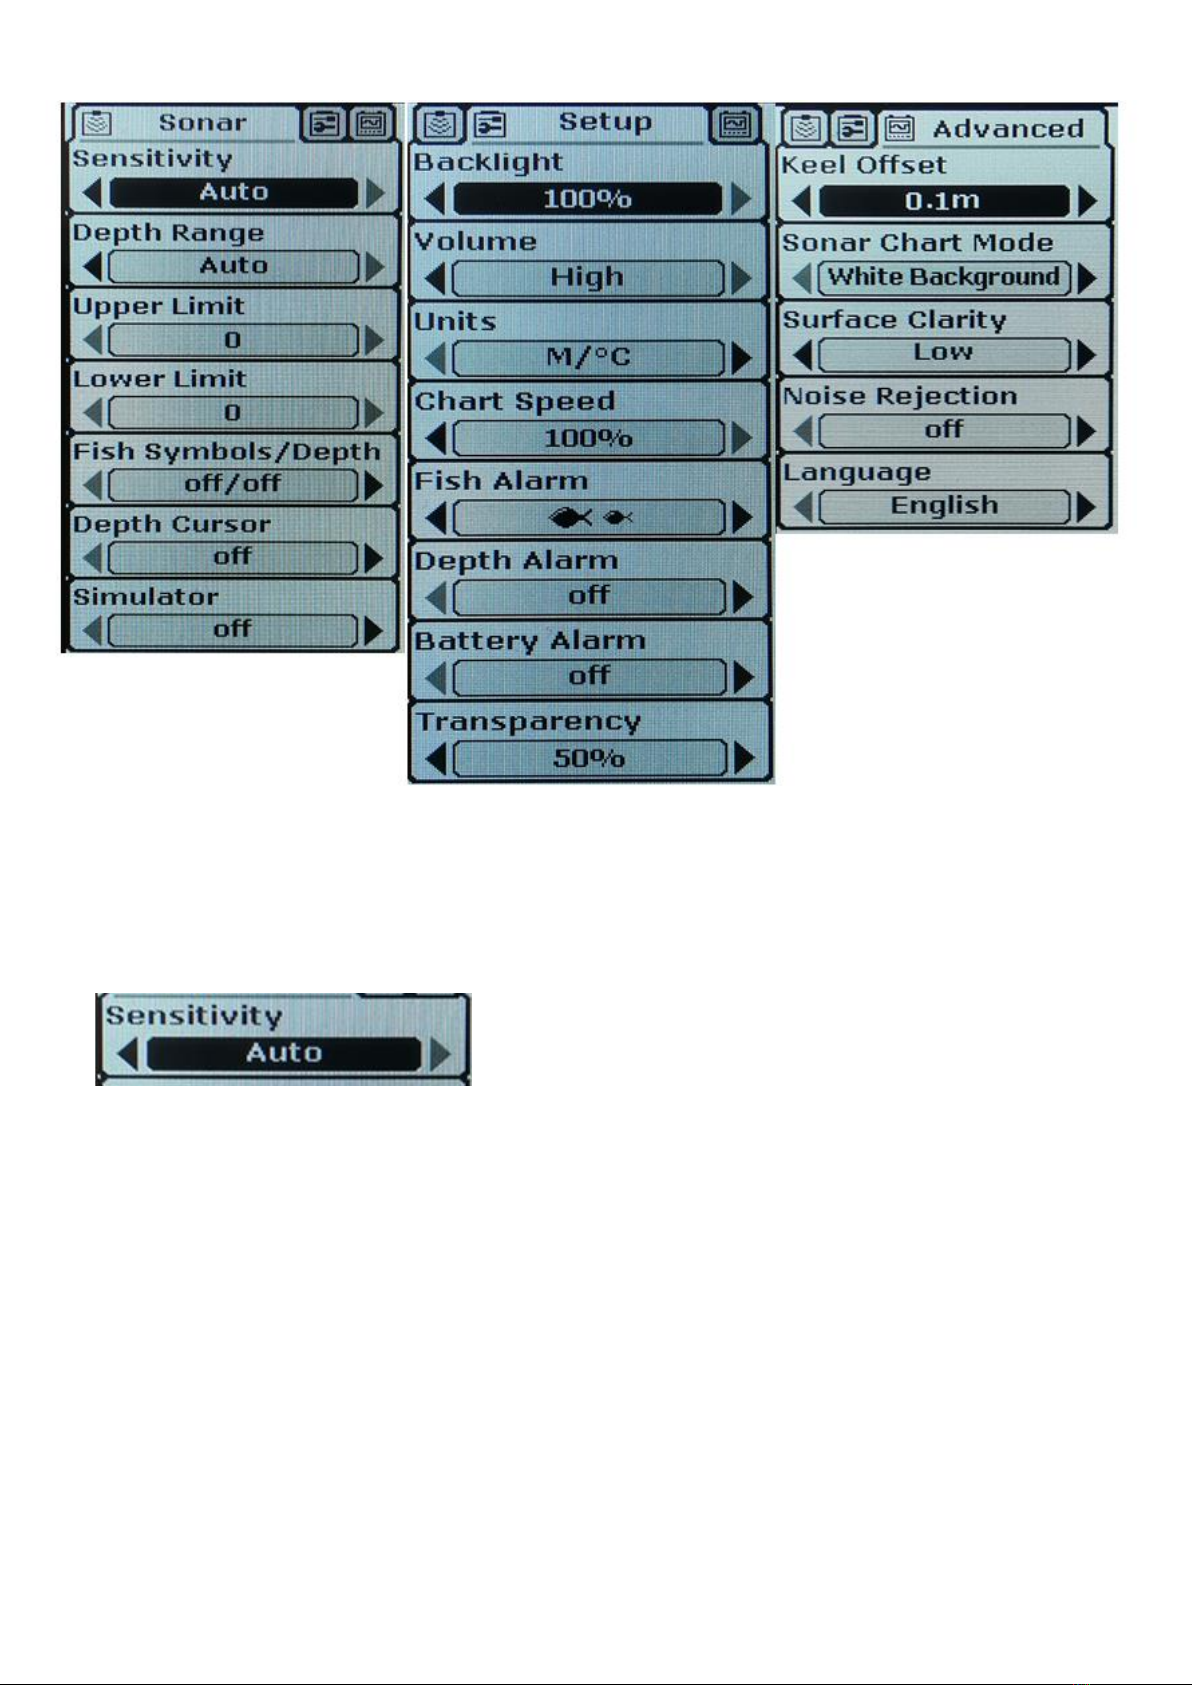
5)Fish icon/depth Settings
Optional Settings: "On/On" "On/Off" "Off/Off"
"On/Off" displays both the icon and depth of the fish.
"On/Off" displays only the fish icon but not the depth.
The "off/off" fish icon and fish depth are not displayed.
Above the fish icon.
When the fish icon and fish depth display is set to "on", the system will echo the signal. Analyze and match the signals
according to the strength of the echoes above the water bottom Display as fish icon of different sizes, and display
the depth values corresponding to these signals.
This product is a very powerful echo signal analysis system, you can select part of the water noise, surface clutter and
temperature change layer through the menu setting, and then the rest of the signal corresponding display as fish icon.
But the system is also limited, and some cases are not recognized, such as suspended in the water of dead branches,
bubbles, garbage and so on May also be displayed as fish icon.
The sonar system is not an underwater video system. It cannot visually display fish and other floating objects, such as
grass, branches, debris or air bubbles. Users need to make judgments based on the reflected sonar signals.
6)Depth pointer
The depth pointer is shown on the right by a horizontal line and a numerical depth box, where the number is the depth
corresponding to the horizontal line. You can use the up and down keys to move the pointer on the screen at will,
allowing you to find the depth of a target.
7)Presentation mode setting
Optional Settings: "On" "Off"
Demo mode is a powerful tool. Using Demo mode makes it easy for the user to learn how to use the fish Finder.
When set to "On", the Demo Mode flag will be displayed on the screen.

11
9.3 Set menu group Settings
Press the menu key twice to enter the setting menu group, which has 8 Settings: 1) screen backlight; 2) Volume; 3)
Unit; 4) Refresh speed; 5) Fish situation alarm; 6) Shallow water alarm; 7) Low voltage alarm; 8) Transparency.
9.3.1 Screen background light setting
Optional Settings: Off, 10% to 100%
Users can switch the foreground light or adjust the brightness to get the right display.
When the screen backlight is set to on (10%-100%), the background light is always on, which uses a lot of power
and reduces battery life. So you're better off using this feature in low light.
The fish finder's screen is visible in sunlight, and the brighter the outside light, the sharper the screen, so you can
turn off the backlight when using it outdoors during the day
9.3.2 Volume setting
Optional setting values: High, Medium, and Low
Users can adjust the volume settings according to their needs.
9.3.3 Unit setting
Optional Settings for: "ft / ° C" (ft/C), "ft / ° F" (ft/degrees Fahrenheit), "m / ° C (m/C)," m / ° F (m/F)
Users can set the measurement unit according to their own needs.
9.3.4 Refresh speed setting
Optional Settings are: "10% to 100%"
10% refresh the slowest; 100% refresh fastest. Users can adjust the screen refresh speed according to their needs.
It is recommended that the screen refresh speed be set to the maximum so that the reflected wave information can be
updated in a timely manner.
9.3.5 Fish situation alarm setting
Optional Settings: Off, Big Fish alarm, Big fish + Medium fish alarm, all fish alarm.

12
When the fish situation alarm is set to off, the system will not do the fish situation alarm.
Or select any fish icon to display the corresponding fish information.
9.3.6 Shallow water alarm setting
Optional Settings are "Off", "3FT(FT)" to "99FT(ft)" (1m to 30m) with increments of 0.1FT or 0.1M
When the shallow water alarm is set to "off", the system will not do shallow water alarm.
When the shallow water alarm is set to "3FT", "4FT"~"99FT "and other specific values, the system will make a judgment
according to the actual measured depth and the set value. When the actual depth is less than the set value, the alarm
sound will flash continuously.
Shallow water alarm function is designed for boat users. Users can set this function according to their actual needs.
9.3.7 Low voltage alarm setting
The optional value is Off, 10V to 12V, in increments of 0.1V.
When the input battery power is equal to or less than the menu set, the low voltage alarm sound and battery power
display reading will blink.
9.3.8 Display transparency setting
Optional Settings are: "0%" to "70%"
Bezels and menu boxes for readings such as depth and temperature can block part of the sonar signal picture. If the
user still wants to see the signal in this situation, they can set the screen opacity to the highest level, and the blocked
signal can be faintly displayed in the menu box or at the bottom of the readout border.
9.4. Advanced menu group Settings
Press the menu key three times to enter the advanced menu group. There are 5 Settings in this menu group, which are:
1) Probe position compensation; 2) Sonar scanning mode; 3) Surface clutter suppression; 4) Clutter filtering; 5) Menu
language.
9.4.1 Probe position compensation setting
Optional Settings are: "Off" "-9ft (ft) "to "+9ft (ft)" {"-3m (m) "to "+3m (m) "}, increasing or decreasing in 0.1 depth units.
Since the probe is installed on the boat, it will be at a certain distance from the water surface and the keel of the boat,
the user can want to know the depth from the water surface to the bottom (+ value compensation), or the depth from

13
the keel to the bottom (- value compensation), as he wishes.
Note: The default value is 0.1M
9.4.2 Sonar scan mode Settings
Optional setting mode: "white background mode"; Blue background pattern; "Gray scale model"
Users can choose the corresponding sonar scanning mode according to their preferences.
9.4.3 Surface clutter suppression Settings
Optional value: "Off"; High; "Middle"; "Low"
Users can adjust the Settings according to their own needs.
Surface clutter suppression means that the system automatically attenuates the background noise signal in shallow
water so as to correctly analyze the normal echo signal. Lower Settings will show more surface clutter.
9.4.4 Clutter filtering Settings
Optional value: "Off"; High; "Middle"; "Low"
Users can adjust the Settings according to their own needs.
Noise suppression is the system automatically filters discrete noise to achieve better analysis results, but also filters
some useful signals. This noise suppression feature probably gives the user the best display in most cases.
If your environment is noisy, try setting the clutter filter to its highest setting. However, if you still see noise, we
recommend that you take steps to identify the source of the interference and resolve it, rather than constantly using the
unit high setting.
9.4.5 Menu language setting
This product offers 17menu languages: English; Russian; French; Chinese; Japanese; Finnish; Polish; German; Italian;

14
Spanish; Dutch; Korean; Swedish; Greek; Danish; Czech; Portuguese.
Customers can choose the corresponding language according to their own needs, so as to better use.
Important (pairing code) : To avoid interference from other wireless fish detectors
or receivers that do not receive the transmitter (sensor) signal, you can reset the
code between the receiver and the transmitter yourself by following the steps below:
1、Switch off receiver and transmitter before code.
2、Holding down the up key and power key ,the screen displays the interface of code matching and
frequency changing after 3 seconds.
3、When the transmitter is turned on, the list of transmitters can be displayed on the left side of the interface. Select the
transmitter that you want to pair,press confirm key ,The right hand side will show the current frequency
(This model is 125KHZ)and frequency range(default 2,it is better to stagger the frequency). Change OK then press
“Connect” key,it will show the progress and will show “success” after finish,
4、Turn it on again and it will work normally.
5、On state,If you want to get out of code matching,hold key for 3 seconds then quit.
This manual suits for next models
1
Table of contents
Popular Fish Finder manuals by other brands

Raymarine
Raymarine Sonar Mode Quick reference card

Standard Horizon
Standard Horizon FF520 owner's manual

Raytheon
Raytheon V400 instruction manual

Eagle
Eagle IntelliMap 500C Installation and operation instructions

Yachting Electronic Co.
Yachting Electronic Co. FC80 user manual

Humminbird
Humminbird Matrix 77c Operation manual