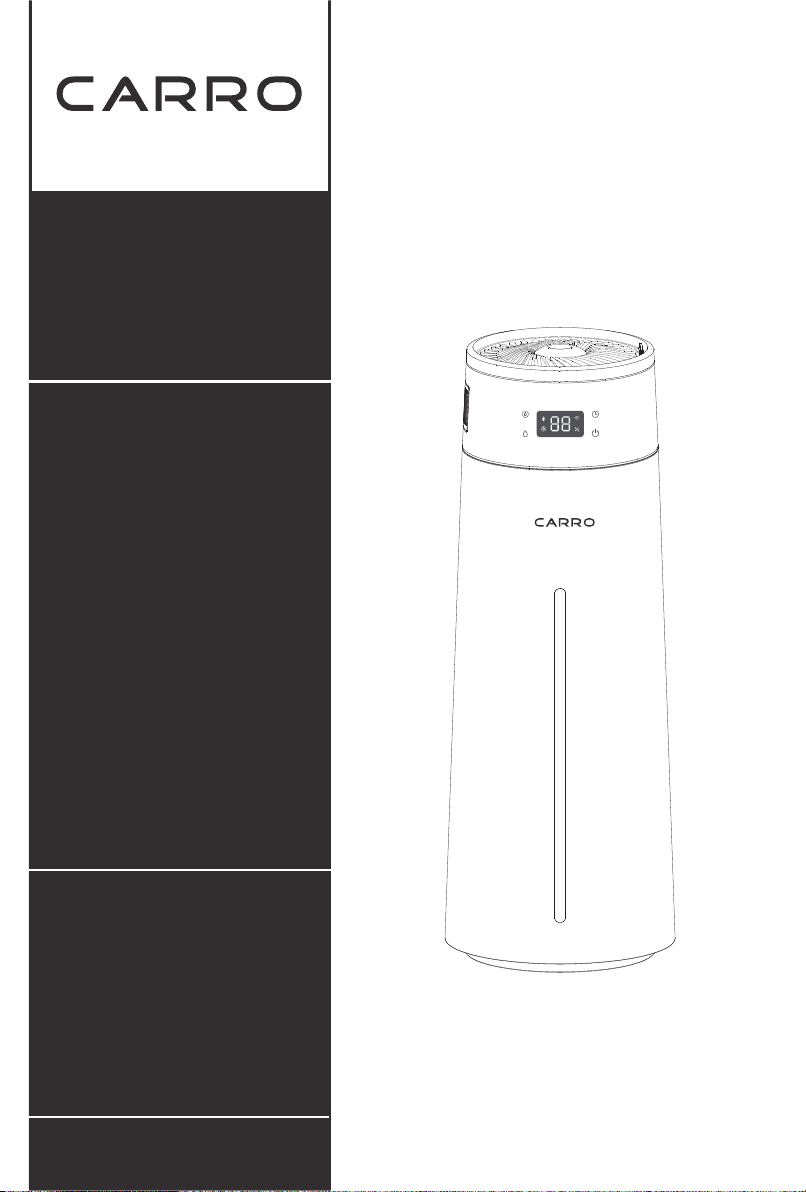
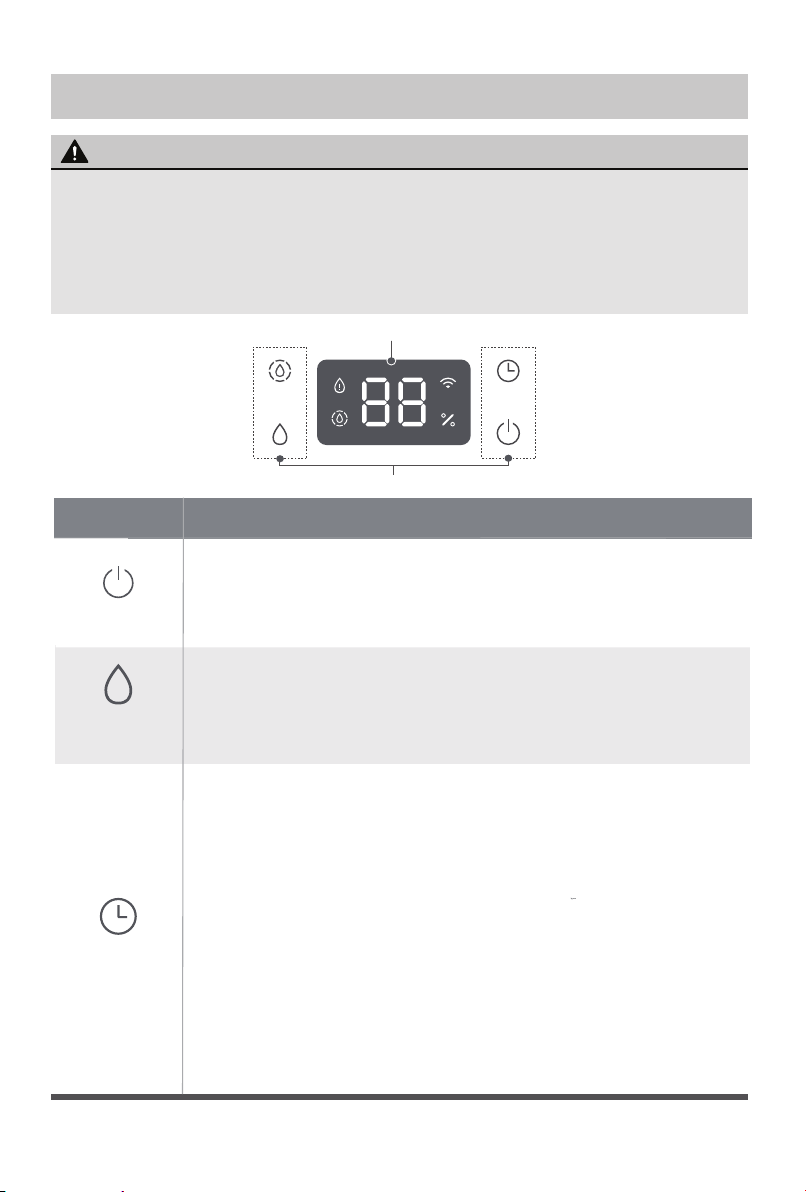
Carro PH-805-24 User manual

Ultrasonic Humidifier
USER MANUAL
Model: PH-805-24
Warning Notice: Before using
this product, please read this
manual carefully and keep it for
future reference.
The design and specifications are
subject to change without prior
notice for product improvement.
Consult with your dealer or
the manufacturer for details.
Rated voltage: 120V
Rated power: 24W
Frequency: 60Hz
QUESTIONS? CONTACT US.
Email: humidifier@fscarro.com
Tel: 888-253-2374

Page 2
Read This Manual
Inside you’ll find many helpful hints on how to use and maintain your appliance
properly. Just a little preventive care on your part can save you a great deal
of time and money over the life of your appliance. You’ll find many answers
to common problems in the troubleshooting tips - you should be able to fix
most of them quickly before calling customer service. These instructions may
not cover every possible condition, so attention to safety details is required
when operating and maintaining this product.
SAFETY PRECAUTIONS
To prevent injury to the user or other people and property damage, the
instructions shown here must be followed. Incorrect operation due to ignoring
of instructions may cause harm or damage. The different levels of risk is shown
by the following indications.
CAUTION
This symbol indicates a hazardous situation, which, if
not avoided, could result in minor or moderate injury.
This symbol addresses practices not related to physical
injury.
NOTICE
This symbol indicates a hazardous situation which, if
not avoided, could result in death or serious injury.
WARNING
READ AND SAVE THESE INSTRUCTIONS
IMPORTANT INSTRUCTIONS
• In the case of power up, do not plug or unplug the power cord with wet hands
to avoid electric shock;
• Do not force the water tank to work in the case of no water;
• Do not add any additives not produced or supervised by the company to the
water tank;
• Do not put or place anything or pets into the water tank;
• Do not add water to the atomization outlet;
• When the humidifier is working, do not touch the water in the water tank or the
parts sank in the water;
• Do not cover the atomization outlet, and please keep it clear above the outlet;

Page 3
IMPORTANT INSTRUCTIONS
• Do not replace the power cord without authorization, or connect the power
cord halfway or use other appliances in parallel;
• Do not place the appliance near water source;
• Do not disassemble, modify or repair internal parts without authorization;
• Do not climb or sit on the appliance;
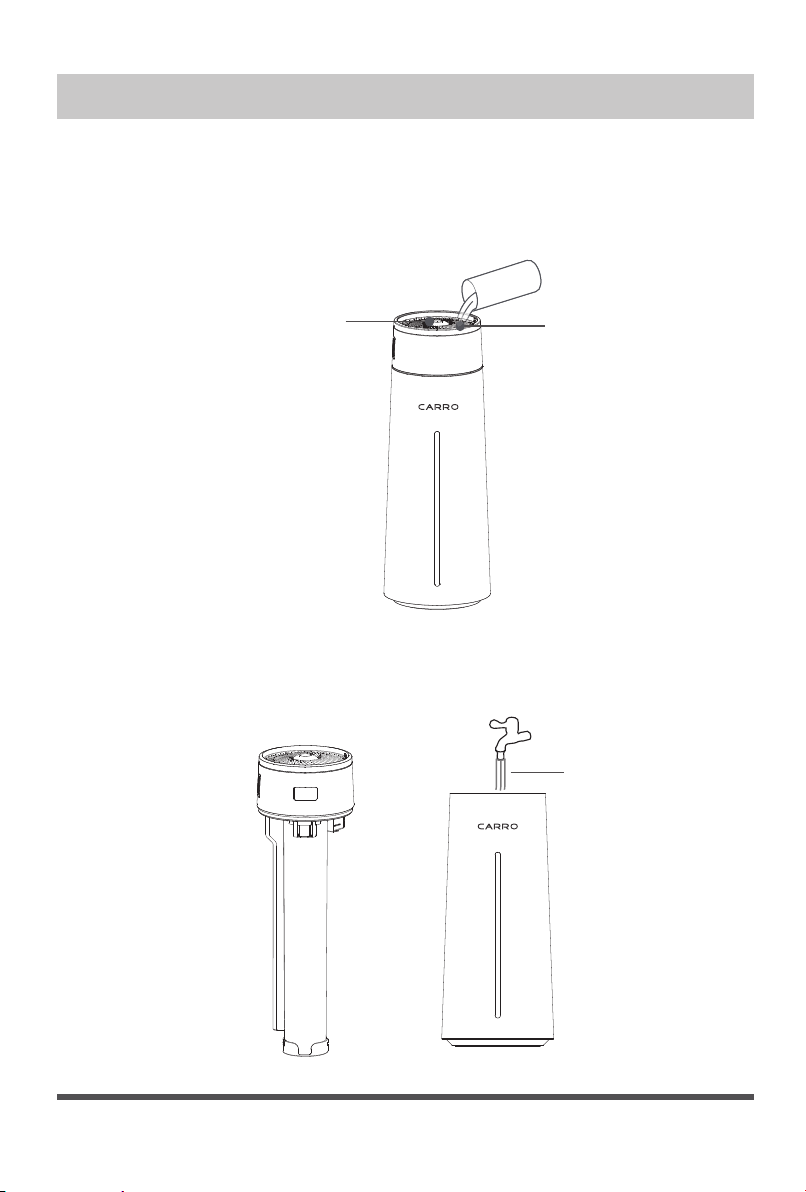
• Do not directly flush the humidifier with water;
• Do not store flammable or explosive materials around the humidifier;
• Do not place it near heat source;
• Do not turn off the humidifier by unplugging the power cord directly;
• Do not use volatile oil, alcohol, thinner, etc. to clean the machine, otherwise, the
product may be damaged;
• Do not modify the use and function of the product without permission;
• When the power is turned off in low temperature weather, the water must be
drained.
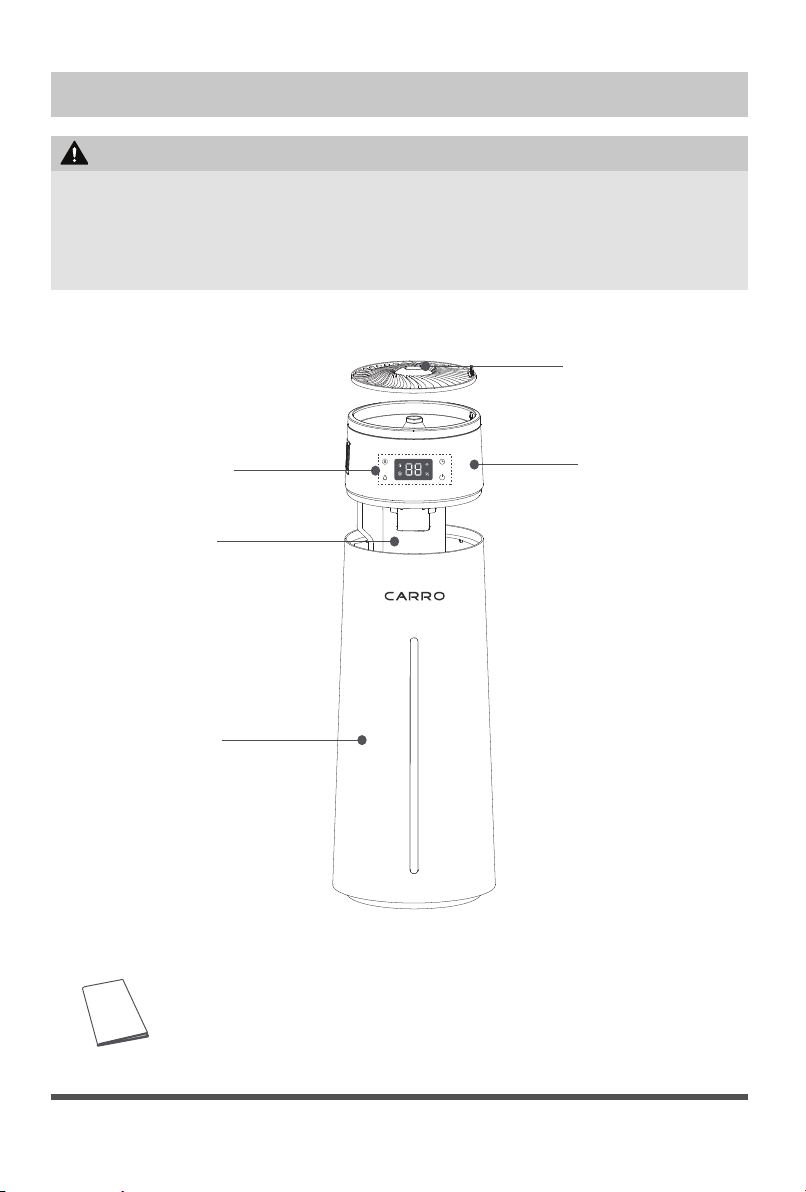
• Do not place the water container on the live product, the water immersing in the
product will weaken the electrical insulation, resulting in Electric shock, fire, etc;
• Please keep a distance of more than 12 inch between the humidifier and other
products;
• Please use purified water for humidification;
• Please do not use a damaged or worn power cord; Do not replace the power
cord without authorization. If the power cord is damaged, it must be replaced
by the manufacturer, its service department or professional from similar
department to avoid danger.
• The power must be cut off in thunderstorm;
• When an abnormal phenomenon (like a burnt smell) occurs, the operation must
be stopped and the power supply is cut off.
• Please unplug the power cord and clean the water tank, when the appliance is
not used for a long time;
• To avoid bacterial growth, please always change the water in the water tank.
• When the appliance is moved, please unplug the power cord to keep the water
tank stable and to prevent the water from overflowing in the water tank;
• If the appliance is tilted when filled with water, be sure to unplug the power
cord immediately and send it for inspection.
• Suitable temperature for this product: 41°F -104°F; relative humidity: less than
80% RH (please fill purified water with water temperature below 104°F).
Matters that may cause minor injury or property damage.
Please unplug the power plug when filling and cleaning.
The power supply must be within the specified voltage range of the product.
CAUTION

Page 4
This humidifier is pre-assembled in factory.
ASSEMBLY
RULES FOR SAFE OPERATION
SPECIFICATIONS
Model Rated
voltage
Rated
frequency
Rated
power Noise Volume
of tank
PH-805-24 120V ~60Hz 24W 38dB 2.11Gal
WARNING
• Please be sure to unplug the power cord before filling water.
• The level of the water added shall not be higher than the highest water level;
• Please be not to add the water in the atomization outlet when the water is
added;
• Please do not add additives like essential oil, perfume, drug, etc. to the water.
• Please use the purified water below 104°F(Do not use distilled water).
NOTICE
• The following are the design parametersof PH-805-24 themeasured
parameters are subject to the product;
• The humidification amount will vary, depending on the temperature and
humidity in the room.
• Actualhumidification amount isnot less than 90% the standard 390mL/h.

Page 5
PARTS AND FEATURES
Manual × 1
NOTICE
Water Mist
Guiding Tube
Water Tank
Main Unit
Control Panel
Atomization Outlet
• The pictures of the Manualare for referenceonly, and theactual product in
thepacking box shall prevail.
• The product appearance and function vary with themodel; Please be subject
to the realproduct,with optional reading of the respective function
description.

Page 6
INSTRUCTION FOR USE
Two methods forwater filing
Method A
Fill the water tank directly through the main unit cover. Please use
purified water. Please do not add the water in the atomization outlet.
Method B
Lift the main unit of the humidifier up and fill purified water directly from top
of the water tank.
Atomization Outlet Main Unit Cover
Purified
Water
Purified Water

Page 7
OPERATION INSTRUCTIONS
Buttons Operation
On/Off
Atomization
adjustment
Timing button
1. Shortly press this button to enter the on/idle state.
2. In the on/idle state, press and hold 3 seconds till hear “be-
ep”, the WIFI signal on the screen will blink and enter the
CARRO HOME APP connection mode.
Under working conditions, the humidity and atomization
amount can be set to three levels (small, medium and large).
Press and hold till hear "beep" to enter sleep mode, the
display light will be turned off, and the atomization amount
level automatically switched to level 1 (small).
1.Shortly press in the working conditions, you can cycle to
set the timer function.The timer setting can be 0h→1h→
2h→4h→8h→0h.
2. In the process of setting, the setting timer time will be
displayed first, and then if you do not operate, the timer
will flash 3 times and then switch to display the humidity
of the current environment.
3.The timer time displays in a countdown way. After setting
the timer, if you press the timer button again, the operation
screen will display the remaining time before shutdown,
and then press the timer button again to re-set the timer.
4. After the timer is turned on, press and hold the timer button
for 3 seconds to exit the timer setting state.
NOTICE
Control Panel
• If the indoor temperature is too low or the humidity is too high, and the mist
cannot be fully diffused, it is recommended to reduce the volume of water
mist.
• When humidity setting lower than current humidity, the atomizing mist will
stop within two minutes. In the working state, if there is no operation for more
than 1 minute, the operation screen will automatically enter the light-off sleep mode
The level of atomization remains unchanged.
Operation Part
Display Part

WiFi indicator
light
Humidity On/Off
Humidity Setting. Press once will display "F", and you can
cycle to set the humidity "40%-45%-50%-55%-...-90%-F-
40%"(5%RH gradient). "F" stands for canceling the preset
humidity.
The indicator light is on when the humidifier is shortage of
water.
When connecting to the network, the indicator light is on.
01 small atomization amount
02 medium atomization amount
03 large atomization amount
0h/01h/2h/4h/8h timer
Display the humidity of the environment, such as 60%.
Page 8
CLEANING AND MAINTENANCE
WARNING
Before cleaning or descaling, be sure to unplug the power cord.
Do not use abrasive, corrosive, or flammable cleaners (such as bleach or
alcohol) to clean any part of the humidifier.
The humidifier must regularly clean the scale and debris in the water tank
and sink. It is recommended to clean it once a week.
•
•
•
Water shortage
indicator light
• IMPORTANT TIP: DO NOT leavethe humidifier plugged in for prolonged
periods (i.e. several days or more) without use.
• This causes premature failure of the circuitry. When the humidifier is not in
use, press the control button until the light goesoff, then UNPLUG it.

Lift the main unit cover.
Fig 1 Fig 2 Fig 4 Fig 5
Atomizing Head
Assembly
Lift the main unit up in
the direction of the arrow.
Placed the main unit on the
platform and stabilize it.
Do not turn the main unit upside down.
Cleaning the outer casing
Wipe and clean the surface of the whole machine with a slightly damp soft
cloth. In case of stubborn stains, add a small drop of detergent to clean it,
and then wipe the detergent away.
Tank cleaning
First take out the main unit cover, then lift the main unit upwards, shake
the main unit slightly, so that the water in the mist guiding tube flows back
to the water tank, put the main unit aside, then pour clean water into the
water tank, and add an appropriate amount of detergent for cleaning.
Use a clean cloth to dry the inside and outside of the water tank.
Warning:Do not use a dripping soft cloth to clean the outer casing, or rinse
it with a shower.
Page 9
Clean the outside part
of the machine.
Lift the main unit up in
the direction of the arrow.
Clean the outside part of the machine.
Do not turn the main unit upside down.
Fig 3

Fig 6
Fig 7 Fig 8
Cleaning the inside & outside of the mist guiding tube,and the
atomizing head
1. Rotate counterclockwise to unscrew connecting hose of the main unit
and the atomizing head as shown in Fig 1.
2. Hold the main unit with one hand, press the spring switch of the mist guidi-
ng tube with the other hand at the same time as shown in Fig 2, and remove
the main unit in Fig 3.
3. Rotate the lower cover of the tube clockwise to remove the cover, and
then take out the atomizing head assembly as shown in Fig 4.
4. Clean the dirt inside the tube with a long-handled soft brush(not included)
as shown in Fig 5, and then wash the tube in the sink.
5.Use a screwdriver(not included) to poke the small hole in the back of
atomizing head assembly, and take out the atomizing head for cleaning as
shown in Fig 6, and wipe the center of it with a damp soft cloth.
6.When cleaning the components of the float, first loosen the set screw,
rotate the upper shell of the float clockwise and take it out, and then take
out the foam of the float as shown in Fig 7.
7.Wipe the upper shell of the float with a clean damp cloth, use a soft brush
(not included) to clean the lower part of the float as shown in Fig 8, and then
put it in sink to clean it.
Page 10
Foam

Install the atomizing head
on the float assembly.
Put the main unit on the table,
and align the mist guiding tube
with slot of it for installation.
Install the float assembly into
the mist tube.(The upper shell of
the float faces the direction of the
main unit.)
Rotate the lower cover of
the tube clockwise.
Connect the atomizing head
hose to the main unit.
NOTICE
Mist tube assembly installation
Page 11
The foam of the float in Fig 7 is important part of atomizing head assembly,
DO NOT mistakenly discard it as part of the packaging.

SOLUTION
CAUSE
PROBLEM
The humidifier does not
work
Small amount of mist
The display screen is
on,windy but no mist
Fouling of atomizing head
assembly
Too little ,or too much water(above
the maximum water mark)
The atomizing head is stuck
Clean the atomizing head
assembly.
Fill enough water,or pour out
some water.
Clean and gently drag the
hose of the atomizing head,
make it smooth.
There is abnormal
noise
The display screen
shows "P1"
The power plug is not plugged well
There is no water in the water tank
The water tank is not in place
The float assembly in the mist tube
is installed in the wrong direction.
When installing the float
atomizer into the mist tube,
follow the direction indicated
by the arrow on the surface
of the atomizer.
The appliance is not in place, tilted or
unstable
The power plug is plugged well
The water is added to the tank
The water tank is fastened in
place
Mist has a bad odor The water tank is not clean.
New machine Leave the water tank open in
the shade for 12 hours.
The clean water is refilled, or
the water tank cleaned
Humidifier is emitting a
white dust/residue.
Use of tap water with a high
mineral content, aka “hard water.”
Clean tank and use only demin-
eralized or purified water.
The appliance is placed on a
solid surface or a flat place
The water tank shows
water shortage, but is
filled with water; the
humidifier does not
work for a long time.
Excessive tilting of the appliance at
an angle causes the water level in
the water tank to be judged as low
water level, so the appliance
automatically starts protection mode
and stops.
The appliance is put on a flat
and firm place, and kept steady
SERVICE GUIDE
NOTICE
• If thehumidifier doesnot work properlyafter thefollowing suggestions,
please contact the customer service center or local service station.
Fault Handling
Page 12

WHAT IS COVERED
This warranty covers any manufacturing defect for the humidifier, with the
exceptions stated below.
HOW T0 GET SERVICE
Please keep your receipt or other document so that we may process your
Tel:888-253-2374.
HOW LONG COVERAGE LASTS
This warranty runs for one(1)years from the date of purchase.
WHAT IS NOT COVERED
The warranty applies only to the original Purchaser within the USA and does
not cover:
• Wear and tear
• Stains
• Misuse or improper maintenance
• Alteration or repair by unauthorized representatives
• Damage resulting from transit or handling
• Damage caused by improper placement (such as placing products near he-
ating pipes, etc.)
• Deterioration caused by Force Majeure (unforeseeable circumstances,such
as fire, earthquake, flood, lightning and other natural disasters, environmen-
tal pollution )
• Any humidifier outside of the contiguous 48 states
• Any claim made outside of the warranty period
QUESTIONS? CONTACT US.
Carro USA Inc.
1037 W.9th street, Unit 101, Upland, CA 91786
Tel:888-253-2374
www.carrohome.com |
humidifier@fscarro.com
ONE (1) YEAR LIMITED WARRANTY
Page 13

APP Control Connection:
1.First download the free Carro Home app from the App Store or Google Play
or scan the QR Code as below.Connect the device to the app must turn on
WIFl and Bluetooth on your phone.
Note: This humidifier needs to use 2.4Ghz wifi to work when you connecting
the device, and after connecting it can use the 5Ghz or 2.4Ghz.
2.Open the Carro Home app to create your account. The
account with "Carro Home" can be registered through E-mail
or Mobile phone.
3.Connect the device to the Carro Home APP(The WIFI signal on the screen
is blinking):
a.Press "+" button,select "Smart Home Appliances"on the sidebar menu on
next page,then select "Humidifier".
b.Connect to your home WIFI (Only for 2.4Ghz).
c.Press the Smart Humidifier "+"button to wait for the connection to compl-
ete.
Note:Press and hold the ""till hear "beep", the WIFI will blink and enter the
CARRO HOME APP connection mode.
4.Connect the device to the Alexa:
a.Make sure you have connected the device to the app and working normally.
b.Open Alexa app, go to the skill to search "Carro Home" skill.
c.Link the skill, log in with your Carro Home app account and password, then
authorize and connect with Carro Home app.
d.Then the Alexa will find out the device automatically.
5.Connect the device to the Google Home
a.Make sure you have connected the device to the app and working normally.
b.Open Google Home app, Set up a device, choose "Works with Google".
c.Search "Carro Home", log in with your Carro Home app account and passw-
ord, then authorize and connect with Carro Home app.
d.Then the Google Assistant will find out the device automatically.
6.Connect the device to the Siri shortcuts
a.Make sure you have connected the device to the app and working in functi-
onal.
b.Tap "Smart" on the main menu.
c.Tap "+" button.
d.Tap "launch Tap To Run”.
e.Tap "Run the device".
f.Choose the device you want to control by Siri.
g.Select the function you want to control by Siri.
h.Then save it.
I. Add to Siri, choose the scene you just made, Add to Siri.
j. Enter the sentence you want to say to make the device works, Add to Siri.
Page 14

Page 15
Carro Home App Connection Guide
1Download & Install Carro Home App
Scan the QR code on the
left and download the
Carro Home App.
Connect the device to the
App must turn on WIFI
and Bluetooth on your
phone.
3Add the Device
F. If the
connection
fails, please
refer to the
instructions
on the App
to check
and retry.
C. Sign into
your WIFI
network (Only
for 2.4Ghz).
D. Please turn on the device and
confirm that indicator is blinking.
For specific operations, please
refer to the instructions on the App.
A. Tap"Add Device”
button to add the
device.
B. Select "Smart
Home Appliances"
on the sidebar menu
on next page, then
select "Humidifier".
E. Wait for the connection
to complete. For specific
operations, please refer to
the instructions on the App.
2Register & Log In
Open the Carro Home
App to create your
account. The account
with "Carro Home" can
be registered through
E-mail or Mobile phone.
Note: Press and
hold the " " on the
device control
panel till hear
"beep",the WIFI will
blink and enter the
Carro Home App
connection mode.
Note:
Connect the device to the App must turn on WIFI and Bluetooth on your phone.
This humidifier needs to use 2.4Ghz WIFI to work when you connecting the device,
and after connecting it can use the 5Ghz or 2.4Ghz.
Make sure the WIFI network is stable.
Make sure that the device, the phone and the router are close to each other.
Check whether the WIFI name, password,etc have been modified. If so, reset the
device and add it again.
With product technical updates, the content of Carro Home App may be changed,
please refer to the guide displayed on the App.
Note: Your device may
be automatically
searched.

Display Real-time
Ambient Humidity
Set Target
Humidity On/off
Power On/Off
Select and Set
Target Humidity
(*40-90 Optional)
(*When in the "on" state,
the "Humidity Setting"
below will become selectable,
and the target humidity can
be selected. ln the "off" state,
the "Humidity Setting" cannot
be selected, and the product
will maintain continuous
humidification.)
Set the Speed Level
(*3 different spray
speed levels optional)
Set and Select Timer
(*O-1-2-3-4-5-6-7-8-9H optional,
avoid over humidifying.)
Set Schedule
(*Work at Specific Times)
Sleep Mode
(*LED screen will be closed,
and adjust the spray speed
to Level 1 automatically.)
Page 16
Humidifier APP Operation
Table of contents
Other Carro Humidifier manuals