Casada Movello User manual

MOVELLO
BEDIENUNGSANLEITUNG | MANUAL
<relaxmyway

3
healthcare
since
2000
Seit der Gründung im Jahr 2000 steht der Name CASADA für hoch-
wertige Produkte im Bereich Wellness und Fitness.
Heute sind CASADA- Geräte in weltweit 37 Ländern erhältlich. Kon-
tinuierliche Weiterentwicklung, unverwechselbares Design und die
strikte Ausrichtung auf eine Verbesserung der Lebensqualität zeichnen
die CASADA-Produkte ebenso aus, wie die zuverlässige und hervorra-
gende Qualität.
WIR GRATULIEREN
Mit dem Kauf dieses „aktiven Sitzmöbels“ haben Sie Gesundheitsbe-
wusstsein bewiesen.
Damit Sie auf lange Zeit die Vorzüge dieses Gerätes nutzen können,
möchten wir Sie bitten, die Sicherheitshinweise aufmerksam zu lesen
und zu beachten.
Wir wünschen Ihnen viel Freude mit Ihrem persönlichen Movello.
www.casada.com
DEUTSCH

45
Aktiv sitzen – Schluss mit lümmeln
Lifestyle in Verbindung mit Gesundheit – Das ist die Kernaussage unse-
res besonderen„Möbelstücks“. Mit diesem Lifestyle-Produkt haben Sie
die Möglichkeit einer dualen Nutzung. Zum einen als Design-Möbel-
stück und gleichzeitig als Aktivitätsgerät.
Aktivität auf überlastungsfreiem Niveau zu jeder Zeit und zu nahezu
jeder Tätigkeit integrierbar. Ohne Anstrengung und gelenkschonend
ganz nebenbei bewegen – DAS Einsatzgebiet des Movello
5 Lifestyle
6 Sicherheitshinweise
7 Ausstattung / Funktion
7 Technische Daten
8 Erste Schritte
10 Aufbau
13 Transport
14 Lagerung / Pege
14 Konformitätserklärung
15 Gewährleistungsbestimmungen
30 Notizen
LIFESTYLEINHALTSVERZEICHNIS
INHALTSVERZEICHNIS
LIFESTYLE

67
Um das Risiko schwerer Verletzungen zu vermeiden, lesen Sie die
folgenden Sicherheitshinweise, vor der Benutzung des Gerätes auf-
merksam durch!
• Lesen Sie alle Warnhinwiese auf dem Gerät.
• Lesen Sie diese Bedienungsanleitung und befolgen Sie sie sorgfäl-
tig vor Inbetriebnahme des Gerätes. Stellen Sie vor dem Gebrauch
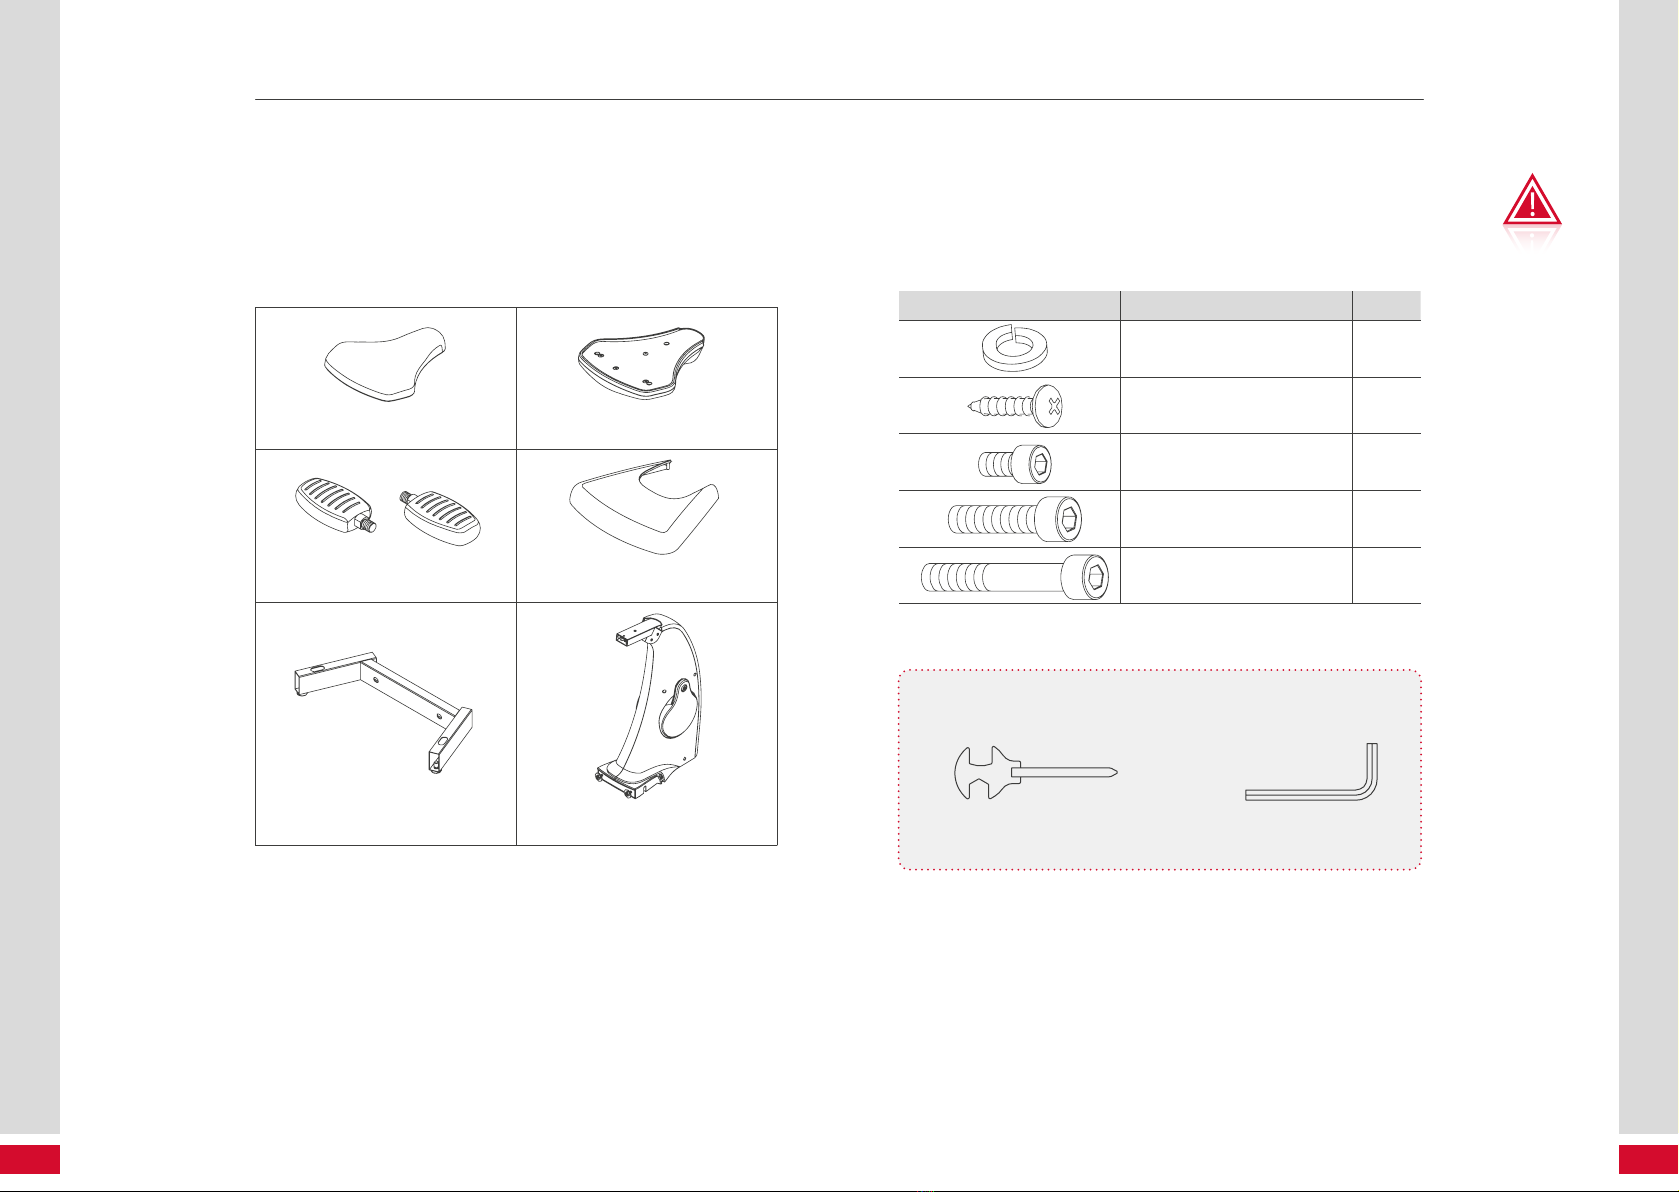
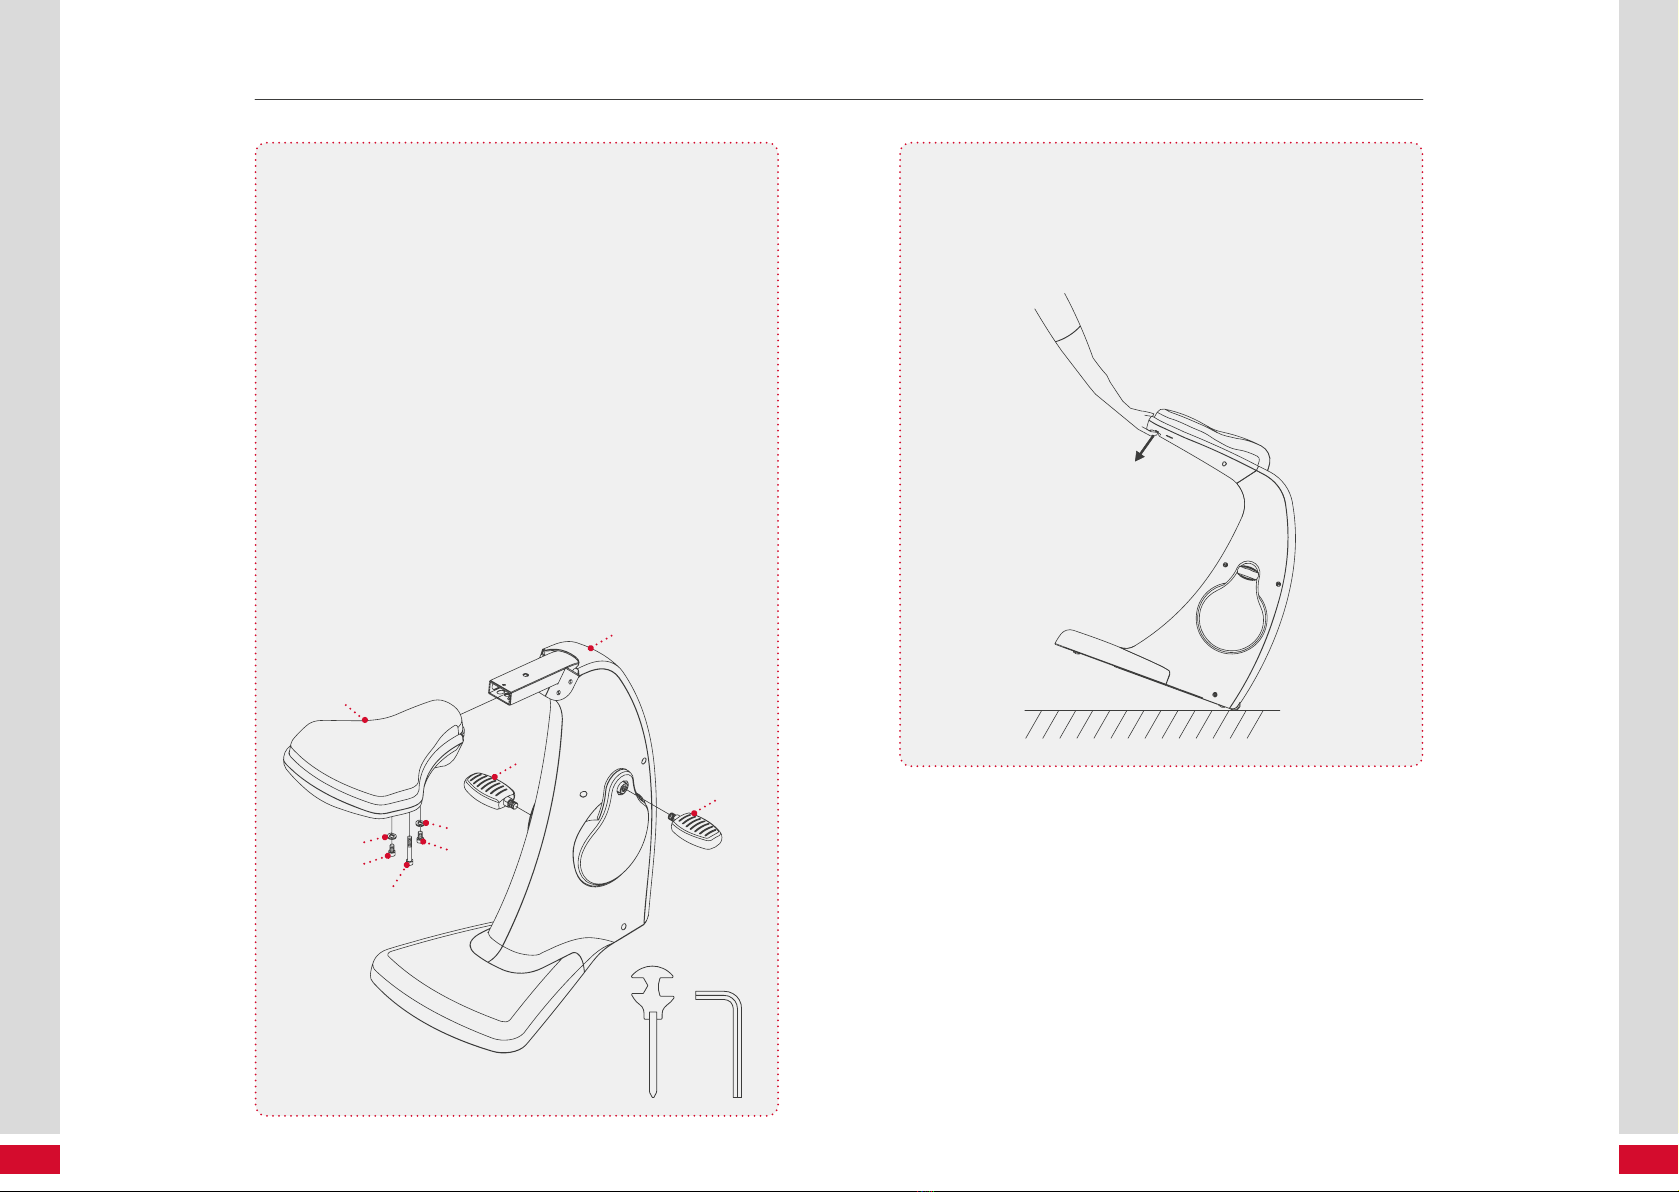
sicher, dass es richtig montiert und Schrauben und Muttern festge-
zogen sind.
• Halten Sie Kinder und Haustiere von dem Gerät fern, insbesondere
während des Gebrauchs. Lassen Sie Kinder und Haustiere das Gerät
nicht benutzen oder damit spielen.
• Ausstellung und Betrieb des Gerätes hat auf einer festen, ebenen Flä-
che zu erfolgen. Platzieren Sie das Gerät nicht auf losen Teppichen
oder unebenen Flächen.
• Überprüfen Sie das Gerät auf abgenutze oder lose Bauteile vor jeder
Benutzung.
• Ziehen Sie alle losen Komponenten fest und ersetzen Sie die Ver-
schlissenen vor der Verwendung des Gerätes.
• Folgen Sie den Empfehlungen ihres Arztes bei der Entwicklung eines
persönlichen Fitness-Programms.
• Wählen Sie immer die Intensität und Dauer, die am besten zu Ihrer
körperlichen Fitness passt. Kennen Sie Ihre Grenzen und handeln Sie
stets nach gesundem Menschenverstand während der Verwendung
des Gerätes.
• Tragen Sie keine losen oder herabhängenden Kleidungsstücke wäh-
rend der Verwendung des Gerätes.
• Halten Sie stets das Gleichgewicht während Sie auf-/absteigen und
auch bei der Montage des Gerätes. Verlust des Gleichgewichts kann
zu einem Sturz und schweren Verletzungen führen.
• Das Gerät sollte nicht von Personen mit einem Gewicht von mehr als
120kg verwendet werden.
• Das Gerät sollte nur von einer Person zu dem jeweilgen Zeitpunkt
verwendet werden.
• Das Gerät ist für den Hausgebrauch konzipiert.
• Wartung: Wechseln Sie defekte Teile sofort aus und/ oder halten Sie
SICHERHEITSHINWEISE
das Gerät außer Betrieb bis zur vollständigen Instandsetzung in der
Gesamtheit.
• Stellen Sie sicher, dass ausreichend Platz zur Verfügung steht. Der Ab-
stand zwischen dem Gerät und jeglichen Hindernissen und Objekten
sollte mindestens 1 Meter betragen
SICHERHEITSHINWEISE
AUSSTATTUNG/FUNKTION / TECHNISCHE DATEN
TECHNISCHE DATEN
Maße (Karton): 73 x 25 x 46 cm
Gewicht: 19 kg
Maximale Belastbarkeit: 120 kg
Zertifikate:
AUSSTATTUNG /FUNKTION
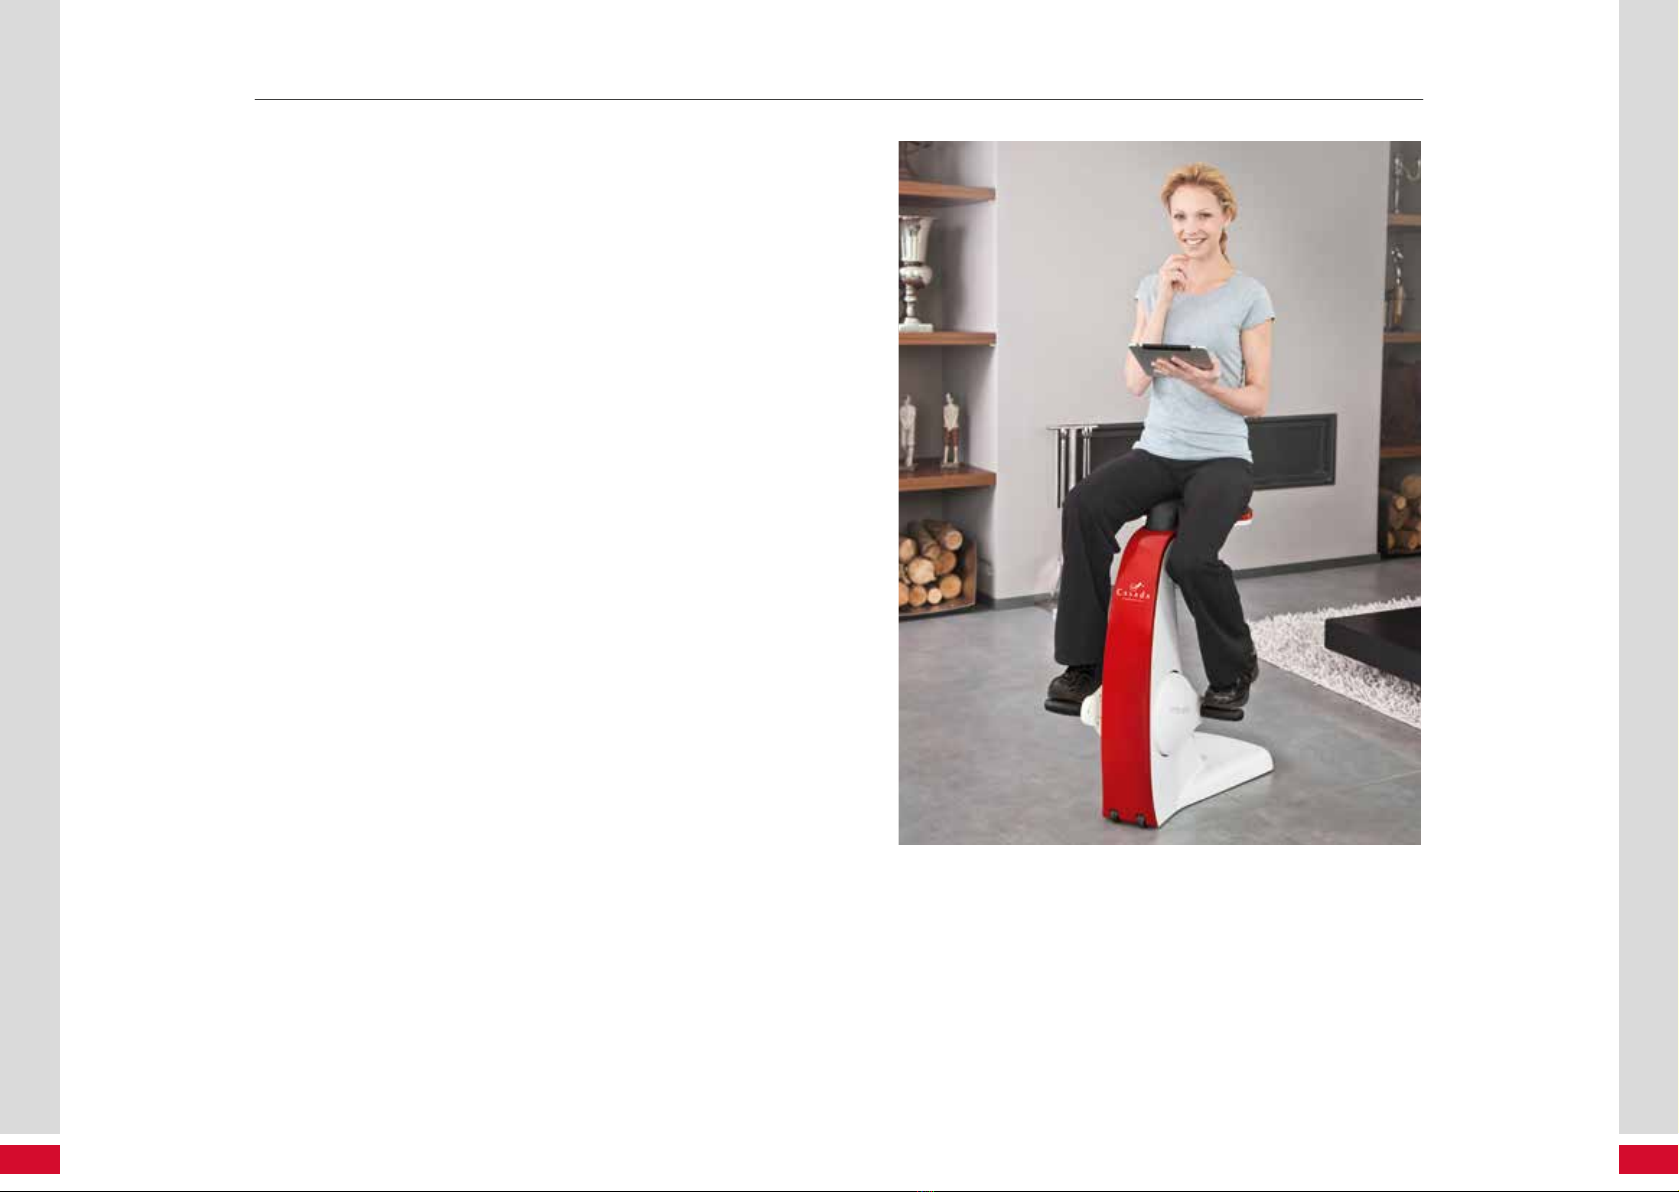
Zuhause ganz entspannt seinen Aufgaben nachgehen und ganz ne-
benbei etwas für seine Gesundheit tun. Das ist unser Konzept mit dem
Movello. Ob Sie nun fernsehen, ein Buch lesen, mit einem Freund te-
lefonieren oder sogar Küchenarbeit verrichten, der Movello ist ab nun
Ihr ständiger Begleiter. Ganz ohne Anstrengung können Sie die duale
Nutzbarkeit dieses aktiven Design-Möbelstückes genießen. Aktivieren
Sie Ihren Körper durch belastungsfreies „Training“ und passive Bewe-
gung. Ohne zu schwitzen und ohne Überbeanspruchung.
Die Bewegung auf dem Movello geschieht im Hauptnutzungsbereich
Ihrer Gelenke und ist auch gut bei z.B. Artrose in den Knien geeignet.
Dadurch, dass es keine Überstreckung/Überbeugung gibt, wird auch
die Bildung von Gelenküssigkeiten angeregt.
Bei regelmäßiger und aktiver Nutzung des Movello und gleichzeiti-
ger bewusster Ernährung werden Sie schnell eine Verbesserung Ihres
Wohlbendens bis hin zur Gewichtsreduzierung feststellen !

89
ERSTE SCHRITTE
ERSTE SCHRITTE
Montagezubehör Teile-Nr. und Beschreibung Stck.
29 Sicherungsplättchen (M8) 2 Stck.
33 Schrauben (M4x12mm) 4 Stck.
39 Schraubbolzen
(M8xp1.25x16mm) 2 Stck.
40 Schraubbolzen
(M8xp1.25x30mm) 2 Stck.
41 Schraubbolzen
(M8xp1.25x50mm) 1 Stck.
ERSTE SCHRITTE
INFO:
Einige Teile können bereits vormontiert sein. Wenn ein Teil nicht im
Montagezubehör vorhanden ist, überprüfen Sie, ob es bereits vormon-
tiert wurde.
Folgende Werkzeuge sind für die Montage beigelegt:
Multi-Schraubenschlüssel mit
Kreuzschlitzschraubendreher
Imbußschlüssel
(6 mm)
ERSTE SCHRITTE
Packen Sie den Karton auf einer freien Fläche aus. Prüfen Sie die fol-
gende Liste der Montageanleitung um sicherzustellen, dass alle Bau-
teile vorhanden und in einem guten Zustand sind. Entsorgen Sie das
Verpackungsmaterial nicht, bis die Monatge abgeschlossen ist. Werk-
zeuge und Materialien zur Montage sind enthalten.
Sitzkissen Untere Sitzabdeckung
Pedale Hintere Dekorationsabdeckung
Hinterer Stützrahmen Hauptrahmen

10 11
AUFBAU AUFBAU
AUFBAU
AUFBAU
SCHRITT 1 HINTERER STÜTZRAHMEN
[a] Entnehmen Sie den Hauptrahmen 1 zusammen mit dem
gestanzten Styropor A aus dem Karton.
[b] Legen Sie den Hauptrahmen 1 in dem gestanzten Styro-
por A auf den Boden.
Hinweis:
Wenn der Hauptrahmen 1 ohne das gestanzte Styropor A
hingelegt wird, können Kratzer entstehen.
[c] Zwei Unterlegscheiben 30 und zwei Nylon Muttern (M8)
43 wurden auf der Rückseite des Hauptrahmens 1 (sie-
he Skizze) bereits vormontiert. Entfernen Sie diese, um den
hinteren Stützrahmen 2 damit an dem Hauptrahmen 1
zu befestigen.
SCHRITT 2 HINTERE ABDECKUNG
[a] Bringen Sie die hintere Abdeckung 13 an dem Hauptrah-
men 1 an und befestigen Sie diesen mit vier Schrauben
(M4x12mm)33.
[b] Richten Sie nun den Hauptrahmen 1 auf und entfernen
Sie das Styropor A.
SCHRITT 3 SITZKISSEN UND SITZABDECKUNG
[a] Für eine einfache Montage drehen Sie die untere
Sitzabdeckung 3 und das Sitzkissen 16 auf den Kopf.
[b] Legen Sie die Sitzabdeckung 3 auf das Sitzkissen
16 und befestigen Sie diese mit zwei Schrauben
(M8xp1.25x30mm) 40.
13
2
33
33
33
1
A
33
43
30
3
40
16
Benutze Sie den
Imbußschlüssel
Stellen Sie sicher, dass die oben genannten Teile gut befestigt sind,
bevor Sie weitere Schritte durchführen

12 13
AUFBAU TRANSPORT
AUFBAU
TRANSPORT
SCHRITT 4 SITZ UND PEDALE
[a] Befestigen Sie das Sitzgestell 3 an dem Hauptrahmen 1
und befestigen Sie diesen mit zwei Unterlegscheiben (M8)
29, zwei Schrauben (M8xp1.25x16mm) 39 und einer
zusätzlichen Schraube (M8xp1.25x50mm) 41.
[b] Führen Sie das rechte Pedal 10 in den rechten Kurbel-
bereich des Hauptrahmens 1. Drehen Sie das rechte
Pedal 10 im Uhrzeigersinn und ziehen Sie es so fest wie
möglich an.
[c] Führen Sie das linke Pedal 9 in den linken Kurbelbereich
des Hauptrahmens 1. Drehen Sie das linke Pedal 9
gegen den Uhrzeigersinn und ziehen Sie es so fest wie
möglich an.
[d] Beenden Sie die Montage und stellen Sie sicher, dass alle
Teile fest angezogen sind, bevor Sie das Gerät benutzen.
Greifen Sie mit den Fingern in die Halteönung auf der Rück-
seite des Sitzes und heben Sie es leicht an. Nun können Sie das
Gerät leicht an die gewünschte Position schieben.
3
3
10
9
41
29
39
29
39
Greifen Sie hier rein.

14 15
healthcare
since
2000
LAGERUNG / PFLEGE
Durch regelmäßige Pege erhöhen Sie die Lebensdauer ihres Movellos
und sorgen gleichzeitig für allzeit sicheren Betrieb.
1. Empfohlene Lagerung: Trocken, staubfrei.
2. Halten Sie Flüssigkeiten oder oene Flamme vom Movello fern.
3. Reinigen Sie das Gerät mit einem trockenen, weichen Tuch.
LAGERUNG / PFLEGE / EUKONFORMITÄTSERKLÄRUNG
GEWÄHRLEISTUNGSBESTIMMUNGEN
Der Händler gewährt auf das umseitig beschriebene Produkt eine ge-
setzlich vorgeschriebene Gewährleistungszeit. Die Gewährleistung gilt
ab dem Kaufdatum. Das Kaufdatum ist mit dem Kaufbeleg nachzuweisen.
Der Händler wird die innerhalb Deutschlands erfassten Produkte, bei
denen Fehler festgestellt wurden, kostenlos reparieren bzw. ersetzen.
Hiervon nicht betroen sindVerschleißteile wie z.B. Stoabdeckungen.
Voraussetzung dafür ist die Einsendung des fehlerhaften Gerätes mit
Kaufbeleg vor Ablauf der Gewährleistungszeit.
Der Gewährleistungsanspruch entfällt, sofern nach Feststellung eines
Fehlers, dieser z.B. durch äußere Einwirkung oder als Folge von Repara-
tur oder Änderung, die nicht vom Hersteller oder einem autorisierten
Vertragshändler vorgenommen wurde, aufgetreten ist.
Die Gewährleistung vom Händler beschränkt sich auf Reparatur bzw.
Austausch des Produktes. Im Rahmen dieser Gewährleistung über-
nimmt der Hersteller bzw. Verkäufer keine weitergehende Haftung
und ist nicht verantwortlich für Schäden, die durch die Missachtung
der Bedienungsanleitung und/oder missbräuchliche Anwendung des
Produktes entstanden sind.
Stellt sich bei Überprüfung des Produktes durch den Hersteller heraus,
dass das Gewährleistungsverlangen einen nicht von der Gewährleis-
tung erfassten Fehler betrit oder dass die Gewährleistungsfrist abge-
laufen ist, sind die Kosten der Überprüfung und Reparatur vom Kunden
zu tragen.
Casada International GmbH
Obermeiers Feld 3
33104 Paderborn, Germany
www.casada.com
Copyright Bilder und Texte unterstehen dem Copyright von CASADA
International GmbH und dürfen ohne ausdrückliche Bestätigung nicht
weiterverwendet werden.
Copyright ©2016 CASADA International GmbH.
Alle Rechte vorbehalten.
GEWÄHRLEISTUNGSBESTIMMUNGEN
EU-KONFORMITÄTSERKLÄRUNG
Entspricht den europäischen Richtlinien EMC 2014/30/EU, LVD
2014/35/EU.

17
healthcare
since
2000
www.casada.com
ENGLISH
Since being established in 2000, the name CASADA stands for high
quality products on the health-spa and tness market. Today, CASADA-
equipment is available in 37 countries world-wide.
Constant further development, an unmistakeable design and a focused
orientationtowardsabetterqualityoflifearewhatcharacterizeCASADA-
products, as much as their unbeatable and reliable quality.
CONGRATULATIONS!
With the purchase of this lifestyle product you have shown awareness
of your health.
In order for you to enjoy the advantages of your massage device in the
long term, we ask you to read and adhere to the instruction manual
carefully.
We wish you a lot of fun with your personal Movello.

18 19
Active sitting – an end to sprawl
Lifestyle in connection with health – This is the gist of our special
„piece of furniture“. With this lifestyle product you have the possibility
of dual utility. Firstly, as a design-piece of furniture and activity-equip-
ment at the same time.
Activity on congestion-free level at any time and to integrate virtually
any activity. Without eort and incidentally moving along the way –
THE main – advantage of the Movello.
LIFESTYLETABLE OF CONTENTS
TABLE OF CONTENTS
LIFESTYLE
18 Lifestyle
20 Safety instructions
21 Equpiment / Function
21 Technical Date
22 Start up
24 Installation
28 Storage/Care
28 Conformity declaration
29 Warranty conditions
30 Notes

20 21
Please carefully read the following instructions to before using this
product. Please retain these instructions for use!
• Read all warnings posted on the equipment.
• Read this Owner‘s Manual and follow it carefully before using the
equipment. Make sure that it is properly assembled and tightene be-
fore use.
• Keep children and pets away from the equipment. Do not allow chil-
dren and pets to use or play on the equipment. Always keep children
and pets away from the equipment when it is in use.
• Set up and operate the equipment on a solid level surface. Do not
position the equipment on loose rugs or uneven surfaces.
• Inspect the equipment for worn or loose components prior to each
use.
• Tighten/ replace any loose or worn components prior to using the
equipment
• Follow your physician‘s recommendations in developing a personal
tness program.
• Always choose the intensity and time which best ts your physical
strength and exibility level. Know your limits and train within them.
Always use common sense when exercising.
• Do not wear loose or dangling clothing while using the equipment.
• Be careful to maintain your balance while using, mounting, dismount-
ing, or assembling the equipment loss of balance may result in a fall
and serious bodily injury.
• The equipment should not be used by persons weighing over 265
pounds /120 kgs.
• The equipment should be used by only one person at a time.
• The equipment is for home usage.
• Maintenance: Replace the defective components immediately
and/or keep the equipment out of use until repair the equipment
completely.
• Make sure that adequate space is available for access to and passage
around the equipment; keep at least a distance of 1 meter from any
obstruction object while using the machine.
SAFETY INSTRUCTIONS
SAFETY INSTRUCTIONS
EQUIPMENT / FUNCTION / TECHNICAL DATA
EQUIPMENT / FUNCTION
Home relaxed doing your job and, by the way, doing something for
your health. This is our concept with the Movello. Whether you are
watching television, reading a book, call a friend or even doing kitch-
en work, the Movello from now on will be your constant companion.
With no eort you can enjoy the dual usefulness of this active- design
furniture. Activate your body through stress-free„training“ and passive
movement. Without sweating and without undue stress.
The movement on the Movello happens in the main-moving are of
your joints and is also good at for example Suitable osteoarthritis in the
knees. In that there is no hyperextension / diraction, the formation of
synovial uid is excited.
With an regular and active use of the Movello and healthy nutrition you
will quickly improve your well-being up to determine the weight loss!
Have fun with it.
TECHNICAL DATA
Measurements (Carton): 73 x 25 x 46 cm
Weight: 19 kg
Max. Capacity: 120 kg
Certifikate:

22 23
START UP
START UP
START UP
NOTE:
Please review below to know the content of the hardware kit Some
small parts may have been pre-attached for shipping. If a part is not in
the hardware bag, check to see if it has been pre-assembled.
THE FOLLOWING TOOLS ARE INCLUDED FOR ASSEMBLY:
multi wrench tool w/ phillips
screwdriver
allen wrench
(6 mm)
START UP
Unpack the box in a clear area. Follow the List of Assembly Parts below
to check and make sure all assembly parts are present and in good
condition. Do not dispose of the packing material until the assembly
process is completed. Assembly tools and hardware kit have included
for you to use when assembling the product
Seat Cushion Lower Seat Cover Assembly
Pedal Rear Decoration Cover
Rear Support Frame Main Frame Assembly
Hardware Kit Part No. and Description Q’TY
29 Lock Washer (M8) 2 pcs
33 Screw (M4x12mm) 4 pcs
39 Bolt (M8xp1.25x16mm) 2 pcs
40 Bolt (M8xp1.25x30mm) 2 pcs
41 Bolt (M8xp1.25x50mm) 1 pcs

24 25
INSTALLATION
INSTALLATION
INSTALLATION
INSTALLATION
REAR SUPPORT FRAME ASSEMBLY
[a] Take out the Main Frame Assembly 1 along with the
die-cut Styrofoam A from the carton.
[b] Refer to the left illustration, lay down the Main Frame
Assembly 1 and die-cut Styrofoam A.
NOTE:
If the Main Frame Assembly 1 is lied down without the
die-cut Styrofoam A covered, scratches may occur on the
painted Front Cover.
[c] Two Washers (8x38x2.0t) 30 and two Nylon Nuts (M8) 43
have been pre-attached on the rear side of the Main Frame
Assembly (1) as the drawing shown above unscrew them
43 from the rear side of the Main Frame Assembly 1 to
attach the Rear Support Frame 2 to the Main Frame As-
sembly 1 and secure with the removed washers and nuts.
REAR DECORATION COVER ASSEMBLY
[a] Attach the Rear Decoration Cover 13 to the Main Frame
Assembly 1 and secure with four Screws (M4x12mm)33.
[b] Stand the Main Frame Assembly 1 straight then remove
the die-cut Styrofoam A from the Main Frame Assembly
1.
SEAT CUSHION & SEAT COVER ASSEMBLY
[a] For easy assembly, turn the Lower Seat Cover Assembly 3
and the Seat Cushion 16 upside down.
[b] Place the Lower Seat Cover Assembly 3 onto the Seat
Cushion 16 and secure with two Bolts (M8xp1.25x30mm)
40.
13
2
33
33
33
1
A
33
43
30
3
40
16
Use this tool:

26 27
INSTALLATION INSTALLATION
INSTALLATION
INSTALLATION
3
3
10
9
41
29
39
29
39
Hold here.
SEAT & PEDAL ASSEMBLY
[a] Attach the Seat Assembly 3 to the Main Frame 1
and secure with two Lock Washers (M8)29, two Bolts
(M8xp1.25x16mm) 39 and one Bolt (M8xp1.25x50mm)
41.
[b] Thread the Right Pedal 10 into the right crank area of
the Main Frame 1. Firmly tighten the Right Pedal 10
clockwise into the right crank. Tighten the Pedal as rmly
as possible.
[c] Thread the Left Pedal 9 into the left crank area of the Main
Frame 1. Firmly tighten the Left Pedal 9 counter-clock-
wise into the left crank. Tighten the Pedal as rmly as
possible.
[d] Finish the assembly, make sure that all parts are tightened
before you use the equipment.
Put your ngers into the holding hole located on the back of
the Seat and gently move the item to the desired location.
Make sure the oor is level while towing the item.

28 29
healthcare
since
2000
STORAGE / CARE
Regular care will extend the life of your Movello whilst also
ensuring safe operation at all times.
1. Recommended storage: dry, free of dust.
2. Keep liquids and open re away from the Movello.
3. Clean the equipment using a dry, soft cloth.
STORAGE / CARE / CONFORMITY DECLARATION
WARRANTY CONDITIONS
CONFORMITY DECLARATION
Corresponds to the European guidelines EMC 2014/30/EU, LVD
2014/35/EU.
The dealer grants the statutory warranty period on the product de-
scribed overleaf. The warranty applies from the date of purchase. The
date of purchase is demonstrated by the sales receipt.
The dealer is to repair or replace products registered within Germany
which are found to be defective free of charge. Parts subject to wear
and tear such as cloth covers are not covered.To assert your claim, sim-
ply return the defective product with the sales receipt before the end
of the warranty period.
The warranty claim does not apply if it is established that a defect has
occurred e.g. through external inuence or as a result of repair or al-
teration not carried out by the manufacturer or an authorized dealer.
The warranty granted by the seller is limited to repair or replacement
of the product. Under this warranty, the manufacturer or seller has no
further liability and is not responsible for damage caused by disregard
of the operating instructions and/or improper use of the product.
If inspection of the product by the seller reveals that the warranty claim
relates to a defect not covered by the warranty or that the warranty pe-
riod has expired, the cost of the inspection and repair are to be borne
by the customer.
Casada International GmbH
Obermeiers Feld 3
33104 Paderborn, Germany
www.casada.com
Copyright Images and texts are subject to the copyright of Casada
International GmbH and may not be used for other purposes without
express conrmation.
Copyright ©2016 Casada International GmbH. All rights reserved.
WARRANTY CONDITIONS

30 31
NOTES
NOTES

Table of contents
Languages:
Popular Exercise Bike manuals by other brands

Life Fitness
Life Fitness CLUB SERIES UPRIGHT LIFECYCLE... Operation manual

Pro-Form
Pro-Form 831.21952.3 user manual

Pro-Form
Pro-Form PFICSP37008.0 user manual

Life Fitness
Life Fitness 90R Assembly instructions

Pro-Form
Pro-Form SR 20 user manual

Life Fitness
Life Fitness LIFECYCLE INTEGRITY+ Series Assembly instructions

Pro-Form
Pro-Form 1550cwi Manuale d'istruzioni

Life Fitness
Life Fitness Lifecycle upright 9500HR Assembly instructions

Medical Technology
Medical Technology Spirit MR100 user manual

Pro-Form
Pro-Form 775s Bike user manual

Star Trac
Star Trac Pro Upright Bike owner's manual

Pro-Form
Pro-Form 425 Zlx Bike Manual Del Usuario