Cascade Health and Fitness FLUIDPro User manual

with Wireless Power Meter
Thank you for purchasing the CASCADE FLUIDPro trainer and wireless power eter.
Please read the following directions thoroughly before use.
Model: 37320 CASCADE FLUIDPro trainer with wireless power meter
Contents: 1 pc trainer, 1 pc riser block, 1 pc quick release skewer and
1 pc wireless power meter.
CAUTION
1.
Please read and ollow all instructions be ore using the trainer.
2.
This trainer is intended or single-rider bicycles only.
3.
Be ore riding make sure that both legs o the trainer are ully extended away rom the rame assembly.
4.
Be ore riding, be sure the bicycle is correctly installed and securely locked into the trainer as explained in the
instructions.
5.
Do not touch the resistance unit during use and or a period o time a ter use until it has had su icient time
to cool down. The resistance unit can become hot enough to cause burns.
6.
Keep children, pets and all items sa ely away rom the trainer during use.
7.
Always use the trainer on a lat sur ace.
8.
Always consult a doctor be ore beginning any exercise routine or using any exercise or itness product.
Should you become ill, eel dizzy, light-headed or nauseous while riding the trainer, stop riding immediately and
seek medical attention.
WARNING
Read and follow all instructions concerning installation
of the bicycle on the trainer Failure to securely attach
the bicycle to the trainer could result in serious injury
to the rider or those near the trainer
BIKE MOUNTING INSTRUCTIONS
1.
Replace the bicycle’s rear wheel quick release (QR) skewer with the one provided. See the bicycle owner’s
manual or instructions on how to properly adjust the QR skewer. Make sure the QR skewer is tight and your
wheel is aligned properly on the bicycle.
2.
Rotate both the Release Clamp and Adjustment Knob (with the associated locking rings) counterclockwise,
moving them away rom the center o the trainer. The release clamp should remain in the locked position as
shown in the Figure 1.
17280 Woodinville-Redmond RD NE
Suite 800
Woodinville WA 98072
425.402.4062
cascadehealthand itness.com

3.
Next rotate the roller adjustment knob and associated lock ring counterclockwise so that the roller
assembly allows room or the rear tire to mount. Figure 2.
Li t the bicycle into position so that the rear QR skewer is aligned with the right and le t axle clamp cones.
See Figure 3.
a.
By turning both the adjustment knob and the release clamp clockwise, tighten the clamp cones until they
come into contact with the bicycle’s QR skewer ends. Align the QR skewer with the notch in the clamp cone.
b.
Tighten the adjustment knob and release clamp until the bike is securely held in place and the bicycle’s
rear wheel is centered on the roller assembly. Now while holding the bike rame in place test that the release
clamp
can be opened and closed irmly. The
release clamp
should close irmly by hand.
•
i the lever will not open or close, loosen the
adjustment knob
by rotating counterclockwise.
•
I the lever is too easy to open or close by hand, tighten the
adjustment knob
by rotating
clockwise.
c.
Rotate the
locking rings
clockwise until they are irm against the rame. Veri y the bicycle is securely
mounted to the trainer.
5. Tighten the
roller adjustment knob
clockwise until the roller contacts the rear tire. Then tighten the knob
an additional 1½ to 2 ull turns. The roller needs to provide only enough pressure to prevent the rear tire
rom slipping while in use. Test tire riction by quickly moving the tire a 1/4 turn back and orth. Apply
another 1/4 turn on roller adjustment knob i needed. Allowing the tire to slip against the roller while riding
will accelerate tire wear. I you notice the tire slipping regularly during use, tighten the roller adjustment
knob by an additional ¼ turn as necessary to reduce slipping. Do not over-tighten the roller adjustment knob.
Over-tightening will cause both tire and unit damage. Tighten only enough to avoid tire slippage. Use a smooth
tread tire at least 23mm in width and maintain the maximum recommended in lation pressure or your tire.
Once this is set properly tighten the lock ring to the rame.
Riser block
Use the included riser block to raise the ront o the bicycle by putting the riser block under the ront wheel.

USING YOUR TRAINER
1.
To minimize the noise rom your trainer during your workout, set the trainer on a loor mat or small section
o carpet and use a rear tire with a smooth tread pattern.
2.
The luid resistance unit provides smooth, naturally progressive resistance that varies based on your wheel
speed. Use your bicycle’s gearing to vary the level o resistance.
BIKE REMOVAL
1.
Loosen the
roller adjustment knob
so the roller no longer touches the tire. Allowing more space between
the roller and tire can make removing the bike easier.
2.
Firmly grasp your bicycle and open the
release clamp
. Care ully, remove the QR skewer side rom the
clamp cone irst and then remove the bike.
3.
The QR skewer provided with the trainer can be used when riding the bicycle o the trainer as well. I you
choose to reinstall your bicycle’s original skewer, re er to your bicycle owner’s manual or instructions on
properly adjusting the skewer. Be ore riding, ensure the quick release skewer is tight.
4.
To store or transport your trainer, grab the trainer rame by the adjustment knob, li t and old the legs in
towards the rame.

Wireless Power Meter
For use with the Cascade Health and Fitness FLUIDPRO Trainer only
Contents.
1. Power Meter console 2.Cable Ties 3. Sponge
4. HR Transmitter and strap 5. Magnet
6. Clamp bracket set 7. Rubber strip
8. Cadence sensor 9. AAA batteries
Power Meter Console Installation:
1-1. Insert 2 * AAA batteries in to the console and then mount onto your bicycle handlebars.
1-2. Attach the Clamp bracket(6) to the back o the console(1) by inserting the provided mounting screw
through the clamp bracket into the console.
1-3. Spread the bottom o the console clamp apart, than clamp it back together over the handlebar.
1-4. Turn the screw bar downward, slightly tighten the screw and adjust the console angle or optimal
visibility. Once the position is set, continue to tighten the screw until it is securely attached to the
handlebar. I the bracket is too large to ully tighten around the handlebar then insert the provided
sponge to ill the space so that the bracket can tighten to the handlebar.

Cadence Sensor Installation
1.
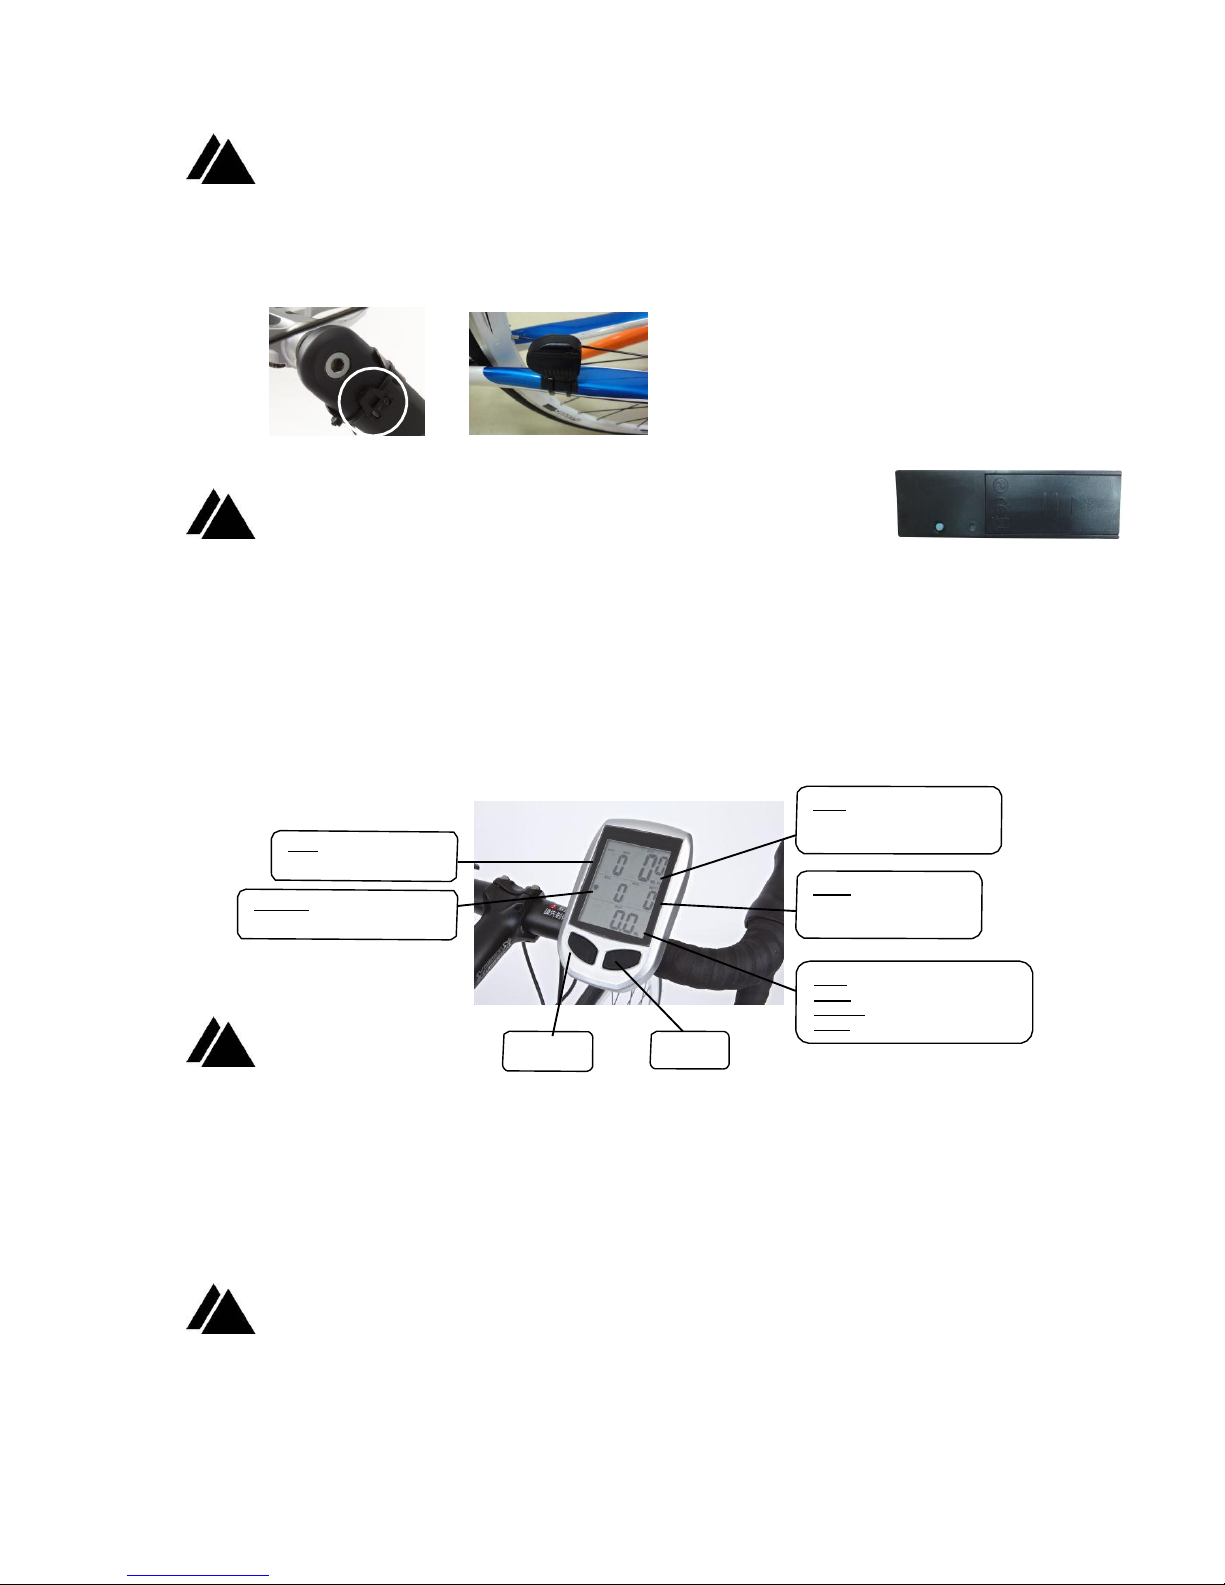
Mount the cadence sensor onto the top o non-drive side chainstay o your bicycle with the acing
outward(battery cover towards the inside), using the zip ties supplied.
2.
Mount the cadence magnet to the inside o the non-drive side crank o your bike, using the zip tie supplied.
The magnet should line up with the line on the cadence sensor and should pass at a distance o 1-2mm.
Use the rubber strip to keep the zip tie and magnet rom moving on the crank.
Final Setup
1.
Insert 2 * AAA batteries into the speed sensor (located on the FluidPro trainer below the resistance
unit).
2.
To monitor your heart rate you will need to wear the provided Heart rate monitor and strap. Make
sure the strap is securely placed around your chest to remain on your body during exercise. I a HR
signal does not display on the computer try to wet your skin a little underneath the heart rate
monitor.
3.
You are now ready to ride. As the trainer is calibrated to the resistance unit there is no need to set
your wheel size into the console. To set the time press and hold the set key or 3 seconds while in
the time mode. Then use the mode button to toggle the time to the desired number and the press
the set key again to set.
RPM
AVG rpm, MAX rpm 0~199
Speed
AVG Speed, MAX Speed
0~99.9 KM/H or HL/H(MPH)
Heat Rate
AVG HR, MAX HR 30~240bpm
WATT
AVG WATT, MAX WATT
0~999
MODE KEY
Mode Key Set Key
DIST 0.00~999.9KM or ML
TIME 0:00~99:59
CLOCK 00:00~23.59 24H OR 12H
KCAL
Press Mode Key to cycle through the ollowing displays:
-
Current RPM/ Current Speed / Current Heart Rate / Current Watt
-
Average RPM/ Average Speed / Average Heart Rate / Average Watt
-
Maximum RPM/ Maximum Speed / Maximum Heart Rate / Maximum Watt
Press and Hold Mode Key or
2 seconds
to activate or deactivate the alarm or heart rate target zone
While in the SETTING MODE(Press and hold Set Key or 3 seconds to enter SETTING MODE)
Press Mode key to switch the item to be set, i.e. timer, heart rate Hi / Low limit, Clock, Km/Mile unit.
Press and Hold Mode Key or
3 seconds
to exit SETTING MODE.
SET KEY
Press Set Key to activate the Backlight or
5 seconds
.
Press Set Key to cycle through ollowing displays: Distance / Time / Clock / KCAL
Press and Hold Set Key or
3 seconds
to enter SETTING MODE while allows changes to be made to - timer, heart
rate Hi / Low limit, Clock, Km/Mile unit. In SETTING MODE, Press Set Key to change the desired units/digits.

MODE & SET KEY
Press and Hold both Mode and Set Key or
2 seconds
to clear ALL Average and Maximum Speed, Heart Rate,
Watt record, as well as Distance and Time.
PAIRING SPEED AND CADENCE SENSORS
Speed Sensor Pairing
Press and Hold both Mode and Set Key or
5 seconds
to synchronize speed sensor pair
up process. When the 3 dots/lines lash on the screen hold down the blue button on the speed
sensor(located below the resistance unit). Once 0 comes up on the screen you can release the blue button.
To con irm the speed sensor is paired spin the roller and con irm speed shows up on the console.
Cadence Sensor Pairing
Press and Hold Mode Key or
5 seconds
to synchronize cadence sensor pair up
process. When the 2 dots/lines lash on the screen hold down the blue button on the cadence sensor. Once
0 comes up on the screen you can release the blue button. To con irm the cadence sensor is paired pedal the
bike and con irm cadence shows up on the console.
The Specifications for the power meter console are:
-
Wireless 2.4 GHz Speed and Cadence
-
Wireless 5 KHz Heart Rate
-
The head Unit will enter into sleep mode once no signal is detected a ter
5 minutes
.

WARRANTY
Cascade Health and Fitness o ers the original owner a li etime warranty against manu acturing de ects and/or
normal wear and tear or both the trainer rame and the resistance unit. This warranty is not applicable to
damage caused by misuse, abuse, neglect, accident or unauthorized modi ication o materials or parts. I the
unit is disassembled by the consumer, this warranty is void. There are no other warranties, expressed or
implied.
The wireless power meter carries a one year warranty on the meter and transmitters. Batteries are not
warranted.
It is the responsibility o the purchaser to ile a warranty card via mail or on-line with Cascade Health and
Fitness in the event that repairs are needed. It is also the responsibility o the purchaser to retain receipts or
proo o purchase in the event that repairs are needed. No warranty repairs will be accepted without the
warranty registration and the serial number o the trainer located on the resistance unit.
WARRANTY CARD/PRODUCT REGISTRATION
Please complete the warranty page with the in ormation requested and return it within 30 days o purchase.
You can also go to www.cascadehealthand itness.com and ill out the warranty in ormation online.
Record the serial number o your trainer in the box below:
WARRANTY CLAIMS
I you experience problems with your trainer, please call 425-402-4062 or email us at
info@cascadehealthandfitness com
. To help us handle your call as e iciently as possible, please have your
trainer’s serial number ready to give to the customer service representative.

-------------------------------------------------------------------------------------------------------
WARRANTY REGISTRATION
Please fill out and return to register your product for warranty.
Thank you for purchasing a Cascade Health and Fitness bike trainer. To validate your
product warranty, please complete the following information and return to Cascade
Health and Fitness within 30 working days from the date of equipment purchase.
First Name: Last Name:
Address:
City State: Zip: Country:
Phone: Fax:
Email:
Purchased at:
Date of Purchase:
Serial Number:
Model Number:
Signature:
Mail to:
Cascade Health and Fitness
17280 Woodinville-Redmond Rd NE
Suite 800
Woodinville, WA 98072 USA
Telephone: (+1) 425.402.4062
Table of contents