Casio XW-PD1 Trackformer User manual

XWPD1-E-2A
EN
USER’S GUIDE (Tutorial)
●Before using this TRACKFORMER for the first time,
be sure to read the separate USER’S GUIDE
(Basics) to familiarize yourself with basic operations.

Contents
Names of Controllers
and their Functions............... EN-1
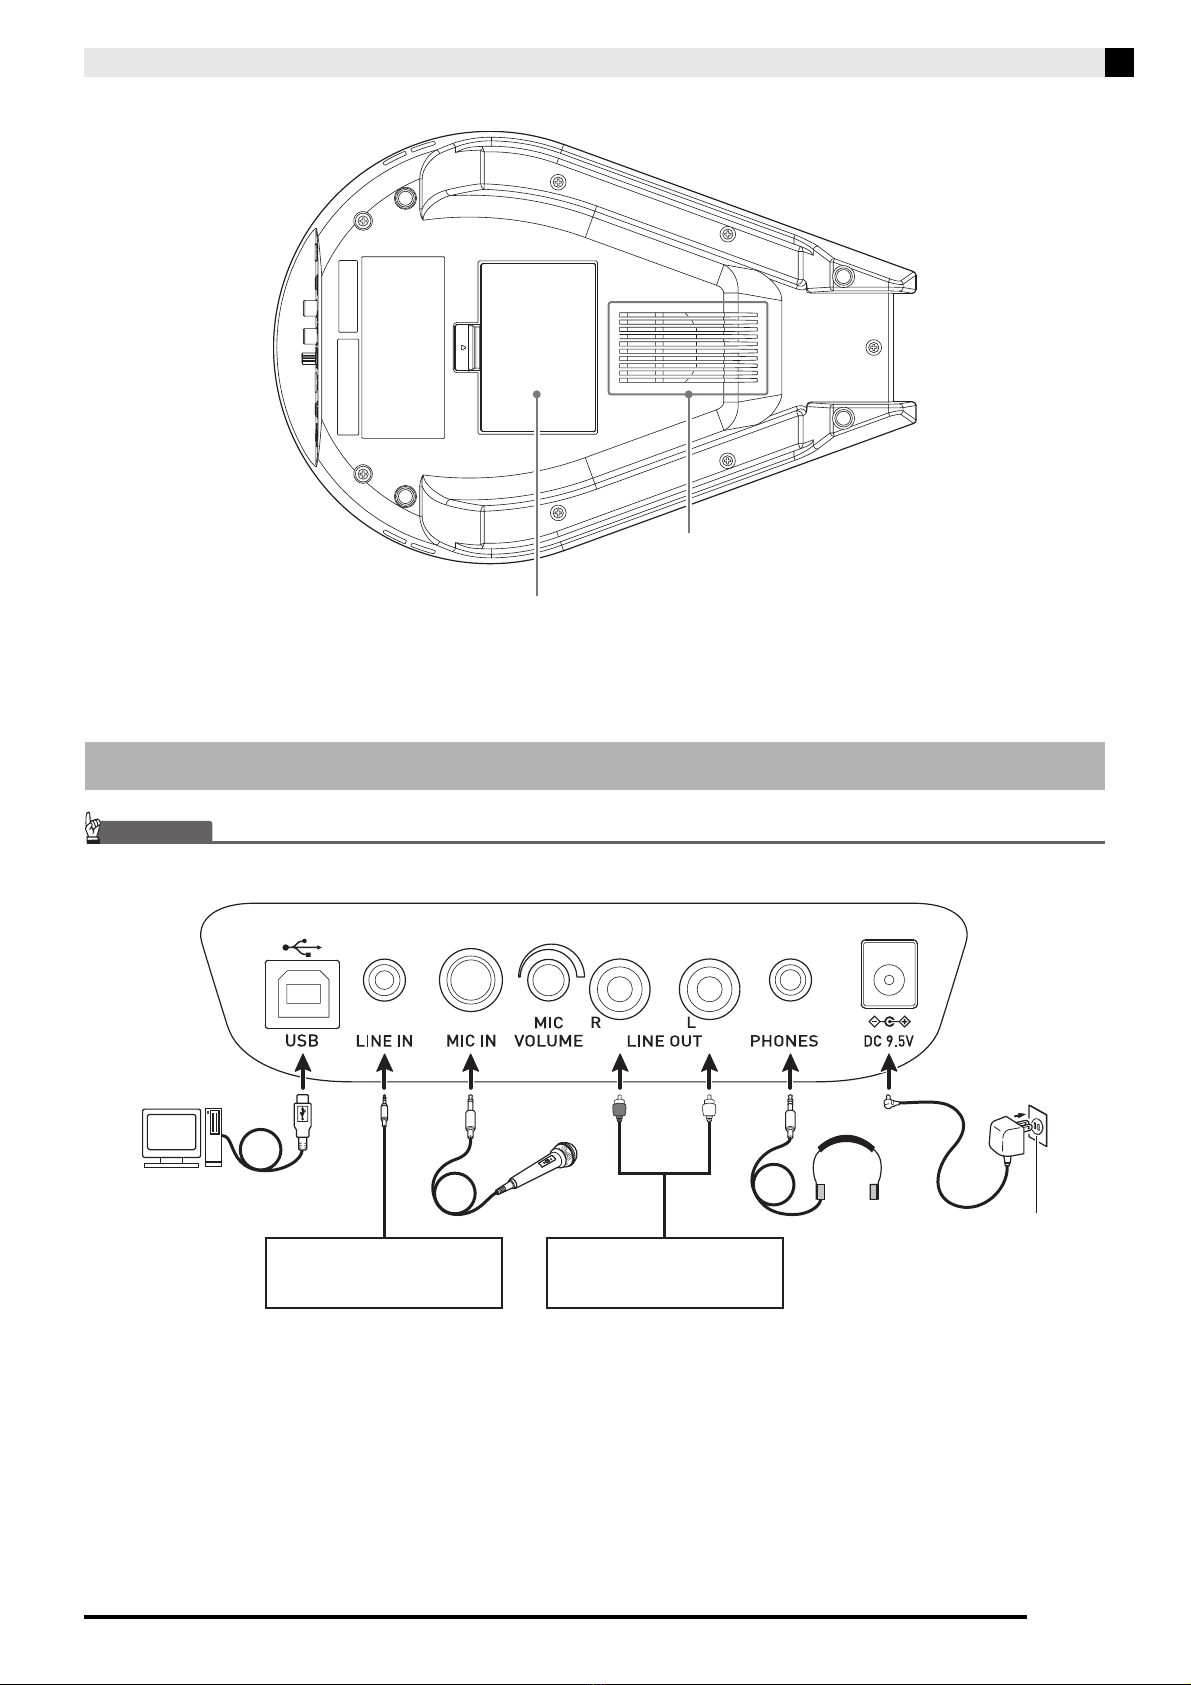
Connection Examples...............................................EN-3
Sequence Creation Flow....... EN-4
1. Getting Ready.......................................................EN-4
2. Creating a Basic Pattern.......................................EN-4
3. Layering ................................................................EN-5
4. Increasing the Number of Patterns .......................EN-5
5. After You’re Done .................................................EN-5
Effect System......................... EN-6
Sampling Tutorial.................. EN-7
Assigning the Sampled Sound to all of the Pads......EN-7
Assigning a Sampled Tone to a Specific Pad...........EN-7
Sampling while Holding Down a
Sequence Step Key ..................................................EN-7
Specifying the Number of Beats and Sampling ........EN-8
Mastering TRACKFORMER
Operations ............................. EN-9
Navigating Between FUNCTION Modes ..................EN-9
Producing a Particular Sound or Sounds..................EN-9
Muting a Particular Sound or Sounds .....................EN-10
Deleting Data ..........................................................EN-10
Copying Data ..........................................................EN-11
Changing the Pitch of a Sequence .........................EN-12
Changing the Number of Steps Per Measure.........EN-12
Applying a Swing Effect ..........................................EN-12
Entering the MIDI Control Mode .............................EN-13
Changing the Configuration of a Pattern ................EN-13
Changing the Pad Velocity .....................................EN-14
Changing the Pad Set Volume Level......................EN-14
Changing the Operation of a Pad ...........................EN-14
Changing the Initial Default Slice Length................EN-16
Using the Equalizer.................................................EN-16
Using the Metronome .............................................EN-16
Configuring Other
Settings ................................ EN-17
Configuring Settings ...............................................EN-17
Menu and Setting List .............................................EN-17
Adjusting Controller
Operations ........................... EN-20
Calibrating Knob and Fader Alignment...................EN-20
Adjusting Pad Sensitivity ........................................EN-21
Connecting to a
Computer ............................. EN-22
Minimum Computer System Requirements ........... EN-22
Connecting TRACKFORMER
to Your Computer................................................... EN-22
Using MIDI ............................................................. EN-23
Saving and Loading TRACKFORMER Data
to a Computer and Editing TRACKFORMER
Data on a Computer............................................... EN-23
Appendix .............................. EN-24
Step Sequence List ................................................ EN-24
Pad Set Tone List................................................... EN-25
Pad Tone List ......................................................... EN-28
Drum Assignment List ............................................ EN-31
Effect List ............................................................... EN-33
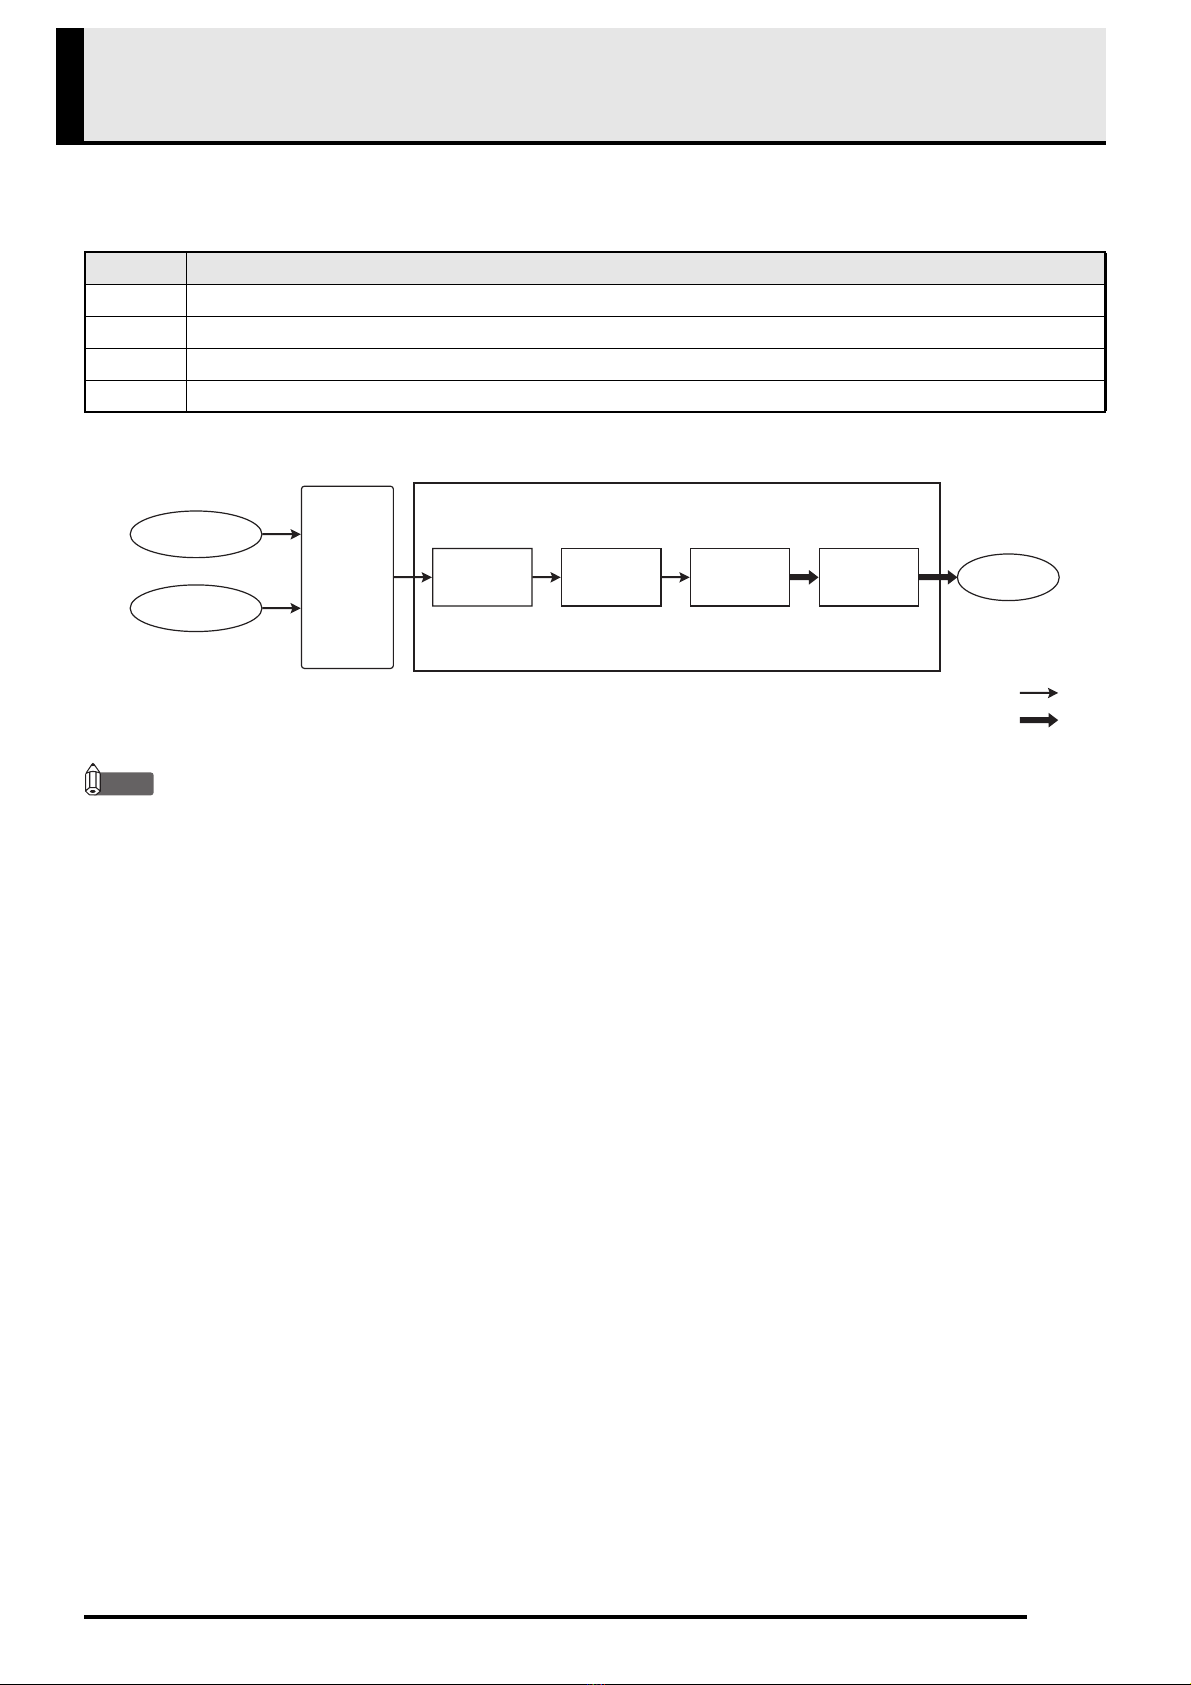
Signal Diagram....................................................... EN-36
Internal Sound Source Operation Flow .................. EN-36
MIDI Implementation Chart
Company and product names used in this
manual may be registered trademarks of others.

EN-1
Names of Controllers and their Functions
zThis section explains the numbers and names used in this manual for buttons and controllers.
1Selector panel
•P(Power) button
•Display
•STEP button
Enables creation of sequence data using the
sequence step keys.
•BANK button
Enables bank selection using the sequence step keys.
•PATTERN button
Enables pattern selection using the sequence step
keys.
•SLICE button
Enables slicing of sequence data or an external
sound source using the sequence step keys.
•SAMPLING button
Samples a sequence or external input.
•PLAY button
Starts and stops sequence playback.
•REC button
Starts and stops real-time recording. Also used to
start and stop sampling.
•FUNCTION button
Used for configuring detailed settings.
•HOLD button
Puts sounds and/or effects into a hold state.
•EXIT button
Backsteps to the previous menu or other screen.
•PAD button
Switches a particular pad’s tone and/or effect.
•PADSET button
Switches the tone and/or effect of all pads.
•SEQ button
Switches the sequence.
•TAP/TEMPO button
Adjusts playback tempo.
1
6
5
4
3
2
7
8

Names of Controllers and their Functions
EN-2
2MIX FADER
Adjusts the volume balance between the internal
sound source (sequence) and an external sound
source.
3VALUE knob
Rotate to change a value. Rotating to the left
reduces the value, while rotating to the right
increase it. The extent that the value is changed
depends on how much the knob is rotated.
Positioning the knob at 12 o’clock stops the value
change operation.
4VOLUME knob
5Sequence step keys
When using the step sequencer, toggle each step
between on and off. These keys are also used when
configuring detailed settings.
6Pads
Tap to produce a sound or apply an effect.
You can also use these pads to input or change a
number or value setting.
7FX1/FX2 knobs
Adjust the intensity of the applied effects.
8ASSIGNABLE fader
Can be used to apply a scratch effect. The function
assigned to this fader can be specified by you.
9USB port
Use a USB cable to connect to a computer, etc.
bk LINE IN terminal
Use to plug in a cable with a stereo mini plug to
connect with a portable audio player, etc.
bl MIC IN terminal
Use to plug in a microphone with a monaural
standard plug.
bm MIC VOLUME knob
Adjusts the microphone input level.
bn LINE OUT L/R terminals
Use to plug in a cable with RCA pin plugs to
connect a speaker, mixer, etc.
bo PHONES terminals
Use to plug in headphones with a stereo mini plug.
bp DC 9.5V terminal
Use to connect the supplied AC adaptor to supply
power from a household power outlet.
bk bl bnbm bo bp9

Names of Controllers and their Functions
EN-3
bq Battery compartment
br Speaker
IMPORTANT!
• Before connecting an external device, first set VOLUME to minimum volume.
Connection Examples
br
bq
Smartphone
Household power outlet
Speaker

EN-4
Sequence Creation Flow
This section provides a general overview of sequence
creation steps.
Selecting a Sequence Data File Number
While holding down the SEQ selector button, use pads
11 (–) and 12 (+) to specify a sequence data file number.
•Data file numbers 100 to 149 are rewritable by you.
There is no data assigned to these file numbers when
TRACKFORMER is shipped from the factory.
To delete data currently assigned to a
data file number
1.
While holding down the FUNCTION selector
button, press sequence step key 3(CLEAR).
2.
Press the SEQ selector button and then
press pad 16 (ENT).
To assign a sound to a step
1.
Press the STEP selector button and then
press the PLAY button.
2.
Press the pad of the sound you want to
assign and then press the sequence step key
to assign the sound.
•If you don’t want anything to sound when you press
a particular pad, hold down the STEP selector button
as you press the applicable pad.
NOTE
•For information about how to assign sound to a step
as you record it, refer to the “User’s Guide (Basics)”
that comes with TRACKFORMER.
To assign tones and effects to all pads or
to a particular pad
NOTE
•For information about tone types that can be
assigned, refer to the “User’s Guide (Basics)” that
comes with TRACKFORMER.
■To assign to all pads
1.
While holding down the PADSET selector
button, use pad 13 (TYPE) to select a tone
type.
2.
While holding down the PADSET selector
button, use pads 11 (–) and 12 (+) to change
the tone.
■To assign to a particular pad
1.
Press the pad whose tone you want to
change.
2.
While holding down the PAD selector button,
use pad 13 (TYPE) to select a tone type.
3.
While holding down the PAD selector button,
use pads 11 (–) and 12 (+) to change the tone
assigned to the pad you pressed in step 1.
1. Getting Ready
2. Creating a Basic Pattern

Sequence Creation Flow
EN-5
To change the bank
After pressing the BANK selector button, press the
sequence step key that corresponds to the number of
the bank you want to use.
To delete a bank sequence
After pressing the BANK selector button, hold down
the sequence step key that corresponds to the bank
number of the data you want to delete. The display
shown below appears to indicate that the sequence
recorded in the bank is deleted.
NOTE
•You can also use the FUNCTION CLEAR mode to
delete the settings of a particular bank. This will not
only delete the sequence, it will also initialize the
tones and other settings of the pads. For more
information, see “To delete bank settings” (page
EN-10).
To enable a pattern group
1.
Press the PATTERN selector button.
2.
Press the sequence step key (11 to 14) that
corresponds to the pattern group you want to
select. A flashing sequence step key
indicates that its pattern group is enabled.
Enabled pattern groups are played back in sequence.
•Pressing the sequence step key of an enabled pattern
group will disable the group.
To change the configuration of a pattern
using Pattern Edit
For details about configuring a pattern, see “Changing
the Configuration of a Pattern” (page EN-13).
To copy or delete a pattern you created
See “To copy pattern contents” (page EN-11) and “To
delete a pattern” (page EN-10) for information about
these procedures.
To save sequence data
1.
While holding down the FUNCTION selector
button, press the SEQ (WRITE) button.
2.
Use pads 11 (–) and 12 (+) to specify the
number of the sequence data file (100 to 149)
where you want to store the sequence.
3.
Press pad 16 (ENT).
3. Layering
4. Increasing the Number of
Patterns
Pattern group 4
Pattern group 3
Pattern group 2
Pattern group 1
5. After You’re Done

EN-6
Effect System
TRACKFORMER comes with 200 built-in effects. These effects are divided among the four blocks shown in the table
below. One effect can be assigned per block, which means you can apply up to four effects simultaneously. For
information about which built-in effect belongs to each block see the Effect List (page EN-33).
■Effect Block Diagram
NOTE
•Applying the scratch effect by moving the ASSIGNABLE fader while the scratch effect is assigned to it or
pressing a pad that has LFO Scratch assigned to it will cancel out all other effects.
•Attempting to apply multiple effects of the same block will result in application of only the final effect.
•Some effects are assigned to two blocks. For example, the PitchUp-Roll effect is assigned to both Block A and
Block B, so effects that can be applied along with it are effects assigned to Block C and Block D.
•Except for Panner and Delay, the same effect type is assigned to Block B and Block C. Because of this, if you apply
a Block B effect type while another effect is already assigned to Block B, the newly applied effect is assigned to
Block C. Conversely, if you apply a Block C effect type while another effect is already assigned to Block C, the
newly applied effect is assigned to Block B. For example, the LPF effect can be assigned to Block B only. However,
applying LPF while PitchUp-Roll is in use causes an effect type derived from PitchUp-Roll to be assigned to Block
A and Block B, and an effect type derived from LPF to be assigned to Block C.
•The same effect type cannot be assigned to Block B and Block C.
•The effect assigned to Block A becomes disabled when slicing.
•When the setting of the effect knob target is “Last,” operation of the knob may not change how the effect is
applied, even though the effect itself is applied.
Block Effect Type
A Roll, Reverse Roll, Step Back, Tape Stop, LFO Scratch
B Filter, Flanger, Tremolo, Gater, Pitch Shifter, Distortion, Crusher, Ring Modulator, Noise Generator
C Filter, Flanger, Tremolo, Gater, Pitch Shifter, Distortion, Crusher, Ring Modulator, Noise Generator, Panner, Delay
DReverb
Internal sound
source
Mixer Block A Block B Block C Block D Output
MONAURAL
STEREO
External sound
source

EN-7
Sampling Tutorial
TRACKFORMER lets you sample the built-in sound
source or an external sound source and assign the
result to a pad. You can also use this function to record
samples while slicing. For information about sampling
basics, refer to the “User’s Guide (Basics)” that comes
with TRACKFORMER.
Making all pad tones melody type and then sampling
causes the sampled sound to be assigned to all of the
pads. In this case, a specified pad is the sound source
and all pads are assigned the sampled sound.
1.
Make all pad tones melody type.
2.
Press the SAMPLING selector button.
3.
Press the pad you want to use as the sound
source.
4.
Press the REC selector button.
This starts recording.
5.
Play the sound you want to sample.
6.
Recording will stop when you press the REC
button again or after the specified recording
time elapses.
•The pad you pressed in step 3 will be the sound
source while all pads will be assigned the sampled
sound.
NOTE
•For information about how to make all pad tones
melody type, refer to the “User’s Guide (Basics)”
that comes with TRACKFORMER.
Making all pad tones drum type and then sampling
makes it possible to assign the sampled sound to a
specific pad.
1.
Make all pad tones drum type.
2.
Press the SAMPLING selector button.
3.
Press the pad to which you want to assign the
sampled sound.
4.
Press the REC selector button.
This starts recording.
5.
Play the sound you want to sample.
6.
Recording will stop when you press the REC
button again or after the specified recording
time elapses.
•This assigns the sample sound to the pad you pressed
in step 3.
NOTE
•For information about how to make all pad tones
drum type, refer to the “User’s Guide (Basics)” that
comes with TRACKFORMER.
1.
Press the SLICE selector button.
2.
While playing back the sound you want to
sample, press a sequence step key to slice.
•Perform the steps below while holding down the
sequence step key.
3.
Press the SAMPLING selector button.
4.
Press the pad to which you want to assign the
sampled sound.
5.
Press the REC selector button.
This samples the sliced sound.
6.
Recording will stop when you press the REC
button again or after the specified recording
time elapses.
Assigning the Sampled Sound
to all of the Pads
Assigning a Sampled Tone to
a Specific Pad
Sampling while Holding Down
a Sequence Step Key

Sampling Tutorial
EN-8
You can use the procedure below to specify the
number of beats to be sampled in a range of 1 to 16, and
then sample a sound. The range of the number of beats
you can specify depends on the sample length and the
tempo.
1.
Enable Sampling Tempo Sync.
•For information about configuring this setting, see
“Configuring Settings” under “Configuring Other
Settings” (page EN-17), and “Sampling Tempo Sync”
under “Menu and Setting List” (page EN-17).
2.
Press the SAMPLING selector button.
3.
Press the pad to which you want to assign the
sampled sound.
4.
Press the sequence step key that
corresponds to the number of beats you want
to specify.
•The sequence step keys that correspond to the
supported number of beats settings will be lit.
•To cancel a number of beats setting, press the flashing
sequence step key so it stops flashing and remains lit.
5.
Press the REC selector button.
This starts recording.
6.
Play the sound you want to sample.
7.
Recording will stop when you press the REC
button again or after the specified number of
beats is exceeded.
•This assigns the sampled sound to the pad you
pressed in step 3.
Specifying the Number of
Beats and Sampling

EN-9
Mastering TRACKFORMER Operations
The FUNCTION mode lets you change the
configuration of a variety of different settings.
1.
While holding down the FUNCTION selector
button, press the sequence step key that
corresponds to the mode you want to use.
•Entering a mode causes the FUNCTION button as
well as the pads and sequence step keys that are
enabled in the mode to light.
2.
To exit a FUNCTION mode, press the
FUNCTION button again.
To step back to the previous menu level, press the EXIT
selector button.
■FUNCTION Mode List
Use the procedure below when you want to produce
all of the sounds in a bank or the sound of a particular
pad in a bank.
1.
Enter the SOLO mode.
2.
Press the sequence step key that
corresponds to the number of bank whose
sounds you want to produce, or press the pad
whose sound you want to produce.
This causes the corresponding sound or sounds to be
produced.
•The soloing bank (sequence step key) or pad will
become lit.
3.
To cancel solo play, press the currently lit
sequence step key or pad.
Navigating Between
FUNCTION Modes
Sequence Step Key
(Mode)
Display
Message Description
1(SOLO) For sounding a
particular sound only.
2(MUTE) For muting a
particular sound.
3(CLEAR) For deleting data.
4(COPY) For copying data.
5(KEY SHIFT) For changing the pitch
of a sequence.
6(MAX STEP) For changing the
maximum number of
steps in a sequence.
7(SWING)Forapplyingaswing
effect.
8(MIDI CTRL) Enters the MIDI
control mode.
9(PATTERN
EDIT)
For changing the
configuration of a
pattern.
10 (VELOCITY) For changing the pad
velocity (degree of
volume level change).
11 (PAD VOLUME) For changing the pad
set volume level.
12 (PAD ACTION) For changing the
operation of a pad
when it is tapped.
13 (SLICE
LENGTH)
For changing the
initial default slice
length.
14 (MASTER EQ) For adjusting the
master equalizer.
15 (METRONOME) Toggles the
metronome between
on and off.
16 (SETTING) For other settings.
Producing a Particular Sound
or Sounds
Sequence Step Key
(Mode)
Display
Message Description
/
Banks 1 to 4
Pads 1 to 16

Mastering TRACKFORMER Operations
EN-10
NOTE
•You can solo play multiple banks or pads.
•When all banks or pads are lit (indicating all are
soloing), pressing any sequence step key or pad
switches to solo play of the corresponding bank or
pad only.
Use the procedure below when you want to mute all of
the sounds in a bank or the sound of a particular pad in
a bank.
1.
Enter the MUTE mode.
2.
Press the sequence step key that
corresponds to the number of bank whose
sounds you want to mute, or press the pad
whose sound you want to mute.
This mutes the corresponding sound or sounds.
•The muted bank (sequence step key) or pad will
become unlit.
3.
To cancel muting, press the currently unlit
sequence step key or pad so it becomes lit.
Use the procedures in this section to delete sequence,
pattern, bank, and pad data.
To delete a sequence
1.
Enter the CLEAR mode.
2.
Press the SEQ selector button.
3.
Press pad 16 (ENT).
This deletes the sequence data.
To delete a pattern
1.
Enter the CLEAR mode.
2.
Press the PATTERN selector button.
3.
Press the sequence step key that
corresponds to the number of the pattern you
want to delete.
This will delete the pattern whose number matches that
of the key you pressed.
To delete bank settings
1.
Enter the CLEAR mode.
2.
Press the PADSET selector button.
3.
Press the sequence step key whose number
corresponds to the bank you want to delete.
This deletes the sequence of the bank that corresponds
to the sequence key you pressed and returns the tone
and other settings to their initial defaults.
Muting a Particular Sound or
Sounds
Deleting Data
Banks 1 to 4
Pads 1 to 16
Delete pattern: Lit
Deleted bank: Lit

Mastering TRACKFORMER Operations
EN-11
To delete pad settings
1.
Enter the CLEAR mode.
2.
Press the PAD selector button.
3.
Press the pad you want to delete.
This deletes the settings of the pad and returns it to its
initial settings.
Use the procedures in this section to copy a pattern or
bank. You can also copy pad setting contents.
To copy pattern contents
1.
Enter the COPY mode.
2.
Press the PATTERN selector button.
3.
While holding down the sequence step key
that corresponds to the pattern number of the
copy source, press the sequence step key
that corresponds to the copy destination.
This copies the sequence to the destination pattern.
To copy bank contents
1.
Enter the COPY mode.
2.
Press the PADSET selector button.
3.
While holding down the sequence step key
that corresponds to the bank number of the
copy source, press the sequence step key
that corresponds to the copy destination.
This copies the sequence to the destination bank.
To copy pad settings
1.
Enter the COPY mode.
2.
Press the PAD selector button.
3.
While holding down the pad whose settings
you want to copy, press the copy destination
pad.
This copies tone and other settings to the destination
pad.
Copying Data
Initialized pad: Lit

Mastering TRACKFORMER Operations
EN-12
Use the procedures in this section to change the pitch
of a sequence when all pad tones are note.
1.
Enter the KEY SHIFT mode.
•You can check the current setting with the pad and
screen.
2.
Use the pads to change the pitch.
Setting values: –7 (Pad 1) to 0 (Pad 8) to +8 (Pad 16)
•You can also use the VALUE knob to change the
setting. With the VALUE knob, the setting range is
–24 to +24.
NOTE
•You can change the pitch of each pattern in a pattern
group (page EN-13). Select a pattern group and play
back its sequence. While the pattern whose pitch you
want to change is playing, perform the above steps
to change it.
1.
Enter the MAX STEP mode.
This will cause the sequence step key that corresponds
to the number of steps to flash.
2.
Press the sequence step key that
corresponds to the number of steps you want
to specify.
Setting values: 1 to 16 steps
•You can also use the VALUE knob to change the
setting.
NOTE
•You can specify the number of steps setting for each
pattern group (page EN-13). Select a pattern group
and then perform the steps above to change the
number of steps.
1.
Enter the SWING mode.
2.
Use the pads to change the swing value.
Each pad changes the value as shown below.
•You can also use the VALUE knob to change the
setting. With the VALUE knob, the setting range is 0
to 100.
NOTE
•You can specify the swing value for each pattern
group (page EN-13). Select a pattern group and then
perform the steps above to change the swing value.
Changing the Pitch of a
Sequence
Pattern configuration:
Pitch: +0 +2 +0 –2 –4
14341
Changing the Number of Steps
Per Measure
Applying a Swing Effect
70 74 78 82
54 58 62 66
38 42 46 50
22 26 30 34

Mastering TRACKFORMER Operations
EN-13
Entering the MIDI Control Mode stops sequence
playback. A special application (Data Editor) can be
used to configure assignments of pads, control buttons,
etc. from your computer. For information about Data
Editor, see “Saving and Loading TRACKFORMER
Data to a Computer and Editing TRACKFORMER Data
on a Computer” (page EN-23).
Patterns can be combined to create a sequence up to 16
measures long. Pressing the PLAY selector button
plays a sequence in accordance with the configuration
of the pattern created here. TRACKFORMER supports
creation of up to four pattern combinations (pattern
groups).
1.
Press the PATTERN selector button.
2.
Use the sequence step keys to select the
number of the pattern group you want to edit.
3.
Enter the PATTERN EDIT mode.
4.
Use the VALUE knob to change the number
of measures.
Setting values: 1 to 16 measures
5.
After pressing pad 1, press the sequence
step key that corresponds to the number of
the pattern you want to use as measure 1.
This assigns the pattern to measure 1.
6.
Repeat step 5 to assign patterns to the
remaining measures.
Entering the MIDI Control
Mode
Sequence step keys Navigates between pages 1 to 16.
Changing to a different page
changes the MIDI message output
when a pad is pressed.
• The sequence step key that
corresponds to the currently
selected page flashes.
Pads,
FX1 and FX2 knobs,
ASSIGNABLE fader
Outputs MIDI messages assigned by
the MIDI map. MIDI map
assignments are configured with
Data Editor.
PLAY button Outputs play and pause MIDI
messages.
Changing the Configuration of
a Pattern
1
2
2
2
1
2
3
4
4
6
6
6
3
8
8
8
4
7
7
7
1
5
5
5
4
4
4
4
3
3
3
3
...
...
...
...
Pattern group numbers Patterns
Pattern group 4
Pattern group 3
Pattern group 2
Pattern group 1
2
1
Patterns
1 to 8
Measures
1 to 16

Mastering TRACKFORMER Operations
EN-14
You can use this setting to fix the volume level when a
pad is tapped, or to change the volume level in
accordance with how strongly the pad is tapped.
1.
Enter the VELOCITY mode.
2.
Press a sequence step key to change the
velocity curve.
*Amount of volume change when the pad is pressed
increases in the following sequence (from least to
most): Linear, Curve 1, Curve 2, Curve 3.
You can specify a pad set volume level for each bank.
1.
Enter the PAD VOLUME mode.
2.
Use the pads to change the volume level of
each bank.
Setting values: 0 to 127
•To make fine adjustments press any one of the pads
in the bank you want to adjust. When the pad is
flashing, use the VALUE knob to adjust the volume
level.
Use the procedures in this section to specify how a
sound should be produced when a pad is tapped.
To configure a pad for repeat play
1.
Enter the PAD ACTION mode.
2.
Press the pad you want to configure.
3.
Use the sequence step keys to select a
trigger timing.
•Each press of a sequence step key toggles its trigger
timing between enabled (flashing) and disabled (lit).
•When a pad is configured not to repeat, all sequence
step keys from 1 through 6 are lit.
*Each press of this type of sequence step key cycles
the setting in the following sequence: Enabled (On)
3Enabled (Triplicate) 3Disabled (Off).
Changing the Pad Velocity
Sequence
Step Key Display Message Setting
1127 (fixed)
2Linear*
3Curve 1*
4Curve 2*
5Curve 3*
12 20 (fixed)
13 40 (fixed)
14 60 (fixed)
15 80 (fixed)
16 100 (fixed)
Changing the Pad Set Volume
Level
Changing the Operation of a
Pad
Sequence
Step Key Display Message Settings
11/32
21/16, 1/16T*
31/8, 1/8T*
41/4, 1/4T*
51/2, 1/2T*
61
127
96
48
0
Max
Min
Bank 1 Bank 2 Bank 4Bank 3
Volume level
,
,
,
,

Mastering TRACKFORMER Operations
EN-15
Grouping Pads
Sounding a grouped pad while the sound of another
one of the group’s pads is sounding will cause the
previous pad’s sound to stop. TRACKFORMER
supports configuration of two groups per bank. This
function is supported only while TRACKFORMER
settings are configured as described below.
Tone type of all pads: Drum
Pad tones: Sound or sample
1.
Enter the PAD ACTION mode.
2.
Press a pad you want to include in the group.
3.
Press sequence step key 8(Group 1) or 9
(Group 2) to assign a group number.
This causes the sequence step key you pressed to flash
and adds the pad you selected in step 2 to the group.
•To remove the pad from the group, press sequence
step key 8or 9again so the key stops flashing and
remains lit.
4.
Repeat steps 2 and 3 to add other pads to the
group.
Entering the TOGGLE Mode
You can configure a pad to remain depressed until you
press it a second time.
1.
Enter the PAD ACTION mode.
2.
Press the pad you want to configure.
3.
Press sequence step key 11 so it is flashing.
This puts the pad in the TOGGLE mode.
•Each press of sequence step key 11 toggles the
TOGGLE mode between enabled (flashing) and
disabled (lit).
Configuring the Effect Target
You can configure settings so effects are applied to a
particular bank, or to the internal sound source or
external sound source only.
NOTE
•This setting can be changed while the pad type is
effect.
1.
Enter the PAD ACTION mode.
2.
Press the pad you want to configure.
3.
Use the sequence step keys to select the
effect target.
Setting
Display
Message
Sequence
Step Key
Status
Description
All 13, 14,
15: Lit
Effects are applied to all
sounds.
Current
Bank
13: Flashing Effects are applied to
the currently selected
bank only.
Internal 14: Flashing Effects are applied to
the internal sound
source (Internal) or
external sound source
(External) only. Each
press of this key cycles
the setting in the
following sequence:
Internal sound source
3External sound
source 3Disabled
(Off).
External
Bank 1 15: Flashing Select the bank to
which you want to
apply the effect. Each
press of this key cycles
the setting in the
following sequence:
Bank 1 3Bank 2 3
Bank 3 3Bank 4 3
Disabled (Off).
Bank 2
Bank 3
Bank 4

Mastering TRACKFORMER Operations
EN-16
To change the sample playback method
NOTE
•This function can be used while the pad type is
sample.
1.
Enter the PAD ACTION mode.
2.
Press the pad you want to configure.
3.
Use the sequence step keys to select a
playback method.
Use the procedure below to change the initial default
slice length to a value from 1 step to 16 steps.
1.
Enter the SLICE LENGTH mode.
A sequence step key will light to indicate the current
slice length.
2.
Use the sequence step keys to change the
slice length.
Use the procedure below to adjust four equalizer
frequency bands (HIGH, HIGH MID, LOW MID,
LOW).
1.
Enter the MASTER EQ mode.
2.
Use the pads to raise or lower the four
frequency bands.
•Use the VALUE knob to make fine adjustments.
•You can select a frequency band by pressing a pad,
and then change the frequency to be adjusted by
moving the ASSIGNABLE fader.
■Selectable Frequencies
Entering the METRONOME mode causes the
metronome to sound. To turn off the metronome, hold
down the FUNCTION selector button again as you
press sequence step key 15.
Settings
Display
Message
Sequence
Step Key
Status
Description
Gate 13, 14: Lit The sample is played
once until the end, as
long as the pad is kept
depressed. Releasing
the pad stops sample
playback.
Loop 13: Flashing Sample playback
repeats as long as the
pad is depressed.
One-Shot 14: Flashing Pressing the pad plays
back the sample once,
all the way through.
Changing the Initial Default
Slice Length
Using the Equalizer
Band Frequency
LOW 50Hz, 100Hz, 200Hz, 400Hz, 800Hz
LOW MID 100Hz, 250Hz, 630Hz, 1.3kHz, 4kHz
HIGH MID 250Hz, 630Hz, 1.3kHz, 4kHz, 8kHz
HIGH 6kHz, 8kHz, 10kHz, 13kHz, 16kHz
Using the Metronome
+12
+6
LOW LOW MID HIGH MID HIGH
0
−
−
12
Max
Min
Frequency bands

EN-17
Configuring Other Settings
This section explains how to configure global TRACKFORMER and sequence settings.
1.
While holding down the FUNCTION selector button, press sequence step key 16.
2.
Press the pad (1through 6) that corresponds to the menu you want to access.
3.
Press pad 16 (ENT).
This displays the menu you selected.
4.
Press the pad that corresponds to the menu item you want to select.
This will cause the pad of the selected item to flash.
5.
Press pad 16 (ENT) to cycle through available settings.
•You can also use the VALUE knob to change the displayed setting.
•Pressing the EXIT button returns to the menu display in step 2 above.
Configuring Settings
Menu and Setting List
Pad Number, Display
Message Overview Settings
1Menu for configuring and saving settings for each sequence. These settings are
not saved by the Auto Resume function.
1Maximizer. Adjusts overall sound pressure. Off, 30, 60, 90*
2Reverb Send. This parameter adjusts reverb. 0, 10, 20, 40, 80,
127*
2Menu for configuring TRACKFORMER input and output audio settings.
1Speaker Out. Off: Output from TRACKFORMER’s speakers is disabled. Off, On
2Stereo Imager. Outputs a stereo effect. A larger value increases the stereo effect. Off, T01, T02,
T03
3Noise Gate. On: External input sound below a fixed level is cut, which reduces
noise.
Off, On
3Menu for configuring MIDI settings.
1Local Control. Off: No sound produced when a pad is tapped. Off, On
2MIDI Control. On: MIDI message input and output is enabled. Off, On

Configuring Other Settings
EN-18
4Menu for configuring knob, fader, and button operation settings.
1Fader Curve. Changes the fader curve of the MIX FADER. 00, 01, 02
2Fader Assign. Assigns a function to the ASSIGNABLE fader.
Off: No function assigned, SCR: Scratch effect, BND: Pitch bender effect, EFT:
Effect
Off, SCR, BND,
EFT
3Scratch Weight. Specifies how the scratch effect (SCR) is applied when it is
assigned to the ASSIGNABLE fader.
LT: Effect fully applied with small fader movement.
MID: Medium
HVY: Not much effect applied even with large fader movement.
LT, MID, HVY
4Effect Knob Reflect. On: Applied effect depends on the current position of the
FX1 or FX2 knob. Off: Applied effect is the last effect applied or the initial default
effect.
Off, On
5Effect Knob Target. Specifies the effects that are adjusted by the effect knob.
All: All effects
Lst: Last effect applied
All, Lst
6Record Controller.
Specifies whether or not FX1 and FX2 knob operations are recorded.
Off, On
7Restart. On: Always starts playback from the beginning whenever sequence
playback started by pressing the PLAY button. Off: Resumes playback from the
location where playback last stopped.
Off, On
8Pad Freeze. Specifies whether or not to return pad tone settings to their initial
defaults after all pad tones are changed.
On: Settings are saved, Off: Returns to initial default settings
• When the pad tone type is one that cannot be selected by an all pad tone that
was selected, all of the pad tones are returned to their initial defaults regardless
of this setting. For example, if a pad’s tone was changed to a sound and all pad
tones were changed to melody type, the tones of all of the pads will be returned
to their initial defaults, even if this setting is “On”.
Off, On
5Menu for configuring sampling settings.
1Sampling Tempo Sync. On: Sampled sounds are synced with the sequence tempo
when played back. The pitch of the sound also changes in accordance with the
tempo. Off: Sampled sounds are always played back at their tempo when they
were sampled.
This function can be used while all pad tones are drum type, and the pad tones
are samples.
Off, On
2Auto Sampling. Specifies the timing when sampling starts.
On: Sampling starts upon sound input after the REC button is pressed.
Off: Sampling starts as soon as the REC button is pressed.
• This setting is disabled automatically when the sampling pre-count setting
(below) is enabled (On).
Off, On
3Sampling Pre-count. On: Sampling starts after a four-beat count. Off, On
4Sampling Threshold. Sampling starts when the sound being sampled reaches a
preset threshold level. This setting is valid only when the Auto Sampling setting
(above) is enabled (On).
0-127
5External Only. On: Only external sound sources are recorded. Off, On
External Vol. Internal Vol.
EXT INT
External Vol. Internal Vol.
EXT INT
External Vol. Internal Vol.
EXT INT
MIX FADER position
00
MIX FADER position
01
MIX FADER position
02
Other manuals for XW-PD1 Trackformer
1
Table of contents
Other Casio Dj Equipment manuals
Popular Dj Equipment manuals by other brands

Equinox Systems
Equinox Systems EQLED054 user manual

Strand
Strand CANTATA LED FRESNEL user manual

HC Stage Lighting
HC Stage Lighting HC-035 Series user manual

Chauvet
Chauvet SM-75 user guide

Chauvet Professional
Chauvet Professional Ovation F-95WW Quick reference guide

Elation
Elation ARTISTE DAVINCI user manual