manuals.online logo
Brands
  1. Home
  2. •
  3. Brands
  4. •
  5. Casio
  6. •
  7. Watch
  8. •
  9. Casio 1993 User manual

Casio 1993 User manual

1993/2075-1
Module No. 1993/2075
ABOUT THIS MANUAL
AC
B
M
L
P
(LIGHT)
(MODE)
AC
B
M
L
P
(LIGHT)
(MODE)
[Module 1993] [Module 2075]
GENERAL GUIDE
AC
B
M
L
P
Telememo Mode
▲
▲
▲
▲
Identification (ID) Mode Vital Statistics Mode
▲
▲
Timekeeping Mode
Alarm Mode
Stopwatch Mode
•TheoperationalproceduresforModule1993and2075areidentical.Alloftheillustrations
in this manual show Module 1993.
•Button operations are indicated using the letters shown in the illustration.
•Press Mto change from mode to mode. Each mode is explained in detail on the
following pages.
•In any mode, press Lto illuminate the display.
TIMEKEEPING MODE
In addition to normal timekeeping, the Timekeeping Mode
is also used to set the current time and date, and to turn the
EL alarm on and off.
•IntheTimekeepingMode,graphicareaindicatescounting
of seconds.
To set the time and date
1. Press Awhile in the Timekeeping Mode. The seconds
digits flash on the display because they are
selected
.
2. Press Mto change the selection in the following
sequence.
Seconds Hour Minutes 12/24-hour
format
Year
MonthDay
3. While the seconds digits are selected (flashing), press Bto reset the seconds to 00.
If you press Bwhile the seconds count is in the range of 30 to 59, the seconds are
reset to 00 and 1 is added to the minutes. If the seconds count is in the range of 00
to 29, the minutes count is unchanged.
4. Whileany other digits (besides seconds) are selected(flashing), pressBto increase
the number. While the 12/24-hour setting is selected, press Bto switch between the
two formats.
•Holding down Bchanges the current selection at high speed.
•When the 12-hour format is selected, the 12H indicator appears on the display. With
the 12-hour format, the P(PM) indicator appears on the display to indicate “p.m.”
times. There is no indicator for “a.m.” times.
•Selecting the 24-hour format causes the 24H and the 24 indicators to appear on the
display.
5. After you set the time and date, press Ato return to the Timekeeping Mode.
•The day of the week is automatically set in accordance with the date.
•The date can be set within the range of January 1, 1995 to December 31, 2039.
•If you do not operate any button for a few minutes while a selection is flashing, the
flashing stops and the watch goes back to the Timekeeping Mode automatically.
AC
B
M
L
P
Month – Day
Year
MinutesSeconds
PM indicator
Hour
Day
of week
Graphic area
To turn the EL alarm on and off
In the Timekeeping Mode, hold down Bfor one or two
seconds to toggle the EL alarm on ( displayed) and off
(not displayed).
•The EL alarm on indicator remains on the display in all
modes until you switch the EL alarm off.
•The above operation controls operation of the EL alarm
only. It does not affect operation of audible tones and
signals.
•When an alarm is reached while the EL alarm is turned
on,the flashing of thebacklight and the timing ofthe alarm
tones may not be exactly matched. This is normal and
does not indicate malfunction.
BACKLIGHT
The backlight uses an EL (electro-luminescent) panel that causes the entire display to
glow for easy reading in the dark.An ELalarm feature can be turned on so the backlight
flashes whenever an alarm or hourly time signal sounds.
•Pressing Lin any mode illuminates the display for about three seconds, regardless
of the EL alarm on/off setting.
•The backlight of this watch employs an electro-luminescent (EL) light, which loses its
illuminating power after very long term use.
•The backlight remains lit for about three seconds from the point you press L, even if
it already lit when you press L. If you keep Ldepressed for one or two minutes, the
backlight will automatically turn off.
•The illumination provided by the backlight may be hard to see when viewed under
direct sunlight.
•The backlight automatically stops illuminating whenever an alarm sounds.
•The watch will emit an audible sound whenever the display is illuminated. It does not
indicate malfunction of the watch.
AC
B
M
L
P
EL alarm on indicator
TELEMEMO MODE
The Telememo Mode lets you store up to 20*pairs of name
and telephone number data. Stored data is sorted
automatically into alphabetic sequence based on the
characters of the name.
*TheTelememoMode shares memory with theIdentification
(ID) Mode. This means that the maximum number of
Telememo Mode entries you can store is reduced by one
each time you store Identification Mode.
To check remaining memory
In the Telememo Mode, hold down Band Cto display
how much memory remains for input of data. The value that
appearsshowshowmanymoredataitems(TelememoMode
and ID Mode) you can input.
•This watch has three built-in ID Mode titles, which are programmed in memory when
you first purchase the watch and which are automatically set whenever the watch’s
battery is replaced. Because of this, the remaining memory display shows a value of
17 (20 – 3) whenever it is performed immediately after you purchase the watch or
have the battery changed.
To input new Telememo data
1. In the Telememo Mode, press Bor Cuntil the new
data screen appears.
•If there is no Telememo data stored in memory yet, the
new data screen appears as soon as you enter the
Telememo Mode.
•If the message FULL appears in the text area, it means
that memory is full. To store more data, you will first have
to delete some of the data stored in memory.
2. Press Aand a cursor appears in the text area.
3. Input a name in the text area and a telephone number in
the number area.
•You can input up to eight characters in the text area, and
12 digits in the number area.
AC
B
M
L
Number area
AC
B
M
L
Cursor
Text area
Text area
Mode indicator
Number area
[New Data Screen]
Use Band Cto input characters, and Mto move the cursor around the display.
For details, see “How to input characters”.
•Makesure that you distinguishbetween the letter Oand the number0(zero).Inputting
a zero for the letter Owill affect automatic sorting.
4. After inputting your data, press Ato store it and return to the Telememo Mode.
•The text area can show only five characters at a time, so longer messages scroll
continuously right to left.
1993/2075-2
IDENTIFICATION (ID) MODE
With the Identification (ID) Mode, you can input up to 20*
setsofdata, each of which contains atitle(such as passport,
creditcard, etc.) and a number.Dataisautomaticallysorted
into the alphabetic sequence of the titles.
*The ID Mode shares memory with the Telememo Mode.
This means that the maximum number of ID Mode entries
you can store is reduced by one each time you store
Telememo Mode.
Important!
The ID Mode is useful for storing important data like passport numbers, license numbers,
credit card numbers, etc. Note, however, that storing such important data in the watch’s
memoryruns the risk of it being misused should you lendthe watch to someone, or should
the watch become lost or stolen. Because of this, the manufacturer strongly recommends
that you store such important information in coded form that cannot be understood by
others.
Note that CASIO COMPUTER CO., LTD. shall not be held liable to you or any third party
for any losses or damages suffered through the misuse of data stored in the memory of
this watch.
About titles
•This watch has three built-in ID Mode titles: PASSPORT, LICENSE, and
CREDIT (credit card). You can use these built-in titles as they are, append eight
morecharacters to a built-in title(to indicate a creditcardcompany name, for example),
or change a built-in title to a different one.
•In addition to the three built-in titles, you can also input your own titles, up to eight
characters long.
•You can input more than one set of data using the same title.
About automatic sorting
ID Mode data items are automatically sorted according to their titles. The three built-in
titles come first, followed by the titles you input, in alphabetical order.
To check remaining memory
In the ID Mode, hold down Band Cto display how much
memory remains for input of data. The value that appears
shows how many more data items (Telememo Mode and
Identification Mode) you can input.
•This watch has three built-in ID Mode titles, which are
programmedinmemorywhen you first purchase the watch
and which are automatically set whenever the watch’s
batteryisreplaced.Because of this, the remaining memory
display shows a value of 17 (20 – 3) whenever it is
performed immediately after you purchase the watch or
have the battery changed.
To input new ID Mode data
1. In the ID Mode, press Bor Cuntil the text area of the
display shows either one of the built-in titles or the new
data screen.
•If the message FULL appears in the text area, it means
that memory is full. To store more data, you will first have
to delete some of the data already stored in memory.
2. Press Aand the characters in the text area begin to
flash.
3. Use Band Cto display a built-in title or new title input
(-----). Each press of Band Cchanges the
selected title in the following sequence.
Press B
PASSP
(PASSPORT) LICEN
(LICENSE) CREDI
(CREDIT) -----
Press C
To recall Telememo data
In the Telememo Mode, press Bto scroll forward through stored data items or Cto
scroll in reverse.
•Holding down either button scrolls through the data at high speed.
•The data item that is displayed when you exit the Telememo Mode is still displayed the
next time you enter the Telememo Mode.
To edit Telememo data items
1. In the Telememo Mode, scroll through the data items and display the one you want to
edit.
2. Press Aand a cursor appears in the text area.
3. Use Mto move the cursor to the character you want to change.
4. Change the character.
•See “How to input characters” for details.
5. After making the changes that you want, press Ato store them and return to the
Telememo Mode.
To delete Telememo data
1. In the Telememo Mode, scroll through the data items and display the one you want to
delete.
2. Press Aand a cursor appears in the text area.
3. Press Band Cat the same time to delete the Telememo data item.
•At this time the cursor appears in the text area, ready for input.
4. Input data or press Ato return to the Telememo Mode.
AC
B
M
L
Text area
Mode indicator
Number area
AC
B
M
L
AC
B
M
L
Text area
Number area
[New Data Screen]
•The built-in titles PASSP, LICEN, and CREDI always appear in the above
sequence, along with the display for input of a new title. Titles you previously created
when inputting other data do not appear.
•If you want to input your own title for the data, select -----.
4. Press Mand a cursor appears in the text area.
5. Input a title in the text area and a number in the number area.
•You can input up to eight characters in the text area, and 12 digits in the number area.
Use Band Cto input characters, and Mto move the cursor around the display.
For details, see “How to input characters”.
•If you are using a built-in title, you can append up to eight characters to the built-in title.
•To use a built-in title as it is without appending text, press Meight times to move the
cursor to the number area.
6. After inputting your data, press Ato store it and return to the normal ID Mode data
screen.
•Thetext area can show onlyfivecharacters at a time,solonger titles scroll continuously
right to left.
To recall ID Mode data
In the ID Mode, press Bto scroll forward through stored data items or Cto scroll in
reverse.
•Holding down either button scrolls through the data at high speed.
•The data item that is displayed when you exit the ID Mode is still displayed the next
time you enter the ID Mode.
To edit ID Mode data items
1. In the ID Mode, scroll through the data items and display the one you want to edit.
2. Press Aand the characters in the text area begin to flash.
•You can also use this procedure to edit built-in title names.
3. Use Mto move the cursor to the character you want to change.
4. Change the character.
•See “How to input characters” for details.
5. After making the changes that you want, press Ato store them and return to the ID
Mode.
To delete ID Mode data items
1. In the ID Mode, scroll through the data items and display the one you want to delete.
2. Press Aand the characters in the text area begin to flash.
3. Press Band Cat the same time to delete the ID data item.
4. Press Ato return to the ID Mode.
A
M
C
L
B
Text area
Date of BirthBlood type
Name Number area
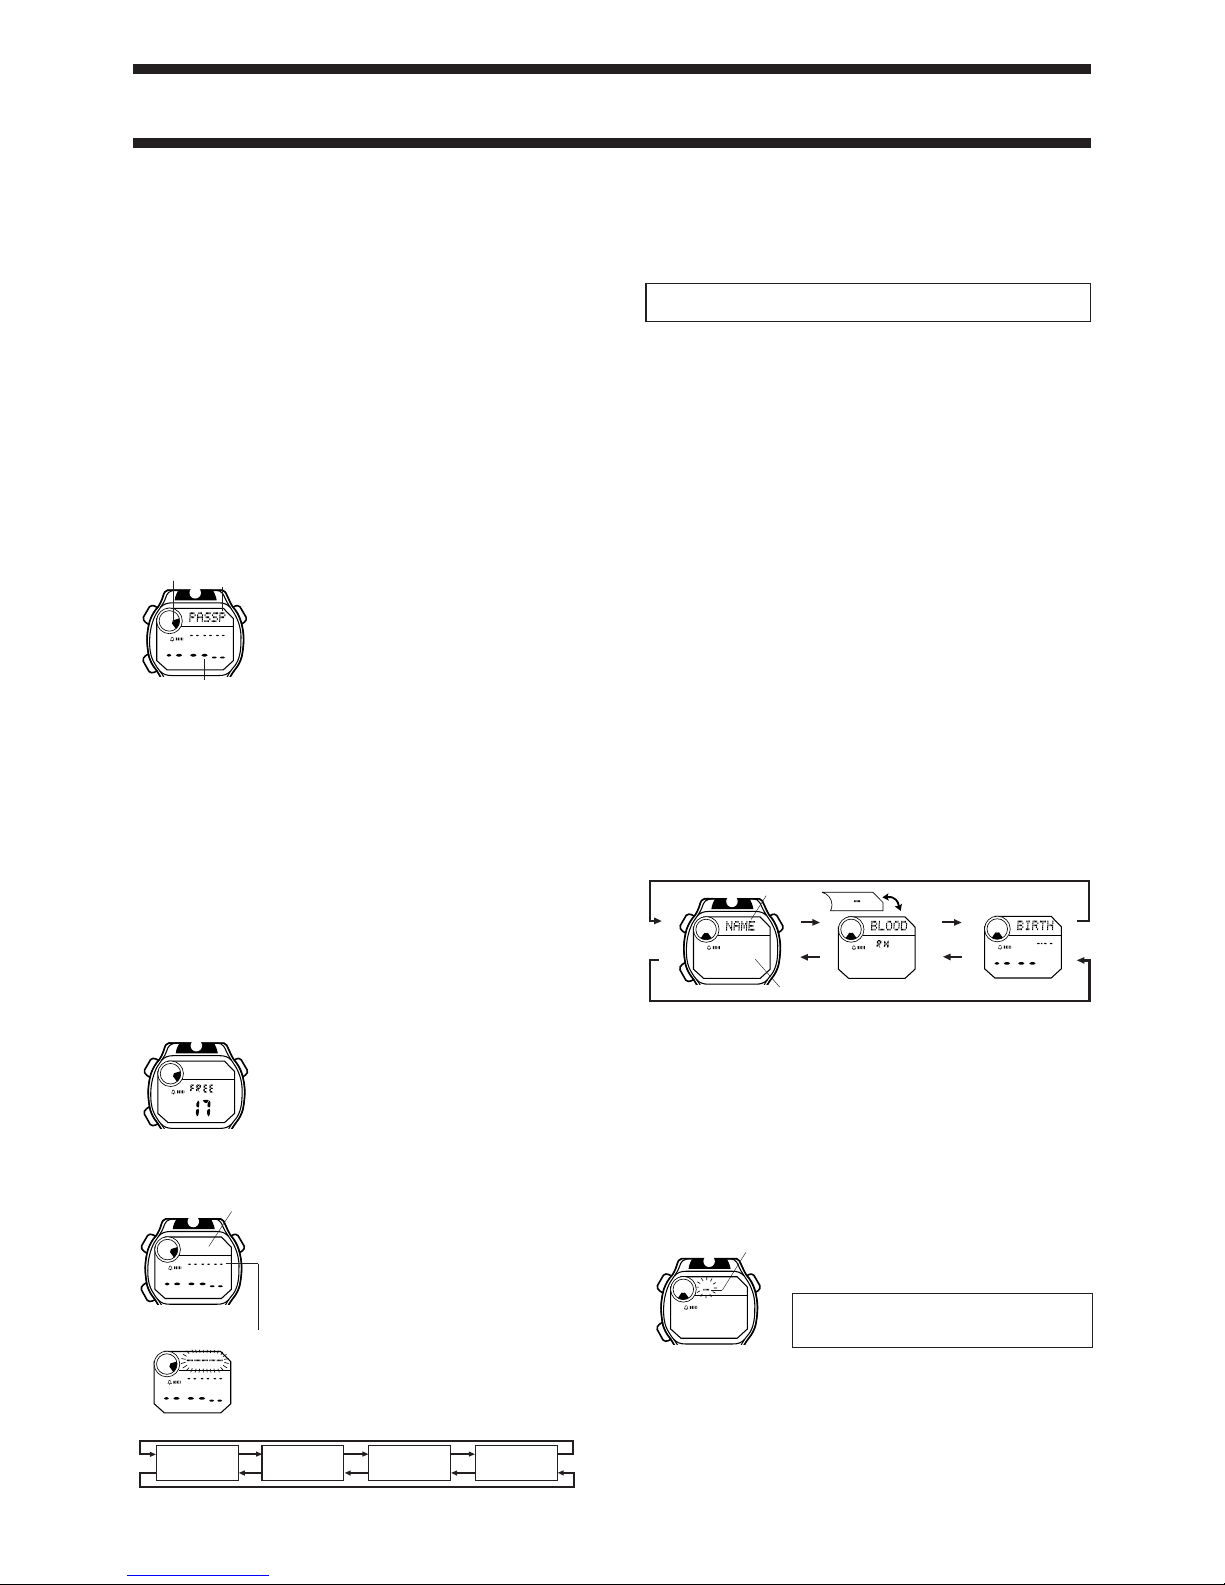
VITAL STATISTICS MODE
The Vital Statistics Mode provides space in memory for storage of your name, blood
type, and the date of your birth.
To recall Vital Statistics data
In the Vital Statistics Mode, press Bor Cto change the data on the display in the
following sequence. Press B
Press C
•The name display always appears first whenever you enter the Vital Statistics Mode.
Important!
•In the blood type display, the text area shows the blood type (A, B, O, AB) and
the number area indicates the Rh factor (+ or –). If no blood type data is stored in
memory (after you purchase the watch or have the battery replaced), the text
area shows “–” and the number area shows “RH”. Since these indicators can
easily be misunderstood as meaning “RH negative,” we recommend that you
input the correct blood type data as soon as possible when necessary.
•Use the Vital Statistics Mode to store your own personal data (name, blood type, date
of birth). Once you input your personal data, take care that the watch is not borrowed
by another person. Otherwise, emergency medical personnel may assume that your
data in the Vital Statistics Mode applies to the person who borrowed the watch.
•Data stored in the Vital Statistics Mode is cleared when you have the battery of the
watch replaced. Be sure to input data again after battery replacement.
To input your name 1. In the Vital Statistics Mode, display the NAME screen.
2. Press Aand a cursor appears in the text area.
3. Input your name into the text area.
•You can input up to 20 characters for your name.
Use Band Cto input characters, and Mto move
the cursor around the display. For details, see “How to
input characters”.
•You can clear the characters currently input for the name by pressing Band Cat the
same time.
4. After inputting your data, press Ato store it and return to the normalNAME screen.
•The text area can show only five characters at a time, so a longer name scrolls
continuously right to left.
AC
B
M
L
Cursor
1993/2075-3
To input your blood type
1. In the Vital Statistics Mode, display the BLOOD screen.
2. Press Aand the blood type ABO appears in the text
area.
3. UseBandCtoscroll through the availableblood types
in the following sequence:
Press B
B- A O AB
Press C
4. Press Mto advance to specification of the Rh factor.
•At this time the current Rh factor (xx or *) will flash on the display.
5. Press Bor Cto select either xx (negative) or *(positive).
6. After inputting your data, press Atostoreitandreturntothe normal BLOOD screen.
To input the date of your birth
1. In the Vital Statistics Mode, display the BIRTH screen.
2. Press Aand the year digits flash in the number area
because they are
selected
.
3. Press Mto change the selection in the following
sequence:
Month
Year Day
4. Press Bto increase the selected digits and Cto decrease them. Holding down
either button changes the selected digits at high speed.
•The year can be set in the range of 1900 to 2039.
5. After inputting your data, press Atostoreitandreturntothe normal BIRTH screen.
AC
B
M
L
Blood type ABO
Rh factor
AC
B
M
L
Year
Month Day
Alarm on indicator
Mode indicator
DailyAlarm
Only Hourly Time
Signal only
Both ON Both OFF
Hourly time signal
on indicator
AC
B
M
L
Minutes
Hour
ALARM MODE
When the DailyAlarm is turned on, the alarm sounds for 20
seconds at the preset time each day. Press any button to
stop the alarm after it starts to sound.
When the Hourly Time Signal is turned on, the watch beeps
every hour on the hour.
To set the alarm time
1. Press Awhile in the Alarm Mode. The hour digits flash
on the display because they are
selected
.
•This operation will turn the Daily Alarm on automatically.
2. Press Mto change the selection in the following
sequence.
Hour Minutes
3. Press Bto increase the selected digits. Holding down Bchanges the selection at
high speed.
•The format (12-hour and 24-hour) of the alarm time matches the format you select for
normal timekeeping.
•Whensettingthe alarm time using the12-hour format, take care to setthe time correctly
as morning (no indicator) or afternoon (P).
4. After you set the alarm time, press Ato return to the Alarm Mode.
To turn the Daily Alarm and Hourly Time Signal on and off
Press Bwhile in the Alarm Mode to change the status of the Daily Alarm and Hourly
Time Signal in the following sequence.
[Hourly Time Signal ON Indicator/Alarm ON Indicator]
To test the alarm
Hold down Cwhile in the Alarm Mode to sound the alarm.
J
J
J
JJ
J
J
J
First runner
finishes.
J
J
J
Record time of
second runner.
J
(a) Elapsed time measurement
BB B B C
Start Stop Re-start Stop Clear
(b) Split time measurement
BC C B C
Start Split Split release Stop Clear
(c) Split time and 1st-2nd place times
BC B C C
Start Split Stop Split release Clear
Second runner
finishes.
Record time of
first runner.
AC
B
M
L
1/100 second
Hours
Seconds
Minutes
Mode indicator
STOPWATCH MODE
The Stopwatch Mode lets you measure elapsed time, split
times, and two finishes. The range of the stopwatch is 23
hours, 59 minutes, 59.99 seconds.
AC
B
M
L
Text area
INPUTTING TEXT
The following describes how to input text in the Telememo Mode, ID Mode, and Vital
Statistics Mode.
How to input characters1. When the cursor is blinking in the text area, use Band
Cto scroll through the available letters, numbers and
symbols, in the following sequence.
Ato Z
0to 9
(space)
:/.-
•Holding down either button scrolls through at high speed.
•You can input English alphabetic characters, numbers, and symbols in the text area.
For a complete list of characters you can input, see the “CHARACTER LIST”.
2. When the character you want at the cursor position is shown, press Mto move the
cursor to the right.
3. Repeat steps 1 and 2 until your text is complete.
•The text area in the Telememo Mode and ID Mode can hold up to eight characters.
When the cursor is located at the eighth space of the text area in these modes, moving
the cursor to the right causes it to jump down to the first digit in the number area. When
the cursor is at the 12th digit of the number area, moving it to the right causes it to jump
back up to the first character of the text area.
•You can input only numbers and spaces in the number area. Each press of Bor C
changes the input at the current cursor location in the following sequence:
0to 9(space)
x
Number area
Press B
Press C
Cursor
Press C
Press B
•If you do not perform any button operation for about two or three minutes while the
cursor is on the display, the watch automatically returns to the normal data display (the
cursor disappears).
1
2
3
4
5
6
7
8
9
10
11
12
13
14
15
16
17
18
19
20
21
22
23
24
25
26
27
28
29
30
31
32
33
34
35
36
37
38
39
40
41
(space)
CHARACTER LIST

This manual suits for next models

1

Other Casio Watch manuals

Casio 3269 User manual

Casio

Casio 3269 User manual

Casio 3406 User manual

Casio

Casio 3406 User manual

Casio 1874 Configuration guide

Casio

Casio 1874 Configuration guide

Casio 5257 User manual

Casio

Casio 5257 User manual

Casio 1402 User manual

Casio

Casio 1402 User manual

Casio DBC32-1A User manual

Casio

Casio DBC32-1A User manual

Casio QW-760 Configuration guide

Casio

Casio QW-760 Configuration guide

Casio 4329 User manual

Casio

Casio 4329 User manual

Casio 3311 User manual

Casio

Casio 3311 User manual

Casio 3513 User manual

Casio

Casio 3513 User manual

Casio 5230 User guide

Casio

Casio 5230 User guide

Casio 5184 User manual

Casio

Casio 5184 User manual

Casio 5625 User manual

Casio

Casio 5625 User manual

Casio 2345 Configuration guide

Casio

Casio 2345 Configuration guide

Casio 3171 User manual

Casio

Casio 3171 User manual

Casio 1879 Configuration guide

Casio

Casio 1879 Configuration guide

Casio 3540 User manual

Casio

Casio 3540 User manual

Casio 3752 User manual

Casio

Casio 3752 User manual

Casio Edifice EQW-510Y-1AV User manual

Casio

Casio Edifice EQW-510Y-1AV User manual

Casio GX56-1ACR User manual

Casio

Casio GX56-1ACR User manual

Casio 5259 User manual

Casio

Casio 5259 User manual

Casio 5603 User manual

Casio

Casio 5603 User manual

Casio 5096 User manual

Casio

Casio 5096 User manual

Casio 5566 User manual

Casio

Casio 5566 User manual

Popular Watch manuals by other brands

Panerai Luminor 1950 instructions

Panerai

Panerai Luminor 1950 instructions

Citizen Eco-Drive CA0 Series instruction manual

Citizen

Citizen Eco-Drive CA0 Series instruction manual

Muhle Lunova Datum manual

Muhle

Muhle Lunova Datum manual

Gold-East Electronic GE-W70 user manual

Gold-East Electronic

Gold-East Electronic GE-W70 user manual

Citizen MIYOTA GP52 manual

Citizen

Citizen MIYOTA GP52 manual

Seiko KINETIC Basic operation instructions

Seiko

Seiko KINETIC Basic operation instructions

Freestyle MacDaddy 813 instructions

Freestyle

Freestyle MacDaddy 813 instructions

LAIMER MIYOTA 82S5 instruction manual

LAIMER

LAIMER MIYOTA 82S5 instruction manual

Vestal The Brig instruction manual

Vestal

Vestal The Brig instruction manual

Citizen 41 series instruction manual

Citizen

Citizen 41 series instruction manual

Timex 127-095000 user manual

Timex

Timex 127-095000 user manual

Sami wearable space kids WS-2371 user manual

Sami

Sami wearable space kids WS-2371 user manual

Stuhrling J1 instruction manual

Stuhrling

Stuhrling J1 instruction manual

Shanling Q1 Advanced user's manual

Shanling

Shanling Q1 Advanced user's manual

Elliot Brown The Canford user guide

Elliot Brown

Elliot Brown The Canford user guide

Chronos Manufactures Mathieu Legrand Dodecagone MLG-1006-A Instruction manual / International Guarantee

Chronos Manufactures

Chronos Manufactures Mathieu Legrand Dodecagone MLG-1006-A Instruction manual / International Guarantee

Ronda Startech 5130.D user manual

Ronda Startech

Ronda Startech 5130.D user manual

Junghans J615.74 Instructions for use

Junghans

Junghans J615.74 Instructions for use

manuals.online logo
manuals.online logoBrands
  • About & Mission
  • Contact us
  • Privacy Policy
  • Terms and Conditions

Copyright 2025 Manuals.Online. All Rights Reserved.