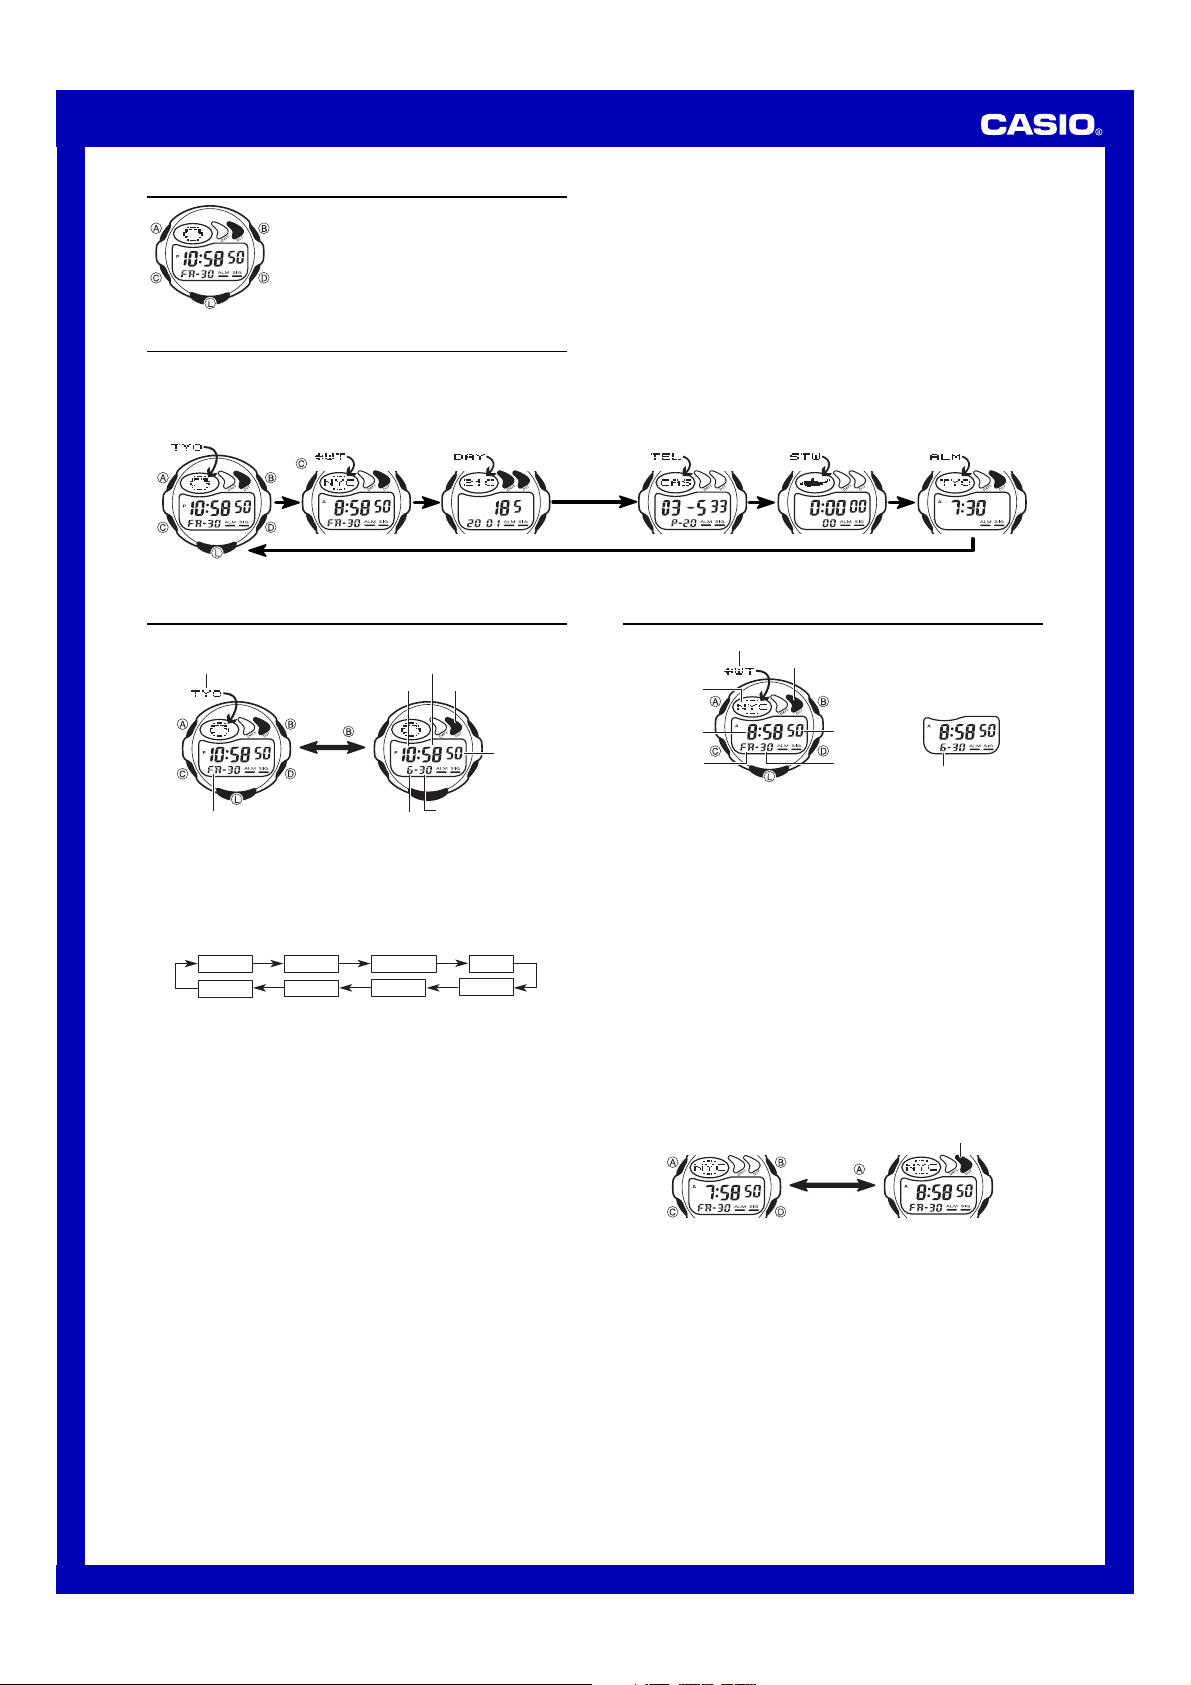
Operation Guide 2516
2
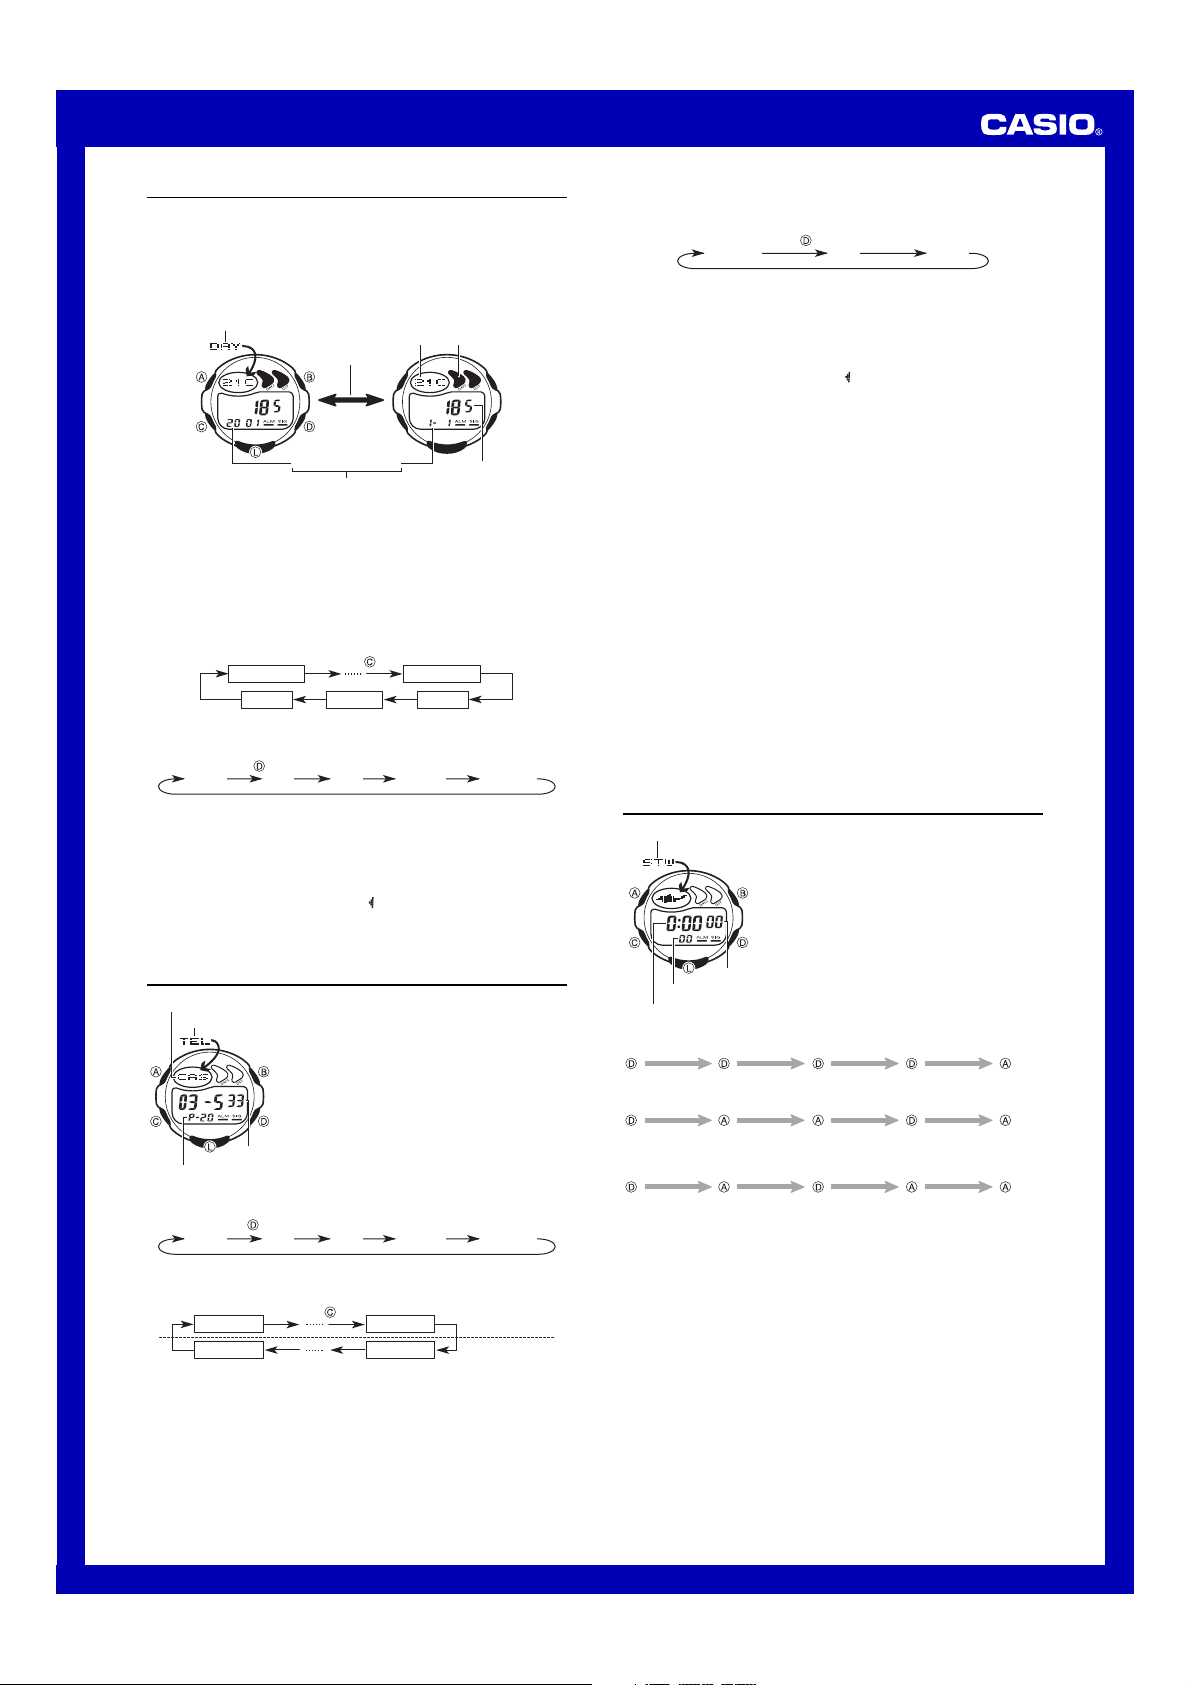
Day Counter Mode
The Day Counter Mode lets you count the number of days from the Timekeeping
Mode’s current date to a specific target date.
This watch has five day counters. You can assign text titles up to eight characters long
to each of the five Day Counters. Whenever the date specified by any one of the day
counters matches the date of the Timekeeping Mode (regardless of the day counter’s
year setting), the DAYS indicator flashes on the Timekeeping Mode screen. In the Day
Counter Mode, the DAYS indicator flashes on the screen of the particular day counter
whose date matches the date of the Timekeeping Mode.
The initial default date for all Day Counters is January 1, 2001.
Year Month - Day
Tar
et date
Numbers of day
Text DAYS indicator
Mode indicator
Alternate at
the 1-second
interval.
•The day counter on the display when you exit the Day Counter Mode appears first
the next time you enter the Day Counter Mode.
Recalling Day Counter Data
In the Day Counter Mode, use D(+) and B(–) to scroll through the day counters.
To set the target date
1. In the Day Counter Mode, use D(+) and B(–) to display the day counter you want
to set.
2. Hold down Auntil the flashing cursor appears in the text area. This indicates the
input screen.
3. Press Cto move the flashing in the sequence shown below.
1st digit
Day
8th digit
Year
Month
Press .
4. While the cursor is in the text area, use Dto scroll through characters at the
current cursor position. Characters scroll in the sequence shown below. Holding
down Dscrolls at high speed.
Press .
(Space) A to Z 0 to 9 . (Period) -(Hyphen)
5. While the cursor is in the date area, press Dto scroll through digits at the current
cursor position. Holding down Dscrolls at high speed.
•Press Band Dat the same time, and the message “CLR”appears in the
display. The characters in the text area are cleared and today’s date is set as the
target date. You can then make any changes in the date you want.
6. After you make the settings you want, press Ato exit the input screen.
•The date can be set within the range of January 1, 1940 to December 31, 2039.
•The text area display can show only three characters at a time. Longer text scrolls
continuously from right to left. The symbol “”indicates that the character to the left
is the last, and the character to the right is first.
Telememo Mode
The Telememo Mode lets you store up to 20 records,
each with a name (up to eight characters) and a phone
number (up to 12 digits). You can recall records by
scrolling through them on the display.
•The page number on the display when you exit the
Telememo Mode appears first the next time you enter
the Telememo Mode.
To input a new Telememo record
1. In the Telememo Mode, use D(+) and B(–) to scroll
through the Telememo records and display the one you
want to input data.
2. Hold down Aand a cursor appears on the name area.
Mode indicator
Pa
e number
Name area
Number
area
3. Use Dto scroll through characters at the current cursor position. Characters scroll
in the sequence shown below.
(Space) A to Z 0 to 9 . (Period) -(Hyphen)
Press .
•Holding down Dscrolls at high speed.
4. When the character you want is at the current cursor position, press Cto move the
cursor to the right.
1st digit 8th digit
12th digit 1st digit
Name area
Number area
Press .
5. Repeat the steps 3 and 4 to input the rest of the characters.
•You can input up to eight characters for the name, though only three characters
are visible at a time. If the name you input has fewer than eight characters, use
Cto move the cursor to the eighth space (which means you would press C
three times after inputting a five-character name).
6. After you input the name, use Cto move the cursor to the number area.
•Pressing Cwhile the cursor is located at the eighth character of the name area
advances to the number area. Pressing Cwhile the cursor is located at the 12th
digit of the number area returns to the name area.
7. Use Dto scroll through characters (hyphen, numbers, space) at the current cursor
position on the number area. Characters scroll in the sequence shown below.
Press .
(Space)
0 to 9-(Hyphen)
•Holding down Dscrolls characters at high speed.
8. When the character you want is at the cursor position, press Cto move the cursor
to the right.
9. Repeat steps 7 and 8 to input the rest of the numbers you want.
•You can input up to 12 digits for the number.
10. After inputting the name and number of the record, press Ato store it and exit
the setting screen.
•The display can show only three name characters at a time. Longer names scrolls
continuously from right to left. The symbol “”indicates that the character to the left
is the last, and the character to the right is the first.
•The number area can show up to six digits at one time. If a number has more than
six digits, the display automatically switched between the first six digits (counting
forward from the first digit) and the last six digits (counting backward from the last
digit) of the number. This means that if a number is 12 digits long, the number area
switches between the first six digits and the last six digits. If a number is seven digits
long, the number area switches between digits 1 through 6, and 2 through 7.
To recall Telememo data
In the Telememo Mode, use D(+) and B(–) to scroll through Telememo records on
the display.
•Holding down Bor Dscrolls at high speed.
To edit Telememo data items
1.
In the Telememo Mode, scroll through the records and display the one you want to edit.
2. Hold down Auntil the cursor appears in the display.
3. Use Cto move the cursor to the character you want to change.
4. Use Dto change the character.
•See step 3 of “To input a new Telememo record”for information on inputting name
characters, and step 7 for inputting number characters.
5. After making the changes that you want, press Ato store them and exit the setting
screen.
To delete a Telememo record
1.
In the Telememo Mode, scroll through the records and display the one you want to delete.
2. Hold down Auntil the cursor appears in the display.
3. Press Band Dat the same time. The message “CLR”appears in the display,
indicating that the record was deleted.
•After the record is deleted, the cursor appears in the name area, ready for input.
4. Input a new record or press Ato exit the setting screen.
Stopwatch Mode
The stopwatch lets you measure elapsed time, split times,
and two finishes.
•The display range of the stopwatch is 23 hours,
59 minutes, 59.99 seconds.
•The stopwatch continues to run, restarting from zero
after it reaches its limit, until you stop it.
•The stopwatch measurement operation continues even
if you exit the Stopwatch Mode.
•Exiting the Stopwatch Mode while a split time is frozen
on the display clears the split time and returns to
elapsed time measurement.
•All of the operations in this section are performed in the
Stopwatch Mode, which you enter by pressing C.
Mode indicator
Hours : Minutes
Second
1/100 second
Elapsed time measurement
Stop Re-start Stop Clear
Start
Start
Split
(SPL displayed)
Split release Stop Clear
Start Split Stop Split release Clear
Split time measurement
Split time and 1st-2nd place times
First runner
finishes.
Display time of
first runner.
Second runner
finishes. Display time of
second runner.


 User manual")