Cata DWI45M User manual

DWI45M

Dishwasher Features.................................... ...3
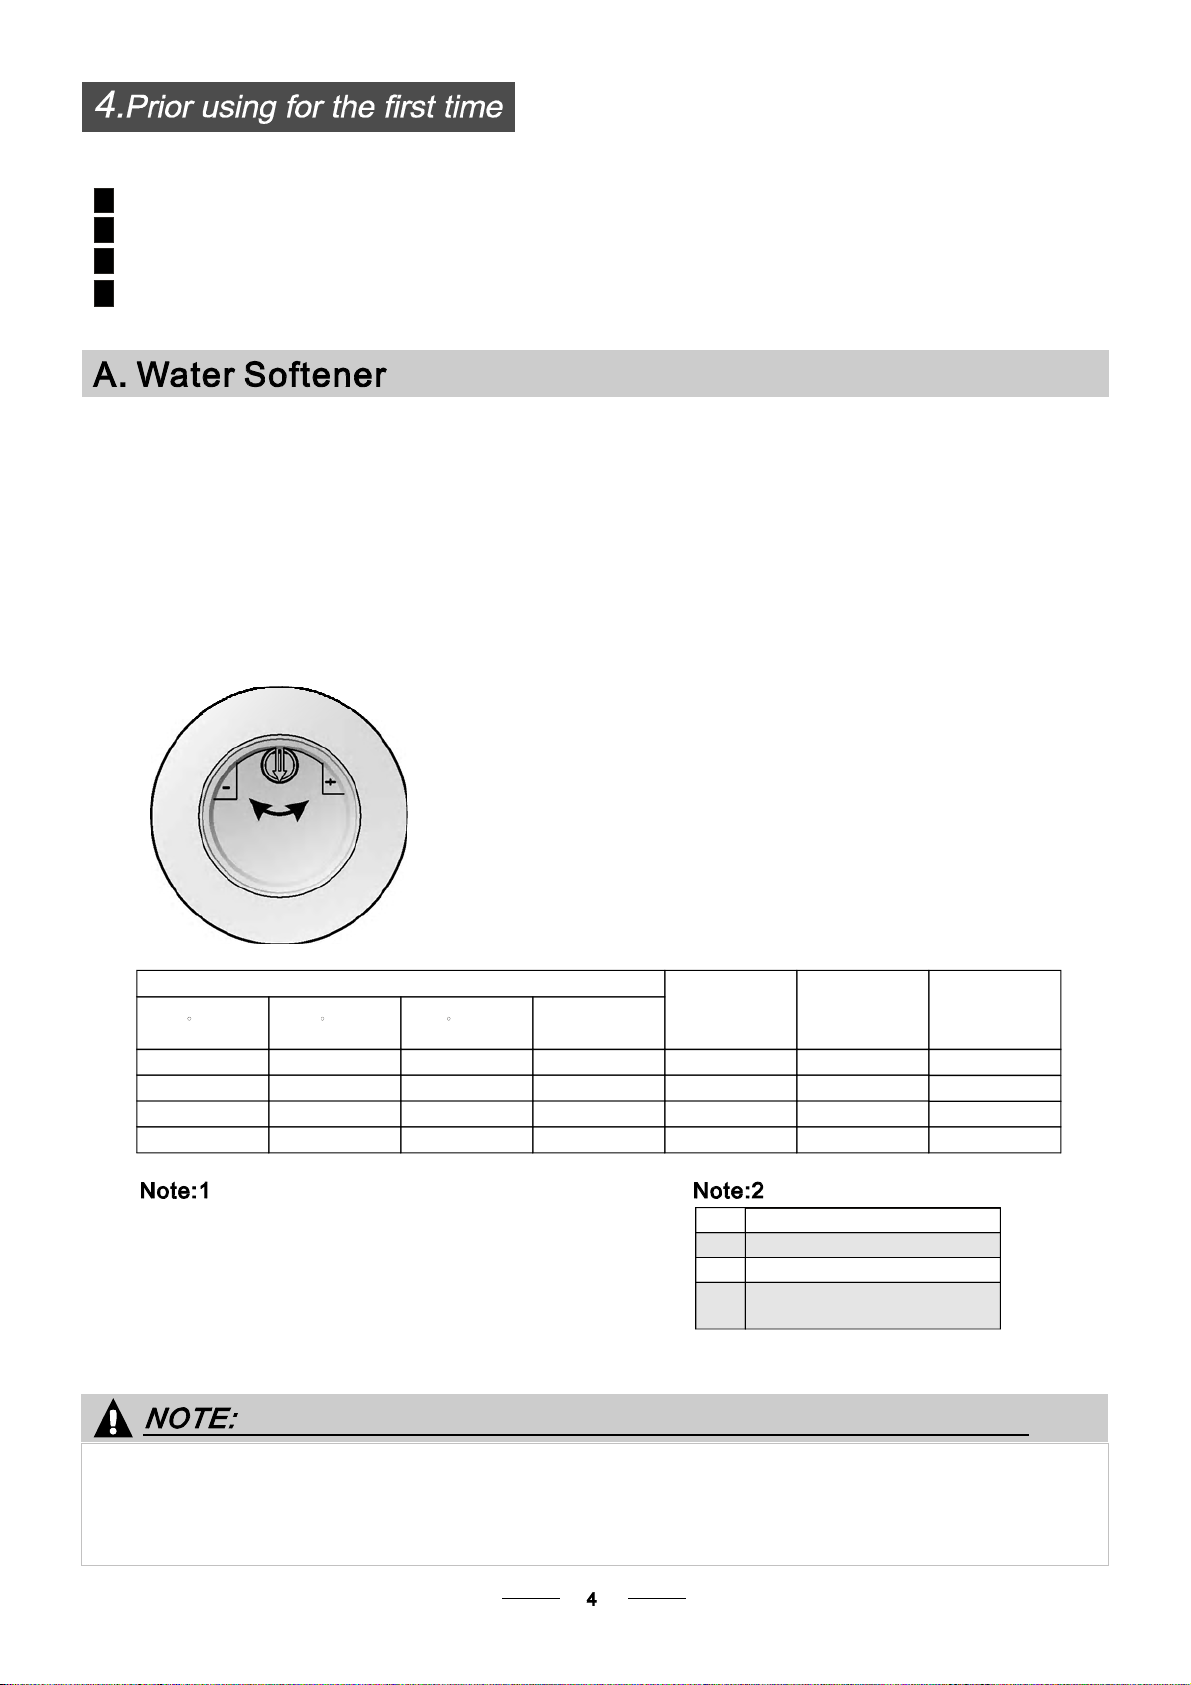
A Water Softener..................... ....................4、..
Attention before or after loading the Dishwasher
Baskets..........................................................9
Filtering System.............................................15
Caring for the Dishwasher..................... .........16.
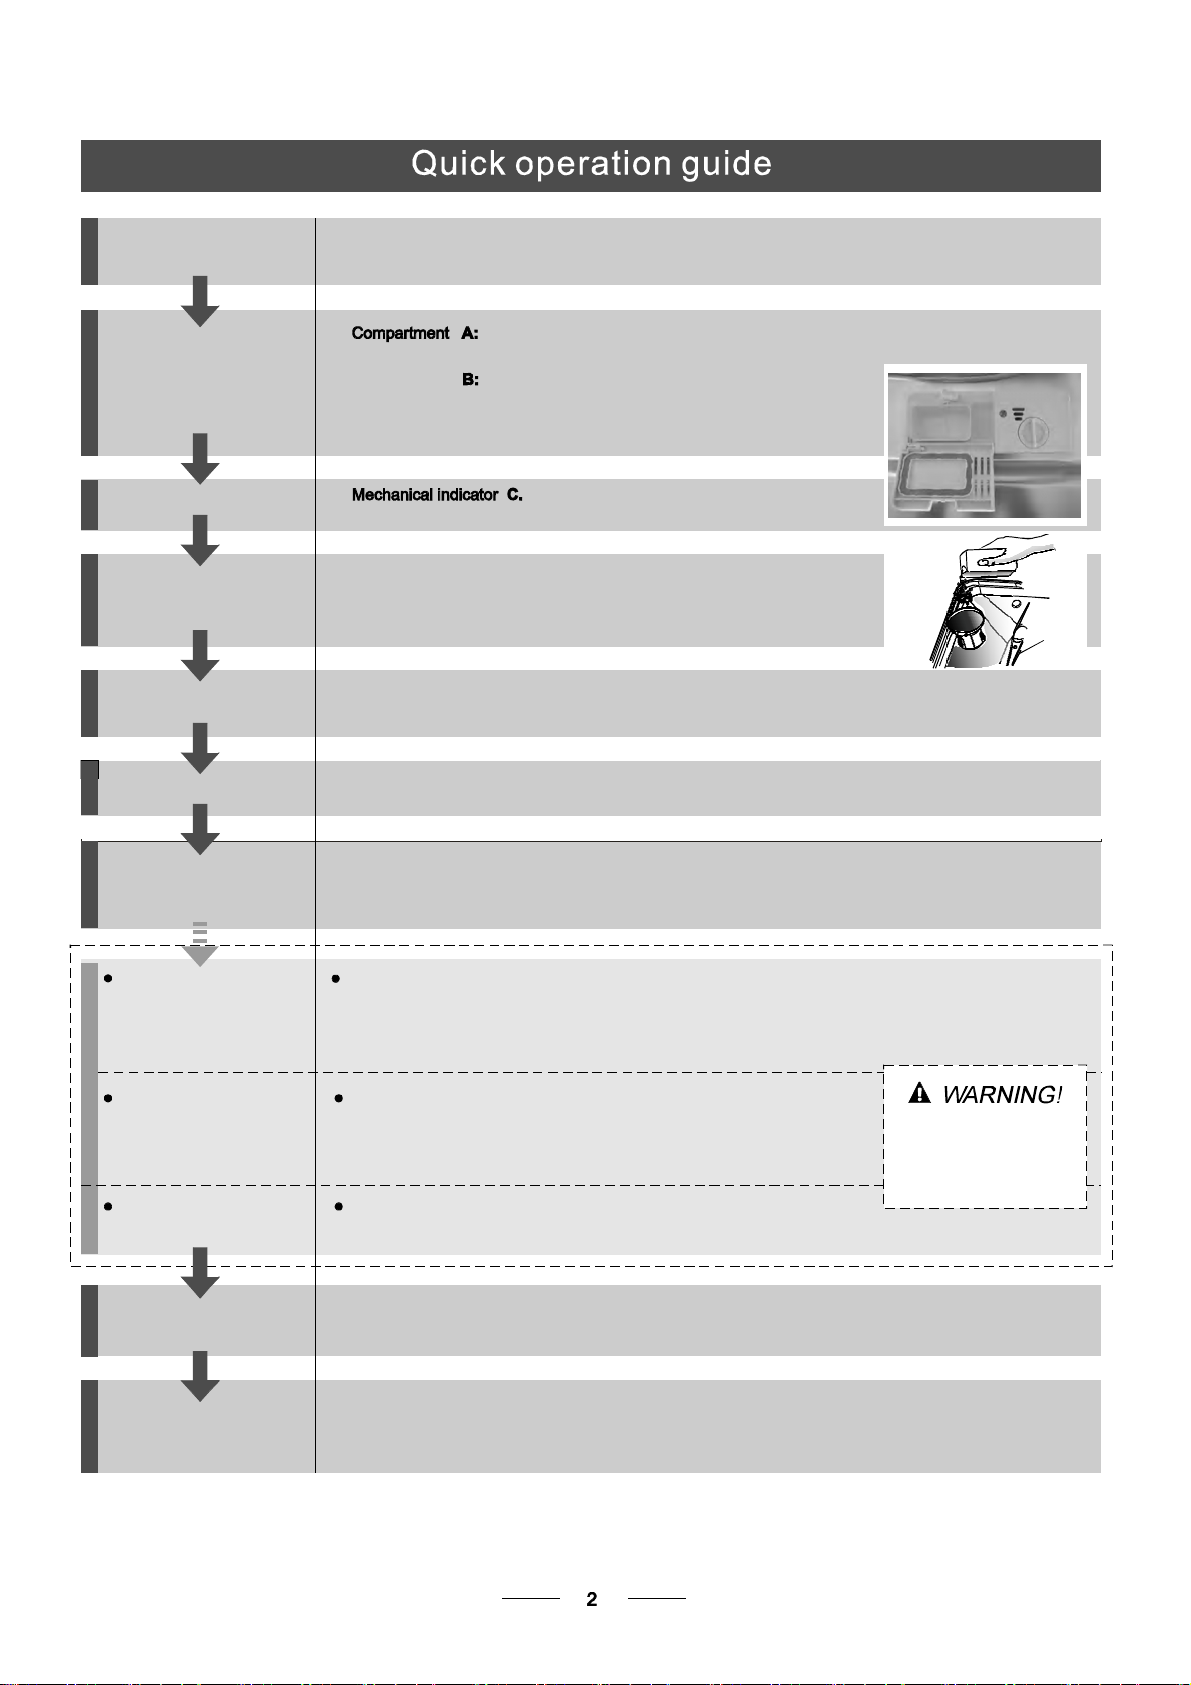
B Loading theSalt into the Softener.................5、
C Fill the RinseAidDispenser.........................5、
D FunctionofDetergent.................................6
、
Loading the upper ...............................10Basket
LoadingtheLower ...............................10Basket
Cutlery Basket..............................................12
Therecommended method loading big
dishware.................................................... ...11
WashCycleTable...........................................13
Turning on theAppliance................................14
Changethe Programme.............. ................14....
At the endof theWash Cycle...........................14
Before calling for service........................... .....24.
Errorcodes.................................... ..............25.
Technical information.............................. .....26..
ControlPanel...................................................3
.................................. 17Installation preparation ...18Aesthetic panel's dimensions and installation
..............20Tension adjustment ofthedoor spring
.............................. 20Connection of drain hoses ......................... 21Dishwasher installation steps
About Electricity Connecting...........................22
Cold Water Connection.................................. 23
To review the section on troubleshooting Tips
will help youto solve some common problems
by yourself .
Dear Customer,
Please carefully read this manual before using the
dishwasher, it will help you to use and maintain the
dishwasher properly.
Pass it on to any subsequent owner of the appliance.
This manual contains sections on safety Instructions,
OperatingInstructions,InstallationInstructionsand
Troubleshooting Tips, etc.
The manufacturer, following a policy ofconstant
developmentandupdatingof the product, may
make modifications without giving prior notice.
This usermanualshall alsobe got fromthe
manufactureror responsible vendor.
Keep it to refer to it ata later date.
If you can not solvethe problems by yourself ,
please ask for the help of professional technicians.

Thisapplianceis intended to beused in household
and similarapplicationssuch as:
-staff kitchen areas in shops, offices andother
working environments;
-farm houses;
-by clients in hotels,motels and other residentialtype
environments;
-bedand breakfast type environments.
This appliance can be used by children aged from8
years and above andpersons with reduced physical,
sensory or mental capabilities or lack of experience
and knowledgeif they have been given supervision
or instruction concerning use ofthe appliancein a
safe way and understand the hazards involved.
Children shall not play with the appliance. Cleaning
and user maintenance shall not be made by children
withoutsupervision. For EN60335-1
This appliance is not intended for use by persons
(including children )with reduced physical, sensory
or mental capabilities, or lack of experience and
knowledge ,unless they have been given supervision
or instruction concerning use ofthe appliancebya
personresponsiblefor their safety. ForIEC60335-1
This appliance is for indoor useonly, for household
useonly.
To protect against the risk of electrical shock, do not
immerse theunit, cord or plug in water orotherliquid.
Pleaseunplug before cleaning and maintenance the
appliance.
Use a soft clothmoisten with mild soap, and then use
adryclothtowipeitagain.
()
()
When using your dishwasher,
follow the precautions listed below:

This appliance must be earthed. In the event of a
malfunction or breakdown, earthing will reduce the risk
of anelectric shock by providing a path of least
resistance of electric current. This appliance is equipped
with a cord having an equipment-earthing conductor
and a grounding plug.
The plug must be plugged into an appropriate outlet that
is installed and earthed in accordance with all local
codes and ordinances.
Improper connection of the equipment-earthing
conductor can result in the risk of an electric shock.
Check with a qualified electrician or service
representative if you are in doubt whether the appliance
is properly grounded.
Do not modify the plug provided with the appliance;
If it does not fit the outlet.
Have a proper outlet installed by a qualified electrician.
Do not abuse, sit on, or stand on the door or dish rack of
the dishwasher.
Do not operate your dishwasher unless all enclosure
panels are properly in place.
Open the door very carefully if the dishwasher is
operating, there is a risk of water squirting out.
Do not place any heavy objects on or stand on the door
when it is open. The appliance could tip forward.
When loading items to be washed:
1) Locate sharp items so that they are not likely to
damage the door seal;

2) Warning: Knives and other utensils with sharp points
must be loaded in the basket with their points down or
placed in a horizontal position.
Check that the detergent powder is empty after
completion of the wash cycle.
Do not wash plastic items unless they are marked
dishwasher safe or the equivalent.
For plastic items not so marked, check the manufacturer's
recommendations.
Use only detergent and rinse additives designed for
an automatic dishwasher.
Never use soap, laundry detergent, or hand washing
detergent in your dishwasher.
Children should be supervised to ensure that they do not
play with the appliance.
The door should not be left open, since this could increase
the risk of tripping.
If the supply cord is damaged, it must be replaced by the
manufacturer or its service agent or a similarly qualified
person in order to avoid a hazard.
During installation, the power supply must not be
excessively or dangerously bent or flattened.
Do not tamper with controls.
The appliance is to be connected to the water mains using
new hose sets and that old hose-sets should not be reused.
The maximum number of place settings to be washed
is 9.
The maximum permissible inlet water pressure is 1MPa.
The minimum permissible inlet water pressure is 0.04MPa.

Dispose of the dishwasher packaging material
correctly.
All packaging materialscan be recycled.
Plasticparts are markedwith thestandard
international abbreviations:
PE for polyethylene,e.g. sheet wrapping material
PS for polystyrene, e.g. padding material
POM polyoxymethylene, e.g. plastic clips
PP polypropylene, e.g. Salt filler
ABS Acrylonitrile Butadiene Styrene, e.g. Control
Panel .
Packaging material could be dangerous for children!
Fordisposing of package and theappliance please
go to a recycling centre. Therefore cut off the power
supply cableand make the door closing device
unusable.
Cardboard packaging is manufactured from recycled
paper and should be disposed in the waste paper
collection for recycling.
By ensuringthis productis disposed of correctly, you
will help prevent potential negative consequences
for the environment andhuman health, which could
otherwise be caused by inappropriate waste handling
of this product.
For more detailedinformation aboutrecycling ofthis
product, please contact your local city office andyour
household waste disposal service.
DISPOSAL: Do not dispose this product as unsorted
municipal waste. Collection of such waste separately
for special treatment is necessary.

With each wash cycle.
Compartment
For programmes with pre-wash only.
(Follow the user instructions!)
Electric indicator on control panel (if provided).
Check the rinse aid level
(On models with water softener system only.)
Electric indicator on control panel (if provided).
If there is no salt warning light in the control panel
(for some models), you can estimate when to fill the saltinto
the softener by the number of cycles the dishwasher has run.
Check the regeneration
salt level
Load the baskets
Select a programme
Close the door, turn on the water tap. The machine will start working after about 10 seconds.
Running the dishwasher
Switch off the appliance
Turn off the water tap,
unloadthe baskets
Fill the detergent dispenser
Warning: wait a few minutes (about 15 minutes) before unloading the dishwasher to avoid handling
the dishes and utensils while they are still hot and more susceptible to break.
They willalso dry better.Unload the appliance, starting from the lower basket.
Changing the programme
Addforgottendishesinthe
dishwasher.
Scrape off anylarge amount of leftover food. Soften remnants of burnt food in pans,
then load the baskets. Refer to the dishwasher loading instructions.
Pressthe Programme button until the selected programme lights up.
( See the section entitled Operationg instruction )“”
When theworking cycle has finished, the buzzer of the
dishwasher will sound 8 times, then stop.
Turn off the appliance using the ON/OFF button.
If the appliance is switched
off during a wash cycle.
Open the door carefully.
Hot steam may escape
when the door is opened!
If the appliance is switched off during a wash cycle, when switched
on again, please re-select the washing cycle and operate the dishwasher
according to the original Power-on state ).
Switch on the appliance Press the On/Off button to switch on the appliance,Open the door.
1.Open the door a little to stop the dishwasher.
2.After the spray arms stop working, you can open the door completely.
3.Add the forgotten dishes.
4.Close the door, the dishwasher will start running again after 10 seconds.
For detailed operating method read the corresponding content on the instruction manual.
1.Arunning cycle can only be modified if it has been running for a short time. Otherwise the detergent
may have already been released and the water already drained. If this is the case, the detergent
dispenser must be refilled.
2. Open the door a little to stop the washing, then press the Program button for more than 3 seconds to
cancel the running programme.
3. Select a new programme, then close the door. The machine will restart after about 10 seconds.
ABC

5
23 4 6
Program indicator lights: Show the washing program.
5
3
6
Delayed Start Button and Delayed start indicator lights: Topreset the wash timer and delay thestarting time
to 3 hours, 6 hours, 9 hours or 12 hours. Every press of this buttonchange the delay time, shown by the
delay start indicator lights.
Program button: To select one of the 5 programs.
4
Program indicator lights: Show the washing program.
2
5
Powerindicator light and switch:To turn on/off andshow the power supply.
Saltand rinse aid warning lights: Toshowwhen the salt containeror dispenserneed to be refilled.
3
6
Delayed Start Button and Delayed start indicator lights: Topreset the wash timer and delay thestarting time
to 3 hours, 6 hours, 9 hours or 12 hours. Every press of this buttonchange the delay time, shown by the
delay start indicator lights.
Program button: To select one of the 5 programs.
4
All in1 button and indicator light: To select and showAllin1 function.
11 12
Back View
Front view
MainFilter
Detergent Dispenser
CupShelf
CutleryBasket
CoarseFilter
RinseAid Dispenser
Inlet pipe connector
Drain pipe connector
Lower Basket
SprayArms
Upper Basket
1
Salt Container
beforeusingit forthe first time.
To get the best performance from yourdishwasher,read all operating instructions
5
6
7
8
9
10
12
11
3
24
1
2
3
4
5
6
7
8
9
10
on
Off

The water softener must be set manually, using the water hardness dial.
The water softener is designed to remove minerals and salts from thewater, which would have
a detrimentalor adverse effect on the operation of the appliance. The higher the
content of these minerals and salts, the harder your water is. The softener should be
adjusted according to the hardness of the water in your area.Your local WaterAuthority
can advise you onthehardnessofthewaterinyourarea.
Adjusting Salt Consumption
The dishwasher is designed to allow for adjustment in the amount of salt consumed based onthe hardness of
thewater used. This is intended tooptimiseand customise thelevel of salt consumption.
1. Unscrew the cap from the salt container.
2. There is a ring on the container with an arrow on it (see figure
ontheside),ifnecessary, rotate thering inthe anticlockwise
direction from the "-" Setting toward the "+"sign, based on the
hardnessof the water being used.
It is recommendedthat adjustments shouldbe made in
accordance with the following scheme:
WATER SOFTENER
The hardness ofthe water variesfrom place to place. If hard water is used inthe dishwasher, deposits will
form on the dishesand utensils.
The appliance is equipped with a special softener that uses a salt container specifically designed to eliminate
lime and minerals from the water.
Contact your local water board for information on the hardness of your water supply.
dH mmol/l
0~140~8 0~1.4 /0/
14~398~22 1.4~3.9 - 20 50
39~8022~45 3.9~8 Mid 40 25
+60 16
fH
0~10
10~28
28~56
Clarke
°Clark: British degree
°fH: French degree
°DH: German degree
dH=1.25 Clarke=1.78 fH=0.178mmol/l
°°
WATER HARDNESS
SelectorPosition Salt consumption
(gram/cycle) Auto nomy
(cycles/1kgs)
Please follow the steps below for adjustment in salt consumption.
°
""/
"-"
"+"
"Mid"
Settingtowardthe"+"sign
Settingtowardthe"-"sign
Settingtowardbetween
the "-" sign and "+" sign
No salt need added
45~60 80~107 56~75 8~11
If your model does not have any water softener, you mayskip this section.
Before using your dishwasher for the first time:
A. Set the water softener
C. Filltherinseaiddispenser
D. Fill in detergent
B..
Add 1.5Kg dishwasher salt and then full fill the salt container with water

1. The salt container must only be refilled when the salt warning light in the control panel comes on.
Depending on how well thesalt dissolves, the salt warning light may still be on even though the
salt container is filled.
If there is no salt warning light in the control panel (for some Models),you can estimate when to fill
the salt into the softener by the cycles that the dishwasher has run.
2. If there are spills ofthe salt, a soak or arapid program should be run to remove the excessivesalt.
Always use the salt intended for use with dishwasher.
The salt container is located beneath the lower basket and should be filled as explained
inthe following:
Attention!
Only use salt specifically designed forthe use in dishwashers! Every other type of
salt not specifically designed for theuse in a dishwasher, especially table salt, will
damage the water softener. In case of damages caused by the use of unsuitable
salt the manufacturer does not give any warranty nor is liable for any damages caused.
Only fillwithsalt just before starting one of thecomplete washingprograms.
This will prevent any grains of salt or salty water, which may have been spilled,
remaining on the bottom of the machine for any period of time, which may cause
corrosion.
Therinse aid isreleased during the final rinse to prevent water from forming droplets onyour dishes, which can
leave spots and streaks. Italso improvesdrying by allowing water toroll offthe dishes. Your dishwasheris
designed touseliquidrinseaids.The rinseaiddispenser islocated inside thedoor next to the detergentdispenser.
To fill the dispenser,open the cap and pour the rinse aid into the dispenser until the level indicator turns completely
black. The volume of the rinseaidcontaineris about 110ml.
RinseAid Dispenser
Function of RinseAid
Rinse aid is automatically added during the last rinse, ensuring thorough rinsing, and spot and streak free drying.
Attention!
Only use branded rinseaid for dishwasher. Never fill therinseaid dispenser withanyothersubstances
(e.g. Dishwasher cleaning agent, liquid detergent). This would damage the appliance.
ARemove the lower basket and then unscrewandremove the cap from thesalt container.
BPlace the end of the funnel(supplied) into the hole and introduce about 1.5kg of dishwasher salt.
CFullfill thesalt containerwithwater.It isnormal fora smallamountof water to comeout of thesalt container.
DAfter filling the container , screw the cap tightly back clockwise.
EUsually, the salt warning light will stop being illuminated within 2-6 days afterthesalt containerhasbeen filled with
salt.
FImmediately after filling the salt into the salt container, a washing program should be started
program Otherwise the filter system, pump or other important parts of the machine may be damaged
bysalty water.This isoutof warranty.
(Wesuggest to use the
soak orrapid ).
Open

To open the dispenser, turn the cap to the "open" (left) arrow and lift it out.
Pour the rinse aid into the dispenser, being careful not to overfill.
Replace the cap by inserting italigned with "open" arrow and turning it tothe closed (right) arrow.
Adjusting RinseAid Dispenser
The rinse aid dispenser has six or four settings. Always start with the dispenser
set on "4". If spots and poor drying are a problem, increase the amount of rinse
aid dispensed by removing thedispenser lid and rotating the dial to "5". If the
dishes still are not drying properlyor are show spots, adjust the dial to the next
higher lever until your dishes are spot-free. The recommended setting is "4".
(Factory valueis "4".)
Increase thedose if thereare drops of waterorlimespotson the dishes after washing.
Reduce it ifthere are sticky whitish stains on your dishes or abluish film on glasswareor
knife blades.
1
2
3
As the rinse aid diminishes, the size of the black dot
ontherinse aidlevel indicator changes,as illustratedbelow.
Full
3/4full
1/2full
1/ 4full -Should refilltoeliminate spotting
Empty
When to Refill the RinseAid Dispenser
Ifthereis no rinse-aid warning light in thecontrolpanel, you can estimate the amount from the colour
of the optical level indicator C located next to the cap. When the rinse-aid container is full, the whole
indicator will be dark .As the rinse-aid diminishes, the size of the dark dot decreases. You should never let
the rinse aid level fall 1 / 4 full.
during the nextwash.
Don't forget to replacethe cap before you close dishwasherdoor.
Clean up any rinse aid spilled while during fillingwith an absorbent cloth to avoid excessive foaming
""
Detergents
There are 3 sorts of detergents
1.Withphosphate and withchlorine
2.With phosphate and without chlorine
3.Withoutphosphate and without chlorine
Detergents with its chemical ingredients arenecessary toremove dirt, crush dirt and transport it out of the dishwasher.
anddry.
Don't put powder detergent into the dispenser until you're ready to wash dishes.
Use only detergent specifically made for use in dishwashers. Keep your detergent fresh
Proper Use of Detergent

AmountofDetergentto Use
Based ontheir chemical composition, detergentscan besplit in two basic types:
Detergent tabletsofdifferent brandsdissolve atdifferent speeds. For thisreason some
detergent tablets cannot dissolve and develop theirfull cleaning power during short
programs. Therefore please use long programs whenusingdetergent tablets, to
ensure the complete removal of detergent residuals.
The dispenser must be refilled before the start of each washcycle following the instructions
provided in the wash cycle table . Your dishwasher uses less detergent and rinse aid than
Conventionaldishwasher.Generally, only one tablespoon of detergent is neededfor
anormal washload. Moreheavily soileditemsneedmore detergent.Alwaysaddthe
detergentjust before starting the dishwasher, otherwise it couldget damp and will not
dissolve properly.
Concentrated Detergent
DetergentTablets
DetergentDispenser
Always add the detergent just before starting each wash cycle.
Only use branded detergent aidfordishwasher.
If the lid is closed: press release button.The lid will spring open.
conventional, alkaline detergents with causticcomponents
low alkaline concentrated detergents with natural enzymes
Normally new pulverised detergent is without phosphate.Thus the water softener function of
phosphate is not given. In this case we recommend to fill salt in the salt container even when
the hardness of water is only 6 dH. If detergents without phosphate are used in the case of hard water
often white spots appear on dishes and glasses. In this case please add more detergent to reach
better results. Detergents without chlorine do only bleach a little. Strong and coloured spots will not
be removed completely. Inthiscase please choosea program with a higher temperature.
°
Dishwasher detergent is corrosive!
Take care to keep it out of reach of children.

Fill the detergent dispenser with detergent.
The marking indicates the dosing levels , as
illustrated on the right:
Theplace of main wash cycledetergent placed.
Theplace of pre-wash cycle detergent placed.
Please observe the manufacturers dosing and storage
Recommendationsas statedonthedetergent packaging.
Close the lid and press untilit locks in place.
If the dishes are heavily soiled, place an additional
detergent dosein the pre-wash detergent chamber. This detergent will take effectduring the pre-wash phase.
A
B
Fill in Detergent
Youfind information about the amount of detergent for thesingle programme onthe last page.
Please aware, that accordingtothe levelsoiling and the specific hardness of water differencesare possible.
Pleaseobservethemanufacturer's recommendationson the detergent packaging.
AB

Cutlery with wooden,horn china or
mother-of-pearl handles
Plastic items that arenot heat resistant
Older cutlery with glued parts that arenot
temperatureresistant
Bonded cutlery items or dishes
Pewter or cooper items
Crystal glass
Steel items subject to rusting
Wooden platters
Items madefromsyntheticfibres
Some types of glasses can become
dull aftera large number of washes
Silver and aluminum parts have a
tendencyto discolourduringwashing
Glazed patterns may fade if machine
washed frequently
Are not suitable Are oflimited suitability
Dishes and itemsof cutlery mustnot lie insideoneanother, or cover each other.
To avoiddamage to glasses,theymust not touch.
Load large itemswhich are most difficult to clean into the lower basket.
The upper basket is designed to holdmore delicate and lighter dishware such as glasses, coffee
andteacups
Long bladedknives stored in an upright positionare a potential hazard!
Long and/or sharp itemsof cutlery such as carving knives must be positioned
horizontallyin the upper basket.
Please do not overload your dishwasher. This is important forgood resultsand for
reasonable consumption of energy.
Load hollow items suchas cups, glasses, pans etc. With the opening facing downwards so that
water cannot collect in the container or a deep base.
Usea mild detergentthatisdescribedas 'kind to dishes'. Ifnecessary,seek further
information from thedetergent manufacturers.
For particular items, select aprogramwithas lowa temperature aspossible.
Consider buying utensilswhich are identifiedas dishwasher-proof.
To prevent damage, do not take glass andcutlery out of the dishwasher immediately
after the programme has ended.
(For best performance of the dishwasher, follow theseloading guidelines.
Features and appearance of baskets and cutlerybasketsmay vary from your model.)
Scrape off any largeamounts ofleftover food.Soften remnants of burnt food in pans.
It is not necessary torinse thedishes under running water.
Place objects in the dishwasher in following way:
1.Items such as cups, glasses, pots/pans, etc. are faced downwards.
2.Curved items, or ones with recesses, should be loaded aslant so that water can run off.
3.All utensils are stacked securely and can not tip over.
4.All utensils are placed in the way that the spray arms can rotate freely during washing.
Very small items should not be washed in the dishwasher as they could easily fall out of the basket.
To prevent water dripping from the upperbasket into the lower basket, we recommend that you
empty the lower basket first and then the upper basket.

The upperbasket is designed tohold more delicate and lighter dishwaresuch as glasses,coffee
and tea cups and saucers, as well as plates, small bowls and shallow pans (as long as they are
not toodirty).
Position the dishes and cookware so that they will not get moved by the spray of water.
Wesuggest that you place large items and the most difficult to cleanitems are to be placedinto thelower basket:
such as pots, pans, lids, serving dishes and bowls, as shown in the figure below.
It is preferable to place serving dishes and lids on theside of theracks inorder toavoid blocking the rotation ofthe
topspray arm.
Pots, serving bowls, etc, must always be placed top down.
Deep pots should be slanted to allow water to flowout.
Please be reminded that:
TheBottom Basket features folding spikes so that larger or more pots and pans can be loaded.
1Cups
2Small serving bowl
3Large serving bowl
4
Glasses
Saucers5
6Dish
Dessert dishes
7
8
Oval platter
10 Soup plates
Dessert dishes
7
9Dinnerplates
11 Silverware basket
5
8
10
10
7
7
9
9
1
1
1
1
1
2
3
4
4
4
5
6
7


Cutlery should be placed in the cutlery basket with the handles at the bottom. If the rack has side baskets, the
spoons should be loaded separately into the appropriate slots, especially long utensils should beplaced in the
horizontalposition at the frontof the upper basket as shown in the picture.
Folding Spikes of Lower Basket
For better stacking of pots and pans,
the spikes can be folded down as
show in the picture right.
Adjusting the Upper Basket
The height ofthe upper basket can be adjusted in order to create more space for large utensils
both for the upper/lower basket. The height of the upperbasket can be adjusted by placing the
wheels on different height of the rails. Long items, serving cutlery, salad servers and knives
should be placed on the shelf so that they do not obstruct the rotation of the sprayarms.
The shelf can be folded back or be removed when not required for use.
111
11
1
11
361
7
4
8
72
233
33
33
33
2
44
44
44
44
22
22
22
5
5
55
5
5
5
5
5
1.fork
2.soup spoon
3.dessert spoon
4.tea spoon
5.knife
6.serving fork
7.serving spoon
8.gravy ladle
Do not letany item extend through the bottom.
Always loadsharp utensils with the sharp
point down!

Means: need to fill rinse into the Rinse-Aid Dispenser.
()
Normal
ECO
(*EN 50242)
Intensive
Rapid
1hour
Express
4/23g
Pre-wash(50 )
Wash (65 )
Rinse
Rinse
Rinse(55 )
Drying
℃
℃
℃
Pre-wash(50 )
Wash (55 )
Rinse
Rinse(65 )
Drying
℃
℃
℃
pre-wash
Wash (50 )
Rinse (60 )
Drying
℃
℃
155
120
1.09
1.13
16.0
13.0
4/23g
4/23g
For normally soiled loads, such
as pots plates glasses and
lightly soiled pans.
、、
160 0.77 10.5
Wash (40 )
Rinse
Rinse (40 )
℃
℃
15 g.
Rinse
Rinse (50 )
Drying
Wash(60 )℃
℃
30
60
0.50
0.77 10.0
9.0
27g
*EN 50242 : This programme is the test cycle. The information for comparability test
in accordance with EN 50242, as follows:
Capacity: 9 setting
Position Upper basket: upper wheels on rails
Rinse aid setting: 6
The power consumption of off-mode is 0W
left-on mode is 0.4W
Ashorterwashforlightly
soiledloadsand quick wash
For lightlysoiled loads that
do not need excellent drying
efficiency.
For heaviest soiled crockery, and
normally soiled pots pans
dishes etc with dried on soiling;
、、
This is standard programme, it
is suitable to clean normally
soiled tableware and it is the
mostefficient programmein
terms of itscombined energy
and water consumption for
that type of tableware.

When the working cycle has finished, the buzzer of the dishwasher will sound for 8 seconds, then stop. Turn off
the appliance using the ON/OFF button, shut off the water supply and open the door of the dishwasher.
Wait for a few minutes before unloading thedishwasher to avoid handling the dishes and utensils while they
are still hot and more susceptible to breakage. They will also dry better.
Switch Off the Dishwasher
1.Switch off the dishwasher by pressingthe ON/OFF button.
2.Turnoffthewatertap!
Open thedoor carefully.
Hot dishes are sensitive to knocks. The dishes should therefore be allowed to cool down around 15 minutes
before removingfrom the appliance.
Open the dishwasher's door, leave it ajar and wait a few minutes before removing the dishes. In this way they
will be cooler and the drying will be improved.
Unloadingthe dishwasher
It is normal that the dishwasher is wet inside.
Empty the lower basket first and then the upper one. This will avoid water dripping from the upper Basket onto
the dishes in the lower one.
the machine will working after 10 seconds.continue
Ifyou open the door , the machine will pause. When you close the door ,during a wash cycle
Draw out the lower and upper basket, load the dishes and push them back.
It iscommendedtoloadthelowerbasketfirst,thentheupperone(seethe sectionentitled
Loading the Dishwasher ).
Pour in thedetergent (see the sectionentitled Salt, Detergent and RinseAid ).
Insert the plug into the socket. The power supplyis 220-240 VAC /50 HZ, the specification of the
socket is 10A 250VAC. Make sure that the water supply is turnedon to fullpressure.
Pressthe ON/OFF button, and the ON/OFF light willturn on. Press the program button to select
a desired washcycle. fter 10 seconds, the machine will work.
“”
“”
Close the door,a
1
2
3
4
Acycle that is underway canonly be modified if it has only been running for a short
time. Otherwise, thedetergent may have already been released, and theappliance may
have alreadydrained the wash water. If this is the case, the detergent dispenser must
be refilled (see the section entitled " Loading the Detergent " ).
Open the door a little to stop the washing. Press the programme button or the washing program more than 3
seconds to cancel the running programme. Then you can select other programmes (see the section entitled "
Startingawashcycle...").
When you select Intensive/Normal/Eco.Programmes, you can select theAllin1 function.
1
2
3
Aforgotten dish can be added any time before the detergent cup opens.
Add forgotten dishes.
Close the door
After the spray arms stop working, you can open the door
completely.
2
3
Open the door a little to stop the washing.
14
5
The dishwasher will run after 10 seconds.
Premise
It is dangerous to open the door when washing,
because the hot water may scald you.

The filter preventslarger remnants of food or other objects from getting inside thepum.
Theresidues may blockthefilter, inthiscase they must be removed.
The filter system consists of a coarse filter,a flat (Main filter)
Anda microfilter(Fine filter).
Food and soil particles trapped inthisfilter arepulverizedby a
special jet on the lower spray arm and washed down to drain.
Larger items, such as pieces of bones or glass, that could block
the drainaretrappedin the coarse filter. To removetheitems
caught by the filter, gently squeeze the tap on the top of this
filterandliftout.
Thisfilter holds soiland food residuesin the sumpareaand
preventsitfrom being redeposit on the dishes during washcycle.
Main filter
1
Coarse filter
2
Fine filter
3
Filterassembly
Thefilter efficiently
For best performance and results, the filter must be cleaned regularly. this reason, it is a good idea to
remove thelarger food particlestrapped in the filter aftereach wash cycle by rinsing the semicircular filterand
cup under runningwater. To remove the filter device, pull the cup handle in the upward direction.
removes food particles from the wash water, allowing it to be recycled during the cycle.
For
The dishwasher must never be used without the filters.
Improper replacement of the filter may reduce the performancelevel ofthe appliance
and damage dishesand utensils.
Step 1 Turn the filter in anti-clockwise direction,
then lift it up.
:
Step 2 lift the Main filterup:
Step 3 lifttheFinefilter up:
When following this procedure from step1 to step 3, the filter system will be removed;
when following it from Step 3 to Step 1, the filter system will be installed.
2
3
1
1
2
3
Table of contents
Other Cata Dishwasher manuals