Cayin CS-100DAC User manual

C S - 1 0 0 D A C
HiFi Audio D/A Converter
User Manual

1
We want to thank you sincerely for choosing CS-100DAC HiFi Audio D/A Converter. We have
prepared this user manual to help you understand the features and get familiar with the
operation of the DAC. We suggest all customers read through this manual before they start
to use the device.
Attention
Please make sure the serial number on the package, chassis and warranty card are
intact and identical. In case of damage, missing or tempered on warranty card or serial
number, Cayin reserves the right to refuse warranty service for the machine.
The user manual is a documentation of the product based on the specification at the
time of print. Cayin reserves the right to change product specification without prior
notice.
Package Contents
Please examine the product package before you open it, the package should be free from any
physical damage or water stain. You should find the following items when you open the
package:
1. CS-100DAC HiFi Audio D/A Converter (1 unit)
2. SP-13N Remote Control (1 piece)
3. User Manual (1 copy)
4. Replacement Fuse (2 units)
5. USB Cable (1 piece)
6. Power Cord (1 piece)
Attention: The product package should include only the items in the list.
Please fill in the warranty card and mail to your local agent or Cayin’s Sales Department, we
shall provide comprehensive after sales service in the future. We recommend you to keep
the package and protection material, this will be most convenient if you need to re-package
the product in the future.

2
Design & Technical Features
Designed with ES9038PRO DAC chipset from ESS. Dual DAC used and each DAC chip
works in MONO mode that four channels of I/V Conversion circuit combined the true
Balance Output Circuitry to achieve the best audio performance of the DAC Chipset.
Deploy discrete components and premium grade specialized op-amp in I/V converter
circuit.
Two pieces of high precision, low noise, low jitter oscillators from American
Accusillicon to serve as master clock of ES9038Pro.
Equipped with single-ended RCA and balanced XLR audio output, both support
Vacuum Tubes and Solid-state timbre selection.
Two separate power transformers for separate power supply to Digital Circuit and
Analog Circuit. Digital circuit, DAC part, and Analogue circuit are powered by
separtate winding and multi-winding of low noise LDO Regulation power supply.
Support I²S digital audio input through HDMI-A connecter, compatible with Cayin
iDAP-6 Digital Transport, N8 and N6ii Digital Audio Player.
Optical, AES/EBU and Coaxial interfaces all support DoP for DSD decoding.
Built-in high-resolution Asynchronous USB AUDIO transmission accepts and decodes
Hi-Res digital audio bitstream from your computer via USB interface.
Both RCA and XLR connecter supports LINE OUT and PRE OUT mode.
Built-in 7 PCM filters and 4 DSD filters.
Extensive mute protection circuit, minize impulse noise or noises generated at
changing of operational stages.
Special designed low leakage, high efficiency toroidal power transformer are used.
Finest sandblast aluminum alloy chassis and panel, shielding external interference
with aesthetics.
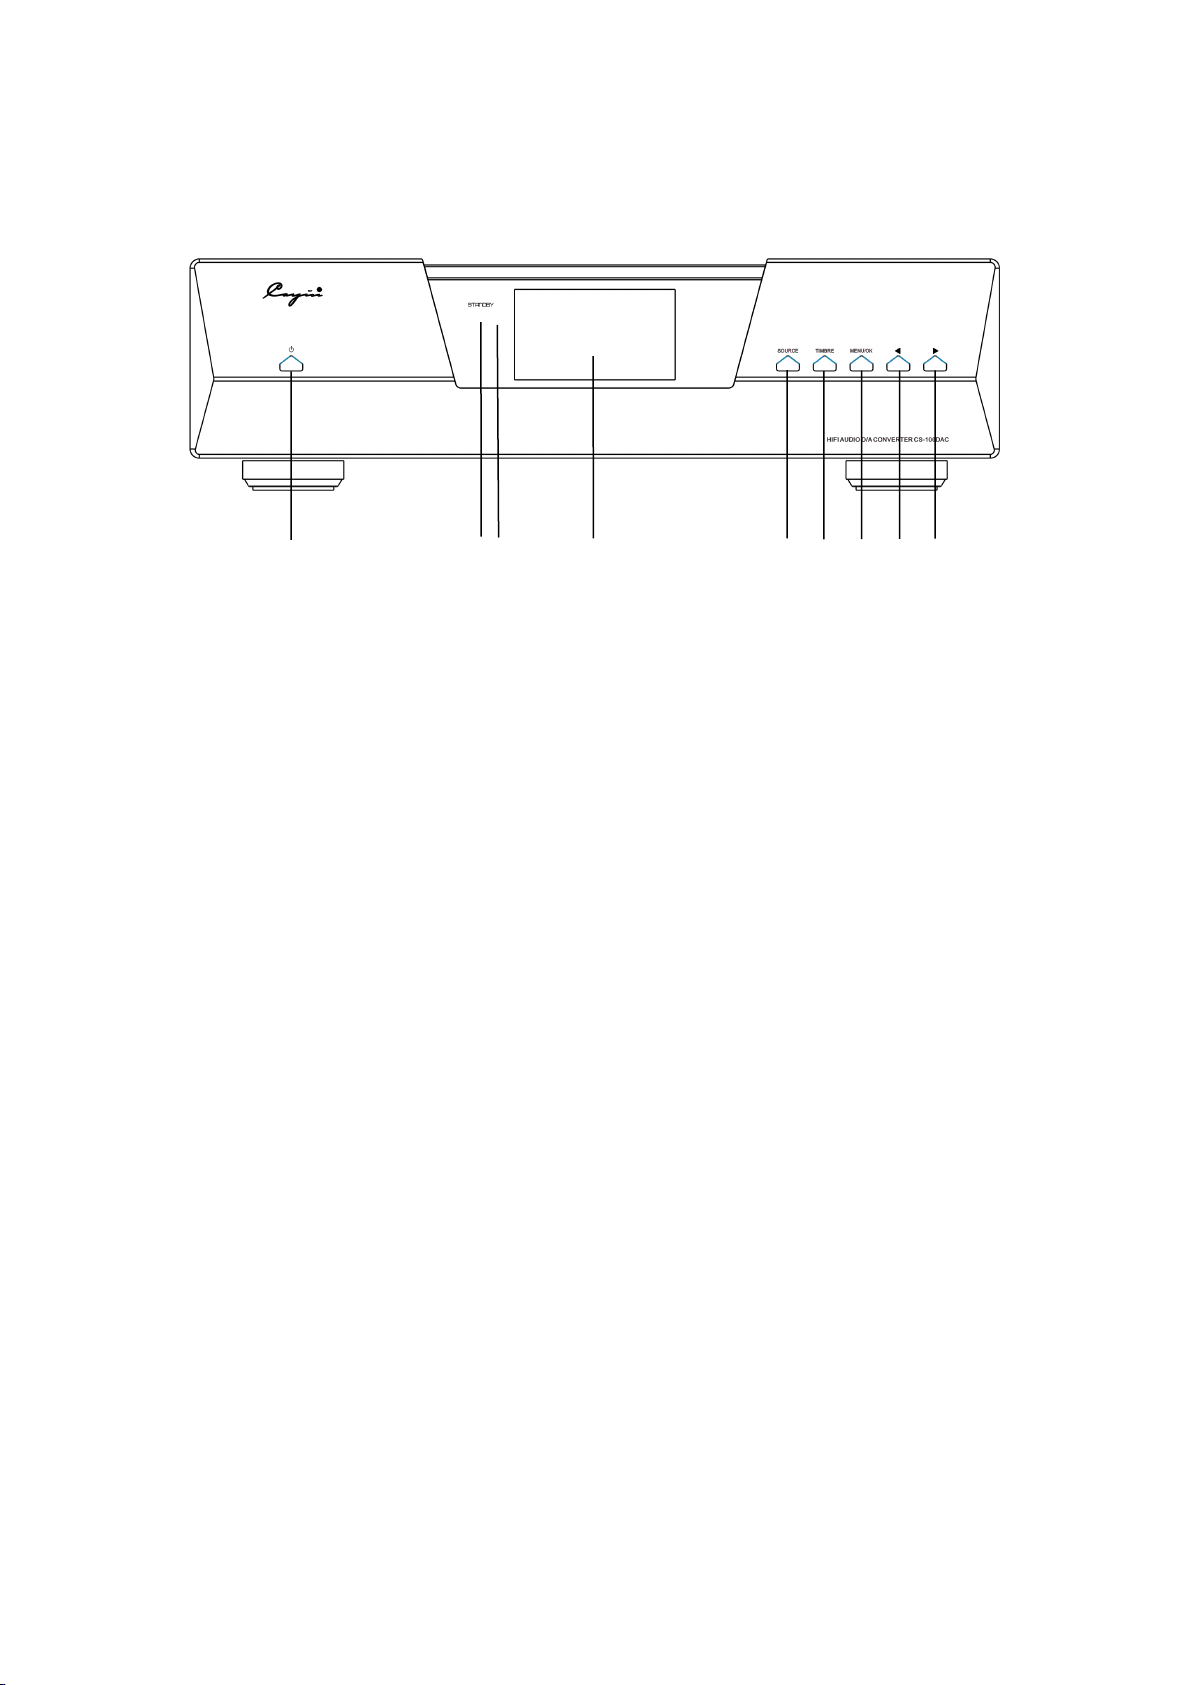
AMOLED Display Screen with GUI (Graphical User-Interface).
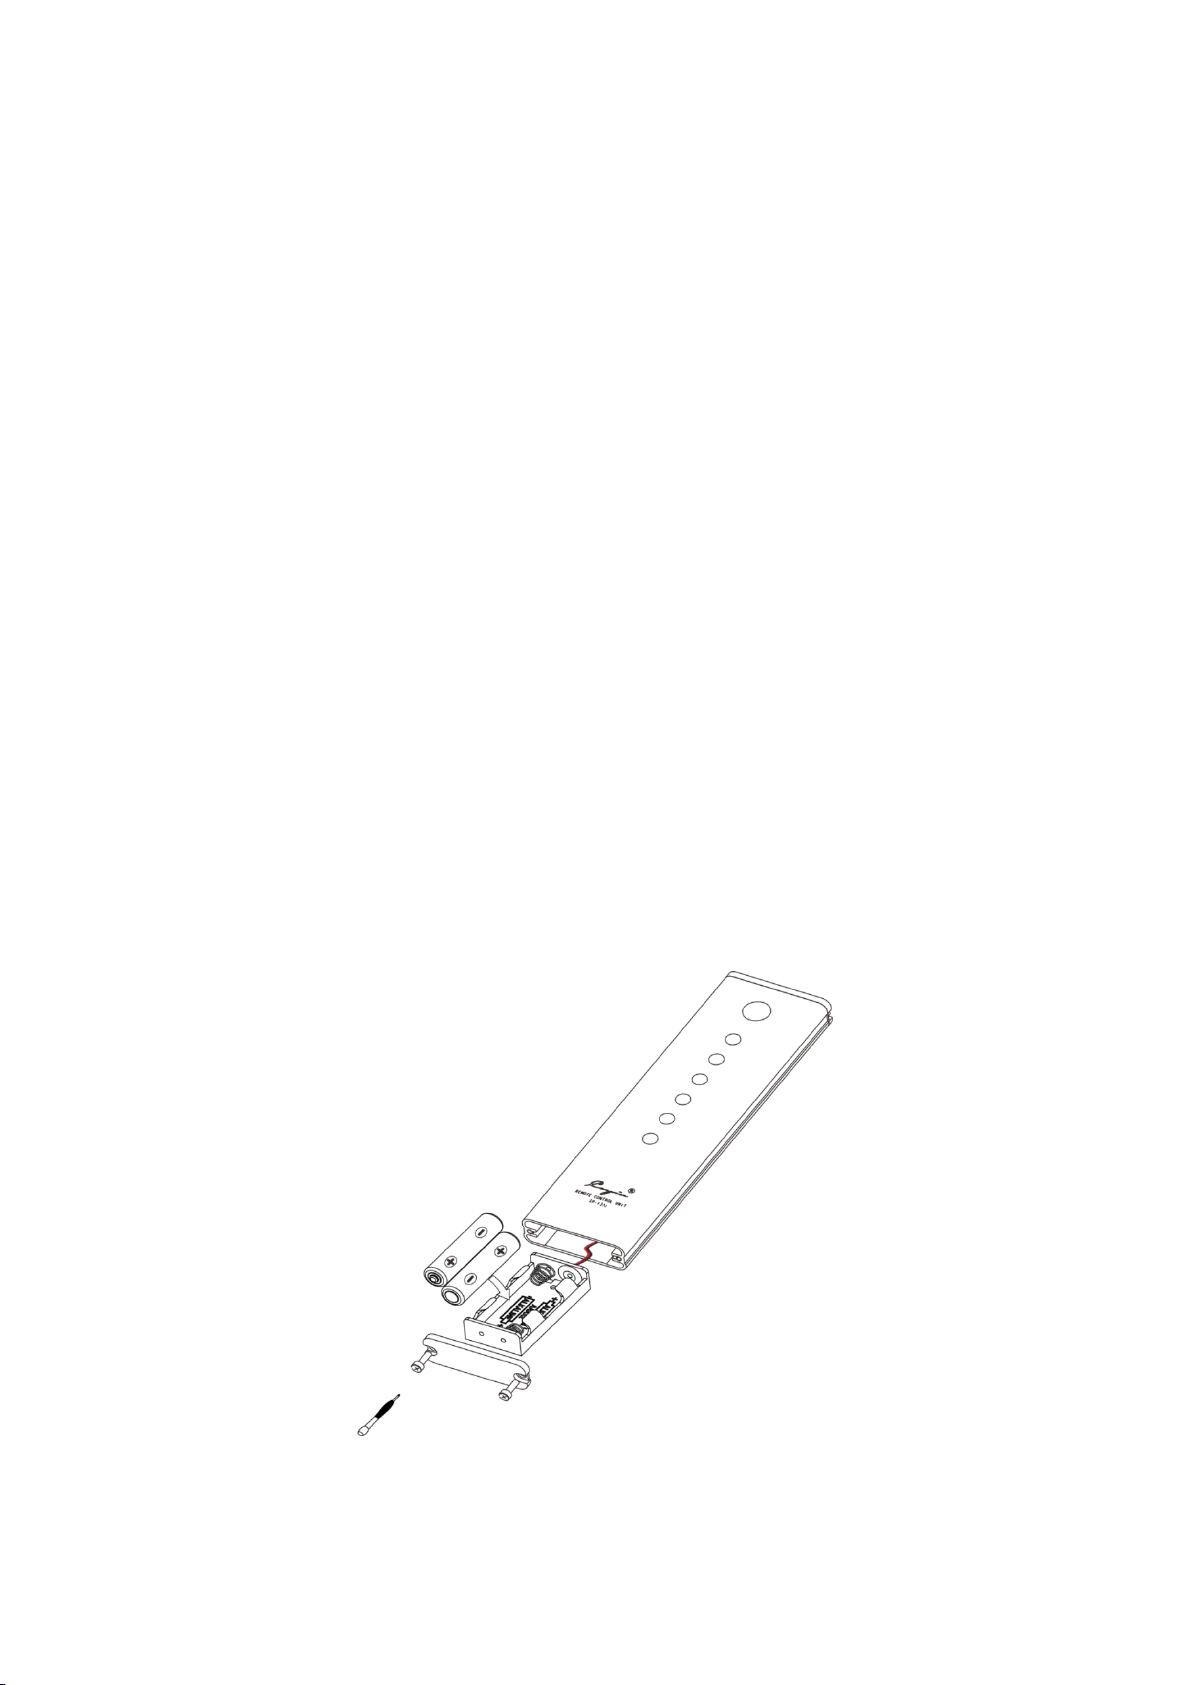
Equipped with full fuction Remote Control.

3
Front Panel Functional Description
1 2 3 4 5 6 7 8 9
CS-100DAC Front Panel illustration
1. Standby Button
Switch between “Standby” and “Operation”.
2. Standby indicator, indicate the working status of the DAC
a. Indicator always on: standing by
b. Indicator flashing: in the process of initialization
c. Indicator off: machine in regular operation
3. Remote sensor window
4. AMOLED Display
5. Source
Select input source, click repeatedly to cycle through the following options: USB AUDIO,
I2S/DSD, AES/EBU, COAXIAL BNC, COAXIAL RCA , and OPTICAL;
6. Timbre
Select output timbre, click repeatedly to cycle through SOLID STATE or VACUUM TUBE
7. Menu/OK
PCM Filter:
APODIZ, BRICKWALL, FAST-L, FAST-M, HYBRID, SLOW-L, SLOW-M
DSD Filter:
IIR47K, IIR50K, IIR60K, IIR70K
Output Mode:
LINE OUT: Please select LINE OUT if you are connecting to Integrated Amplifiers. Volume
of the DAC will not take effective.
PRE OUT: Please select PRE OUT if you are connecting to Power Amplifiers. Volume of
the DAC will take effective.
About Device:

4
You can check the model number, Firmware version etc of the DAC.
8. “ ”: In Menu interface, you can press the button to move to the left option. If it is
Pre Out Mode you can press the button to lower the volume level.
9. “ ”: In Menu interface, you can press the button to move to the right option. If it is
Pre Out Mode you can press the button to raise the volume level.
Rear Panel Functional Description
CS-100DAC Rear Panel illustration
1. Single-ended connector for Line Out (RCA)
Connect the single-ended Line output of the DAC to the single-ended input of an
Integrated amplifier with a pair of RCA audio signal cable, please make sure the left and
right channel is connected correctly.
2. Balanced connector for Line Out (XLR)
Connect the balanced Line output of the DAC to the balanced input of an Integrated
amplifier with a pair of XLR audio signal cable, please make sure the left and right
channel is connected correctly.
3. Single-ended connector for Pre Out (RCA)
Connect the single-ended Pre output of the DAC to the single-ended input of a Power
amplifier with a pair of RCA audio signal cable, please make sure the left and right

5
channel is connected correctly.
4. Balanced connector for Pre Out (XLR)
Connect the balanced Pre output of the DAC to the balanced input of a Power amplifier
with a pair of XLR audio signal cable, please make sure the left and right channel is
connected correctly.
5. Serial No.
6. Power input connector
Connect to AC Power supply
7. FUSE
If in case you need to change the fuse, please resort to replacement fuse with same
specification with the original.
8. Power Switch
Switching the power switch to "On" position will turn on the Player.
9. I2S/DSD
Connect the HDMI-A of the DAC to the HDMI of a player like iDAP-6 with a HDMI
cable.
10. OPTICAL
Connect the optical input digital audio signal of the DAC to the Optical output digital
audio signal of a player with a Toslink (Optical) cable.
11. COAXIAL RCA
Connect the RCA coaxial input digital audio signal of the DAC to the Coaxial
output digital audio signal of a player with a standard 75ohm coaxial cable.
12. COAXIAL BNC
Connect the BNC coaxial input digital audio signal of the DAC to the Coaxial
output digital audio signal of a player with a standard 75ohm coaxial cable.
13. AES/EBU
Connect the AES/EBU input digital audio signal of the DAC to the AES/EBU output digital
audio signal of a player with a standard 110ohm AES/EBU (XLR) cable.
14. USB
Connect the USB port of the DAC to the USB port of a computer with a USB
cable (provided in the product package)
I2S/DSD Port
The I²S of CS-100DAC employs the 19-pin HDMI-A interface. This is our proprietary
implementation. The pin definition was defined in-housed and was designed to work with
Cayin Digital Audio Player or Digital Transport with I²S output. It is incompatible with

6
standard HDMI audio visual device, and we cannot guarantee compatibility with other DAC
with I²S input.
Definition of HDMI pin of this product
REMOTE CONTROL UNIT
1. “ ”:Standby button

7
2. “SOURCE”: Source Input Selection
3. TIMBRE: Timbre Selection
4. FILTER: Filter Selection
5. LINE/PRE: Output Mode Selection.
6. Volume Up. Only for Pre Output.
7. Volume Down. Only for Pre Output.
※NOTE
◆Point the Remote Control Unit at the Remote Sensor on the front panel within about
8 m and within about 30.
◆Don't drop the remote control. Keep the remote control dry.
◆Replace the batteries timely.
◆Don't mix new and old batteries together and use the
batteries with the same specification
◆Take out the batteries if you don't use the remote control for an extended period of
time.
◆Batteries with high quality are recommended.
Installation
1. Place the remote control upside up. Screw the rear cover open with the screwdriver.
2. Pull out the battery case carefully (do not break the wires connected).
3. Put in the batteries with correct polarity.
4. Push in the battery case and screw the rear cover.

8
Preparation
1. Connect Power source
Please make sure the AC voltage of your local power supply matches the voltage
information printed on the back panel before you plug in a power cord and connect to a
AC power outlet.
2. Connect to Audio Source
The connection diagram illustrates how to connect the DAC to the iDAP-6 HiFi digital
audio player, a computer and the M-52T vacuum tube integrated amplifier as a
complete system.
a. Connect to audio player: Connect the coaxial input digital audio signal of the DAC
to the Coaxial output digital audio signal of a player with a standard 75ohm coaxial
cable; or connect the optical input digital audio signal of the DAC to the Optical
output digital audio signal of a player with a Toslink (Optical) cable, or connect the
AES/EBU input digital audio signal of the DAC to the AES/EBU output digital audio

9
signal of a player with a standard 110ohm AES/EBU (XLR) cable; or connect the
HDMI-A of the DAC to the HDMI of a player with a HDMI cable.
b. Connect to a computer: connect the USB port of the DAC to the USB port of a
computer with a USB cable (provided in the product package)
c. Connect to integrated amplifier: Use XLR audio cable to connect the balanced
audio output of the DAC to the balanced audio input of the M-52T, or use RCA
audio cable to connect the single-ended audio output of the DAC to the
single-ended audio input of the M-52T, please make sure the left and right channel
is connected correctly.
Attention:
Please make sure that the AC Voltage Selector has been set correctly for your local
power supply voltage
Please turn off al equipment when you connect the audio signal cables, this will avoided
pulse or high magnitude noise from headphone amplifier and causing damage to
associated equipment.
The vacuum tubes takes 15 seconds to warm up to desirable working condition, the DAC
will be muted during this period of time and there will not be any audio signal output
from the DAC.
3. Install Driver
If you plan to use CS-100DAC with a window-based computer, you need to install a USB
Audio Driver in your computer before you can use the DAC as an outboard USB sound
card for your system. You can install the driver from the following url:
http://en.cayin.cn
The steps to install the drivers are as follows:
(1)Double click the “ ” icon to activate the driver installation
process, skip all warning until the installation process is completed.
(2)If the driver has installed successfully, you should be able to see the name “Cayin
CS-100DAC at the Device Manager interface of your computer.
(3)Select “Cayin CS-100DAC” as audio output device in your computer playback
software
(4)Windows 7/8/8.8/10 need to install the driver, and Mac OS X 10.6.3 do not need to
install the driver.

10
Basic Operation
1. Please make sure the AC Voltage Selector is setup correctly for your local power supply
voltage.
Turn on the DAC by press down the Power ON/OFF button on the rear panel, the
Standby Indicator will always on. Press the Standby button on the front panel or on
the remote control, indicator will flash and the display screen will enter the
interface.
The initialization process will take around 15 second, the standby indicator will be
off, and the DAC is ready for playback.
Note: Please do not remove any audio cable when the DAC is in normal operation, this
might cause damage to the amplifier or other associated equipment.
2. Source Selection
Select input source, click the SOURCE button on the Front or Remote repeatedly to
cycle through the following options: USB AUDIO, I2S/DSD, AES/EUB, COAXIAL BNC,
COAXIAL RCA , and OPTICAL;
The DAC will remember the previous setting even when the device is power off,
and will resume to the previous selected source when power up again.
3. Using AES/EBU, coaxial and Optical input
After the digital cables are connected, you can select AES/EBU, COAXIAL and
OPTICAL by click the SOURCE button repeatedly to select your desirable
connection.
Once the DAC can lock into a digital connection, the screen will display the bit rate
and sampling frequency for your reference.
4. Using USB decoding
Before you proceed with USB decoding, please confirm again that appropriate
drive has been installed in your computer (if needed), otherwise USB decoding will
not be functional.
Connect the USB port of the DAC to the USB port of a computer with a USB cable
(provided in the product package), Click the SOURCE button repeatedly until USB
AUDIO is selected.
Once the DAC can lock into the USB connection, the screen will display the bit rate
and sampling frequency for your reference.
Please setup your playback software such as Foobar2000 in your computer

11
correctly otherwise the system will not be able to output the original unaltered
bitstream to the DAC for decoding, you might need to install plugin such as ASIO or
WASAPI to achieve that.
5. Using I2S/DSD input
After the digital cables are connected, you can select I2S/DSD by click the SOURCE
button repeatedly to select your desirable connection.
Once the DAC can lock into a digital connection, the screen will display the bit rate
and sampling frequency for your reference.
6. PCM Filter
Selection with buttons on the Front
At the Main Screen, press “MENU/OK” Button to enter the Main Menu.
Press the Triangle to Select “PCM FILTER”, press MENU/OK button to enter the
selection menu, Press the Triangle buttons repeatedly to select filters among APODIZ,
BRICKWALL, FAST-L, FAST-M, HYBRID, SLOW-L, SLOW-M. Select the filter by pressing
MENU/OK button.
Display will return to the main screen after 3 seconds, the filter character and filter
curve will be shown on the display.
Selection with Remote
Using the Filter Key on the remote can switch between different filters once PCM
format music files are recognized and playbacked.
7. DSD Filter
Selection with buttons on the Front
At the Main Screen, press “MENU/OK” dial to enter the Main Menu.
Press the Triangle to Select “DSD FILTER”, press MENU/OK button to enter the
selection menu, Press the Triangle buttons repeatedly to select filters among IIR47K,
IIR50K, IIR60K and IIR70K. Select the filter by pressing MENU/OK button.
Display will return to the main screen after 3 seconds, the output mode will be shown
on the display.
Selection with Remote
Using the Filter Key on the remote can switch between different filters once DSD
format music files are recognized and playbacked.

12
8. Output Mode
Selection with buttons on the Front
At the Main Screen, press “MENU/OK” button to enter the Main Menu.
Press the Triangle to Select “OUTPUT MODE”, press MENU/OK button to enter the
“OUTPUT MODE” selection menu, Press the Triangle buttons repeatedly to select
between “LINE OUT” and “PRE OUT”. Select the output mode pressing MENU/OK
button.
Display will return to the main screen after 3 seconds, the output mode will be shown
on the top-right corner of the display.
Selection with Remote
Using the LINE/PRE Key on the remote can switch between LINE OUT and PRE OUT
output modes.
Safety Precautions
1. Please make sure local voltage level is matched with the input level of the amplifier,
which indicates on the rear panel.
2. Unplug the power cord if you are not going to use the DAC for an extended period of
time, and keep the machine in proper condition.
3. Please handle with care, avoid tempering to the machine.
4. The DAC will not function appropriately if moistures has developed inside the DAC,
please avoid operate the machine until internal moistures has cleared. Moistures can be
caused by:
Placing the DAC at a location when heater or steamer has just turned on
Moving the machine from a cold environment to a warm location
Moving the machine from a chilled (e.g., air conditioned room) to a hot and
humidity environment.
5. Do not attempt to service this product yourself. Opening the cover may expose you to
electric shock or other hazards.
6. The DAC must be keep away from water dripping or water splitting, do not place any
objects filled with liquids such as vases or some others on the top or around.
7. Do not attempt to disassembly the machine, all service and maintenance must be
conducted by authorized service technician.
8. Please disconnect power cable before you attempt to clean the machine. Please use
soft clean cloth to wipe clean the chassis, do not use volatile solution or corrosive

13
cleaning product.
9. Place the DAC at a flat surface, make sure all four supporting tips are evenly loaded.
10. Do not place any flammable material on the DAC
11. Do not operate the DAC under direct sunlight or high temperature, will cause serious
deviation or even damage to the electronic components.
12. The machine will become hot during operation, Please keep the DAC at a well-ventilated
environment and do not cover the DAC with anything.
13. Please Contact your Cayin agent or retail shop, or our after-sales service if the machine
is not working properly.
This product is designed to work at 2000m altitude or below and non-tropical climate.
Please make sure there are amper space around so that the power cord can be disconnected
when needed.
Specification
Line Out Level
Solid State
RCA:2.3V RMS
XLR:4.6V RMS
Vacuum Tube
RCA:2.2V RMS
XLR:4.2V RMS
Pre Out Level
Solid State
RCA:8.8V RMS (Max.)
XLR:17V RMS (Max.)
Vacuum Tube
RCA:8V RMS (Max.)
XLR:11.5V RMS (Max.)
Frequency Response
20Hz~50kHz (±0.5dB,Fs=192kHz) (RCA)
20Hz~35kHz (±0.5dB,Fs=192kHz) (XLR)
THD+N
Solid State: ≤0.0008% (20~20kHz, A-weighting, Fs=192kHz)
Vaccum Tube: ≤1.8% (20~20kHz, A-weighting, Fs=192kHz)
S/N
(Line Out)
Solid State:RCA ≥115dB (20~20kHz,A-weighted)
XLR ≥119dB (20~20kHz,A-weighted)
Vaccum Tube:RCA ≥99dB (20~20kHz,A-weighted)
XLR ≥119dB (20~20kHz,A-weighted)
USB capability
PCM: support 16Bit-32Bit, 44.1kHz~768kHz
DSD: support DSD64-DSD512(Native Mod), DSD64-DSD256(DoP Mod)
I2S/DSD capability
PCM: support 16Bit-32Bit, 44.1kHz~768kHz
DSD: support DSD64-DSD512
AES/EBU, Coaxial,
capability
PCM: support 16Bit-24Bit, 44.1kHz~384kHz
DSD: support DSD64-DSD128(DoP Mod)
Optical capability
PCM: support 16Bit-24Bit, 44.1kHz~192kHz
DSD: support DSD64(DoP Mod)
Max. Power
Consumption
70W

14
Dimension
440mm x 392mm x 126mm (WxDxH)
Weight
Approx. 12kg
Trouble Shooting
To ensure the DAC will function at premium condition, please follow the basic operation and
safety precaution as advice. Improper operation might lead to malfunction, if you run into
trouble as stated below, please check before you panic. Sometime the problem are related
to associated equipment or cables, please also check and make sure everything is in proper
condition. Please contact your Cayin agent or retail shop, or our after-sales service if the
problem cannot be rectified.
Problem
Cause
Remedy
No sound
after power
on
Standby
Indicator is
OFF.
Power is not connected.
Make sure power cable is
properly connected to a power
outlet and there is proper power
supply from the outlet.
Main fuse is out.
Replace fuse with same
specification with the original.
Standy
Indicator is
ON.
DAC is in Standby Mode.
Press Standby button on the
remote or the front panel to
wake up the DAC.
No display once pressed
Standby.
Internal Problem.
Please contact local agent for
service.
Display works but no
Sound
No Signal Input
Please make sure you select the
correct source input and the
source works normally.
Audio Connection is wrong.
Please make sure all
interconnectors are connected
correctly.
No Output for Coaxial
Input
Coaxial cable connection
problem.
Please check the coaxial cable
and re-connect.
No coaxial Signal input.
Please check the coaxial
output of the source.
No Output for AES/EBU
Input
Digital cable connection
problem.
Please check the AES/EBU Digital
cable and re-connect.
No Signal input.
Please check the AES/EBU Digital
output of the source.
No Output for Optical
Input
Optical cable connection
problem.
Please check the optical cable
and re-connect.
No optical Signal input.
Please check the optical output
of the source.

15
Computer cannot
recognize the device
USB Cable does not
conform to the standard.
Replace a proper USB 2.0 cable.
USB driver has not been
installed correctly.
Install the USD Driver.
USB driver error
Restart the computer.
Abnormal Audio output
when USB Audio is used.
Computer is busy.
Optimise computer for audio
playback.
Computer hardware cannot
catch up with audio
playback requirements.
Upgrade the computer
hardware.
USB Interface Problem.
Please switch to another USB
Interface.
Table of contents
Other Cayin Media Converter manuals