CDA PC900 Quick start guide

Customer Care Department • The Group Ltd. • Harby Road • Langar • Nottinghamshire • NG13 9HY
T : 01949 862 012 F : 01949 862 003 E : customer.care@cda.eu W : www.cda.eu www.cda.eu
PC900 American
Style Fridge
Freezer
Installation, Use and Maintenance

2
Important
The CDA Group Ltd cannot be held responsible for injuries or losses
caused by incorrect use or installation of this product. Please note
that CDA reserve the right to invalidate the guarantee supplied with
this product following incorrect installation or misuse of the appliance.
Under no circumstances should any external covers be removed for
servicing or maintenance except by suitably qualified personnel.
Appliance information:
Please enter the details on the appliance rating plate below for
reference, to assist CDA Customer Care in the event of a fault with
your appliance and to register your appliance for guarantee purposes.
Appliance Model
Serial Number
EU Declarations of Conformity:
This appliance meets the requirements of all applicable EU directives
with the corresponding harmonised standards which provide for CE
marking.
IMPORTANT INFORMATION FOR CORRECT DISPOSAL OF THE
PRODUCT IN ACCORDANCE WITH WEEE DIRECTIVE 2012/19/EU.
At the end of its working life, the product must not be disposed
of as urban waste. It must be taken to a special local authority
dierentiated waste collection centre or to a dealer providing this
service.

3
Disposing of a household appliance separately avoids possible
negative consequences for the environment and health deriving from
inappropriate disposal and enables the constituent materials to be
recovered to obtain significant savings in energy and resources. As a
reminder of the need to dispose of household appliances separately,
the product is marked with a crossed-out wheeled dustbin .
Before first use of the fridge/freezer
You must allow the fridge to settle for at least twenty four hours
prior to switching the power on.
It is recommended that you clean the interior of the appliance prior to
first use, using a solution of bicarbonate of soda and warm water then
thoroughly dry the interior.
The fridge may have an odour to it at first use. This will disappear
as the appliance cools.
This appliance has been designed with ease of use in mind but
please read the following instructions carefully to ensure you
familiarise yourself with the appliance and its operation. This will help
you to get the best results and also help to prevent you from being
charged for unnecessary service calls.
Please note:
The appliance will work continuously until it comes down to the
correct temperature.

4
Important
This appliance is not intended for use by persons (including children)
with reduced physical, sensory or mental capabilities, or lack of
experience and knowledge, unless they have been given
supervision or instruction concerning use of the appliance by a person
responsible for their safety. Children must not play with the appliance.
Cleaning and user maintenance must not be made by children without
supervision.
If the supply cord is damaged, it must be replaced by the
manufacturer, its service agent or similar qualified persons in order to
avoid a hazard.
Keep ventilation openings, in the appliance enclosure or in the
built-in structure, clear of obstruction.
Do not use mechanical devices or other means to accelerate the
defrosting process.
Do not use electrical appliances inside the food storage
compartments of the appliance.
Do not damage the refrigerant circuit.
Do not store explosive substances such as aerosol cans, with a
flammable propellant, within this appliance.
Children should be supervised to ensure that they do not play with the
appliance.

5
WARNING: To avoid a hazard due to instability of the appliance, it
must be fixed in accordance with the instructions.
The appliance should be placed against a wall with a free distance of
50mm or more.
This appliance is not intended for use at altitudes exceeding 2000
metres.
If one or more of your appliance’s LED lights fails, please contact CDA
Customer Care to arrange a service visit. This appliance must only
be serviced by CDA authorised personnel. Contact details for CDA
Customer Care are on the back of this manual.
If the appliance is switched o, you should allow five minutes
before switching it on again to prevent unnecessary damage to the
compressor.

6
Fridge use
• Never put liquids in the refrigerator uncovered.
• Never put hot foods in the refrigerator. Warm food should
be allowed to cool to room temperature before being put
into the refrigerator.
• Nothing should rest against the rear wall of the
refrigerator, as this will cause frost and possible
condensation problems which will be dicult to remove.
• Make sure food is clean and any extra water is wiped
away before putting into the fridge.
• Wrap or cover food before putting into the fridge. This
will help prevent the loss of moisture, keep food fresh and
avoid unpleasant odours.
• Sort foods prior to storing. Any foods to be used soon
should be stored at the front of the shelf to prevent
deterioration caused by the door being open for
prolonged periods.
• Do not overfill the fridge. There should be sucient space
between the foods to allow the cool air to circulate.
• Thawing frozen foods in the fridge compartment will help
to keep the temperature low and save energy.
Freezer use
• The freezer compartments are designed to store only
frozen food.
• Never put hot or warm foods in the freezer, allow them to
cool fully before putting them into the freezer.

7
• Follow the instructions on the food packaging for storage
of frozen food. If no information is provided, foods
should not be stored for more than three months after the
purchase date.
• Store food in small packages (ideally less than 2.5kg).
This reduces the freezing time and improves the quality of
the food after thawing.
• Wrap food before putting into the freezer. To stop the
wrapping sticking together, ensure it is dry.
• Label the food before freezing with information including
type of food and dates of storage and expiry.
• Once food is thawed, it must not be refrozen. Only defrost
as much food as is required to prevent wastage.
• Bottled or canned drinks should not be stored in the
freezer compartments as they could explode.
• The maximum amount of fresh food that can be frozen
within a 24 hour period is 10 kg.
• Do not attempt to freeze more than the maximum amount.
• To freeze fresh food more quickly, switch on the super
freeze function a few hours prior to placing the food in the
freezer.
• Do not use the super freeze function more than once
in 72 hours. Use over the recommended time will place
unnecessary strain on the refrigeration system.

8
Storage
A - Fridge compartment 5 - Dairy shelves
B - Freezer compartments 6 - Door shelves
B1 - Zone 1 7 - Egg trays
B2 - Zone 2 8 - Bottle shelves
1 - Fridge shelves 9 - Led lights
2 - Chiller compartment 10 - Ice trays
3 - Crisper drawers 11 - Top freezer drawers
4 - Dairy shelf covers 12 - Bottom freezer drawers
10
Fig. 1

9
Food types and where to store them within the fridge section:
Vegetables and fruits - Crisper drawers (3)
Red meat - Lower fridge shelves and chiller compartment (2)
White meat and fish - Lower fridge shelves and chiller compartment (2)
Cheese - Dairy shelves (5)
Butter and margarine - Dairy shelves (5)
Bottled milk products and yoghurt - Bottle shelves (8)
Eggs - Egg trays (7)
Cooked food - Fridge shelves (1)
Crisper air adjustment sliders
This appliance’s crisper drawers feature two air adjustment vent
sliders. There is one on each side of the crisper drawer section. When
the crisper drawers are full these vents should be moved to the open
position to allow air to flow freely ensuring the food remains fresher
for longer. To adjust the air sliders, open the crisper drawers part of
the way and then lift and pull out the crisper drawer cover. Move the
vent sliders towards you to open them and towards the back of the
fridge to close them.
Crisper air adjustment slider
Fig. 2
10
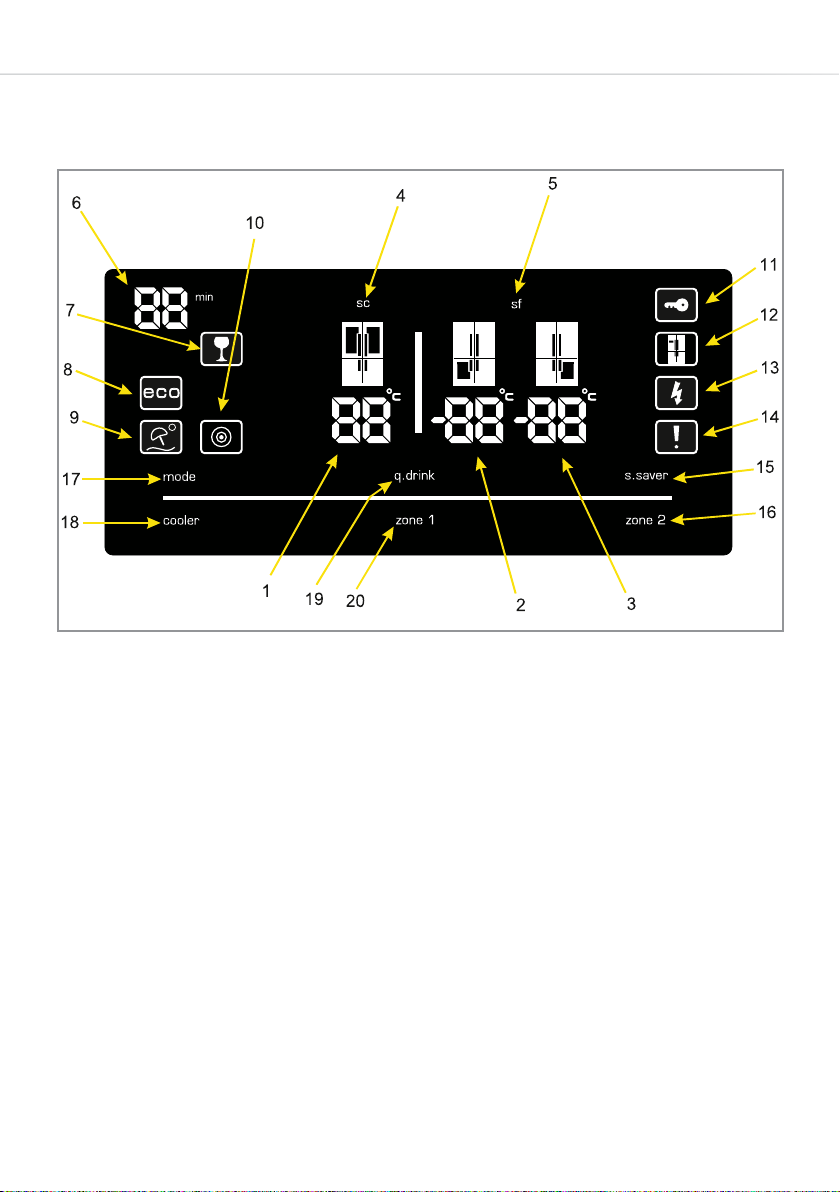
Control panel
1 - Fridge compartment temperature indicator
2 - Left freezer compartment temperature indicator
3 - Right freezer compartment temperature indicator
4 - Super cool indicator
5 - Super freeze indicator
6 - Quick-drink timer
7 - Quick-drink indicator 14 - Alarm indicator
8 - Eco mode indicator 15 - Screen saver sensor
9 - Holiday mode indicator 16 - Zone 2 sensor
10 - Eco light mode indicator 17 - Mode sensor
11 - Safety key lock indicator 18 - Fridge sensor
12 - Demo mode indicator 19 - Quick-drink sensor
13 - Low voltage warning 20 - Zone 1 sensor
Fig. 3
Table of contents
Other CDA Freezer manuals

CDA
CDA FF880 Reference manual

CDA
CDA FW482 Safety guide

CDA
CDA FW952 Quick start guide

CDA
CDA FW482 Reference manual

CDA
CDA CRI681 User guide

CDA
CDA FW881 Reference manual

CDA
CDA FF660 Quick start guide

CDA
CDA FW880 Reference manual

CDA
CDA FW927 Installation and operating instructions

CDA
CDA FW281 Reference manual


