Cecilio Violin User manual

Cecilio Violin Owner’s Manual
Congratulations on your purchase of a Cecilio Musical Instruments Violin! Please read through
the manual below to familiarize yourself with your new instrument.
READ THIS FIRST
All of our instruments are inspected upon arrival to our distribution center and again prior to
shipping. We can not accept responsibility for merchandise arriving in damaged condition. It is
the dealer’s and the end user’s responsibility to inspect merchandise upon receipt and report any
damages. Please inspect your violin immediately. Merchandise can be damaged in transit
even though there is no outward evidence of rough handing. (Concealed damage)
If damaged goods are found please contact your place of purchase within 24 hours of receipt of
package to have a claim filed with the carrier. You must save the cartons and packing material
until the claim is resolved.
Take extra care to prevent exposure to sudden changes in temperature and humidity. Avoid
direct, extended exposure to:
• Sunlight • Rain • Heaters • Air Conditioners
Cecilio violins are handcrafted instruments and are tested at our factory. Prior to shipping each
instrument is inspected by skilled technicians at our Los Angeles distribution center. However,
because violins are fragile instruments they can get out of adjustment in the shipping process. If
this occurs you may need to get your new instrument adjusted by a local technician.

Getting Started
You must assemble and tune your new violin prior to playing. Violins are delicate instruments and can be
damaged easily. Handle with care. If you have a violin instructor we recommend you see him or her to
assist you with assembling, cleaning and tuning your instrument for the first time.
If can not wait, follow the steps below:
Violin Bridge
The bridge is very important in transmitting the sound of your violin. It serves as the conduit
between the strings and the body of the instrument. Many players prefer to have their bridges
“customized” by violin luthiers in order to draw out an even better tone from their instrument. If
you desire this please visit your place of purchase or your local violin repair shop for information.
The bridge is not in a fixed position. It is held in place with the tension of the strings over the top
edge. Your bridge may not be set. If it is proceed to the tuning section. If your bridge is not set
you will need to set it by following the simple instructions below:
oLoosen strings if necessary. You will need some tension on the strings in order to keep
the bridge in place.
oPosition the bridge so the higher side of the bridge is under the low strings (G string
side).
oAlign the feet of the bridge with the two notches on the inside of the “F” holes and evenly
with the fingerboard.
oTilt the bridge up under the strings toward the tailpiece and set at a 90-degree angle. If
you can not tilt the bridge up because the strings are too tight, loosen them slowly and
tighten just enough so you can hold the bridge in place.
oAlign the strings so they are evenly spaced on the bridge prior to tightening the string too
much.
oTighten pegs by turning clockwise and pushing in towards the peg box in order to hold
the bridge in place.
oIf the pegs are slipping please refer to Pegs section below for simple solutions.
oIf the bridge begins to tilt forward you can very carefully pull it back with both hands while
resting the lower bout of the violin on your stomach.
Keep in mind that not all players have the same size hands and fingers. Some violins come with
the bridge not set at the correct height for the player and need to be adjusted. If this is the case
then a professional luthier should adjust the bridge to get it comfortable to play. Cost should be
minimal unless the pro wants to do more work on the violin. Tell them to only do what is vital to
allow the violin to be played easily, not an extensive setup to maximize its sound quality; unless,
of course, you’re ready to spend that money.
Sound Post
The sound post is vital to producing any sound from your new instrument. It serves as the conduit
between the bridge, strings, and body of the instrument and is located in the inside of the body,
visible through the “F” holes. The sound post on your instrument has been set in the correct
position prior to shipping by our skilled technicians using special tools. It is not in a fixed position
but is held in place by being custom fit to match the curvature of your instrument. During shipping
it is possible for the sound post to come loose or dislodge itself. If this happens, please see a
local luthier or repair technician. Harm can be done to your violin if the sound post is set
improperly that is not covered by Cecilio warranty.
Tuning

Once the bridge is set you are ready to bring your violin up to pitch.
If you are new to the violin we suggest you have your instructor assist you with tuning. The
strings are delicate and if tightened too tight can snap and cause damage to your new instrument.
As you are tightening the strings to correct pitch keep pulling the top of the bridge back toward
the tailpiece. It will tend to lean toward the fingerboard as you tighten the strings. If you let it lean
too far it will SLAM down and could result in damage to your instrument.
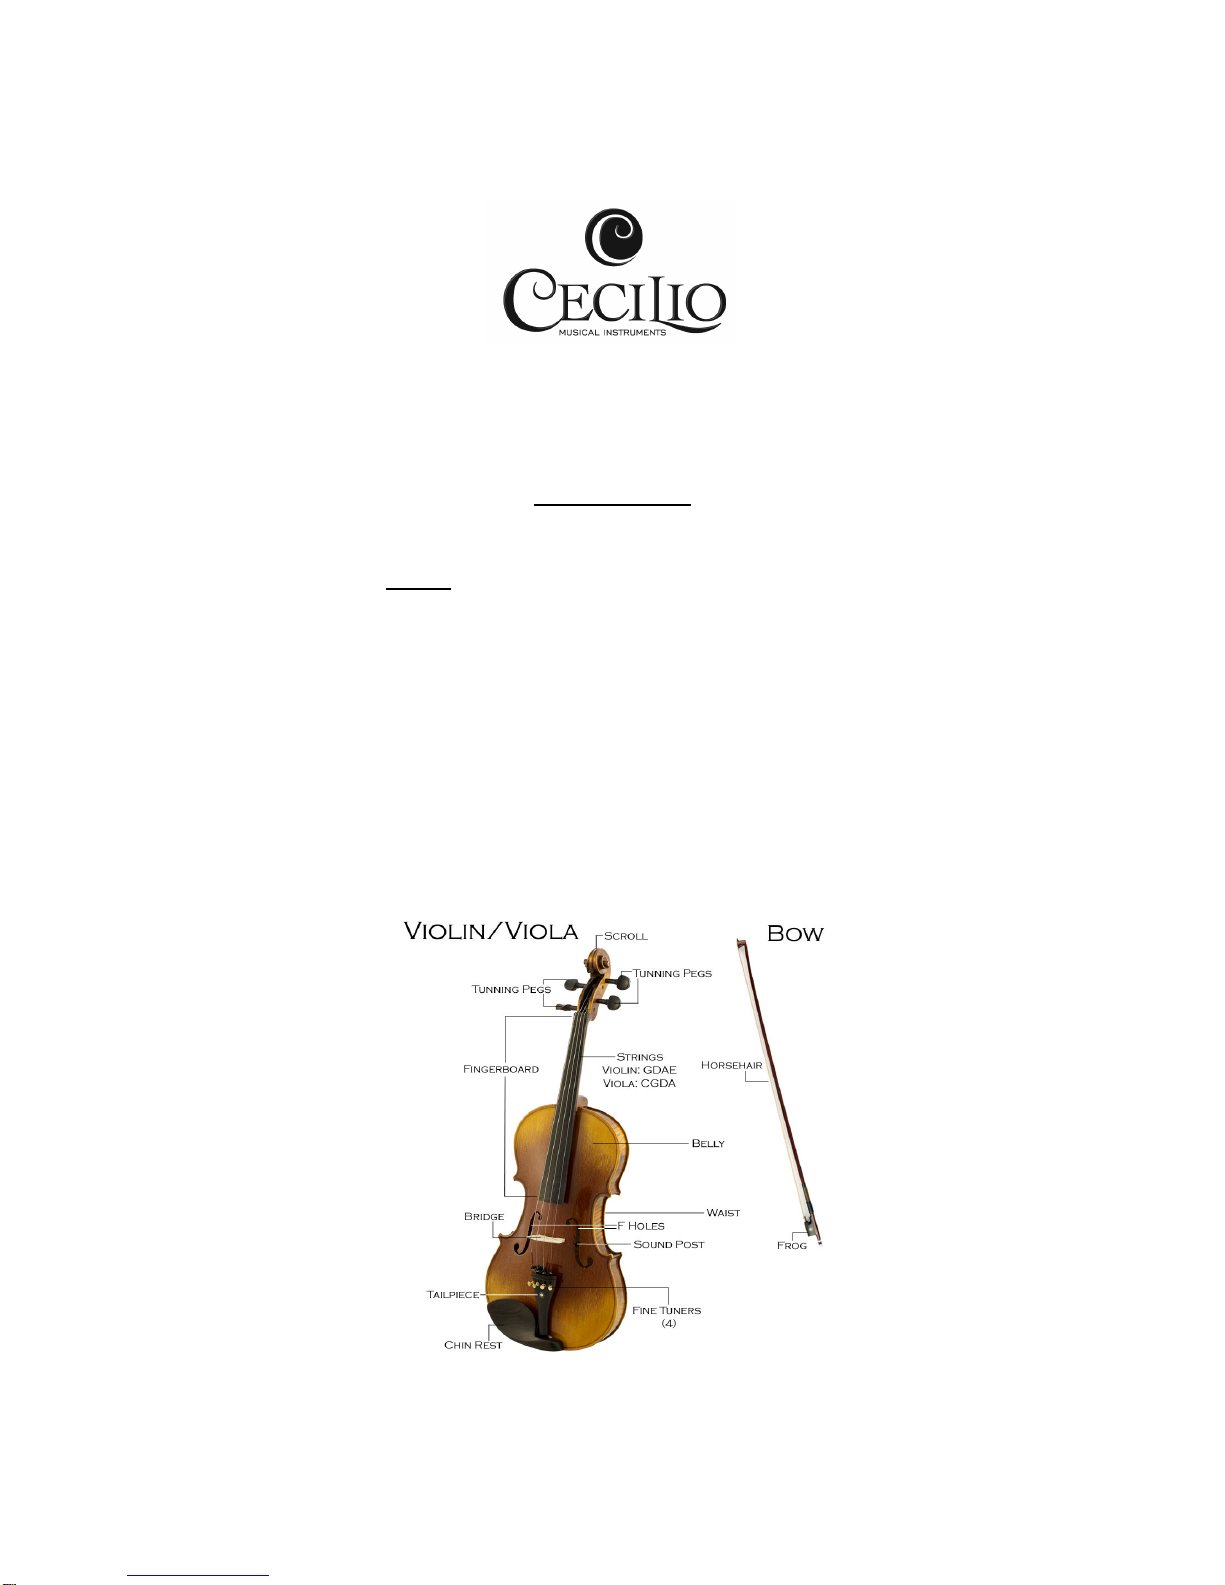
The violin notes are G-D-A-E from low to high
Use a pitch pipe or an electronic tuner for reference
Start by tuning the G string first. The G string is the lowest pitch and the first string from
the left as you are looking at the violin.
If you are using a pitch pipe blow into it to produce a G note
Pluck the string and adjust the tension of the string with the peg to get relatively close to
the pitch. You will need to push the pegs in toward the peg box
You will need to continue to pluck or play the string, all the while keeping the G pitch in
your ear or blowing into the pitch pipe in order to get the pitches to match. Once you are
close you can use the fine tuner that is located on the tailpiece to get an exact match of
pitches.
Repeat the steps above to tune the remaining strings in the following order: D, A, and E.
Once you have completed the tuning of each string, be sure to double-check the
accuracy of the intonation by playing each consecutive pair of strings together, G-D, D-A,
A-E. Make any adjustments that may be necessary with the fine tuners
You are finished
Things to keep in mind
Adjust the pegs to make larger adjustments and use the fine tuners to make smaller
adjustments.
Tighten the tuning pegs by turning them clockwise.
You will need to push the pegs in towards the peg box in order to lock the strings in
place.
Depending on the weather (temperature and humidity level), as well as the amount and
type of playing, you may need to retune the instrument frequently (for example, every 15
minutes to a half an hour). In ideal conditions, this will not be necessary, but do check
periodically to see that your violin is still in tune.
Strings take some time to wear in. New strings tend to loose their tension more than
older strings. When you get your new strings to pitch you may want to slightly pull on
them to help them stretch out and settle in. After pulling on the string you most likely will
need to re-tune it.
It is easier to arrive at the desired pitch from below the note. If the string pitch is sharp
(high) loosen the string slightly until the string pitch is flat (low). Slightly tighten the peg
until you arrive at the desired pitch.
It will take some practice going back and forth before you can quickly tune a string, but in
time, you will master the slight adjustments needed instinctually and be able to tune the
instrument without thinking it through step by step

Pegs
If the pegs are slipping you can do the following:
Be sure to push the pegs in as you tune the strings up to pitch. This ensures that the
pegs hold tighter as the tension of the string goes up.
Use peg compound to help lock the pegs in place. You can also apply chalk onto the
pegs where it is inserted into the peg box.
New strings will require some stretching before they settle in and hold pitch. Try pulling
the strings slightly upwards after tuning to pitch. This can take some of the slack out of
the strings and help accelerate the settling in process for new strings.
Bow
The bow must be tightened and rosined in order to product a sound with it. To prepare your bow
follow the steps below:
Use the screw to tighten the frog so that the hair has tautness.
Be careful to not over tighten your bow. The hair should have a slight bounce to it without
touching the stick after placing it on the strings. Usually about 1/4 of an inch distance
from the low point of the curve to the hair is ideal. For some it is more and some it is less
depending on how the player plays.
A new rosin cake will be too slick to apply to the hair. To correct this, take a small
pocketknife and cut three or four parallel lines in the rosin so that there will be some
texture to the cake. You can also roughen the surface of the rosin cake with some
sandpaper.
Slowly draw the hair over the rosin cake from the frog to the tip of the bow. Be careful not
to draw the bow too quickly which would cause some friction.
On a new bow, you may have to repeat this process approximately 5-10 minutes...test
the bow to determine if the rosin is adhering to the hair.
If it is, you'll start to hear a clear pitch emitted as the bow is drawn over the strings.
Try placing the bow on your strings and play a few notes open.
If there is no tone or volume emitting from the strings the bow is not grabbing the strings
enough to generate a tone, try applying more rosin.
Follow this process repeatedly until the bow no longer slides on the strings, and you're
getting a clear tone.
Things to keep in mind
There’s a happy medium you’re trying to attain when applying rosin. Listen for a nice clear tone
as the bow draws on the strings. If there’s a whispering tone or no tone at all, add more rosin. If
there’s a clear tone, you should have the optimal level of rosin on the bow. If there’s a scratchy
tone, stop applying your rosin and start playing.
If you start to hear a scratchy tone, instead of a nice clear tone, you may have applied too much
rosin. If so, simply play until the rosin slowly wears off.
When your practice session is over loosen the screw so that the hair is no longer taut and return
your bow to its case. This will help you prolong the life of your bow.
Never touch the horsehair on your bow. The oils from your skin will damage the hair and
take away its ability to grab the strings.

Shoulder Rest
To attach the shoulder rest:
oAdjust the feet so that the shoulder rest will clamp on the edges of the lower bout
oGently spread the feet to fit over the edge and snap in.
Maintenance
Always keep your instrument and bow in its case with the lid closed when not in use. Also, be
sure that you securely lock the bow in place and remove the shoulder rest or pad before closing
the case. Careless accidents could leave your instrument seriously damaged.
Pegs
If pegs start to slip push the peg in towards the peg box to get a better grip.
Use peg compound to help lock the pegs in place. You can also apply chalk onto the pegs
where it is inserted into the peg box. You should apply peg drop every couple of months.
Over time, all pegs and the peg box become worn. When this happens, it is time to bring the
instrument to a professional repairperson for refitting.
Body
Never use furniture polish or alcohol to clean your instrument
Always clean your violin after playing. Keep a lint-free cloth inside your case and wipe off all the
rosin dust and dirt from your instrument after each time you play. Pay particular attention to the
fingerboard and the top of the instrument. If rosin dust accumulates and is not wiped off it will
fuse with the varnish, and become impossible to remove without damage.
Be careful not to knock the bridge out of place while cleaning.
The Bow
The bow should not be used on anything or for anything other than the strings of a
stringed instrument.
Never touch the horsehair on your bow. The oils from your skin will damage the hair and
take away its ability to grab the strings.
Rosin the bow regularly. For students it is probably sufficient to rosin the bow once a week. Too
much rosin will produce a harsh tone and cause an excessive build-up of white rosin powder on
the instrument.
When your practice session is over loosen the screw so that the hair is no longer taut and return
your bow to its case. This will help you prolong the life of your bow. You should loosen the hair
completely then bring it back with just a single turn of the screw. The goal is to “keep the hair
even but allow the bow to relax.”

Bows must be periodically rehaired. This should be performed by professional repair technicians.
Rehairing is done when too many of the hairs are broken, or the hair is dirty, or has lost its
friction. Sometimes changing the whole bow can be easier and cheaper than rehairing the old
bow, especially with small fractional sized bows.
Bows sometimes lose their correct camber and need to be recambered using the same heating
method as is used in the original manufacture. This should be performed by professional repair
technicians.
A bow stick should be wiped clean after every use. A soft, non-abrasive, clean cloth (lint free) with
no oils or chemicals of any kind, should be used. There are special untreated cloths marketed for
the cleaning of instruments and bows; there are also many types of cleansers and polishes for
stringed instruments that can be used on bows. If the bow is wiped properly after every use,
cleansers and polishes are pretty much unnecessary. (If you feel the need to polish your bow
stick, first use a drop on a small area of the stick to make sure it won’t damage or discolor your
finish.) Never use any kind of commercial cleanser on a bow (or stringed instrument) and keep all
chemicals, cleansers etc. away from the hair.
Grip or winding of the bow must occasionally be replaced to maintain a good grip and protect the
wood.
Strings
Always clean your violin strings after playing. Keep a lint-free cloth inside your case and wipe off
all the rosin dust and dirt from your strings after each time you play. This will make a striking
difference to the sound.
Strings will slowly deteriorate. Usually, within six months they start to lose much of their tone
quality and begin to sound dull and dead. This occurs even if the violin is not being played.
Old strings are lifeless and dull sounding. They should be replaced with new strings. The finest
instrument will not sound good with poor strings. The strings should be replaced one at a time.
When you need to change an entire set of strings, do not remove all of the old strings at one
time. This will cause you to lose the correct bridge placement and the lack of tension can cause
the soundpost to fall over.
To change your strings follow the steps below:
Adjust the fine tuner so that it is in the middle of its range.
Insert the ball end of the string around the hooks of fine tuner and lightly pull
Insert the other end of the string through the hole in the peg and wind it by turning the
peg clockwise. Align the string on the bridge by running it through the groove that was
made from the old string.
Wind the string evenly from the center of the peg to just before the edge of the pegbox.
Tighten the string until you get close to the desired pitch.
Use the fine tuner to lock the string into pitch
Check the bridge’s adjustment, guarding against the to edge being pulled toward the
fingerboard excessively while bring the new strings up to pitch gradually.
Things to keep in mind

New strings may break after installation. If this happens be sure to take note of where
the string broke. This can be caused by a variety of reasons:
oA violin can develop a rough spot at the peg, the nut, or the fine tuner if the
winding of the string is too close to the wall of the pegbox.
oIt may be under too much tension and stress, causing it to snap.
If you are suffering from either slipping or tight pegs please see above for details of how
to remedy the problem.
Remember that after you have put them on, strings will slowly deteriorate. Usually, within
six months they start to lose much of their tone quality and begin to sound dull and dead.
This occurs even if the violin is not being played. Even unused strings. In their packages
lose their quality after a while.
Often, trying different strings can make a significant contribution to improving the sound
of your Instrument.
Your violin is a fragile instrument and requires service on a regular basis. We recommend that
you visit a skilled repair shop at least twice a year to have your instrument checked. An
inexpensive, early repair can save you the expense of a major repair or overhaul.

Cecilio Musical Instruments Warranty Information
The terms and conditions listed here will govern all warranty claims for Cecilio Musical
Instruments products.
These terms and conditions cover all instruments manufactured and distributed by Cecilio
Musical Instruments. There is no additional warranty, express or implied.
Cecilio Musical Instruments warrants its instruments to be free of defect in material and
construction for 1-year from the date of purchase. Warranty excludes accessories and cases.
Please see below for limitations and restrictions to this warranty. Cecilio Musical Instruments will,
at its option, repair or replace any item found to have been defective in materials or manufacture
under the terms stated here. Cecilio Musical Instruments shall be the sole arbiter of eligibility for
warranty repair or replacement. Cecilio Musical Instruments liability is limited to repair or
replacement of defective items.
To be eligible for warranty coverage, the original purchaser of the item must present the defective
item, together with the original receipt of purchase, to the dealer from which it was purchased.
The dealer will then make arrangements with Cecilio Musical Instruments for repair or
replacement of the defective item.
Cecilio Musical Instruments reserves the right to make changes to this warranty. The policies in
place at the time of purchase will be honored.
Restrictions:
o1-year warranty applies only to original purchaser of instrument
oWarranty does not cover strings, reeds, cases or other free accessories
oDamage caused by neglect or misuse of instrument is not covered
oDelicate instruments are affected by climatic conditions. Exposure to excessive heat,
cold, dryness, or moisture is considered neglect
oInstrument adjustment is not covered by this warranty
oNormal wear caused by normal use of items is not covered by this warranty
oNatural products, such as wood, cannot be guaranteed against cracking, seam
separation, warping of fingerboard or chipping
Table of contents
Other Cecilio Musical Instrument manuals