Celestron VistaPix 72210 User manual

8x32
Binocular & Digital Camera
Model #72210
Resolution
HI-1600x1200 / LO-640x480
Photograph measure
HI-40 P / LO-300 P(Built-in 16MB Flash memory)
Image sensor CMOS sensor
Focus range 15m( 49.21ft )~infinity
Exposure Auto
White balance Auto
Memory inside 16MB Flash internal memory
Memory slot SD card slot for expandability
Specifications 8 x32 mm
Angular field of view o
5.6 Field of view:
92.7m(304 ft) at 914m(1000 YDS)
Exit pupil 4.0 mm
Digital Camera Specifications
Binocular specifications
System Requirements:
USB Cable x1
1.Window 98/ 98SE/ME/2000/ XP
2.Theprocessor abovePentium233MHz
3.128MBSDRAM
4.Video(VGA)card with2MBof RAMfor
minimum16-bit(HighColor)display.
5.CD-ROM
6.USBport
7.600MBof freehard
diskspace.
Battery AAA alkaline battery x 2
Package Contents
Eye Relief 12.5 mm
Coatings Multi coating on the first surface.
Single layer for other surface, fully coated.
Close focusing distance
3.5 m
Binocular Dimensions 156mm x 102mm x 56mm
Binocular Weight 433 g
User Guide x1
Software x1

Cautions Viewing (Movie) recordedimages on PC
1. Use theUSB cable toconnect the USBport from PCto VistaPix.
After connectionthe "PC" displayon LCD.
P.16
2. Double click"MY COMPUTER"
on the PC'sdesktop. 3. Double click"Removable Device".
4. Open \DCIM\100scope\ 5. Select thevideo file (*.AVI) and
double click it,the images video
will play through"Windows Media
Player" software orother software.
In order touse Windows MediaPlayer to viewthe videoAVI filetaken with
your VistaPix, thecomputer viewing theAVIfile needs tobe running Microsoft
DirectX version 8.0aor later.If you experienceproblems viewingAVI files
from Media Playeryou can upgradeDirectX to themost current versionby
going to theMicrosoft DirectX WebPage at:
www.microsoft.com/windows/directx/default.aspx
Follow the downloadinstructions given onthe web site.The download isfree.
Warning:
Avoid using undercombustibility gas environment.
Do not lookat the sunwith the Binocular, which willdamage the eyes
even lead toblindness.
Please take carewhen using thehanging tape, anddo not letchildren
twist it aroundtheir necks andbodies to avoiddanger due toimproper
operation.
Please don't throwthe product withthe gallus inhand to avoiddamage
to others ormalfunction of theproduct.
Keep the productaway from babiesto prevent themfrom putting the
batteries or silicagels into theirmouths, which causesdanger.
Usage of thebattery
Please always useAlkaline Battery(AAA Alkaline Battery)
Please take outthe batteries andkeep them separatelywith the product
if you'll notuse the productfor a longtime.
About usage
Do Not placethe product underthe following environmentsto avoid any
damage. o
1.Places in temperaturehigher that 70C
2.Damp or dustyplaces
3.Places with strongelectromagnetic field.
Please do notdisassemble or repairthe product toavoid malfunction.
Please do notdrop the productto the groundto avoid malfunction.
Never immerse VistaPixinto any fluidor liquid.
Remove dust orstains with asoft cloth dampenedwith water orneutral
detergent. Keep ina dry andcool dust-free environmentor a container
when it isnot used.
Takethe batteries outwhen VistaPix isnot to beused over along period.
Avoid dropping theVistaPix. Do notdisassemble VistaPix.
Cautions

Contents
1.Introduction......................................................P.1
2.Notice to user..................................................P.2
3.Product part identification.................................P.3
4. ................................P.4
5.Digital camera modes......................................P.5
6.How to use the binocular..................................P.7
7.Using the camera............................................P.8
8.System requirements.......................................P.9
9.Basic maintenance..........................................P.10
Memory & Image Download
10.Driver software and image
downloading procedure..........................P.11~P.15
P.15
1
2
4
3
6
57
8
1.To execute Photo Manager.
Select the buttons as indicated.
2.Enter " Removable Disk " to open
"DCIM" file.
5.Images download finished.
3.In " DCIM " file, open"100MEDIA "
data file.
4.In " 100MEDIA " Data file, choose the
pictures you want or choose all Images.
How To Use the PhotoManager
1
2
3
Steps to download image file
11.Viewing(Movie) recorded images on PC.........P.16
Select the buttons as indicated. "Help" will give you
detailed information on Photo Manager's many
features. To learn more about Photo Mangaer you
can click on the Icon (3) in the lower left side of the
screen to directly to the PhotoManager web site
www.photo-diy.com.tw/

P.1
1.Introduction
VistaPix is a binocular integrated with a digital camera that is great for
sporting events, concerts and wildlife activities such as hunting or
bird-watching. VistaPix lets you record memories and sights at the touch
of a button. Usethe full-featured binocular for closer views and capture
images to take home with you at thesame time.
VistaPix makes it possibleto share your fun with others by downloading
images from the camera right to your computer to e-mail to your friends and
family.
P.14
8. Choose "Custom" or "Typical"
form of installation. 9.Please confirm the file location
10. Begin installing software 11.Software installation finished, please
press "Finish"for confirmation
After installing VistaPix driver & software. Please restart your computer.
Steps to install Photo Manager
Battery installation manner
1. Hold tight the bottom of battery cover, and lift to open.
2. Install two AAA batteries into the battery compartment as shown below.
2
1

P.13 P.2
Looking at or near the sun will cause instant and irreversible damage
to your eye. Eye damage is often painless, so there is no warning to
the observer that damage has occurred until it is too late. Do not
the binocular at or near the sun.
Children should always have adult supervision while observing.
point
WARNING !
Never use a VistaPix to look at the sun !
2.Notice toUser
Steps to install Photo Manager
2. Select "Install Thalia Photo Manager" 3.Choose the language and press
confirm button
4.Enter installing screen 5.After confirming, please press
"Next" button
7.The serial number is located on the
front of the CD.Press "Next" when
complete
1. Insert the CD ROM
6.After confirming, please press "Yes"
SD card lidclosed SD card lidopened
Foil face up
2-1. When noaction is performedwith your binocular, the VistaPixwill
automatically turn offafter 90 seconds.
2-2. The VistaPix has abattery level displayin the rightlower corner of
the LCD .When the batteryis low youwill hear along "beep" .If no
action is taken, VistaPix willautomatically turn-off after10 seconds.
2-3. Please usealkaline battery forthis product.
2-4. VistaPix comeswith a SDcard slot thatenables you toexpand the
memory. Toinstall an optionalSD card:
Open the coverof the SDcard slot andinstall the card(with the gold
strips facing up)into the SDcard slot (12)until it clicksinto the
position.

P.3 P.12
3. Product part identification
1. Diopter Knob(on underside)
2. Center Focus Knob
3. Objective Lens
4. Power/Mode Button
5. Shutter/Set Button
6. USB Port
7. Eyepiece
8. Camera Lens
9. LCD Screen
10. Battery Compartment Lid
11. Barrel
12. SD card Slot
10
1
4
5
6
7
3
2
89
11
12
7
3
7
11
5. Computer willautomatically install
the driver.
7. Installation complete.Please press
"Finish" button.
Steps toinstall VistaPix driver
6. If yousee the "Microsoftdigital sign"
request appear onscreen as you
are installing thedriver , please
"Yes"button to continue press
installing.
After installing VistaPix driver. Please restart your computer.

P.11 P.4
1.Before you installthe driver,please make surethat your VistaPixis not
connected to thecomputer.
2.If you havewindows ME/ 2000/ XP operation systeminstalled in your
computer, youshould not needto install theVistaPix driver.Simplyview
and save imagesthrough your MyComputer icon.
1. Insert theCD included withyour
VistaPix.
2. Click themouse on "Installation
Driver" to begininstallation.
3. Begin "InstallShieldWizard"
and your computerwill
automatically execute the
installation of driverprogram.
4. Follow the"InstallShield Wizard"
steps to guideyou through the
driver installation.
Click on "Next"when complete.
Steps toinstall VistaPix driver Memory & Image Download
Download images
When downloading thephotos, the internalmemory and thecard memory
must be downloadedseparately.
Download from flashmemory
Takeout the SDcard (if necessary)and connect theto the computer,
then follow thedownloading steps andall the photosin the flash
memory can bedownloaded.
Download from OptionalSD card
Insert the SDcard and connectthe to thecomputer, thenfollow the
downloading steps andall the photosin the SDcard memory canbe
downloaded.
Using SD memorycard
The VistaPix hasbuilt in flashmemory, sowhen you takeimages, the
images will besaved into theflash memory insideyour VistaPix until
the memory isfull.
Whenever you insertan optional SDmemory card totake images, the
images taken withthe SD cardand flash memoryare stored separately.
So when downloading theimages, the internalflash memory andthe
card memory mustbe downloaded separately.
(Once the SDcard memory isfull, you canremove the cardand continue
to use theVistaPix until theinternal memory isfull as well).

[ Erase All Images mode ]
P.5 P.10
8.Basic maintenance oooo
Operating Environment: 41 to104 F(5 to 40 C). 20%-85% relativehumidity,
non-condensing.
Care of yourVistaPix
8 -1.Never immerseVistaPix into anyfluid or liquid.Removedust or stains
with a softcloth dampened withwater or neutraldetergent. Keep ina dry
and cool dust-freeenvironment when notin use.
8 -2.Take the batteriesout when VistaPixis not tobe used overa long
period.
8 -3.Avoid dropping theVistaPix. Do notdisassemble VistaPix.
4. Digital Camera Modes
4-2. Explanation of mode icons.
Full display of mode icon.
FMT
4-1.Press the left button (Mode/Power Button) to scroll through the Modes.
Press right button(Shutter/Set Button)to select a mode or to take images.
[ Erase Last Image mode ]
[ Self timer mode ]
VistaPix will take an Image after 10 seconds.
[ Low Resolution mode ]
(640x480)
[ High Resolution mode ]
(1600x1200)
[Optional SD Card inserted]
[ Low Resolution mode ]
(640x480)
[ High Resolution mode ]
(1600x1200)

P.9 P.6
7.System requirements
Installation of driver
Since VistaPix is a Mass Storage Deviceyou can access captured images
just as if it were a hard drive,therefore no software driver is needed (SeeMass
Storage Mode ).
If using VistaPix with an older versionof Windows 98SE it may be
necessary to install the software Driver.
B
A
VistaPix PC with USB port
7-1. Windows 98SE /2000 / ME /XP
7-2. Pentium 233MHzor higher
7-3. 128MB SDRAM
7-4. Video(VGA) card with2MB of RAM forminimum 16-bit(High Color) display.
7-5. CD-ROM
7-6. USB port
7-7. 600MB of freehard disk space.
6-1-10. VistaPix has a continuous picture taking (CPT) mode that allows you to
record a video stream as an AVI file.To use continuous picture taking
mode:
-Use the Mode/Power Button (4) to select the CPT mode.
-Press the Shutter/Set Button (5) to begin taking video.
-Press the Shutter/Set button again to finish the operation.
[ Power off mode ]
FMT
[ SD card warning ]
"FMT" will flash if VistaPix is unable to access the SD card. SD card
may need to be re-formatted.
FMT
[ SD card Format mode ]
VistaPix will format SD card.Images will be erased.
[ Continuous picture taking mode ]
(Video capture mode). Saves images as an AVI file.
[ Mass Storage mode ]
When connected to computer using USB cable "PC" will display.
[SD card full mode]
When the memory is full, the LCD displays "Full"
When no action is performed on each chosen mode, it will return to the photograph
taking mode automatically after 10 seconds.
Press Mode/Power button and Shutter/Set button at thesame time to
power up in mute mode.
Mute Mode
Ordinary

P.7 P.8
6.Using the Camera
Photographic functions
6-1-1. Turn on Power bypressing the Mode/ Power Button (4) for 3seconds.
6-1-2. Press the Mode/ Power Button (4) toselect the resolution mode ("Hi" or"Lo").
6-1-3. Select a target to view with thebinocular, and aim at thetarget.
6-1-4. Press the Shutter/Set Button (5) totake an image. Ashort beep will
sound indicating the picture has been taken.
6-1-5. The digital counter on the LCDwill advance each time an image is taken.
When the camera's memory is full, thescreen will display Full.
6-1-6. To erase the last image taken, use theMode/Power Button (4)to select
the "erase last image" mode (trash canicon), and press theShutter/Set
Button for 3 seconds.
6-1-7. The self timer function can be selected from the LCD by using the
Mode/Power Button (4). Press the Shutter/Set Button(5) to take an
image after 10 seconds.
6-1-8. VistaPix is a Mass Storage Device. This means that while
connected to a PC through the USB port, Windows will add a "Removable
hard drive under the "My Computer" icon. Simply access the removable
disk to Disk" toretrieve,view and save imagesto a permanent location.
When connected to a PC, the LCD screen will display the [PC] screen.
6-1-9. If at any time VistaPix cannot access the optional SD memory card,the
"FMT" icon will flash. To correct this the SD card mayneed to be
Formatted. To format the SD card, select "SDcard format mode" and
Press the Shutter/Set Button for 3 Seconds.NOTE:This willerase
all images stored on the memory card.
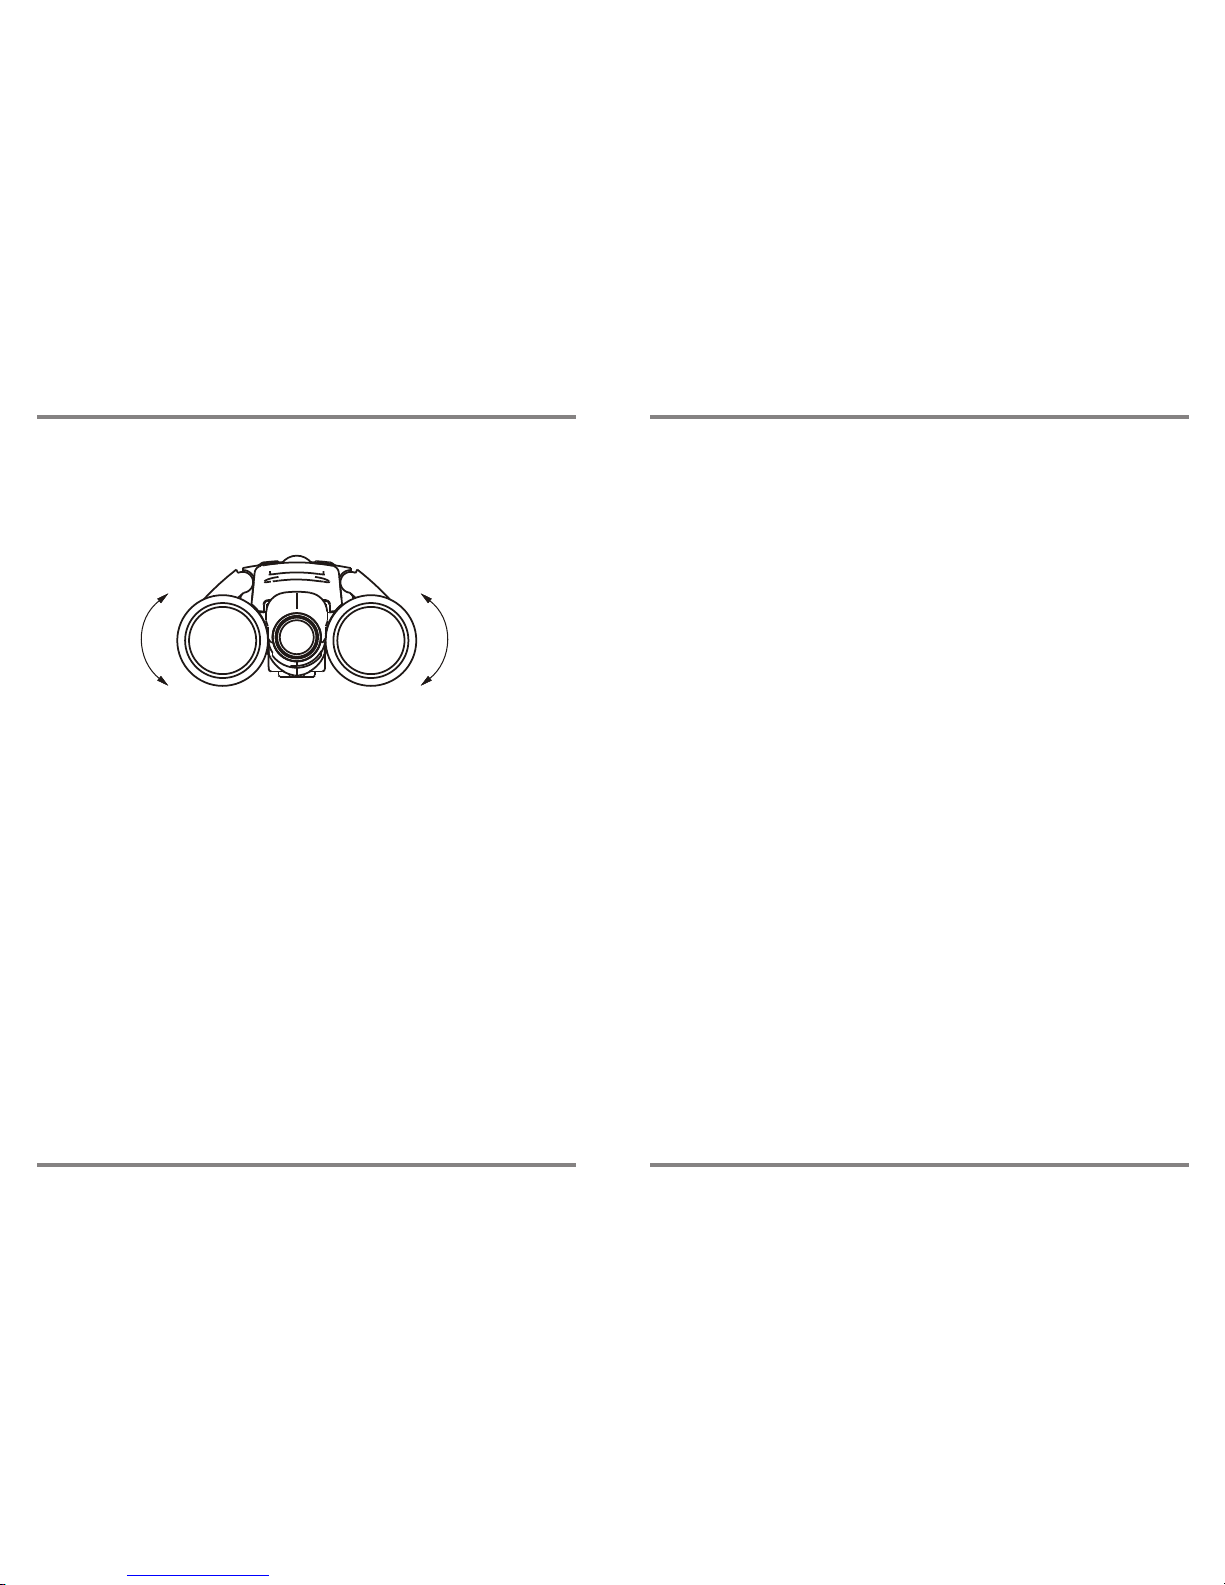
5. How to use the binocular
Focusing the Binocular
Adjusting the eyepieces
The distance between your eyes is called interpupillary distance.
The interpupillary distance is different from oneperson to another.
It is important to adjust to yourinterpupillary distance before usingyour
VistaPix:
- Hold the VistaPix firmly in thenormal viewing position.
- Adjust the barrels bypushing together or pulling apart until you see a single
circle field with both of your eyes.
A. Set the Diopter Knob on underside ofVistaPix at its center point between
+ and - .
B. Choose an object that is at least 15 meters (49.21 ft) away .
C. Looking with just your left eye, rotatethe Center Focus Knob until the object
you are viewing is in best focus.
D. Looking with just your right eye, rotatethe Diopter Knob until the object you are
viewing is in best focus.
E. Viewing your object with both eyes,turn the Center Focus Knob to bringit in
best focus.
Toadjust the eye-relieffor eyeglass wearers:Fold down therubber eyecups
and place themagainst your glassesto get thebest viewing result. Use this productunder good lightingconditions, avoid facinglight source
directly. Rememberto keep adistance of atleast 49 feet(15 meters) away
from the targetwhen taking aphoto. Asyou press the"Shutter/Set" button,
hold the binocularvery steady untilyou hear a"Beep" sound. Ifthe binocular
is unsteady,the camera willnot focus welland blurred imageswill result.
Table of contents
Other Celestron Digital Camera manuals

Celestron
Celestron Skyris 132M Operating and maintenance manual

Celestron
Celestron NexImage 93708 User manual

Celestron
Celestron VistaPix 72212 User manual

Celestron
Celestron 95507 Operating and maintenance manual

Celestron
Celestron StarSense AutoAlign User manual

Celestron
Celestron VistaPix 72204 User manual

Celestron
Celestron VistaPix 72204 User manual