Celia & Perah M6 User manual

M6 | The Dramatic Moment
User Manual
Wireless Scalable Hi-Fi Audio System

2 3
Table of Contents Table of Contents
Getting started .................................................................................................................... 4
Package contents ................................................................................................................................... 4
Controls, connections and display ............................................................................................... 5
Installation precautions ...................................................................................................................... 7
Installation .................................................................................................................................................. 8
Installation suggestions ...................................................................................................................... 11
Audio source inputs .............................................................................................................................. 12
Settings ................................................................................................................................... 13
Powering on .............................................................................................................................................. 13
Subwoofer and Zone 2 speakers connection (if any) ........................................................ 13
Main Speakers' left and right channels settings ................................................................... 15
Zone 2 Speakers' left and right channels settings .............................................................. 15
Sound testing .......................................................................................................................................... 15
Remote control .................................................................................................................. 16
Remote control buttons ..................................................................................................................... 16
Buttons functions explanation ....................................................................................................... 16
Bluetooth ...............................................................................................................................18
Pairing ........................................................................................................................................................... 18
Unpairing .................................................................................................................................................... 18
Wi-Fi .........................................................................................................................................19
Connecting M6 to your Wi-Fi network ..................................................................................... 19
Wi-Fi playback .................................................................................................................... 24
C&P Connect playback instructions ............................................................................................ 24
Using AirPlay ............................................................................................................................................ 25
Care and Maintenance .................................................................................................. 26
Troubleshooting ............................................................................................................... 27
Important safety instructions ....................................................................................29

4 5
① ON/OFF ⑥ 3.5 mm jack input
② Source ⑦ Optical input
③ WPS (Wi-Fi connection) ⑧ DC in
④ CONN. (C&P wireless connection) ⑨ RCA line connector
⑤ USB-C input ⑩ Coaxial input
Ⓐ Remote control receiving area Ⓒ LED display
Ⓑ LED status indicator
Package content
Getting started Getting started
Controls, connections and display
Package content description
Please make sure that the package contains the following components:
»Main Speakers
»Main Speakers │ | Control panel and display
»Subwoofer
»Zone 2 Speakers
2.1 set-up 4.1 set-up 6.1 set-up
Main Speakers (pair) 1 unit Main Speakers (pair) 1 unit Main Speakers (pair) 1 unit
Subwoofer 1 unit Zone 2 Speakers (pair) 1 unit Zone 2 Speakers (pair) 2 units
Subwoofer 1 unit Subwoofer 1 unit
Master speaker (front) Master speaker (back)
Remote control
Adapter Power cord RCA cable Rubber pads Rubber pads template User manual
Master speaker Slave speaker
Adapter Power cord RCA cable Rubber pads Rubber pads template
Master speaker Slave speaker
Subwoofer
Adapter Power cord

6 7
LED indicator Current state
Steady light Stand-by
Blinking light Entering pairing mode
Change in quantity It indicates whether the Zone 2 Speakers or the Subwoofer
are currently connected
LED indicator Current state
Slow blinking Stand-by
Quick blinking Waiting for the Main Speakers to enter pairing mode
Steady light Paired with the Main Speakers
LED indicator Current state
Slow blinking Stand-by
Quick blinking Waiting for the Main Speakers to enter pairing
mode
Steady light Paired with the Main Speakers
LED indicator
The LED display provides information such as source, volume and 3D mode selected, as well as
an interface when operating the remote control; the LED status indicator shows the connection
status of the Subwoofer and the Zone 2 Speakers. For detailed instructions, please refer to the
table below.
Main Speakers and Zone 2 Speakers can be installed on wall mounts or desk stands as well.To
purchase them, please contact C&P's distribution channel or visit directly the C&P website at
www.celia-perah.com.
• To avoid any interference, please keep the Main Speakers and other wireless devices (such
as Wi-Fi routers, wireless phones etc.) at least 30 cm away one from the other, and make sure
that no wall or metal barrier is found between the Main Speakers, the Zone 2 Speakers and
the Subwoofer.
• Direct the front (soft grille) of the Main Speakers towards the centre of the room.
• If you wish to install the Main Speakers on a bookshelf or cabinet, make sure to position
them nearby the front edge to avoid the sound to be aected.
• Place the Subwoofer's rubber pads on the ground and make sure that the power outlet is
located nearby the installation spot.
• Do not place anything on top of the Main Speakers or the Subwoofer.
• Keep the speakers away from heat sources.
LED indicator
LED indicator
»Subwoofer │ | Connections
Installation accessories
»Zone 2 Speakers │ | Connections
① DC in
② CONN.
③ LED status indicator
④ Software update port
① DC in
② CONN.
③ LED status indicator
④ Software update port
⑤ RCA line connector (left and right
channel connection)
Installation precautions
Getting started Getting started
Subwoofer(back)
Master speaker (back)

8 9
Installation
»Main Speakers
»Subwoofer
»Zone 2 Speakers (if any)
① Master and slave speaker positioning
Position the master speaker—the one with the control panel on the back—on the left side
of the listening position and the slave speaker on the right side. Depending on the position
of the TV screen and the surroundings, the speakers can be placed upright on the left and
right sides of the screen, or horizontally below the screen.
① Installation spot
Place the Subwoofer nearby a power outlet with the rubber pads on the
ground.
Tip: Place the Subwoofer at a distance of 30 cm from the corner of the room for
optimal performances. Place the Subwoofer nearby the listening position for a
more direct and powerful bass performance.
① Master and slave speaker positioning
The active speaker—the one with the connection ports and the buttons on the
back—should be installed to the left side of the listening position, while the
passive speaker should be installed to the right.
② Adhesive rubber pads
Align the template to the four corners of the speaker's bottom and attach the rubber pads
one after the other. ② Connecting the power
Plug one end of the power cord into theDC INpower port on the back of the
Subwoofer and plug the other end into a power outlet.
Attention:The LED indicator will light up and blink slowly.
③ Master and slave speaker connection
Insert the RCA cable into the L/R into the connection ports on the back of the two speakers.
Getting started Getting started
④ Connecting the power
Plug one end of the power cord into the DC IN power port on the back of the
active speaker and plug the other end into a power outlet.
Master speaker Slave speaker Master speaker Slave speaker
Upright placementH orizontal placement

10 11
③ Slave and master speaker connection
Insert the two ends of the RCA cable into theL/RandCH Outconnection ports on
the back of the Zone 2 Speakers.
④ Connecting the power
Plug one end of the power cord into theDC INpower port on the back of the
active speaker and plug the other end into a power outlet.
Attention:The LED indicator will light up and blink slowly.
Installation suggestions
Getting started Getting started
2.1 set-up - suitable for the bedroom
4.1 set-up - suitable for the living room
6.1 set-up - suitable for larger living rooms or commercial spaces
② Adhesive rubber pads
Align the rubber pad template to the four corners of the speaker's bottom and
attach the rubber pads one after the other.
Master speaker Slave speaker
Upright placementH orizontal placement

12 13
Audio source inputs Powering on
Subwoofer and Zone 2 Speakers pairing (if any)
You can connect the Main Speakers to your TV using the following inputs:
optical, coaxial, 3.5 mm jack
You can connect the Main Speakers to your PC using the following inputs:
USB, 3.5 mm jack, Bluetooth, Wi-Fi
You can connect the Main Speakers to your smartphone or tablet using the following inputs:
Bluetooth, Wi-Fi, 3.5 mm input
You can connect the Main Speakers to your gaming console or Blu-ray player using the
following inputs: Optical, coaxial
You can connect the Main Speakers to other sources such as turntable or CD player using
the following inputs: 3.5 mm jack
Attention: to connect an audio source wirelessly, using Bluetooth or Wi-Fi, see pages 18 to 23.
① Remove the battery insulation slip from the battery compartment of the remote control to
allow the remote control battery to supply power.
② Point the remote control at the remote control receiving area on the front of the speaker and
press thePowerbutton: you will hear the system power-on tone.[LED display: boot animation
and preset audio source (BT)]
Attention:The next time you power on the system, the most recently used audio source will
be selected by default.
② Press and hold the CONN. button on the
Zone 2 Speakers until the LED indicator starts
blinking rapidly: the Zone 2 Speakers are now
in the C&P wireless connection pairing mode.
» Subwoofer/Zone 2 Speakers operation:
① Press and hold the CONN. button on the
Subwoofer until the LED indicator starts
blinking rapidly: the Subwoofer is now in the
C&P wireless connection pairing mode.
Getting started Setting up
ON/OFF

14 15
Tip: Main Speakers Main Speakers、 Zone 2 Speakers。
② After pairing successfully, the LED indicators on the Subwoofer and the Zone 2 Speakers
will stop blinking, and the number of LEDs displayed on the Main Speaker's display will vary
accordingly to the conguration (a 2.1 conguration will be signalled by two LEDs, 4.1/6.1
congurations will be signalled by three LEDs);Now, press the CONN. button of the Main
Speaker again to exit pairing mode and stop searching for new speakers to connect.
»Main Speakers operation:
① Short press the CONN. button on the Main Speaker control panel: the LED will go from
steady light to blinking, indicating that the Main Speaker has entered the C&P wireless
connection pairing mode. The Main Speaker will automatically search for nearby speakers
that can be connected.
Main Speakers' left and right channels setting up
Zone 2 Speakers' left and right channels setting up
Testing the system
The active speaker is preset to be the left channel. If your power outlet is found on the right side,
you can switch the active speaker to the right channel by following the steps below.
Short press thePowerbutton on the control panel of
the Main Speaker to swap channels. The LED display
will show an R (right channel), and the slave speaker
will show an L (left channel).(After pressing the
power button again, the left and right channels will
be swapped again.)
Attention:The system will automatically return to
the default settings after powering it o.
The active speaker of the Zone 2 Speakers is pre-set to be the left channel. If your power outlet
is found on the right side, you can switch the active speaker to the right channel by following
the steps below.
Short press theCONN.button on the back of the active speaker
to swap to R (right channel);the slave speaker will beep to
indicate that it has been swapped to L (left channel).(Press
theCONN.button again and the left and right channels will be
swapped again.)
① 1. Connect an audio source from TV/PC/Blu-ray player/
Turntable.
② 2. Press the audio source button [OPT/Coaxial (COA)/USB
(USB)/3.5mm (AUX)] on the remote control to switch the
audio source from the preset one [Bluetooth (BT)] to the
audio source that is currently connected.
③ 3. The Main Speakers, the Subwoofer and the Zone 2
Speakers (if any) will start reproducing the sound.
④ 4. Press theMutebutton on the remote control.
⑤ The Main Speakers, the Subwoofer and the Zone 2 Speakers
(if any) will stop reproducing the sound.
Attention:If the audio source you are connecting to is a TV, turn
o the built-in speakers to avoid any sound distortion.For the
detailed steps, please refer to the TV user manual.
Setting up Setting up
MUTE
Master speaker LED display explanation
No speakers connected 2.1 set-up 4.1/6.1 set-up

16 17
Remote control buttons
Buttons functions
You can connect all the audio sources at once and switch through them by operating the
remote control.
① Make sure that all the audio sources are connected and powered on.
② The interaction between the sound sources, the buttons on theSOURCEarea of the remote
control, and the LED display is as follows:
On the remote:
• Press ▲ in the VOL area to increase the volume. [LED display: from the current level up to
+99]
• Press ▼ in the VOL area to decrease the volume. [LED display: from current level down to
mute]
• Press theMutebutton to mute the speakers and press it again to unmute them. [LED display:
mute or previous volume]
Tip:When connecting a new audio source for the first time, set the volume of the audio
source to the maximum level. By doing so, you will be able to adjust the volume by
operating the remote control only.
You can freely adjust the volume of the left and right channel to achieve the best listening
experience based on the placement of the speakers and the listening position.
① Press theBalancebutton on the remote control.[LED display: currently set value; default value
is 0]
② Press the ▲ or ▼ buttons in theVOLarea to adjust the volume of the left and right channel.
[LED display: adjust gradually from the currently set value up to L+9 or R+9]
You can freely adjust bass and treble according to dierent types of music and your personal
listening preferences.
① Press theHIGHorLOWButtonin theEQarea.[LED DISPLAY: HI or LO]
② Press the ▲ or ▼ Buttonof theVOLarea to adjust the bass or treble.[LED display: increase
from the current value up to +6 or decrease down to -6]
You can choose the most suitable among the three 3D modes available (Stereo, Live, Movie) to
suit dierent types of audio content
① Press the3Dbutton on the remote control: the LED display will show the currently set mode.
[LED display: STEREO/LIVE/MOVIE]
② Press the3Dbutton to switch between the modes.
You can freely adjust the volume of the subwoofer.
① Press theSUBbuttonon the remote control.[LED display: SUB]
② Press the ▲ or ▼ buttonin theVOLarea to adjust the volume of the subwoofer.[LED display:
from the current value up to +6 or down to -12]
You can freely adjust the volume of the Zone 2 Speakers.
① Press theZone 2buttonon the remote control.[LED display: Z2]
② Press the ▲ or ▼ buttonin theVOLarea to adjust the volume of the Zone 2 Speakers.[LED
display: from the current volume up to 0 or down to -12]**
In Bluetooth and Wi-Fi modes, you can operate the Play/Pause and Next/Previous playback
controls on the remote.
Attention:If you switch audio source during playback, the speakers will receive the audio signal
from the next source and reproduce it right away. Switching source will not pause the previous
audio source. If you want to pause the playback of the previous audio source, please operate
through the interface of the source itself.
Audio source switching
Volume adjusting
Left and right channel balance adjusting
Bass and treble adjusting
Switching between the sound modes
Subwoofer volume adjustment
Zone 2 Speakers volume adjustment (if any)
Playback control
Input Bluetooth Optical USB-C Wi-Fi Coaxial 3.5 mm jack
Button BT OPT USB WIFI COA AUX
LED display BT OPT USB WiFi COA AUX
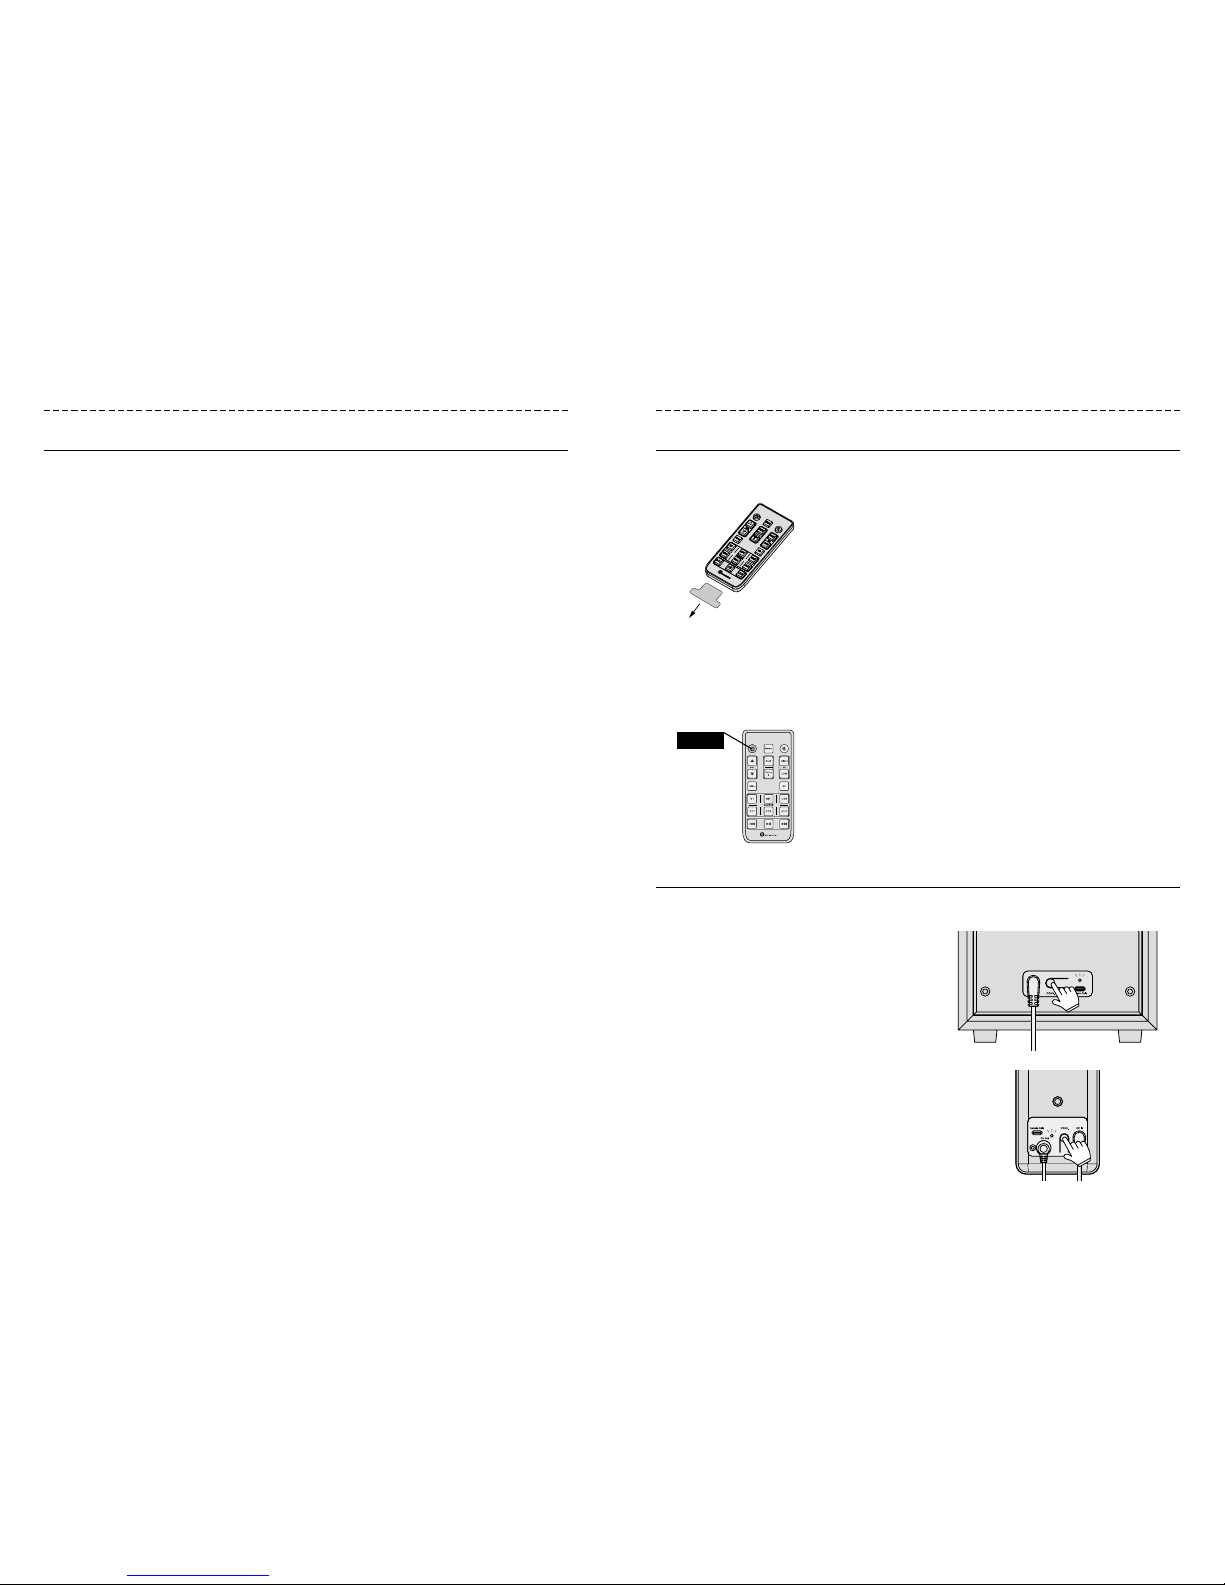
Remote control Remote Control
Balance
Mute
SUB Vol Control
Treble/Bass Eq.
Zone 2 Volume
3D Listening Modes
ON/OFF
Volume
BT Pairing
Source
Playback

18 19
① Locate the WIFI button on the remote control and theWPSbutton on the back of the Main
Speaker and press them in sequence.
You will hear the “Entering setup mode” and “Follow the instructions in the app to finish the setup”
notications.
② Connect your mobile device to your home Wi-Fi network
③ Open the C&P Connect app
④ The description in the centre of the screen will let you know theName of the current Wi-Fi
network, tap "Add device" below.
Pairing
Connecting M6 to your Wi-Fi network
Unpairing
You can pair M6 with a Bluetooth-enabled audio device such as your smartphone, tablet or
laptop.
You can connect multiple M6 systems installed in dierent rooms through the Wi-Fi network.
The mobile devices under the same network can remotely control the systems through the C&P
Connect app. You can set the systems to play the same track simultaneously or dierent tracks
individually;In addition, you can answer calls or perform other activities on the mobile devices at
the same time: the music reproduction will not be interrupted.
Download and install the C&P Connect app
① Press theBTbuttonin theSOURCEarea of the remote control.[LED display: BT].
② Press thePairingbuttonabove theBTbuttonto put M6 into the Bluetooth pairing mode.[LED
display: pairing symbol].
③ Make sure that Bluetooth is enabled on the device.
Attention:This is usually found in the device's Settings menu.
④ Select "CnP M6 BT" from the "List of available Bluetooth devices" on the device.
⑤ Successful pairing.
⑥ Now you can stream your music wirelessly via Bluetooth.
Attention:You can pair any Bluetooth-enabled device with M6. After the rst time, you simply
need to tap on the M6 unit in the Bluetooth devices list: you won't need to go through the
pairing process again;However, at most two devices can be connected to M6 at the same
time. When M6 is already connected to two devices, other devices will no longer be able to
connect to M6.
※ If pairing or connection is unsuccessful, there may be already two devices connected to M6.
If this is the case, press thePairingbuttonagain to re-enter pairing mode and disconnect all the
devices.
① Access the list of available Bluetooth devices on the device.
② Tap the settings icon on the right of the "CnP M6 BT" name.
③ Tap "Unpair" or "Forget this device".
iOS Android
Bluetooth Wi-Fi

20 21
iOS
iOS
iOSiOS
Android
Android
AndroidAndroid
⑤ Follow the instructions on the screen and tap "Settings" below to connect to M6 in the Wi-Fi
settings of the mobile device.
⑨ Tap "Next " on the C&P Connect app screen.
⑦ Return to the C&P Connect app.
⑧ The list of available Wi-Fi networks will appear: select your home Wi-Fi network and enter the
Wi-Fi password. Then, tap "Continue". You will hear the “Connected to your Wi-Fi network” notication.
⑥ Find "CnP-M6_XXXX" in the Wi-Fi list and tap Connect.
You will hear the "You're now connected to your speaker" and
"Follow the instructions in the app to nish the setup" notications.
Wi-Fi Wi-Fi

22 23
⑩ If you have multiple sets that you want to use in dierent rooms at the same time, you can
modify the name of each unit for easier identication.When editing is complete, tap ">" on
the top right corner.
⑪ M6 has been successfully connected to the Wi-Fi network.
Attention:After you complete the steps above on the first mobile device, you simply need to
connect the other mobile devices to the same Wi-Fi network and open the C&P Connect app:
you will nd M6 in the device list (pictured above). You can play the music remotely at any time
without setting it up.
※ If connection is unsuccessful, or if the app screens are dierent from those pictured above,
please return to the "Settings" menu of the mobile device and make sure that the latter is
connected to the same Wi-Fi network.
iOS
iOS
Android
Android
Wi-Fi Wi-Fi

24 25
C&P Connect playback instructions
Using AirPlay
① Tap "<" in the upper left corner of the device list to enter the playback interface.
② Tap "C&P" in the upper left corner of the playback interface to enter the list of available
services.
③ Select "TuneIn" (online radio) or "Spotify" in the list of services.
④ Online streaming can now be performed and the music is not interrupted by dial-up calls.
Attention:Spotify requires an additional dedicated app and an account to be used.
Since M6 is equipped with a hotspot function, it can be connected directly to any mobile device.
The C&P Connect app supports AirPlay, meaning you can use AirPlay's transmission function to
enjoy the same level of transmission quality even in the absence of a Wi-Fi home network.
① Go to the settings of your mobile device > Wi-Fi.
② Select "CnP-M6_XXXX" in the list and connect to it.
③ When playing music, tap the AirPlay icon below the play button.
④ Select "CnP-M6_XXXX" as source.
⑤ The music will start broadcasting.
Attention:When connecting the mobile device directly to M6 through the hotspot
functionality, the mobile device will not be able to access the Internet using 4G or other Wi-
Fi services. Spotify's oine playback or the streaming of the music on your mobile will still be
available.
Since M6 is equipped with a hotspot function, after connecting it to the Wi-Fi network you can
use it as a hotspot to connect mobile devices to the Internet.This hotspot feature is turned o
by default to prevent others from taking up Wi-Fi bandwidth. To use this feature, use the C&P
Connect app to turn on the hotspot function and set your own password.
① Tap the"Settings"gear icon to the right of the selected item.
② Select "Device Information".
③ Find "Personal Hotspots" below the hotspot status.
④ After activating the switch on the right, set the password.
① Tap "<" in the upper left corner of the device list to enter the playback interface.
② Tap "C&P" in the upper left corner of the playback interface to enter the list of available
services.
③ Select the "My Music" service in the list of available services.
④ Select the name of your device.
⑤ Enter the list of music les in your device.
⑥ Tap on the track to play it.
Should you need to change the Wi-Fi router after completing the connection between M6 and
your Wi-Fi network, you can clear up the connection record in the C&P Connect. After doing so,
repeat the connection procedure.
① Tap the"Settings"gear icon to the right of the selected item.
② Select "Device Information".
③ Swipe to the bottom and tap "Restore Factory Settings".
④ Select "Conrm".
All of the features above can be operated remotely from any mobile device at any time by
connecting it to the same Wi-Fi network as M6.
① Tap "< " in the upper left corner of the device list to enter the playback interface.
② Tap "C&P" in the upper left corner of the playback interface to enter the list of available
services.
③ Select the "My Music" service in the list of available services.
④ Select "Family Music Sharing".
⑤ Select the location of the le you want to play.
⑥ Access the list of audio les on your NAS or computer.
⑦ Tap on the track to play it.
① Tap theLRicon to the right of the selected item.
② Switch between monoL(all left channel), R(all right channel) or stereoLR.
You can sync all the speakers operating within the same Wi-Fi network and let them play the
music all together at the same time.
① Tap and hold any M6 system in the devices list until it turns grey.
② Drag it to another item, overlap it and release.
③ The screen will now show the sync mode (indicated by the hierarchy of the items).
④ From now, as long as you operate the highest-level item, you can control all the units under
it.
Attention:To cancel the synchronized playback, tap and hold the item in the second level
until it turns grey, then drag it to a blank spot and release it.
Use of TuneIn, Spotify and other services for online streaming
Using M6 as a Wi-Fi hotspot and setting a password
Play music stored in your mobile device Deleting the Wi-Fi connection settings and records
Remote operation
Play music from your NAS or PC via DLNA
Mono and stereo switching
Synchronized playback
Wi-Fi playback Wi-Fi playback

26 27
Care and maintenance Troubleshooting
• Be careful not to spill any liquid into any opening.
• Wipe the speaker cabinet with a soft, clean, and dry cloth.
• Wipe the speaker’s soft grille with an electrostatic dusting cloth.
• Do not use any solvent, chemical product or detergent.
If you are experiencing any of the following problems, please follow the suggested steps:
① Make sure that the Main Speakers, Zone 2 Speakers and the Subwoofer are connected to the
power supply.
② Make sure that the RCA cables between the Main Speakers' left and right channel and the
Zone 2 Speakers' left and right channel are connected.
③ Check the status indicator of the Zone 2 Speakers and the Subwoofer connection (see pages
6, 7).
④ Keep the system away from any possible source of interference (wireless routers, wireless
phones, microwave ovens etc.).
⑤ Verify that the system is within the recommended range of your wireless router or mobile
device.
If the above steps do not solve the problem, please refer to the common problems and
solutions listed in the table below;if you still can't solve your problem, please contact us.
subwoofer and the Zone 2 Speakers are for updating the devices only: do not plug any cable or
USB ash drive into it.
If you run into any issue, please contact us.
Service website:www.celia-perah.com.
Service email:[email protected]
Service line:+88602-23461011
Service address:5F., No. 31, Sec. 6, Xinyi Rd., Xinyi Dist., Taipei City 110, Taiwan (R.O.C.)
Products are guaranteed for one year. Visit our official website within two weeks from the
purchase to extend the warranty for half a year.
Cleaning
C&PWireless Connection Feature Update
Customer service
Warranty information
Problem Solution
The system is not
responding when
operating the
remote control.
• Press thePowerbutton on the back of the Main Speaker to manually
power on the system.
• Press any button on the remote control to check whether the LED
display on the front of the Main Speaker is working properly.
• Make sure that the battery insulation slip is removed and that the
battery does not need to be replaced.
• Unplug the power from the Main Speaker and plug it back in after 30
seconds.
• Make sure that the Main Speaker's control panel is not connected to a
USB cable which, in turn, is not connected to the PC. Please connect the
PC or unplug the cable from the control panel.
No sound is
reproduced
• Increase the volume.
• Press theMutebutton to make sure that the system is not muted.
• Make sure that the correct source is selected.
• Switch between dierent audio sources.
• Make sure that the connection with the audio source is correct.
• Check the volume of the audio source.
No sound
reproduced by
Zone 2 Speakers/
Subwoofer
• Make sure that the volume of the Zone 2 Speakers/Subwoofer is not
turned o.
• Make sure that the C&P wireless connection is set up correctly.(See
page 13)
Bass is too strong
or too weak
• Use theLOWbutton in theEQarea of the remote control and the ▲ , ▼
buttonsin theVOLarea to adjust the bass.
• Use theSUBbutton on the remote control and the ▲ , ▼ buttonsin
theVOLarea to adjust the volume of the subwoofer.
• Keep the subwoofer at least 30 cm from the wall.
Care and Maintenance Troubleshooting

28 29
Problem Solution
Bluetooth connection
fails
• Press thePairingbutton on the remote control to re-enter pairing
mode.
• Make sure that the connected device is within 10 m from the
system.
• Re-enable the Bluetooth function of the device.
• Clear up the Bluetooth pairing record on the device.
Wi-Fi connection fails
• Make sure that the Wi-Fi function of the device is turned on.
• Access the device's Wi-Fi devices list and check if it is connected to
the same Wi-Fi network as M6.
A sudden sound is
reproduced • Make sure that no device is streaming thorough Wi-Fi.
Important Safety Instructions
Do not disassemble the unit by yourself to avoid electric shock: users do not need to operate
internal components. For maintenance, please contact qualied personnel.
1. Please read this safety guide carefully.
2. Please store this safety guide carefully.
3. Please pay attention to all warnings.
4. Please follow all instructions.
5. Do not use this product nearby water sources.
6. Please use a dry cloth to clean the product.
7. Do not block any vent.Please follow the manufacturer's instructions for carrying on the
installation.
8. Do not place the product nearby heat sources such as:heating system, electric heaters,
radiators, or other equipment that may generate heat (including ampliers).
9. Do not expose this product to extreme temperature conditions.
10. Do not place this product in direct sunlight. Long-term exposure may cause malfunctions.
11. Please use the original adapter provided. Other adapters may look similar, but they may
cause electric shock or damage the product due to dierent voltage output.
12. Do not alter the polarized or grounded plug: they are designed for safety.The polarized plug
has a wide and a narrow at pin;The grounded plug has two at pins and one round ground
pin.Wide flat pins or round ground pins are designed for safety.If the supplied plug is not
suitable for your power outlet, contact a professional electrician to replace it.
13. Avoid placing the power cord in a location where people are frequently transiting, and do
not pull the plug, socket, or speaker outlets.
14. Make sure to use the accessories or parts specied by the manufacturer only.
15. Be sure to use the trolley, stand, tripod, bracket, or machine specied by the manufacturer or
that came with the product.If you use a trolley to carry the product, prevent the upper items
from falling down, so as not to cause personal injury.
16. Unplug the power cord during lightning storms or when not operating the product for a
long period of time.
17. Make sure to connect a power supply within the specied voltage range.
18. REMOVE
19. Do not expose the product to liquid dripping or spilling. Do not place water-lled appliances
such as vases on top of the product.
20. When moving the product, please hold it from the bottom.
21. Make sure that the surface where the product is placed is strong enough to support its
weight.
22. For all repairs, please contact our professional service personnel.If the product has any
damage, it should be repaired. Damages may include:damage to the power cord or power
plug, liquid or foreign matter leaking into the device, exposure to rain or moisture, abnormal
operation, falling.
23. The speaker driver unit can generate electromagnetic fields.Do not place any object that
may be damaged by magnetic fields within 0.5 m from the device, such as:audio tapes,
video tapes, credit cards and magnetic stripe cards.
Troubleshooting Important Safety Instructions
Soundstage isn't
reproduces properly.
• Make sure that the left and right channels of the Zone 2 Speakers
are set correctly.
TV is still reproducing
the sound • Turn o the TV's built-in speakers through the TV's settings menu.
No image on the TV,
but sound is being
reproduced
• Make sure that the input signal on the TV is selected correctly.
No sound coming from
the connected device
• Turn the device on.
• Switch between dierent audio sources.
• Please refer to the device's user manual.

31
M6 The Dramatic Moment
Table of contents