Celli TIGER 280 DD User manual

FRESATRICE FISSA DOPPIA
DUAL DRIVE ROTARY TILLERS
MANUALE USO E MANUTENZIONE
USE AND MAINTENANCE MANUAL
093.589.0
TIGER 280 DD
(T280DD)
1955
Celli S.p.A. Via Masetti N°32, 47100 Forlì (Italy) - Tel: 0543 794711 - Fax: 0543 794747
Fax: 0543 722034 - e-mail:[email protected] - www.celli.it
Data ultimo aggiornamento 09/08/07 Date of latest updating 09/08/07


Manuale uso e manutenzione fresa doppia 1 Use and maintenance dual drive rotary tillers
Celli dà grande importanza alle opinioni
dei suoi clienti!
La Celli ha sempre basato la sua politica commerciale
e di prodotto su quattro idee di base:
• La professionalità
• La gamma
• L’innovazione
• Il rapporto qualità/prezzo.
Per sapere se siamo sulla buona strada e se il nostro
cliente è soddisfatto è importante sapere cosa pensate
di noi, del nostro prodotto e del nostro servizio.
Non esitate a contattare il rivenditore autorizzato Celli
presso cui avete acquistato questa macchina per
esprimere un qualunque parere.
Oppure inviateci le Vostre opinioni direttamente:
In Celli diamo un grande valore ai Vostri suggerimenti
perché ci servono per migliorare e servirVi meglio!
Grazie per averci scelto!
Marketing team/Celli S.p.A.
Celli gives great importance to its
customers’ opinions!
Celli has always based its sales and product policy on
4 basic concepts:
• Professionalism
• Range of products
• Innovation
• Quality/price ratio.
In order to learn if we are on the right way and if our
customers are satisfied, we need to know your opinions
about our company, our products and our service.
Please do not hesitate to contact your Celli dealer to
make any comment.
Otherwise, send us your comments directly to
Your suggestions are very important for us since they
help us to improve ourselves and offer you a better
service!
Thanks for choosing our products!
Marketing team/Celli S.p.A.
CUSTOMER SERVICE
CUSTOMER SERVICE

Manuale uso e manutenzione fresa doppia 2 Use and maintenance dual drive rotary tillers
This Use and Maintenance manual contains some
useful indications to:
- reduce the risks for the operator and other people
- use the product in the most correct way in order to
obtain the best possible results
- extend the useful life of the machine by avoiding any
improper use and by performing the maintenance
operations required
- ask for any repairs or replacements of parts during
the warranty period.
We thus recommend to:
- read this manual carefully, especially chapter 2
(Safety)
- keep this manual in a safe place for future
reference
- in case you lose this manual, ask your dealer for
another copy
PREMESSA
FOREWORD
Questo libretto Uso e Manutenzione fornisce una serie
di indicazioni utili per:
- limitare i rischi per l’operatore e terze persone
- utilizzare il prodotto nel modo più corretto per
ottenere i migliori risultati
- prolungare la vita utile della macchina evitando usi
non appropriati ed effettuando la manutenzione
richiesta
- richiedere eventuali interventi in garanzia.
Vi consigliamo quindi di:
- leggerne attentamente il contenuto, con particolare
riferimento al capitolo 2 (sicurezza)
- conservarlo per futura consultazione
- richiedere una copia ulteriore se andasse
smarrito.

Manuale uso e manutenzione fresa doppia 3 Use and maintenance dual drive rotary tillers
INDICE
INDEX
1 IDENTIFICAZIONE DELLA MACCHINA
1.1 Targhetta di identificazione ................................4
1.2 Marcatura CE ....................................................4
1.3 Terminologia ......................................................4
2 SICUREZZA
2.1 Avvertenze generali ...........................................6
2.2 Protezioni di sicurezza ......................................6
2.3 Chi può utilizzare la macchina ...........................8
2.4 Dove può essere utilizzata la macchina ............8
2.5 Come deve essere utilizzata la macchina .........9
2.6 Precauzione nell’impiego della macchina .......10
3 SEGNALAZIONI ADESIVE
3.1 Avvertenze di carattere generale ...................12
3.2 Adesivi ............................................................12
3.3 Sostituzione adesivi ........................................13
4 CARATTERISTICHE TECNICHE
4.1 Impiego della macchina ...................................14
4.2 Dati tecnici .......................................................14
4.3 Potenza massima suggerita ............................14
5 UTILIZZO DELLA MACCHINA
5.1 Aggancio e sgancio dal trattore .......................17
5.2 Avvertenze per l’albero cardanico ...................19
5.3 Regolazione della macchina ...........................21
5.4 Trasporto su strada .........................................22
5.5 Velocità di lavoro .............................................23
5.6 Velocità di rotazione .......................................24
6 MANUTENZIONE DELLA MACCHINA
6.1 Manutenzione e pulizia ....................................26
6.1.1 Manutenzione ordinaria ...................................26
6.1.2 Manutenzione straordinaria .............................26
6.2 Lubrificazione .................................................26
6.3 Sostituzione olio scatole ..................................27
6.4
Sostituzione olio trasmissione laterale ..............28
6.5 Montaggio kit impianto di raffreddamento
scatola centrale (optional) ...............................29
6.6 Montaggio protezioni anteriori CE ...................32
6.7 Sostituzione utensili .........................................33
6.8 Periodo di inattività ..........................................34
6.9 Tabelle di conversione dei lubrificanti ..............34
7 GARANZIA E RICAMBI
7.1 Pezzi di ricambio ............................................35
7.2 Garanzia .........................................................35
7.3 Aggiornamento prodotti ..................................35
7.4 Nota ................................................................35
1 IDENTIFICATION OF THE MACHINE
1.1 Identification plate .............................................4
1.2 CE trademark ....................................................4
1.3 Terms ................................................................4
2 SAFETY INSTRUCTIONS
2.1 General warnings ..............................................6
2.2 Safety guards ....................................................6
2.3 Allowed operators ..............................................8
2.4 Working place ....................................................8
2.5 Use of the machine ...........................................9
2.6 Precautions when using the machine ..............10
3 INSTRUCTION STICKERS
3.1 General warnings ............................................12
3.2 Stickers ............................................................12
3.3 Stickers replacement .......................................13
4 TECHNICAL DATA
4.1 Use of the machine ........................................14
4.2 Technical data .................................................14
4.3 Maximum recommended horsepower .............14
5 USE OF THE MACHINE
5.1 Coupling and uncoupling operations ..............17
5.2 Instructions for the driveshaft ..........................19
5.3 Machine adjustment ........................................21
5.4 Road transport .................................................22
5.5 Working speed ................................................23
5.6 Rotation speed ...............................................24
6 MACHINE MAINTENANCE
6.1 Maintenance and cleaning .............................26
6.1.1 Ordinary maintenance .....................................26
6.1.2 Supplementary maintenance ...........................26
6.2 Lubrication ......................................................26
6.3 Oil change in the gearboxes ............................27
6.4 Oil change in the side drives ...........................28
6.5 Central box cooling kit (optional) assembly
instructions .....................................................29
6.6 CE front guards assembly ...............................32
6.7 Tool replacement .............................................33
6.8 Periods of inactivity .........................................34
6.9 Lubricants conversion table .............................34
7 SPARE PARTS - WARRANTY
7.1 Spare parts ......................................................28
7.2 Warranty ..........................................................28
7.3 Product updates ..............................................28
7.4 Note .................................................................28

Manuale uso e manutenzione fresa doppia 4 Use and maintenance dual drive rotary tillers
IDENTIFICAZIONE DELLA MACCHINA
IDENTIFICATION OF THE MACHINE
1.1 Targhetta di identificazione
Questo prodotto Celli è identificato da una targhetta
metallica (vedi Fig.1.1) fissata sul telaio della macchina
in posizione ben visibile. Sulla targhetta sono riportati
i seguenti dati:
1. Nome e indirizzo del costruttore
2. Numero di matricola
3. Modello della macchina (sigla del modello e
larghezza di lavoro)
4. Peso della macchina in Kg
5. Anno di costruzione
6. Marchio CE che certifica la conformità del prodotto
La corretta identificazione della macchina è necessaria
per potere ordinare pezzi di ricambio ed eventualmente
attivare la richiesta di garanzia.
Si consiglia di annotare i dati della targhetta in
modo da averli disponibili anche nel caso che
accidentalmente la targhetta venisse smarrita
durante il lavoro.
Il dato più importante è il NUMERO DI MATRICOLA
che identifica completamente il prodotto.
1.2 Marcatura CE
La marcatura CE implica che le macchine sono state
costruite nel rispetto delle direttive CEE .
1.3 Terminologia
Terminologia impiegata nel libretto: in Fig.1.2 e Fig.1.3
sono rappresentati il cardano e la macchina con la
spiegazione dei relativi particolari.
1.1 Identification plate
A metal identification plate (see Fig.1.1) is fixed to the
frame of this Celli product in a clearly visible position.
The following information are indicated on the plate:
1. Name and address of the manufacturer
2. Serial number
3. Model (model abbreviation and working width)
4. Machine weight in Kg
5. Manufacturing year
6. CE trademark certifying the conformity of the
product
To order spare parts and to apply for warranty, a correct
identification of the machine is required.
We suggest to note down the data indicated on the
metal plate in order to have them available even
in case the plate gets accidentally lost during
operation.
The most important datum is the SERIAL NUMBER
that provides a complete identification of the product.
1.2 CE trademark
The CE trademark means that the machines are
manufactured in compliance with the EEC Directives.
1.3 Terms
Terms used in the manual: the Fig.1.2 and Fig.1.3
show the drive shaft and the machine, with explanation
of relative components.
1
1
3
2
4
5
6
Fig. 1.1

Manuale uso e manutenzione fresa doppia 5 Use and maintenance dual drive rotary tillers
IDENTIFICAZIONE DELLA MACCHINA
IDENTIFICATION OF THE MACHINE 1
Fig.1.2: albero cardanico (o cardano)
A. albero scanalato
B. organo di sicurezza (raffigurata una frizione)
C. protezioni esterne di sicurezza (tubi)
D. protezioni esterne di sicurezza (cuffie)
E. catenella di bloccaggio
F. innesto scanalato lato trattore
G. innesto scanalato lato macchina
Fig.1.3: Fresatrice doppia (versione DD)
A. castello tre punti
B. attacchi inferiori
C. cofano (telaio scatolato della macchina)
D. rotore
E. deflettore mobile posteriore (o coperchio post.)
F. scatole trasmissione
G. cuffia di protezione cardano
H. trasmissione laterale
I. ruote anteriori
L. Cardani laterali
M. Martinetti sollevamento ruote
N. Protezione anteriore
O. Protezione laterale parazolle
Fig.1.2: Driveshaft
A. splined driveshaft
B. safety guard (a clutch is shown)
C. external safety guards (tubes)
D. external safety guards (covers)
E. locking chain
F. splined coupling tractor side
G. splined coupling implement side
Fig.1.3: Rotary tiller (dual drive version)
A. three-point hitch
B. lower hitches
C. box section frame
D. blades rotor
E. rear flap (or rear cover)
F. side and central gearboxes
G. driveshaft cover
H. side transmission
I. front wheels
L. side drive shafts
M. lifting hydraulic rams for wheels
N. front safety guard
O. side safety guard
Fig. 1.2
FC
ED
G
D
A
B
Fig. 1.3
F
LGA
FLCG F M
B
DN
O
H
I
I
E
M

Manuale uso e manutenzione fresa doppia 6 Use and maintenance dual drive rotary tillers
SICUREZZA
SAFETY INSTRUCTIONS 2
2.1 Avvertenze generali
• Questa sezione è di vitale importanza per la
sicurezza dell’operatore e di terzi; assicurarsi di
leggerne e comprenderne il contenuto e attenersi
scrupolosamente a quanto prescritto. Questa
attrezzatura è potenzialmente pericolosa e può
causare gravi ferite o anche la morte.
• La macchina è dotata di tutte le necessarie
protezioni di sicurezza, vedere paragrafo 2.2 per
ulteriori dettagli.
• E’ fornita di alberi cardanici completi di protezioni
idonee per garantire la sicurezza dell’operatore.
• Se queste protezioni di sicurezza sono assenti
o danneggiate è assolutamente vietato avviare
la macchina e utilizzarla.
• Alcuni componenti della macchina hanno anche la
funzione di protezioni di sicurezza, vedere Fig.1.3.
- N Protezione anteriore
- O Protezione laterale carter
- E Deflettore mobile posteriore
• E’ vietata la rimozione di una qualunque delle
parti a corredo del prodotto perché potrebbe
causare delle situazioni di pericolo.
• Sul prodotto (macchina e albero cardanico) sono
posizionati adesivi di sicurezza (vedere il capitolo
3 per la macchina e Fig.2.1 per il cardano), è
essenziale che le indicazioni vengano sempre
seguite. Nel momento in cui uno o più adesivi
di sicurezza fossero danneggiati o mancanti, è
necessario rimpiazzarli tempestivamente.
• Parecchie operazioni di regolazione, manutenzione,
movimentazione, possono avere aspetti critici
per la sicurezza dell’operatore o di terzi. Queste
operazioni sono evidenziate in questo libretto col
simbolo
ATTENZIONE!
• Oltre a questo libretto, leggere attentamente il
libretto Uso e Manutenzione del trattore ed attenersi
scrupolosamente a quanto prescritto.
• E’ vietato qualunque tipo di modifica alla macchina
che ne alteri la funzionalità. Modifiche arbitrarie
possono causare situazioni di grave rischio
e annullano la validità della garanzia sul
prodotto.
2.2 Protezioni di sicurezza
Prima di iniziare il lavoro verificare che tutte le protezioni
della trasmissione, del trattore e della macchina
operatrice siano presenti ed efficienti. Eventuali
componenti danneggiati o mancanti devono essere
sostituiti con ricambi originali ed installati correttamente
prima di utilizzare la trasmissione cardanica.
Gli alberi cardanici forniti con la fresa sono marcati
CE e sono corredati di: (vedi Fig.2.1)
− Etichette di sicurezza
− Catene di sicurezza
− Libretto di istruzioni CE
2.1 General warnings
• This section is of vital importance for the safety
of the operator and other people; make sure to
read and understand it well and keep strictly to
the instructions provided. This machine may be
dangerous and cause serious injuries or even
death.
• This product is equipped with all the necessary
safety guards, see point 2.2 for details.
• The drive shafts are also supplied with the
necessary safety guards to guarantee the safety of
the operator.
• It is strictly forbidden to operate the machine if
the safety guards are missing or damaged.
• Several components of the machine serve also as
safety guards (see point Fig. 1.3.):
- N Front safety bar
- O side safety guard
- E Rear flap
• It is forbidden to remove even only one of the
components supplied with the product since
this may cause situations of danger.
• Some safety stickers (see chapter 3 for the machine
and Fig. 2.1 for the drive shaft) are attached on the
product (machine and drive shaft). Keep strictly to
the instructions indicated on these stickers. If one
or more safety stickers are missing or damaged,
replace them immediately.
• Several adjustment, maintenance, handling, etc.
operations may be dangerous for the safety of the
operator or other people. In this manual, these
operations are highlighted with the symbol
WARNING!
• In addition to this manual, read also the tractor Use
and Maintenance manual and keep strictly to the
instructions provided.
• Any change to the machine that may affect its
functioning is forbidden. Improper machine
alterations may cause situations of serious
danger and invalidate product warranty.
2.2 Safety guards
Before starting, check that all safety guards of the drive
shaft, of the tractor and of the machine are working
properly.
Missing or damaged components must be replaced
with original parts and correctly installed before starting
the transmission.
The drive shafts, supplied with the power harrow, are
CE trademarked and are equipped with: (see Fig.2.1)
− Safety stickers
− Safety chain
− CE instruction manual

Manuale uso e manutenzione fresa doppia 7 Use and maintenance dual drive rotary tillers
SICUREZZA
SAFETY INSTRUCTIONS 2
− Identificazione dell’albero marchio CE
ATTENZIONE!
Gli alberi cardanici devono essere originali e idonei per
lunghezza, dimensioni, limitatori di coppia e protezioni.
I due giunti cardanici consentono compensazioni
angolari che possono arrivare a 35°, ma si consiglia di
non superare i 15-20°.
Fissare le catene in modo che siano correttamente
inserite nelle loro sedi, controllare che le catene di
ritenuta del cardano siano fissate correttamente al
trattore o alla fresa, per evitare che le protezioni
possano ruotare insieme all’albero cardanico. Non
rimuovere le protezioni dell’albero cardanico, se
parti del vestiario o del corpo vengono agganciate
dall’albero in movimento, l’operatore può rischiare
anche la morte. Verificare che l’albero cardanico ruoti
liberamente all’interno della protezione. Fare attenzione
a non danneggiare le protezioni durante le operazioni
di aggancio e sgancio della macchina al trattore.
Mantenere la parti scanalate dell’albero correttamente
pulite ed ingrassate in modo da garantirne la perfetta
scorrevolezza. Per agganciare l’albero cardanico oltre
a leggere le prescrizioni di questo manuale, consultare
anche il manuale del trattore e il manuale del cardano
allegato.
La corretta velocità di rotazione della presa di forza del
trattore è riportata sulle protezioni dell’albero di ogni
macchina; attenersi alle velocità indicate.
ATTENZIONE!
Fare molta attenzione a quando si sfila
completamente il cardano e poi lo si rimonta.
− CE identification of the drive shaft
WARNING!
Make sure that the drive shafts are original and
compatible in length, power capacity, torque limiters
and are equipped with safety devices. The two joints
allow angles adjustment till 35° but it is advisable not
to exceed the 15 - 20°.
Fix the chains correctly in their housing and check that
the safety chains are correctly connected to the tractor
or to the power harrow to avoid their rotation when
operating the drive shaft.
Do not remove any of the safety devices of the drive
shaft. If clothes get tangled to rotating parts, the
operator can even risk the death. Check that the drive
shaft is freely rotating inside the protection shielding.
Pay attention not to damage the safety devices
when connecting the machine to the tractor or when
disconnecting it.
Keep the splined parts of the drive shaft clean and
greased in order to guarantee a smooth sliding.
Read also the use and maintenance manuals of the
tractor and of the drive shaft for a correct connection
of the same.
On the safety devices of the drive shaft it is indicated
the correct rotation speed of the tractor PTO: keep
strictly the speed provided.
WARNING!
Pay maximum attention when it is necessary to
disassemble and reassemble the drive shaft.
Fig. 2.1
Fig. 2.2 VISTA FRONTALE - FRONT VIEW
LE FORCELLE DI ESTREMITA’ DEVONO ESSERE ORIZZONTALI - THE SIDE FORKS MUST BE HORIZONTAL

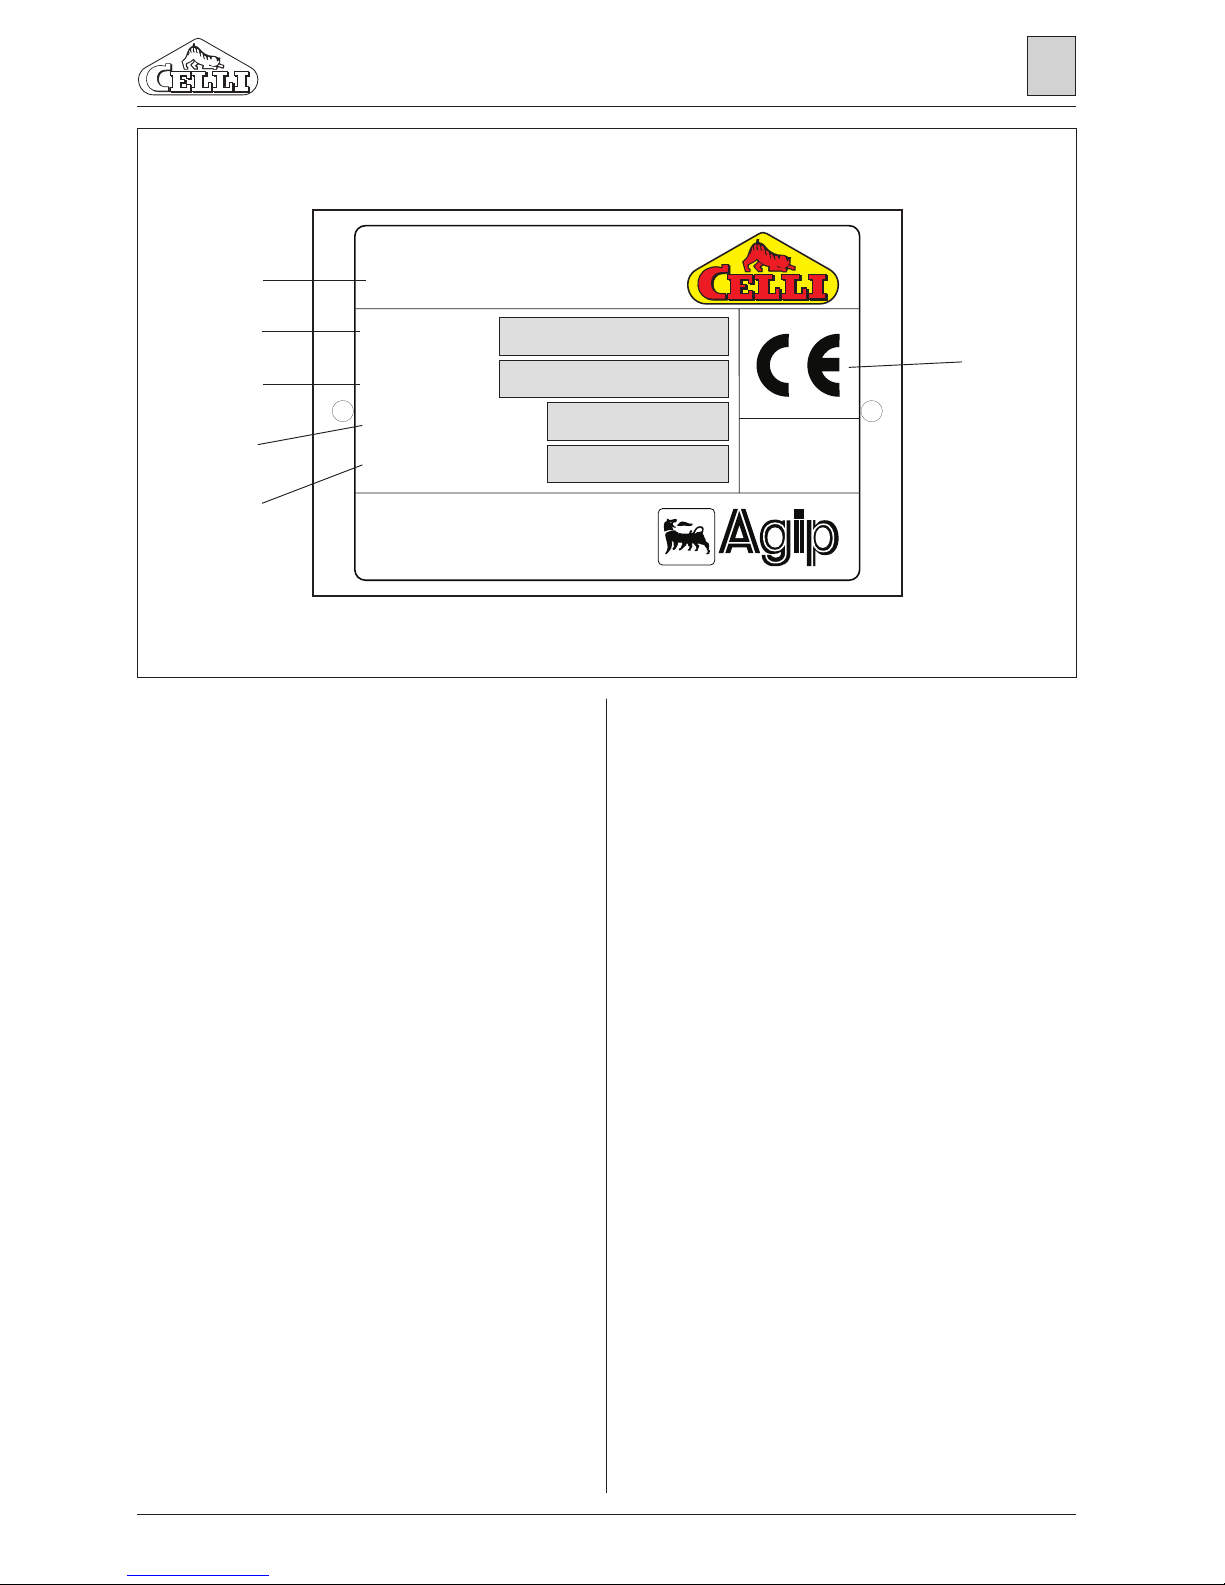
Manuale uso e manutenzione fresa doppia 8 Use and maintenance dual drive rotary tillers
SICUREZZA
SAFETY INSTRUCTIONS 2
2.3 Chi può utilizzare la macchina
− Questo prodotto può essere utilizzato unicamente
da operatori esperti ed addestrati, previa lettura
delle raccomandazioni contenute in questo libretto
Uso e Manutenzione.
− L’operatore è uno solo e non è ammessa la
presenza di terzi nella zona di operazioni della
macchina.
− Una volta completate le operazioni di aggancio
della macchina eventuale personale di supporto
deve allontanarsi prima che la macchina venga
messa in movimento. Dal momento in cui
l’operatore ha posto in rotazione gli organi di lavoro
non dovrà abbandonare più la cabina del trattore.
− Non deve essere dato accesso o disponibilità della
macchina a terzi che non abbiano la necessaria
esperienza.
− Chi utilizza la macchina deve indossare
abbigliamento adatto. Nell’impiego delle macchine
agricole, si consiglia di utilizzare sempre idonei abiti
da lavoro evitando qualsiasi indumento non aderente
al corpo. E’ comunque consigliabile sempre l’uso
della tuta da lavoro. E’ pericoloso lavorare con
capi di vestiario slacciati o penzolanti (foulards,
sciarpe, cinture, ecc.). Indossare sempre scarpe
antinfortunistiche e guanti protettivi. Valutare
se può essere opportuno proteggere occhi ed
orecchie.
2.4 Dove può essere utilizzata la macchina
− E’ estremamente pericoloso l’utilizzo di questa
macchina in prossimità di zone abitate. In caso
di necessità assicurarsi che la zona di lavoro sia
sgombra, le persone presenti in zone limitrofe siano
consapevoli dei rischi e bambini ed animali siano
strettamente sorvegliati e mantenuti a distanza.
− La circolazione su strada è consentita nei limiti
di quanto previsto dal Codice della Strada, cui
ci si dovrà attenere scrupolosamente. Informarsi
preventivamente sui limiti di ingombro trasversale
previsti dalla legge e su eventuali regolamentazioni
specifiche relative al tratto di strada da percorrere.
Se necessario munirsi dei necessari permessi e/o
della scorta.
− La lavorazione su terreno in pendenza può
rappresentare un grave pericolo in quanto
l’attrezzatura tende a modificare il baricentro
del trattore. Verificare con attenzione quanto
prescritto dalla casa costruttrice del trattore e
non superare mai i limiti di pendenza indicati.
Se necessario dotare il trattore delle necessarie
zavorre di bilanciamento.
− Prima dell’inizio del lavoro accertarsi che non
ci siano ostacoli nel terreno (sassi di grosse
dimensioni, oggetti metallici, ecc.) che possano
essere proiettati a distanza dalla macchina o creare
gravi avarie alla macchina stessa. Assicurarsi
anche che non ci siano ostacoli nella zona di lavoro
2.3 Allowed operators
− This product can be used only by skilled and trained
operators that have previously read the instructions
contained in this Use and Maintenance manual.
− There must be only one operator and nobody
but the operator is allowed in the machine
working area.
− Once the machine has been hitched, any supporting
staff must move away before the machine is started.
Once the operator has let blades start rotating, the
operator must remain in the driver’s seat of the
tractor all the time during the work.
− Nobody lacking the necessary experience can have
access to the machine or dispose of it.
− Operators must wear suitable clothing. When
operating an agricultural implement, it is strongly
recommended to wear close-fitting or better the
working overalls. It is dangerous to operate the
machine wearing loose or long clothing (e.g.
scarves, belts, etc.). Always wear safety boots
and protective gloves. Consider whether it is
advisable to protect ears and eyes.
2.4 Working place
− It is extremely dangerous to operate the machine
near inhabited areas. If this is inevitable, make
sure that the working area is empty and that any
people in the nearby areas are aware of the risks
as well as that children and animals are looked
after and kept away.
− Driving the machine on public roads is allowed
in compliance with the traffic regulations,
that are to be strictly followed. Get information
beforehand about the overall width limits envisaged
by the law and any specific regulation applying to
the part of the way you have to cover. If necessary,
get all authorisations required and/or an escort.
− Operating the machine on sloping ground may
be very dangerous since the equipment tends
to modify the tractor centre of gravity. Check the
instructions of the tractor manufacturer and never
exceed the maximum gradient at which it is allowed
to operate. If necessary, equip the tractor with the
balancing ballasts required.
− Before starting the machine, make sure that the
ground is free from obstacles (big stones, metal
objects, etc.) that may be thrown away or cause
serious damage to the machine. Make also sure
that the working area is free from obstacles the
machine may run into. In case of folding machines,

Manuale uso e manutenzione fresa doppia 9 Use and maintenance dual drive rotary tillers
SICUREZZA
SAFETY INSTRUCTIONS 2
contro i quali si possa urtare. Nel caso di macchine
pieghevoli, visto il notevole ingombro in verticale,
controllare sempre l’altezza di ponti e fili sospesi
sotto ai quali si debba eventualmente passare
durante i trasferimenti.
2.5 Come deve essere utilizzata la macchina
− Assicurarsi che l’abbinamento macchina - trattore
sia corretto. Attenersi alle fasce di potenza suggerite
dalla ditta costruttrice. Verificare le tabelle riportate
nel capitolo 4.
− Impiegare la macchina solo per le operazioni
per le quali è stata progettata dal costruttore.
Non adibirla a lavorazioni diverse che non siano
state preventivamente autorizzate per iscritto dal
costruttore.
− Operare con la massima attenzione nella fase di
aggancio e sgancio della macchina dal trattore, nel
caso ci siano terzi che collaborano con l’operatore.
Nessuno deve avvicinarsi alla macchina senza
che la presa di forza sia stata preventivamente
disinserita e gli organi in movimento si siano
fermati.
− Tenere sempre presente che spesso gli organi di
lavoro non sono facilmente visibili dal posto di guida,
o da chi si avvicina, e che spesso la rotazione di
questi organi continua per parecchi secondi dopo
che la presa di forza è stata disinserita. L’operatore
non deve consentire ad alcuno di avvicinarsi
alla macchina senza avere lasciato trascorrere
un lasso di tempo tale da avere la certezza che
tutti gli organi di lavoro siano fermi.
considering their great overall height, always check
the height of bridges and overhead wires you may
need to pass under during any transfers.
2.5 Use of the machine
− Make sure that the machine-tractor coupling
is correct. Observe the horsepower ranges
recommended by the manufacturer. Check the
tables in chapter 4.
− Use the machine only for the operations for
which it has been designed. Do not use it for
other operations without the prior written consent
of the manufacturer.
− If other people are helping the operator, pay
maximum attention during the coupling and
uncoupling operations. Nobody can get near the
machine if the PTO is still connected and the
moving parts are still moving.
− Never forget that working parts often cannot be
easily seen from the driver’s seat or by the people
approaching the machine and that they often keep
on rotating for several seconds after the PTO has
been disconnected. The operator must not
allow anybody to get near the machine before
a sufficient lapse of time has passed to ensure
that all working parts have stopped moving.
Fig. 2.3

Manuale uso e manutenzione fresa doppia 10 Use and maintenance dual drive rotary tillers
SICUREZZA
SAFETY INSTRUCTIONS 2
2.6 Precauzione nell’impiego della macchina
• La movimentazione di questa macchina va
effettuata con la massima attenzione. Quando
viene utilizzato un trattore verificarne sempre che le
caratteristiche siano adeguate con quanto indicato
dalla casa costruttrice della macchina agricola.
Quando vengono utilizzati mezzi di sollevamento
ricordare che:
- i mezzi di sollevamento vanno azionati da
personale esperto
- i punti di sollevamento sono indicati da appositi
adesivi di indicazione Fig.2.3, i rulli posteriori
vanno sollevati come indicato in Fig.2.4.
- i dispositivi di sollevamento (ganci, catene,
cinghie) devono essere conformi alle normative
ed adatti al peso della macchina, indicato nella
targhetta di identificazione.
• Quando la macchina non viene utilizzata deve
essere posizionata su superfici piane.
- Non appoggiare mai la macchina su terreno
cedevole in quanto potrebbe inclinarsi e
quindi rovesciarsi.
- Non appoggiare materiale sulla macchina che
possa causare sbilanciamento della stessa, né
salire in nessun caso sulla macchina.
- Le macchine pieghevoli andranno lasciate a terra
esclusivamente nella posizione aperta.
• Qualunque operazione di manutenzione va effettuata
tenendo presente le seguenti raccomandazioni:
- deve essere effettuata solo da personale
esperto
- la macchina deve essere scollegata dalla presa
2.6 Precautions when using the machine
• Operating this machine requires the utmost
attention. When using a tractor, always check that
the tractor features comply with the indications
of the manufacturer. If lifting devices are used,
remember that:
- lifting devices must be operated by skilled staff
only
- lifting points are marked by specific stickers
(Fig.2.3), rear rollers must be lifted as shown in
Fig.2.4
- lifting devices (e.g. hooks, chains, belts) must
comply with the current regulation and must be
appropriate for the machine weight as indicated
on the identification plate
• When the machine is not being used, place it on a
flat surface.
- Never place the machine on a soft soil because
it may tilt and overturn.
- Never place on the machine any material that
may cause the machine to overbalance and
never step on the machine.
- Folding machines must be always storaged in
open position.
• All maintenance operations must be carried out
keeping in mind the following warnings:
- hey must be carried out by skilled staff only
- the machine must be disconnected from the PTO
Fig. 2.4

Manuale uso e manutenzione fresa doppia 11 Use and maintenance dual drive rotary tillers
di forza (albero cardanico staccato)
- gli organi di lavoro devono essere fermi
- se staccata dal trattore la macchina deve essere
in piano e in posizione stabile
- se attaccata, il trattore deve avere il motore
spento ed il freno di stazionamento attivato
- tenere sempre presente che la temperatura degli
organi di trasmissione può essere elevata e
dentro agli organi contenenti olio lubrificante può
esserci pressione
- in caso di dubbio o difficoltà contattare sempre il
rivenditore più vicino
- utilizzare solo pezzi di ricambio originali.
disconnected driveshaft)
- working parts must not be moving
- when disconnected from the tractor, the machine
must be in a stable position on a flat surface
- if connected to the tractor, the tractor engine must
be shut off and the handbrake must be on
- never forget that the temperature of the drive
units may be high and that the parts containing
lubricating oil may be under pressure
- for further information or assistance, contact your
nearest dealer
- use only original Celli spare parts.
SICUREZZA
SAFETY INSTRUCTIONS 2

Manuale uso e manutenzione fresa doppia 12 Use and maintenance dual drive rotary tillers
SEGNALAZIONI ADESIVE
INSTRUCTION STICKERS 3
3.1 Avvertenze di carattere generale
ATTENZIONE!
Gli adesivi presenti su tutte le macchine sono
importanti per la sicurezza dell’operatore e per un
corretto utilizzo della macchina.
E’ necessario che le indicazioni riportate sugli
adesivi vengano seguite attentamente.
3.2 Adesivi
In Fig.3.1 sono rappresentati gli adesivi di istruzione e/
o sicurezza presenti sulla fresa doppia Tiger 280 DD.
In Fig.3.2 è evidenziata la posizione di ciascuno di essi
sulla macchina.
3.1 General warnings
WARNING!
The instruction stickers on the machines are
important both for the safety of the operator and
for the correct use of the machine.
When using the machine, follow the stickers
instructions.
3.2 Stickers
Fig.3.1 shows the instruction and/or safety stickers on
the machines this Use and Maintenance manual refers
to Tiger 280 DD.
Fig.3.2 shows the position of each of these stickers on
the machine
Fig. 3.1
www.celli.it
1. Attenzione! Non avvicinarsi alle parti in
movimento
Warning! Do not stay close to moving
2. Attenzione! Leggere il manuale di istruzioni
prima di effettuare interventi sulla macchina
Warning! Read the use and maintanance maual
before starting any operationon the machine
3. Pericolo! Non sostare tra la macchina e la
trattrice
Danger! Do not stay between the machine the
machine and the tractor
4. Adesivo CELLI made in Italy
Made in Italy CELLI sticker
5. Adesivo controllo livello olio
Oil level control sticker
6. Certificazione ISO 9001
ISO 9001 Certification
7. Indirizzo internet
Internet address
8. Attenzione! Punto di aggancio sollevamento
macchina
Warning! Machine lifting point
9. Punto da ingrassare
Greasing point
10. Marchio Celli
CELLI logo
11. N° di giri scatola cambio
Gearbox rpm
11. N° di giri scatola cambio
Gearbox rpm
12. Targhetta identificazione macchina
Identification plate
13. Tabella cambio di velocità
Example table of working speeds
14. Ingranaggi in presa standard
Show the meshing gears pair standard

Manuale uso e manutenzione fresa doppia 13 Use and maintenance dual drive rotary tillers
SEGNALAZIONI ADESIVE
INSTRUCTION STICKERS 3
3.3 Sostituzione adesivi
Nel caso in cui uno o più adesivi siano deteriorati e
quindi non più leggibili, è necessario rimpiazzarli
tempestivamente. I nuovi adesivi vanno richiesti al
rivenditore Celli presso il quale è stata acquistata la
macchina. In caso di difficoltà ci si può rivolgere alla
nominativo del rivenditore più vicino.
3.3 Stickers replacement
If one or more stickers are so damaged that it is
impossible to read them, replace them immediately.
Ask your Celli dealer for new stickers.
For any problem, contact the Celli company (info@celli.
it), which will give you the name of the nearest Celli
dealer.
Fig. 3.2
11 5 9
13 12 4 8
7
13
2 1 3 12
6
5 5
14 14

Manuale uso e manutenzione fresa doppia 14 Use and maintenance dual drive rotary tillers
CARATTERISTICHE TECNICHE
TECHNICAL DATA 4
4.1 Impiego della macchina
I prodotti a cui questo libretto Uso e Manutenzione
fa riferimento sono stati progettati e realizzati per la
coltivazione del terreno ad uso agricolo.
Qualunque altro tipo di utilizzo può causare situazioni
di pericolo, un precoce deterioramento o la rottura
della macchina ed invalida la garanzia del costruttore.
4.2 Dati tecnici
Le caratteristiche tecniche dei vari prodotti a cui questo
libretto fa riferimento sono nelle tabelle di seguito
riportate.
Si consiglia di ricontrollare la targhetta di identificazione
della macchina per individuare la tabella relativa al
prodotto di cui si è in possesso.
4.3 Potenza massima suggerita
Si noti in modo particolare la potenza massima
indicata per il trattore, facendo riferimento alla
potenza del motore. Nelle tabelle è anche indicata una
potenza minima richiesta per utilizzare la macchina in
condizione medie di lavoro.
Se la potenza del trattore disponibile fosse al di
4.1 Use of the machine
The products this Use and Maintenance manual refers
to have been designed and realised for tilling farmlands.
The use of the machine for other purposes may cause
situations of danger, premature wear or breakage
of the machine and invalidates the manufacturer’s
warranty.
4.2 Technical data
The technical data of the different products this manual
refers to are shown in the above tables.
We suggest to check the identification plate of the
machine once again to identify the table relating to the
product you bought.
4.3 Maximum recommended horsepower
In particular, note the maximum horsepower for the
tractor by making reference to the engine power. The
tables also show the minimum horsepower required to
use the machine in average working conditions.
If the horsepower of your tractor is outside the

Manuale uso e manutenzione fresa doppia 15 Use and maintenance dual drive rotary tillers
CARATTERISTICHE TECNICHE
TECHNICAL DATA 4
CONFIGURAZIONE STANDARD
• POTENZA MASSIMA: 280 HP (206 KW)
• PRESA DI FORZA 1000 giri/min CON CAMBIO 2V
N° denti: 15-30 = 260 giri/min; 14-31 = 230 giri/min
• TRASMISSIONE LATERALE: INGRANAGGI
•
ATTACCO A 3 PUNTI CATEGORIA 2
/3
• ATTACCHI ANTERIORI OSCILLANTI
• VENTOLE POSTERIORI REGOLABILI CON VITE
• ZAPPE SQUADRO 80x10 (6 per ogni flangia, all’estremità rivolte all’int.)
• PROFONDITA’ DI LAVORO 25 cm
• SLITTE LATERALI
• CARDANI LATERALI CON FRIZIONE
STANDARD CONFIGURATION
• MAXIMUM HORSEPOWER: 280 HP (206 KW)
• 2 SPEED GEARBOX FOR 1000 rpm PTO
N° of teeth: 15-30 = 260 rpm; 14-31 = 230 rpm
• GEARS SIDE DRIVE
•
THREE POINT HITCH CATEGORY 2
/3
• SWINGING LOWER LINKAGES
• TAILGATE ADJUSTMENT BY THREADED BAR
• L-SHAPED BLADES 80x10
(6 side blades leaning inwards for each flange)
• WORKING DEPTH 25 cm
• SIDE SKIDS
• SIDE DRIVE SHAFTS WITH CLUTCH
POTENZA MINIMA
MINIMUM
HORSEPOWER
180 HP - 132 KW
POTENZA MASSIMA
MAXIMUM
HORSEPOWER
280 HP - 206 KW
MOD. cm cm HP / KW Kg Nr.
400
413 391 160/118 2000 90 Cardano S.10
L=838,
lato trattore
1”3/8 Z=21
Drive shaft S.10
L=838,
tractor side
1”3/8 Z=21
450
463 441 180/132 2120 102
500
513 491 200/147 2240 114
fuori della fascia di potenze consigliate (Min -
Max), consultare il rivenditore prima dell’utilizzo
della macchina.
range of the recommended (Min - Max) horsepower,
consult your dealer before starting to use the
machine.

Manuale uso e manutenzione fresa doppia 16 Use and maintenance dual drive rotary tillers
5.1 Aggancio e sgancio dal trattore
ATTENZIONE!
Prima di iniziare le operazioni di aggancio o di
sgancio leggere con attenzione le raccomanda-
zioni riportate all’inizio di questo libretto. Si tratta
di operazioni potenzialmente molto pericolose! E’
richiesta perizia e grande attenzione in ogni fase!
• Queste operazioni di aggancio e sgancio possono
essere svolte da un solo operatore senza l’intervento
di altre persone. Se ci sono altre persone coinvolte
assicurarsi che:
-
queste persone siano esperte e sappiano cosa fare
-
l’operatore ai comandi del trattore possa comunicare
agevolmente con le persone che stanno effettuando
le operazioni di aggancio o sgancio.
• Prima di iniziare ogni operazione di aggancio o
sgancio è essenziale verificare che:
- la presa di forza del trattore sia disinserita
- gli organi di lavoro della macchina siano fermi
- la macchina sia aperta in piano, in posizione
stabile su terreno non cedevole
• Il trattore è dotato dei seguenti organi di
collegamento Fig.5.1.
A. presa di potenza meccanica (albero scanalato)
B. bracci inferiori del sollevatore idraulico
C. braccio superiore del sollevatore idraulico
D. innesti presa di potenza idraulica
Prima di iniziare le procedure di aggancio è necessario
controllare che questi organi siano compatibili con
le caratteristiche degli organi corrispondenti sulla
macchina da agganciare.
5.1 Coupling and uncoupling operations
WARNING!
Before starting the coupling or uncoupling
operations, read carefully the warnings on the first
pages of this manual. These operations may be
very dangerous! Every stage requires the utmost
care and attention!
• Coupling and uncoupling operations must be carried
out by a single operator without the involvement of
other people. If other people are involved, make
sure that:
- these people are duly skilled and trained
- the operator that is at the controls of the tractor
can easily communicate with the people carrying
out the coupling and uncoupling operations
• Before starting any coupling or uncoupling
operation, check that:
- the tractor PTO is disengaged
- the machine working parts are not moving
- the machine must be open in a stable position on
a horizontal and flat solid ground
• The tractor is equipped with the following connecting
parts (see Fig.5.1):
A. Mechanical PTO (splined shaft)
B. Lower hydraulic lifting arms
C. Upper hydraulic lifting arm
D. Hydraulic PTO
Before starting the coupling operations, check that the
above parts are compatible with the features of the
corresponding parts of the machine to be hitched.
UTILIZZO DELLA MACCHINA
USE OF THE MACHINE 5
Fig. 5.1
D
C
A
B

Manuale uso e manutenzione fresa doppia 17 Use and maintenance dual drive rotary tillers
UTILIZZO DELLA MACCHINA
USE OF THE MACHINE 5
In modo particolare la presa di potenza meccanica
dovrà avere caratteristiche compatibili con l’innesto
dell’albero cardanico (numero di scanalature e
diametro, regime di rotazione: 1000 giri), i bracci
inferiori e superiore dovranno essere compatibili
con le misure standard del castello a tre punti della
macchina ed i relativi perni di collegamento. Nel caso
ci siano problemi di compatibilità fra gli organi
di collegamento del trattore e della macchina
contattare il rivenditore presso cui si è effettuato
l’acquisto.
Aggancio della fresa al trattore Fig.5.2
La corretta posizione trattore / fresatrice o frangor viene
determinata ponendo la fresatrice ad una distanza dal
trattore tale che, il giunto cardanico resti esteso 5-10
cm dalla posizione di chiusura.
A questo punto procedere come segue:
− Aprire i due sportellini (superiore ed inferiore)
presenti sulla cuffia centrale.
− Montare il cardano nella presa di forza della fresa.
− Richiudere gli sportellini.
− Sostenere il cardano utilizzando l’apposito gancio
sul castello centrale.
− Avvicinare il trattore alla fresatrice cercando di
portare i bracci A in corrispondenza delle forcelle B
del castello 3 punti della fresa.
− Spegnere il motore del trattore ed inserire il freno di
stazionamento.
− Collegare i due bracci inferiori del sollevatore A ai
rispettivi attacchi della fresatrice B.
− Collegare il cardano alla presa di forza del trattore.
− Collegare il braccio del terzo punto superiore C.
Regolare la posizione del telaio della fresatrice in
modo che sia orizzontale.
In particular, the features of the mechanical PTO
must be compatible with the driveshaft hitch (number
of splines and diameter, rotation speed: 1000 engine
RPM), the upper and lower arms must be compatible
with the standard dimensions of the three-point hitch
of the machine and relative connecting pins.
In case of compatibility problems between
the tractor connection parts and the machine
connection parts, contact your dealer.
Hitching the rotary tiller to the tractor Fig.5.2
For a correct positioning of the tractor and the machine
when hitching the tiller, the driveshaft has to work at 5-
10 cm from its closing position (minimum length).
Then proceed as follows:
− Open the two doors (upper and lower) which are on
the central cap.
− Connect the driveshaft with the tiller PTO.
− Close the doors.
− Keep the driveshaft in position using the hook on
the central frame.
− Drive the tractor close to the rotary tiller so that
the lifting arms A are as close as possible to the B
linkages.
− Stop the tractor engine and put the parking brake
on.
− Connect the two lower lifting arms A to the linkages
of the rotary tiller B.
− Connect the driveshaft to the tractor PTO.
− Connect the upper three-point hitch C. Adjust the
tiller frame position so that the rotary tiller is in a
horizontal position.
Fig. 5.2
C
B
A90°

Manuale uso e manutenzione fresa doppia 18 Use and maintenance dual drive rotary tillers
UTILIZZO DELLA MACCHINA
USE OF THE MACHINE 5
− Fermare con gli appositi tenditori i bracci del
sollevatore e per non tenere la fresa troppo rigida
rispetto al trattore, lasciare una oscillazione di circa
5 cm.
− Controllare il livello olio della scatola cambio prima
della messa in opera.
− Mettere la fresatrice in rotazione, interrarla in
posizione di lavoro e controllare nuovamente la
posizione del telaio; se necessario regolare di
nuovo il braccio del terzo punto.
5.2 Avvertenze per l’albero cardanico
In posizione di lavoro l’angolo del giunto cardanico
non deve mai superare i 20° Fig 5.3. Quando l’albero
è sfilato al massimo 15 cm Fig.5.4; una volta effettuato
il collegamento fra fresa e trattore, messo il cardano
in posizione di lavoro, verificare che sia consentito
un movimento ulteriore di almeno 4 cm nel senso
dell’accorciamento del cardano stesso Fig.5.4.
ATTENZIONE!
Provvedere sempre all’innesto delle due forcelle
− Lock the lifting arms with the stabilizers and allow a
5 cm side movement not to keep the rotary tiller too
rigid.
− Check the gearbox oil level before starting the
machine.
− Let the rotary tiller start rotating, put it in its working
position and check again the frame position. If
necessary, adjust again the top arm of the three-
point hitch.
5.2 Instructions for the driveshaft
The angle of the driveshaft in working position has
never to exceed 20° Fig.5.3. When the driveshaft
reaches its maximum extension, the two half-shafts
must overlap for at least 15 cm Fig.5.4. When the tiller
has been hitched to the tractor, the driveshaft is in its
working position; check that when working at minimum
extension, a further shortening of the driveshaft (4 cm
at least) is allowed Fig.5.4.
WARNING!
Always couple with care the driveshaft sides with the
Fig. 5.3
20°
Fig. 5.4
Table of contents
Popular Tiller manuals by other brands

Scheppach
Scheppach MTE450 Translation from the original instruction manual

EINHELL
EINHELL ROYAL RLE 450 operating instructions

Mantis
Mantis 7265 Operator's & parts manual

Makita
Makita UK360D instruction manual

Troy-Bilt
Troy-Bilt TB146 EC Operator's manual

Redexim
Redexim Verti-Drain 7521 Operating and parts manual