CenturionPro DBT 4 User manual

OWNERS MANUAL
DBT MODEL 4
WITH VARIABLE SPEED CONTROL

2cprosolutions.com1 855 535 0558
CenturionPro Solutions (the manufacturer) will repair or replace, without charge, any
parts proven defective in material or in workmanship for a period of 3 years on the
Trimming Machine and 2 years on the Variable Speed Control.
Thewarrantyperiodwillbeginonthedatethemachine(s)ispurchasedbytheinitialpurchaser.
Product or component warranty defects can be remedied at any authorized service dealer, or
directlyat the manufacturer.Any service workperformed,anddeemed valid due toadefective
part, will be free of charge. CenturionPro Solutions reserves the right to use any manufacturer-
approved replacement part for the warranty repair.
The machine or defective part then must be returned to the manufacturer for analysis or
replacement at the cost of the owner. Parts deemed to be covered under the warranty will be
provided for free excluding shipping costs.
Do not return the machine to the place of purchase for repair or warranty claims, unless you
have been authorized by CenturionPro Solutions to do so. The place of purchase can only sell
replacement parts and will not repair any warranty issues, unless it is noted as an authorized
repair dealer and has been authorized to work on your machine.
CenturionPro trimming machines are intended for use on legal aromatic herbs and hops. Please check all municipal, provincial/state and
federal laws and regulations before using these machines. CenturionPro Solutions does not promote or condone the use of these products in
any way that may be deemed illegal. Allow only persons who understand this disclaimer to operate the machines.
The manufacturer assumes no risk and shall be subject to no liability for damages or loss resulting from the specic use or application made
of the product. In no event will the manufacturer be liable for any special, incidental or consequential damages (including loss of use, loss
of prot and claims of third parties) however caused - whether by negligence of the manufacturer or otherwise. If you have any questions
regarding your warranty rights and responsibilities, please contact the manufacturer.
YOU MUST REGISTER YOUR TRIMMER WITHIN 30 DAYS OF YOUR PURCHASE
WARRANTY
YOU HAVE JUST MADE A SMART DECISION BY PURCHASING THE BEST TRIMMER IN THE WORLD. FAILURE TO REGISTER YOUR MACHINE WITHIN 30
DAYS OF PURCHASE WILL VOID YOUR 10 YEAR WARRANTY. PROTECT YOUR INVESTMENT. THIS PROCESS WILL ONLY TAKE 3 MINUTES TO COMPLETE.
!! IMPORTANT !!
IF WARRANTY REPAIR IS REQUIRED, PLEASE CONTACT THE MANUFACTURER AT 1-855-535-0558 OR
1. Model and serial number - Located on outside of motor
2. Proof of purchase date
3. A copy of the original Warranty Registration Card or Online Submission
4. Details of the defect or problem (include photos and videos)
YOU MAY BE DENIED WARRANTY COVERAGE IF YOUR MACHINE HAS FAILED
DUE TO ANY OF THE FOLLOWING:
Product abuse Normal wear
Product neglect Accidental damage
Improper maintenance Unapproved modications
Improper electrical connection Water Damage
WARRANTY TERMS AND CONDITIONS
cprosolutions.com/warranty
REGISTER NOW!
LEGALITIES
LIABILITIES

3
OWNERS MANUAL
MODEL 4 DBT
For more information or to watch our DIY video tutorials visit cprosolutions.com
The DBT Model 4 is a high-speed trimming system, requiring that specic safety precautions are practiced during operation to reduce the risk of personal injury.
Improper use of the DBT Model 4, or any CenturionPro product, may cause serious or fatal injury. Please ensure you read the operations manual and warning notes
before using the DBT Model 4 with Variable Speed Control.
IMPORTANT SAFETY INFORMATION
CENTURIONPRO SOLUTIONS:
DBT MODEL 4 WITH VARIABLE SPEED CONTROL
AUTOMATED TRIMMING SYSTEM
DO NOT LEND OUT OR RENT YOUR DBT MODEL 4 WITHOUT THIS OPERATING MANUAL. A FIRST TIME USER SHOULD OBTAIN PROPER INSTRUCTION PRIOR TO USE.
GENERAL
• Do not move, disassemble, clean or inspect the trimmer while the power is still
connected to the machine.
• Replacement parts are specic to DBT Model 4 and must be purchased from
an authorized dealer only. Substituting factory parts with non-approved third-
party replacements may result in damage to the machine or bodily harm.
• Keep all individuals a safe distance from the work area. Do not operate the
machine around children.
• Do not remove safety labels. Replace any and all labels if they become
damaged or obscured.
CONNECTION
• As with home appliances, the DBT Model 4 must be used in connection with a
properly grounded receptacle.
• Never plug in or power up your trimming machine if the protective shrouds are
removed.
• Do not use extension cords over 8m (25ft) in length to power the DBT Model 4.
OPERATION
• The initial set up will show assembly instructions to unpack and set-up your machine.
• Safety glasses should be worn at all times while operating theDBT Model 4.
• Do not operate any trimming machine while tired or under the inuence of
medication, drugs or alcohol.
• Do not put anything other than plant material into the tumbler. Doing so may cause
damage to the tumbler, the machine or result in bodily harm.
• Operate the trimmer in a well ventilated area in order to prevent overheating.
MAINTENANCE
• Never leave the DBT Model 4 system running unattended.
• Never conduct maintenance or cleaning while the machine is plugged in.
• Do not modify or adapt any part of the trimmer or its accessories. Doing so may
cause irreversible damage to the machine or result in bodily harm.

4cprosolutions.com1 855 535 0558
DBT MODEL 4 - WITH VARIABLE SPEED CONTROL
DBT MODEL 4 - WITH VARIABLE SPEED CONTROL
Input Voltage
3 Amp - 110V NA
1.5 Amp - 220V EU/AUS
Dimensions (L x W x H) 67in x 36in x 53in
170cm x 91cm x 135cm
Weight 240 lbs / 109 kg
Tumbler Diameter 20in / 51cm
Tumbler Length 66in / 168cm
Number of Tumblers 1
Processing Capacity (per hour) Dry: 108 lbs / 49 kg
Motor 1/4 HP
Warranty 3 years
VSC Warranty 2 years
DBT MODEL 4 - ADDITIONAL REQUIREMENTS
EXTENSION CORD
14 AWG (min AWG SIZE)
7.6m/25ft MAX LENGTH
ELECTRICAL POWER SUPPLY SET-UP
TEST YOUR ELECTRICAL CURRENT TO MAKE SURE IT
IS PRODUCING POWER. WE RECOMMEND HAVING A
CERTIFIED ELECTRICIAN SET UP THE PROPER POWER
SUPPLY. THIS WILL ENSURE YOUR POWER SOURCE IS
SUPPLYING THE CORRECT ELECTRICITY. IF YOU HAVE NOT
DONE THIS, HAVE A CERTIFIED ELECTRICIAN COME AND
TEST YOUR ELECTRICAL CURRENT.

5
OWNERS MANUAL
MODEL 4 DBT
For more information or to watch our DIY video tutorials visit cprosolutions.com
TABLE OF CONTENTS
WARRANTY
IMPORTANT SAFETY INFORMATION
SPECIFICATIONS
TABLE OF CONTENTS
BEFORE YOU START
COMPONENT OVERVIEW
TRIMMING PLANT MATERIAL
CLEANING & MAINTENANCE
CLEANING & MAINTENANCE - DISASSEMBLE
CLEANING & MAINTENANCE - RE-ASSEMBLE
KIEF FILTER SCREEN UPGRADE
TRIMMER SAFETY
TROUBLESHOOTING
FREQUENTLY ASKED QUESTIONS
RETURN/REFUND POLICY
ADDITIONAL ASSISTANCE
2
3
4
5
6
7
8
9
10
11
12
13
14
15
15
15

6cprosolutions.com1 855 535 0558
SIDE DRIVE
INSTALL SIDE DRIVE
1. Install Side Drive on trimmer using 2 locking pins.
2. Ensure wheel is clean and fully engaged on Tumbler.
CONNECT POWER CORDS
1. Connect the DBT Model 4 power cord to a 15 amp 120 VAC circuit. Do not connect and
disconnect the power cord with wet hands. Do not operate in the rain.
STARTING THE MACHINE
1. Rotate and pull the red Emergency STOP button outward.
2. Press the green START Button.
3. Turn the TIMER dial clockwise until it is aligned with the desired trimming duration,
or turn TIMER dial counter-clockwise for continuous trimming.
4. Turn the TUMBLER SPEED dial clockwise to set the desired speed, start o at the
lowest setting and increase as required.
STOPPING THE MACHINE
NOTICE: In an emergency, hit the red EMERGENCY STOP button.
1. At any other time, Turn TUMBLER SPEED dial counter-clockwise to align with ZERO.
2. Turn the TIMER dial counter-clockwise to align with ZERO.
3. Press in the Emergency STOP button.
DISCONNECT POWER CORDS
1. Disconnect the trimmer’s power cord.
NOTICE: The DBT Model 4 draws a max of 5 amps.
NOTICE: Be sure to hold the plug when disconnecting the power cord from
the electrical outlet. Do not disconnect by pulling on the power cord.
CONTROLS AND COMPONENTS
BEFORE OPERATION
Read and understand this manual. Educate yourself on the location and operation of the controls. Familiarize yourself with the trimmer and how
it works before you begin using it. Know how to quickly shut o the machine in case of an emergency.
Your safety is your responsibility.
PRE-OPERATION CHECK
For your safety, and to maximize the service life of your equipment, it is very important to take a few moments before you operate the trimmer to
check its condition before each use. If you happen to come accross any issues, be sure to take care of them before you operate the trimmer.
Improperly maintaining this trimmer, or failing to correct a problem before operation, could cause a malfunction which could cause you to be
seriously injured. Always perform a pre-operation inspection before each use, and correct any problem.
Before beginning your pre-operation checks, be sure the trimmer is on a level surface, the MOTOR SWITCH is in the OFF position, and all power
cords are unplugged.
CHECK THE GENERAL CONDITION OF THE TRIMMER
Clean the Tumbler, Blade Sheet, and tension system. Look for signs of damage.
Check each control for proper operation.
Check parts for wear. Replace if necessary.
Check that all nuts, bolts, and clamps are tightened appropriately.
NOTICE: Keep all shields, Trim Trays and covers in place while operating the trimmer.
BEFORE YOU START

7
OWNERS MANUAL
MODEL 4 DBT
For more information or to watch our DIY video tutorials visit cprosolutions.com
SPRING
PLUNGER
TRIM
TRAY
TENSION
KNOB
TUMBLER
LID
SIDE DRIVE:
- SPEED
CONTROL
BOX
- MOTOR
STAND
TRIM
TRAY
TUMBLER
LID
TUMBLER
BLADE
SHEET
BRUSH
TOP
COVER
TRAY
STOP
TIGHTENING
ROD
COMPONENT OVERVIEW

8cprosolutions.com1 855 535 0558
LOAD
Remove clear Tumbler Lid from front of
Tumbler. Hold drum and pull out Plunger
and pivot drum into a upward facing posi-
tion, replace Plunger. Load dried, prepped,
untrimmed plant material into the Tumbler.
For best eciency, ll Tumbler 40-60% full
and run batches of similar material.
RUN
Re-apply clear Tumbler Lid. Pull out Plunger
and pivot Drum into a horizontal position.
Tighten Blade Sheet as required. Turn ma-
chine ON and allow to run for 1-15 minutes.
Check material every 2-5 minutes. For a
closer trim, continue running the DBT Model
4 until desired trim is accomplished.
EMPTY
Once desired trim is accomplished, remove
Trim Tray & Tumbler Lid, position separate
container (not included) to capture
processed material, pull out Plunger and
pivot drum to a downward facing position.
Processed material will be deposited in
container when correctly positioned.
TRIMMING PLANT MATERIAL
IMPORTANT NOTE:
TRIM TRAY SERVES AS A COLLECTION MECHANISM AND AS A SAFETY GUARD. MACHINE SHOULD NOT BE RUN
WITHOUT TRIM TRAY IN PLACE AND TABS ORIENTED IN THE VERTICAL POSITION.
SERVICING YOUR TRIMMER
Proper maintenance is essential for safe, economical, and trouble free operation.
Other service tasks that are more dicult, or require special tools, are best handled by professionals and are normally performed by a Centurion Pro technician or other qualied mechanic.
The maintenance schedule applies to normal operating conditions. If you operate your trimmer under severe conditions, such as sustained high load or high temperature operation, or use
it in unusually wet or dusty conditions, consult your servicing dealer for recommendations applicable to your individual needs and use.
Remember that an authorized Centurion Pro servicing dealer knows your trimmer best and is fully equipped to maintain and repair it. To ensure the best quality and reliability, use only new,
Centurion Pro parts or their equivalents for repair and replacement.
NOTICE: Improper maintenance, or failure to correct a problem before operation, can cause a malfunction which can cause serious injury
or death. Always follow the inspection and maintenance recommendations and schedules in this owner’s manual.
IMPORTANT NOTE:
SIDE DRIVE IS NOT WATERPROOF.
DO NOT GET WET.
Empty Trim Tray:
Lift the Tray Stop on the front of the machine to release the Trim Tray. Slide Trim Tray out of slots, empty tray and replace.

9
OWNERS MANUAL
MODEL 4 DBT
For more information or to watch our DIY video tutorials visit cprosolutions.com
CLEANING & MAINTENANCE
PRESSURE WASHING THE DBT MODEL 4
WARNING:
PINCH POINT HAZARD - WEAR GLOVES WHEN REMOVING BRUSH.
ALWAYS WEAR PERSONAL PROTECTIVE EQUIPMENT WHEN CLEANING MACHINE.
STEP 2:
CLEAN
ELECTROPLISH
TUMBLER
Clean the length of
the tumbler of all
debris using hot
pressurized water.
NOTICE: Side Drive is NOT waterproof DO NOT GET WET. If you choose to
use a pressure washer take care not to damage the trimmer’s n-
ish by holding the nozzle excessively close to the machine. Avoid
spraying the bearings, located at the ends of the brush. These
components are not intended to be waterproof and water dam-
age is excluded from warranty coverage.
- Clean with pressure-washer at up to 1500 psi.
- Hot water, fan spray setting.
- Run for 15 mins after washing to allow components to dry.
STEP 1:
CLEAN
BRUSH
Simply pull on brush
to remove. Clean the
length of the brush of
all debris using hot
pressurized water.
CLEANING
INTERVAL ITEM
Before each use
Check that Blade Sheet is snug, and in contact with Tumbler and is tightened appropriately
Check that machine is free of excessive debris.
Ensure that machine is clean and the Tumbler can be rotated without power under manual force.
During use Although not required, application of a food grade lubricant to Tumbler and Blade Sheet can help reduce resin build up.
After each use For best performance and longevity, clean trimmer after every use or if plant material is visibly aecting the trim quality or speed of the trimmer.
Every 10 hours
of operation
To maximize Blade Sheet life, rotate orientation of blade sheet every 10 hours or when visible signs of wear are identied. Although not required, this will extend the life of
the Blade Sheet.
Remove Tumbler and Blade sheet and cover with a thick coat of cooking oil (olive, vegetable, etc.). Let sit for 3-12 hours. Using warm/hot water, concentrated dish soap and a non-metallic dish
scrubber, clean the Tumbler and other machine components by hand. Alternatively you can pressure wash with hot water, at up to 1500 psi on fan spray setting. After pressure washing, run
machine for 15 minute to allow components to dry.
Read full CLEANING AND MAINTENANCE instructions before cleaning.
When to Clean:
Depending on the material being processed and the frequency of use, the slots of the Tumbler may need to be cleaned after each use or periodically.
Indications that machine requires cleaning
• Reduced trim quality
• Visible build-up of material in the Tumbler slots which obscure the sharp edge of the slots
• Visible evidence of material on Blade Sheet
• Excessive noise (machine should run quietly so that you may converse normally when it is running)
The DB T Model 4's are precision machines. It is essential that they be operated and maintained with this in mind. It's important to inspect the machine at initial start-up and after each use
to ensure that no damage or plant material build-up has occurred and that the tumbler spins freely.
In addition, it is highly recommended to clean the machine after every day of use. This ensures that the Blade Sheet and Tumbler are kept lubricated and that resin does not build-up and
aect performance. This is especially important if the machine has been stored for an extended period of time.
REMOVING OBSTRUCTIONS
If the rotating Tumbler becomes restricted or clogged:
Stop the motor and Make sure that all rotating parts have come to a complete stop. Disconnect the trimmer’s power cord. Use a wooden stick to clear the obstruction.

4.
A
4.B
6
.B
5
.
A
6
.
A
3.A
3.A
10 cprosolutions.com1 855 535 0558
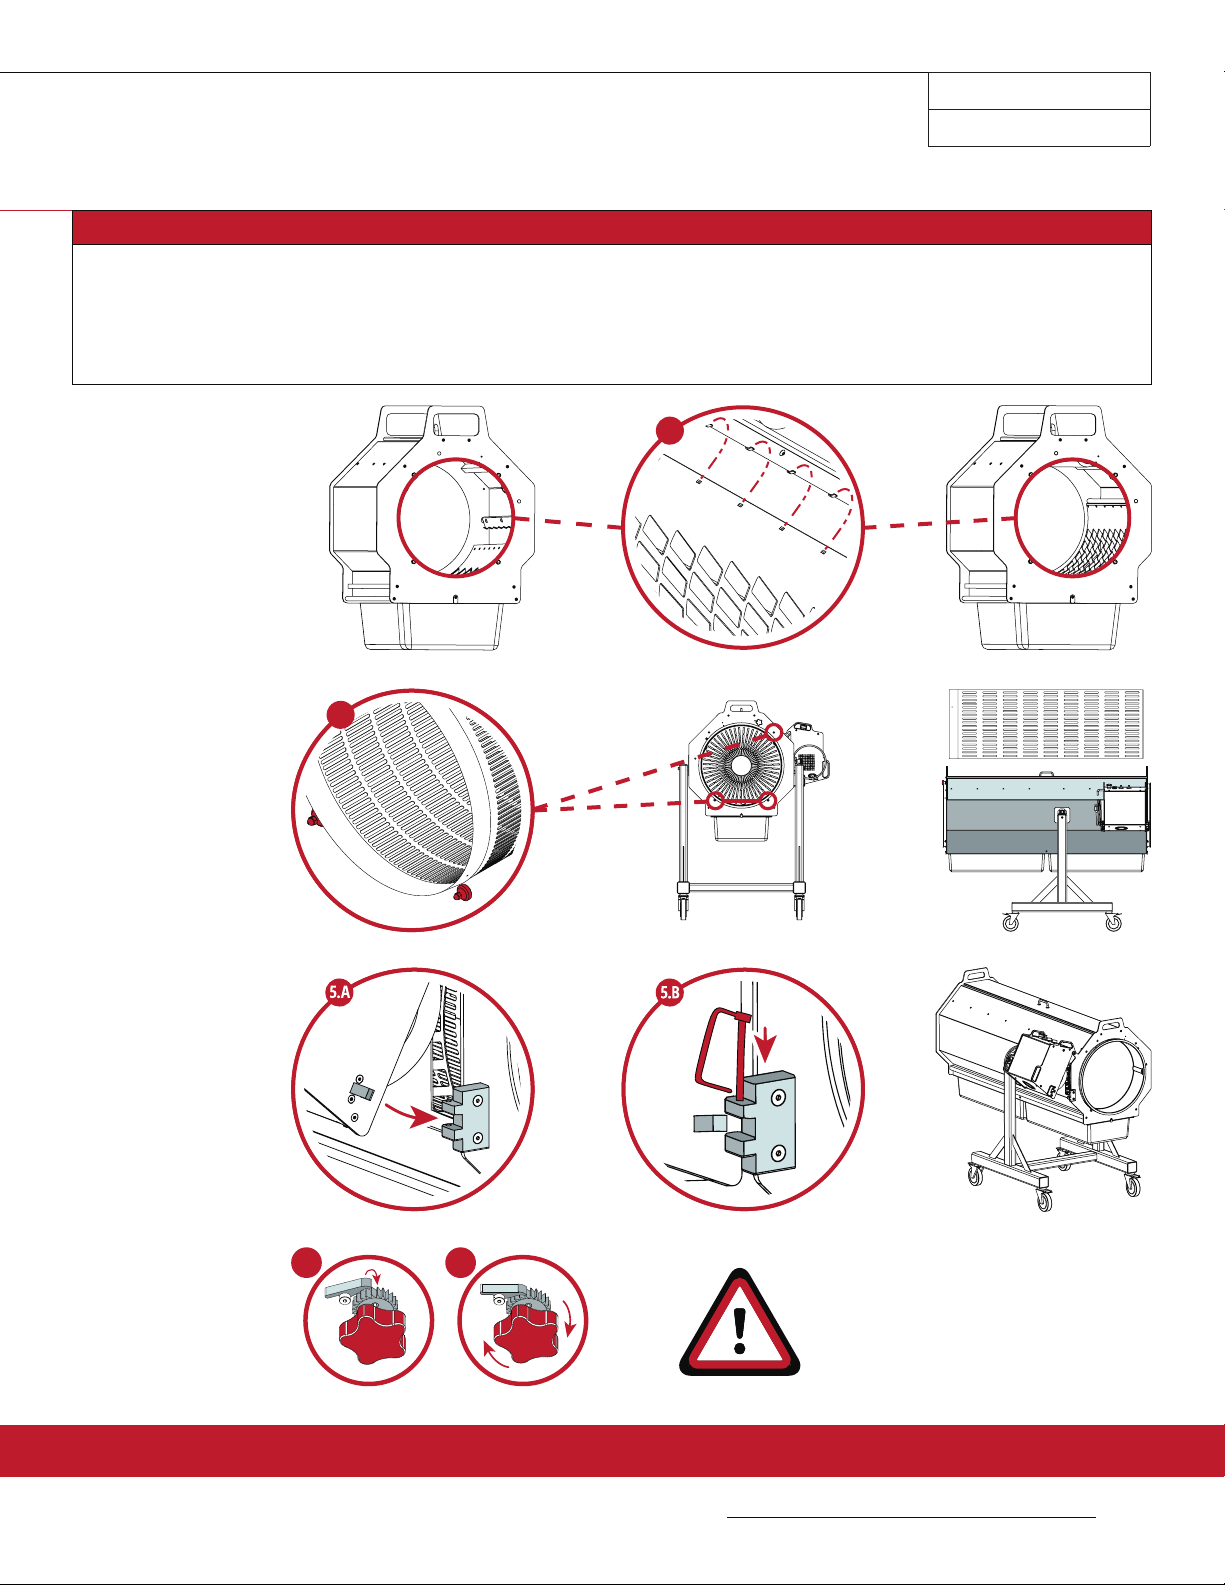
CLEANING & MAINTENANCE
DISASSEMBLE
STEP 1:
SHUT OFF MOTOR. UN-
PLUG POWER CORDS.
STEP 4:
RELEASE TENSION ON
THE BLADE SHEET:
A. Turn the tension adjustment
knob clockwise slightly to re-
lease tension on the ratchet.
B. While turning the tension ad-
justment as described above
ip the pawl o of the ratchet
so it is no longer in contact.
c. Release the tension knob; the
Blade Sheet will now hang
freely within the trimmer.
STEP 5:
REMOVE TUMBLER:
A. To remove the Tumbler, Turn
motor o, unplug power
cords, and put the machine
in a horizontal position. With
2 people, lift the Tumbler o
of the rollers.
B. Slide the Tumbler gently from
the machine and set it on a
non-abrasive surface.
(Tip: If the Tumbler does not
come out easily check that
the Blade Sheet has been re-
leased as described in step 4)
STEP 6:
REMOVE BLADE SHEET:
A. Reach inside the machine
and remove the Blade Sheet
by gently lifting the Blade
Sheet o of the metal tabs
which hold it in place.
B. Gently remove the sheet
from the machine and place
it on a non-abrasive surface.
STEP 2:
REMOVE BRUSH:
A. PUT ON GLOVES and, pull
brush rmly to release from
snap clips.
STEP 3:
REMOVE SIDE DRIVE:
A. Release side drive by remov-
ing the 2 locking pins.
BLADE SHEET WILL
BECOME VISIBLY
LOOSENED AROUD
THE TUMBLER.
2
.
A
3.A
6.
A
6.
B
11
OWNERS MANUAL
MODEL 4 DBT
For more information or to watch our DIY video tutorials visit cprosolutions.com
CLEANING & MAINTENANCE
MONTHS OF WORK CAN BE RUINED IN A FEW HOURS AT THE END SO PLEASE BE PATIENT AND TAKE YOUR TIME WITH THE HARVESTING AND CURING PROCESS.
STEP 1:
SHUT OFF MOTOR.
UNPLUG POWER CORDS.
STEP 2:
INSTALL BLADE SHEET:
A. Reach inside the machine
and install the Blade Sheet by
gently placing the sheet on the
metal tabs until all holes are
resting evenly on metal tabs
on both sides of the machine.
STEP 6:
RE-TENSION
BLADE SHEET:
A. Flip the pawl so it is in contact
with the ratchet and prevents
the ratchet from moving in a
counter clockwise direction.
B. Turn tension adjustment knob
clockwise slightly until you en-
counter minor resistance and
the Blade Sheet has come in
full contact with the Tumbler.
STEP 3:
INSTALL THE TUMBLER:
A. With motor o, power cord
unplugged, and the machine
in a horizontal position, slide
the tumbler gently into the
machine until the Rollers are in
the grooves of the Tumbler.
STEP 4:
INSTALL BRUSH:
A. Place Brush on the snap clips
and rmly press into place.
STEP 1:
SOAK WITH
COOKING OIL
STEP 2:
USING WARM/
HOT WATER
A. Cover entire tumbler and
blade sheet with a thick coat
of cooking oil (olive, vegeta-
ble, etc). Let it sit for 3-12hrs.
A. Using warm/hot water, concen-
trated dish soap and a non-me-
tallic dish scrubber, clean the
tumbler and other machine
components by hand.
NOTICE: For best results use hot water whenever possible.
Be careful when selecting the degreaser that it will
not damage the painted or anodized components
of the trimmer. Always follow the operating in-
structions provided with the pressure washer.
STEP 5:
INSTALL SIDE DRIVE:
A. Hook Side Drive on the Trim-
mer and rmly press until
locking latch holes line up.
B. Insert locking pins to secure
Side Drive. Make sure Side
Drive wheel is fully engaged
to Tumbler.
IMPORTANT NOTE:
SIDE DRIVE IS NOT WATER-
PROOF. DO NOT GET WET.
REASSEMBLE
BEFORE RE-ASSEMBLY
4
4
7.
A
6
7.
B
7.
C
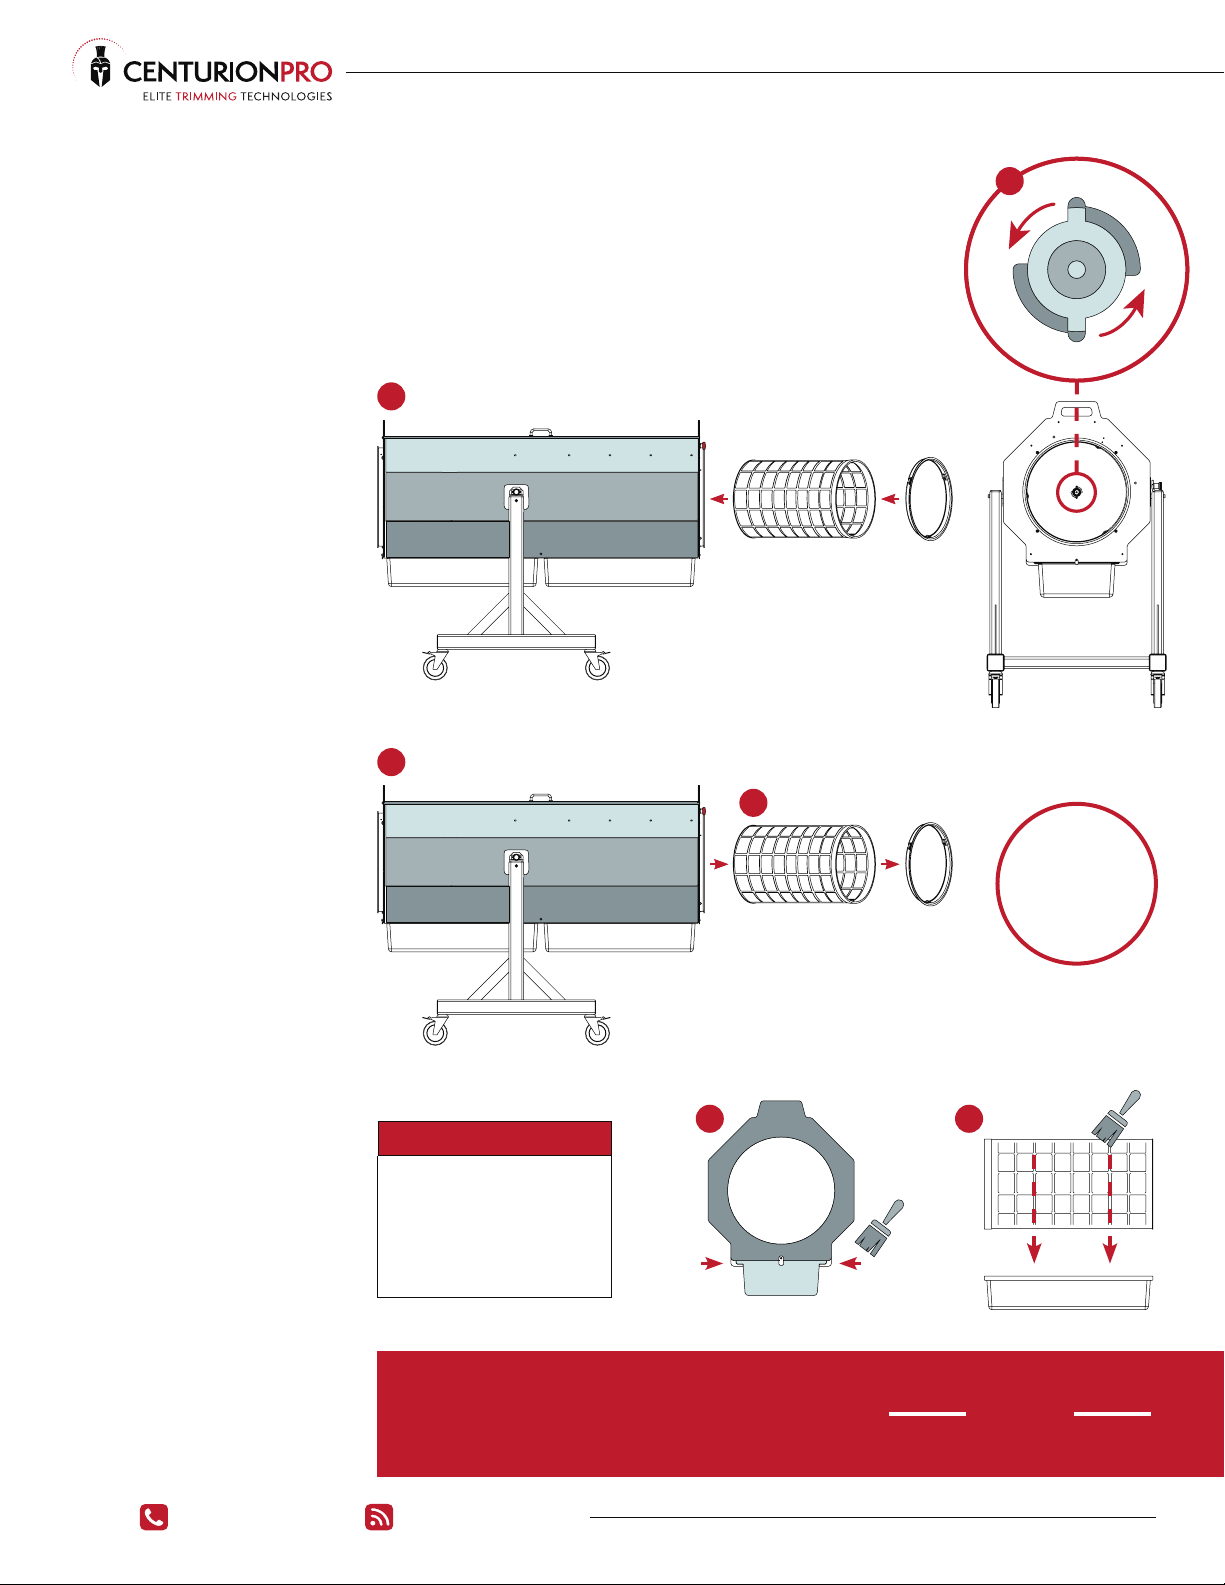
12 cprosolutions.com1 855 535 0558
STEP 3:
REMOVE BLADE SHEET:
STEP 2:
REMOVE TUMBLER:
STEP 1:
LOOSEN BLADE SHEET:
Refer to DISASSEMBLE instructions on (pg 11).
Refer to DISASSEMBLE instructions on (pg 11).
STEP 7:
REMOVE KIEF FILTER SCREEN:
STEP 5:
FILL FILTER SCREEN:
STEP 6:
RUNNING MACHINE:
Rotate the Trimmer into a horizontal position and
turn machine ON. Run materials for up to 10 minutes.
NOTE: If you wish to separate the differ-
ent Kief qualities, run for 5 min-
utes, remove first batch of Kief.
Then run for another 5 minutes.
With Kief Filter Screen in place and machine in a
vertical position, take your Kief and ll Filter Screen
1/2 up to 3/4 of the way full, then insert Tumbler Lid.
NOTE: Overfilling will lower quality and
processing speed.
Refer to DISASSEMBLE instructions on (pg 11).
A. Carefully remove Kief Filter Screen.
B. Brush excess kief o the inside ledges which
hold Trim Tray in place.
C. Carefully remove Trim Tray and brush Kief re-
maining on lter, into the Trim Tray.
NOTE: If you wish to separate the differ-
ent Kief qualities, run for 5 min-
utes, remove first batch of Kief.
Then run for another 5 minutes.
KIEF FILTER SCREEN UPGRADE
PREPARATION
NOTICE: Make sure all motors are o and power cords are unplugged before you begin.
- Before setting up your Kief Filter Screen Upgrade with your trimmer, be sure to read and understand entire manual.
- Refer to CLEANING & MAINTENANCE (pg 10 & 11) for DISASSEMBLE & REASSEMBLE instructions.
STEP 4:
INSERT FILTER SCREEN:
With motor o, power cord unplugged, and machine
in a vertical position, slide Filter Screen gently into
machine. Rotate Tumbler counter-clockwise to lock.
NOTE: Failure to keep hooks on Tighten-
ing Rod, away from Filter Screen
can result in damage.
IDEAL RATIOS FOR DRY ICE KIEF FILTERING
NOTICE: - Dry ice must be in pellet form or nely crushed.
- Large chunks of Dry Ice will damage the lter screen.
- Allow product t get realy cold. Approx. 5-10 minutes.
TRIM
DRY ICE
TRIM
DRY ICE
70%
30%
80%
20%
ALWAYS HAVE
TRIMMER IN A
HORIZONTAL POSITION
WHEN RUNNING
CLEANING
HAND CLEAN WIH
SOAP AND HOT WATER
WHEN YOU NOTICE
OUTPUT DIMINISHING

13
OWNERS MANUAL
MODEL 4 DBT
For more information or to watch our DIY video tutorials visit cprosolutions.com
SAFETY
TRIMMER SAFETY
IMPORTANT SAFETY INFORMATION
Some of the most important safety precautions follow. However, we cannot warn you of every conceivable hazard that can arise in performing maintenance. Only you can decide whether
or not you should perform a given task. Failure to properly follow maintenance instructions and precautions can cause you to be seriously hurt or killed. Always follow the procedures
and precautions in this owner’s manual. Centurion Pro trimmers are designed to trim excess plant material from a variety of herbal material. Other uses could result in injury to the
operator or damage to the trimmer and other property. Injuries and property damage from trimmers can be prevented by following all instructions in this manual and on the trimmer.
The most common hazards are discussed below, along with the best way to protect yourself and others.
Safety Precautions
Make sure all motors are o and power cords are unplugged before you begin any maintenance or repairs.
Read the instructions before you begin, and make sure you have the tools and skills required.
AVOID ROTATING TUMBLER
The DBT Model 4 Tumbler can cause serious injury, cuts and even amputate ngers or hands. Keep hands, arms, and body away from the Tumbler whenever the Tumbler is in motion. Keep hair,
clothing, and jewelry away from the Tumbler. If you need to work around the trimmer to clear or clean plant material for any reason, always shut o the electric motor and disconnect the trimmer’s
power cord from the AC outlet. Use a wooden stick to remove any obstruction or debris. Never put your hand into the Tumbler while the machine is running; serious personal injury could result.
AVOID BLADE SHEET
The DBT Model 4’s Blade Sheet can cause serious cuts and even amputate ngers and hands. Keep Trim Trays and Tumbler Lids in place at all times while machine is operating. If you
need to work around the trimmer to clear or clean plant material for any reason, always shut o the electric motors and disconnect the trimmer’s power cord from the AC outlet.
CLEAR OPERATION AREA
Before operating the trimmer, carefully inspect the surrounding area and remove all hazards that could cause you to trip, slip, or fall into the trimmer. Anything which can be grabbed by the
rotating Tumbler is a potential hazard to you and others. Look for hazards and remove them from the work area. Tie back loose clothing and long, loose hair. Remove any and all jewelry.
KEEP GUARDS AND SHIELDS IN PLACE
Guards, Shields, Trim Trays and Tumbler Lids are designed to protect you from touching moving components. For your safety and the safety of others, keep all shields in place when the
trimmer is running.
TURN MOTOR OFF WHEN NOT OPERATING THE TRIMMER
If you need to leave or step away from the trimmer for any reason, always make sure to turn the motor o.
OPERATE ON FLAT SURFACE
Do not operate on slopes. To avoid overturning, only operate the trimmer on at surfaces. Control the trimmer carefully when transporting it across uneven ground or slopes. Do not push
the trimmer down or across steep slopes: the trimmer could overturn, causing damage to the machine or injury to the operator and/or bystanders.
OPERATOR RESPONSIBILITY
Know how to stop the trimmer quickly in case of emergency. Understand the use of all trimmer controls. Never permit anyone to operate the trimmer without proper instruction. Do not
let children operate the trimmer.
SAFE OPERATING PRECAUTIONS
- Before operating the trimmer for the rst time, please review both the BEFORE YOU START section and the TRIMMER SAFETY section.
- Even if you have operated other trimmers, to take time to become familiar with how the Centurion Pro works.
- Never operate Centurion Pro machines while under the inuence of drugs, alcohol or prescriptions, including over-the-counter cold/u/allergy medications.
- Protective clothing and eye and/or hearing protection should be worn during operation.
- For your safety, do not operate while wearing loose tting clothing, jewelry, etc..
- Rotating machinery parts can entangle loose clothing, long hair or dangling jewelry resulting in serious injury or death.
- Long hair should be secured in a manner that keeps it away from mechanical parts.
14 cprosolutions.com1 855 535 0558
MY SIDE DRIVE IS HOT.
1) Your machine may be overworking due to a voltage drop in your power supply. This can happen if you’re using an extension cord that is too long or undersized. You can
only use an extension cord with a maximum length of 25ft.
2) Use a voltage tester to test your electrical current to ensure you have the correct voltage. We recommend having a certied electrician come in and make sure
your power supply is consistent.
3) Having a motor on for an extended period can be the reason for overheating. Allow the motor to cool down by turning the machine o for an hour, every 5 hours of use.
THE CIRCUIT BREAKER KEEPS TRIPPING.
1) This is caused by a cord that is too long or undersized. Your cord must be no more than 25ft long and the same gauge of thickness as the main cord.
2) Also, ensure the machine is not sharing a circuit with other devices and the correct size breaker is present. Circuit sharing can signicantly decrease the power
being supplied to the devices therefore causing the breaker to trip.
3) Test your electrical current to make sure it is producing consistent power. We recommend having a certied electrician set up the proper power supply. This
will ensure your power source is supplying the correct electricity. If you have not done this, have a certied electrician come and test your electrical current to
ensure it complies with the electrical requirements.
MY TUMBLER IS NOT SPINNING.
1) If its not spinning, check for obstructions between Tumbler and Blade Sheet.
2) Ensure that the rollers are properly placed on grooved Tumbler and/or the Side Drive is engaged on Tumbler.
THE PRODUCT IS NOT COMING OUT TRIMMED.
1) Tumbler and/or Blade Sheet are excessively dirty. Clean Tumbler and Blade Sheet.
2) Make sure that the Blade Sheet is tightened onto the umbler.
3) Check plant to make sure that moisture content is between 8-10% and that the leaves are snappy and dry, not bendy and pliable.
MACHINE MAKES A LOUD SCRAPING OR CLICKING SOUND.
1) Tumbler and/or Blade Dheet are excessively dirty. Clean Tumbler and Blade Sheet.
2) Tumbler and/or Blade Sheet are Damaged and need to be replaced.
ELECTRIC MOTORS WILL NOT START OR HAVE LOW POWER
1) No electric power from the outlet. Plug trimmer into a functional electrical outlet.
2) Outlet is overloaded. Check that breaker is not overloaded and has not tripped. If tripped, switch plug to a dierent circuit.
3) Extension cord is faulty. Check extension cord is rated appropriately for the distance and current. Do NOT use a longer cord unless the wire size is larger.
Undersized extension cords may cause an under-voltage, over-current condition which could damage or destroy the drive motor and void the motor warranty.
4) Overcurrent circuit has been exceeded. Determine cause of excessive circuit resistance which may include: overloaded outlet, faulty extension cord, bad outlet,
underrated generator, excessively dirty machine, incorrectly tensioned Blade Sheet or obstruction between Tumbler and another part of machine. Once source
of resistance has been identied and resolved, reset circuit by pressing small button on control panel for 3 seconds then operate machine normally.
TUMBLER DOES NOT ROTATE UNDER MANUAL FORCE
1) Tumbler and Blade sheet are excessively dirty. Clean Tumbler and Blade Sheet; excessive plant material builts up on these surfaces and causes excess friction.
2) Tension on Blade Sheet is too tight. Reduce tension on Blade Sheet by releasing the pawl and rotating the tension knob in a counter clockwise direction until
the Tumbler can easily be rotated under manual force and the Blade Sheet is in contact with the Tumbler.
TROUBLESHOOTING

15
OWNERS MANUAL
MODEL 4 DBT
For more information or to watch our DIY video tutorials visit cprosolutions.com
FREQUENTLY ASKED QUESTIONS
You are about to enjoy the experience of CenturionPro Solution’s automated trimming machine. For critical information on assembly, cleaning, care, maintenance and
how to operate your machine correctly, please review this manual and check out our video tutorials, which are posted on our website for your ease and convenience.
Go to www.cprosolutions.com/video-tutorials for our video tutorials.
ADDITIONAL ASSISTANCE
These tutorials provide how-to assistance on the following aspects of machine maintenance:
• Straightening the Tumbler/Drum • Complete Unit Assembly • Trimmer Cleaning and Maintenance
• Replacing The Motor • Blade Sheet Removal and Cleaning • DBT Harvest Workow
**If for some reason you can’t nd an answer to your question online or in your manual, please do not hesitate to contact us.
RETURN/REFUND POLICY
Once the machinery/parts are opened and/or used they are no longer eligible for refund or exchange. Customers can only return if written notice of return has been provided to CenturionPro Solutions within 7
days of receiving their machine and the machine or any component of which have not been used. There will be a 20% restocking fee and the customer will be responsible for all shipping costs. Returns must be
packaged same as it arrived and CenturionPro is not liable for any shipping damage incurred on return. If damage occurs in transit on return, CenturionPro will refuse the return and customer will need to process
a claim with their shipping provider. Any missing or damaged items must be reported to CenturionPro within 14 business days of receiving the shipment.
HOW EASY IS IT TO CLEAN?
Please see the detailed cleaning instructions throughout this manual. Remove Tumbler and Blade
Sheet and cover with a thick coat of cooking oil (olive, vegetable, etc.). Let sit for 3-12 hours. Using warm/hot
water, concentrated dish soap and a non-metallic dish scrubber, clean the Tumbler and other machine
components by hand. Alternatively you can pressure wash with hot water, at up to 1500 psi on fan
spray setting. After pressure washing, run machine for 15 minute to allow components to dry.
We recommend to clean your after every day of use, but it depends on your strain. We know the
importance of down time during a harvest so we wanted to make this processas easy as possible.
ARE YOUR MACHINES BUILT TO AN INDUSTRIAL STANDARD?
We do not compromise quality for cost savings. All CenturionPro Solutions machines are composed
of the highest quality materials available in North America and each machine is put through a
comprehensive quality control inspection. We only use brand name components in the build out of
our machines which enables us to have the comfort in giving you a 3 year trimmer warranty. With
proper maintenance these machines will last you well over a decade.
HOW MUCH PRODUCT SHOULD BE IN THE TUMBLER AT ONE TIME?
The Tumbler should be 40-60% full when trimming.
WHAT IS THE MAINTENANCE LIKE?
We have several video tutorials on our website with how to fully service your machine. These step
by step DIY videos make it very easy to do everything necessary to maintain your machine. All parts
can be ordered through any hydroponic store nationwide.
WHAT IS THE OPTIMAL ROOM TEMPERATURE TO TRIM?
Use your CenturtionPro machine in 50-60 °F (10- 15 °C) room to get the best performance. Cooler
temperatures prevent excessive sticking to machine components.
WHY IS MY PRODUCT STICKING TO THE INSIDE OF THE TUMBLER?
If you nd that product is sticking to the inside of the Tumbler, rst clean the Tumbler. When you
reassemble it, make sure the top brush bristles are poking through 1/4" into the Tumbler.

This manual suits for next models
3
Table of contents
Other CenturionPro Trimmer manuals

CenturionPro
CenturionPro GC1 User manual

CenturionPro
CenturionPro Original User manual

CenturionPro
CenturionPro THE MINI User manual

CenturionPro
CenturionPro 3.0 User manual

CenturionPro
CenturionPro Original User manual

CenturionPro
CenturionPro The Gladiator User manual

CenturionPro
CenturionPro XL Series User manual


