cetis TeleMatrix 9700 Series User manual

For 9700IPMWD5, 9700IPMWD, 9702IPMWD5, 9702IPMWD,
9700IPMWD5, 9702IPMWD, 9700IPMWD, 9700IP Series
Handset and 9702IP Series Handset!
9700 SERIES VoIP
SIP 2020 - USER GUIDE
Amazingly elegant! Functional beyond its beauty!
Teledex 9700
Series VoIP models
feature a 1-year
limited warranty.
a brand

2www.telematrix.net 9700 SERIES VOIP USER GUIDE: CETIS SIP 2020
Table of Contents
9700 Series Corded VoIP Phone Map......... 3
9700 Series Cordless VoIP Phone Map ....... 4
9700 Series VoIP RediDock Phone Map ....... 5
Quick Start .............................. 6
Function ................................ 7
Standards and Protocols................... 8
1. Introduction ........................... 8
1.1 Overview of Hardware................ 8
1.1.1 Base Unit ..................... 8
1.1.2 DECT Handset ................. 8
1.2 Overview of Software ................ 9
1.2.1 Configuration Methods .......... 9
1.2.2 Specs Overview ................ 9
1.3 Understanding Buttons and Hardware.... 9
2. Operating Method for Dialing ............ 11
2.1 How to Dial a Phone ................ 11
2.1.1 Basic Call .................... 11
2.1.2 Hold and Resume.............. 11
2.1.3 Volume Control................ 12
2.1.4 Mute ........................ 12
2.1.5 Multi-Function Memory Keys .... 12
2.1.6 Three-Way Conversation ........ 12
2.1.7 Transfer ..................... 12
2.1.8 Call Park..................... 12
2.1.9 Redial ....................... 12
2.1.10 Register Handset ............. 12
2.1.11 Delete Handset............... 13
2.1.12 Switch between Base
and Handset ...................... 13
2.1.13 Switch between Line 1
and Line 2 ........................ 13
2.1.14 Base Phone and Cordless
Handset Can Maintain Independent
Conversations ..................... 13
3. Web Interface Settings ................. 13
3.1 Home Page—Summary of Network
Parameters .......................... 13
3.2 Network Settings .................. 14
3.2.1 WAN Settings ................. 14
3.2.2 Basic Settings. . . . . . . . . . . . . . . . . 14
3.2.3 DHCP........................ 14
3.2.4 Static IP Settings .............. 14
3.2.5 PPPOE Settings (Point to Point
Protocol over Ethernet) ............. 14
3.2.6 802.1X Settings................ 14
3.2.7 LLDP Settings ................ 15
3.2.8 LAN Settings. . . . . . . . . . . . . . . . . . 15
3.3 VoIP Settings ...................... 15
3.3.1 Primary Register .............. 15
3.3.2 Audio Settings ................ 16
3.3.3 Call Features ................. 17
3.3.4 Dialing Rules ................. 18
3.3.5 Multicast Paging .............. 19
3.3.6 Advanced Settings ............. 19
3.4 QoS Settings (Quality of Service)/
Virtual LAN (VLAN) .................... 20
3.5 Provisioning ....................... 20
3.5.1 Provisioning Options ........... 20
3.5.2 Provisioning Server Settings..... 21
3.5.3 AutoUpdate Settings ........... 21
3.5.4 WebUI Management. . . . . . . . . . . . 22
3.6 System Settings.................... 22
3.6.1 Logging Server................ 22
3.6.2 Time Settings ................. 22
3.6.3 User Management ............. 23
3.6.4 System Actions................ 23
3.6.5 DECT—Digital Enhanced Cordless
Telecommunications................ 23
4. Tech Notes ........................... 24
4.1 LLDP—Tech Notes ................. 24
4.2 802.1x—Tech Notes................. 25
4.3 DHCP Options—Tech Notes .......... 25
4.4 QuickKey DialPad Shortcuts. . . . . . . . . . 26
Important Safety Instructions.............. 28

9700 SERIES VOIP USER GUIDE: CETIS SIP 2020 www.telematrix.net 3
9700 Series Corded VoIP Phone Map (Faceplate Removed)
BASE FEATURES AND CONTROLS
1. OneTouch message-waiting light
2. In Use and Charge lights
3. Guest service keys
4. Submerged FLASH button
5. Submerged STORE button
6. HOLD key
7. LINE 1 key
8. LINE 2 key
9. MUTE key
10. Speakerphone key
11. Line in
12. Line 1, Line 2 reversal switch
2
4 5
3
679 10
1
8
11 12
Bottom of phone

BASE FEATURES AND CONTROLS
1. OneTouch message-waiting light
2. Charge light
3. Guest service keys
4. Submerged FLASH button
5. Submerged STORE button
6. HOLD key
7. LINE 1 key
8. LINE 2 key
9. MUTE key
10. Speakerphone key
4www.telematrix.net 9700 SERIES VOIP USER GUIDE: CETIS SIP 2020
9700 Series Cordless VoIP Phone Map (Faceplate Removed)
1
2
3
45
6 7 8 9 10

9700 SERIES VOIP USER GUIDE: CETIS SIP 2020 www.telematrix.net 5
9700 Series Handset Kit
9700 Handset Kit Info
1. USB charging port
(Each side has a USB port)
2. Speaker
1
2
9700 Handset Kit
(End view)

6www.telematrix.net 9700 SERIES VOIP USER GUIDE: CETIS SIP 2020
Quick Start
Cetis’ 3.x generation of SIP phones have several
deployment / configuration file download options
available through the network. All of these
methods require the phones to download and
apply a configuration file with all the necessary
parameters in place to navigate their network
and register to a SIP PBX/server. Alternatively
you can program each individual phone by logging
into it and adding the necessary information.
There are several recommended methods for
configuration and deployment:
1. The simplest is probably to use a single
global (global.cetis.cfg) configuration file for all
the phones, and at installation enter in the correct
“Extension” number to finish the programming
steps. This requires that you use either the same
password as the DN/Extension on the PBX, or
you use a single complex password for every
phone, and that password is baked into the global
file used on every phone programmed in the
PBX. (See Appendix or download Step-by-Step
Deployment with GlobalConfig)
2. Use individual (configID.cetis.cfg)
configuration files for each phone using
the available Cetis tools to create uniform
configuration files. As each phone endpoint does
require a unique configuration file to operate
correctly. The configuration file is the sum of all of
the parameters found in the web interface of the
phone and constitutes its complete programming
information . By using the Mass Configuration
utility tools, you can ensure that the substitution
of values is not subject to human error that
may happen when programming several
hundred phones by hand. (See Knowledgebase
for the ConfigurationGenerator) The Cetis
ConfigurationGenerator is a simple spreadsheet
based program used to generate a batch of
configuration files based off of your ‘golden’
configuration file created by programming
a single phone and exporting its working
configuration. Please visit the KnowledgeBase at
https://sipsupport.cetis.com/portal and search
for ‘ConfigurationGenerator’. CetisCreator is
another potential program for building files.
3. For Cloud-based systems installers, there
is a global file re-direct method of deployment
that employs an intermediate provisioning
server, allowing the installer to simply place a
phone on the network, where the phone will then
download a global.cetis.cfg file during its boot-
up process from a server that someone must
set up in the hotel. That global file will point to a
provisioning server at a different address, from
which the phone can then download one of the
valid configuration file types (ConfigID, Global, or
MACaddress). The phone will then go to that re-
directed address and download the configuration
file of , for example, (<macaddress>.cetis.cfg)
and apply it. The phone is then configured.
The initial step in creating any template
configuration file (or global) is to program the
phonevia itswebinterfaceto operatesatisfactorily
in your network environment and then export
that config file from within the web interface
(You can export config or export global files from
the Provisioning page). To start programming
the phone, power the phone with PoE into the
WAN port of the phone. When you first hear the
“doodle-doodle” tone or “Enter configID” you do
not want to download a config file; instead, press
# directly to enter into the default standby status.
After the phone enters that idle state, press **47#
(** I P #) on the keypad to make the phone recite
and/or display its IP address that it received from
your DHCP server. With that IP address, you may
log in and check the existing configuration or
recommended). Once programmed and tested

M SERIES VOIP USER GUIDE: CETIS SIP 2017 www.teledex.com 7
in the local environment, export that config file
and use it as a template configuration file in the
Mass Configuration tool to create others.
When the phone boots-up, it will by default
be configured to enable LLDP and DHCP. This
will help to navigate the network to the proper
VLAN and obtain its IP address as well as the
Provisioning Server’s IP address through a DHCP
Server (DHCP Options 60/43 or DHCP Option 66
for tftp server address). Once the phone has been
guided by the network to find the provisioning
server, it will attempt to download each of these
files, in order. If that file is not present, it will skip it
and move to to the next file.
The phone will attempt to download the
following files in this order:
1. global.cetis.cfg - this file will be one you
have exported with most shared values
2. macaddress.cetis.cfg (ex: 0019f30a1f2c.
cetis.cfg) the phone’s individual MAC address
3. configID.cetis.cfg (ex: 78101.cetis.cfg) You
create these to your numbering scheme.
4. partial.cetis.cfg (a supplementary
“change” file to make value changes after a
global file
5. firmware.cetis.txt ( a list of firmware file
names that are present to be updated
Each phone will try to download its config file as
a global.cetis.cfg, or if that is not available, it will
move on to its unique <macaddress>.cetis.cfg.
If that file is not found, the phone will produce
an audio prompt (“doodle-doodle” or “Enter
ConfigID”) tone as well as flashing lights to
prompt the user to enter a “Config ID”.
After inputting the ConfigID through the
numeric keyboard and ending with #, the phone
will download the configuration file named
<ConfigID>.cetis.cfg from the Provisioning Server.
If the download is successful, the phone will
apply the configuration and re-boot. If it failed—
no file found or no server configured—the phone
will boot with default settings. You can also press
just # at the ConfigID prompt in order to skip the
download process and go to the idle state, where
you can then use the QuickKeys for diagnostics.
(pp26-27).
Cetis has a Knowledgebase, where you can find
resource documents explaining programming
at https://support.cetis.com/portal email us at
Example Searches:
• Step-by-Step Deployment
• ConfigurationGenerator
• Global Redirect
• Firmware.cetis.txt
Function
1. Support DHCP assigns IP address, etc.,
automatically
2. Support PPPoE (used while connecting
ADSL, cable modem)
3. Firmware and configuration can be
updated via HTTP, HTTPS, FTP, and TFTP
4. Hold function
5. Speed-dial
6. DND (Do not disturb), black list, hotline
function
7. Voicemail message
8. Configurable via common browsers
9. Remote management function
10. Classification management for common
user’s password and super-user’s
password
11. Support **codes function
12. Call waiting
13. Auto answer
14. Call park
9700 SERIES VOIP USER GUIDE: CETIS SIP 2020 www.telematrix.net 7

8www.telematrix.net 9700 SERIES VOIP USER GUIDE: CETIS SIP 2020
15. Call transfer
16. Three-way conference
17. 802.1x authentication
18. LLDP feature
Standards and Protocols
• IEEE 802.3 /802.3 u 10 Base T / 100Base TX
• PPPoE
• DHCP Client and Server
• Support G.711a/u,G729, G723.1 Audio Codec
• SIP RFC3261
• TCP/IP: Internet Transfer and Control Protocol
• RTP: Real-Time Transport Protocol
• VAD Save Bandwidth
• TFTP: Trivial File Transfer Protocol
• 802.3af POE
1. Introduction
This Cetis SIP endpoint device is SIP 2.0 compliant
with RFC 3261, and some configuration is
necessary before using the phone. The base is
connected via networking cable and powered via
802.3af PoE (Power over Ethernet). If the endpoint
is a cordless set, the handset is a DECT radio
device that synchronizes to the base. If the set is
a corded device, the handset coil cord is simply
plugged into the proper port on the base. This
manual will illustrate how to setup the phone
through the keypad and web interface.
1.1 Overview of Hardware
1.1.1 BASE UNIT
The base unit has a WAN interface and LAN
interface for a total of two network ports. The
default WAN interface is a DHCP Client. The user
will connect the WAN interface to a PoE switch
to obtain power and an IP address, and connect
the LAN interface to a computer to bridge the
network or configure virtual LAN networks. The
administrator username “admin” and password
“admin” is used to login and configure the set
via HTTP web browser access. Only the WAN
interface supports 802.3af Power Over Ethernet.
The LAN port can be setup to mirror the WAN
port for diagnostic troubleshooting or disabled
entirely.
1.1.2 DECT HANDSET
The DECT handset is automatically synchronized
to the base and operates at 1.9 GHz in North
America and 1.8 GHz in many parts of Europe.
The handsets auto-negotiate with the base
through the charging leads on the base/cradle
for seamless, secure cordless communications.
Setting the handset (with connected battery)
into the cradle (when powered by PoE) will
synchronize the handset to the base.

1.2 Overview of Software
1.2.1 CONFIGURATION METHODS
3.x firmware configuration and firmware updates
can be controlled by:
• Using a web browser to setup configuration
and update the firmware. Press the key
strokes **47# (** I P) #, and the phone will
announce its IP address from the audio
speaker. Input this IP address directly into the
browser address field to reach the login page
of the phone. The default username/password
is admin/admin.
• Downloading configuration files from a
provisioning server. Create configuration
file for the phone(s), and place it on the
provisioning server. Ensure provisioning
server is reachable by phone.
1.2.2 SPECS OVERVIEW
Network Protocol
• SIP v2(RFC3261)
• IP/TCP/UDP/RTP
• IP/ICMP/ARP/RARP/SNTP
• TFTP Client/DHCP Client/PPPOE Client
• SSH/HTTP Server
• DNS Clients
Codec
• G.711a
• G.711u:
• G.723.1:
• G.729
• G.722
Voice Quality
• VAD: Voice Activity Detection
• AGC: Automatic Gain Control
• AEC: Automatic Echo Cancellation
• SRTP: Secure Real-Time Transport Protocol
Call Function
• Call Hold • Call Forward
• Call Waiting • Caller ID
DTMF
• IN Band • SIP Info • RFC2833
Tone
• Ring Tone • Dial Tone
• Ring Back Tone • Busy Tone
Phone Function
• Volume Adjustment • Speed Dial Key
IP Assignment
• IP (Static IP) • DHCP • PPPoE
Security
• HTTP 1.1 Basic/Digest Authentication for
Web Setup
• MD5 for SIP Authentication (RFC2069/RFC2617)
• SRTP/TLS for Secure Conversation
• HTTPS for Secure Provisioning
QoS
• QoS Field
NAT Traversal
• STUN
Configuration
• Web Browser • Keypad • Via Config File
SIP Server
• Support two SIP servers working at the
same time
• Provide a backup SIP server
Firmware Upgrade
• TFTP • HTTP • HTTPS • FTP
1.3 Understanding Buttons and
Hardware
You can use the tables that follow to identify the
buttons and hardware on your phone.
Base Keys Functions
Keys Mode Function/Display
Volume + Calling Increase volume
Config Choose page (page up)
Volume - Calling Reduce volume
Config Choose page (page down)
9700 SERIES VOIP USER GUIDE: CETIS SIP 2020 www.telematrix.net 9

10 www.telematrix.net 9700 SERIES VOIP USER GUIDE: CETIS SIP 2020
Keys Mode Function/Display
Message Dialing Pick up the voicemail
message
Line 1 Hook-on Pick up
Talking Hold or resume
Line 2 Hook-on Pick up
Talking Hold or resume
Page Hook-on Press to call handset;
press this key for 3 s to
register handset
Speaker Talking Between the handset
and speaker switches
Mute Talking Mute function
Redial Dialing Redial the last number
and make a call
Hold Calling Hold or resume or park
key
M1~M7 Dialing 7 speed dial numbers or
the second function
Menu On-hook Press this key to store
number; press this for
3 s to enter the phone
menu
Config Confirm/enter to the
next sub-menu
Enter Config Exit /return to the first
menu
1 Dialing “1”
Config “1”, “space”, “”, “_”,
“-”, “/”, “%”
2 Dialing “2”
Config “2”, “a”, “b”, “c”, “A”, “B”,
“C”
3 Dialing “3”
Config “3”, “d”, “e”, ”f”, “D”, “E”,
“F”
4 Dialing “4”
Config “4”, “g”, “h”, “I”, “G”, “H”,
“I”
5 Dialing “5”
Config “5”, “j”, “k”, “l”, “J”, “K”,
“ L”
Keys Mode Function/Display
6 Dialing “6”
Config “6”, “m”, “n”, “o”, “M”,
“N”, “O”
7 Dialing “7”
Config “7”, “p”, “q”, “r”, “s”, “P”,
“Q”, “R”, “S”
8 Dialing “8”
Config “8”, “t”, “u”, “v”, “T”, “U”,
“V”
9 Dialing “9”
Config “9”, “w”, “x”, “y”, “z”,
“W”, “X”, “Y”, “Z”
0 Dialing “0”
Config “0”, “*”, “#”, “$”, “&”,
“?”, “!”, “<”, “>”
* Dialing “*”
Config “*”, “.”
# Dialing Dial as the first number
or finish number sign
Handset Keys Functions
Keys Mode Function/Display
Volume + Talking Increase receiver volume
Hook-on Increase ringer volume
Volume - Talking Reduce receiver volume
Hook-on Choose ringer volume
Line 1
ON/OFF
Hook-on Pick up
Talking Hold or resume
Line 2
ON/OFF
Hook-on Pick up
Talking Hold or resume
Redial Dialing Redial the last number
and make a call
Hold/
Conf
Calling Hold or resume or
conference
FNC Talking Call transfer
Hook-on Press for 5 s to adjust
the incoming call ringer
types, use the number
keys 1-6 to choose ringer
type

Keys Mode Function/Display
1 Dialing “1”or press for 3 s
to pick up voicemail
message
Config “1”, “space”, “”, “_”,
“-”, “/”, “%”
2 Dialing “2”
Config “2”, “a”, “b”, “c”, “A”, “B”,
“C”
3 Dialing “3”
Config “3”, “d”, “e”, ”f”, “D”, “E”,
“F”
4 Dialing “4”
Config “4”, “g”, “h”, “I”, “G”, “H”,
“I”
5 Dialing “5”
Config “5”, “j”, “k”, “l”, “J”, “K”,
“ L”
6 Dialing “6”
Config “6”, “m”, “n”, “o”, “M”,
“N”, “O”
7 Dialing “7”
Config “7”, “p”, “q”, “r”, “s”, “P”,
“Q”, “R”, “S”
8 Dialing “8”
Config “8”, “t”, “u”, “v”, “T”, “U”,
“V”
9 Dialing “9”
Config “9”, “w”, “x”, “y”, “z”,
“W”, “X”, “Y”, “Z”
0 Dialing “0”
Config “0”, “*”, “#”, “$”, “&”,
“?”, “!”, “<”, “>”
* Dialing “*”
Config “*”, “.”
# Dialing Dial as the first number
or finish number sign
2. Operating Method
for Dialing
2.1 How to Dial a Phone
You can place calls after the phone is successfully
registered to a SIP server/IP-PBX. Please confirm
that all cables for power and network connectivity
are correct.
2.1.1 BASIC CALL
1. Place a call using the handset:
Line 1/Line 2 is in off-hook status, dial
a number, and then dial # as the ending
character after the last digit to immediately
send the digits to the SIP server.
2. Place a call using the speakerphone:
The phone has an active keypad. That
means pressing a number on the dial-pad
will take Line 1 off-hook: dial the number
and then dial # as the ending character
after the last digit to immediately send the
digits to the SIP server.
2.1.2 HOLD AND RESUME
1. You can hold and resume calls. Only
one call can be active at any given time
on a corded phone; all other connected
calls must be placed on hold. Two-line
cordless phones can have up to two active
conversations.
1) Put a call on hold
Make sure the call you want to put on
Hold is enabled, then press the Hold key.
2) Resume a call from hold
Make sure the appropriate call is
enabled, then press the Hold key or
press the Line 1 or Line 2 key to resume
the call on whichever line was on Hold.
2. Call Park feature
Enable Call Park feature and the Hold key
can be used as a Park key (see below).
9700 SERIES VOIP USER GUIDE: CETIS SIP 2020 www.telematrix.net 11

12 www.teledex.com M SERIES VOIP USER GUIDE: CETIS SIP 2017
2.1.3 VOLUME CONTROL
Press VOL+ to increase the volume and press
VOL- to decrease.
2.1.4 MUTE
If you do not want the called party to hear your
end of the line, press the Mute key; they will not
hear your conversation or background noise. You
will still hear their conversation. This is often
used while in conference calls.
2.1.5 MULTIFUNCTION MEMORY KEYS
The speed dial memory keys have multiple
modes of operation. They may also be used as
hold, DND, transfer, and conference functions.
See the web settings of the call feature function.
2.1.6 THREEWAY CONVERSATION
If Line 1 is holding and Line 2 is talking on
an active call, initiate a conference call by
pressing the conference key connecting all
three parties. When the phone is in three-way
conference, the user cannot switch between
base and handsets.
2.1.7 TRANSFER
The phone is capable of blind and attendant
transfers. For example:
Blind Transfer—User A is conversing with user
B. A wants to transfer the call conversation with
B to user C. User A would press the Transfer key
(a speed dial programmed with transfer function)
and call user C. Press the Transfer key again to
leave the call and finalize the transfer function to
connect user B with user C.
Attended Transfer—User A is conversing with
user B. A wants to transfer the call conversation
with B to user C. User A would press the Transfer
key (a speed dial programmed with transfer
function) and call user C. After the call between
user A and user C is connected, user A would
hang up to leave the call and finalize the transfer
function to connect user B with user C.
2.1.8 CALL PARK
The Hold key can be configured to utilize a Call
Park function. Call Park is essentially sending an
active call to a place holder on the server where
someone else can then retrieve the call from its
“parking spot.” Many PBXs have a Call Park and
Call Retrieval special feature code.
Park is programmed in the phone under Call
Features > Programmable Keys and MWI Number
section. Set Park Mode: to Park | Hold Key Active:
The parking place code or pilot number | Hold
Key Idle: The retrieval from parking place code.
2.1.9 REDIAL
Press the Redial key to dial the last number
called. By default, the last number dialed will be
erased after 60 minutes to protect guest privacy.
This time is configurable under Dialing Rules >
Dialing Rules Configuration from 0~60.
2.1.10 REGISTER HANDSET
The handset on the IP DECT phone is essentially
a radio, and can register to the base in two ways:
manual registration and automatic registration.
Manual Registration: While on-hook, press the
Page key on the base unit for three seconds
to begin the handset registration mode. The
Message indicator light will begin to flash. Press
the * key for 3 seconds to register the handset,
then you will hear a confirmation tone indicating
a successful registration.
Automatic registration: Place the handset in the
cradle of the base. The Message light begins to
12 www.telematrix.net 9700 SERIES VOIP USER GUIDE: CETIS SIP 2020
M SERIES VOIP USER GUIDE: CETIS SIP 2017 www.teledex.com 13
flash, indicating the handset is in register mode;
the ON/OFF light on the handset flashes at the
same time. If the handset registers successfully
to the base, then the Message light on the base
and the ON/OFF light on the handset will stop
flickering and will give the prompt tone for a
successful registration.
Note: Each base phone can register up to 5
handsets.
2.1.11 DELETE HANDSET
Hold down the page key until the MWI light starts
blinking, then release the page key and press it 7
times. After this the MWI light should start blinking
rapidly. After the page light as stopped blinking
rapidly, all handset registrations should be deleted.
2.1.12 SWITCH BETWEEN BASE AND
HANDSET
When a call is active on the base phone, press
the Line 1 or Line 2 handset key and the handset
will pick up the active call. If a call is active on
the handset, press the Line 1 or Line 2 key on the
base to switch the conversation to the base.
2.1.13 SWITCH BETWEEN LINE 1 AND
LINE 2
When Line 1 is on Hold and Line 2 is active, press
the Line 1 key, and Line 1 will no longer be on
Hold—Line 2 is now on Hold. If Line 2 is on Hold
and Line 1 is active, press the Line 2 key for Line
2 to resume and for Line 1 to be placed on Hold.
2.1.14 BASE PHONE AND
CORDLESS HANDSET CAN MAINTAIN
INDEPENDENT CONVERSATIONS
The base phone and the cordless handset can
maintain conversations independently, with true
two-line functionality. For example, Line 1 can
place a call from the base phone to one phone
destination while Line 2 from the cordless
handset can be active to a separate destination.
3. Web Interface
Settings
Connect both the phone and your PC on the same
LAN (Local Area Network), open the browser and
enter the IP address of the phone. The browser
will ask you to enter the username and password.
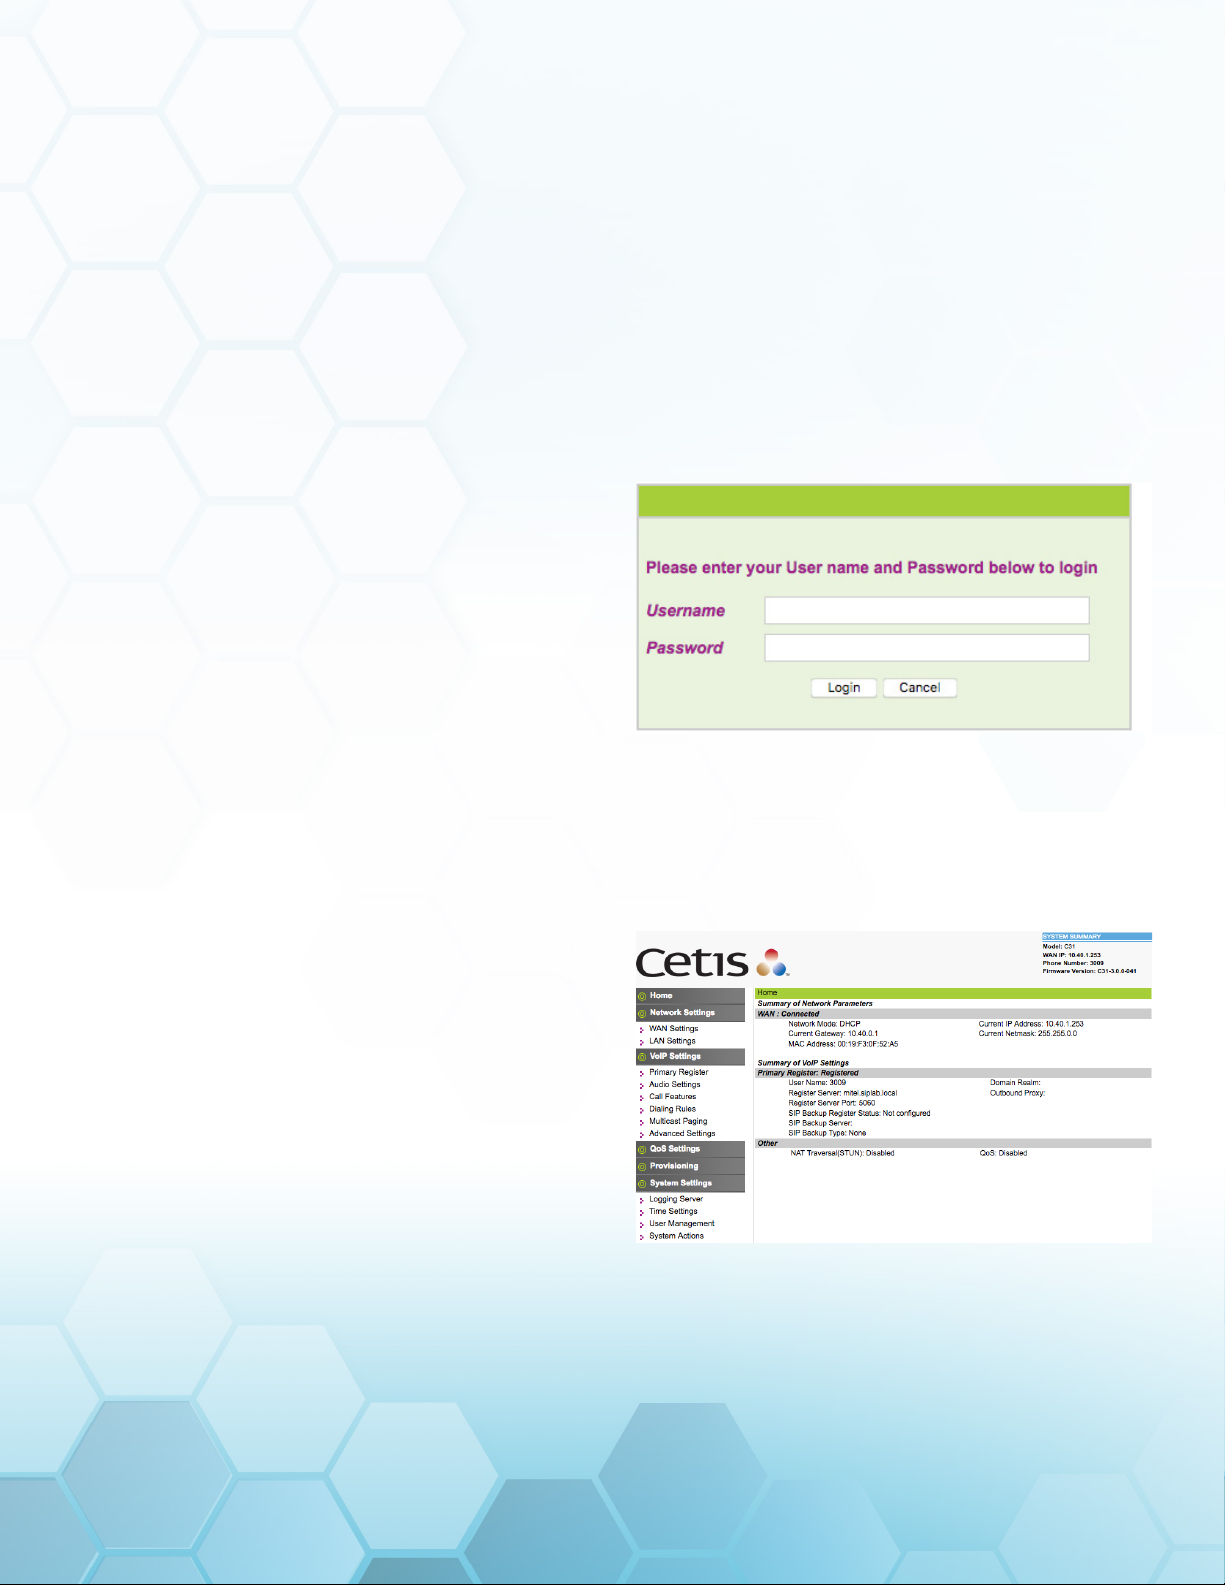
Please enter the username and password as
to login. Default username and password are
admin/admin.
3.1 Home Page—Summary of
Network Parameters
After entering the username and password, the
following screen is displayed:
9700 SERIES VOIP USER GUIDE: CETIS SIP 2020 www.telematrix.net 13

14 www.teledex.com M SERIES VOIP USER GUIDE: CETIS SIP 2017
3.2 Network Settings
You can get your network information from this
page:
3.2.1 WAN SETTINGS
WAN port network settings page can be used to
configure network access settings. Some vendors
call it the network port. This port is used to power
(POE) and connect the phone to the network.
Supports static IP, DHCP (to obtain dynamic IP
address), and PPPoE.
3.2.2 BASIC SETTINGS
Basic Setting
Network Mode Select WAN port network
mode. Default is DHCP.
Link Mode Auto is default.
Primary DNS Set the primary DNS IP
address.
Secondary DNS Set the secondary DNS IP
address.
3.2.3 DHCP
If there is a DHCP server in your local network,
the phone will automatically obtain WAN port
network information from your DHCP server.
3.2.4 STATIC IP SETTINGS
If you wish to set the phone to a static IP address,
configure the IP address, subnet mask, and
gateway here. DNS servers configured under
Basic Settings will be used.
Static IP Setting (Required if Network Mode Is
Set to Static IP)
Static IP Address Set static IP address.
Subnet Mask Set network mask of static
IP.
Default Gateway Set default gateway IP
address of static IP.
3.2.5 PPPOE SETTINGS (POINT TO
POINT PROTOCOL OVER ETHERNET)
PPPoE Setting (Required if Network Mode Is
Set to PPPoE)
User Account Set your PPPoE user
account.
Password Set the password of your
PPPoE account.
3.2.6 802.1X SETTINGS
802.1x Settings
802.1x_Enable Enable or disable 802.1x
authentication.
802.1x_UserName 802.1x User name.
14 www.telematrix.net 9700 SERIES VOIP USER GUIDE: CETIS SIP 2020

M SERIES VOIP USER GUIDE: CETIS SIP 2017 www.teledex.com 15
802.1x_Password 802.1x Authentication
password.
802.1x_Type Multicast (default) or
Broadcast.
3.2.7 LLDP SETTINGS
LLDP Settings
LLDP Enable Enable or disable LLDP
feature.
Packet Interval 120 (default).
LLDP-MED (Link Layer Discovery Protocol-
Media Endpoit Discovery) is a vendor-neutral link
layer protocol in the Internet Protocol Suite used
by network devices for advertising their identity,
capabilities, and neighbors on an IEEE 802 local
area network, principally wired Ethernet. LLDP-
MED is enabled by default on the phone and is
used to help the phone navigate to the correct
VLAN. If properly configured on the L2 switch, the
phone should arrive on the VLAN segment it is
directed to. Once on the correct VLAN, the phone
will try to obtain an IP address via DHCP.
3.2.8 LAN SETTINGS
The LAN port is used to provide network
connectivity to guest ethernet devices such as
laptops. It has several modes of operation:
• WAN/LAN Mirror—All WAN traffic is mirrored
to the LAN port. This can be used for diagnostic
troubleshooting of the phones connection by
plugging in a capture device such as a laptop
with Wireshark into the LAN port.
• Bridge—LAN traffic is passed-through the
WAN port unaltered (unless QoS settings
are specified, see appropriate section) to the
access switch.
• NAT—The WAN port address is used to
translate IP connections of devices that are
connected to the WAN.
• Disable—LAN port can not be used to connect
ethernet devices to the network.
If NAT is selected/enabled, you may use the phone
as a DHCP server as well. This is not a feature
often used in the intended hotel guestroom
setting. More often the LAN is left as bridge,
and additional QoS/VLAN settings are applied
to separate Data (LAN) and Voice (WAN) traffic.
Please see QoS settings.
3.3 VoIP Settings
You can get your SIP account information and
registration status from this page.
3.3.1 PRIMARY REGISTER
You set up your SIP account on this page. These
are the minimum required variables to enable
the phone on a SIP PBX server.
9700 SERIES VOIP USER GUIDE: CETIS SIP 2020 www.telematrix.net 15

16 www.teledex.com M SERIES VOIP USER GUIDE: CETIS SIP 2017
Register
Register Server
Use Service Enable or disable this SIP
account. Default is Disabled.
Display Name Set display name of your SIP
account.
User Name Set user name (SIP account
number).
Authorization
User Name
Set authorization user name of
your SIP account.
Password Set password of your SIP
account.
Register
Server Port
Set register server’s port
number. Default is 5060.
Register
Server
Address
Set register server’s IP
address or domain name.
Domain
Realm
Set server authentication
realm.
Outbound
Proxy
Set if your service provider has
different proxy server from
register server. Most of the
service providers use the same
address for both servers.
Register
Expire
Set register expire time. The
unit is a second. Default is 300.
SIP Backup
Type
Set the operation of the
Backup SIP server
SIP Backup
Server
Set the IP address of the
Backup SIP server
Protocol Control
MWI
Subscribe
Set Disable/Enable message
waiting through pull-down
menu, including:
Disable: MWI is disabled, even
if received NOTIFY message
from the server indicating
new voicemail, phone will not
prompt.
Enable (Subscribe): MWI is
enabled and SUBSCRIBE will
be sent, if the server sends
NOTIFY message indicating
new voicemail received, MWI
LED will blink to prompt.
Enable (No Subscribe): MWI
is enabled, but phone will
not send SUBSCRIBE, if the
server sends NOTIFY message
indicating new voicemail
received, MWI LED will also
blink to prompt.
Subscribe
Expire
Set subscribe expire time. The
unit is a second. Default is 300.
Local SIP Port Set the port to send receive
SIP packets (when transport is
UDP). Default is 5060.
DTMF Select DTMF mode. Choices
can include RFC2833, In
Band, and SIP Info. Default is
RFC2833.
Anonymous
Call Rejection
Set to reject anonymous calls.
Default is OFF.
PRACK Enable or disable PRACK.
Rport Open or close the rport
mechanism.
Transport UDP/TCP transmission mode.
3.3.2 AUDIO SETTINGS
You can adjust sound and volume settings, set
codecs and ring types and international signal
standards on this page.
16 www.telematrix.net 9700 SERIES VOIP USER GUIDE: CETIS SIP 2020

M SERIES VOIP USER GUIDE: CETIS SIP 2017 www.teledex.com 17
Audio Settings
Sound and Volume Control
Handset Set output volume of handset.
Ranges from 1–7. Default is 5.
Speaker Set output volume of speaker.
Ranges from 1–7. Default is 5.
Ring Tone Set volume of ring tone. Ranges
from 1–5. Default is 5.
Ringer Turn Ringer off or on.
Ringer Type Select ringer type.
Codec Setting
Codec #1–6: Prioritize the codec selections,
there are six choices:
• G.711a
• G.711u
• G.729
• G.723.1
• G.722
• iLBC
Packet Data
Size
Size of the RTP packet size.
Default is 20 ms.
Voice VAD/CNG
VAD Enable or disable Voice Activated
Detector function. VAD can reduce
RTP data to not send silence
packet. Default is Enabled.
CNG Enable or disable Comfort
Noise Generation when silence
is detected in the conversation.
Codec ID Settings
DTMF
Payload
(RFC2833)
Set the default DTMF payload
ID.
3.3.3 CALL FEATURES
You can set call features, program Speed Dial
button functions and Message Waiting Indication
buttons, as well as create blocked and/or
restricted lists on this page.
9700 SERIES VOIP USER GUIDE: CETIS SIP 2020 www.telematrix.net 17

18 www.teledex.com M SERIES VOIP USER GUIDE: CETIS SIP 2017
Call Features
Programmable Keys & MWI Number
Mem1–
Mem10
1. Input speed dial number. OR
2. Configure the second feature:
Every memory key can be set as a
feature key to hold, DND, transfer,
or initiate a conference.
MWI
Number
Input voice mail number.
Park
Mode
Enable or disable the Call Park
feature
Hold Key
Active
Configure the number of the Park
key. In Park mode, if a call is active
on either line, press the Hold key
to actively call the parking slot
number. This is a feature to place a
call into a parking slot on the PBX if
the PBX is capable of that feature.
Hold Key
Idle
Configure the number of the
Park key. In Park mode, if no call
is active and a line is available,
execute Idle by pressing the Hold
key. Hold will call the programmed
number (usually to retrieve a call in
a parked state).
Hotline
Number
Program a hotline number for
immediate dialing when off-hook.
Warm
Line
Time
Set waiting time for the user
picking up the phone to dial hotline
number. The range is 0–30s;
default is 4 s.
If warm line time is 0 s, then
hotline number will be sent right
away after off-hook.
If the range is 1–30 s and using 3s
as an example, the hotline number
will be sent 3 s later automatically
without pressing any key.
As long as any key is pressed within
that setting time, the timer will be
suspended and the hotline call will
fail.
Forward
Type
Select the type of call forward:
Default is Disable.
Disable: Disable call forward.
All Forward: The caller is always
forwarded to the appointed phone.
Busy Forward: If the phone is busy, it
will forward to the appointed phone.
No Answer Forward: If no answer,
it will forward to the appointed
phone.
Forward
Number
Call the forwarded phone number.
Enable
Call Time
Out
Enable or disable no answer time
out. Default is enabled.
No
Answer
Time Out
No answer call forward time
setting. Default value is 20 s.
Call
Waiting
Enable/disable Call Waiting.
Do Not
Disturb
Enable this option to refuse any
calls.
Ban
Outgoing
Enable or disable outgoing calls.
Default is OFF.
In the Blocked List section of the web page, click
ADD to add a blacklisted number from which you
do not want to receive calls:
3.3.4 DIALING RULES
You can manage your dial rules on this page.
You can remove the option of sending digits
18 www.telematrix.net 9700 SERIES VOIP USER GUIDE: CETIS SIP 2020

M SERIES VOIP USER GUIDE: CETIS SIP 2017 www.teledex.com 19
immediately by pressing the # key. It is also
possible to set the timeout from when the user
stops dialing until the digits transmit to the server
(between 1 and 9 seconds).
Digital Map Configuration
Field Name Description
Dialing Rules
Configuration
Set dial ending rule. There are
three kind of rules:
• End with “#”.
• Erase Redial memory (default
is 60 s)—This is a guestroom
security feature.
• Auto Dial time is a timeout:
Set dial ending waiting time
in seconds. The default
timeout is 5 seconds.
User Defined
Rules
Define your dial ending rule by
prefix number and length. In the
example shown: 3xxx will cause
every 4 digit number dialed,
starting with a 3 to immediately
dial without the 5second timeout.
So dialing 3004 would immediately
send those digits to the SIP PBX
and dial without a delay.
3.3.5 MULTICAST PAGING
Multicast paging allows the phone to receive
paging as defined in the listening address from
an audio source on the network and is a useful
safety feature in case of emergencies or for non-
safety related notifications.
3.3.6 ADVANCED SETTINGS
You can set NAT (Network Address Translation)
traversal function on this page.
Advanced Setting
Field Name Description
Enable Enable or disable NAT
(Network Address
Translation) Traversal
function. Default is disabled.
STUN Server
Address
Set STUN server’s IP
address.
STUN Server
Port
Set STUN server’s port
number.
Check Interval Set check interval time. The
unit is second.
9700 SERIES VOIP USER GUIDE: CETIS SIP 2020 www.telematrix.net 19

20 www.teledex.com M SERIES VOIP USER GUIDE: CETIS SIP 2017
3.4 QoS Settings (Quality of
Service)/Virtual LAN (VLAN)
You can get your QoS Virtual LAN information
from this page and configure voice and data
VLANs.
QoS Setting
Field Name Decription
Voice VLAN Enable voice VLAN. Default is Off.
Voice VID
Tag
VLAN tagging values (2~4094)
available. Default is undefined
number.
User Priority Values (0 to 7) are available.
Default is undefined.
Data VLAN Enable data VLAN. Default is Off.
Data VID Tag VLAN tagging values (2~4094)
available. Default is undefined
number.
User Priority Values (0 to 7) are available.
Default is undefined.
Voice Qos
DiffServ
Set DSCP value. Default is 40.
SIP QoS
DiffServ
Set DSCP value. Default is 40.
Regarding QoS and VLAN ID. In order to
troubleshoot VLANs, you may use the QuickKeys
from the dial pad of:
VL—**85# Show the VLAN ID.
VS—**87*<kp>*<vlan id>#.
Set the VLAN ID. Use value of 0 to turn off/disable
VLAN. Example: * * 8 7 * 1 2 3 * 0 # will disable
VLAN and should allow the phone to receive a
DHCP address from the local network segment.
Any other valid number for a VLAN ID (2-4095)
will set the VLAN ID to that number.
3.5 Provisioning
Provisioning is the methodology of getting
the phone programmed with its necessary
configuration file and/or upgrading firmware.
3.5.1 PROVISIONING OPTIONS
Provisioning Options
Field Name Decription
DHCP
Options
DHCP Options (such as 66,
60 and 43) will be checked in
order to find a TFTP or other
provisioning server.
Auto
Redirection
The phone will contact
https://provision.cetis.com to
see if there is a provisioning
server to be re-directed to for
configuration file download.
20 www.telematrix.net 9700 SERIES VOIP USER GUIDE: CETIS SIP 2020
Other manuals for TeleMatrix 9700 Series
1
This manual suits for next models
4
Table of contents
Other cetis IP Phone manuals


Popular IP Phone manuals by other brands


Grandstream Networks
Grandstream Networks Phone Book Guide manual

Sony
Sony Memory Stick Camera Application Version 1.0 Programming instructions

Slican
Slican VPS-912G quick reference

Shin Chuan Computer
Shin Chuan Computer SC700 user manual

Avaya
Avaya E129 manual

Polycom
Polycom SoundPoint IP 32 Series Trouble Shoots


