ATCOM AT840 series User manual

AT840 Series User Manual
NAM TRUONG GIANG
www.lapdattongdaidienthoai.com
2
AT840 series User Manual
Version: 1.3
2014-03-31
Release note
Version
Changed note
Editor
Date
1.0
First Release
Stefen
2013-1-25
1.1
Page 9: Packing List
1. Add Ethernet Cable(1.5m)
Jessie
2013-5-13
1.2
Web Settings -> Account
Add parameters:
1.Session Timer Enable
2.Early Update Enable
3.Caller ID Display
4.AutoSubscribeMWBEnable
5.Server List
6.Dns Mode
7.Blf List Uri
8.G711A
9.G711U
10.AVT
11.G722
12.G723
13.G729ab
14.iLBC
15.G726-16
16.G726-24
17.G726-32
18.G726-40
Jason
2013-8-26
1.3
Web Settings -> Account
Add parameter:
1.SIP Redundancy Server
Aimee
2014-3-31

AT840 Series User Manual
NAM TRUONG GIANG
www.lapdattongdaidienthoai.com
3
Content
Contact ATCOM.............................................................................................................................................5
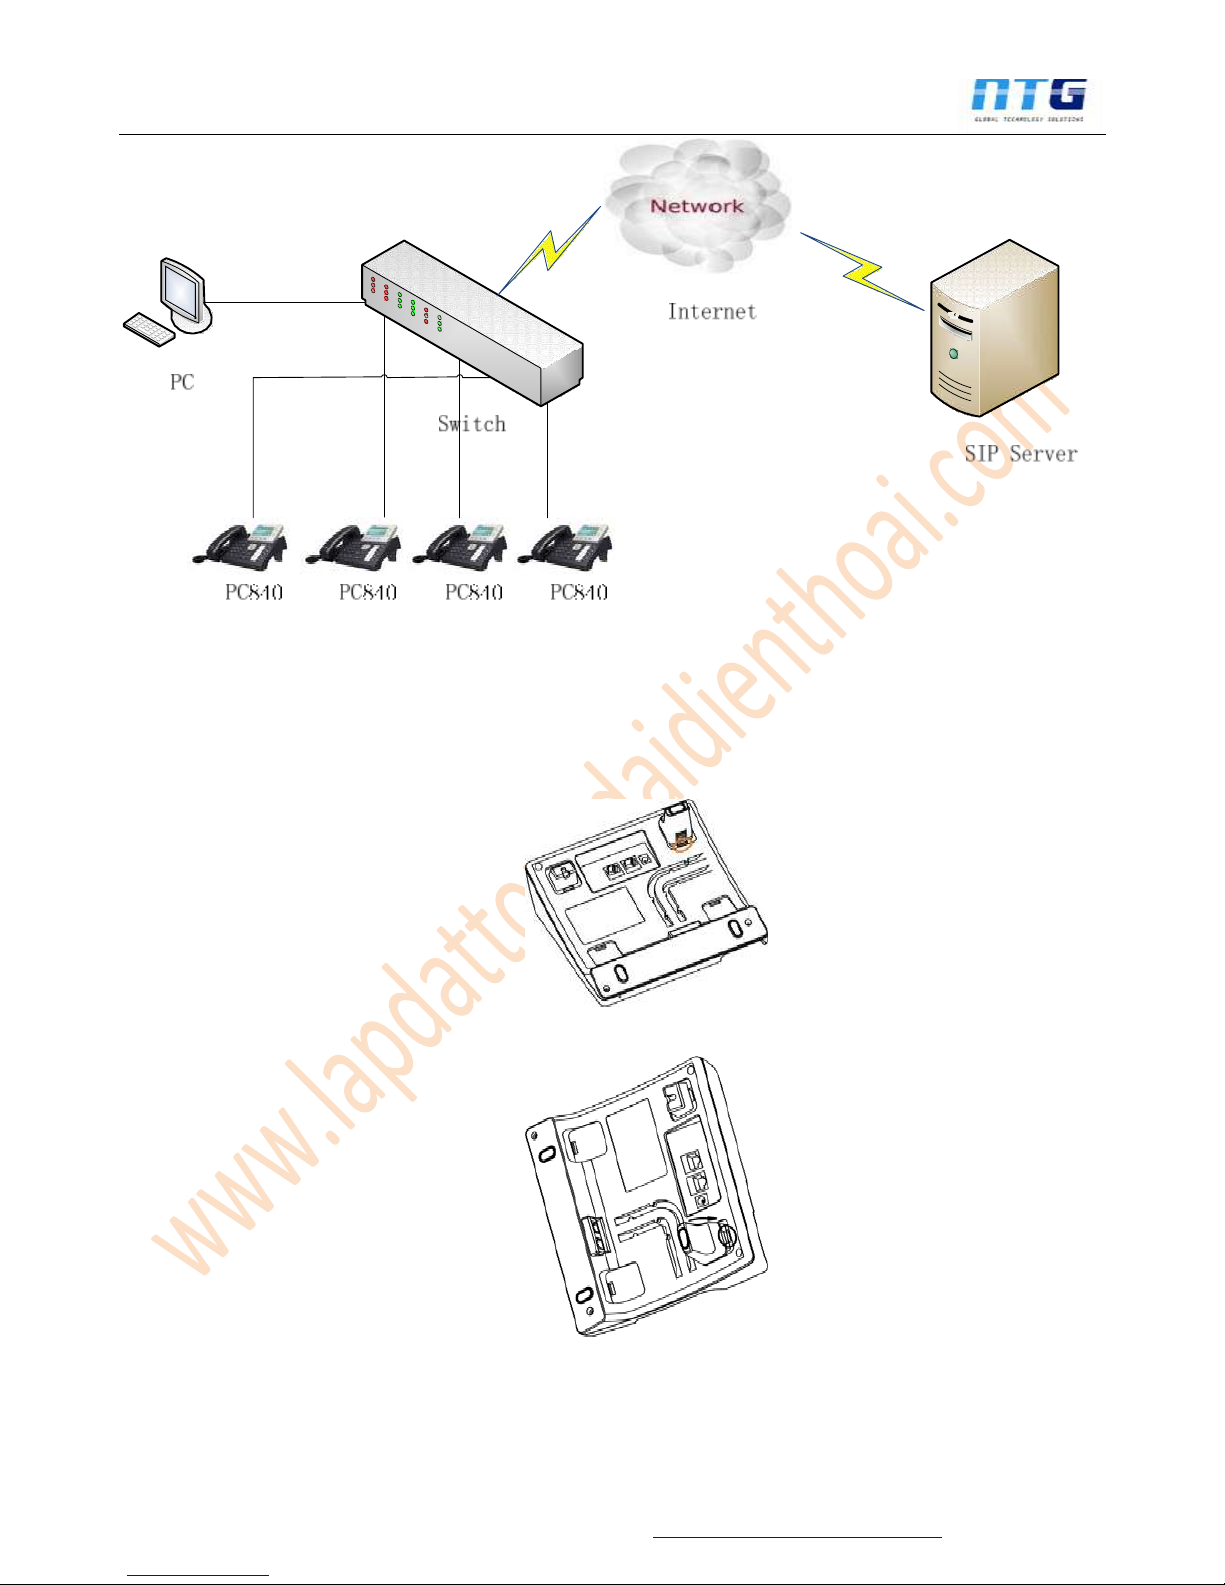
1. AT840 Series Overview ...........................................................................................................6
1) Interfaces...........................................................................................................................................................7
2) Hardware............................................................................................................................................................7
3) Software .............................................................................................................................................................7
4) Network ..............................................................................................................................................................8
5) Management and Maintenance..................................................................................................................8
6) Protocol...............................................................................................................................................................8
7) Compliant Standard........................................................................................................................................8
8) Operating Requirement.................................................................................................................................9
9) Packing List........................................................................................................................................................9
10) Installation ......................................................................................................................................................9
2. Keypad of IP Phone................................................................................................................13
1) Describe of the buttons and Screen.......................................................................................................13
2) BLF indicator status .....................................................................................................................................14
3. Basic functions and operations...........................................................................................15
1) Answer the calls.............................................................................................................................................15
2) Make Call..........................................................................................................................................................15
3) Speed dial ........................................................................................................................................................16
4) Multiple line dial-up......................................................................................................................................16
5) Hang up the phone.......................................................................................................................................16
6) Call Transfer....................................................................................................................................................................16
7) Message waiting indication(MWI) ...........................................................................................................17
8) Mute calls .........................................................................................................................................................17
9) Call Hold ...........................................................................................................................................................17
10) 3-Way Conference Calls...........................................................................................................................18
11) Call History....................................................................................................................................................18
12) SMS function ................................................................................................................................................19
13) Default Password ........................................................................................................................................19
14) Check the Phone‟s IP ................................................................................................................................20
15) Dial Plan.........................................................................................................................................................20
4. Web settings............................................................................................................................. 23
1) System status ................................................................................................................................................24
2) Network ............................................................................................................................................................25
1.1.
Basic
............................................................................................................................................25
1.2.
Advance
..................................................................................................................................................25
3) SIP Setting.......................................................................................................................................................27
4) Account.............................................................................................................................................................29
Account1/Account2/Account3/Account4
..................................................................................29
5) Phone Setting.................................................................................................................................................33
5.1.
Preference
................................................................................................................................33

AT840 Series User Manual
NAM TRUONG GIANG
www.lapdattongdaidienthoai.com
4
5.2.
Line
............................................................................................................................................35
5.3.
Features
................................................................................................................................................35
5.4.
Voice
......................................................................................................................................................37
5.5.
Ring
...........................................................................................................................................38
5.6.
Tone
........................................................................................................................................................38
5.7. Programmable key ............................................................................................................................39
5.7. Ext Key
.................................................................................................................................................40
6) Update...............................................................................................................................................................41
6.1. Manual Update....................................................................................................................................41
6.2. Reset & Reboot...................................................................................................................................42
7) Phone Book.............................................................................................................................................. 42
8) Call Log ..................................................................................................................................................... 43
5. FAQ & Trouble Shooting ..........................................................................................................43
1)Frequently Asked Questions .................................................................................................................................43
1.1 How to make a factory reset..........................................................................................................43
1.2 Upgrade firmware under safe mode............................................................................................ 43
1.3 How to make direct IP call ..............................................................................................................44
2)....................................................................................................................................................................T
rouble Shooting .....................................................................................................................................................44
2.1 The phone can’t register successfully....................................................................................... 44
2.2 The phone can’t obtain IP address............................................................................................ 44
2.3 Only one part can hear the voice during the call....................................................................45

AT840 Series User Manual
NAM TRUONG GIANG
www.lapdattongdaidienthoai.com
5
Contact ATCOM
The Introduction of ATCOM
ATCOM is the leading VoIP hardware manufacturer in global market. We have been keeping innovating with
customer’s needs oriented , working with partners to establish a total solution for SMB VoIP with IP phone , IP
PBX andAsterisk cards
With over 10 years’experience of R&D , manufacturing and service in network and VoIP filed ; mission of
creating the biggest value for IP terminals , we commit ourselves in supplying the competitive IP phone and
other terminals for IP PBX , softswitch , IMS , NGN providers and carriers; supplying the competitive total
VoIP solution for SMB market. We keep improving the customer’s experience and creating the bigger value
with our reliable
products. Until now , our VoIP products has been sold to over 60 countries and used by millions of end users.
Contact Sales
CÔNG TY CỔ PHẦN ĐẦU TƯ & PHÁT TRIỂN CÔNG NGHỆ NAM TRƯỜNG GIANG
Địa chỉ: 355 Nguyễn Khang - Yên Hòa - Cầu Giấy - Hà Nội
E- mail: namtruonggiang.jsc@gmail.com
http://www.lapdattongdaidienthoai.com
WebsiteAddress: http://www.lapdattongdaidienthoai.com
Download Center: http://www.lapdattongdaidienthoai.com/e-books
1. AT840 Series Overview
AT840 is almost the same with AT840Pwithout PoE

AT840 Series User Manual
NAM TRUONG GIANG
www.lapdattongdaidienthoai.com
6
AT840/AT840P
AT840/AT840P with extension module
Type
PoE
Power adapter
AT840
No
Standard accessory
AT840P
Yes
Optional accessory
1) Interfaces
Power input: DC 12V, 500mA
WAN: RJ45 port
PC: RJ45 port
EXT: RJ45 port
Headset jack 1 : RJ9 port
Handset jack 1 : RJ9 port
2) Hardware
LCD: 128×64 dot matrix
FLASH: 8M
RAM: 32M
CPU: 262MHz Dual Core
LED indicator: 1 Status Light , 4 line indicators, 9 BLF indicators, 1 voicemail indicator, 1
headset indicator, 1 mute indicator, 1 hand-free indicator
Expander board: 20 BLF keys on each expander board, can connect at most 5
expander boards on a AT840.
3) Software
Sip 2.0 (RFC3261) and other related SIP RFCs
4 SIP lines
Multi-language
G.711A/u, G722, G.723, G.726, G.729 , Lin16-16, iLBC Codec
DTMF inband, RFC2833 and SIP info
Call Forward, DND(Do Not Disturb), Pickup, Redial, Call Park, Call waiting
Call transfer, Call hold, 3-way conference

AT840 Series User Manual
NAM TRUONG GIANG
www.lapdattongdaidienthoai.com
7
BLF, SMS, Blacklists, Dial plan, IP to IP call
Auto answer, Block Anonymous call, Block Call-ID
STUN, SNTP
Jitter Buffer,VAD,CNG
HD voice
G.168 compliant 96ms echo cancellation
SIP UDP,TCP, TLS
Phone book with 200 records, 200 answered calls, 200 missed calls, 200 dialed calls
Auto update via HTTP, FTP, TFTP
Syslog
Soft button: soft button * 4
4) Network
WAN/PC:Support bridge mode
Support PPPoE(ADSL,cable modem use for Internet connecting)
Support VLAN(DATA VLAN and VOICE VLAN)
Support L2TP VPN
WAN support Primary and Secondary DNS
WAN support DHCP Client
Qos support Diffserv
5) Management and Maintenance
Support safe mode and firmware updating under safe mode
Support different level user management
Configuration via web , keyboard
Support multi-language
Firmware and configuration updating via HTTP , FTP and TFTP
Support system log and call log
Firmware and configuration file auto provision
6) Protocol
IEEE 802.3 /802.3 u 10 Base T / 100Base TX
PPPoE:PPP over Ethernet
WAN support DHCP Client
SIP RFC3261, RFC3262, RFC3263, RFC3264, RFC3265, RFC2543, RFC3489, RFC3842,
RFC3515, RFC2976, RFC3428, RFC2327, RFC2782, RFC1889
TCP/IP: Transfer Control Protocol/Internet Protocol
RTP: Real-time Transport Protocol
RTCP:RTP Control Protocol
VAD/CNG
DNS: Domain Name Server
TFTP:Trivial File Transfer Protocol
HTTP:Hypertext Transfer Protocol
FTP:File Transfer Protocol
7) Compliant Standard
CE:EN55024,EN55022
Comply with ROHS in EU
Comply with ROHS in China

AT840 Series User Manual
NAM TRUONG GIANG
www.lapdattongdaidienthoai.com
8
Explanation:
The letter “e” is the first letter of “environment: and “electronic”. The rim is a round with two
arrow, stands for recycle. The number 20 stands for the years of environment protection. Please
note the years of environment protection is not discarding year nor usage life.
8) Operating Requirement
Operation temperature: 0 to 45° C (32° to 113° F)
Storage temperature: -5° to 55° C (12° to 131° F)
Humidity: 10 to 90% no dew
9) Packing List
Model
Phone
Hands
et
Handse
t line
Power
adapter
Ethern
et
Cable
Manu
al CD
Feet
underpro
p
EX20B
AT840
1
1
1
1,Standar
d
accessory
1,1.5m
1
3
Optional
AT840
P
1
1
1
Optional
accessory
1,1.5m
1
3
Optional
Note: Power adapter (Input: AC 100~240V, 50/60Hz; Output: 12V ,500mA;)
10)Installation
Use Ethernet cable to connect AT840‟s WAN port and your computer. on the same switch, AT840
default to use DHCP to obtain IP from switch. Check AT840 IP by press MENU -> 9.Network
->2.Current IP (default password:123). Then open web browser and key in the IP, you will see the
login page of AT840, the default username is admin for administrator and user for user, no
password was set for them, you can set password in webpage by yourself.
Set up page for VoIP user only:

AT840 Series User Manual
NAM TRUONG GIANG
www.lapdattongdaidienthoai.com
9
Feet installation instruction
1) Desktop position:
A. Put the bottom side of the IP phone upside and press the plate with letter “PUSH” into the
slot, please refer the picture as below:
B. Press the other plate into the slot in accordance with the direction of the arrow
C. Repeat A and B. It is the right picture of putting on desk after fixing the two feet below:

AT840 Series User Manual
NAM TRUONG GIANG
www.lapdattongdaidienthoai.com
10
D. Disassemble the feet:
Press the plate with word “PUSH” and pull the feet with the direction of arrow. When the
plate is pull out of the slot (there will be a sound of “pa”) you can take off the feet
2) On wall position
A. Put the bottom side of the IP phone upside and push the plate with letter “PUSH” into the
slot, please refer the picture as below:
B. Push the other plate into the slot in accordance with the direction of the arrow
C. Repeat A and B. It is the picture of wall mounting after fixing the two feet below:

AT840 Series User Manual
NAM TRUONG GIANG
www.lapdattongdaidienthoai.com
11
D. Disassemble the feet way:
Press the plate with word “PUSH” and pull the feet with the direction of arrow. When the
plate is pull out of the slot (there will be a sound of “pa”) you can take off the feet
2. Keypad of IP Phone
Attention: Please rotate the hook to the position as in
picture with a coin or other tools

AT840 Series User Manual
NAM TRUONG GIANG
www.lapdattongdaidienthoai.com
12
1) Describe of the buttons and Screen
Soft buttons
Press to select an feature shown in the soft button features.
Soft button
features
Shows available choices based on current phone function
displayed on the last line of LCD screen.
Status light
Shows the phone status, if the phone is standby, the LED is
with light. If there is income calling, the LED will flicker.
If the phone is starting ,the LED is flicker
If the phone is standby, the LED is off
If there is income calling, the LED will flicker. The
frequency is 500ms off, 500ms on.
LCD Screen
Display screen for the phone: It shows the date, time, phone
number, incoming caller‟s ID(if available),line/call status,
extension numbers and the soft button features.
Line indicators
Shows extension number and status.
There are three colors for LED: red, green and orange.
If the line is registered, the LED shows green
If the line is registered failed, the LED shows orange.
Whenever it tries to register again after a while, the LED
shows red and starts flashing.
If the line has income calling, the LED shows red and
flicker at 500ms off, 500ms on.
If the line is on the calling , the LED shows red
If the line disable for register, the LED is off.
Navigation
button
Allows users to navigate(left, right, up, down).
Dial pad
Entering numbers, letters or characters.
BLF Key
All the function key can be defined as BLF key, Speed dial key
etc.
Menu
Come into Keypad menu.
Volume buttons
Adjust the volume.
Speakerphone
button
Pick up and hung up on the speakerphone mode, when pick
up by speakerphone, the LED of the button is on.
Mute button
Mute the handset, headset or speakerphone by press the
Mute button; this prevents the person on the active call
form hearing what you or someone else in the room is
saying.
To cancel the Mute function, press the Mute button again.
If Mute the voice, the LED is light on this button.
Headset button
Pick up and hung up on headset mode. When pick up by
headset, the LED button will light on.
Voicemail button
Check the Voicemail status, if there are voicemail, the button
will light on.
2) BLF indicator status

AT840 Series User Manual
NAM TRUONG GIANG
www.lapdattongdaidienthoai.com
13
AT840 supports BLF in two ways, one is integrated on the IP phone, the other one is extended
interface.
The BLF indicator status:
When boot up,all the light blink for once.
When there is a coming call,the corresponding line key and status light will blink.
3. Basic functions and operations
1) Answer the calls
When there is an incoming call, AT840 will remind user with ringing. There are 5 ways to answer
the call
A. Answer by handset
Pick up the handset and talk with the caller. If you want to hang up, just put back the handset.
When you are phoning with the handset and want to phone with hand-free mode, please press
the hand-free button and put down the handset.
B. Hand-free mode
Press the speaker button in the phone and talk with callers by built-in Micro-phone and Speaker.
If you want to hang up, please press the speaker button again. Lifting the handset in hand-free
mode will switch to hand-free mode talking.
C. Answer by earphone
Keep your earphone connected with the RJ9 earphone jack, when there is an incoming call, press
the earphone button on the IP phone and talk with the caller. If you want to hang up, please press
the earphone button again. Pressing hand-free key can change to hand-free mode, and lifting the
handset will change to hand-free mode.
2) Make Call
A. Use the handset
Pickup the handset, the LCD will show the current lines (user could switch between line1 to line4
by pressing the line button beside the LCD). Press soft key "dial" to send the number. When you
hear the tones of “du~~du~~” with dialed number showed on the LCD, the called‟s phone is
ringing. If the called answer the call, the phone call is established and the LCD will show the
calling time and the called‟s number.
B. Answer the phone under hand-free mode
Press the Speaker Phone button, the LCD will show the current lines (user could switch between
line1 and line2 by pressing the line button beside the LCD). User can input the number with the
keyboard and press soft key "dial" to send the number. When caller hear the tones of
“du~~du~~” with dialed number showed on the LCD, the called‟s phone is ringing. If the called
answers the call, the phone call is established, and the LCD will show the calling time and the
called‟s number.

AT840 Series User Manual
NAM TRUONG GIANG
www.lapdattongdaidienthoai.com
14
C. Dial from phone book
1. Press " Menu” button and enter Directory->Personal Directory.Press "Select" to show the
total amount in telephone.Use "up" and "down" keys to find the contact person.When you find
the certain contact person, press" Dial" or just pickup the handset to call this number.
2. Pickup the handset, press "Dir", then select the contact person and press "Dial".
3) Speed dial
It‟s method for the phone in standby mode to dial number immediacy.
The method is as below:
A、Dial-up the number in standby mode
B、Press soft key "dial" to send out the number
Dial the number end with #, the number will be sent out immediately too,but only can used if pick
up the handset or press handfree/headset key.
4) Multiple line dial-up
AT840 IP phone supports 4 SIP lines. That means user can register on 4 different sip accounts
simultaneity in the same IP phone. The User can choose line1, line2, line 3 or line 4 by press
corresponding line key, System default to use Line1 if you didn't choose line.
IP Phone be called:
AT840 maximum supports 8 concurrent calls. When there is an incoming call to the second line,
LCD will show the incoming telephone number and line led will blinking. The User can press the
“corresponding line key” , or press soft button "Hold" then press “Ans” to receive the second line
call.
5) Hang up the phone
1) Headset hang up
When use handset mode calling, put back the handset to hang up.
2) Hands free hang up
When use hands free calling, press soft button “speaker phone” to hang up.
3) Earphone Hang up
When use Earphone calling, Press the soft button “headset” to hang up.
4) Hang up one line call
When 2 lines call simultaneous, press the hook will end the current call.
6) Call Transfer
Attended call transfer
An attended call transfer allows a user to optionally transfer a call to a third party, after having a
discussion with that third party.
During an active call, press the "xfer" soft key to place the current call on hold and to activate an
idle line key. Dialed the transfer target number on the newly activated line. When the target is
ringing or answered, press the "xfer" soft key again to complete the transfer.
Notes:
The case that transfer a call before the transfer target answer the phone is called semi-attended
call transfer. This is different from a blind transfer which is described in the next subsection.
Blind call transfer
A blind transfer allows the user to transfer a call without speaking with the receiver of the
transferred call. For the user, the call ends as soon as the transfer target‟s phone number is dialed.
The underlying mechanism is the user‟s phone sends the contact information for the transfer
target to the phone of the other party on the call. The information is carried in a signaling

AT840 Series User Manual
NAM TRUONG GIANG
www.lapdattongdaidienthoai.com
15
message. When the message is sent, the user‟s phone is dropped from the call and the other
party‟s phone automatically dials the transfer target.
To perform a blind transfer press the right navigation key then press "Bxfer" soft key and dial the
target number,press "dial" to blind transfer the call to this target.
7) Message waiting indication(MWI)
The AT840 has an MWI key on the phone with an envelop ico. If user doesn't set the voicemail
number, pressing MWI key will require the setup of voicemail number. Then pressing the MWI key
can directly access the mailbox.
8) Mute calls
The user can mute the audio input into the phone when an audio device is switched on, by
pressing the MUTE key. To un-mute, press the MUTE key again. If no audio device is on, pressing
the MUTE key has no effect. When switching from the speaker phone to the handset, the phone
is automatically un-muted.meanwhile Sip server must support RFC3515.
9) Call Hold
User can hold the current call by pressing soft button “Hold”. And by pressing soft button “Resum”
or press the line key, user can get back to the previous call. In 3-way conference call mode, user
can also press this button to hold 3-way conference call, and if you press it again, user can go
back to 3-way conference mode. If hang up without exiting the status of hold. The conversation
will not be canceled; the line is still on hold.
10)3-Way Conference Calls
To initiate a conference call:
Press the Conf soft button in a conversation to hear a dial tone.
Enter the telephone number of the third party and press dial key to send it out.
1) Press the "Conf" soft button in Called party ringing state. When the third party answers the call,
it will enter 3-way conference automatically.
2) After the third party answers the call, pressing "Conf" key to enter 3-way conference.
3) Press "Join" soft button to leave the conference and make the two other parties still in a
conversation.
4) If user hangs up the call directly without pressing "Join" soft button, the conference will be
ended and the three parties are hanging up.
11)Call History
AT840 supports 200 missed calls, 200 incoming calls and 200 dialed calls. When the storage is full,
the latest call will update the history.
Press "redial" soft button when standby, all the incoming(->) outgoing(<-) and missed calls(!)
will be listed. There is other way to check them:
Missed
call Method
1:
1) When the LCD screen displays “(number) Missed call(s)”, press soft button “Missed”, then the
screen shows all the “Missed Call”.
2) Press navigation button to browse missed call history.
3) Choose the missed call record, press “Dial “soft button to call back it
4) Press "Delete" soft button to elect this item.
5) Press “Edit“soft button to edit this item.

AT840 Series User Manual
NAM TRUONG GIANG
www.lapdattongdaidienthoai.com
16
6) Press right navigation key then press "Save" soft button to save this
number. Method 2:
1) Press the "MENU" button.
2) Press the navigation button to choose “Call History” and then press OK button.
3) Press the navigation button to choose “Missed Calls”, press soft button OK.
4) Press the navigation button to browse the missed call record. If there is no record, the LCD
screen display “List is Empty”.
Incoming call
5) Press the "MENU" button.
6) Press the navigation button to choose “Call History” and then press OK button.
7) Press the navigation button to choose “Answered Calls”, press soft button OK.
8) Press the navigation button to browse the incoming call records. If there is no record, the LCD
screen display “List is Empty”.
Outgoing call
1) Press “MENU”
2) Press up or down navigation key, and select "Call history" and press soft button “OK”
3) Select “Redial list” through “up” or “down” key, and press soft button “OK”
4) Press up or down navigation button and check the received calls, LCD will show “List is
Empty”, if there is no received incoming call.
12)SMS function
Create new SMS
1) Press right navigation key
2) Press SMS
3) Press New
4) Edit SMS context and you can switch the input method by press right navigation key then
press "Alpha" to change to "Num", press "Num" to change to "IP".
5) When the edit is done , press "Send" and input receiver‟s phone number or IP.
After inputting receiver's address, press Send to send out your message.
SMS Check new SMS
When there is a new SMS, voicemail indicator will flicker.
1) press right navigation key
2) press SMS
3) press View to check the new SMS
4) Press Reply to reply the SMS, or press Delete to delete this SMS
5) Press Cancel to exit.
13)Default Password
There are 2 models to set the authority of web accessing and command line: User model and
Admin model. All the parameters can be visible and changed in Admin mode while part of them
can be visible in User mode.
Web interface:
User Model
Username:user
no default Password
Admin Model:
Username:admin
no default Password

AT840 Series User Manual
NAM TRUONG GIANG
www.lapdattongdaidienthoai.com
17
14)Check the Phone’s IP
Press "MENU", default password is 123, then press 9 to enter "Network", you will see the network
mode and current IP.
15)Dial Plan
The AT840 allows each extension to be configured with a distinct dial plan. The dial plan
specifies how to interpret digit sequences dialed by the user, and how to convert those sequences
into an outbound dial string.
The AT840 syntax for the dial plan closely resembles the corresponding syntax specified by MGCP
and MEGACO. Some extensions are added that are useful in an end-point.
Default: (xxxxxxxxxxxx.)
Which means allow dial out all kind of numbers.
Dial plan format: (Dial_Plan 1| Dial_Plan 2| Dial_Plan 3|Dial_Plan 4)
For example: (*xx | [3469]11 | 0 | 00 | [2-9] xxxxxx | 1xxx [2-9] xxxxxxS0 | xxxxxxxxxxxx.)
The Dial_Plan parameters contain the actual dial plan scripts for each extension.
Dial Plan Digit Sequences:
The plans contain a series of digit sequences, separated by the „|‟ character. The collection of
sequences is enclosed in parentheses, „(„and „)‟.
When a user dials a series of digits, each sequence in the dial plan is tested as a possible match.
The matching sequences form a set of candidate digit sequences. As more digits are entered by
the user, the set of candidates diminishes until only one or none are valid.
Any one of a set of terminating events triggers the AT840 to both accept the user-dialed sequence,
and transmit it to initiate a call, or else reject it as invalid. The terminating events are:
•No candidate sequences remain: the number is rejected.
•Only one candidate sequence remains, and it has been matched completely: the number is
accepted and transmitted after any transformations indicated by the dial plan, unless the
sequence is barred by the dial plan (barring is discussed later), in which case the number is
rejected.
•A timeout occurs: the digit sequence is accepted and transmitted as dialed if incomplete, or
transformed as per the dial plan if complete.
•An explicit „send‟ (user presses the „#‟ key): The digit sequence is accepted and transmitted as
dialed if incomplete, or transformed as per the dial plan if complete.
The timeout duration depends on the matching state. If no candidate sequences are as yet
complete (as dialed), the Interdigit_Long_Timeout applies. If a candidate sequence is complete,
but there exists one or more incomplete candidates, then the Interdigit_Short_Timeout applies.
White space is ignored, and may be used for readability.
Digit Sequence Syntax:
Each digit sequence within the dial plan consists of a series of elements, which are individually
matched to the keys pressed by the user. Elements can be one of the following:
Individual keys „0‟, „1‟, „2‟ . . . „9‟, „*‟, „#‟.
The letter „x‟ matches any one numeric digit („0‟ ... „9‟)
A subset of keys within brackets (allows ranges): „[„set „]‟ (e.g. [389] means „3‟ or „8‟ or „9‟)

AT840 Series User Manual
NAM TRUONG GIANG
www.lapdattongdaidienthoai.com
18
Numeric ranges are allowed within the brackets: digit „-„digit (e.g. [2-9] means „2‟ or „3‟ or …or
„9‟)
Ranges can be combined with other keys: e.g. [235-8*] means „2‟ or „3‟ or „5‟ or „6‟ or „7‟ or „8‟ or
„*‟.
Element repetition:
Any element can be repeated zero or more times by appending a period („.‟ character) to the
element. Hence, “01.” matches “0”, “01”, “011”, “0111” … etc.
Subsequence Substitution:
A subsequence of keys (possibly empty) can be automatically replaced with a different
subsequence using an angle bracket notation: „<‟ dialed-subsequence „:‟ transmitted-
subsequence „>‟. So, for example, “<8:1650>xxxxxxx” would match “85551212” and
transmit “16505551212”.
Intersequence Tones:
An “outside line” dial tone can be generated within a sequence by appending a „,‟ character
between digits. Thus, the sequence “9, 1xxxxxxxxxx” sounds an “outside line” dial tone after the
user presses „9‟, until the „1‟ is pressed.
Number Barring:
A sequence can be barred (rejected) by placing a „!‟ character at the end of the sequence. Thus,
“1900xxxxxxx!” automatically rejects all 900 area code numbers from being dialed.
Interdigit Timer Master Override:
The long and short interdigit timers can be changed in the dial plan (affecting a specific line) by
preceding the entire plan with the following syntax:
Long interdigit timer: „L‟ „:‟ delay-value „,‟
Short interdigit timer: „S‟ „:‟ delay-value „,‟
Thus, “L=8, (. . .)” would set the interdigit long timeout to 8 seconds for the line associated with
this dial plan. And, “L: 8, S: 4, (. . .)” would override both the long and the short timeout values.
Local Timer Overrides:
The long and short timeout values can be changed for a particular sequence starting at a
particular point in the sequence. The syntax for long timer override is: „L‟ delay-value „„. Note the
terminating space character. The specified delay-value is measured in seconds. Similarly, to
change the short timer override, use: „S‟ delay-value <space>.
Pause:
A sequence may require an explicit pause of some duration before continuing to dial digits, in
order for the sequence to match. The syntax for this is similar to the timer override syntax: „P‟
delay-value <space>. The delay-value is measured in seconds.
This syntax allows for the implementation of Hot-Line and Warm-Line services. To achieve this,
one sequence in the plan must start with a pause, with a 0 delay for a Hot Line, and a non-zero
delay for a Warm Line.
Implicit sequences:
The SPA implicitly appends the vertical code sequences entered in the Regional parameter
settings to the end of the dial plan for both line 1 and line 2. Likewise, if Enable_IP_Dialing is
enabled, then ip dialing is also accepted on the associated line.
Examples:
The following dial plan accepts only US-style 1 + area-code + local-number, with no restrictions

AT840 Series User Manual
NAM TRUONG GIANG
www.lapdattongdaidienthoai.com
19
on the area code and number.
(1 xxx xxxxxxx)
The following also allows 7-digit US-style dialing, and automatically inserts a 1 + 212 (local area
code) in the transmitted number.
(1 xxx xxxxxxx | <:1212> xxxxxxx)
For an office environment, the following plan requires a user to dial 8 as a prefix for local calls and
9 as a prefix for long distance. In either case, an “outside line” tone is played after the initial 8
or 9, and neither prefix is transmitted when initiating the call.
(<9, :> 1 xxx xxxxxxx | <8,:1212> xxxxxxx )
The following allows only placing international calls (011 call), with an arbitrary number of digits
past a required 5 digit minimum, and also allows calling an international call operator (00). In
addition, it lengthens the default short interdigit timeout to 4 seconds.
S: 4, (00 | 011 xxxxx x.)
The following allows only US-style 1 + area-code + local-number, but disallows area codes and
local numbers starting with 0 or 1. It also allows 411, 911, and operator calls (0).
(0 | [49]11 | 1 [2-9] xx [2-9] xxxxxx)
The following allows US-style long distance, but blocks 9xx area codes. (1 [2-8] xx [2-9]
xxxxxx)
The following allows arbitrary long distance dialing, but explicitly blocks the 947 area code. (1
947 xxxxxxx! | 1 xxx xxxxxxx)
The following implements a Hot Line phone, which automatically calls 1 212 5551234. (S0
<:12125551234>)
The following provides a Warm Line to a local office operator (1000) after 5 seconds, unless a 4
digit extension is dialed by the user.
(P5 <:1000> | xxxx)
4. Web settings
Enter AT840 IP addresses in the web browser to go to the log on page, then you will access
AT840's user webpage.
Click "admin" which is on the right corner to enter administrator webpage.

AT840 Series User Manual
NAM TRUONG GIANG
www.lapdattongdaidienthoai.com
20
1) System status
This page shows the IP phone's system status.
Product Information shows the product name, protocol, software and hardware version, Mac
address and serial number.
Network Information shows the type, IP, netmask, gateway, DNS, host name, domain and VPN
information.
Account 1/2/3/4 Information shows whether the account is registered and the proxy, user ID
,message waiting on or off and the registration time.
The Version shows the current firmware version.
2) Network
1.1.
Basic
There are 3 ways to connect to the internet DHCP, Static and PPPoE, please choose one
according to your own situation.

AT840 Series User Manual
NAM TRUONG GIANG
www.lapdattongdaidienthoai.com
21
Network mode: you can choose DHCP, Static and PPPoE
DHCP: AT840 default to use DHCP to obtain dynamic IP.
Static: If you want to set your ip as static, you should fill ip, netmask, gateway and DNS
information.
PPPoE: If connect AT840 to modem, you should fill ADSL account and the password which
assigned by your network service provider.
1.2.
Advance
Web Server
Enable Web Server: enable or disable web access. If choose "no", you can not access AT840
webpage.
Admin password: set admin webpage access password.(username:admin)
User password: set user webpage access password.(username:user)
HTTP port: set port for HTTP(default is 80)
For example, the AT840's ip is 192.168.1.223
HTTP port was set as 100, you have to type "http://192.168.1.223:100" in web browser to
enter AT840 webpage.
VPN
Other manuals for AT840 series
5
This manual suits for next models
1
Table of contents
Other ATCOM IP Phone manuals