cetis TeleMatrix 9700 Series User manual

a brand
9700 SERIES ANALOG
USER GUIDE
9700MWD5, 9700MWD, 1-Line Handset Kit,
9602MWD5, 9602MWDD, 2-Line Handset Kit

Table of Contents
9700 Series Analog Phone Map ............. 3
Parts Check List ......................... 5
Care and Maintenance .................... 5
Installation .............................. 5
Caution Information .................... 5
Connecting the Line Cord ............... 5
Connecting to Data Port ................ 5
Settings. . . . . . . . . . . . . . . . . . . . . . . . . . . . . . . . . 5
Line Voltage Selectors (Optional Feature) .... 5
Message Waiting Selector ............... 6
Features ................................ 6
Operation ............................... 6
Volume ............................... 6
Handset and Speaker Volume Controls ... 6
Handset and Base Ringer Volume
Control ............................ 6
During Power Outage ................... 6
Indicators............................. 7
Speaker and Mute Key Connecting
and Status Indicators ................ 7
Using the Mute Feature ................. 7
Using the Conference Key ............... 7
Calling ............................... 7
Placing a Call Using the Handset ...... 7
Receiving a Call Using the Handset
or Speaker ......................... 7
Placing a Call Using the
Speakerphone ...................... 7
Message Retrieval...................... 7
OneTouch (Message Waiting)
Retrieval........................... 7
Handset Message Retrieval ........... 8
Programming............................ 8
Storing a Number into Memory Keys
or OneTouch Key ..........................8
Programming Flash Timing and Pause
Timing ............................... 8
Flash Hook Function .................... 8
Handset Locate Key .................... 8
Redial Key ............................ 9
Handset Battery.......................... 9
Charging the Handset Battery
(On Base and Charging Station)........... 9
Battery Life When Completely Charged .... 9
Installing Battery Into Handset ........... 9
Syncing Handset ......................... 9
Registering DECT Handset
with a Specific Base Unit ................ 9
To Delete ALL Registered Handsets
from a Base Unit ..................... 10
Statement of Limited Warranty ............ 10
Important Safety Instructions ............. 11
FCC Interference Information.............. 12
FCC RF Radiation Exposure Statement ...... 12
Industry of Canada Requirements..............13
Requirements of Part 15—FCC Rules ....... 13
Requirements of Part 68—FCC Rules ....... 14
2 www.telematrix.net 9700 SERIES ANALOG USER GUIDE
9600 SERIES ANALOG USER GUIDE www.telematrix.net 3
www.telematrix.net 9700 SERIES ANALOG USER GUIDE 3
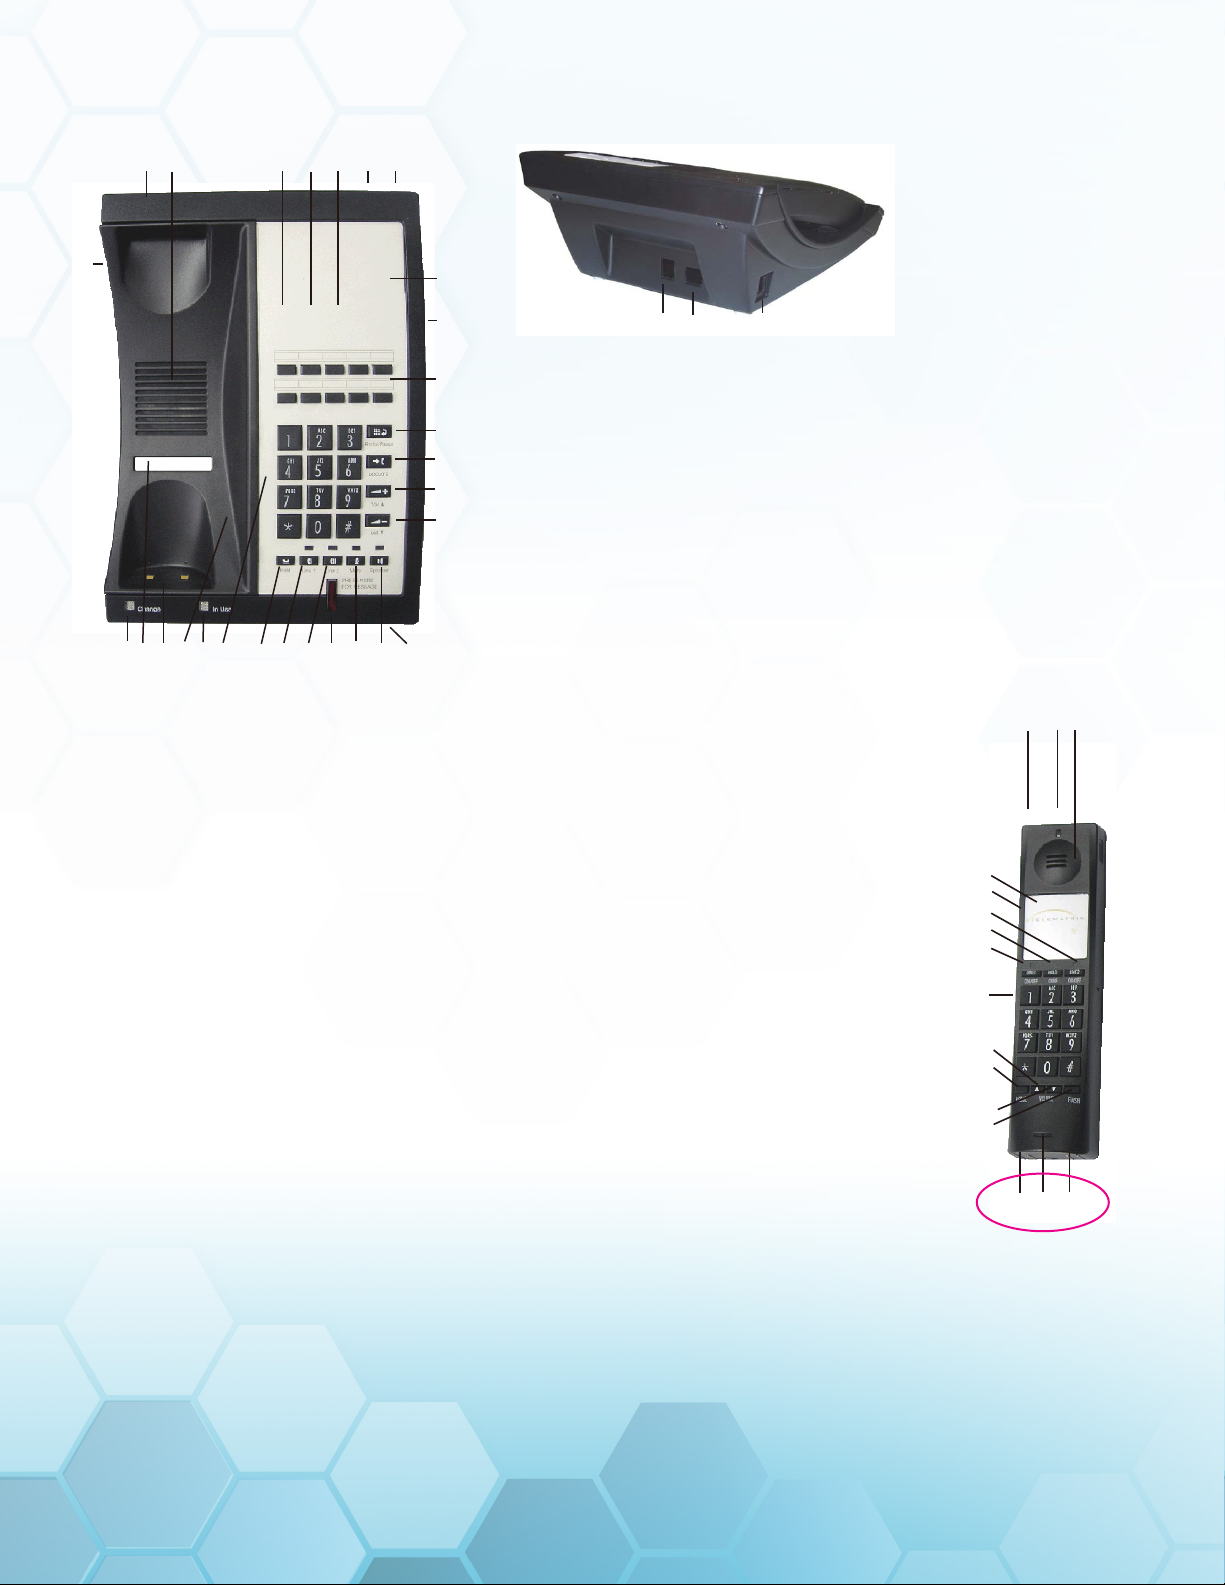
9700 Series Analog Phone Map
Version 01.21.08
DECT 6.0 & 1.8GHz Series Features:
• Line Powered - Single & Two Line Telephones
• DECT Non-Interference cordless technology
• SteelTrap™memory technology (EEPROM)
• TouchLite™one-touch message waiting retrieval
DECT Base:
1. Industrial grade construction, smooth plastic finish
2. Speaker (half duplex)
3. Message Waiting selector switch (submerged) (OFF On) (TYPE LR1 LR2)
4. Programmable Store key. (submerged) (used to program location in speed dial keys)
5. Programmable Flash key.(submerged) (100mS to 1000mS timed line break, Default is 600mS)
6. Line Cord receptacle (top end of phone)
7a. HSIA (High Speed Internet Access) receptacle incoming from wall (top end of phone)
7b. PassPort®HSIA (High Speed Internet Access) receptacle outgoing to guest laptop
8. Faceplate & Plastic Overlay display area (full-length, 4-color printing possible)
9. Base Ringer Volume switch - LOW or HI settings on Line 1 and Line 2
10. Guest Services Memory keys (10 or 5 keys) (store up to 32 digits maximum)
11. Programmable Pause/Redial key (submerged) (programmable for1.0 to 5.0 second pause)
12a. ADA Compliant Speaker Volume key (up) (8-step control)
12b. ADA Compliant Speaker Volume key (down) (8-step control)
13. Handset Locate key with audio indication
14. Base Microphone
15. Speaker key with No/Off LED indication
16. Mute key with On/Off LED indication
17. TouchLite™ Message Waiting key with 1-touch retrieval, bright red color, blinks when message waiting.
18a. Line 1 with LED indication
18b. Line 2 with LED indication
19. Electronic HOLD key with On/Off indication and remote release
20. Dial Pad - (On-hook dialing possible with Memory keys and when Speaker key is activated)
21. Interchangeable handset cradle (provides for special accent colors to light ash or black telephones)
22. Handset Charging location (handset must be face down to charge)
23. In Use - Ringer indication light
24. Charging Indication light
25. Desi strip display area
Handset:
26. Cordless Handset with programmable “Handshake” technology - Handset can be
synchronized with base with a few simple steps.
27. Message Waiting Indicator, blinks when message is waiting.
28. ADA Compliant Handset Speaker
29. Handset Faceplate & Plastic Overlay
30. Handset Ringer Volume switch LOW or HI settings
31. Line Selector key - Line 2 On/Off with LED indication
32. Hold / Conf. Handset key, and remote release
33. Line Selector key - Line 1 On/Off with LED indication
34. Handset Dial Pad (Press and Hold Key “1” to retrieve messages from TouchLite).
35. Last Number Redial key
36a. Handset Volume Up ▲ (8-Step)
36b. Handset Volume Down ▼(8-Step)
37. Flash key
38. Charging Location Contacts (Handset must be face down to charge)
39. Handset Microphone
1
23 19 18a 18b 17 16 15
12b
12a
13
11
10
8
7b
7 a65432
24 20
26
35
36a
34
29
33
32
31
30
2827
37
36b
3738
37
9
14
21
22
25
BASE FEATURES AND CONTROLS
1. Industrial grade construction,
smooth plastic finish
2. Speaker (half duplex)
3. Message Waiting selector switch
(submerged)
4. Programmable Store key
(submerged)
5. Programmable Flash key
(submerged)
6. Line Cord receptacle
7a. HSIA (High Speed Internet Access)
7b. HSIA (High Speed Internet Access)
8. Faceplate and Plastic Overlay
9. Base Ringer Volume switch
10. Guest Services Memory keys
11. Programmable Pause/Redial key
(submerged)
12a. ADA Compliant Speaker Volume
key (up)
12b. ADA Compliant Speaker Volume
key (down)
13. Handset Locate key
14. Base Microphone
15. Speaker key with LED indicator
16. Mute key with LED indicator
17. OneTouch Message Waiting key
18a. Line 1 with LED indicator
18b. Line 2 with LED indicator
19. Electronic HOLD key with On/Off
indicator and remote release
20. Dial Pad
21. Interchangeable handset cradle
22. Handset Charging location
23. In Use—Ringer indicator
24. Charging Indicator
25. Desi strip display area
HANDSET KIT CONTROLS
26. Cordless Handset
27. Message Waiting Indicator
28. ADA Compliant Handset Speaker
29. Handset Faceplate and Plastic
Overlay
30. Handset Ringer Volume switch
31. Line Selector key
32. Hold/Conf. Handset key
33. Line Selector key
34. Handset Dial Pad
35. Last Number Redial key
36a. Handset Volume Up
36b. Handset Volume Down
37. Flash key
38. Charging Location Contacts
39. Handset Microphone
Version 01.21.08
DECT 6.0 & 1.8GHz Series Features:
• Line Powered - Single & Two Line Telephones
• DECT Non-Interference cordless technology
• SteelTrap™memory technology (EEPROM)
• TouchLite™one-touch message waiting retrieval
DECT Base:
1. Industrial grade construction, smooth plastic finish
2. Speaker (half duplex)
3. Message Waiting selector switch (submerged) (OFF On) (TYPE LR1 LR2)
4. Programmable Store key. (submerged) (used to program location in speed dial keys)
5. Programmable Flash key.(submerged) (100mS to 1000mS timed line break, Default is 600mS)
6. Line Cord receptacle (top end of phone)
7a. HSIA (High Speed Internet Access) receptacle incoming from wall (top end of phone)
7b. PassPort®HSIA (High Speed Internet Access) receptacle outgoing to guest laptop
8. Faceplate & Plastic Overlay display area (full-length, 4-color printing possible)
9. Base Ringer Volume switch - LOW or HI settings on Line 1 and Line 2
10. Guest Services Memory keys (10 or 5 keys) (store up to 32 digits maximum)
11. Programmable Pause/Redial key (submerged) (programmable for1.0 to 5.0 second pause)
12a. ADA Compliant Speaker Volume key (up) (8-step control)
12b. ADA Compliant Speaker Volume key (down) (8-step control)
13. Handset Locate key with audio indication
14. Base Microphone
15. Speaker key with No/Off LED indication
16. Mute key with On/Off LED indication
17. TouchLite™ Message Waiting key with 1-touch retrieval, bright red color, blinks when message waiting.
18a. Line 1 with LED indication
18b. Line 2 with LED indication
19. Electronic HOLD key with On/Off indication and remote release
20. Dial Pad - (On-hook dialing possible with Memory keys and when Speaker key is activated)
21. Interchangeable handset cradle (provides for special accent colors to light ash or black telephones)
22. Handset Charging location (handset must be face down to charge)
23. In Use - Ringer indication light
24. Charging Indication light
25. Desi strip display area
Handset:
26. Cordless Handset with programmable “Handshake” technology - Handset can be
synchronized with base with a few simple steps.
27. Message Waiting Indicator, blinks when message is waiting.
28. ADA Compliant Handset Speaker
29. Handset Faceplate & Plastic Overlay
30. Handset Ringer Volume switch LOW or HI settings
31. Line Selector key - Line 2 On/Off with LED indication
32. Hold / Conf. Handset key, and remote release
33. Line Selector key - Line 1 On/Off with LED indication
34. Handset Dial Pad (Press and Hold Key “1” to retrieve messages from TouchLite).
35. Last Number Redial key
36a. Handset Volume Up ▲ (8-Step)
36b. Handset Volume Down ▼(8-Step)
37. Flash key
38. Charging Location Contacts (Handset must be face down to charge)
39. Handset Microphone
1
23 19 18a 18b 17 16 15
12b
12a
13
11
10
8
7b
7 a65432
24 20
26
35
36a
34
29
33
32
31
30
2827
37
36b
3738
37
9
14
21
22
25
Q to Engineering:
Should one or both
of the 37s circled be
changed to 39?
Installation...
Caution Information -
• Never install telephone or network wiring during a lightning storm.
• Never install telephone or Ethernet jacks in wet locations unless the jack is specically
designed for wet locations.
• Never touch uninstalled telephone wires or terminals unless the telephone line has
been disconnected at the network interface.
• Use caution when installing or modifying telephone and network lines.
• Be sure your power adaptor meets your regions requirements prior to installation.
Connecting the Line Cord - # 6 & # 49/50
Two line cords are provided 1-RJ45 & 1-RJ25. To install, simply plug one end of the
RJ45 cord into the modular jack at the top end of the base unit # 6 and the other end
into the RJ45 Phone Jack on the power adaptor # 50. Take other line cord and plug
into Line jack on power adaptor # 49, then plug other end into wall. Finish by plugging
power adaptor into normal wall outlet.
Be sure your power adaptor is specied for your region of the world prior to plugging
into the wall socket
Connecting to the HSIA Port - # 7a & 7b
The phone is equipped with PassPort™, a High Speed Internet Access port on the left
side of the base unit. This receptacle acts as a pass-through so that the guest may
connect their laptop into the hotel’s high speed internet system for maximum effeciency.
To connect - place the Ethernet cable from the wall into the RJ45 receptacle at the top
end of the base # 7a.
3 12 Version 12.03.08
67a 7b
Statement of Limited Warranty
4 www.telematrix.net 9600 SERIES ANALOG USER GUIDE
9700 Series Analog Phone Map
DECT 6.0 & 1.8GHz
Cordless Series
DECT MWD5 • DECT MWD • DECT 2MWD5 • DECT 2MWD
User’s Guide
Single & Two Line • 10 or 5 Button
Cordless Speakerphones with Optional Charging Stations
1.800.462.9446 domestic
+1.719.638.8821 international
www.telematrix.net
5025 Galley Road
Colorado Springs
Colorado 80915 USA
1.800.462.9446 domestic
+1.719.638.8821 international
www.telematrix.net
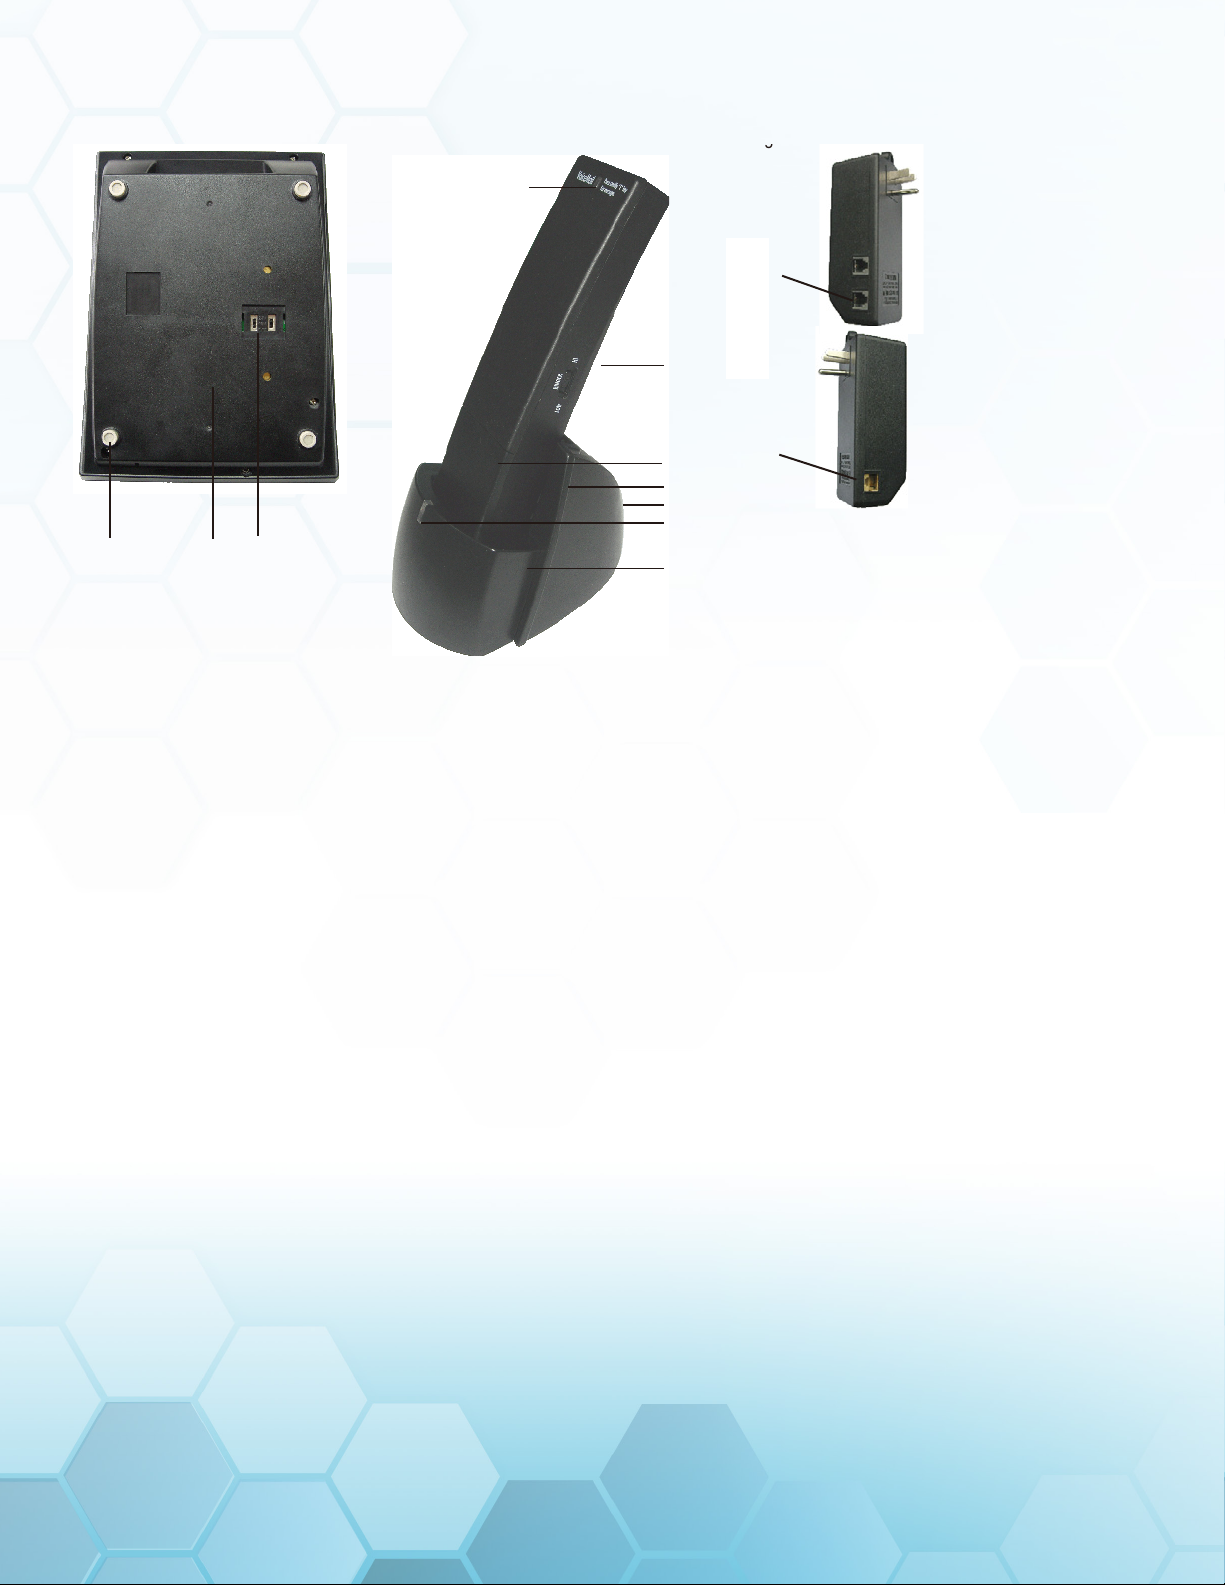
Telephone Underside:
39. Base underside sticker information:
Certification - FCC, CE, ETL, RoHS
Version label
Model name
REN number
Disposal label
QC label
Series number
Warranty Void If Seal Broken label
40. Voltage Settings - 24V, 48V & OFF
for Line 1 & Line 2.
(factory set at 24V)
Line Voltage 24-52VDC (+/-)
Line Current 15mA to 80mA
Ringer Equivalance - 0.6B
41. Non-Slip rubber feet (4)
Cordless Handset Charging Station:
42. Message Waiting indicator
43. Cordless Handset
44. Handset Pop-Off Cover for
battery compartment.
45. Interchangeable Accent Piece, to
match custom cradle color # 21.
46. AC Power Plug-In. (back of stand)
47. Battery Charging & Synchronization
programming indicator light.
48. Cordless Handset Charging Stand.
Handset will charge regardless of
whether it is placed with either front
or back showing.
49
50
Power Adaptor:
49. Phone Line
from wall goes
into Line
receptacles.
50. Line to Phone
from Adaptor.
39 40
41
42
43
46
45
44
47
48
UNDERSIDE CONTROLS
39. Base underside sticker
information:
Certification—FCC, CE, ETL, RoHS
Version label
Model name
REN number
Disposal label
QC label
Series number
Warranty Void If Seal Broken
label
40. Voltage Settings—24V, 48V
and OFF for Line 1 and Line 2
(factory set at 24V)
Line Voltage 24-52VDC (+/-)
Line Current 15mA to 80mA
Ringer Equivalance—1.3B
41. Non-Slip rubber feet (4)
CORDLESS HANDSET
CHARGING STATION
42. Message Waiting indicator
43. Cordless Handset
44. Handset Pop-Off Cover for
battery compartment
45. Interchangeable Accent Piece
46. AC Power Plug-In (back of
stand)
47. Battery Charging and
Synchronization programming
indicator light.
48. Cordless Handset Charging
Stand
POWER ADAPTOR
49. Phone Line from wall goes into
Line receptacles
50. Line to Phone from Adaptor
DECT 6.0 & 1.8GHz
Cordless Series
DECT MWD5 • DECT MWD • DECT 2MWD5 • DECT 2MWD
User’s Guide
Single & Two Line • 10 or 5 Button
Cordless Speakerphones with Optional Charging Stations
1.800.462.9446 domestic
+1.719.638.8821 international
www.telematrix.net
5025 Galley Road
Colorado Springs
Colorado 80915 USA
1.800.462.9446 domestic
+1.719.638.8821 international
www.telematrix.net
Telephone Underside:
39. Base underside sticker information:
Certification - FCC, CE, ETL, RoHS
Version label
Model name
REN number
Disposal label
QC label
Series number
Warranty Void If Seal Broken label
40. Voltage Settings - 24V, 48V & OFF
for Line 1 & Line 2.
(factory set at 24V)
Line Voltage 24-52VDC (+/-)
Line Current 15mA to 80mA
Ringer Equivalance - 0.6B
41. Non-Slip rubber feet (4)
Cordless Handset Charging Station:
42. Message Waiting indicator
43. Cordless Handset
44. Handset Pop-Off Cover for
battery compartment.
45. Interchangeable Accent Piece, to
match custom cradle color # 21.
46. AC Power Plug-In. (back of stand)
47. Battery Charging & Synchronization
programming indicator light.
48. Cordless Handset Charging Stand.
Handset will charge regardless of
whether it is placed with either front
or back showing.
49
50
Power Adaptor:
49. Phone Line
from wall goes
into Line
receptacles.
50. Line to Phone
from Adaptor.
39 40
41
42
43
46
45
44
47
48
4 www.telematrix.net 9700 SERIES ANALOG USER GUIDE

9600 SERIES ANALOG USER GUIDE www.telematrix.net 5
• Never touch uninstalled telephone wires or
terminals unless the telephone line has been
disconnected at the network interface.
• Use caution when installing or modifying
telephone and network lines.
CONNECTING THE LINE CORD
Two line cords are provided 1-RJ45 and 1-RJ14. To
install, simply plug one end of the RJ45 cord into
the modular jack at the top end of the base unit
and the other end into the RJ45 phone jack on the
power adaptor. Take other line cord and plug into
line jack on power adaptor, then plug other end
into wall. Finish by plugging power adaptor into
normal wall outlet.
Be sure your power adaptor is specified for your
region of the world prior to plugging into the wall
socket.
CONNECTING TO DATA PORT
The phone is equipped with a data port, a High
Speed Internet Access port on the left side of the
base unit. This receptacle acts as a pass-through
so that the guest may connect their laptop into the
hotel’s high-speed internet system for maximum
effeciency. To connect—place the Ethernet cable
from the wall into the RJ45 receptacle at the top
end of the phone base.
Settings
LINE VOLTAGE SELECTORS (OPTIONAL
FEATURE)
DECT telephones are equipped to operate behind
a PBX telephone systems rated between 24 volts
and 48 volts. There is a selector switch on the
bottom of the phone (hidden). The switch has 3
settings 24V, 48V, or Off for either line. Your phone
must be set according to what your PBX system is
rated. The default setting is 24V.
9700 Series
Parts Check List
The following parts are included in this package:
• (2) Line cords
• Battery for handset
• Base unit
• Mobile handset
• Faceplate
• Plastic faceplate overlay
• Power adaptor
The following are optional items possibly included
(must be ordered separately):
• Charging stations and handset with handset
battery and power adaptor
Care and Maintenance
• Keep the telephone dry. If it gets wet, wipe it
dry immediately. Liquids might contain minerals
that can corrode the electronic circuits.
• Use and store the telephone in a normal
temperature environment. Temperature
extremes can shorten the life of electronic
devices and distort or melt parts.
• Keep the telephone away from excessive dust
and dirt that can cause premature wear of parts.
• Wipe the telephone with a damp cloth
occasionally to keep it looking new. Do not use
harsh chemicals, cleaning solvents, or strong
detergents to clean the system.
Installation
CAUTION INFORMATION
• Never install telephone or network wiring
during a lightning storm.
• Never install telephone or Ethernet jacks in
wet locations unless the jack is specifically
designed for wet locations.
www.telematrix.net 9700 SERIES ANALOG USER GUIDE 5

6 www.telematrix.net 9600 SERIES ANALOG USER GUIDE
7. SPEAKER Key (for phones with a
speakerphone): Sets the hands-free
speakerphone function On or Off. The LED
indicator located above the [Speaker] key
displays the status of the speakerphone.
8. Data Port: Provides a convenient extension
of the telephone line in use for connecting a
device such as a modem, fax, or answering
machine.
Operation
VOLUME
HANDSET AND SPEAKER VOLUME CONTROLS
When using the handset or speaker key engaged
press the respective volume control keys to
increase or decrease the volume. All models are
hearing aid compatible with 8-step volume levels.
HANDSET AND BASE RINGER VOLUME CONTROLS
The ringer volume control switch is on the right
side of the base, and on the side of the handset.
You may set either at LOW or HI settings.
DURING POWER OUTAGE
During a power failure, the cordless base unit
will maintain operation in Speaker Mode, and the
Handsets will not function.
• On a single line telephone, simply press the
Speaker key and you will receive dial tone,
then begin dialing. Disconnect by pressing the
Speaker key again.
• On a two line telephone, simply press Line 1 or
Line 2 key to connect to dial tone. Disconnect
by pressing the selected Line key again.
• To answer an incoming call, use the Speaker or
Line keys as specified above.
MESSAGE WAITING SELECTOR
This telephone can support LR1 (Line 1 reverse
polarity), LR2 (Line 2 reverse polarity), TYPE (Neon
or LED) message waiting systems. Simply slide the
switch to the desired position that is compatible
with your PBX message system. The message
waiting may also be turned On or Off.
Note: Phones are factory preset to TYPE.
Features
1. Speed-Dial Memory Keys: 5, 10, or 0 user
programmable speed-dial keys with 32-digit
capacity. [Flash] and [Pause] are storable.
Speed-dial memory is non-volatile RAM, so
programming is retained without the need for
batteries or telephone line power.
2. FLASH Key: Generates a 600 ms (0.6
seconds) hook switch “tap” signal. Utilized
to access special features on PBX systems.
The Flash function is programmable at
100 ms to 1000Ms (default is 600 ms). This
button is located underneath the faceplate.
3. HOLD Key: Controls the “local hold”
function. Each time it is pressed, the [Hold]
key toggles the local hold mode on or off. An
LED indicator located above the [Hold] key
displays the on-hold status.
4. REDIAL Key: Redials the last-dialed
telephone number, up to 32 digits.
5. STORE Key: Utilized to program the speed-
dial memory keys and the voice mail
retrieval touch bar. This button is located
underneath the faceplate.
6. MUTE Key: Sets the microphone mute
function On and Off. The LED indicator
above the [Mute] key displays the On/Off
status of the mute function. When mute is
on, the handset and hands-free microphone
audio is turned off. You will be able to hear
the party at the other end of your call, but
they will not be able to hear you.
6 www.telematrix.net 9700 SERIES ANALOG USER GUIDE

9600 SERIES ANALOG USER GUIDE www.telematrix.net 7
5. If you wish to continue speaking with one of
the callers and wish to drop the other caller,
simply press the line key of the caller you
wish to continue speaking with. The other
caller will automatically drop-off.
CALLING
PLACING A CALL USING THE HANDSET
• Lift the handset.
• Dial out by using the numeric dial pad on the
handset or by pressing Line 1 on the handset
then a speed dial location.
RECEIVING A CALL USING THE HANDSET OR
SPEAKER
• On a single-line telephone, when the phone
rings, either lift the handset and press the
activated Line 1 button on the handset, or press
the Speaker key, to begin the conversation.
• On a two-line telephone, when the phone
rings, the line LED indicator will blink to show
which line the call is coming in on. Lift the
handset and select blinking Line key to begin
conversation, or select the blinking Line key on
base then press the Speaker key, to begin the
conversation.
PLACING A CALL USING THE SPEAKERPHONE
The DECT Series speakerphones are equipped
with a high quality speakerphone feature to allow
hands-free operation. To use, simply press the
Speaker key when placing or answering a call.
The telephone line will activate automatically.
The Speaker key will light up indicating that the
speakerphone is in-use. To hang up, press the
Speaker key again.
MESSAGE RETRIEVAL
ONETOUCH (MESSAGE WAITING) RETRIEVAL
OneTouch is an innovation that integrates the
visual message waiting lamp and a speed dial
INDICATORS
SPEAKER AND MUTE KEY CONNECTING AND
STATUS INDICATORS
Speakerphones are equipped with LED indicators
to show the current feature key status.
• Press SPEAKER or MUTE feature key to use
that service—LED will light green when that
key is in use.
USING THE MUTE FEATURE
A MUTE key is provided to allow privacy during
a background conversation. When the MUTE key
is activated, the microphones in the handset and
speakerphone are disabled. When the MUTE
feature is activated, the caller will not hear your
voice. The MUTE key will light to show that the
feature is activated. To de-activate, press the
MUTE key again.
USING THE CONFERENCE KEY
The CONF key is used to establish a 3-way
conversation. The conference feature is activated
by a soft key that will automatically reset when
hung up.
A 3-way conference call can be established while
using the handset. To use the CONF feature:
1. Place the line that is currently in-use on
hold by pressing the HOLD key. The line
status indicator will turn from green to red.
2. The second call can be established by
selecting the idle line key and dialing the
call.
3. When the second call is established,
activate the 3-way conference call by
pressing CONF key. Line 1 and Line 2 will
automatically bridge together and all three
parties can now converse.
4. To end the call, simply hang-up by placing
the handset back in its cradle.
www.telematrix.net 9700 SERIES ANALOG USER GUIDE 7

8 www.telematrix.net 9600 SERIES ANALOG USER GUIDE
PROGRAMMING FLASH TIMING AND
PAUSE TIMING
Flash timing options are 100 mS through 1000 mS,
programmable in 100 mS increments. The default
Flash timing is 600 mS.
Pause timing options are 1.0s through 5.0 s. The
default Pause timing is 3.6s.
1. Press the Speakerphone ON/OFF key to
activate the telephone.
2. Press the STORE key once.
3. Program FLASH by pressing “1” for 100 mS,
“2” for 200 mS, and so on.
4. Press STORE key again.
5. Press FLASH key again. The long beep
means that the setting was successful.
6. Exit programming by pressing Speaker key
again.
Note: Use 3a from the Phone Map when
programming Flash. Use 3b when programming
Pause.
FLASH HOOK FUNCTION
The FLASH function is used to access PBX features
or Telco line features such as call waiting. The
FLASH function is a 600 mS timed line break. If
the FLASH function will be used often, store the
feature into memory located for easy access as
follows:
1. Press Speakerphone ON/OFF key, then
press the STORE key.
2. Press the FLASH key.
3. Press the memory location wherein the
FLASH is to be stored.
4. Press Speaker key to end this programming
phase.
HANDSET LOCATE KEY
The DECT Cordless Series is equipped with a
handset locator feature key located on the base.
key onto one. It allows easy access for guests to
retrieve messages. When the message waiting
lamp lights this notifies the guest that a message
is waiting. A simple press of the red OneTouch bar
connects the guest to the message center or front
desk. OneTouch also adds an additional memory
location to this telephone.
HANDSET MESSAGE RETRIEVAL
When the DECT handset is idle, pressing and
holding down dial key “1” on the DECT mobile
handset, this will dial the pre-programmed
contents of the OneTouch button on the DECT base
unit.
Programming
The telephone set must be connected to the PBX
in order to program it.
Some of these programming keys are located
under the faceplate and overlay, begin by lifting
up faceplate and overlay, by either a paperclip or
sharp pointer.
STORING A NUMBER INTO MEMORY KEYS
OR ONETOUCH KEY
Each location can store up to 24 digits in tone
mode.
Note: A PAUSE or FLASH programmed into
memory counts as one digit when storing a
number.
1. Press the Speakerphone ON/OFF key to
activate telephone.
2. Press the STORE Key.
3. Enter the number to be stored using the
numeric dial pad.
4. Press the desired memory location wherein
the number is to be stored.
5. If additional numbers are to be stored,
repeat steps 3 through 5.
6. Press Speaker key to end this programming
phase.
8 www.telematrix.net 9700 SERIES ANALOG USER GUIDE

9600 SERIES ANALOG USER GUIDE www.telematrix.net 9
INSTALLING BATTERY INTO HANDSET
1. Open cover with small screwdriver. Do not
open more than half-inch.
2. Grip handset and depress cover at hinged end.
3. Slide cover off, exposing battery compartment.
4. Slide battery plug into receptacle, matching
up slot and opening on receptacle.
5. Slide battery into battery compartment.
Do not force battery!
6. Press on back end of battery to snap into
place.
7. Place hinged end of cover into slot, then
press down and snap into place.
Syncing Handset
REGISTERING DECT HANDSET WITH A
SPECIFIC BASE UNIT
1. Place handset into base (or charging
station) for 10 minutes before attempting
the handset sync procedure. This gives the
battery enough charge to complete the sync
process.
2. Remove DECT handset from base unit cradle.
3. Press and hold down the LOCATE button on
the base for approximately 10 s.
4. When the button has been held down long
enough, the In-Use or Charge indicator on
the base unit begins to blink (even though
there isn’t a handset in the cradle).
5. While the In-Use or Charge indicator
is blinking, press steadily “*” (star key)
on the handset until the beep is heard
(approximately 10 s), continue to hold down
the “*” (star key) until you hear a second
beep. The handset is now registered to this
base unit.
6. If you hear three short beeps this means
that the handset failed to register.
Simply press the LOCATE button on the base unit.
See Phone Map. The handset will beep for about
15 seconds. Once the handset is located, press the
ON/OFF key to activate your handset.
REDIAL KEY
The REDIAL key is used to automatically redial the
last number manually dialed from the numeric
dial pad on the base or handset.
Simply engage telephone by pressing handset Line
1 or Line 2 ON/OFF key—or Line 1 or Line 2 key on
the base ON/OFF key, then press REDIAL button
on handset or base to dial last number dialed.
Note: You may have up to three cordless handset
charging units operating off one DECT base unit.
Handset Battery
CHARGING THE HANDSET BATTERY (ON
BASE AND CHARGING STATION)
The handset Battery is a Ni-MH battery. This
battery requires a full charge prior to use to
ensure long life. To charge the battery, complete
the installation procedure by plugging the power
source into the wall outlet and the telephone base
or charging station.
Install the battery the battery per below
instructions, inserting battery plug into receptacle.
Place battery into opening in handset, press into
place, then replace cover and place handset into
base face down or charging station face front.
BATTERY LIFE WHEN COMPLETELY
CHARGED
Talk time: 7.5 hours
Standby (handset off hook): 6 days
Charge for 24 hours to ensure a fully charged
battery.
www.telematrix.net 9700 SERIES ANALOG USER GUIDE 9

10 www.telematrix.net 9600 SERIES ANALOG USER GUIDE
Statement of Limited Warranty
TELEMATRIX, INC. warrants to its [original
end customer] [purchaser] that Spectrum
PLUS, Marquis and RETRO branded products
manufactured by TELEMATRIX, INC. are free
from defects in materials and workmanship for
five (5) years after the date of purchase, products
manufactured by TELEMATRIX, INC. are free from
defects in materials and workmanship for three
(3) years, other than the following products for
which the warranty period shall be one (1) year:
handset batteries, either NiCd or NiMH, used in
TELEMATRIX, INC. cordless products. If a product
fails this warranty during the warranty period,
TELEMATRIX, INC. will, at its option, either repair
or replace the defective product or parts, or
deliver replacements for defective products or
parts on an exchange basis at no additional charge
to the customer except as set forth below. Repair
parts or replacement products may be either new
or reconditioned. Products or parts returned to
TELEMATRIX, INC. under this warranty will become
the property of TELEMATRIX, INC. Warranties on
products repaired by TELEMATRIX, INC. expire at
the termination of the original warranty period.
This limited warranty does not cover
1. Products or parts which are damaged,
abused or misused;
2. Any damage resulting from improper
installation, maintenance or operation of
the product;
3. Damage resulting from unauthorized
modification or repair of the product, or
from improper connection of the product to
other equipment;
4. Cords, connectors and replaceable batteries;
5. Damage in transit to the TELEMATRIX, INC.
repair facility;
6. Any product or part unless proof of date
of purchase is submitted with the product
when returned for warranty repair; or
7. Once you have successfully registered the
handset, you may now place the handset
into a charging station, or use as the base
handset.
8. Repeat steps 1–5 to register additional
handsets.
• Registering a new handset to a given base
unit does not affect the registrations of other
handsets that were previously registered to this
base.
• Likewise, power failures or removal/
replacement of the handset battery do not
affect registration.
• There is a maximum of four handsets which
can be registered to a single base.
• Once all registration slots have been used
up on a base and you can no longer register
an additional handset, it will be necessary to
delete ALL handset registrations from the base
unit, and then start over by re-registering all
the handsets.
TO DELETE ALL REGISTERED HANDSETS
FROM A BASE UNIT
1. Remove DECT handset from base unit
cradle and remote charging station.
2. Unplug line cord from rear of base unit and
wait 3 minutes.
3. Press and hold down LOCATE button on the
base unit.
4. While continuing to hold down the LOCATE
button, plug the line cord back into the base
unit.
5. Continue to hold down the LOCATE button
for 5 more seconds, after plugging in line
cord.
6. Release LOCATE button.
7. This handsets are now de-registered from
the base unit.
8. Continue with the above registration
procedure to re-register each handset to be
used with this base unit.
10 www.telematrix.net 9700 SERIES ANALOG USER GUIDE

9600 SERIES ANALOG USER GUIDE www.telematrix.net 11
Important Safety Instructions
When using your telephone equipment, basic
safety precautions should always be followed to
reduce the risk of fire, electric shock, and injury to
persons, including the following:
1. Read and understand all instructions.
2. Follow all warnings and instructions
marked on the product.
3. Unplug the product from the wall outlet before
cleaning. Do not use liquid cleaner or aerosol
cleaners. Use a damp cloth for cleaning.
4. Do not use this product near water—for
example, near a bathtub, wash bowl,
kitchen sink or laundry tub, in a wet
basement, or near a swimming pool.
5. Do not place this product on an unstable
cart, stand, or table. The product may fall,
causing serious damage to the product.
6. Slots and openings in the cabinet and the back
or bottom are provided for ventilation, to protect
it from overheating. These openings must not
be blocked or covered. The openings should
never be blocked by placing the product on the
bed, sofa, rug, or any other similar surface. This
product should never be place near or over a
radiator or heat register. This product should
not be placed in a built-in installation unless
proper ventilation is provided.
7. Never push objects of any kind into this product
through cabinet slots as they may touch
dangerous voltage points or short out parts that
could result in a risk of fire or electric shock.
Never spill liquid of any kind on the product.
8. To reduce the risk of electric shock do
not disassemble this product. Take it
to a qualified service facility if service
or repair work is required. Opening or
removing covers may expose you to
dangerous voltages or other risks. Incorrect
reassembly can cause electric shock when
the appliance is subsequently used.
7. Costs incurred by the customer in removing
and shipping the product to TELEMATRIX,
INC. for repair or replacement, and costs of
reinstallation of the product.
8. Products or parts which are not owned and
used by the original end user customer.
The cost and risk of loss or damage for sending
the product to TELEMATRIX, INC. will be borne by
the customer.
TELEMATRIX, INC. EXPRESSLY DISCLAIMS ALL
WARRANTIES EXCEPT THE LIMITED WARRANTY
SET FORTH HEREIN, WHICH IS THE SOLE AND
EXCLUSIVE WARRANTY OF THE PRODUCT,
AND IS IN LIEU OF ALL OTHER WARRANTIES,
WHETHER ORAL OR WRITTEN, EXPRESS OR
IMPLIED, OR STATUTORY. THERE ARE NO
IMPLIED WARRANTIES OF MERCHANTABILITY
OR FITNESS FOR A PARTICULAR PURPOSE.
THE CUSTOMER’S SOLE REMEDY UNDER THE
TELEMATRIX, INC. WARRANTY SHALL BE REPAIR
OR REPLACEMENT AS PROVIDED ABOVE. IN
NO EVENT WILL TELEMATRIX, INC. BE LIABLE
TO CUSTOMER OR ANY OTHER PARTY FOR ANY
INDIRECT, INCIDENTAL OR CONSEQUENTIAL
DAMAGES, INCLUDING, WITHOUT LIMITATION,
DAMAGES OF LOST PROFITS, LOST REVENUES,
LOSS OF USE OF FACILITIES OR EQUIPMENT,
OR COST OF SUBSTITUTE EQUIPMENT ARISING
OUT OF THE USE OR INABILITY TO USE THIS
PRODUCT, EVEN IF THE CUSTOMER HAS ADVISED
TELEMATRIX, INC. OF THE POSSIBILITY OF SUCH
DAMAGES. TELEMATRIX, INC. LIABILITY FOR
DAMAGES SHALL NOT EXCEED THE PURCHASE
PRICE OF THE DEFECTIVE PRODUCT.
Thislimitedwarrantyisnon-transferablewithoutthe
prior written approval of TELEMATRIX, INC. It gives
the customer specific legal rights. The customer
may have other rights which vary under local law.
Some jurisdictions may not allow limitations on
the term of an implied warranty or exclusions or
limitations of incidental or consequential damages.
www.telematrix.net 9700 SERIES ANALOG USER GUIDE 11

12 www.telematrix.net 9600 SERIES ANALOG USER GUIDE
This equipment has been tested and found to
comply with the limits for a Class B digital device,
pursuant to Part 15 of the FCC Rules. These limits
are designed to provide reasonable protection
against harmful interference in a residential
installation. This equipment generates, uses,
and can radiate radio frequency energy and, if
not installed and used in accordance with the
instructions, may cause harmful interference
to radio communications. However, there is no
guarantee that interference will not occur in a
particular installation.
If this equipment does cause harmful interference
to radio or television reception, which can be
determined by turning the equipment off and on, the
user is encouraged to try to correct the interference
by one or more of the following measures:
– Reorient or relocate the receiving antenna
for the radio or television that is receiving the
interference).
– Reorient or relocate and increase the
separation between the telecommunications
equipment and receiving antenna.
– Connect the telecommunications equipment
into an outlet on a circuit different from that to
which the receiving antenna is connected.
FCC RF Radiation Exposure
Statement
The installation of the base unit should allow
at least 20 centimeters between the base and
persons to be in compliance with FCC RF exposure
guidelines. For body-worn operation, the portable
part (handset) has been tested and meets FCC RF
exposure guidelines.
9. Unplug this product from the wall outlet
and refer servicing to qualified service
personnel under the following conditions:
– When the power supply cord or plug is
damaged or frayed.
– If liquid has been spilled into the product.
– If the product has been exposed to rain or
water.
– If the product does not operate normally
by following the operating instructions.
Adjust only those controls that are
covered by the operating instructions, as
improper adjustment of other controls
may result in damage and may require
extensive work by a qualified technician to
restore the product to normal operation.
– If the product has been dropped or the
cabinet has been damaged.
– If the product exhibits a distinct change in
performance.
10. Avoid using a telephone (other than a
cordless type) during an electrical storm.
There may be a remote risk of electric
shock from lightning.
11. Do not use the telephone to report a gas
leak in the vicinity of the leak.
PLEASE SAVE THESE INSTRUCTIONS.
FCC Interference Information
This device complies with Part 15 of the FCC
Rules. Operation is subject to the following two
conditions:
1. This device may not cause harmful
interference.
2. This device must accept any interference
received, including interference that may
cause undesired operation.
12 www.telematrix.net 9700 SERIES ANALOG USER GUIDE

9600 SERIES ANALOG USER GUIDE www.telematrix.net 13
Caution: Users should not attempt to make such
connections themselves, but should contact
the appropriate electric inspection authority, or
electrician, as appropriate.
Notice: The Ringer Equivalence Number (REN)
assigned to each terminal device provides an
indication of the maximum number of terminals
allowed to be connected to a telephone interface.
The termination on an interface may consist of
any combination of devices subject only to the
requirementthat thesum ofthe RingerEquivalence
Numbers of all the devices does not exceed 5.
REN: Z
For warranty and service in Canada, please
contact:
Williams Telecommunications
5610 Kennedy Road
Mississauga, Ontario, L4Z2A9
Canada
Phone: 905-712-4242
Fax: 905-712-1754
Requirements of Part 15—
FCC Rules
Note: This equipment has been tested and found
to comply with the limits for a Class B digital
device, pursuant to Part 15 of the FCC Rules.
These limits are designed to provide reasonable
protection against harmful interference in a
residential installation. This equipment generates,
uses, and can radiate radio frequency energy and,
if not installed and used in accordance with the
instructions, may cause harmful interference
to radio communications. However, there is no
guarantee that interference will not occur in a
particular installation. If this equipment does
This device must not be co-located or operating in
conjunction with any other antenna or transmitter.
The changes or modifications not expressly
approved by the party responsible for compliance
could void the user’s authority to operate the
equipment.
Industry of Canada Requirements
Note: This equipment meets the applicable
Industry Canada Terminal Equipment Technical
Specifications. This is confirmed by the registration
number.Theabbreviation,IC,beforetheregistration
number signifies that registration was performed
based on a Declaration of Conformity indicating
that Industry Canada technical specifications
were met. It does not imply that Industry Canada
approved the equipment.
Before installing this equipment, users should
ensure that it is permissible to be connected to
the facilities of the local telecommunications
company. The equipment must also be installed
using an acceptable method of connection. The
customer should be aware that compliance with
the above conditions may not prevent degradation
of service in some situations.
Repairs to certified equipment should be coordinated
by a representative designated by the supplier.
Any repairs or alterations made by a user to this
equipment, or equipment malfunctions, may give
the telephone communications company cause to
request the user to disconnect the equipment.
Users should ensure for their own protection, that
the electrical ground connections of the power utility,
telephonelines,andinternalmetallicwaterpipesystem,
if present, are connected together. This precaution may
be particularly important in rural areas.
www.telematrix.net 9700 SERIES ANALOG USER GUIDE 13

14 www.telematrix.net 9600 SERIES ANALOG USER GUIDE
all areas, the sum of RENs should not exceed five
(5.0). To be certain of the number of devices that
may be connected to a line, as determined by the
total RENs, contact the local telephone company.
For products approved after July 23, 2001, the REN
for this product is a part of the product identifier
that has the format US:AAAEQ##TXXXX. The digits
represented by ## are the REN without a decimal
point (e.g., 03 is a REN of 0.3). For earlier products,
the REN is separately shown on the label.
If this telephone causes harm to the telephone
network, the telephone company will notify you
in advance that temporary discontinuance of
service may be required. But if advance notice is
not practical, the telephone company will notify
the customer as soon as possible. Also, you will
be advised of your right to file a complaint with the
FCC if you believe it is necessary.
The telephone company may make changes in its
facilities, equipment, operations, or procedures
that could affect the operation of the equipment. If
this happens, the telephone company will provide
advance notice in order for you to make the
necessary modifications to maintain uninterrupted
service.
If trouble is experienced with this equipment, for
repair or warranty information, please contact
Teledex at (800) 462-9446. If the equipment is causing
harm to the telephone network, the telephone
company may request that you disconnect the
equipment until the problem is resolved.
There are no user-serviceable parts contained in
this equipment.
cause harmful interference to radio or television
reception, which can be determined by turning the
equipment off and on, the user is encouraged to
try to correct the interference by one or more of
the following measures:
1. Move the telephone away from the receiver.
2. Consult the dealer or an experienced radio/
TV technician for help.
Any changes made by the user not approved by
the manufacturer can void the user’s authority to
operate the telephone.
Requirements of Part 68—
FCC Rules
This equipment complies with Part 68 of the FCC
Rules and the requirements adopted by ACTA. On
the bottom of this telephone is a label that contains,
among other information, a product identifier
in the format US:AAAEQ##TXXXX. If requested,
this number must be provided to the telephone
company. The USOC Jack for this equipment is
RJ11C.
A plug and jack used to connect this equipment
to the premises wiring and telephone network
must comply with the applicable FCC Part 68 rules
and requirements adopted by ACTA. A compliant
telephone cord and modular plug are provided with
this telephone. It is designed to be connected to a
compatible modular jack that is also compliant.
See installation instructions for details.
The Ringer Equivalence Number (REN) is used
to determine the number of devices that may be
connected to a telephone line. Excessive RENs on a
telephone line may result in the devices not ringing
in response to an incoming call. In most but not
14 www.telematrix.net 9700 SERIES ANALOG USER GUIDE

9600 SERIES ANALOG USER GUIDE www.telematrix.net 15
This telephone is hearing aid compatible.
These telephone devices are intended for
commercialuseonly,primarilyinhotelguestrooms.
They must be used with a PBX (private branch
exchange), and are not intended to be connected
directly to a PSTN line (public switched telephone
network). There are no user-serviceable parts
inside the equipment.
Connection to party line service is subject to
state tariffs. Contact the state public utility
commission, public service commission, or
corporation commission for information.
If your home has specially wired alarm equipment
connected to the telephone line, ensure the
installation of this product does not disable your
alarm equipment. If you have questions about
what will disable alarm equipment, consult your
telephone company or a qualified installer.
www.telematrix.net 9700 SERIES ANALOG USER GUIDE 15

a brand
Toll Free: +1.800.462.9446
Tel: +1.719.638.8821
www.telematrix.net
© 2020 Cetis, Inc. Product specifications and descriptions in this document subject to change without notice. CetisTM, Teledex®, TeleMatrix®, and Scitec®
are trademarks or registered trademarks of Cetis, Inc. TMX_9700Series_Analog_UG
Other manuals for TeleMatrix 9700 Series
1
This manual suits for next models
4
Table of contents
Other cetis Telephone manuals


Popular Telephone manuals by other brands


Videx
Videx 3000 Series quick guide

france telecom
france telecom DIATONIS 420 manual

Emos
Emos H2014 manual
 user guide")
Alcatel
Alcatel 2.3) user guide

Bell System Practices
Bell System Practices 831 Series Installation & maintenance instructions

Lucent Technologies
Lucent Technologies Definity Callmaster II instructions


