CG AIR MILLENIUM Series User manual

IMPORTANT
READ AND FOLLOW ALL INSTRUCTIONS
SAVE THESE INSTRUCTIONS
CAUTION
1. Read these instructions and rules carefully. Failure to follow them
could cause serious body injuries and/or property damages.
2. Check your local electrical safety and plumbing codes. The
installation must comply with these guidelines.
3. No modications, additions or deletions should be made to the blower
without factory approval.
4. Do not relocate blower without prior approval from the factory.
5. Ensure that a class A ground fault interrupter (G.F.I.) is installed as part
of the wiring.
6. Wiring should be permanent. Do not use an extension cord. Have the
electrical part of the installation done by, or approved by, a qualied
electrician.
7. The blower has no serviceable parts.
INSTALLATION
Air massage bathtub installation
1. Never handle your air massage bathtub by the piping.
2. Do not rest your bath unit on the jets located underneath the bathtub.
Make sure that back jets are adequately protected when entering the
unit into your bathroom. Be careful not to hit a wall or door frame with
the back jets.
IMPORTANT
An
a c c ess pa nel
of 30" x 15" (75cm x 40cm) must be
located near the blower to allow easy servicing if need be.
Final installation
1. IMPORTANT: The blower must not be insulated and must have sucient
air space to permit proper functioning. Surrounding air should be
able to reach the room under the apron or the podium of your bathtub.
2. If factory installed, the optional heating element on your air massage
system heats the air blown into the bathtub for the comfort of the
customer. It will not, under any circumstances, reheat or maintain
the temperature of the bath water.
3. Area underneath and around the bathtub must be cleaned before
nalizing the installation to ensure that no wood shavings or other
particles enter into the air blower and are blown through the jets.
4. Before lling with water, clean bathtub from installation debris and dirt.
If necessary use a vacuum cleaner.
5. Verify connection and functioning of touch pad and air blower before
nalizing the installation.
AIR MASSAGE SYSTEM
Introduction
Thank you for your condence in CG Air Systèmes inc. by purchasing
your new air massage system.
We can assure you that CG Air Systèmes inc. uses the best materials and
applies the most strict quality control measures to ensure that each and
every unit meets the highest standards of the Canadian Standard
Association (CSA) and Underwriters Laboratories (UL).
The origins of Air Massage...
Air massage, also known as balneotherapy, is the use of air mixed with
water to gently but eciently massage the body.
Its soothing and pain relieving virtues were already recognized by the
Romans. But, unlike the Romans who could only aord the pleasures of
a relaxing and invigorating bath every now and then, the technology
developed by CG Air Systèmes inc. allows you to enjoy the benets of
balneotherapy every day in your own bathroom.
Safe use of your air massage bathtub
Your new massage system provides you with a gentle, overall massage.
The massage eect is obtained by injecting warm air through air jets into
the bathwater. Using the blower for too long a period at too high water
temperature will cause a tiring eect. When you rst begin to use your
luxury bath unit, set the blower duration at ve minutes maximum.
Regulate the water temperature to a moderately warm level. These
levels can be later increased for additional massaging eects.
Your physiological response to a hot massage bath depends on your
age, health and medical history. If you develop a headache or become
dizzy or nauseous, get out at once and cool o under the shower. Get
medical help if the symptoms persist.
Consult your doctor before you use the massage bath for physical
therapy of an injury or disorder. Do not take a massage bath without your
doctor’s consent if you are ill, pregnant or if you suer from high blood
pressure, heart disease or other health problems. Never take a massage
bath while under the inuence of medication, drugs or alcohol.
C a ution:
Children or incapacitaded people should not use the massage
bath unattended. Your bath water temperature should not exceed 40ºC
(104ºF).
After having cleaned the tub from all installation debris and dirt, ll with
water at normal bathing water level ie. maximum 2” below the overow
when bather is sitting in the tub. Never ll the tub with water above the
overow level.
When lling your tub make sure that water temperature does not exceed
70ºC (158ºF). The use of water that is too hot might shorten the lifetime
of the o’rings and gaskets of the air jets.
TROUBLESHOOTING
Blower fails to operate
1. Verify that electronic touch control is connected properly
(Refer to wiring diagram).
2. Check electric power supply. Reset circuit breaker or replace fuse if
necessary.
3. Check ground fault circuit interrupter. Reset if tripped.
4 If the system has been functioning for quite some time, it is possible
that the thermic protection has shut o the motor. Let it cool o for at
least 30 minutes before using it again.
Motor runs, but no air comes through the jets
1. Verify that the main air hose from manifold to blower is properly
connected. If necessary, reconnect and tighten clamps.
Air outlets o et heads are obstruded
1. If the air outlets of a jet head are obstructed by soap or other residues,
ll tub with warm water, then switch system ON and OFF several times.
The air outlets should be cleared, if this is not sucient, carefully tap
on the jet heads with the handle of a screw driver or a similar tool
(plastic) while the blower is running.
The air heater seems not to work
1. To verify the operation of the air heater, ll the bathtub to working level
and operate blower on high turbulence for approximately 5 minutes.
Carefully feel the exible connection hose where it connects to the
blower. The hose and its immediate area should feel warm to the
touch. If not, contact your local distributor.
2. If your tub is installed against two outside walls, it is recommended to
ensure adequate insulation for these outside walls to minimize
heat loss.
3. Skin sensitive people might experience the so-called “cold air eect”
which is caused by the sensation of air bubbles running along the wet
skin and providing the bather with a shivering sensation. Just move
your body slightly away from the closest jet to stop the sensation of
cold air. (NOTE: Even if the outcoming air would be hot enough to burn
the skin, this shivering eect would still persist.)
Note: The air heater is not designed to heat your bath water, just to
preheat the incoming air to body temperature.
The drying cycle
1. Verify with our electronic control instructions.
For blowe r m ode ls
MILLENIUM: ME · ME-LL · M0 · M0-LL · M3 · MAS · MAST · MS PIGGY: PE · P0 · P3 · PAS · PAST
MILLENIUM & PIGGY
1000 _10-JANV.-2005
WARRANTY
All air blowers are warranted to be free of defects in manufacturing,
material and workmanship for a period of one year from the date of
purchase by the owner/end-user.
Limitations
This warranty does not apply to the bath tub and/or spa but solely to
the components manufactured by CG AIR SYSTÈMES INC.
This warranty shall not apply to the following incorrect operating
procedures, breakage or damages caused by fault, abuse, misuse,
carelessness, misapplication, alteration, modication, improper
maintenance of the unit, as well as act of God, re, chemical or natural
corrosion or any other casualty.
The owner of the product covered by the present warranty is entirely
responsible for the proper installation of the product in accordance with
the installation manual provided. CG AIR SYSTÈMES INC. neither installs
nor supervises nor contracts for the installation and consequently cannot
be held responsible for the installation.
CG AIR SYSTÈMES INC. is not responsible for any damages or claims
resulting from defects that could have been discovered, repaired or
avoided by inspection and testing prior to installation.
CG AIR SYSTÈMES INC. makes no express warranty , no warranty for
merchantability, no warranty of tness for particular purposes, neither
any other warranty implied or statutory for its products other than
specied above.
In no event shall CG AIR SYSTÈMES INC. liability exceed the purchase
price of the defective part.
If within the warranty period, any such product shall prove to be
defective, CG AIR SYSTÈMES INC. reserves the right to repair or replace
the defective product with one of equal value.
Commercial limitations
In addition to the above conditions and limitations, if the product is to
be used as a display, the warranty period begins when the product has
been placed on display. Under no circumstances will
CG AIR SYSTÈMES INC. be responsible for any prot loss due to a
malfunction of the unit. This warranty gives the owner/end-user specic
ME · ME-LL · MO · MO-LL · PE · PO AIR BLOWERS
legal rights and the owner/end-user may have other rights which vary
from one state/province to another.
CG AIR SYSTÈMES INC. reserves the right to discontinue and/or change
models, colors and specications in design together with replacement
parts without notice and without incurring any obligations.
ELECTRICAL INSTALLATION
1. The electrical installation is subject to inspection and approval by
local authorities. All electrical connections must be made by a
licensed electrician.
2. Before beginning installation make sure that electric power is
disconnected at fuse box.
3. The blower must be located out of reach from the person in the
bathtub and xed in position with screws.
4. The blower connection is pre-installed. Do not remove the blower
cover, this will void the warranty.
5. Refer to your local electrical code if your distance between the
installation site of the bath unit and the main fuse box is more than
100 feet (30,4 m).
120V
Use the factory pre-installed type SJ wire to connect to junction
box (not provided by the tub manufacturer). Run a separate
120V, 60Hz, 15A
G.F.I. (Class A protected) electric circuit from the main
fuse box to the junction box. Use a 14 gage three conductor cable
(2 wires plus ground) in connections up to 100 feet (30,4m) from the
main fuse box.
240V
Use the factory pre-installed type SJ wire to connect to junction
box (not provided by the tub manufacturer). Run a separate
240V, 60Hz, 15A
G.F.I. (Class A protected) electric circuit from the main
fuse box to the junction box. Use a 14 gage three conductor cable
(2 wires plus ground) in connections up to 100 feet (30,4m) from the
main fuse box.
FUNCTIONS ME · ME-LL · PE
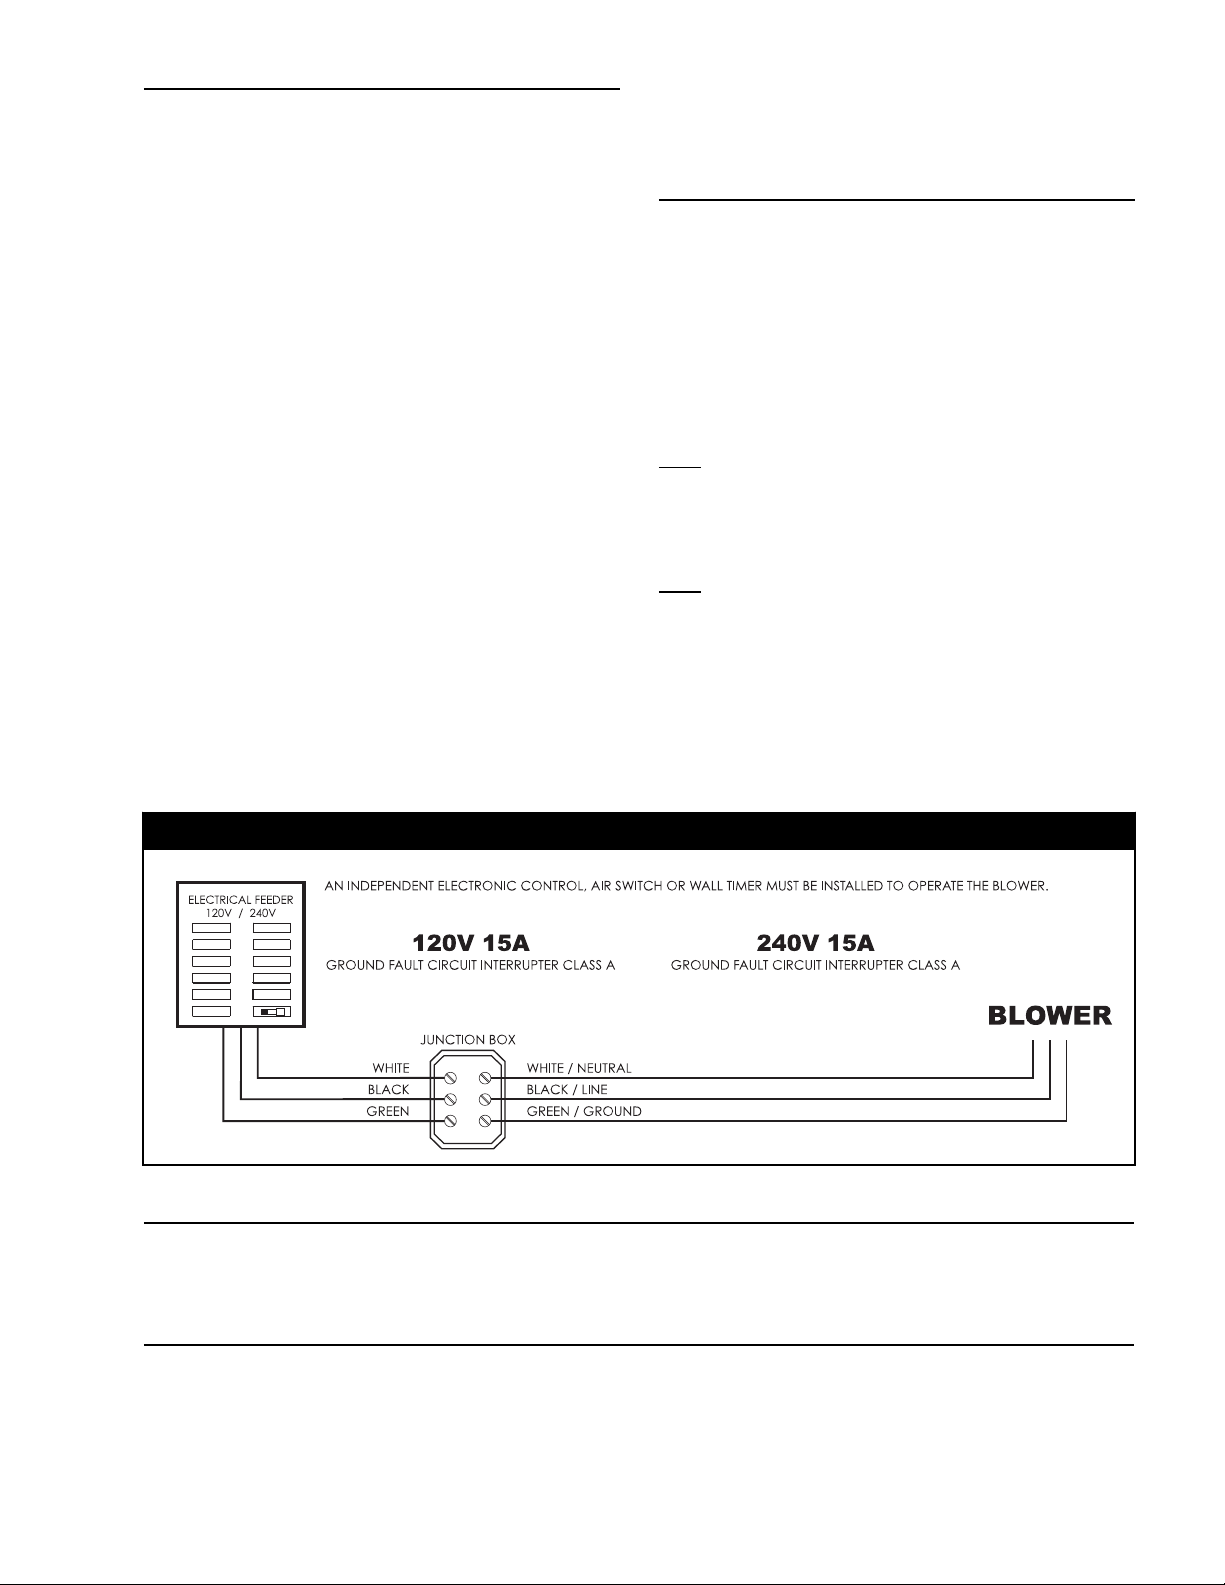
This blower can be operated by an independent electronic control, air switch or wall timer.
One speed or multispeed depending of the control model. Please refer to the instructions of the electronic control, air switch or wall timer for the
operation of your air system.
FUNCTIONS MO · M0-LL · PO
Your blower is equipped with an integrated air heating element.
This blower can be operated by an independent electronic control, air switch or wall timer.
One speed or multispeed depending of the control model. Please refer to the instructions of the electronic control, air switch or wall timer for the
operation of your air system.
MAS · MAST · M3 · MS · PAS · PAST · P3 AIR BLOWERS
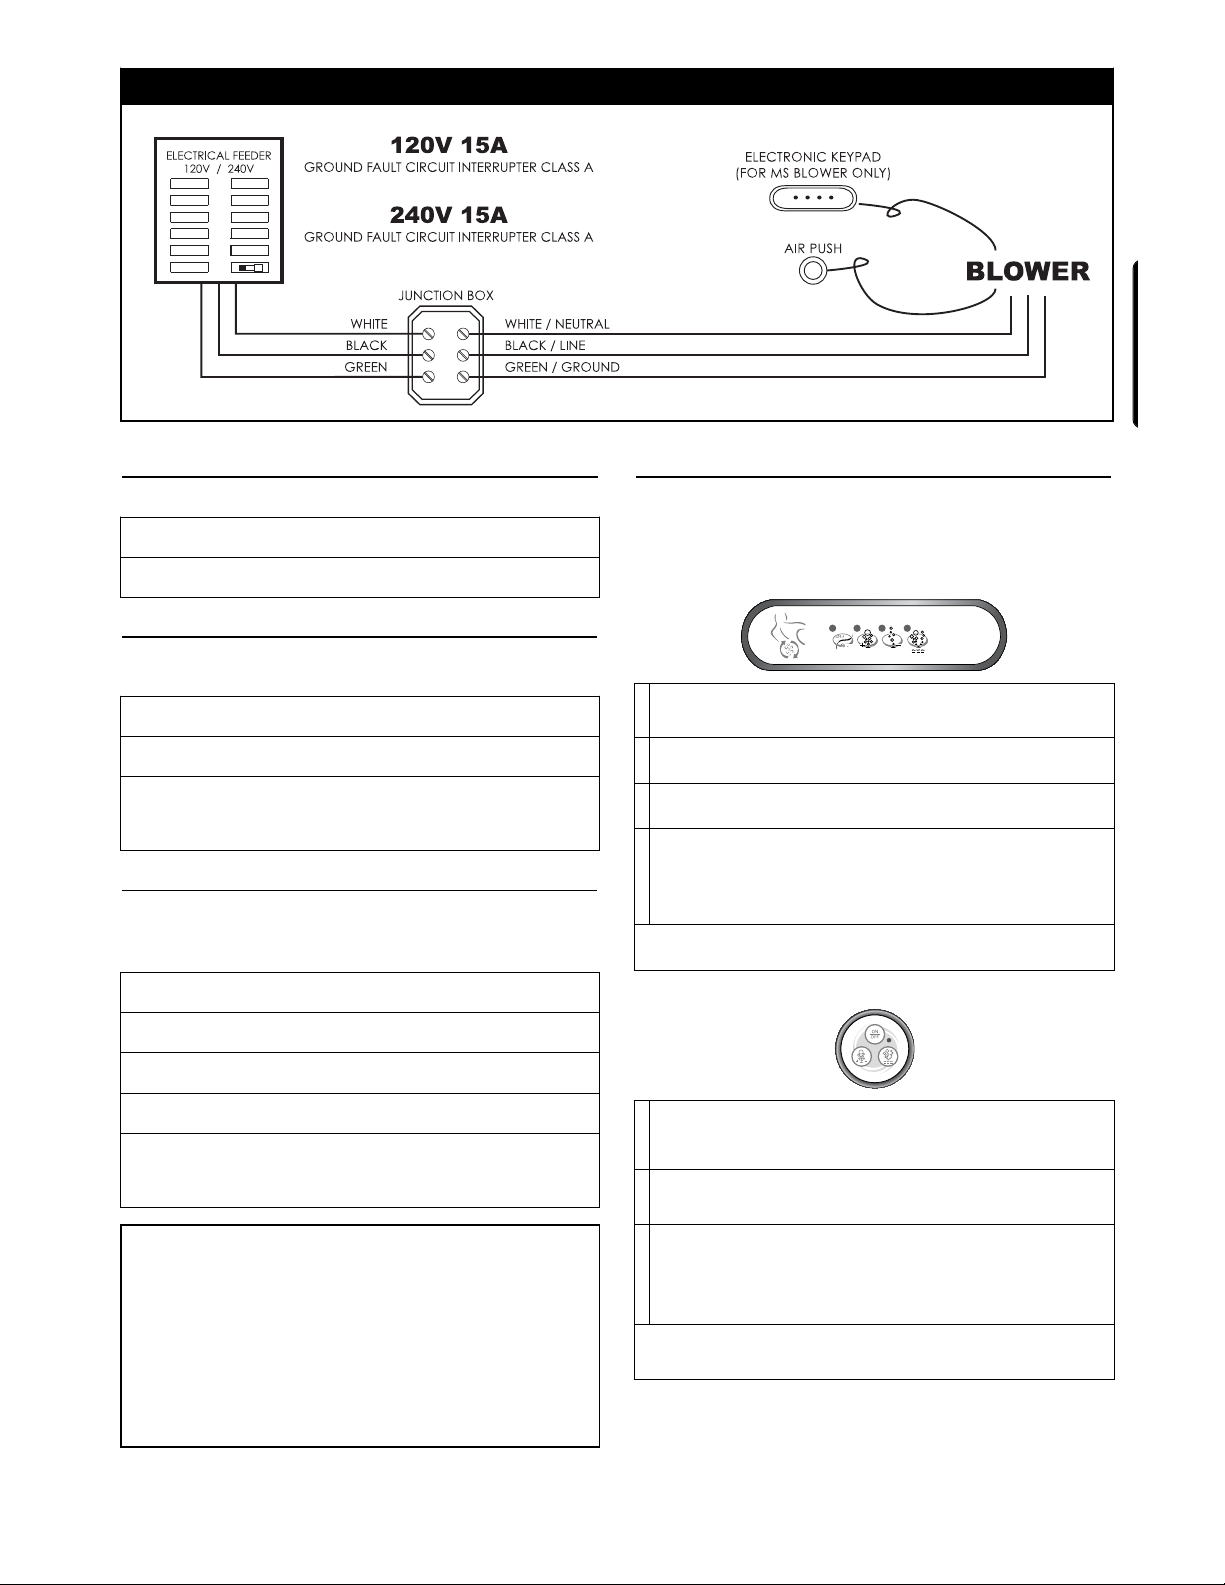
FUNCTIONS MAS · PAS
Your blower is equipped with a built-in ON/OFF air switch
1st press air push: The blower starts at maximum speed.
2nd press air push: The blower stops.
FUNCTIONS MAST · PAST
Your blower is equipped with a built-in electronic control, 1 speed
and a 20 minute automatic timer as well as an automatic drying cycle.
FUNCTIONS M3 · P3
Your blower is equipped with a built-in electronic control,
3 speeds: maximum, medium, minimum and a 20 minute automatic
timer as well as an automatic drying cycle.
1st press air push: The blower starts at maximum speed.
2nd press air push: The blower stops.
Standard function: A drying cycle will automatically start
the blower for 1 minute, 20 minutes
after the system, stops.
1st press air push: The blower starts at maximum speed.
2nd press air push: The blower turns to medium speed.
3th press air push: The blower turns to minimum speed.
4th press air push: The blower stops.
Standard function: A drying cycle will automatically start
the blower for 1 minute, 20 minutes
after the system, stops.
FUNCTIONS MS
Your blower is equipped with an integrated air heating element,
built-in electronic control, variable speed, pulsation cycle, a
20 minute automatic timer and an automatic drying cycle.
Optional: water level detectors
1
1st press: The blower starts at maximum speed, LED: ON
2nd press: The blower stops, LED: OFF
21st press: Speed goes up, LED: ON when pressing.
Release pressure at the desired speed.
31st press: Speed goes down, LED: ON when pressing.
Release pressure at the desired speed.
4
1st press: Speed will vary gradually from maximum to
minimum and back to minimum, LED: ON
2nd press: System turns o and on, then o again, LED: ashes
3th press: Returns to maximum speed, LED: OFF
Standard function: A drying cycle will automatically start
the blower for 1 minute, 20 minutes after the system, stops.
1
1st press: The blower starts at maximum speed, LED: ON
2nd press: The blower stops, LED: OFF
21st press: Speed goes up or down, LED: ON when pressing.
Release pressure at the desired speed.
3
1st press: Speed will vary gradually from maximum to
minimum and back to minimum, LED: ON
2nd press: System turns o and on, then o again, LED: ashes
3th press: Returns to maximum speed, LED: OFF
Standard function: A drying cycle will automatically start
the blower for 1 minute, 20 minutes after the system, stops.
AC05
Optional function with M3 · P3 · MS :
If your blower has been factory set for a 24 hour drying cycle,
program as follows:
1. Determine the time that you wish your drying cycle to start
each day.
2. Completely shut down the electrical current to the blower
for 10 seconds.
3. Start your system for a few seconds.
Your drying cycle will start every 24 hours from that moment on.
In case of a power failure, reprogram as needed.
1
32
INSTALLATION INSTRUCTIONS FOR REMOTE CONTROL
REMOTE CONTROL
14 00 0 · E N GLIS H
PRINTED AND MANUFACTURED IN CANADA
One (1) remote control Two (2) magnets One (1) receiver module One (1) cable
The following components are necessary
2006-07-05
WARNING: The magnets are extremely powerful despite their small size. Use caution while installing and
handling to avoid injuries caused by a sudden movement of the magnets clinging together and possibly
pinching fingers, skin or other. Persons with physical conditions that could be affected by magnetic fields
should avoid using it and/or consult with their physician.
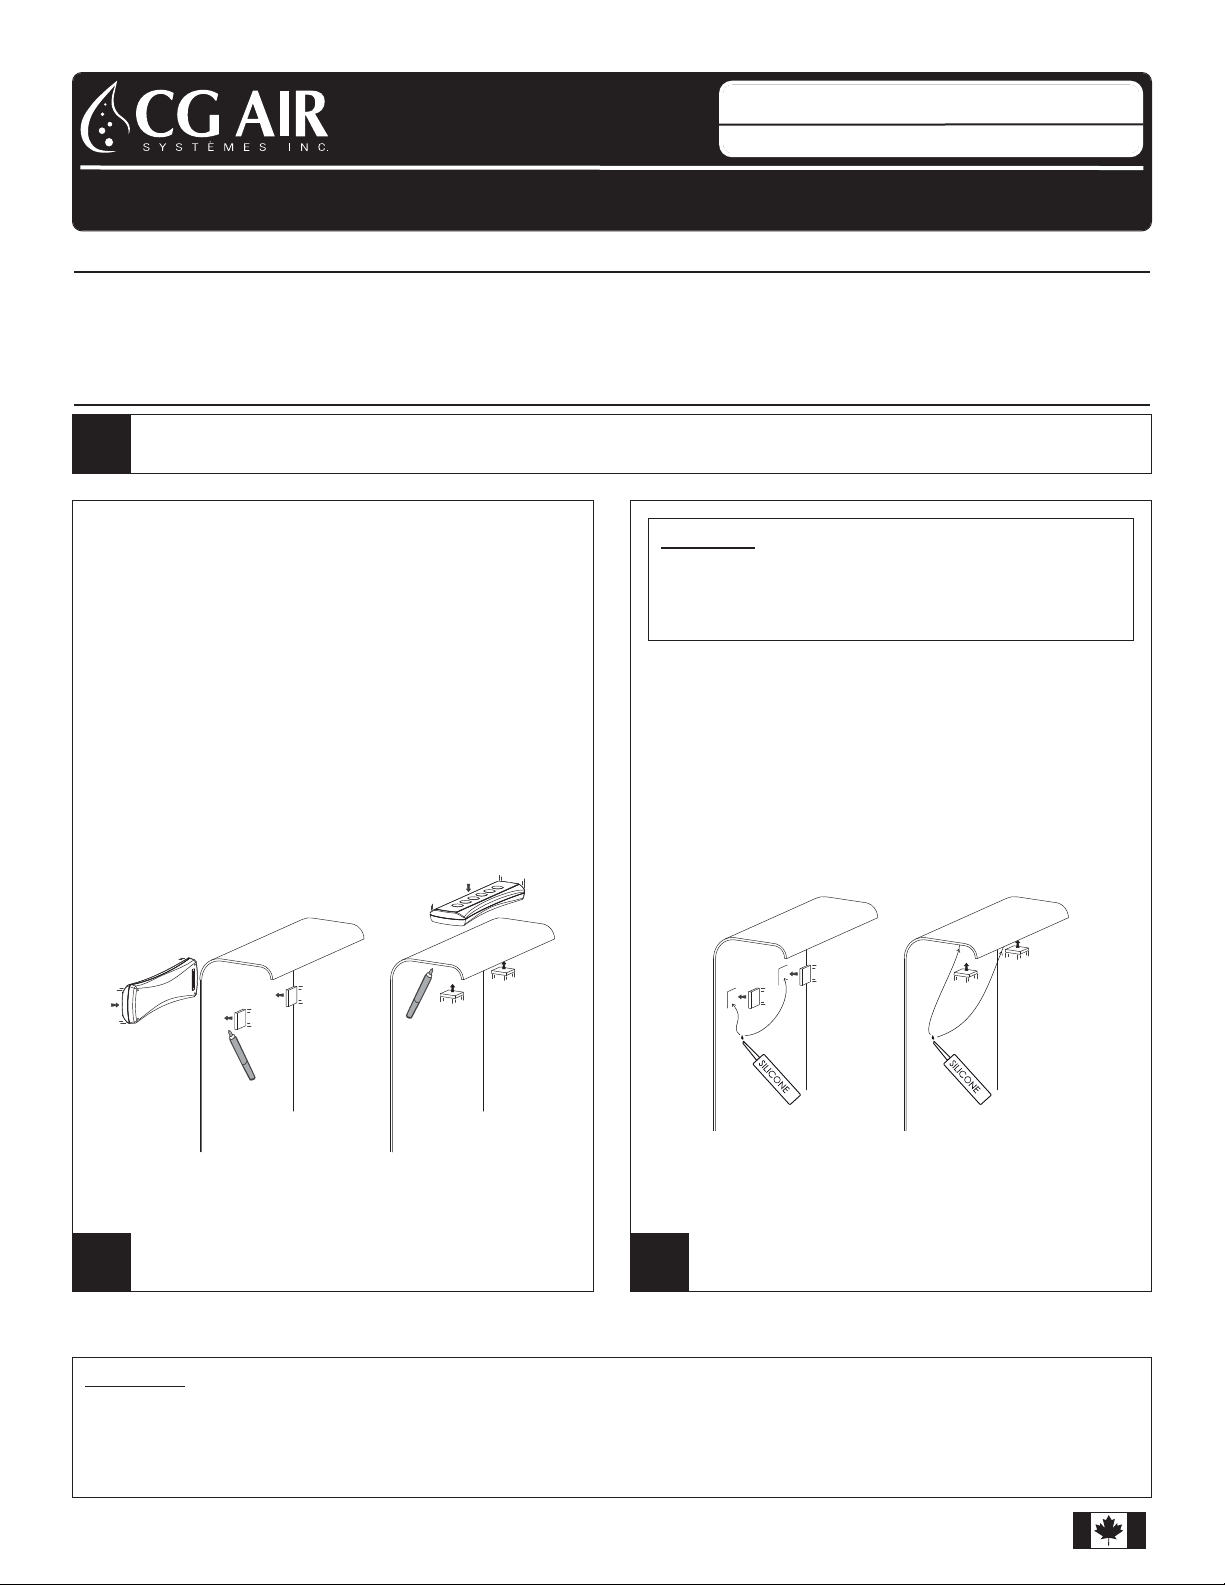
A. Determine appropriate location for the remote control in the bathtub.
R EMOTE CONTR OL INSTA LLATION
1
Determine backside location of magnets
A. Hold the remote control in the chosen location.
B. From the exterior of the bathtub position the
supplied magnets, the attraction force will
guide you to the proper area and they will hold
in place.
C. Mark the position of the magnets with a marker
or pencil.
2
Install magnets on backside
A. Apply a dab of silicone to the magnets, place
and maintain in the premarked position.
B. Let dry in this position.
3
CAUTION: Magnets always have a positive and
negative side and will only be attracted to one
side. Consider this to avoid applying the silicone
to the wrong side.
INSTALLATION INSTRUCTIONS FOR REMOTE CONTROL
REMOTE CONTROL
14000 · ENGLISH
2006-07-05
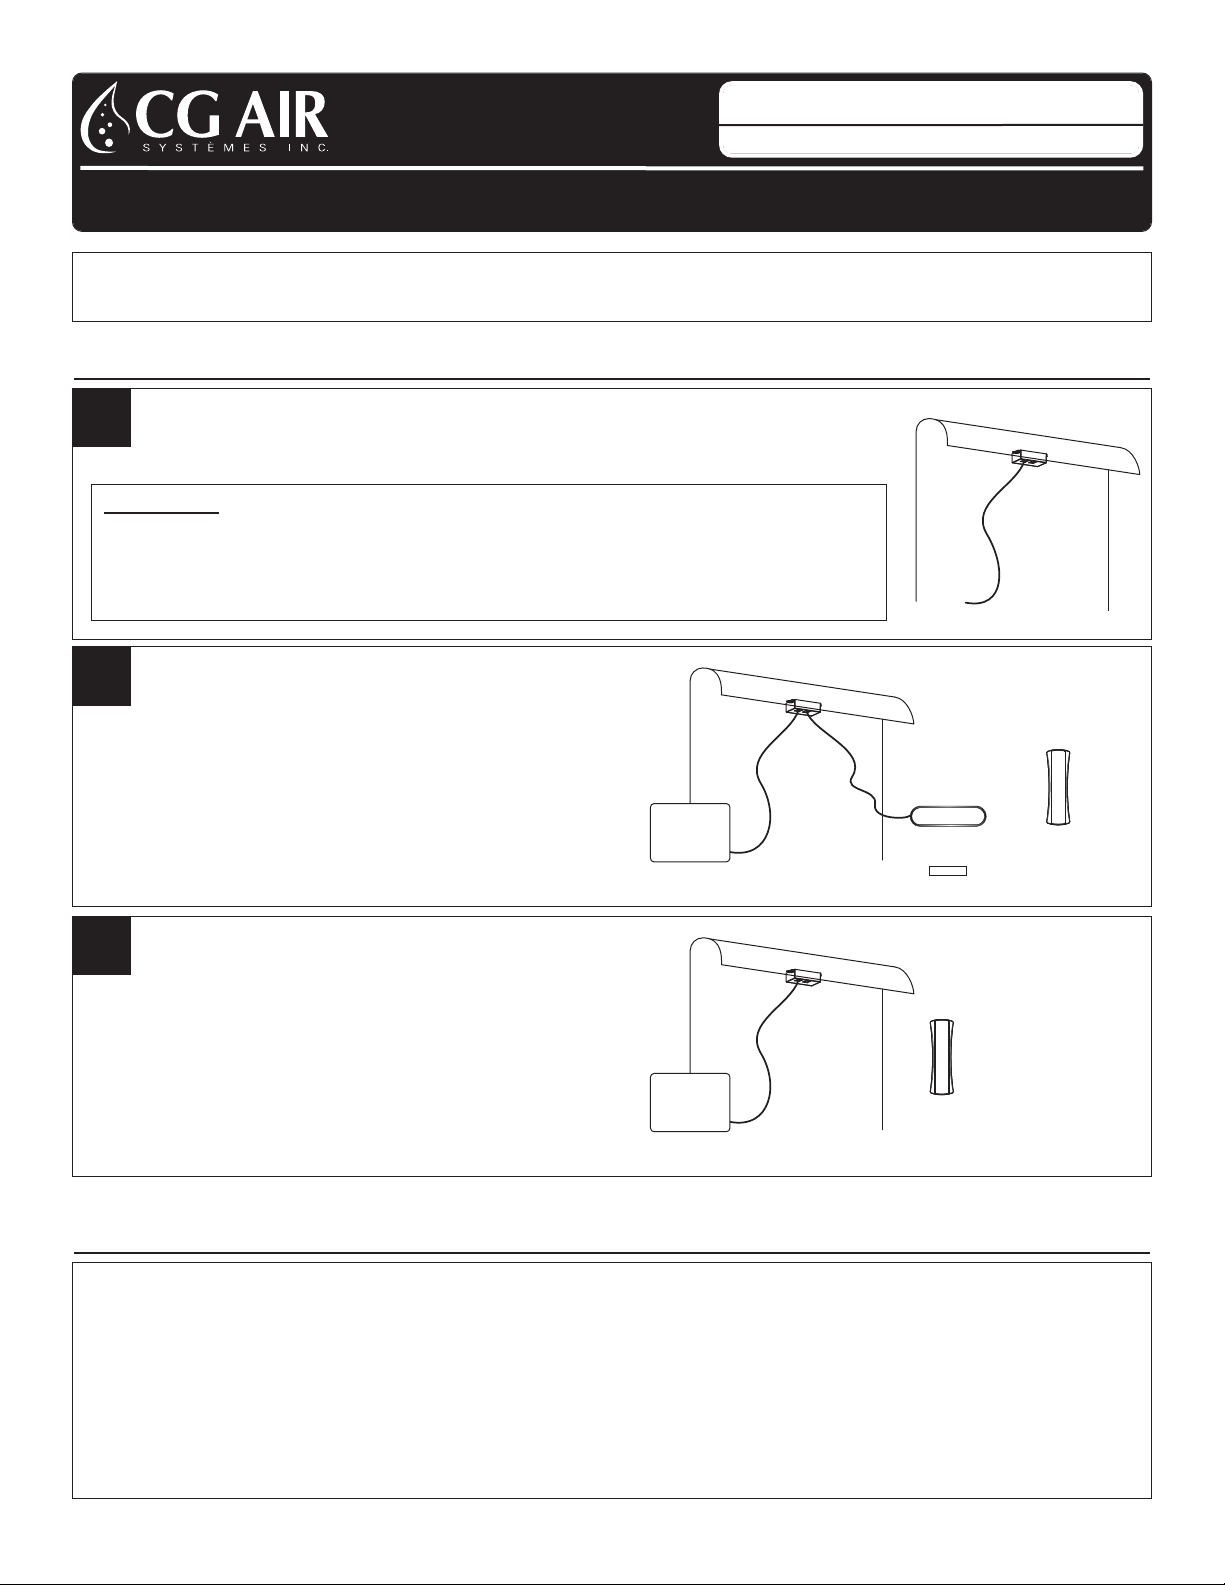
Receiver module installation
A. The receiver module must be installed under the bathtub rim.
R ECEIVER MODULE INSTA LLA TION
1
The remote control only operates CG Air Systèmes
Millenium MS+ &Silver SLS+ blower series and CG Air electronic controls Evolution
SYNCHRONIZATION
Remote control and keypad used
to activate the system
A. Plug in the cables as shown on the drawing
B. Once everything is connected, the remote
control is ready for synchronization
2.A
RECEIVER
MODULE
KEYPAD REMOTE CONTROL
BLOWER OR
ELECTRONIC CONTROL DISPLAY
OR
Remote control only,
to activate the system
A. Plug in the cable as shown on the drawing
B. Once everything is connected, the remote
control is ready for synchronization
2.B
BLOWER OR
ELECTRONIC CONTROL
RECEIVER
MODULE
REMOTE CONTROL
A. Once the system has been connected,
the remote control must be synchronized with its receiver module.
B. Switch off the main breaker or unplug the system and switch it on again.
C.From this moment, you have 15 seconds to proceed with the synchronization.
D. Press simultaneously on the button 2 + 3 of the remote for 4 seconds.
E. The remote control is now synchronized and ready to use.
F. If the synchronization is not successful the first time, you should resynchronize, starting from step B.
RECEIVER
MODULE
IMPORTANT:
· In order to obtain the best reception possible, we recommend not to install
the receiver module next to the faucets or metal piping.
· Location of the receiver module must be easily accessible
from the outside of the bathtub for maintenance.
Product Catalog - V.02
T: (418) 935-7075 ·1-800-463-9927 ·F:(418) 935-3507 ·wwwwww..ccggaaiirr..ccoomm
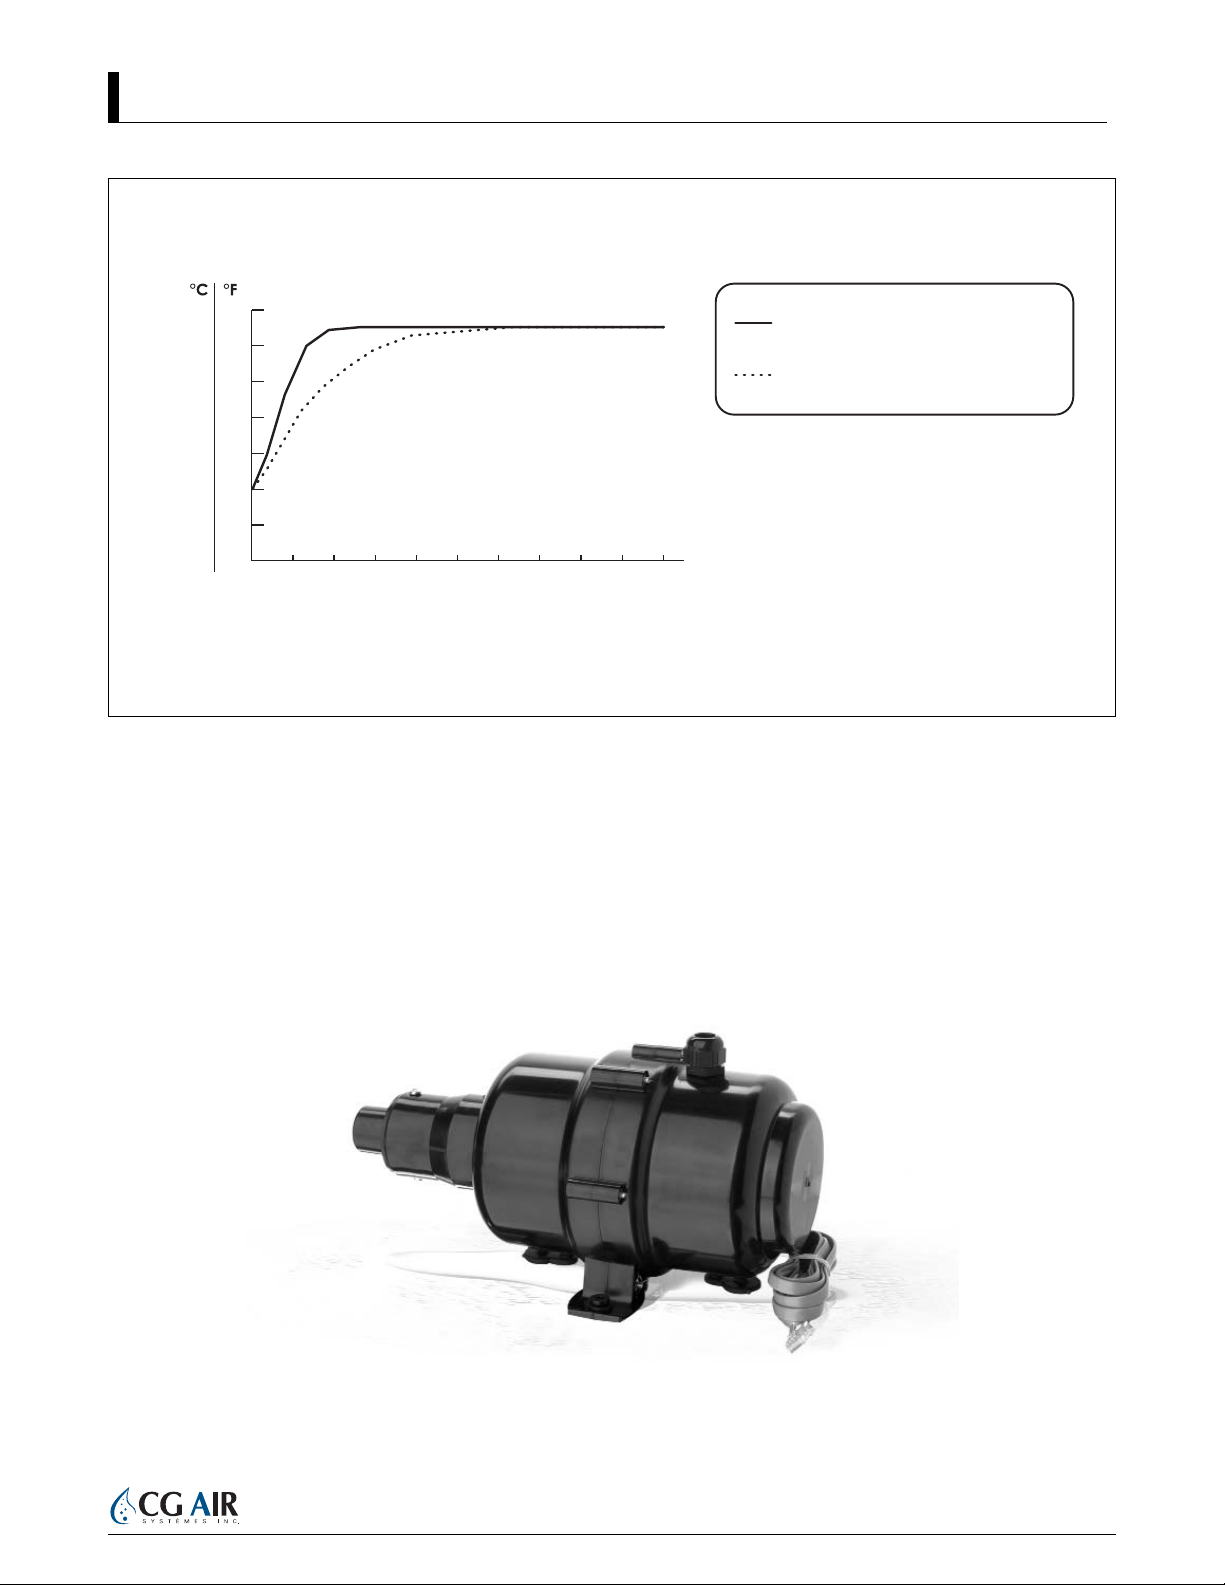
PPEERRFFOORRMMAANNCCEE
GGRRAAPPHHIICCSS
23 56 8 101 4 7 9
32
50
68
86
104
122
140
158
0
10
20
30
40
50
60
70
TEMPERATURE
TIME (MINUTES)
The graphic curves shown are approximate
and can vary depending on the installation.
Temperatures are taken on a 16 air jet
system using a Silver blower.
WITH 300W HEATING ELEMENT
WITHOUT HEATING ELEMENT
BLOWER OUTLET AIR TEMPERATURE
This manual suits for next models
14
Table of contents
Other CG AIR Blower manuals


