CG CG-VC18D01I User manual

1800Watt
USER’S MANUAL
MODEL: CG-VC18D01I


Safety directions:
1. For your continued safety and to reduce the risk of
injury or electric shock, please follow all the safety
precautions listed below.
Read all the instructions carefully before using the
appliance and keep them for future reference.
2. Make sure the dust bag is properly installed before use.
3. Check that the voltage marked on the rating label
matches your mains voltage.
4. Never vacuum up water or any other liquids.
5. Never vacuum up flammable substances and do not
vacuum up ashes until they are cold.
6. Dot not let children use the machine in case of danger.
7. Do not continue to operate the appliance if you are in
any doubt about it working normally (e.g. abnormal
noise, smell, smoke), or if it is damaged in any way -
switch off, withdraw the mains plug and consult your

dealer.
8. If the mains cable is damaged it must be replaced by the
manufacturer, its service agent, or similarly qualified
persons in order to avoid a hazard.
9. This appliance can be used by children aged from 8
years and above and persons with reduced physical,
sensory or mental capabilities or lack of experience and
knowledge if they have been given supervision or
instruction concerning use of the appliance in a safe way
and understand the hazards involved.
10. Children shall not play with the appliance. Cleaning and
user maintenance shall not be made by children without
supervision.
11. If a blockage is found in the brushes, hoses or tubes, it
should be removed before use.
12. Store and use the appliance well away from heat sources
such as radiators or gas/electric fires.

13. Do not point the hose, tube or any other accessory at the
eyes, ears or mouth during operation.
14. Unplug the appliance from the mains socket when it is
not in use and before replacing filter.
15. Allow the appliance to cool completely before cleaning
or storing.
16. Do not use the appliance for other uses than its intended
use.
17. The use of accessories not recommended by the
appliance manufacturer may cause injuries.
18. Do not use the appliance outdoors.
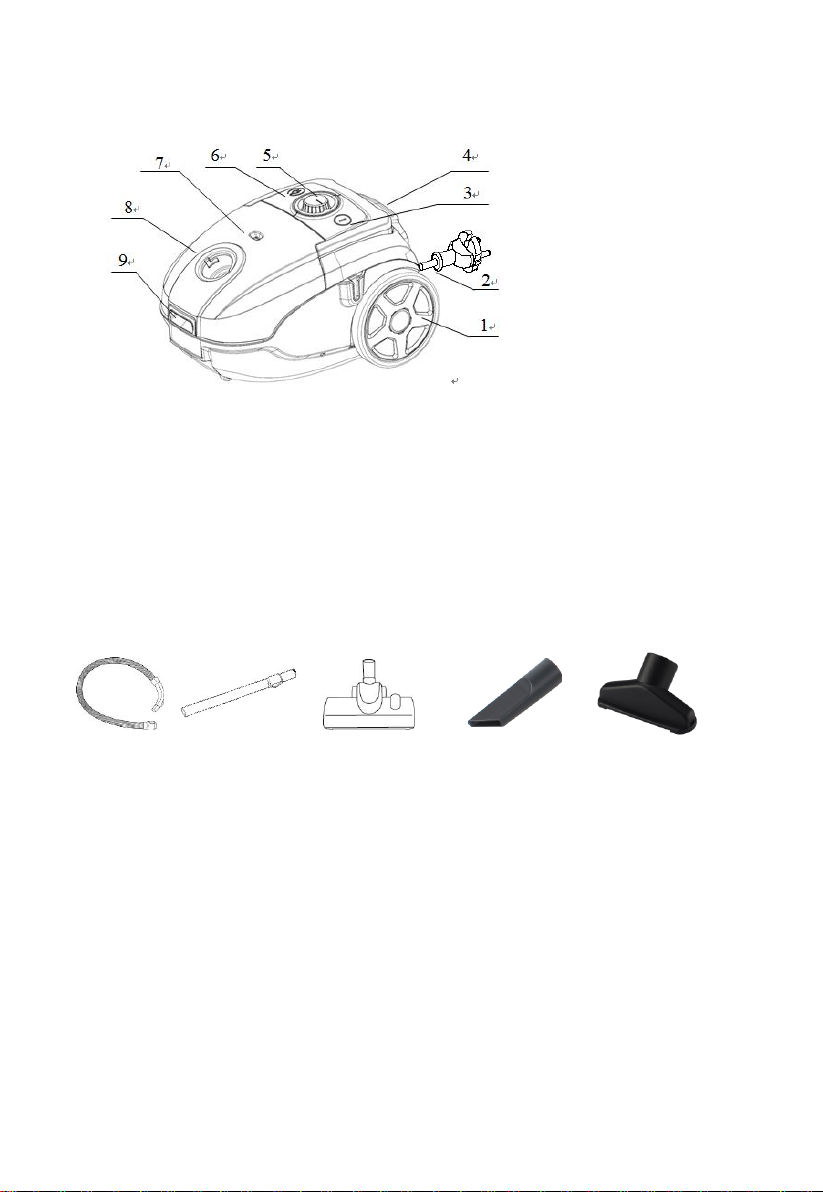
Product Overview
1. Rear wheel
2. Power cable
3. ON/OFF button
4. Exhaust filter grill
5. Speed Control
6. Cable rewind button
7. Dustbag-full indicator
8. Dust cover
9. Lock clip
Attached list
1 x Hose, 1 x metal Tube, 1 x main brush, 1 x crevice tool, 1 x small brush
Operations
1. To connect the hose, insert the hose connector into the hose connection opening
until you hear a ‘click’ sound (see Fig 1).
To remove the hose, press both sides of the hose end and then pull the hose (see
Fig. 2)
2. To connect the tubes to the handgrip of the hose, insert the narrow section into
the wider section while turning a little (see Fig 3). Connect the two tubes together,
insert the narrow section into the wider section while turning a little.
3. Connect a brush suitable for the floor type to be cleaned. The hard floor brush
can be used with brush strips lowered or raised (see Fig 4 and 5). You may also
connect the integrated brush and nozzle to vacuum sofa, wall surface, curtain,

corners, slots or grooves (see Fig 6).
4. Hold the mains plug and pull the retractable mains cable out of the vacuum
cleaner. Connect it to the mains socket. The YELLOW mark indicates the ideal
length to extend the cable. Do not extend the mains cable beyond the RED mark
which indicates the maximum length.
5. Press the ON/OFF button on the top of the vacuum cleaner to turn it on (see Fig.
8) Turn the speed control to select your desired suction power.
HINT: To move the vacuum cleaner from room to room, you can unplug and carry
it by either the handle or the handgrip. Never use the mains cable to pull the
vacuum cleaner.
Powering off and storage
1. When finished vacuuming, press the ON/OFF button on the top of the vacuum
cleaner to turn it off and then remove the mains plug from the mains socket (see
Fig.7).
2. Press the cable rewind button to rewind the retractable mains cable(see Fig. 8).
Put the vacuum cleaner in an upright position and attach the lower tube to the clip
on the vacuum cleaner for storage.
1 2 3 4
5 6 7 8

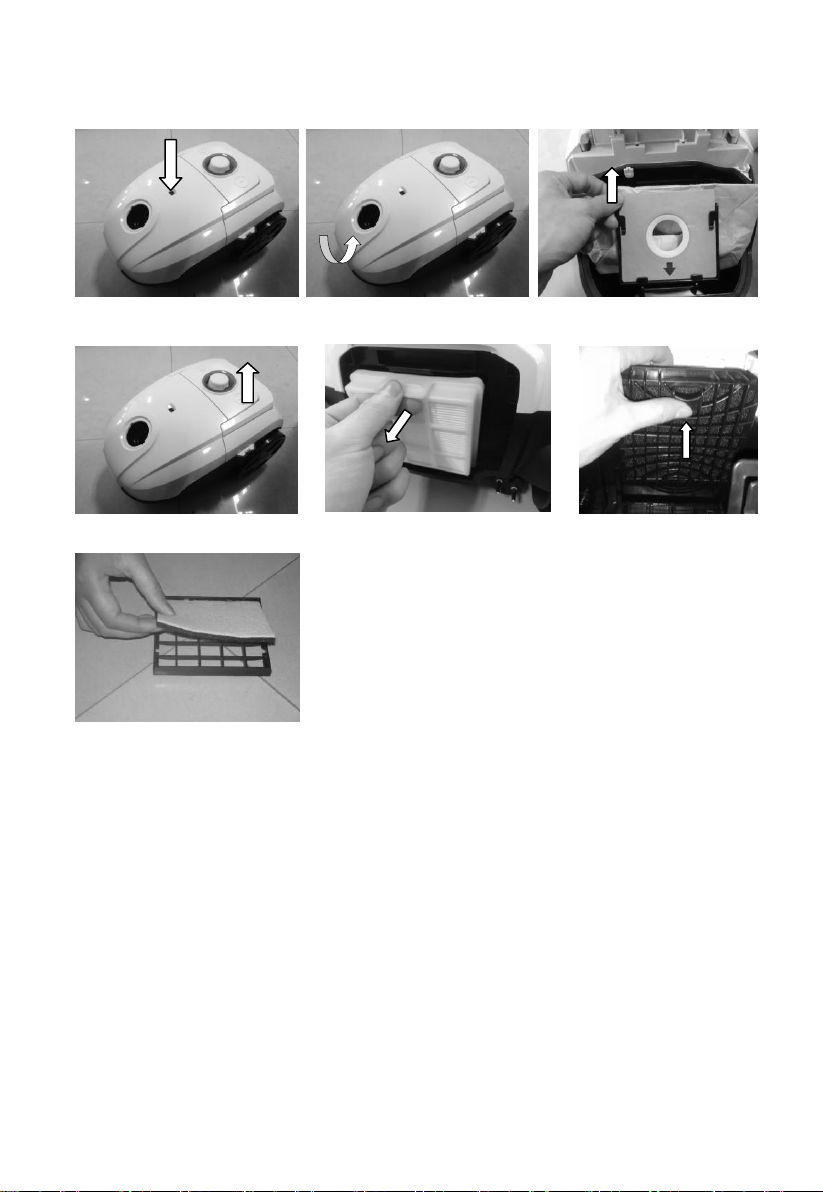
Replacing the Dustbag
Replace the dustbag when the dustbag-full indicator turns red (see Fig. 1).
Always unplug the vacuum cleaner from the mains socket before replacing the
dustbag.
1. Open the dustbag compartment cover (see Fig. 2).
2. Take out the dustbag holder and gently remove the full dustbag from the holder
with the dustbag’s opening facing upwards.
3. Slide the cardboard front of the new dustbag into the two grooves of the
dustbag holder (see Fig 3.).
4. Relocate the dustbag holder back into the lower housing and close the dustbag
compartment cover until you hear a ‘click’ sound.
NOTE: The dustbag compartment cover cannot be closed unless the dustbag is
installed properly.
Cleaning the motor protection filter
The motor protection filter should be cleaned twice a year, or when it appears to
be visibly
clogged.
Always unplug the vacuum cleaner from mains socket before replacing the filter.
1. Open the dustbag compartment cover (see Fig. 2).
2. Take out the dustbag holder and remove the motor protection filter (see Fig. 4 &
Fig 5).
3. Shake out the dust accumulated on the filter into a dustbin.
4. Relocate the filter and dustbag holder back into the lower housing.
5. Close the dustbag compartment cover till you hear a ‘click’ sound.
Cleaning the exhaust filter
Always unplug the vacuum cleaner from mains socket before replacing the filter.
1. Unclip the grill and take out the exhaust filter (see Fig. 6 and 7).
2. Shake out the dust accumulated on the filter into a dustbin.
3. Relocate the filter and the grill.
1 2 3
4 5 6
7
This symbol on the product or in the instructions means that
your electrical and electronic equipment should be disposed
at the end of its life separately from your household waste.
There are separate collection systems for recycling in the EU.
For more information, please contact the local authority or
your retailer where you purchased the product.


IMPEX
Table of contents


