Champ RCEP400WR User manual

RCEP400WR
E
-
P
R
E
P
G
E
A
R
Weather Radio
Radio-météo
Radio para informes
meteorológicos
Owner’s Manual
Tour of the Weather Radio....................................................... 1
Before You Start: Charge Up the Weather Radio................ 2
Using AM/FM/Weather Band radio ....................................... 2
Flashlight.................................................................................... 2
Solar Panel.................................................................................. 3
Hand-Crank Charging.............................................................. 3
Mobile Phone Charging............................................................ 3
Limited 12 Month Warranty..................................................... 6
Manuel du propriétaire
Présentation de la radio-météo ............................................. 7
Avant de commencer Charger la radio-météo..................... 8
Radios AM/FM/canal météo ................................................... 8
Torche électrique ...................................................................... 8
Panneau solaire......................................................................... 9
Manivelle de chargement........................................................ 9
Chargement de téléphone mobile.......................................... 9
Garantie limitée de 12 mois...................................................... 12
Manual del Propietario
Recorrido del radio para informes meteorológicos............. 14
Antes de comenzar: Cargue el radio...................................... 15
Radios AM/FM/banda meteorológica ................................... 15
Linterna....................................................................................... 16
Panel solar .................................................................................. 16
Carga por manivela ................................................................... 16
Carga del teléfono móvil.......................................................... 16
Garantía Limitada de 12 Meses............................................... 19

IMPORTANT SAFETY INSTRUCTIONS
PLEASE READ AND SAVE THIS FOR
FUTURE REFERENCE
Some of the following information may not
apply to your particular product; however, as with any
electronic product, precautions should be observed
during handling and use.
•Readtheseinstructions.
•Keeptheseinstructions.
•Heedallwarnings.
•Followallinstructions.
•Donotusethisapparatusnearwater.
•Cleanonlywithdrycloth.
•Donotinstallnearanyheatsourcessuchasradiators,
heat registers, stoves, or other apparatus (including
amplifiers) that produce heat.
•
Only use attachments/accessories specified by the
manufacturer.
•Referallservicingtoqualiedservicepersonnel.
Servicing is required when the apparatus has been
damaged in any way, such as power-supply cord or
plug is damaged, liquid has been spilled or objects
have fallen into the apparatus, the apparatus has been
exposed to rain or moisture, does not operate normally,
or has been dropped.
ADDITIONAL SAFETY INFORMATION
•Apparatusshallnotbeexposedtodrippingor
splashing and no objects filled with liquids, such as
vases, shall be placed on the apparatus.
•Donotattempttodisassemblethecabinet.This
product does not contain customer serviceable
components.
Precautions for the unit
•Donotusetheunitimmediatelyaftertransportation
from a cold place to a warm place; condensation
problems may result.
•Donotstoretheunitnearre,placeswithhigh
temperature or in direct sunlight. Exposure to direct
sunlight or extreme heat (such as inside a parked car)
may cause damage or malfunction.
•Cleantheunitwithasoftclothoradampchamois
leather. Never use solvents.
•Theunitmustonlybeopenedbyqualiedpersonnel.
FCC Information
This device complies with Part 15 of the FCC Rules.
Operation is subject to the following two conditions: (1)
this device may not cause harmful interference, and
(2) this device must accept any interference received,
including interference that may cause undesired
operation.
Note: This equipment has been tested and found to
comply with the limits for a Class B digital device,
pursuant to Part 15 of FCC Rules. These limits are
designed to provide reasonable protection against
harmful interference in a residential installation. This
equipment generates, uses, and can radiate radio
frequency energy and, if not installed and used in
accordance with the instructions, may cause harmful
interference to radio communications.
However, there is no guarantee that interference will
not occur in a particular installation. If this equipment
does cause harmful interference to radio or television
reception, which can be determined by turning the
equipment off and on, the user is encouraged to try to
correct the interference by one or more of the following
measures:
•Reorientorrelocatethereceivingantenna.
•Increasetheseparationbetweentheequipmentand
receiver.
•Connecttheequipmentintoanoutletonacircuit
different from that to which the receiver is connected.
•Consultthedealeroranexperiencedradio/TV
technician for help.
Changes or modifications not expressly approved by
VOXXAccessoriesCorporationcouldvoidtheuser’s
authority to operate the equipment.
Industry Canada Regulatory Information
CAN ICES-3 (B)/NMB-3 (B)
Avis d’Industrie Canada
CAN ICES-3 (B)/NMB-3 (B)
Important battery information
Warning: Your product contains a battery and charging
system which is designed to work in temperatures that
do not exceed 50°C (122°F). Leaving this product in a
closed automobile or the trunk of an automobile where
temperatures may exceed 50°C may result in permanent
battery damage, fi re, or explosion. Please remove your
product from the automobile when you exit, do not place
your product in the trunk of your automobile, and do not
leave your product in any location where temperatures
may exceed 50°C.
Ecology
Your product must be disposed of properly according to
local laws and regulations. Because this product contains
a battery, the product must be disposed of separately
from the household waste.
1
Emergencies happen.
Be prepared. The 5 in 1 multi-function weather radio has been designed to help
you in unforeseen events.
What’s in this package?
•USBTypeAtominiUSBcable(Fig.1)
•2.5mmcabletoUSBcable(Fig.2)
•Thisuserguide
•Weatherradio
•Lanyard
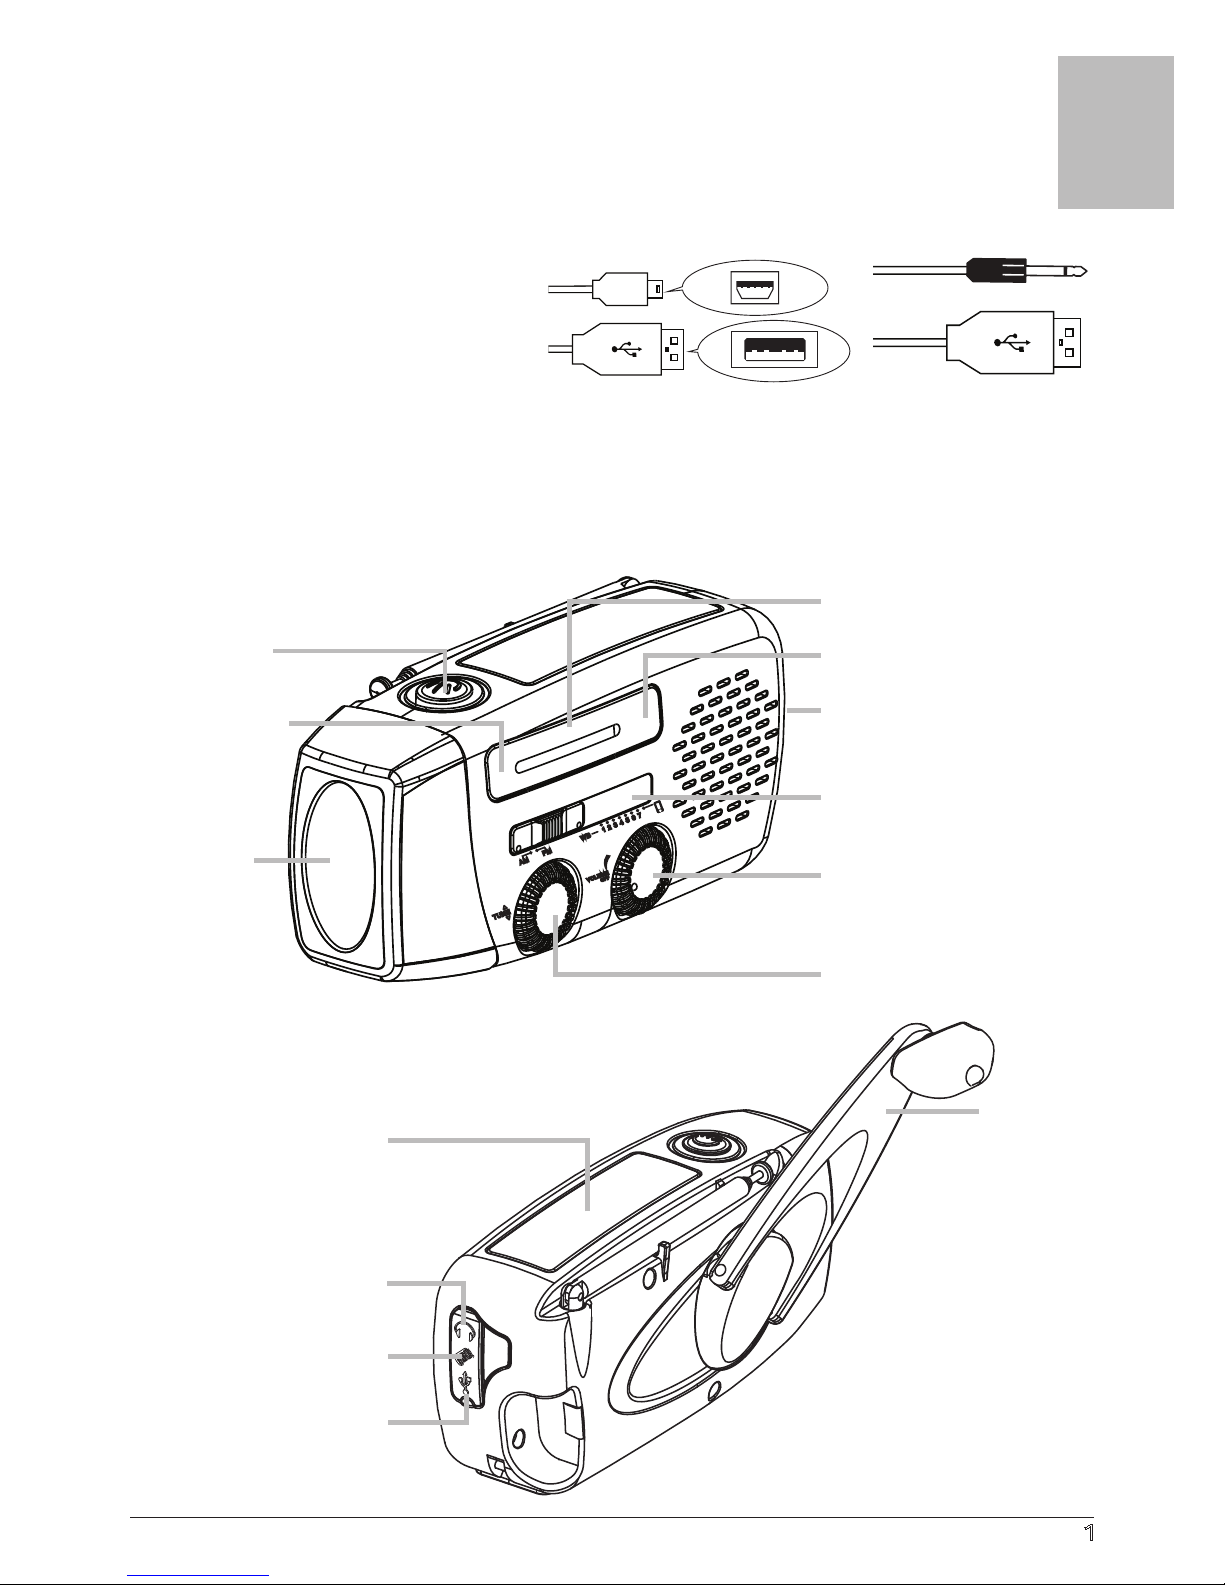
Tour of the Weather Radio
Mini USB
USB Type A
2.5mm cable
USB cable (female)
Figure 1 Figure 2
AM Reception
Charging, Weather
Band and Tuning LEDs
USB Charging
AM, FM,
Weather Radio Controls
Volume Knob
Tuning Knob
Flashlight
Button
FM Reception
Flashlight
Hand
Crank
Charging
Solar Panel Charging
Headphone Jack
USB Charging
Mobile Phone Charging
English

2
Before You Start: Charge Up the Weather Radio
Before you use the Weather Radio for the first time, use the supplied USB to mini USB
cabletochargeitsthebatterycompletely.Here’show:
1. Find the USB Type A to mini USB cable included in this package.
Note: You can also use your own USB Type A to mini USB cable to charge the Weather
Radio’sinternalbattery.
2. Open the door covering the USB connections on the Weather Radio. Plug the mini
USB end of the cable into the mini USB port behind this door.
3. Plug the other end of the USB cable into a USB power source (like a computer or a
USBpoweradapter).TheWeatherRadio’schargingLEDwillstayilluminatedwhilethe
USB power source is connected. A full charge takes approximately 4 hours.
AM/FM/Weather Band Radios
The Weather Radio lets you listen to local weather band, as well as your local AM and FM
radio stations.
To turn the radio on:TurntheVOLUMEknobtotheright.
To turn the radio off:TurntheVOLUMEknobtothelefttotheOFFsetting.
To change between AM, FM, or WB (weather band): Slide the Weather Radio switch to
AM, FM, WB (weather band) number. The Controls show which mode the radio is in: AM,
FM, or WB (weather band).
To increase or decrease radio volume: TurntheVOLUMEknoblefttodecreaseorrightto
increase the radio volume.
Using AM/FM radio
To tune to FM or AM radio frequencies: Turn the TUNE knob to go up or down through
each radio frequency while in FM or AM radio mode. Turn the TUNE knob to scan through
frequencies until you find a station you would like to listen to.
Using the weather band radio
To tune to weather band radio frequencies: Slide the AM, FM, WB (weather band) switch
to the number that weather information is provided. Start with number 1 and continue
until you hear the weather information.
Flashlight
Press the flashlight button to turn the flashlight on and off. When the Weather Radio is
fully charged, the flashlight can work up to 7 hours consecutively. For every minute of
hand-cranking at 120 RPM, the flashlight can work up to 5 minutes consecutively.

3
Solar Panel
ThesolarpanelchargestheWeatherradio’sinternalbattery.Itcouldtake15to20hours
under stronger sunlight.
Hand-Crank Charging
ThehandcrankchargestheWeatherradio’sinternalbattery.
1. Open the hand crank.
2. Grip the Weather radio with one hand the crank with the other.
3. Turn the handle rapidly (about 120 to 150 RPM). It will take about 100 minutes to
recharge completely if battery was totally depleted.
IMPORTANT:Don’tforcethehandcrank.Makesureyouturnfromthehandleonly–
don’tgrabtheentirecrank.
Mobile Phone Charging
1. Movetheweatherradio’sslideswitchpastthenumber7tothemobilephoneicon.
This puts it into charging mode.
2.Lifttherubbercoverofftheweatherradio’sjacksontheendoppositetheashlight.
3.Plugthe2.5mmendoftheincluded2.5mmtoUSBcableintotheweatherradio’s
mobile phone charging jack.
4. Plug the charging cable that came with your mobile device into the USB female
connector on the included 2.5mm to USB cable.
5.Connectyourdevice’schargingcabletoyourmobiledevice(seeFigure3).
USB
CABLE
USB cable female
connector Your USB to mobile
phone cable
Figure 3
Continues on next page...
Iftheweatherradio’sbatteryhassufcientcharge,yourmobiledevicewillstart
chargingimmediately.Ifitdoesn’thaveenoughcharge,usethehandcranktostart
charging.

4
Note:Theweatherradio’schargingoutputis5V+/-0.2V.Makesureyourmobile
device is compatible with this voltage.
6.Whenyou’renishedcharging,disconnectthe2.5mmtoUSBcablefromtheweather
radioandplacetherubbercoveroverthejacksagain.Thenputtheweatherradio’s
slide switch back in one of the AM, FM, or weather band positions (this helps the
weather radio conserve battery power).
Note: Phone talk time from charging varies from model to model. Mobile device
chargingislimitedduetothesizeoftheweatherradio’sinternalbattery.Charging
from the weather radio is intended for emergencies, to provide enough charge for an
emergency call or to send an emergency text. You can use the hand crank to continue
charging once the internal battery has run out of charge.
IMPORTANT: The weather radio may not charge all models of all brands. Phone
adapters are not included—use the adapter that came with your device.
Approximate Use Time of Flashlight
Weather Radio Status Approximate flashlight use time
Battery fully charged (Weather Radio battery) ≥ 90 minutes
When battery level decreased to a level that
the lighting fades out/light intensity drops
to200LUX,anduserhandcranksitforone
minute (speed ≥ 120 rev/min)
≥ 5 minutes
Approximate Use Time of Radio
Weather Radio Status Approximate radio use time
Battery fully charged (Weather Radio battery) ≥ 180 minutes
When battery level decreases to a level that
the radio stops working, and user hand-cranks
it for one minute (speed ≥ 120 rev/min)
≥ 7 minutes

5
Approximate Mobile Phone Charging Times
Weather Radio Status Approximate talk time
Battery fully charged (Weather Radio battery) 10-15 minutes*
When battery level decreased to a level that
the lighting fades out/light intensity drops
to100LUX,anduserhandcranksitfor10
minutes (speed ≥ 120 rev/min)
≥ 14 minutes
* Minutes will vary by phone type, operating system and settings.
IMPORTANT CHARGING NOTES
• It’simportanttokeepyourWeatherRadio’sinternalbatterychargedupforwhen
you need it.
• FullychargetheWeatherRadio’sinternalbatteryevery3monthsifyouhaven’t
used it so you are ready to use it in case of an emergency.
• ThebestwaytochargetheinternalbatteryisbypluggingtheWeatherRadiointoa
USB power source (like a computer). However, if you find yourself without a charge
during an emergency, you can use the hand crank to charge internal battery.
Precautions:
1. This product should not be used by children 8 years and under unless supervised by
an adult.
2. DonotuseorleavetheWeatherRadioinextremecoldorextremeheatorexposeit
to dusty or moist environments for long periods.
3. Useasoftclothdippedinaneutraldetergenttocleanthisproductifnecessary.Do
not use strong solvents to clean this product.
4. If you keep this product in your vehicle, make sure you keep it somewhere secure, so
that you avoid misuse or injury, but also somewhere you can get to quickly in case of
need.
5. Donotshineashlightatanyone’seyes.
6. Donotuseexcessivevolumewhenusingheadphones.
7. Cover the charging connections with the rubber plug when not in use.

6
Specifications
Built-inbattery:320mAh/3.7VLithiumbattery
LED:lifespan50,000hrs
Outputpower:DC5V/500mA
Weight: 323g
Size: 129mm x 48mm x 62mm
For additional support, call our Consumer Help Line at 1-888-217-7900, or visit Champ-
Eprep.com
Limited 12 Month Warranty
VoxxAccessoriesCorp.warrantsthatfor12monthsfromdateofpurchase,itwill
replace this product if found to be defective in materials or workmanship. Return it
to the address below for a replacement with a current equivalent. This replacement
isthecompany’ssoleobligationunderthiswarranty.ANYIMPLIEDWARRANTYOF
MERCHANTABILITYORFITNESSFORAPARTICULARUSEISDISCLAIMED.Thiswarranty
excludes defects or damage due to misuse, abuse, or neglect. Incidental or consequential
damages are disclaimed where permitted by law. This warranty does not cover product
purchased, serviced or used outside the United States or Canada.
U.S.A.: Audiovox Return Center, 150 Marcus Blvd., Hauppauge, New York 11788
CANADA:AudiovoxReturnCenter,c/oGenco,6685KennedyRoad,Unit#3Door14,
Mississauga Ontario L5T 3A5


RCEP400WR IB 00
©2014VoxxAccessoriesCorp.
3502 Woodview Trace, Suite 220
Indianapolis, IN 46268
Table of contents


