ChamSys MagicQ MQ100 Pro User manual

www.chamsys.co.uk MagicQConsoleQuickStart Manual
1 of 34
ChamSys
MagicQ Quick Start Manual

www.chamsys.co.uk MagicQConsoleQuickStart Manual
2 of 34
Careofyourconsole
Tokeepyour consoleinbest conditionpleaseobservethefollowingrecommendations:
qKeepliquidsawayfromtheconsole. Drinkssplitover a consolemaycauseirreparabledamage.
qKeeptheconsoleout ofdirectsunlight–placetheconsoleintheshade. Excess heatfromthesunmaycause
damagetothetouchscreensand totheplastic bezel.
qDonotusesharpobjects onthetouch-screen. If youwishtouseanobjectother thanyour finger, thenusea blunt
objectthatwillnotdamagethesurface.
qDonotblocktheventilationgrillsontherear panel andunderneaththeconsole.
qDonotusetheconsoleoutsideits operatingtemperaturerange.
qHandletheconsolewithcarewhenmovingor transportingit. Theconsolecontainscomponents thatmaybe
damagedbyshocksuchasa harddrive. Alwaysusea paddedflightcasewherever possible.
qDonotusesolvents or cleanserstocleantheconsole. Donotrub firmlyonthemetalor plastic surfaces–thismay
causethepaintor letteringtoberemoved. Gentlyusea dampclothtocleanthetouch-screenandpanels.
SafetyInformation
qDonotopenthefront, rearor lower panelsoftheconsoleunless youhaveelectricalexpertise. Theconsole
containscomponents withvoltagesthatmayshock.
qDonotusetheconsoleifthepower cablesaredamagedinany way.
qRepairsshouldonlybeundertakenbyauthorisedservice representatives.
qIf liquidsarespiltover theconsolethenremovepower immediately, and seekadvicefromyour authorisedservice
representative.
qWhentransportingtheconsoleensurethattherearesufficientpeopletocarrytheconsole.

www.chamsys.co.uk MagicQConsoleQuickStart Manual
3 of 34
Quick Start Guide to using MagicQconsoles
Introduction
Thisdocument isintendedtoenableyoutogetup and runningwithMagicQconsoles. It isdesignedtointroducethe
layout oftheconsolealongwiththekeyfunctions. It thenrunsthrough patchinga show, recordingCuesandCue
Stacksand showplayback.
Thisguideisnota substitutefor theMagicQmanual. Themanualprovidesdetailedinformationonall thestandard
and advancedfeaturesof theconsole. ThemanualisavailablefromChamSys websiteatwww.chamsys.co.uk. The
manualisalsoavailableontheconsole-simplypress theHelpbutton andusehyperlinkstonavigatetothetopic you
areinterestedin.
MagicQsoftwareisbeingcontinuallyimproved–pleaseusetheinformationinthismanualasa guideonly–detailed
informationonnewfeaturesandchangesareavailablein thesoftwarechangeslogsonour website.
MagicQ Consoles
The MagicQrangeof consolesincludesthe MagicQMQ100 Pro, MagicQMQ200 Pro, MagicQMQ300 Pro, Magic
MQ100 Xpertand the MagicQMQ50. All theconsolesrunthesameoperatingsystemand MagicQsoftware–they
just varyin styling, number of fadersand buttons, and choiceofinternalor externalscreen.

www.chamsys.co.uk MagicQConsoleQuickStart Manual
4 of 34
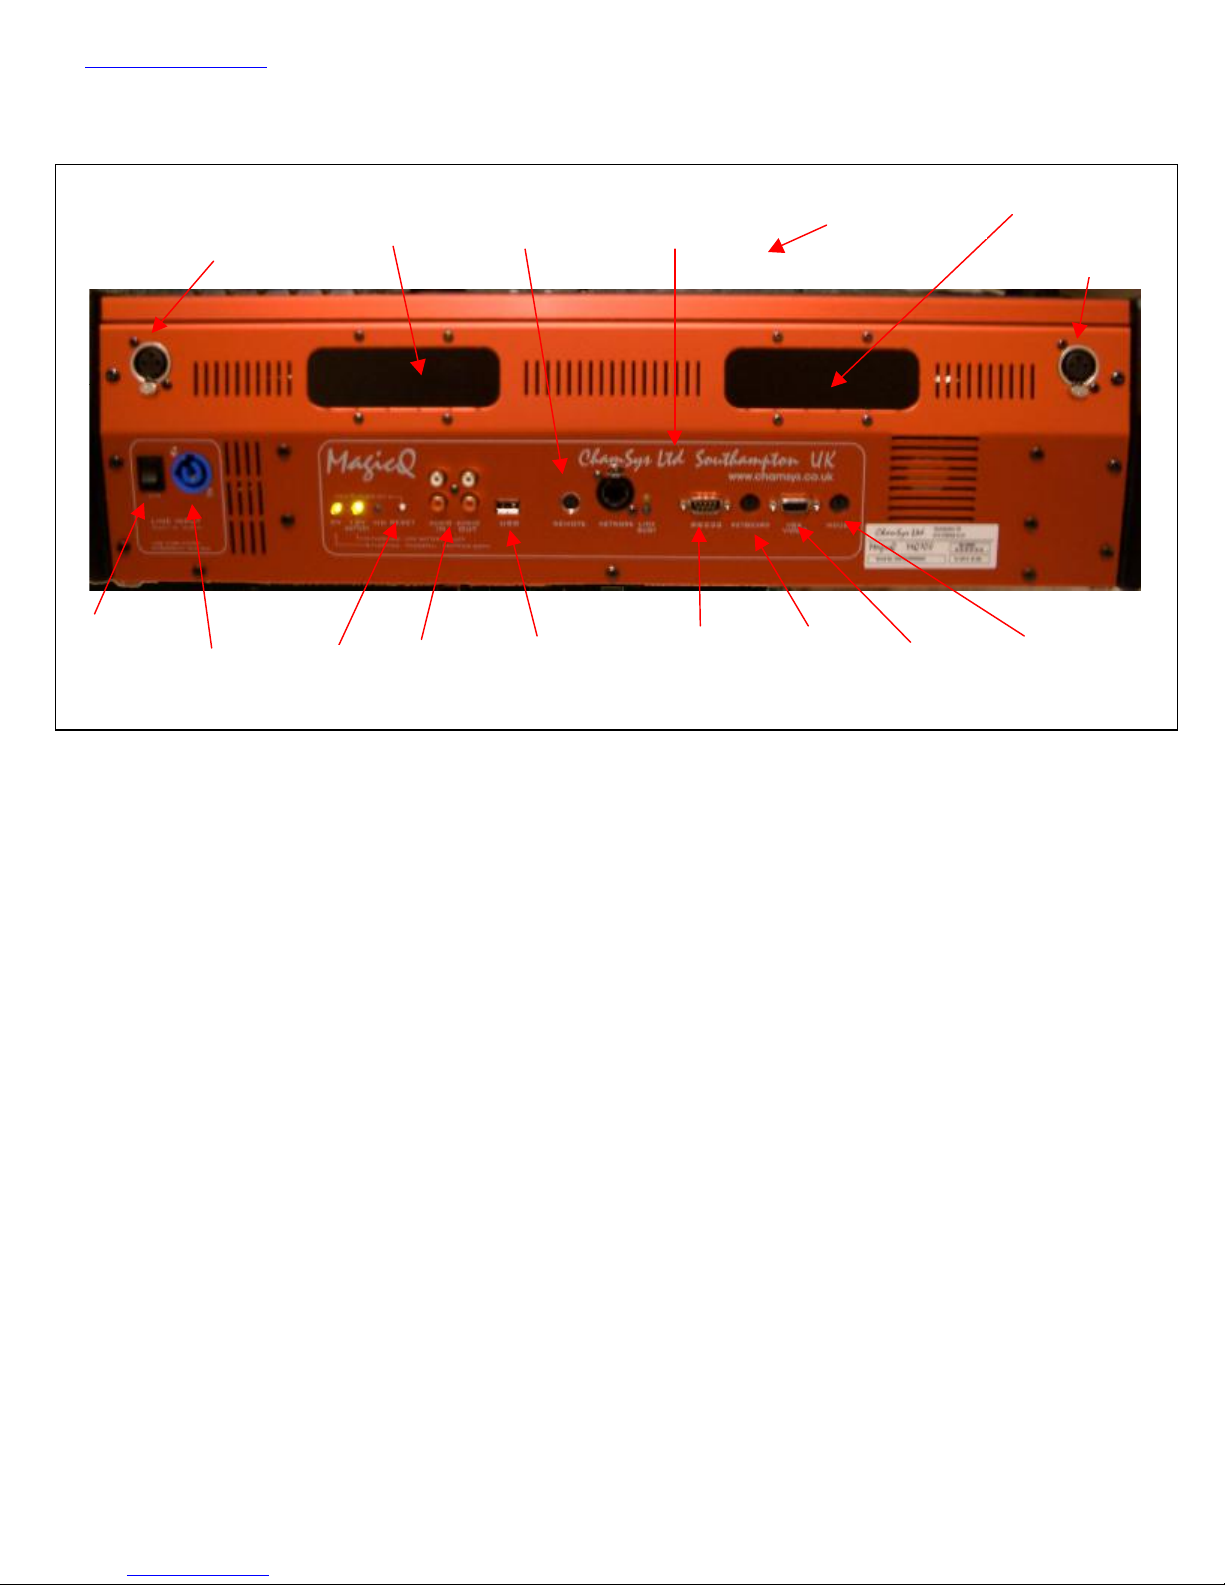
Connections
Thepicturebelowshowstheconnectionson a MQ100 Proconsole. TheMQ200 Proand MQ300 Prohavethesame
connectorswiththeadditionofextra consolelampsockets.
Theexpansionmoduleslots canbefittedwith MagicQexpansionmodulessuchasthetwinDMX512 output module,
and other futureexpansionmodules.
Power socket
(110-240Vac)
Power switch
Audio
ports
Consolelamp
USB
port
butto
Network
ports
Monitor
port
Mouse
port
Serial
port
Reset
button
Keyboard
port
Remote
trigger
Expansion
module
Expansion
module
USBport
under arm-rest
Consolelamp
DMX
ports
USB
ports
MQ100 Pro
www.chamsys.co.uk MagicQConsoleQuickStart Manual
5 of 34
TheoriginalMQ100 (MQ100 Xpert) hasthefollowingconnections.
Therear panel oftheMQ50 issimilar butwitha slightlydifferentlayout oftheconnectors.TheMQ50 power
connector isanIEC connector.
Pluggingup
•Connectthepower leadtothepower socketlabelledLINE INPUT.
•Put theconsolelamps intotheconsolelampsockets
•Connectthekeyboardtothesocketon thebackpanel markedKEYBOARD
It isnotnecessarytoconnectthemouse. Themouseisonlyrequiredifthetouchscreenbecomesdamaged.
DMX connections
The MagicQProseriesofconsoleshave4directDMX outputs on therear ofthepanel soyoucanconnectyour DMX
cablesdirecttotheconsole.
AlternativelyyoucanuseEthernetandanexternalEthernettoDMX converter boxsuchastheChamSys3Universe
EthernettoDMX converter. ConnecttheDMX converter totheconsoleNetworkportvia thenetworkcableprovided.
Whenmakinga directconnectioninthiswayan”inverted”networkcablemust beused.
ToconnectmultipleEthernettoDMX converterstotheconsole, usea networkhub or networkrouter usingstandard
networkcables.
Power socket
(110-240Vac)
Power switch
Audio
ports
Consolelamp
USB
port
Network
port
Monitor
port
Mouse
port
Serial
port
Reset
button
Keyboard
port
Remote
trigger
Expansion
module
Expansion
module
USBport
under arm-rest
Consolelamp
MQ100
This manual suits for next models
4
Table of contents
Other ChamSys Dj Equipment manuals


