ChamSys MagicQ MQ50 Mounting instructions

ChamSys
MagicQ MQ50, MQ70 and MQ80
Console
Installation, Software manual and
Warranty Certificate

www.chamsys.co.uk MagicQ Console Quick Start Manual
Page 2 of 40
Edition Notes
This Compact series User guide includes a description, safety precautions, installation, programming, operation
and maintenance instructions for the MQ50, MQ70 and MQ80 consoles as of the release date of this edition.
Trademarks
ChamSys, the ChamSys logo and MagicQ are registered trademarks or trademarks of ChamSys Ltd in the United
Kingdom and other countries. Other company and product names and logos referred to herein may be
trademarks of their respective companies.
Copyright Notice
The works of authorship contained in this manual, including, but not limited to, all design, text and images are
owned by ChamSys Ltd. All rights reserved.
Manual Use
ChamSys authorises its customers to download and print this manual for professional information purposes only.
Chauvet expressly prohibits the usage, copy, storage, distribution, modification, or printing of this manual or its
content for any other purpose without written consent from ChamSys
Intended Audience
Any person installing, operating, and/or maintaining this product should completely read through the guide that
shipped with the product, as well as this manual, before installing, operating, or maintaining this product.
Disclaimer
ChamSys believes that the information contained in this manual is accurate in all respects. However, ChamSys
assumes no responsibility and specifically disclaims any and all liability to any party for any loss, damage or
disruption caused by any errors or omissions in this document, whether such errors or omissions result from
negligence, accident or any other cause. ChamSys reserves the right to revise the content of this document
without any obligation to notify any person or company of such revision, however, ChamSys has no obligation to
make, and does not commit to make, any such revisions. Download the latest version from www.chamsys.co.uk

www.chamsys.co.uk MagicQ Console Quick Start Manual
Page 3 of 40
Table of Contents
Care of Your Console .................................................................................................................................................... 4
Safety Notes .................................................................................................................................................................. 4
Quick Start Guide to using MagicQ Consoles .............................................................................................................. 5
Introduction .................................................................................................................................................................. 5
MagicQ Consoles ......................................................................................................................................................... 5
Uninterruptable Power Supply’s (UPS) ........................................................................................................................ 5
Connections .................................................................................................................................................................. 6
Plugging Up .................................................................................................................................................................. 7
DMX Connections ........................................................................................................................................................ 7
Powering Up ................................................................................................................................................................. 7
Powering Down ............................................................................................................................................................ 8
Resetting the Console ................................................................................................................................................... 8
Console Layout ............................................................................................................................................................. 9
Troubleshooting .......................................................................................................................................................... 32
Reporting Problems .................................................................................................................................................... 34
Restoring Default Console Settings ............................................................................................................................ 36
Appendix .................................................................................................................................................................... 37
DMX, Ethernet and ArtNet ........................................................................................................................................ 37
What is Artnet? ........................................................................................................................................................... 37
FCC Part 15 Notice..................................................................................................................................................... 38
Disposal and Recycling of unwanted consoles ........................................................................................................... 39

www.chamsys.co.uk MagicQ Console Quick Start Manual
Page 4 of 40
Care of Your Console
To keep your console in best condition please observe the following recommendations:
Keep liquids away from the console. Drinks spilt over a console may cause irreparable damage.
Keep the console out of direct sunlight – place the console in the shade. Excess heat from the sun may cause
damage to the touch screens and to overlays.
Do not use sharp objects on the touch-screen. If you wish to use an object other than your finger, then use a
blunt object that will not damage the surface.
Do not block the ventilation grills on the rear panel, side and underneath the console.
Do not use the console outside its operating temperature range.
Handle the console with care when moving or transporting it. The console contains components that may be
damaged by shock such as a hard drive. Always use a padded flight case wherever possible.
Do not use solvents or cleansers to clean the console. Do not rub firmly on the metal or plastic surfaces – this
may cause the paint or lettering to be removed. Gently use a damp cloth to clean the panels. Do not put
water on the touch screen as this may get inside it and make it unusable.
Safety Notes
Do not open the console unless you are a skilled person authorised and trained by ChamSys in console
maintenance and repair. The console contains components with voltages that may shock.
CAUTION: Compact consoles incorporate a replaceable coin cell processor battery. These batteries can cause
a serious burn hazard if ingested. Do not place battery into the mouth. Keep out of reach of small children. If
accidentally ingested the battery it is imperative to seek immediate medical help.
Do not use the console if the power cables are damaged in any way.
Repairs should only be undertaken by authorised service representatives. There are no user serviceable parts
inside the console.
If liquids are spilt over the console then remove power immediately, and seek advice from your authorised
service representative.
When transporting the console ensure that there are sufficient people to carry the console.

www.chamsys.co.uk MagicQ Console Quick Start Manual
Page 5 of 40
Quick Start Guide to using MagicQ Consoles
Introduction
This document is intended to enable you to get up and running with MagicQ consoles. It is designed to introduce
the layout of the console along with the key functions. It then runs through patching a show, recording Cues and
Cue Stacks and show playback.
This guide is not a substitute for the MagicQ manual. The manual provides detailed information on all the standard
and advanced features of the console. The manual is available from ChamSys website at www.chamsys.co.uk.
MagicQ software is being continually improved – please use the information in this manual as a guide only –
detailed information on new features and changes are available in the software changes logs on our web site.
MagicQ Consoles
The MagicQ range of consoles includes the MagicQ Stadium series and MagicQ Compact consoles. All consoles
run the same MagicQ software – they just vary in number of faders and buttons, size of screen and number of
universes output from the console.
MagicQ Stadium and MagicQ Compact consoles manufactured from 2013 onwards use the same operating system
utilising the same installer .cdc extension files. Other older MagicQ consoles use the Pro2010 or Pro/Expert
operating system. MagicQ Stadium and MagicQ Compact consoles have a solid state drive instead of a traditional
magnetic rotating hard drive.
The MagicQ MQ50 and MQ70 compact consoles feature a Micro SD card for show data storage rather than a solid
state drive.
Uninterruptable Power Supply’s (UPS)
The MagicQ MQ70 and MQ80 Compact consoles feature an inbuilt UPS, this protects the console and its hardware
in the event of power failure. The desk will run for around ~15 minutes on the backup battery.
The UPS is designed as a power fail backup system only.
The console UPS battery must remain charged at all times. The battery charges while the console is powered on,
the console must be powered on and running MagicQ for the battery to charge. To maintain battery life and UPS
performance the console should be run for at least a 12 hour constant period every 2 months to ensure the battery is
kept charged and in the best condition.

www.chamsys.co.uk MagicQ Console Quick Start Manual
Page 6 of 40
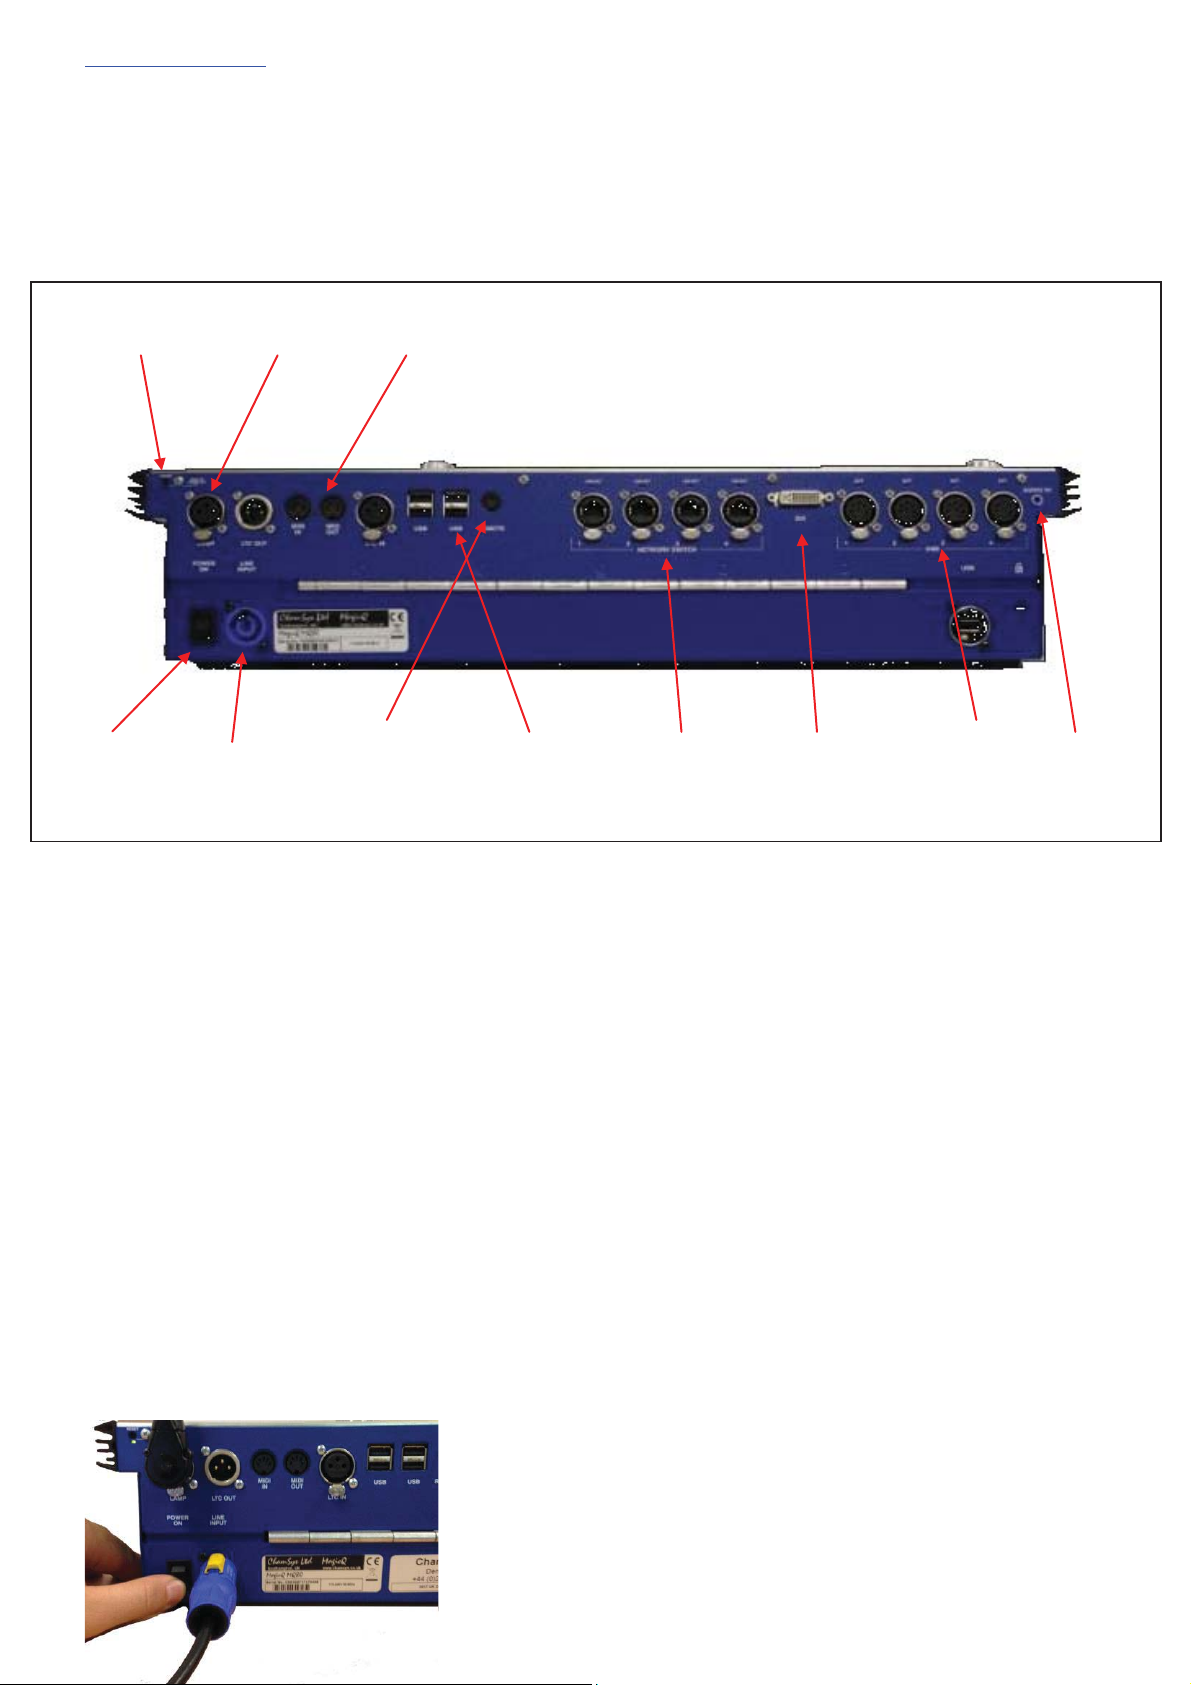
Reset button Console lamp Recovery Button
Connections
MQ50/70 Console
The picture below shows the connections on the MQ70 Compact console.
Power Power DMX Audio Midi LTC Network HDMI Remote USB
S
witch Socket Ports Ports Ports Input Ports Ports Ports P
orts
www.chamsys.co.uk MagicQ Console Quick Start Manual
Page 7 of 40
Reset button Console lamp MIDI/TC ports
MQ80 Console
The picture below shows the connections on the MQ80 Compact console.
Plugging Up
x Connect the power lead to the power socket labelled LINE INPUT.
x Put the console lamp into the console lamp sockets
It is not necessary to connect a USB mouse. A mouse is only required if the touch screen becomes damaged.
DMX Connections
The MagicQ consoles have 4 direct DMX outputs on the rear of the panel so you can connect your DMX cables
direct to the console.
Alternatively you can use Ethernet and an external Ethernet to DMX converter box such as our range of SnakeSys
Ethernet to DMX Interfaces. Connect the Interface to the console Network port via a network cable.
Powering Up
To power up the console press the power switch on the back panel. The
blue LEDs around the left and right of the display should light, after a
few seconds the screen will come to life and you will see the operating
system loading.
Power Power Socket Remote USB Ports Network Ports Monitor DMX Audio
Switch
Trigger
port ports input

www.chamsys.co.uk MagicQ Console Quick Start Manual
Page 8 of 40
Powering Down
To power down the console it is necessary to quit the MagicQ application. The console operating system then
performs an automatic shutdown and turns itself off when complete. To quit the MagicQ application, press the
SETUP button and then the QUIT soft button. When asked for confirmation, press the YES.
Note that just removing the power cord to the console will not have the desired effect since the internal UPS
continues to provide power.
If for some reason you are unable to power off the console then you may need to force the console to power off as
below.
Resetting the Console
Under rare circumstance it may be necessary to reset the console. To reset the console, press SETUP to go to the
Setup Window and hold SHIFT and press RESET. This performs an immediate soft reset of the console - the
MagicQ application will be running the show again within about 2-3 seconds.
If this has no effect then a hard reset may be required. Hard resets should be avoided as they bypass the operating
system shutdown procedures and may cause problems with the file system.
The reset switch is recessed behind the rear panel metalwork. A small screwdriver/end of a pen can be used to
gently press the button. Press and hold the button for 5 seconds to reset the front panel.
Forcing the Console to power off
If for any reason the hardware reset does not work, it may be necessary to perform a hard reset.
Switch off the console at the mains supply and press and hold the reset until it powers off completely (about 10
seconds).

www.chamsys.co.uk MagicQ Console Quick Start Manual
Page 9 of 40
Console Layout
All MagicQ consoles layout are very similar - the programming interface is consistent across the entire range of
consoles.
The MagicQ MQ50 and MQ70 console do not have the physical ‘S’ buttons directly below the display, pressing on
the touch screen above the fader has the same effect as using the ‘S’ buttons on these consoles.
Playback
section
Touch screen
& encoders
Keypad
section
Editor
buttons
Head control
section
Window select
buttons

www.chamsys.co.uk MagicQ Console Quick Start Manual
Page 10 of 40
Touch Screen & Encoders
Around the central screen area there are 8 rotary encoders and soft buttons.
The buttons around the display referred to as soft buttons since their function changes according to the active
window on the touch screen. The current function of a soft button is displayed on the touch screen adjacent to the
button. To select the function you can either press the screen or the soft button itself.
The function of the rotary encoders also changes according to the active window with the current function being
displayed adjacent to the encoder.
The SHIFT and CTRL buttons on the console selects alternate functions for the soft buttons and encoders.

www.chamsys.co.uk MagicQ Console Quick Start Manual
Page 11 of 40
Windows
The area in the centre of the screen is the windows section in which the various control windows are displayed.
There are two main types of windows – boxes style windows which have large boxes such as the Group Window
and spreadsheet style editing windows such as the Patch Window.
A window is displayed by pressing the appropriate window button. Changing window does not affect
programming or playback.
On Compact consoles (MQ40N, MQ60, MQ80) The top right window keys have secondary functions, to access
these hold the ‘ALT’ key to access the additional function.
Multiple windows can be displayed at one time by sizing the windows appropriately. In addition a complete
configuration of windows – i.e. a complete view can be selected using CTRL and the top soft buttons. For
example, to select the Palettes view (Groups, Positions, Colours and Beams) press CTRL and the first top soft
button. Layouts can also been recorded and quickly recalled using the Lay1,2,3 keys on the console.
When a window button is pressed, that window becomes the active window. The active window is on the top of
the screen and is easily identified as the window with the highlighted title bar at the top. It is also the window with
the cursor in it.
An item in a window can be selected either
a) By pressing the touch screen over the appropriate part of the window
b) By moving the cursor to the appropriate position and pressing the ENTER button.
c) By moving the mouse to the position and pressing the left mouse button.
The cursor can be moved around the active window using the cursor keys in the Editor area of the console or via
the cursor keys on the keyboard. PG UP, PG DN, PG LEFT and PG RIGHT can be used to scroll the window in
the appropriate direction. HOME and END can be used to get to the start and end of the window respectively.
(ALT + Cursor keys on Compact consoles)

www.chamsys.co.uk MagicQ Console Quick Start Manual
Page 12 of 40
Towards the bottom of the touch screen are two small windows, the Status Display and the Input Display. The
Status Display shows the current date and time, the ADD / SWAP status of the console and other relevant status
information.
The Input Display shows the data that has been currently entered through the keypad and the keyboard. Note that
text is not entered into the main Windows until ENTER is pressed. This allows the user to choose whether the
keyboard data is SET into fields in the windows or onto Playbacks.
After a command has been entered it also confirms that the command has been accepted and shows any error
messages when a command is not possible.
Head Control
The area around the two large rotary encoders is referred to as the head control area. It is used to alter the
parameters of individual heads and apply effects such as fans over groups of heads.
The NEXT HEAD and PREV HEAD buttons are used to select an individual head to modify.
The other buttons control the selection mode; LOCATE, HIGHLIGHT, FAN, SINGLE, ODD/EVEN, and ALL.
Programmer Buttons
The Editor buttons are used to modify program data. The 8 buttons on the right hand side are the action buttons
which are used to modify show data. The action buttons are
UNDO REMOVE MOVE COPY
SET INCLUDE UPDATE RECORD
The buttons on the left:
BLIND and CLEAR affect the programmer
REL and SELECT affect playbacks
SHIFT selects alternate functions
<-- undoes keyboard input and clears actions

www.chamsys.co.uk MagicQ Console Quick Start Manual
Page 13 of 40
Playback
The Playback area is situated directly below the touch screen and consists of 10 playbacks each with a fader and
four buttons (FLASH, GO, STOP, SELECT). The area above each of the playbacks on the touch screen is used to
provide information about the status of the playback.
The playback area also contains a Grand Master, a Sub Master, Page Select buttons and a Manual Playback for
taking control of Cue Stacks.
The cross fade section contains a GO, STOP. FWD, BCK buttons, a cross fader and a master GO button. The cross
fade section controls the current playback selected with the S button.
www.chamsys.co.uk MagicQ Console Quick Start Manual
Page 14 of 40
Getting Going
Starting up the Console
After powering up you are presented with the introductory Help Window. Choose Continue Show.
You can revert to the Help Window by pressing the HELP button at any time.
The console remembers all windows that were open when the console was last used. To close all windows press SHIFT
and CLOSE.
Press SETUP to open the Setup Window.
Calibrating the Touch Screen
If the touch screen does not seem to be responding to your touch correctly then you may need to calibrate the touch
screen.
To calibrate the touch screen hold CTRL and press the ‘Set’ key. If the touch screen is not responding you can press 1 on
the console keypad to confirm and enter the touch screen calibration mode.
Calibration works by finding the bottom left and top right corners of the screen. First press the bottom left of the touch
screen and then the top right. You may wish to use a fine but blunt object.

www.chamsys.co.uk MagicQ Console Quick Start Manual
Page 15 of 40
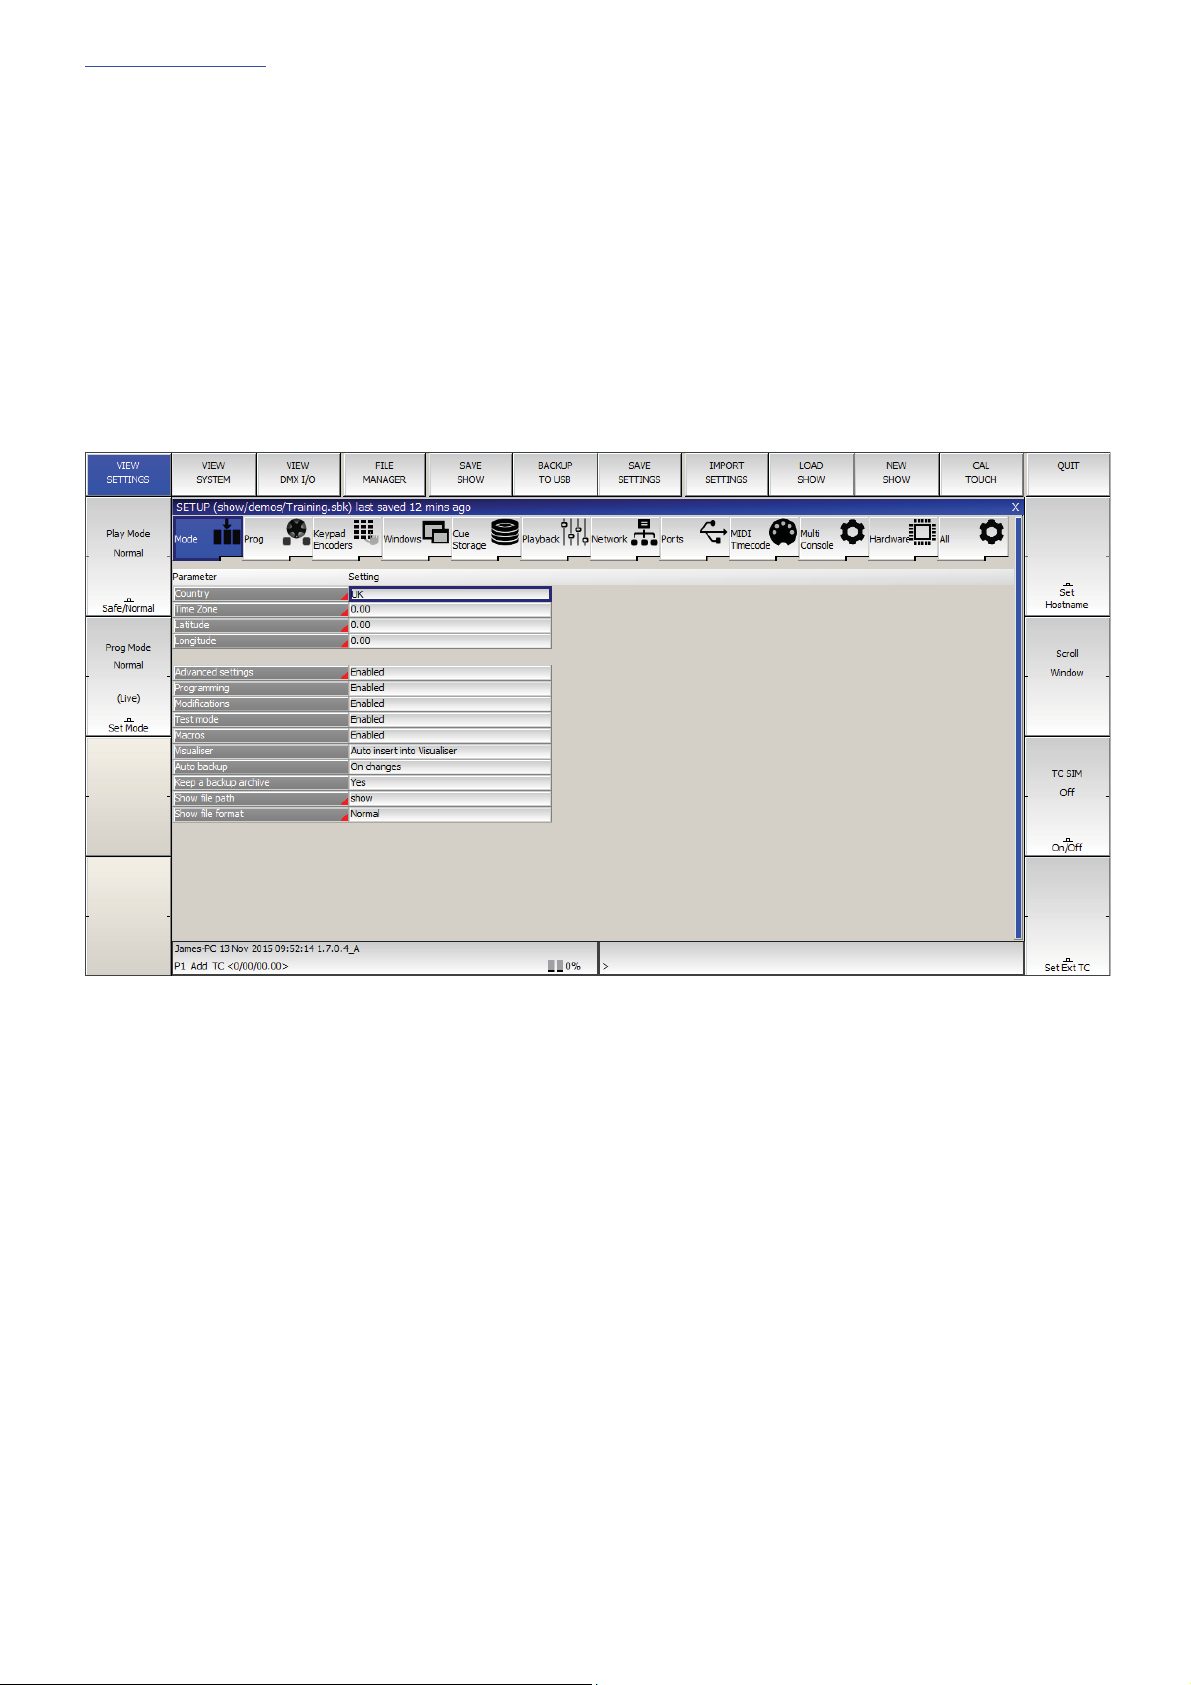
Starting a New Show
To start a new show, open the Setup window using the Setup key, toggle to ‘view settings’ using the top left soft
button. Then press the NEW SHOW soft button. This will clear the current show from memory – shows that have
been previously saved to disc will not be affected. You will be asked to confirm by selecting YES.
There is a choice of four modes.
x Normal - faders activate Cue Stacks. When recording, all data in the programmer is stored in recorded cues
x Theatre non-track - faders operate levels only. When recording, all data in the programmer is stored in
recorded cues
x Theatre tracking - faders operate levels only. When recording only data in the programmer that has changed
since the last record is stored in recorded cues
x Hog II warp – like Theatre Tracking but with some extra features to make the programming more familiar to
Hog II users.
In Theatre modes, fixtures return to their default values when under control of a playback or the programmer. The
keypad is set up to enable selection of Palettes using Palette numbers, and Cue Stack timing defaults to being
stepped timing rather than chase timing.
The mode can be changed at any time by using the Programming Mode soft button in the Setup Window. In
addition each individual option / default value can be customised by the user and saved as their personal settings
file.
Starting a show clears all patching, all programming and all palettes. It does not clear console specific options such
as the configuration of the DMX outputs or the calibration of the touch screen.

www.chamsys.co.uk MagicQ Console Quick Start Manual
Page 16 of 40
Enabling Console Outputs
To enable output of channel data select the DMX IO VIEW in the Setup Window. This window enables modification of
the inputs and outputs for the 64 universes on the Pro2014, 24 universes on the MQ80 and 12 universes on the Expert
and MQ60/70. The MagicQ consoles support DMX directly from the console or via an external Ethernet to DMX
convertor.
Using Direct DMX Outputs
MagicQ consoles have 4 DMX outputs directly on the rear panel.
The four DMX outputs on the rear panel automatically output universes 1 to 4 unless they are configured
otherwise. The DMX will be output regardless of the “Status” enabled or disabled in the Setup window. All
consoles have either a DMX status LED or individual Port status LED’s which show if the port is currently active.
If you wish to choose alternative universes to be output to the four DMX outputs on the rear panel, or you have
software prior to version 1.3.4.5 then you will need to configure the outputs manually. For each of the Universes
you wish to output on the rear panel, select Out Type as “MagicQ Direct” and Port 1, Port 2, Port 3 and Port 4.

www.chamsys.co.uk MagicQ Console Quick Start Manual
Page 17 of 40
Using ArtNet and ArtNet to DMX interfaces
To output ArtNet on a Universe enable it and ensure that the output type is set to ArtNet. Choose which ArtNet
Universe you wish to Output the MagicQ Universe on. MagicQ defaults to outputting MagicQ universe 1 on the first
ArtNet Universe (Art 0).
If you are using Ethernet to DMX512 conversion boxes then you will need to configure the boxes to respond to the
correct Art-Net subnet and Art-Net universe. With SnakeSys B4 Ethernet to DMX boxes you need to place the device
into Art-Net mode by setting dip switch 4 into the up position and all others down, and then set up the two rotary
switches to the correct values – the left one for Art-Net subnet and the right one for Art-Net universe. The interface will
then decode the four Art-Net universes starting from that Art-Net subnet and universe.
In most networks the Art-Net subnet is set. In Setup DMX I/O the Output and Input universes use subnet 0 unless
specifically set to an Art-Net universe greater than 15 or set using the notation X-Y where X is the subnet and Y the
universe. If you are using only one Ethernet to DMX512 interface then you can use Universe 0.
If you are using multiple Ethernet Interfaces then you will need to set each Ethernet Interface to a different Art-Net
Universe – for example when using two SnakeSys B4 Ethernet Interfaces set the first Interface to Art-Net Universe 0 and
the second one to Art-Net Universe 4.
Connecting a MagicQ Playback Wing
To connect a MagicQ Playback Wing simply connect the Wing to the MagicQ console via USB. In the Setup
Window, View System, View Wings by default in versions 1.6.0.6 and above all wings are set to Playback/Extra so
the wing should be automatically configured.
By default the Playback Wings are set so that the Wings change page when the Next Page / Prev Page button are
pressed on the MagicQ console. It is possible to make the Wings operate completely independently of the main
MagicQ console by changing the “Lower Bank Tie” and “Upper Bank Tie”.
www.chamsys.co.uk MagicQ Console Quick Start Manual
Page 18 of 40
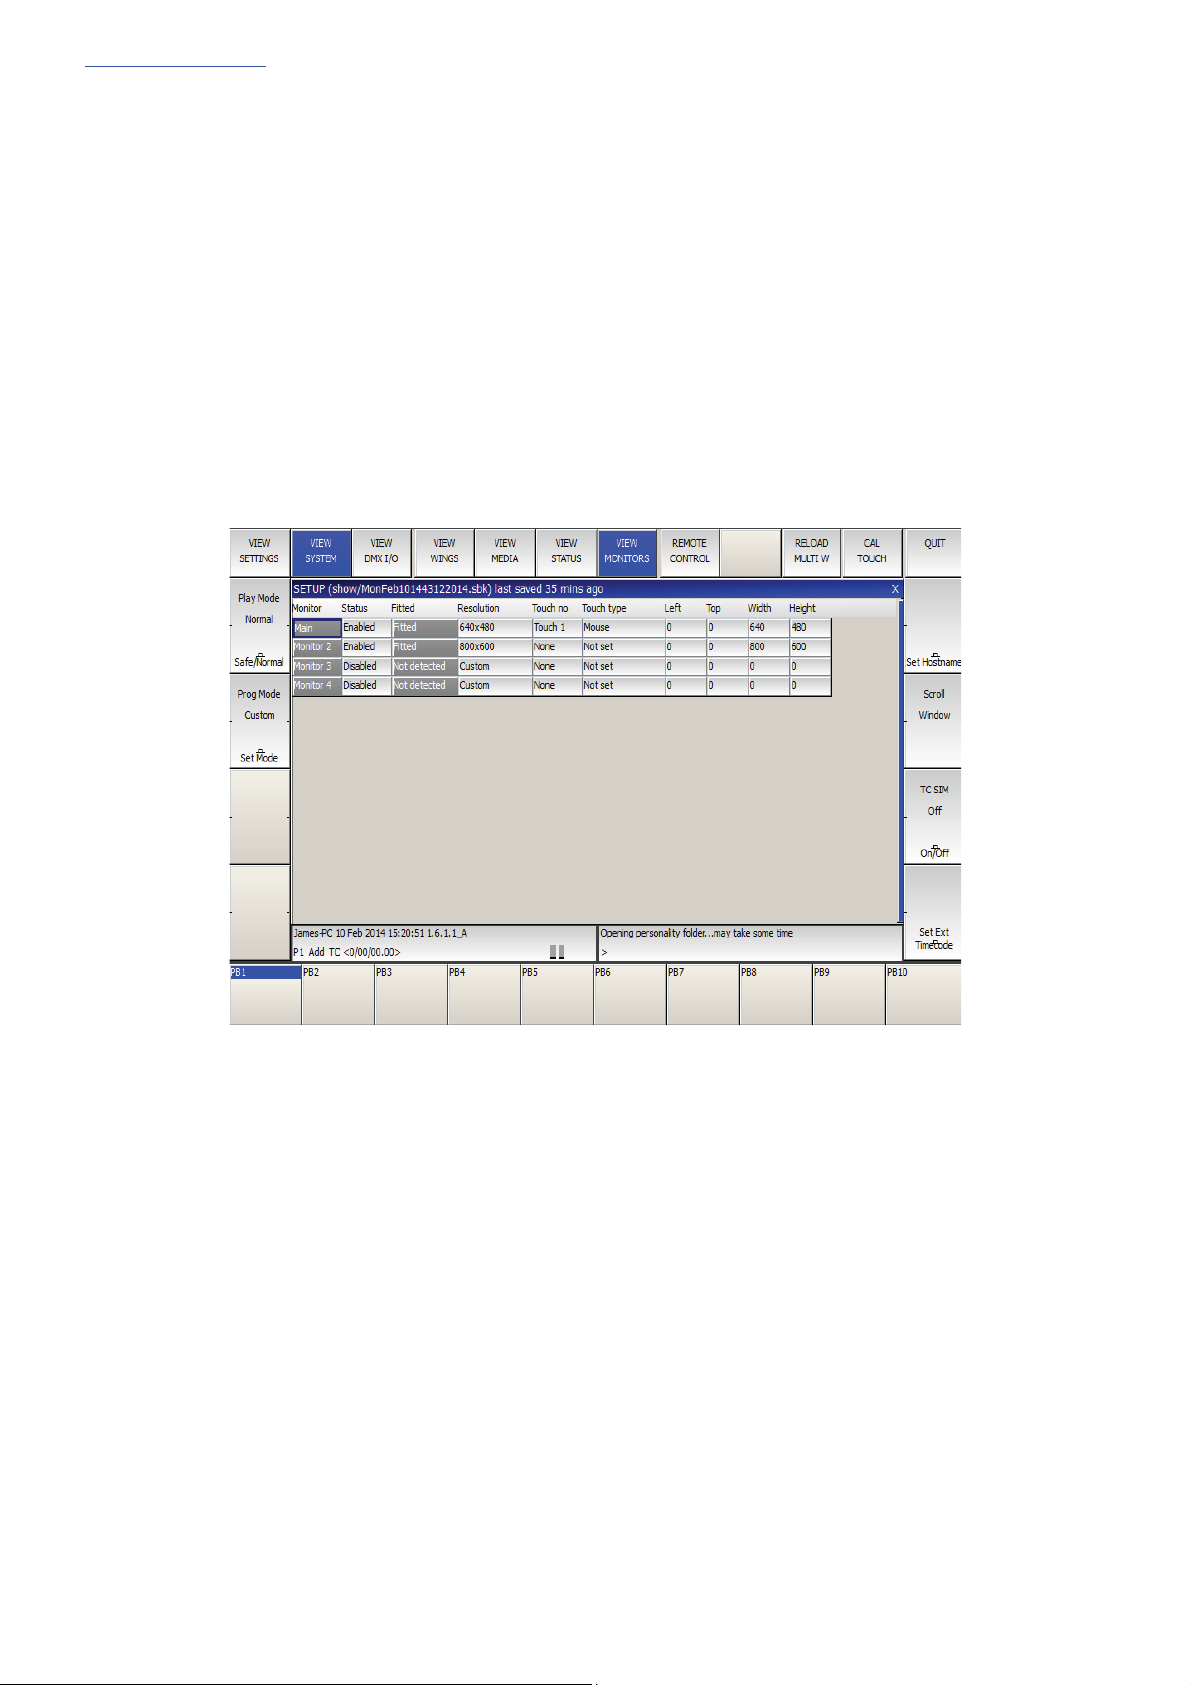
Connecting External Monitors
MagicQ compact consoles have HDMI connectors for External monitor connection. These monitors can be touch
screen monitors on MQ70 or MQ80 Compact consoles
The monitor output is used for showing extra windows. To enable windows to be moved onto external monitors,
enable it in Setup, View System, View Monitors.
In this menu set Monitor 1 to the required resolution in the Resolution column, and enable it. You will
be asked to restart – select yes.
When you start a new show, the pre-programmed layout views include views external displays- the Outputs Info,
Cue Stack Info and Programmer Info windows now default to the 2nd monitor. There is also an “Ext Palettes”
layout view which puts the Group, Pos, Colour, Beam windows onto the external display.
To Calibrate external touch monitors go to: Setup > View Settings and select CAL TOUCH, press 1 to confirm.
Then press the 4 points on the external monitor, do not press on the internal display during this time.
External USB touch monitors are shown in the Setup > View system > View Monitors window.

www.chamsys.co.uk MagicQ Console Quick Start Manual
Page 19 of 40
Supported touch monitors
For the MQ70 & MQ80 consoles we have tested and recommend the iiyama Prolite T2336MSC, Hanns G
HT225HPB, Asus VT207N and Dell S2240T Touch monitors. Note these are not supported on MQ60 console.
MagicQ consoles have support for the following USB communication protocols:
• Elo 15 * E271-2210 10-byte protocol
• Elo legacy E281A-4002 6-byte protocol
• Elo 16 * legacy E271-140 4-byte protocol
• Elo legacy E261-280 3-byte protocol
• eGalax Touchkit
• eTurboTouch CT-410/510/700
• 3M/Microtouch EX II series
• ITM
• PanJit TouchSet
• eTurboTouch
• Gunze AHL61
• DMC TSC-10/25
• IRTOUCHSYSTEMS/UNITOP
• IdealTEK URTC1000
• General Touch
• GoTop Super_Q2/GogoPen/PenPower tablets
• JASTEC USB touch controller/DigiTech DTR-02U
• Zytronic capacitive touchscreen
• NEXIO/iNexio
www.chamsys.co.uk MagicQ Console Quick Start Manual
Page 20 of 40
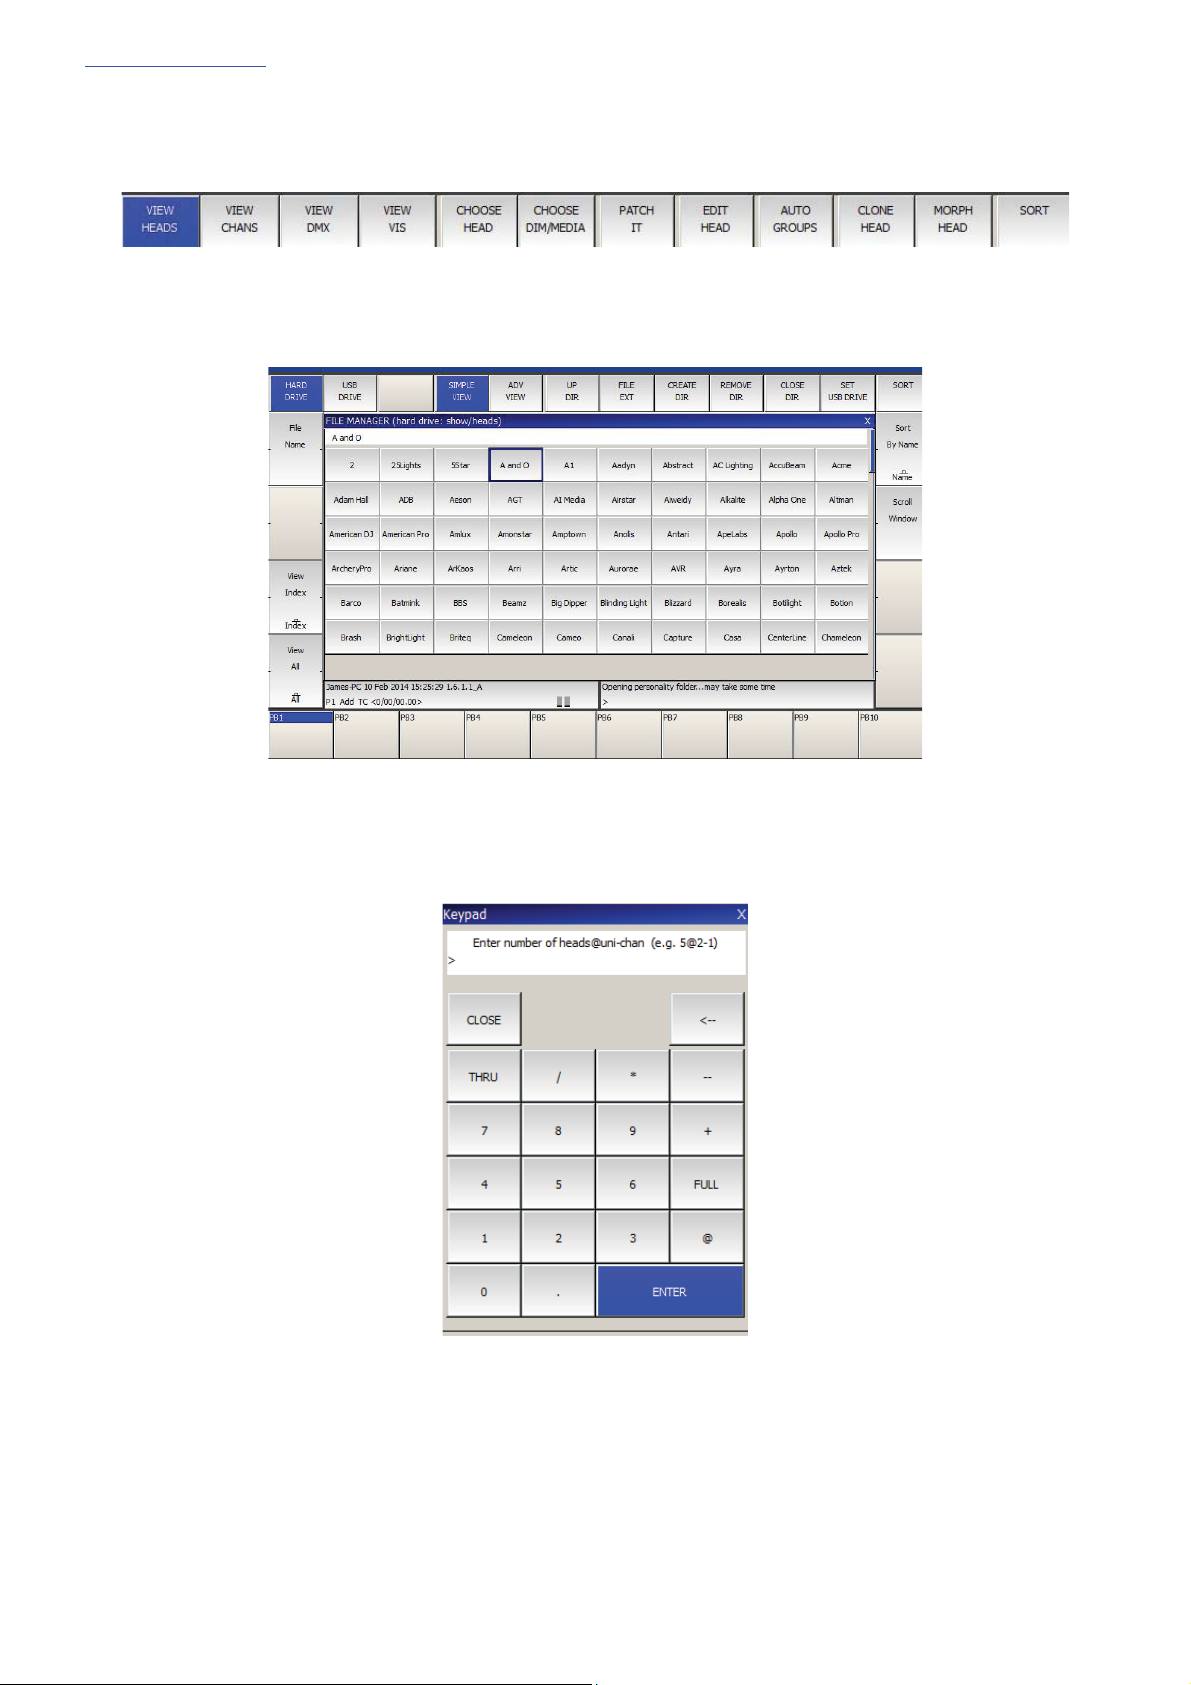
Patching
Open the Patch Window by pressing the PATCH button. The Patch Window has three views, VIEW HEADS, VIEW
CHANS and VIEW DMX. In this section we describe patching in VIEW HEADS.
Choose the head you wish to patch by pressing the CHOOSE HEAD soft button. The Window will change to give you a
list of manufacturers and heads. Select a head by pressing the touch screen. Alternatively scroll around the Window
using the cursor keys, and press ENTER when the cursor is over the correct head.
Once you have chosen a head you will be returned to the Patch Window. Press the PATCH IT soft button to patch the
head. You will be prompted for the number you wish to prompt and the address where you wish to patch the heads.
Use @ to patch at a specific address.
For example to patch 5 Mac250 mode 4 to Universe 2 channel 1 enter
5 @ 2 - 1
If you wish to patch multiple channels at fixed offsets e.g. five Martin Mac250s at DMX channels 1,21,41,61,81 then
enter
5 @ 2 – 1 / 20
This manual suits for next models
2
Table of contents
Other ChamSys Dj Equipment manuals


