CHANCEE K90 User manual

K90 Floor Scrubber
Instruction Manual

We explore safer, higher-end and more user-friendly cleaning equipment
through technical advantage and idea innovation.

Preface
This instruction manual contains all the information that you need to use and
maintain the machine. Please read it carefully before getting started. Only with
correct operation and regular maintenance can the machine be kept in its best
working condition.
This instruction manual is an important part of the product and should be kept
together with the machine.
If this manual is lost, please contact us immediately and we will be glad to provide
you with a new one. All technical details included in this manual are property of
Anhui Chancee Technology Co., Ltd and are protected by law.
In this manual we use illustrations to show the components and functions of the
machine. It is possible that some of them contain details that are slightly different
from those of yours. However, all the instructions presented here still apply to your
product and should be followed strictly during the operation.
Some components of the product may be harmful or dangerous and we have tried
our best to include them in this manual. It is the user’s obligation to pay special
attention to them during the work. However, since it is impossible for us to point out
all potential dangers, we expect you to be extremely cautious during the work so as
to protect the machine, yourself and other people in the working area.
Only accessories from the original manufacturer can be used on the machine. Using
accessories from other sources may lead to low working efficiency or even accidents
in extreme cases.
We usually modify or improve our products to meet the latest market demand.
However, this is NOT suitable for machines that have been sold. We will NOT be
responsible for any injury or loss caused due to the user’s improper operation either.
If you have any question, complaint or suggestion, please feel free to contact us and
we will be at your service with all our knowledge and enthusiasm.
We wish you a pleasant experience with our product!

Components and technical parameters
1
Chapter 1 Cautions
2/3
Chapter 2 List of accessories and installation of the batteries
4/5
2.1 List of accessories
2.2 General instructions
Chapter 3 Operation of the machine
6/10
3.1 Washing the machine
3.2 Assembling the machine
3.3 Preparation before operating the machine
3.4 Operating the machine
3.5 Power meter
3.6 Emptying the water tank
3.7 Charging the batteries
3.8 Maintaining the machine
3.9 Transporting the machine
3.10 Storing the machine
Chapter 4 Common problems and solutions
11
Chapter 5 After-sale services
12
Warranty card
13
Contents

1
Components and technical parameters
1 Controlling panel 6 Sewage tank 11 Seat
2 Steering wheel 7 Sewage discharging pipe 12 Tire
3 Clean water tank 8 Clean water discharging pipe 13 Seat adjuster
4 Left brush plate 9 Suction pipe 14 Front light
5 Sewage tank cover 10 Squeegee
Item Parameter Item Parameter
Cleaning width System voltag900 mm e 36 V
Squeegee width 1,200 mm Suction motor
power 600 W
Working efficiency Brush plate motor
powe
7,800 m2/h r650 W * 2
Clean water tank
capacity 240 L Driving motor
power
Sewage tank
capacit
800 W
y260 L Total power 2,700 W
Battery capacity 6 V/220 Ah * 6 Total weight
Working tim
555 kg
e Product siz4-5 h e 1,790 * 1,200 *
1,450 mm

2
Chapter 1 General description
This product is used for industrial and commercial purposes and suitable for cleaning
hard indoor floors. Do NOT use the machine for other purposes. Use suggested brush
plates and scouring pads, as well as detergent suitable for this machine.
Any operator must read, understand and abide by the following safety guidance.
ALERT!
Do NOT use explosive liquids; do NOT use the machine in places with
flammable or explosive liquids, gases or dust.
Do NOT use the machine to clean flammable materials or active metals.
Hydrogen is generated when the battery is being charged. Please keep it away from
sparks or open flames. Keep the battery box open when charging the battery.
ALERT!
Disconnect the battery before maintaining the machine, or electric shocks, fire or
explosion may be caused.
ALERT!
Turn off the general switch before maintaining the machine. Keep your hands away
from the brush plate when it is operating.
FOR YOUR OWN SAFETY
1. Do NOT use the machine when
explosive liquids or gases are presented in the working area, or
you are not trained and qualified for the operation, or
you have not read and understood the instruction manual, or
you are not sure how to operate the machine safely
2. Before starting the machine,
make sure that all safety-ensuring devices are installed and adjusted to the
correct positions.
3. When using the machine,
slow down on slops, and
wear anti-slippery shoes, and
report immediately when a fault is produced, and
pay attention to the people in your neighborhood, especially children, and
pay attention to the concentration of chemical materials.
4. Before leaving or maintaining the machine:

3
park the machine on a flat land, and
turn off the machine.
5. When maintaining the machine,
do NOT move its key components, and
do NOT wear loose clothes, and
disconnect the battery, and
wear protective devices if you need to handle the battery or the battery
cables, and
do NOT touch the acid liquid of the battery, and
do NOT use high pressure water guns to wash the machine, and
use spare parts from the original manufacturer, and
do NOT change the original design of the machine.
6. When transferring the machine,
turn off the machine, and
do NOT transfer the machine without the battery removed, and
do NOT carry the machine on your own, and
use a rope to fix the machine, and
descend the brush plate to the lowest position.
4
Chapter 2 List of accessories and installation of the batteries
2.1 List of accessories
When you receive the machine, check whether its packing is damaged. Make a
declaration to the carrier immediately if the packing is obviously damaged.
Check whether the following items are presented. If one or more item(s)
is(are) lost, contact the distributor or the original manufacturer immediately:
1. 6V battery * 6
2. 36 V charger
3. Battery connecting cable
4. Water absorbent strip
5. Brush plate * 2
6. Needle plate * 2
7. Other accessories that you have purchased.
Before unpacking the machine, remove the shipping fasteners and ropes
securing the machine to the pallet, and then carefully remove the machine
from the pallet with the assistance of others.
If a loading pad is not used, do NOT push the machine directly to avoid
damage to it.
Remove the machine from the pallet before installing the batteries so as to
avoid damage to the machine.
2.2 Installation of the batteries
ALERT!
Hydrogen will be generated during the charging process. As a result, the charging
room must be well ventilated and away from sparks and open fire, or severe
accidents may take place.
FOR YOUR OWN SAFETY
Please wear protective devices and avoid direct contact with the acid liquid of the
batteries.
Follow the instructions below to install the batteries:
1. Park the machine on a flat land and take out the
starting key.
2. Raise the sewage tank.

5
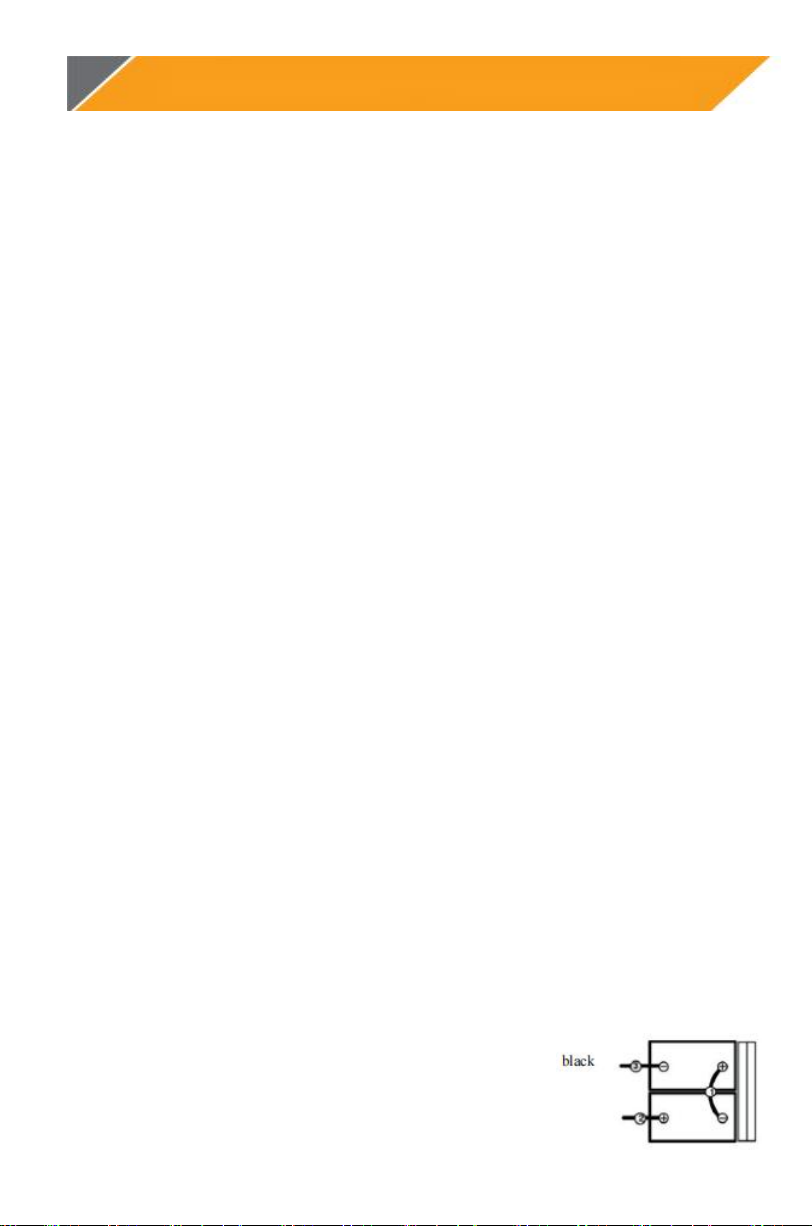
3. Install the batteries carefully into the battery box and connect the battery
cable according to the figure:
ATTENTION!
Do NOT throw the batteries into the battery box.
1. Before connecting the batteries, check whether the ends of the batteries are
clean.
2. When the batteries are installed, check the power and charge the batteries
when necessary.
NOTE
Apply a coat of metal-free lubricant to the battery cables to prevent corrosion.

6
Chapter 3 Operation of the machine
3.1 Washing methods
Adjust the flow of the washer fluid (mixture of water and detergent) through the
water valve. The brush plates use the washer fluid to clean the floor. While the
machine is moving, the squeegee will suck the sewage into the sewage tank.
In order to achieve the best cleaning effects, please use the appropriate brush to
clean the floor:
1. soft nylon brush (white): used to clean coated floor.
2. polishing pad (white): used for maintaining highly glossy or polished floors
3. buffering pad (red): used for scrubbing light dirt
4. gravity folding pad (black): used for super powerful washing
3.2 Assembling the machine
3.2.1 Installation of the squeegee
Park the machine on a flat land and take out the starting key.
Descend the squeegee lifting rod to the lower position.
Install the squeegee on the squeegee brackets and make sure that the
tightening knobs are fully inserted into the socket before tightening the
knobs.
Check the water absorbent strip of the squeegee and make necessary
adjustments.
3.2.2 Installation of the brush plates and the scouring pads
Park the machine on the flat ground and remove the starting key.
Step on the brush head lifting pedal to raise the brush head.
Add the scouring pad on the needle plate and install the driving plate; tighten
the central bolt to lock the scouring pad.
Align the brush plate or needle plate with the clips of the driving plate; insert
the brush plate or needle plate and press the switch of the brush plate motor.
If you need to remove the brush plate or the needle plate, step on the brush
head lifting pedal and press the brush plate motor button.
3.3 Preparation before operating the machine
FOR YOUR OWN SAFETY
Do NOT operate the machine until you have fully understood the instruction
manual.

7
ALERT!
Do NOT operate the machine in places with flammable or explosive gases, liquids
or vapor.
Before operating the machine, check
if there is dust on the ground, and
if the batteries are fully charged, and
if the brush plates and the scouring pads are worn, and
if the water absorbent strip of the squeegee is worn, and
if the sewage tank is empty, and
if a floating filter screen is installed in the sewage tank, and
if the boards of the brush head are worn.
3.4 Operating the machine
Turn the general switch to the position I.
Pull down the squeegee lifting handle to lower the squeegee.
Step on the brush head lifting pedal to lower the brush plates.
Turn on the clean water controlling knob.
Press the brush plate motor button and then the water suction motor button.
Adjust the washing speed through the speed controlling knob. Suggested
washing speed: 45-60 meters per minute.
During the operation, pay attention:
Do NOT park the machine on the same place for a long time so as to avoid
damage to the ground.
Do NOT operate the machine on slopes with an inclination higher than 5% (3°).
Use defoamer when there is too much foam in the sewage tank.
Do NOT let foam get into the filter screen to prevent the vacuum motor from
being damaged.
Pay attention to the power of the batteries.
When the clean water tank has run out of washing fluid, discharge the
sewage tank first and then add washing fluid.
Before leaving the machine, park it on a flat land and take out the starting key.
Maintain the machine regularly when you have finished the cleaning.
3.5 Power meter
The current power of the batteries is displayed in the power meter. Pay attention
to the power display during the work and do NOT leave the batteries in a low
voltage state, or else the service life of the batteries will be reduced.

8
Note: the interval of charging should be larger than 30 minutes.
3.6 Discharging water from the water tanks
The sewage tank should be cleaned every time you finish the work. The clean
water tank should be washed regularly to remove corrosion and small particles.
Before discharging the water tanks, move the machine to an appropriate place and
follow the instructions below.
FOR YOUR OWN SAFETY
Before discharging the water tanks, turn off the machine and take out the starting
key.
Discharging the sewage tank:
Unscrew the sewage tank cover counterclockwise and remove it.
Wash the sewage tank.
Remove and wash the floating filter screen inside the sewage tank.
3.7 Charging the batteries
NOTE
In order to extend the service life of the batteries and keep the machine in its best state,
the batteries can only be charged when the machine has been operating for 30 minutes;
do NOT keep the batteries in the low-power state for a long time.
Specifications of the charger:
Charger type: Lead-acid battery charger
Voltage output: 36 V
Current output: 25 Ah
Automatic circuit breaker
Suitable for deep cycle battery charging
EXTREMELY IMPORTAMT NOTE!
Hydrogen will be generated during the charging process. As a result, the charging
room must be well ventilated and without any spark or open fire, and the battery
box should be kept open during all the process.
FOR YOUR SAFETY
Please wear gloves and other protective devices to avoid contact with acid
substances.
Instructions on charging the batteries:
The charging room should be well ventilated.

9
Park the machine on the flat ground and turn off the switch.
Before charging the batteries, check the battery liquid level in every battery unit.
When charging the batteries, keep the sewage tank slightly open to facilitate
the ventilation.
Plug the AC cord of the charger into a well-grounded socket.
Plug the DC cord of the charger into the charging port behind the sewage tank.
The charging process will automatically begin and stop.
When the charging process is finished, check the battery liquid level again.
NOTE
The machine cannot be operated during the charging process, and do NOT unplug
the DC cord during this time.
3.8 Maintenance of the machine
The machine can be kept in its best condition if regular maintenance is performed.
ALERT!
Before maintaining the machine, disconnect the power or electric shocks may be
produced.
Daily maintenance:
Discharge and cleanse the sewage tank.
Remove and clean the floating filter screen inside the sewage tank.
Discharge the clean water tank and wash it with hot water (the temperature
of the water should NOT be higher than 60℃)
Remove and clean the brush plate and the scouring pad.
Clean the water absorbent strips of the squeegee. Keep the squeegee in a
lifted state to prevent the strips from being damaged.
Scrub the machine with an all-purpose cleaner and a damp cloth.
Charge the batteries.
Monthly maintenance
Remove the filter of the clean water tank and wash the filter screen. Make
sure that the clean water tank is discharged before removing the filter.
Clean the ends of the batteries to prevent corrosion.
Check whether the battery cables are loosened.
Check and clean the sealing strip of the sewage tank cover. Change it if it is broken.
Apply anti-waterlubricants onall the pivots and rollers to keep them running smoothly.
Check whether the nuts on the machine are loosened.
Check whether the machine leaks.

10
Other maintenance
Check the state of the driving motor, vacuum motor and the degree of wear
of the carbon brushes of all the motors. If a carbon brush is seriously worn
(10 mm), it has to be replaced.

11
Chapter 4 Common problems and solutions
The batteries cannot
be charged.
The charger fails.
Replace the charger.
The charging port is
oxidized.
The suction motor does
not work.
The fuse is blown.
Replace the fuse.
The brush plate motor
does not work.
The fuse is blown.
Replace the fuse.
No water outlet is
produced.
The clean water pipe is
blocked.
Clean the water pipe.
There are impurities in the
filter cover.
Clean the filter cover.
The electromagnetic valve
fails.
Check the electromagnetic
valve.
Loud noise is produced.
The squeegee is in the
wrong position.
Adjust the height of the
universal wheels of the
squeegee.
The suction motor is
broken.
Replace the suction
motor.
The brush plate
The brush plate drops
often.
Improper operation.
The brush plate buckle is
worn.
Replace the buckle.
The water suction
efficiency is low.
The floating ball cage is
blocked.
Clean the floating ball
cage.
The suction pipe is
blocked.
Clean the suction pipe.
The sealing of the sewage
tank is cracked.
Replace the sewage tank.
The strip of the squeegee
is cracked.
Replace the strip.

12
Chapter 8 After-sale services
8.1 General description
Seven-day guaranteed return, fifteen-day guaranteed replacement, one-year
warranty for the whole machine, 6-month warranty for damaged parts, and no
warranty for consumables (calculated from the next day after receiving the
machine).
The delivery receipt and purchase invoice are certificates for warranty and
must be kept properly.
8.2 Contents of warranty
Category
Contents
Warranty period
The entire machine
1 year
Damaged
parts
Fuses, universal wheels, electromagnetic
valve, flange buckles, filter
6 months
Consumables
Brush plate, scouring pad, needle plate,
sealing strip
No warranty
8.3 Cases not covered in the warranty
The operator fails to perform maintenance according to the instruction manual,
resulting in damage or failure.
The surface and/or the structure of the machine are obviously damaged due to
improper operation.
Disassembly or modification not approved by the original manufacturer.
Damage due to weather or force majeure.
The warranty is expired or the machine has been used for more than 1,500
hours.

13
Warranty Card
用户名
User’s name
联系电话
Tel
通讯地址
Address
票据号
Bill No.
购买时间
Date of purchase
机身编号
Serial number
产品型号
Type of product
日期
Date
更换配件:
Accessories to be replaced:
故障描述:
Fault description:

14
Anhui Chancee Technology Co., Ltd.
Direction: 11 Qiaowan Road, Heifei, Anhui, China
Website: www.chanceeglobal.com
Table of contents
Other CHANCEE Scrubber manuals


