CHANCEE M50 User manual


We explore safer, higher-end and more user-friendly cleaning equipment through technical advantage and idea innovation.

Preface
This instruction manual contains all the information that you need to use and maintain the machine. Please read it carefully before
getting started.
This instruction manual is an important part of the product and should be kept together with the machine.
In order to ensure your safety, the following instructions must be followed when operating the machine and performing
maintenance:
Do NOT use the machine after drinking or taking medicine.
Turn off the machine before any maintenance or repair.
The machine can only be used by trained and competent personnel; children and disabled people are forbidden to use it.
Keep the batteries away from sparks, flame and smoke.
Do NOT use the machine in places with flammable or explosive liquids, gases and vapor.
When operating the machine, do NOT wear loose clothing, and keep you body away from the moving parts of the machine.
Do NOT smoke when charging the batteries.
In the event of a fire, use a powder extinguisher instead of water.
Attention must also be paid when the machine is about to be scrapped. Since some harmful substances have met the
standards, they should be sent to a specific service center for treatment.
If you have any question, complaint or suggestion, please feel free to contact us and we will be at your service with all our
knowledge and enthusiasm.
We wish you a pleasant experience with our product!

Contents
Chapter 1 General description 1/3
1.1 Suitable scenes
1.2 Overview of the product
1.3 Controlling panel and keys
1.4 List of accessories
1.5 Consumables and optional items
Chapter 2 Unloading and assembling the machine 4/5
2.1 Unloading the machine
2.2 Assembling the machine
Chapter 3 Checks and adjustments before using the machine 6/7
3.1 Check items
3.2 Adjustment of the squeegee
Chapter 4 Instructions on operating the machine 8/10
4.1 Walking of the machine

4.2 Scrubbing the floor
4.3 Discharging sewage
4.4 Stopping the machine
4.5 Charging the batteries
Chapter 5 Cleaning and maintenance of the machine 11/12
5.1 Cleaning of the machine
5.2 Maintenance of the machine
Chapter 6 Storage and transportation of the machine 13
6.1 Storage of the machine
6.2 Transportation of the machine
Chapter 7 Common problems and solutions 14
1
Chapter 8 After-sale services 5
8.1 General description
8.2 Contents of warranty
8.3 Cases not covered in the warranty
Technical parameters & Warranty card

Chapter 1 General description
1.1 Suitable scenes
This product can be used in multiple scenes such as restaurants, schools, hospitals, factories, supermarkets and office buildings and
has a good cleaning effect on floors of epoxy, PVC, terrazzo, ceramic tile, wood and rubber.
1.2 Overview of the product
1
No.
Name No. Name
1 Sewage tank cover 9 Squeegee lifting handle
2 Brush plate 10 Brush plate lift pedal
3 Tire 11 Sewage discharging pipe
4 Universal wheel 12 Squeegee
5 Anti-collision wheel 13 Clean water inlet
6 Controlling panel 14 Suction motor
7 Handrail 15 Sewage inlet
8 Sewage discharging pipe
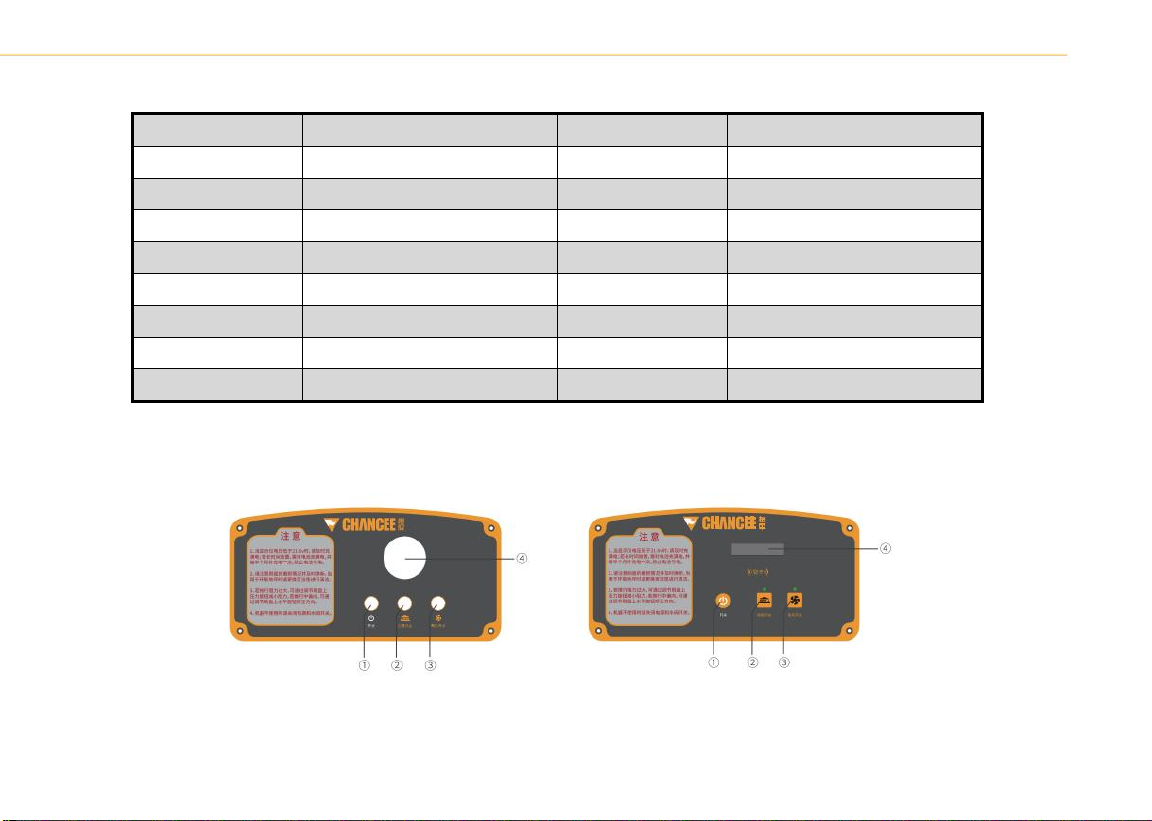
1.3 Controlling panel and buttons
① Switch button ③ Suction motor button
② Brush plate button ④ Voltmeter
2
1.4 List of accessories
When you receive the product, check whether all of the following items are presented. If there is any loss, contact the seller immediately.
Item
Number
Scrubber 1
Charger 1
Squeegee 1
Tool bag 1
Instruction manual 1
Warranty card 1
Spare fuses 2
1.5 Consumables and optional items
Consumables refer to accessories that become worn gradually and need to be replaced when they cannot work normally.
You can purchase consumables and optional accessories from the original manufacturer.
Consumables Optional items
Brush plate Needle plate
Sealing strip Scouring pad (red)
Needle plate Scouring pad (black)
Scouring pad (red) Scouring pad (white)
Scouring pad (black)
Scouring pad (white)
3

Chapter 2 Unloading and assembling the machine
2.1 Unloading the machine
Remove the packing carefully to avoid damaging the machine.
We recommend that you keep the packing of the product because it can be used again if you need to repair or transport the
machine.
Do NOT unload or unpack the machine violently.
2.2 Assembling the machine
2.2.1 Installing the squeegee
Use the squeegee lifting handle to put down the plastic squeegee holder.
Pass the squeegee fixing screws through the holes of the squeegee holder, and tighten them with plastic knobs:
2.2.2 Installing the sewage discharging pipe
Remove the cover of the sewage tank and insert the sewage suction pipe.
Insert the conical mouth of the suction pipe into the hole of the sewage tank, and the other end into the suction port of the
squeegee.
4
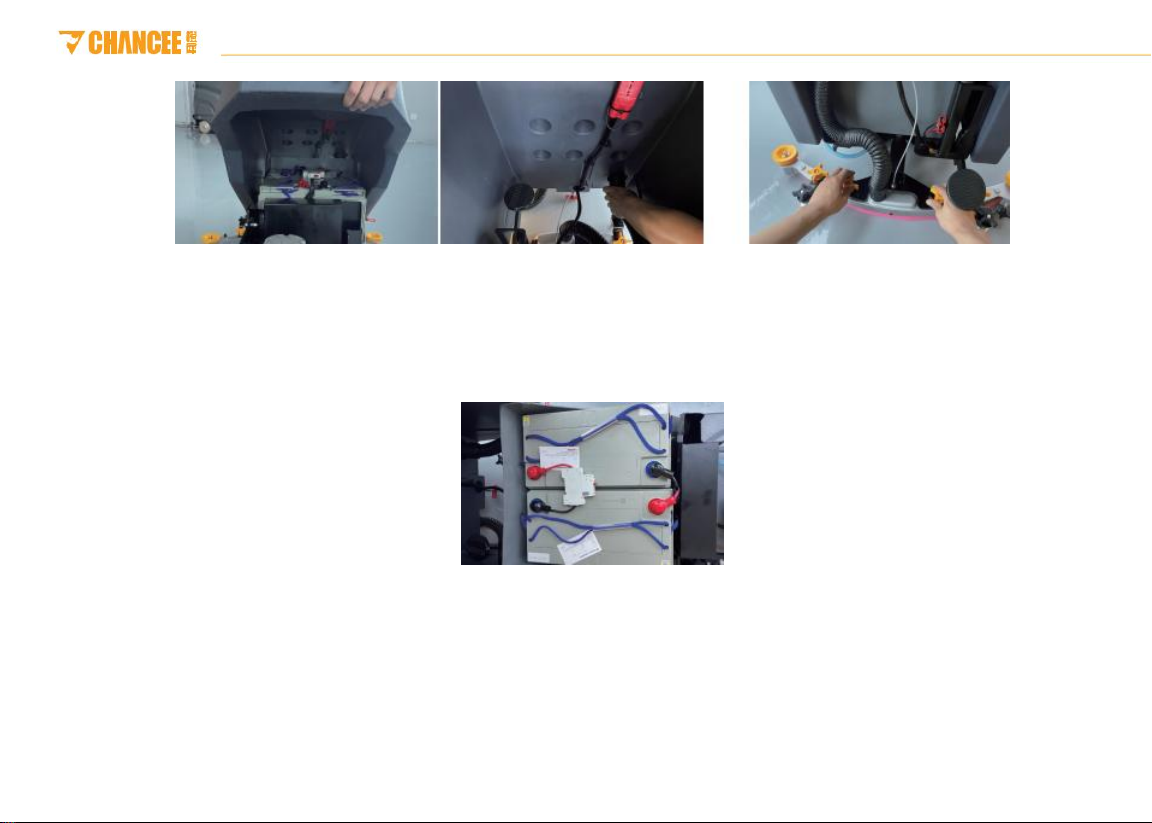
2.2.3 Connecting the battery cords
Open the sewage tank and check whether all the cables on the batteries are connected and tightened.
Connect the battery poles. Pay attention to the polarity.
Close the sewage tank.
5
Chapter 3 Checks and adjustments before using the machine
3.1 Check items
3.1.1 Checking the water volume in the clean water tank
Make sure that there is sufficient water in the clean water tank before work. Do NOT do the cleaning without enough water, or
dust may be sucked into the suction motor leading to loud noise and low working efficiency.
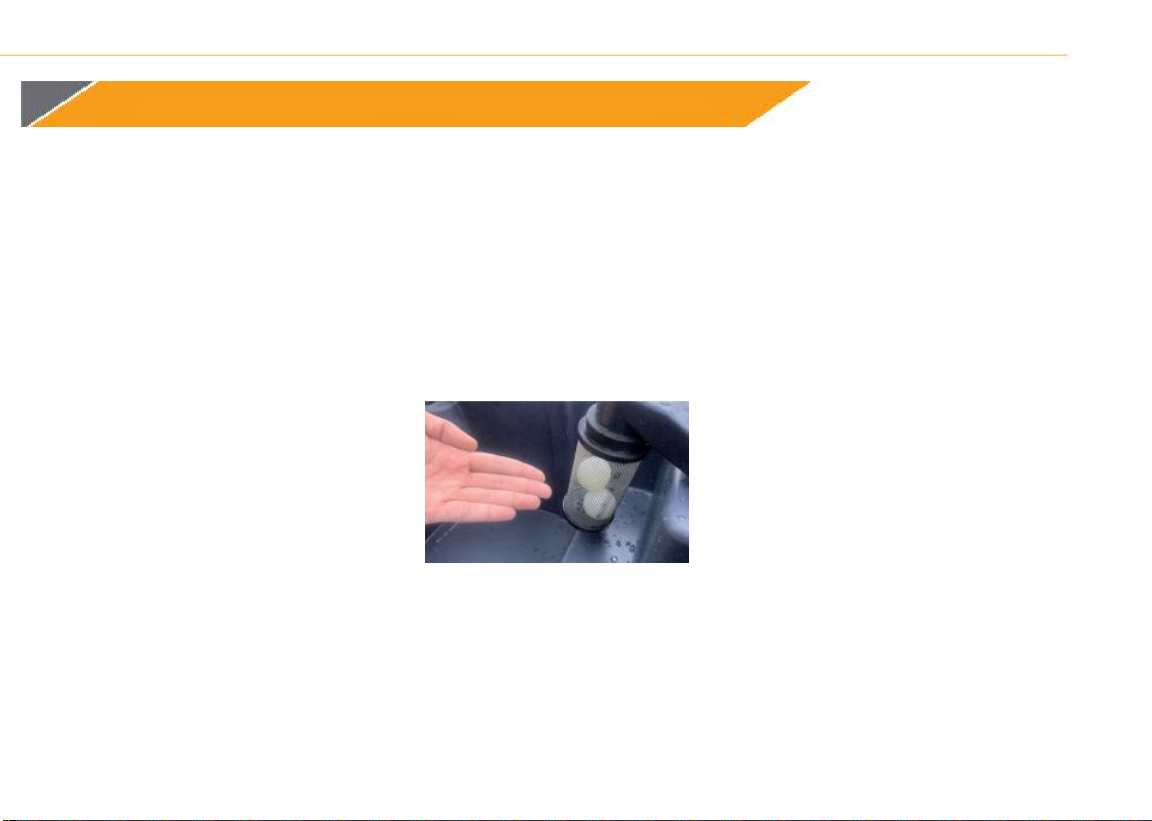
3.1.2 Checking the water level in the sewage tank
Pay special attention to the water level in the sewage tank. When the floating balls are in the highest position, discharge the
sewage tank immediately or the suction motor will be burnt.
3.1.3 Checking the voltage of the batteries
When the general switch is turned on, the current voltage of the batteries will be displayed on the voltmeter. If the last bar of
the voltmeter is flashing, the power is insufficient and please charge the batteries immediately.
Note that deep discharging (e.g. frequently using the machine when the voltage is lower than 21 V) will reduce the service life
of the batteries.
6

3.1.4 Checking the degree of wear of the brush plate
Check whether the brush plate is worn. If so, adjust the height of the brush plate or
replace it.
3.1.5 Checking the degree of wear of the strip
The strip needs to be replaced if:
the strip cannot touch the ground when the squeegee is put down, or
the strip is cracked.
3.2 Adjustment of the squeegee
Use the nuts on the universal wheels to lift or lower the squeegee. Make sure that the squeegee touches the ground during
your work.
7
Chapter 4 Instructions on operating the machine
4.1 Walking of the machine
When the general switch is turned off, you can push the machine forward after the brush
plate and the squeegee are lifted.
When the general switch is turned on, you can push the machine forward when the brush
plate and the squeegee are lowered and started.
If you need to pull the machine backward, make sure that the squeegee is lifted or the strip
and the sheet metal will be deformed.
4.2 Scrubbing the floor
Put down the brush plate and the squeegee.
Turn on the switch button.
Turn on the drain switch, the electromagnetic valve will be started and the brush plate begins to work.
Turn on the brush plate button and the brush plate begins to rotate.
Turn on the suction motor button and the suction motor begins to work.
Push the machine forward with your hands to started the cleaning.
Note: when the brush plate motor is turned on, do NOT leave the machine in the same place for a long time, because this
would leave unnecessary marks on the ground.
8

4.3 Discharging sewage
Before discharging the sewage tank, stop the machine and turn off the general
switch.
Put down the sewage discharging pipe, open the cap and discharge the sewage.
Use clean water to wash the sewage tank.
9

4.4 Stopping the machine
When the work is finished, discharge the sewage tank.
Move the machine to an appropriate storage place.
Turn off all the buttons on the controlling panel.
Lift the brush plate and the squeegee.
Note: if the machine is not about to be used for a long time, please fully charge the batteries, disconnect the battery cords
to avoid power loss.
4.5 Charging the batteries
Note: the machine is powered by two 12 V maintenance-free lead-acid batteries and the total system voltage is 24 V.
The total voltage of the batteries will gradually decrease during the work. When the last bar of the voltmeter is flashing, the
machine is running out of power and charge the batteries immediately.
When maintaining the batteries, please wear gloves to avoid contact with acid substances.
Check whether the battery cords are worn and the connecting parts are loose, and replace them when necessary.
Keep the batteries dry and clean and make sure that there are no dust on them, since it is extremely harmful to the batteries
and may even cause them to burn in severe cases. Do NOT put any object (especially metallic object) on the batteries either.
In order to extend the service life of the batteries, charge them immediately when the cleaning work is finished. Deep
discharging is strictly forbidden for it will reduce their capacity and service life.
The correct steps of charging the batteries: first install the batteries, then connect them to the mains.
If the machine is not about to be used within a long period of time, please fully charge the batteries and disconnect the battery
cords.
10

Chapter 5 Cleaning and maintenance of the machine
Regular maintenance can extend the service life of your machine.
5.1 Cleaning of the machine
Check the wheels regularly and remove entanglements.
Clean the sewage tank and the sewage discharging pipe with clean water regularly.
Clean the filter of the water valve. If there are impurities in its transparent cover, unscrew the filter and wash the cover
and the filter screen repeatedly.
Alert: do NOT wash the machine body with water directly, since it is NOT strictly water-proof and may be short-circuited or
burnt in this case.
5.2 Maintenance of the machine
5.2.1 Replacement of the brush plate
Part the machine on the flat ground and put down the brush plate.
Rotate the plastic handle counterclockwise to remove the brush.
Grab the bristles, lift the brush plate slightly and shake it from side to side, and then the brush plate will be removed.
When installing the new brush plate, make sure that the flange plate is aligned with the holes on the brush plate, and rotate it
in any direction to finish the installation.
Installation of the needle plate: add a scouring pad on the bottom of the needle plate, and install it following the instructions
above. You can purchase needle plates and scouring pads from the original manufacturer.
11

5.2.2 Replacement of the strip of the squeegee
Use the squeegee lifting button to lower the squeegee, rotate the plastic handle and take out the squeegee.
Remove the rear wheels of the squeegee, use a wrench to remove the fixing nuts of the squeegee, unscrew the fixing knob of
the squeegee bar, and take out the bar, the front strip, the rear strip and the squeegee.
Install the new squeegee and tighten the rear wheels and the fixing nuts.
12

Chapter 6 Storage and transportation of the machine
6.1 Storage of the machine
If you do not need to use the machine for a long time, please remove and wash the squeegee and the brush plate, and store
them in a dry clean place. We recommend that you store them in an airtight plastic container.
Make sure that the water tanks are discharged and cleaned.
Charge the battery before storing the machine. If you do not use the machine for a long time, charge the battery regularly (at
least once a month) to make sure that it has enough power.
6.2 Transportation of the machine
When lifting or lowering the machine, make sure that it is in a stable position to prevent it from tipping over or falling.
When the machine leaves the factory, it is fixed on a wooden pallet and carried on a transport vehicle with appropriate
equipment; upon arrival at the destination, the same equipment must be used for loading and unloading.
When using a forklift to move the machine, it must be handled together with the packing; avoid the machine from tipping over
or falling during the operation.
13

Chapter 7 Common problems and solutions
The batteries cannot be charged. The charger fails. Replace the charger.
The charging port is oxidized.
The suction motor does not work. The fuse is blown. Replace the fuse.
The brush plate motor does not work. The fuse is blown. Replace the fuse.
No water outlet is produced.
The clean water pipe is blocked. Clean the water pipe.
There are impurities in the filter cover. Clean the filter cover.
The electromagnetic valve fails. Check the electromagnetic valve.
Loud noise is produced. The squeegee is in the wrong position. Adjust the height of the universal
wheels of the squeegee.
The suction motor is broken. Replace the suction motor.
The brush plate The brush plate drops often. Improper operation.
The brush plate buckle is worn. Replace the buckle.
The water suction efficiency is low.
The floating ball cage is blocked. Clean the floating ball cage.
The suction pipe is blocked. Clean the suction pipe.
The sealing ofthe sewage tank is cracked. Replace the sewage tank.
The strip of the squeegee is cracked. Replace the strip.
Alert!
14

Chapter 8 After-sale services
8.1 General description
Seven-day guaranteed return, fifteen-day guaranteed replacement, one-year warranty for the whole machine, 6-month
warranty for damaged parts, and no warranty for consumables (calculated from the next day after receiving the machine).
The delivery receipt and purchase invoice are certificates for warranty and must be kept properly.
8.2 Contents of warranty
Category Contents
The entire machin
Warranty period
e 1 year
Damaged
parts
Fuses, universal wheels, electromagnetic
valve, flange buckles, filter 6 months
Consumables Brush plate, scouring pad, needle plate,
sealing strip No warranty
8.3 Cases not covered in the warranty
The operator fails to perform maintenance according to the instruction manual, resulting in damage or failure.
The surface and/or the structure of the machine are obviously damaged due to improper operation.
Disassembly or modification not approved by the original manufacturer.
Damage due to weather or force majeure.
The warranty is expired or the machine has been used for more than 1,500 hours.
15
Table of contents
Other CHANCEE Scrubber manuals


Popular Scrubber manuals by other brands


Tennant
Tennant T12 parts manual

Nilfisk-Advance
Nilfisk-Advance Liberty SC50 Instructions for use

Legend Brands
Legend Brands Prochem Ninja Warrior 200 PSI operating instructions

U.S. Products
U.S. Products HHP-150 Information & operating instructions

MasterCraft
MasterCraft MSR-15E Safety, operation and maintenance manual

Powr-Flite
Powr-Flite Phantom PFS28 Operator's manual