Charmate CM160-011 User manual
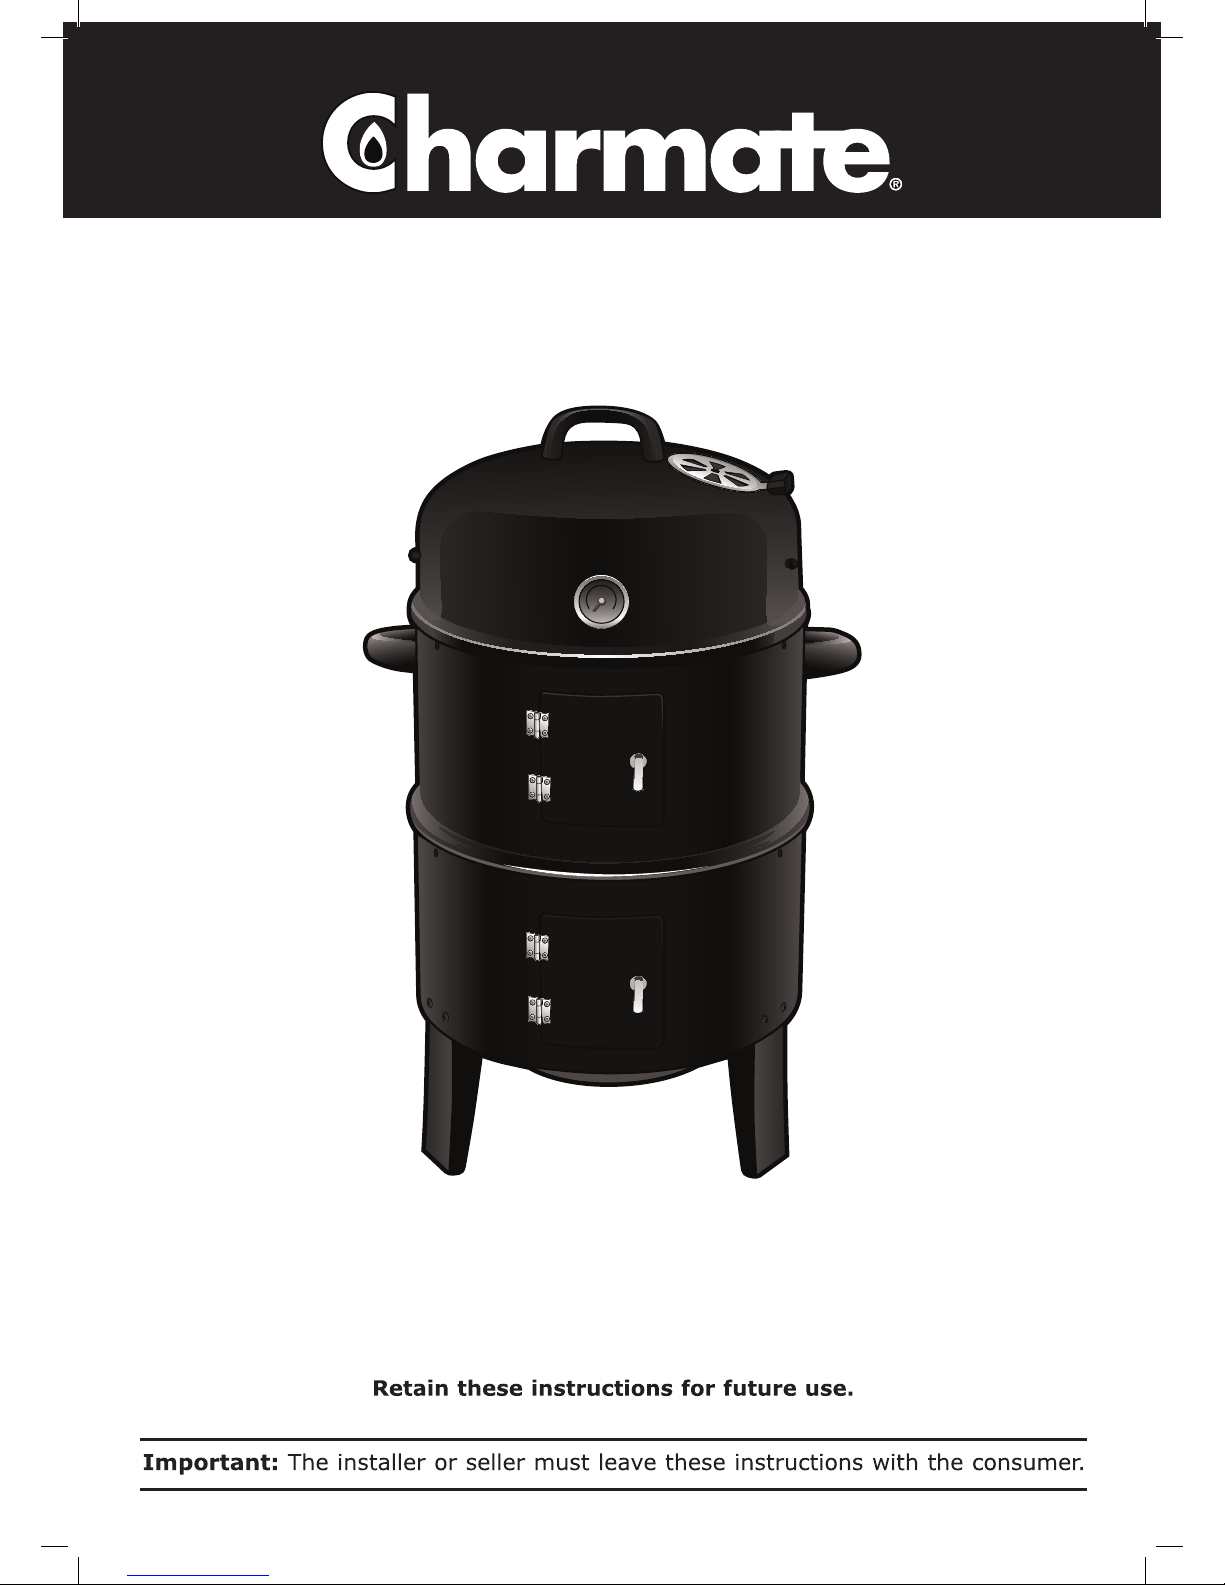
Smoker & Grill
FOR OUTDOOR USE ONLY
Model No. CM160-011
3926-06/14

3
2
We want you to assemble and use your
Charmate Smoker & Grill as safely as
possible.
When you see this safety alert symbol
please pay particular attention to
the information which follows it.
Read all safety warnings and instructions
carefully before assembling and operating
the Smoker & Grill.
Warning
• Only use this Smoker & Grill on a hard, level,
non-combustible, stable surface. Never use
on a wooden surface or one that could burn.
• Always use a drip pan/ash guard under
Smoker & Grill to protect surface from heat
damage and/or discoloration and to catch
ashes, embers and drippings. Place a thin
layer of water in drip pan/ash guard to help
extinguish falling ashes and embers. A drip
pan/ash guard is designed for use with the
Smoker & Grill for easy clean up of drippings
that can cause discoloration of surface and
to catch falling ashes and embers.
• Proper clearance of ten feet between the
smoker and any combustible material
(bushes, trees, wooden decks, wooden
fences, buildings, etc.) or construction
should be maintained at all times when
Smoker & Grill is in use. Do not place
Smoker & Grill under a roof overhang or
other enclosed area.
• For household use only. Do not use this
Smoker & Grill for other than its intended
purpose.
• For outdoor use only. Do not operate Smoker
& Grill indoors or in an enclosed area.
• Water bowl should always be used when
smoking. Do not allow liquid in water bowl
to completely evaporate. Check water bowl
every 2 hours and add water if level is low
(a sizzling should may indicate a need for
water). Follow instructions in “Adding Water
or Wood during Cooking” section of this
manual.
• Always keep water in the water bowl even
after food is removed from Smoker. Water
will evaporate and grease in water bowl can
catch on re.
• Do not move Smoker & Grill when water
bowl contains hot liquids and while it is in
use.
• Do not leave Smoker & Grill unattended
when in use.
• Use extreme caution when adding charcoal/
wood. Follow instructions in “Adding Water
or Wood during Cooking” section of this
manual.
Important Safety Warnings
• Do not store or use Smoker & Grill near
gasoline or other ammable liquids, gases or
where ammable vapors may be present.
• We do not recommend the use of lighting uid.
If you choose to use charcoal lighting uid,
only use lighting uid approved for lighting
charcoal. Carefully read instructions on the
charcoal lighting uid and charcoal prior to
use.
• Do not use self-starting charcoal. Use only
high grade plain charcoal or charcoal/wood
mixture.
• Do not use gasoline, kerosene or alcohol
for lighting charcoal. Use of any of these
or similar products can cause an explosion
possibly leading to severe bodily injury.
• Never add charcoal lighting uid to hot or
even warm charcoal.
• During grilling, grease from meat may drip
into the charcoal and cause a grease re.
If this should happen, replace dome lid to
suffocate the ame. Do not use water to
extinguish grease res.
• Use caution since ames can are-up when
fresh air suddenly comes in contact with re.
When opening the dome lid, keep hands, face
and body safe from hot steam and ame
are-ups. Remove the dome lid by tilting it
toward you to allow heat and steam to escape
away from your face.
• Use caution when assembling and operating
your Smoker & Grill to avoid scrapes or cuts
from sharp edges of metal parts.
• Check support brackets to make sure they are
secure and notches are upright before each
use.
• Place Smoker & Grill in an area where children
and pets cannot come into contact with unit.
Close supervision is necessary when Smoker &
Grill is in use.
• Use caution when lifting or moving Smoker &
Grill to prevent strains and back injuries.
• In windy weather, place Smoker & Grill in an
outdoor area that is protected from the wind.
• Do not wear loose clothing or allow hair to
hang freely while using Smoker & Grill.
• Use caution when reaching into or under
Smoker & Grill. Always wear oven mitts or
gloves to protect your hands from burns.
Avoid touching hot surfaces.
• We advise that a re extinguisher be on hand.
Refer to your local authority to determine
proper size and type of re extinguisher.
• Any accessory attachments not included with
this unit are not recommended and may lead
to personal injury or property damage.
• Never leave coals and ashes in Smoker & Grill
unattended.
• Before Smoker & Grill can be left unattended,
remaining coals and ashes must be removed

3
2
Smoking
Caution:
Before each use, check handles and
support brackets to make sure they
are securely fastened.
1. Remove dome lid and upper body from lower
body.
2. Always use high quality charcoal. We
recommend using a Charmate Chimney
Starter which speeds up the lighting process
and avoids the dangers associated with
charcoal lighter uid. Directions for use can be
found with the Chimney Starter.
3. If you do not use a Chimney Starter, carefully
place 2.5-3.5 kilos of charcoal in the charcoal
bowl. If you chose to use lighter uid or re
starters carefully follow the manufacturer’s
warnings.
4. If using lighter uid, saturate charcoal with
lighter uid and wait 2 to 3 minutes for uid to
soak in. Store charcoal lighter uid safely
away from Smoker & Grill.
5. Carefully light the charcoal and allow to burn
until covered with a light ash prior to closing
door and continuing to Step 6. This may take
up to 30 minutes, if you use a Charmate
Chimney Starter this may take less time.
Warning:
Failure to do this could trap fumes from
charcoal lighting uid in Smoker & Grill
and may result in a ash-re or
explosion when door is opened or dome
lid is removed.
6. Refer to “Flavoring Wood” section overleaf for
the recommended amount of avoring wood.
Use long cooking tongs to carefully place
avoring wood directly on top of hot charcoal
or into water bowl.
7. Place empty water bowl inside Smoker & Grill
body on the lower support brackets. Position
water bowl so rim is resting securely on
notched out step of all three support brackets.
8. Carefully, ll water bowl with warm water or
marinade to 2.5cm below the rim. A full pan
holds 4.5 – 5.5 litres of water and will last for
approximately 3-4 hours. Do not over ll or
allow water to overow from water bowl.
9. Place a cooking rack on the lower support
brackets directly above the water bowl.
10. Place food on the cooking rack in a single
layer with space between each piece. This will
allow smoke and moist heat to circulate evenly
around all pieces of food.
11. Place the upper body on lower body, making
sure the water bowl is still in place.
12. Place the other cooking rack on the upper
support brackets. Make sure the rim is resting
securely on the notched-out step of all three
support brackets. Place food on the cooking
rack and cover with dome.
from Smoker & Grill. Use caution to protect
yourself and property. Place remaining
coals and ashes in a non-combustible metal
container and completely saturate with water.
Allow coals and water to remain in metal
container 24 hours prior to disposing.
• Extinguished coals and ashes should be
placed a safe distance from all structures and
combustible materials.
• With a garden hose, completely wet the
surface beneath and around Smoker to
extinguish any ashes, coals or embers which
may have fallen during the cooking or cleaning
process.
• Store the Smoker & Grill out of reach of
children, indoors in a dry location when not in
use.
• Do not attempt to service Smoker & Grill
other than normal maintenance as explained
in “After-Use Safety and Proper Care &
Maintenance” sections of this manual.
• Properly dispose of all packaging material.
Use caution and common sense when
using your Smoker & Grill.
Failure to adhere to the safety warnings
and guidelines in this manual could result
in bodily injury or property damage.
Please keep this manual for future
reference.
Operating Instructions
Place the Smoker & Grill outdoors on a
hard, level and non-combustible surface
away from roof overhangs or any
combustible material. Never use on
wooden or other surfaces that could
burn. Place the Smoker & Grill away
from open windows or doors
to prevent smoke from entering
your house. In windy weather, place
the Smoker & Grill in an outdoor area that
is protected from the wind.
Never attempt to remove water bowl when
hot.
Read all safety warnings and instructions
carefully before operating your Smoker &
Grill.
5
4
Flavoring Wood
To obtain your favorite smoke avor, experiment
by using chunks, sticks or chips of avor-
producing wood such as manuka, apple or cherry.
Most fruit or nut tree wood can be used for smoke
avoring. Do not use resinous woods such as pine
as it will produce an unpleasant taste.
Wood chunks or sticks 7.5-10cm long and
1.25-2.5cm thick work best. Unless the wood is
still green, soak the wood in water for 20 minutes
or wrap each piece in foil and tear several small
holes in the foil to produce more smoke and
prevent the wood from burning too quickly. A lot
of wood is not required to obtain a good smoke
avor. A recommended amount is 3-4 wood
chunks or sticks. Experiment by using more wood
for stronger smoke avor or less wood for milder
smoke avor.
Adding Water or Wood during Cooking
Additional avoring wood should not have to be
added during the cooking process, however it may
be necessary when cooking very larger pieces of
meat. Follow the instructions and cautions below
to avoid injury while adding water and/or wood.
1. Remove dome lid by tilting it away from you
to allow heat and steam to escape away from
your face. Use caution since ames can
are-up when fresh air suddenly comes in
contact with re.
2. Wearing oven mitts carefully remove upper
body from lower body.
Warning
The water in water bowl will be extremely
hot. When lifting upper body from
lower body, use extreme caution
and make sure the water bowl is securely
in place on the three lower support
brackets.
Keep legs and feet out from under the upper body
to avoid being scalded by hot liquids spilling from
water bowl. Be extremely careful not to tilt or jar
the Smoker & Grill so that hot water does not spill
out of water bowl.
3. Set the upper body on a hard, level
non-combustible surface.
4. Stand back a safe distance and use long
cooking tongs to add wood, being careful not
to splash water.
5. If water level is low, add water to water bowl.
If food is on top cooking rack only, water may
be added to the water bowl by moving food
aside on cooking rack and pouring water down
through the cooking rack. Fill water bowl to
2.5cm below the rim. Pour slowly to avoid
splashing or overlling.
6. Using oven mitts replace upper body on lower
body.
The water in water bowl will be extremely hot.
When lifting Smoker & Grill body from ground,
13. Alternatively, lid contains two horizontal bars,
which hold hooks, ideal for hanging sh, ribs
or sausages.
14. Allow food to cook. After 3-4 hours of cooking,
check water level and refer to “Adding Water
or Wood during Cooking” section of this
manual.
15. Always use a meat thermometer to ensure
food is fully cooked before removing from
Smoker & Grill.
16. After cooking, allow Smoker & Grill to
cool completely then follow instructions in
the “After-Use Safety and Proper Care &
Maintenance” sections of this manual.
Grilling & Searing
1. Remove dome lid and upper body from lower
body.
2. Always use high quality charcoal. We
recommend using a Charmate Chimney
Starter which speeds up the lighting process
and avoids the dangers associated with
charcoal lighter uid. Directions for use can be
found with the Chimney Starter.
3. If you do not use a Chimney Starter, carefully
place 2.5-3.5 kilos of charcoal in the charcoal
bowl. If you chose to use lighter uid or re
starters carefully follow the manufacturer’s
warnings.
4. If using lighter uid, saturate charcoal with
lighter uid and wait 2 to 3 minutes for uid
to soak in. Store charcoal lighter uid safely
away from Smoker & Grill.
5. Carefully light the charcoal and allow to burn
until covered with a light ash prior to closing
door and continuing to Step 6. This may take
up to 30 minutes, if you use a Charmate
Chimney Starter this may take less time.
Warning
Failure to do this could trap fumes from
charcoal lighting uid in Smoker & Grill
and may result in a ash-re or explosion
when door is opened or dome lid is
removed.
6. Place a cooking rack on the lower body.
7. Place food on the cooking rack in a single layer
with space between each piece.
8. For best results, the dome lid should be placed
on the lower body when grilling food.
9. Always use a meat thermometer to ensure
food is fully cooked before removing from
Smoker & Grill.
10. After cooking, allow Smoker & Grill to
cool completely then follow instructions in
the “After-Use Safety and Proper Care &
Maintenance” sections of this manual.
Warning
When grilling, dripping from meat may
cause ame are-ups. Use extreme
caution when removing the dome lid. Do
not use water to extinguish a grease re.

5
4
After-Use Safety
Warning
• Always allow Smoker & Grill and all
components to cool completely before
handling.
• Never leave coals and ashes in Smoker & Grill
unattended.
• Before Grill can be left unattended, remaining
coals and ashes must be removed from
Smoker & Grill. Use caution to protect yourself
and property. Place remaining coals and ashes
in a non-combustible metal container and
completely saturate with water. Allow coals
and water to remain in metal container 24
hours prior to disposing.
• With a garden hose, completely wet surface
beneath and around the Smoker & Grill to
extinguish any ashes, coals or embers which
may have fallen during the cooking or cleaning
process.
• Extinguished coals and ashes should be
placed a safe distance from all structures and
combustible materials.
• Cover and store Smoker & Grill in a protected
area, out of reach of children.
Proper Care & Maintenance
• Wash cooking racks, water and charcoal pans
with hot soapy water, rinse well and dry.
Lightly coat cooking racks with vegetable oil or
vegetable cooking spray.
• Clean inside and outside of Smoker & Grill by
wiping off with a damp cloth. After cleaning,
apply a light coat of vegetable oil or vegetable
cooking spray to the interior surface of the
dome lid, smoker body, cooking racks and
water bowl. This simple process will help
reduce interior rusting. Do not apply oil to the
charcoal pan.
Note:
Smoke will accumulate and leave a residue in
the dome lid of your unit that may drip onto
food during cooking. To minimize accumulation
of residue, wipe off dome lid after each use.
• If rust appears on the exterior surface of your
Smoker & Grill, clean and buff the affected
area with steel wool or ne grit emery cloth.
Touch-up with a good high-temperature
resistant paint.
• Never apply paint to the interior surface. Rust
spots on the interior surface can be buffed,
cleaned, then lightly coated with vegetable
oil or vegetable cooking spray to minimize
rusting.
• Always keep your Smoker & Grill covered
when not in use to protect against excessive
rusting.
use extreme caution and make sure the water
bowl is securely in place on the three lower
support brackets. Keep legs and feet out from
under Smoker & Grill body to avoid being scalded
by hot liquids spilling from water bowl. Be
extremely careful not to tilt or jar Smoker & Grill
so hot water does not spill out of water bowl.
6. Replace food on cooking racks then place the
dome lid on upper body.
Option 2: Adding Charcoal or Wood during
Cooking
1. Stand back and carefully open side door using
pliers or similar tool. Use caution since ames
can are-up when fresh air suddenly comes in
contact with re.
2. Add charcoal or wood using long tongs.
3. Close side door and allow food to continue
cooking.
Cooking Tips
• Variations in avor can be achieved by adding
wine, soft drinks, herbs, spices, bits of citrus
peel, fruit juice, onion or marinades to the
water bowl.
• Brush poultry and naturally lean meats
with cooking oil, butter or margarine before
cooking.
• Meat should be completely thawed before
cooking.
• When cooking more than one piece of meat,
the cooking time is determined by the largest
single piece being cooked.
• The meat bastes itself while cooking in the
Smoker & Grill. No basting or turning is
necessary after the meat is placed on the
rack. For added variety, barbecue sauce or
marinade may be applied on meat before
placing on rack.
• There is very little difference in temperature
and cooking time between top and bottom
rack levels. When cooking different types or
cuts of meat at the same time, place the meat
that requires the least cooking time on the top
cooking rack so that it may be easily removed
rst. If only one cooking rack is required, use
the upper rack level for the best result.
• During the smoking process, avoid the
temptation to lift dome lid to check food.
Lifting the dome lid allows heat to escape,
making additional cooking time necessary.
• Always use a meat thermometer to determine
if food is done. Many variables (outside
cooking temperature, amount of charcoal,
the number of times the dome lid is removed,
proximity of food to heat source, etc) will
affect actual cooking times. When using a
meat thermometer, place probe mid-way into
the thickest part of the meat, making sure
that it does not touch any fat or bone. Allow
ve minutes for the thermometer to properly
regulate temperature.

7
6
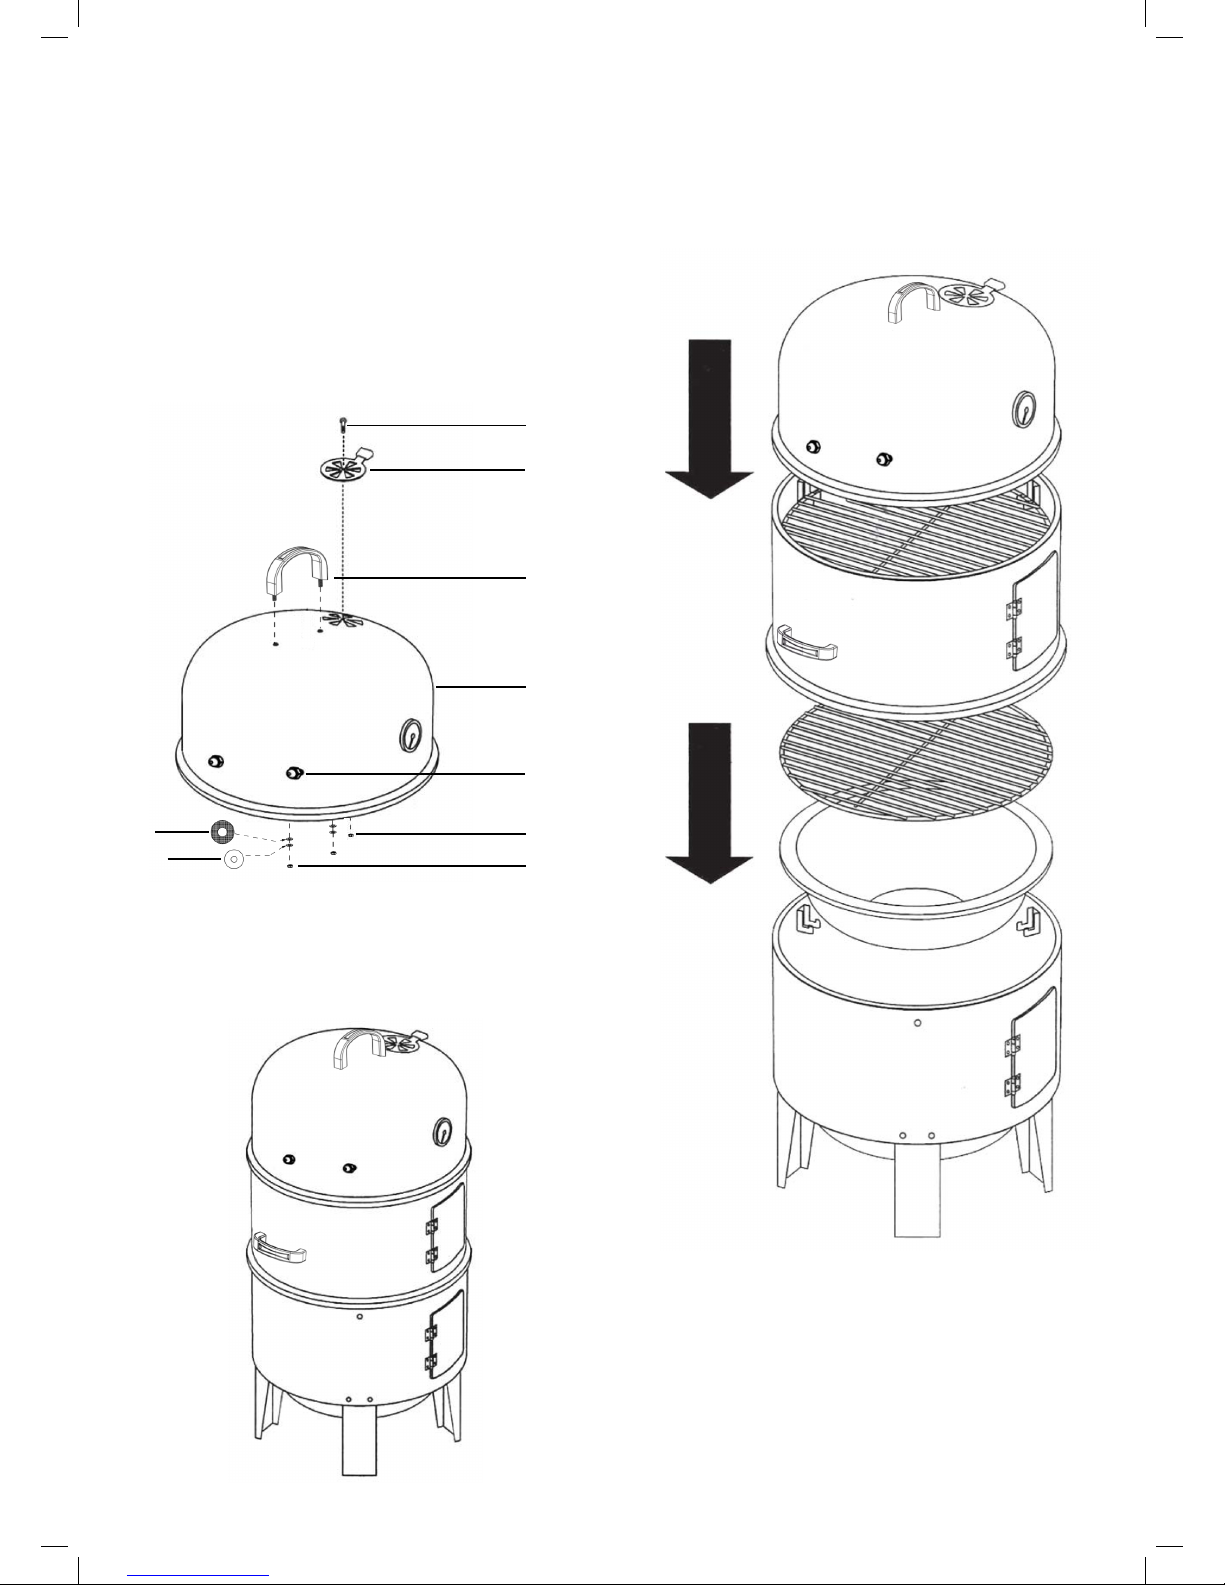
Exploded Diagram
S Hooks
L
N
M
K

7
6
Parts List
AA
X6
BB
X7
CC
X8
DD
X6
EE
X12
FF
X7
GG
X8
HH
X4
II
X6
Hardware
Lower Body
X 1
Charcoal Pan and Water Pan
X 2
Upper Body
X 1
Chrome Cooking Grill
X 2
Support Bracket
X 6 X 2
Dome Lid
X 1
Charcoal Grate
X 1
Leg
X 3
D
A
E
B
F
C
GH I
J K L
M
X3
Air Vent
X 1
Handle
X 3
Door
X 2
Iron Support
S Hook
N
X1
Thermometer

9
8
Assembly Instructions
Step 1
Attach three legs (G) to lower body (A) using six bolts (AA) & six nuts (EE), then attach door (H) to lower
body (A) using four bolts (CC) & four nuts (GG).
Attach three support brackets (K) to lower body (A) using three bolts (BB) & three nuts (FF).
Place charcoal grate (F) inside the charcoal pan (D).
Step 2
Attach door (H) to upper body (B) using four bolts (CC) and four nuts (GG).
Attach three support brackets (K) to upper body (B) using three bolts (BB) & three nuts (FF).
Attach two handles (J) on upper body (B) using four heat resistant plates (II), four washers (DD) and four
nuts (EE).
F
D
BB
K
FF
A
EE
G
H
GG
CC
BB
K
EE
J
BB
H
GG
CC
AA
B
FF
EE
DD
II
II
9
8
Assembly Instructions
Step 3
Attach handle (J) to dome lid (C) using two heat
resistant plates (II), two washers (DD) and two
nuts (EE).
Attach air vent (I) to lid (C) using one bolt (BB) &
one nut (FF).
Attach two iron supports (L) to dome lid (C) using
four nuts (HH).
Step 4
Stack the parts as shown below.
Final View of Charcoal
Smoker When Assembled
BB
I
J
C
EE
HH
o
o
FF
DD
II
BB
I
J
C
EE
HH
o
o
FF
DD
II
BB
I
J
C
EE
HH
o
o
FF
DD
II

11
10
Assembly Instructions
Step 5
The smoker can be used with lower body and dome lid only-as a charcoal grill, without needing to use
water pan.
o
o
Caution
Caution: Be careful to not spill hot water.
Ensure all bolts are tight.
o
o

11
10
placed a sprig of coriander inside each. Sprinkle
trout with the brown sugar, salt and pepper. Place
Manuka wood chips into Smoker & Grill and place
seasoned sh onto the grill above the chips.
Starting with a high heat to get a strong scent
of Manuka, then turning down to allow a slow
consistent cooking with the Manuka smoke. This
results in a beautiful caramel colour and tender
pink centres. When cooked, remove string and
serve as required.
Smoked Mussels
Steam required quantity of mussels open.
Marinate in sweet chilli sauce for 4 – 24 hours
with a little brown sugar added. Smoke for
approximately 20 minutes.
Smoked Mushrooms
4 cups mushrooms
2 tablespoons lemon pepper
2 tablespoons garlic powder
Cut mushroom stems off and wash. Sprinkle
lemon pepper and garlic powder lightly over
mushrooms. Smoke at 225°F for 45 minutes.
Cool; serve immediately.
Smoked Corn on the Cob
6 to 12 ears of corn with husks on
1/2 cup olive oil
1 bunch nely chopped green onions
(including tops)
Gently pull back the husks on the each ear.
Remove the silk but not the husks. Place the ears
in a large pot and cover with water. Let sit for
several hours.
Remove from water and brush each ear of corn
with olive oil, then sprinkle about 2 teaspoons
green onion over. Cover corn with husks. Repeat
with each ear of corn.
Prepare smoker. The ears of corn will need to
smoke at 225°F for about 1 1/2 hours.
When done smoking, remove husks and eat.
Smoked Chicken
1 chicken
50ml olive oil
Juice of one lemon
Salt & Pepper
Mix the olive oil and lemon juice together in a cup
or ramekin and then use a meat injector to inject
into the breast and the thighs. Use the last few
drops of the mix to rub over the skin and then
sprinkle with salt and pepper. Load the chicken
onto the cooking rack and place it in the smoker
at 110°C or 225°F for 60 minutes per .5 kilo.
It’s important to make sure the chicken is
properly cooked so ensure the juices run clear
when a skewer is placed in the meat or use a
thermometer. Breast meat should be at 165°F and
thigh meat at 175°F.
Smoked Herbed Chicken
1 (approx. 2 kilos) whole chicken
45 g butter
4 g chopped fresh parsley
6 g chopped fresh oregano
3 g chopped fresh basil
3 g fresh chives, nely chopped
Preheat outdoor Smoker & Grill for low heat.
Using hickory is a great option if you want to add
additional avour to the chicken.
Rinse chicken inside and out and pat dry. Loosen
skin around the breast area.
Place three tablespoons of butter in various places
under the skin. Mix herbs together and place
half under the skin and the other half inside the
chicken.
Cook chicken in Smoker & Grill for 4 hours or
until juices run clear when poked with a fork.
Manuka Smoked Trout
120 g x 4 portions Trout
Brown sugar
Salt & Pepper
2 handfuls Manuka chips
Coriander
Fillet trout taking care to remove all bones. Tie
2 llets together at a time with string, having
RECIPE IDEAS
Charmate® is a registered trademark of: Sitro Group Australia Pty Ltd. www.gasmate.com.au
Aber, Hamilton, N.Z. www.gasmate.co.nz
12
12
15
Table of contents
Other Charmate Grill manuals

Charmate
Charmate Corona CM155-028 User manual

Charmate
Charmate Marshall CM155-029 User manual

Charmate
Charmate Kamado CM155-024 User manual

Charmate
Charmate CM155-041 User manual

Charmate
Charmate Lawson 470 User manual

Charmate
Charmate Shogun CM155-055 User manual

Charmate
Charmate Kamado CM155-024 User manual
Popular Grill manuals by other brands


Brinkmann
Brinkmann Portable Tailgate Gas Grill owner's manual

Backyard
Backyard GBC1349W owner's manual

Trisa electronics
Trisa electronics 7570 Instructions for use

Tramontina
Tramontina TCP 320 Safety and instruction manual

Viking
Viking VGIB242TNSS Use & installation guide

GERMANICA
GERMANICA GE88EB instruction manual


