Charmate CM155-041 User manual
CHARMATE
CHARMATENZ
@CHARMATENATION
CHARMATE
CHARMATENZ
@CHARMATENATION
CHARMATE
CHARMATENZ
@CHARMATENATION
Cob Barrel
Barbecue & Smoker
Model No. CM155-041
Grill, roast or smoke generous amounts of food on the 950mm x 420mm cooking area
Durable high temperature powder coated 1.2mm solid steel construction
Temperature control with four adjustable air vents and lid mounted temperature gauge
Easy to clean porcelain enamel grill with swing-away warming rack
Adjustable height charcoal grate regulates heat intensity
Large stainless steel cool-touch handle
Sturdy and stable cross-leg stand design ensures stability
Assembled dimensions (mm): 1060 W x 1020 H x 545 D
FOR OUTDOOR USE ONLY
DO NOT OPERATE THIS APPLIANCE BEFORE READING THE INSTRUCTION BOOKLET
DO NOT PLACE ARTICLES ON OR AGAINST THIS APPLIANCE
DO NOT STORE CHEMICALS OR FLAMMABLE MATERIALS OR SPRAY AEROSOLS NEAR THIS APPLIANCE
DO NOT OPERATE THE APPLIANCE INDOORS
DO NOT OPERATE IN AN ENCLOSED AREA. ACCESSIBLE PARTS MAY BE VERY HOT. KEEP YOUNG CHILDREN AWAY.
MINIMUM CLEARANCES FROM COMBUSTIBLE MATERIALS: 3 METRES
is a registered trademark of: Sitro Group Australia Pty Ltd - www.sitro.com.au & Aber, Hamilton, N.Z - www.charmate.co.nz
Important: Retain these instructions for future use.
4772-07/17

32
Important Safety Warnings
We want you to assemble and use your Charmate Smoker
as safely as possible.
When you see this safety alert symbol please
pay particular attention to the information
which follows it.
Read all safety warnings and instructions carefully before
assembling and operating the Smoker.
Warning
• Place the smoker on an even, horizontal, secure, heat-
resistant and clean surface.
• Always use a drip pan/ash guard under Smoker to
protect surface from heat damage and/or discoloration
and to catch ashes, embers and drippings. Place a thin
layer of water in drip pan/ash guard to help extinguish
falling ashes and embers. A drip pan/ash guard is
designed for use with the Smoker for easy clean up of
drippings that can cause discoloration of surface and
to catch falling ashes and embers.
• Proper clearance of 1 metre between the smoker and
any combustible material (bushes, trees, wooden
decks, wooden fences, buildings, etc.) or construction
should be maintained at all times when Smoker is in
use. Do not place Smoker under a roof overhang or
other enclosed area.
• For household use only. Do not use this Smoker for
other than its intended purpose.
• For outdoor use only. Do not operate Smoker indoors or
in an enclosed area.
• Do not leave Smoker unattended when in use.
• Do not store or use Smoker near gasoline or other
ammable liquids, gases or where ammable vapors
may be present.
• We do not recommend the use of lighting uid.
If you choose to use charcoal lighting uid, only
use lighting uid approved for lighting charcoal.
Carefully read instructions on the charcoal lighting
uid and charcoal prior to use.
• Do not use self-starting charcoal. Use only high
grade plain charcoal or charcoal/wood mixture.
• Do not use gasoline, kerosene or alcohol for lighting
charcoal. Use of any of these or similar products can
cause an explosion possibly leading to severe bodily
injury.
• Never add charcoal lighting uid to hot or even
warm charcoal.
• During grilling, grease from meat may drip into
the charcoal and cause a grease re. If this should
happen, close lid to suocate the ame. Do not use
water to extinguish grease res.
• Use caution since ames can are-up when fresh air
suddenly comes in contact with re. When opening
the lid, keep hands, face and body safe from hot
steam and ame are-ups.
• Use caution when assembling and operating your
Smoker to avoid scrapes or cuts from sharp edges of
metal parts.
• Check support brackets to make sure they are
secure before each use.
• Place Smoker in an area where children and
pets cannot come into contact with unit. Close
supervision is necessary when Smoker is in use.
• Use caution when lifting or moving Smoker to
prevent strains and back injuries.
• In windy weather, place Smoker in an outdoor area
that is protected from the wind.
• Do not wear loose clothing or allow hair to hang
freely while using Smoker.
• Use caution when reaching into or under Smoker.
Always wear oven mitts or gloves to protect your
hands from burns. Avoid touching hot surfaces.
• We advise that a re extinguisher be on hand. Refer
to your local authority to determine proper size and
type of re extinguisher.
• Any accessory attachments not included with this
unit are not recommended and may lead to personal
injury or property damage.
• Never leave coals and ashes in Smoker unattended.

32
• Before Smoker can be left unattended, remaining
coals and ashes must be removed from Smoker.
Use caution to protect yourself and property. Place
remaining coals and ashes in a non-combustible
metal container and completely saturate with water.
Allow coals and water to remain in metal container
24 hours prior to disposing.
• Extinguished coals and ashes should be placed a
safe distance from all structures and combustible
materials.
• With a garden hose, completely wet the surface
beneath and around Smoker to extinguish any
ashes, coals or embers which may have fallen during
the cooking or cleaning process.
• Store the Smoker out of reach of children, indoors in
a dry location when not in use.
• Properly dispose of all packaging material.
• Use caution and common sense when
using your Smoker.
• Failure to adhere to the safety warnings
and guidelines in this manual could result
in bodily injury or property damage.
• Please keep this manual for future
reference.
Operating Instructions
Preparing to use your Smoker
Before cooking with your smoker, the following steps
should be closely followed to both cure the nish and
season the interior steel. Failure to properly follow
these steps may damage the nish and/or impart
metallic avours to your rst foods.
1. Brush all interior surfaces including grills and grates
with vegetable cooking oil.
2. Build a small re on the re grate or pan, being sure
not to lay coals against the walls.
3. Close door. (Position damper and smoke stack
damper approximately at one quarter open). This
burn should be sustained for at least two hours, the
longer the better. Then begin increasing temperature
by opening the damper and smoke stack damper
half-way and adding more charcoal.
Your smoker is now ready for use.
Rust can appear on the inside of your smoker.
Maintaining a light coat of vegetable oil on interior
surfaces will aid in the protection of your unit. Exterior
surfaces of smoker may need occasional touch up. We
recommend the use of a commercially available black
high temperature spray paint.
NEVER PAINT THE INTERIOR OF THE UNIT!
• Place the Smoker outdoors on a hard,
level and non-combustible surface away
from roof overhangs or any combustible
material. Never use on wooden or other
surfaces that could burn. Place the
Smoker away from open windows or
doors to prevent smoke from entering
your house. In windy weather, place
the Smoker in an outdoor area that is
protected from the wind.
• Read all safety warnings and instructions
carefully before operating your Smoker.

54
Lighting
1. Always use high quality charcoal. We recommend
using a Charmate Chimney Starter which speeds
up the lighting process and avoids the dangers
associated with charcoal lighter uid. Directions for
use can be found with the Chimney Starter.
2. If you do not use a Chimney Starter, stack charcoal
briquettes or wood into a pyramid-shaped pile on
top of the charcoal grate or ash pan. We recommend
using 2kg (approximately 45 briquettes) to start
your re, adding more as needed.
3. If using lighter uid, saturate the charcoal
briquettes with lighter uid and let it soak in
for approximately 5 minutes. If using a chimney
starter, electric starter, or other type of re starter,
light your re according to the manufacturer’s
instructions.
4. Always light the re with the grill lid open. Carefully
light the charcoal and allow to burn until covered
with a light ash prior to closing lid. This may take up
to 30 minutes, if you use a Chimney Starter this may
take less time.Failure to do this could trap fumes
from charcoal lighter uid in grill and may result in a
ash re when lid is opened.
5. Never add charcoal lighter uid to hot or warm coals
as ashbacks may occur causing injury.
6. You are ready to begin cooking when the pile of
briquettes ashes over and produces a red glow
(approximately 12 – 15 minutes).
7. Depending on your cooking method, either leave
the briquettes in a pile or spread evenly across the
charcoal grate using a long-handled poker.
Smoker Maintenance
Frequency of clean-up is determined by how often
the grill is used. Make sure coals are completely
extinguished before cleaning inside of the unit.
Thoroughly rinse with water and allow to air dry
before using again. Wipe out the interior of the unit
with a cloth or paper towels. When nished cooking,
and the unit has adequately cooled, clean out all
remaining ashes.
Ashes collect moisture, which can lead to premature
rusting and decay. Periodically coating the interior
surfaces with vegetable oil will aid in the protection
of your unit. Also, occasional touch up of the exterior
paint will be required. Black, high-temperature spray
paint is recommended.
NEVER PAINT THE INTERIOR OF THE UNIT.
Cooking Surface: If a bristle brush is used to clean any
of the grill cooking surfaces, ensure no loose bristles
remain on cooking surfaces prior to grilling. It is not
recommended to clean cooking surfaces while grill is
hot.
Know when your re is ready
Successful charcoal grilling depends on a good re. The
general rule for knowing when your coals are ready for
grilling is to make sure that 80% or more of the coals
are ashy grey. Using caution, arrange the hot coals on
your charcoal grate based on your desired method of
cooking. Here are a few steps you can take to adjust
the temperature of your re:
- If it is too hot, spread the coals out a bit more, which
makes the re less intense.
- Partially close the vents in the grill, which reduces
the amount of oxygen that feeds the re.
- Use the indirect grilling method, with coals to either
side of drip pan and the food over the pan rather
than directly over the coals.
- In the event of a severe are-up, spray the ames
with water from a squirt bottle. Be careful, spraying
with water tends to blow ashes around and make a
mess.
- Add briquettes 2 or 3 at a time to increase the burn
time. Allow 10 minutes for coals to ash over before
adding more.
Smoking and Slow Cooking
Remove the cooking grill from the rebox and build
your re on top of the re grate in the rebox. Either
charcoal or wood may be used, but wood is the
recommended fuel for its rate of burn and the avour
it imparts to the food being cooked. Most seasoned
hardwoods are good for smoking such as hickory,
mesquite, pecan, oak, and many other fruit woods.

54
Bark should be avoided or turned o rst as it contains
a high acid content and imparts an acrid avour.
After allowing the re to burn down, close the
doors and control the temperature and smoke with
the dampers located on the rebox and atop the
smokestack. Smoke is contained within the chambers,
which will reduce burn while imparting more smoke
avour. Do not operate the Smoker with temperatures
exceeding 230ºC in the smoker chamber.
Place the food in the smoker chamber and monitor the
temperature. Cooking and smoking are taking place
using indirect heat. There is no need to worry about a
grease re are-up ruining the food. Do not place food
within 15cm of the opening from the rebox into the
smoker chamber. A general rule of thumb for cooking is
about 1 hour per .45kg for smoking large cuts of meat.
Refer to a cook book for specic cuts of meat. Limit the
number of times you open the smoker chamber door as
this will allow heat to escape and extend the cooking
time.
Smoking with Wood Chips/Wood Chunks
For a more robust smoke avour while using charcoal
briquettes or lump charcoal, try adding wood chips
or several wood chunks to the re. Wood chunks are
available in a variety of natural avours and can be
used alone or in addition to charcoal. As a general rule,
any hardwood that bears a fruit or nut is suitable for
cooking. However, dierent woods have very dierent
tastes.
Experiment with dierent woods to determine your
personal favourite, and always use wellseasoned
wood. Green or fresh-cut wood can turn food black,
and tastes bitter.
Our Recommendations:
Chicken Alder, Apple, Hickory, Mesquite
Beef Hickory, Mesquite, Oak
Pork Fruitwoods, Hickory, Oak
Lamb Fruitwoods, Mesquite
Veal Fruitwoods, Grapevines
Seafood Alder, Mesquite
Vegetables Mesquite
Food Safety
Food safety is a very important part of enjoying the
outdoor cooking experience. To keep food safe from
harmful bacteria, follow these four basic steps:
Clean: Wash hands, utensils, and surfaces with hot
soapy water before and after handling raw meat.
Separate: Separate raw meats from ready-to-eat foods
to avoid cross contamination. Use a clean platter and
utensils when removing cooked foods.
Cook: Cook meat and poultry thoroughly to kill
bacteria. Use a thermometer to ensure proper internal
food temperatures.
Chill: Refrigerate prepared foods and leftovers
promptly.
Cooking on your new grill is a hands-on experience,
and it is recommended to remain outside with your
grill while cooking. Grilling can be aected by many
external conditions. In cold weather, you will need
more heat to reach an ideal cooking temperature,
and grilling may take longer. The meat’s internal
temperature and thickness can also aect cooking
times. Cold and thicker meats will take longer to cook.
Internal Meat Temperatures
Meat cooked on a grill often browns very fast on the
outside. Therefore, use a meat thermometer to ensure
it has reached safe internal temperatures.
Beef, veal, lamb, steak, roasts &
whole pork 63ºC
Fish 63ºC
Beef, veal, lamb & pork – ground 71ºC
Egg dishes 71ºC
Turkey, chicken & duck – whole pieces
& ground 74ºC
This internal temperature chart is based on USDA
standards for meat doneness.

76
Assembly Instructions Hardware
For Easiest Assembly:
• To avoid losing any small components or hardware,
assemble your product on a hard level surface that
does not have cracks or openings. You may wish to lay
down a blanket or similar, to avoid possible damage to
the nish during assembly.
• Clear an area large enough to layout all components
and hardware.
• Great care has been taken during production to remove
sharp edges but you should handle all components
with care to avoid injury.
• Check you have all components before beginning.
• When applicable, tighten all hardware connections by
hand rst. Once the step is completed go back and fully
tighten all hardware.
• Follow all steps in order to properly assemble your
product.
Typical assembly: approximately ½ hour.
Tools Needed:
• 5/16” Open End Wrench
• Slotted Screwdriver
• Pliers
• Phillips Head Screwdriver
A. φ6x16 Washer
Qty. x14
B. M6x110 Screw
Qty. x2
C. M6 Nut
Qty. x6
D. M6x20 Screw
Qty. x6
E. M6x16 Screw
Qty. x4
F. M6x25 Screw
Qty. x6
G. M6x12 Screw
Qty. x4

76
No. Description Qty
1 Lid 1
2 Thermometer 1
3 Air Vent 1 4
4 Air Vent 2 4
5 Lid Handle Support 2
6 Lid Handle 1
7 Warming Rack 1
No. Description Qty
8 Cooking Grid 3
9 Charcoal Grid 1
10 Charcoal Grid Holder 2
11 Handle 2
12 Fire Bowl 1
13 Leg A 1
14 Leg B 1
Exploded View
1
2
3
4
5
6
7
89
10
12
11
13
14
98
B
A
C
A
D
A
AD
E
C
B
A
C
A
D
A
AD
E
C
B
A
C
A
D
A
AD
E
C
Assembly Instructions
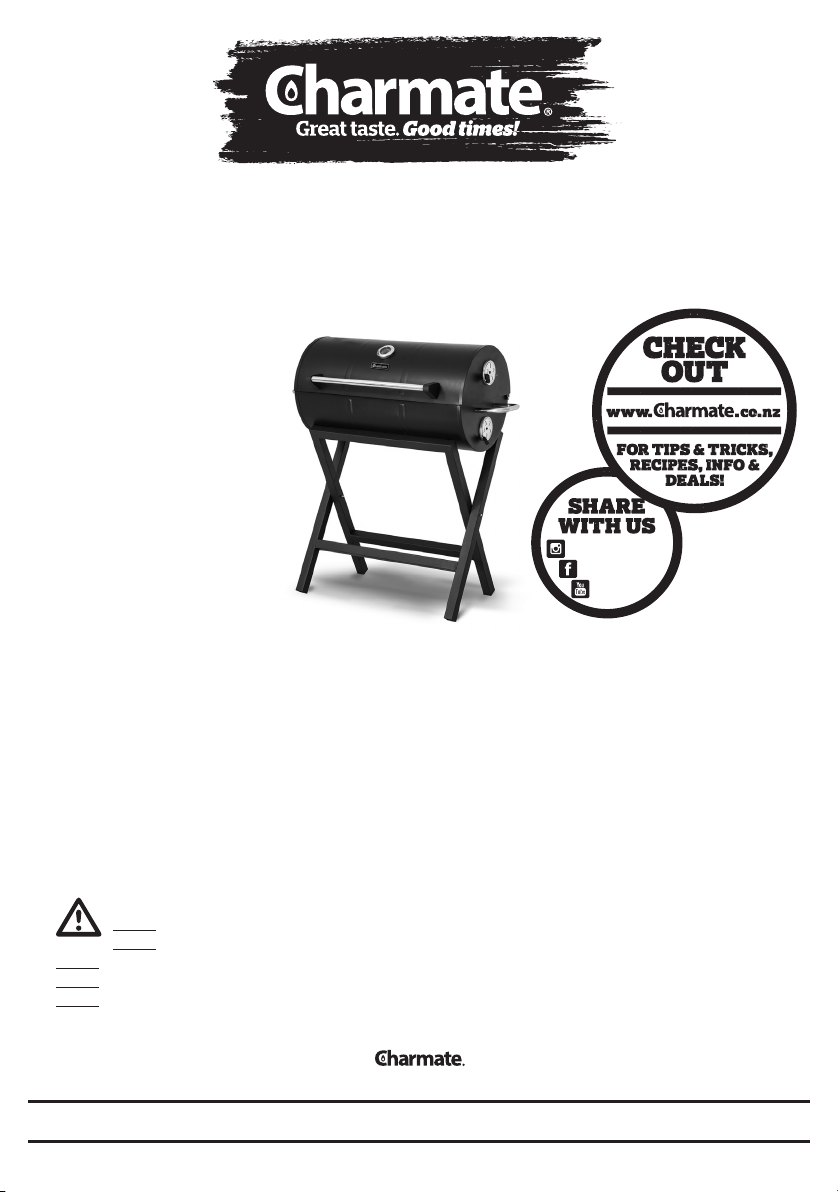
Step 1
Assemble leg structure by slotting Leg A (13) inside Leg B (14) as
shown. Secure together in middle of legs using 2 x M6x110 bolts
(B), 4 x washer (A) on either side of the leg and 2 x M6 nut (C)
inside each leg.
Step 2
With the legs lying on their side, from the inside, attach the
re bowl (12) to one side of the legs using 3 x M6X20 bolts (D)
and 3 x washers (A).
Step 3
Place the legs and re bowl upright and attach from the
inside, the remaining side, using 3 x M6X20 bolts (D) and
3 x washers (A).
Step 4
Secure air vent assembly (parts 3 & 4) to ends of re bowl
with 2 x M6x16 bolts (E) and 2 x M6 nuts (C) as shown.
B
A
C
A
D
A
AD
E
C

98
G
E
C
A
F
G
E
C
A
F
G
E
C
A
F
G
E
C
A
F
Assembly Instructions
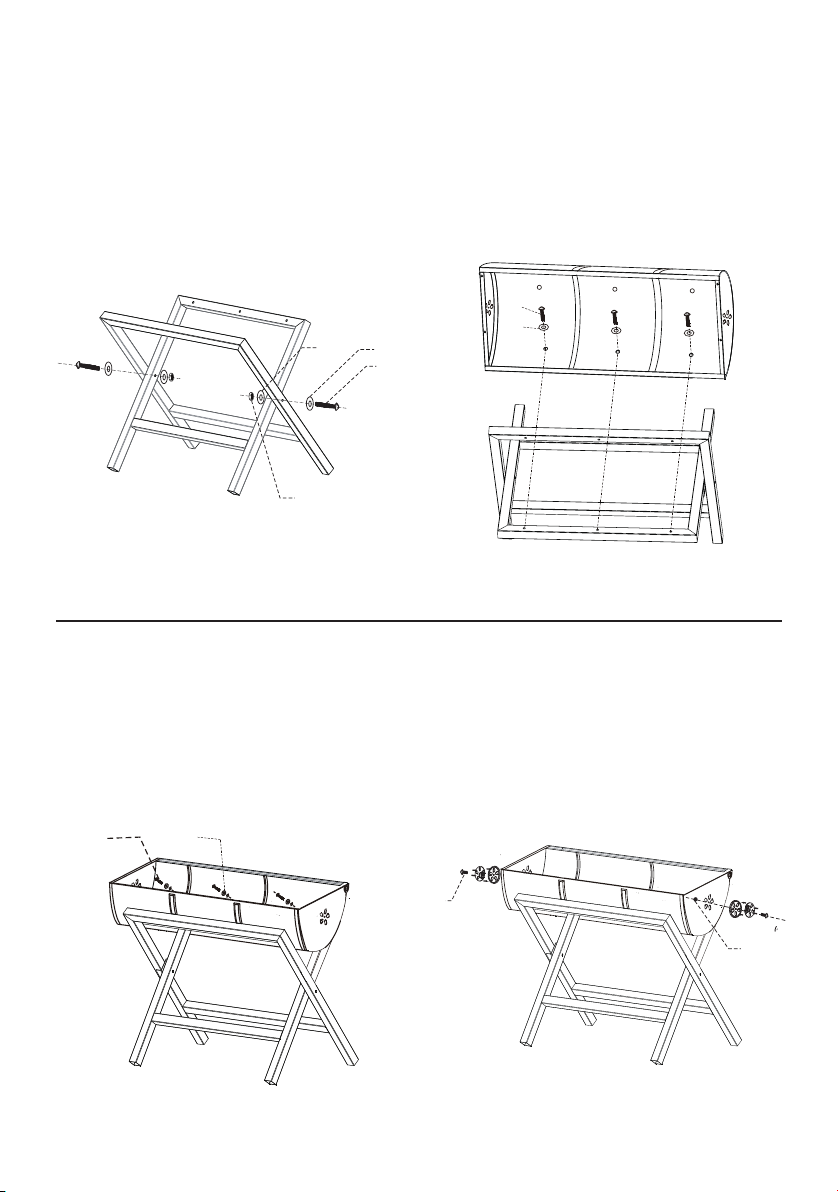
Step 5
Attach handles (11) to the sides of re bowl with 4 x M6-15 (C)
bolts and 4 x washers (A) from the inside of re bowl.
Step 6
Hang charcoal grid (9) by charcoal grid holders (10) and secure
holders to the ends of re bowl using hooks inside re bowl,
as shown. Ensure that the charcoal grid is level by aligning
charcoal grid holders at same level on each end.
Step 7
Insert lid handle (6) ends into each lid handle support (5) and
attach to lid (1) with 4 x M6x12 (G) bolts.
Secure air vent assembly (parts 3 & 4) to ends of lid (1) with
2 x M6x16 bolts (E) and 2 x M6 nuts (C) as shown.
Step 8
Insert temperature gauge (2) into lid and secure from behind
with wing nut supplied ensuring gauge is correctly aligned.
1110
F
F
F
Assembly Instructions
Step 9
Join lid and re bowl together at the back with 2 x M6x25
bolts (F).
Step 10
Insert warming rack (7) by slotting back solid bar into lid in
holes provided. Then insert swing bar end into re bowl sides in
holes provided.
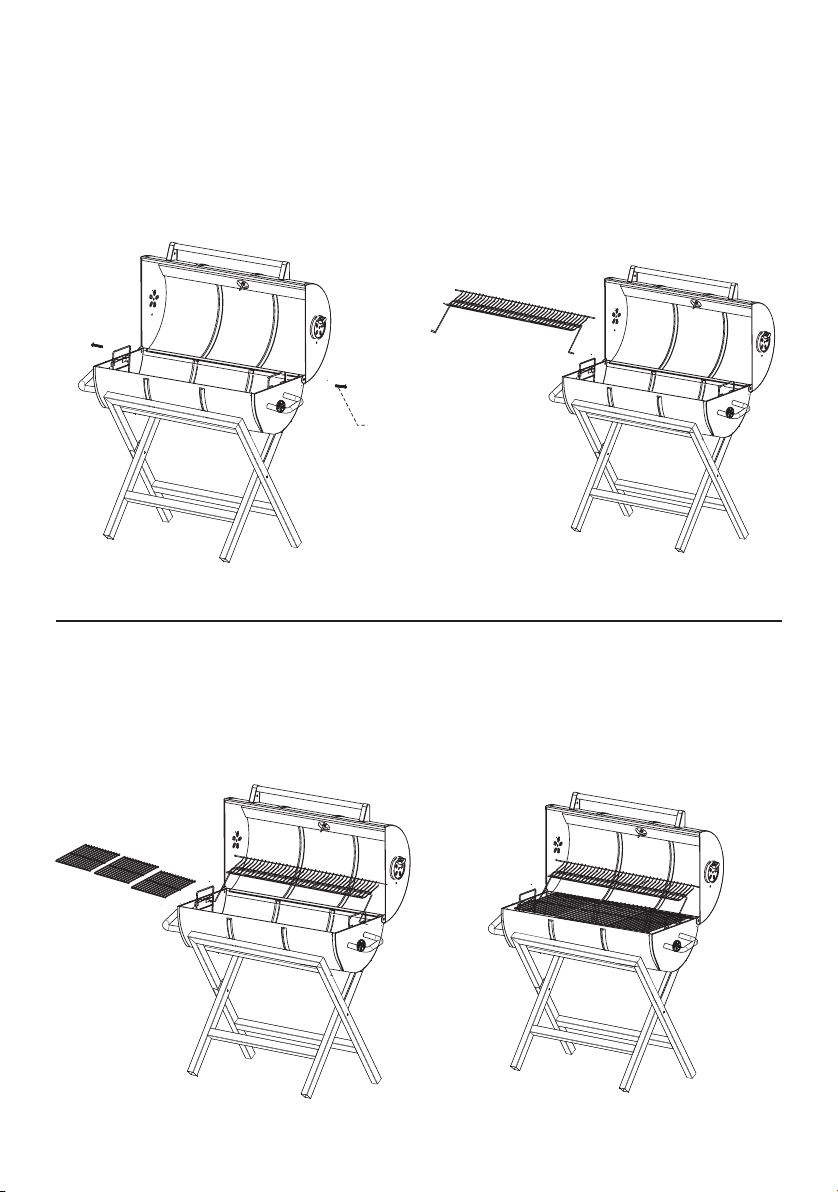
Step 11
Place 3 x cooking grates (8) into re bowl on shelf edge.
Step 12
Congratulations you have completed the assembly of your
Charmate Cob Barrel BBQ. Please follow the instructions to
season your BBQ.
F

1110
Recipe Ideas
Smoked Chicken
1 chicken
50ml olive oil
Juice of one lemon
Salt & Pepper
Mix the olive oil and lemon juice together in a cup or
ramekin and then use a meat injector to inject into the
breast and the thighs. Use the last few drops of the mix to
rub over the skin and then sprinkle with salt and pepper.
Load the chicken onto the cooking rack and place it in the
smoker at 110°C or 225°F for 60 minutes per .5 kilo.
It’s important to make sure the chicken is properly cooked
so ensure the juices run clear when a skewer is placed in
the meat or use a thermometer. Breast meat should be at
165°F and thigh meat at 175°F.
Smoked Herbed Chicken
1 (approx. 2 kilos) whole chicken
45 g butter
4 g chopped fresh parsley
6 g chopped fresh oregano
3 g chopped fresh basil
3 g fresh chives, nely chopped
Preheat outdoor Smoker for low heat. Using hickory is a
great option if you want to add additional avour to the
chicken.
Rinse chicken inside and out and pat dry. Loosen skin
around the breast area.
Place three tablespoons of butter in various places under
the skin. Mix herbs together and place half under the skin
and the other half inside the chicken.
Cook chicken in Smoker for 4 hours or until juices run
clear when poked with a fork.
Smoked Mussels
Steam required quantity of mussels open. Marinate in
sweet chilli sauce for 4 – 24 hours with a little brown
sugar added. Smoke for approximately 20 minutes.
Smoked Mushrooms
4 cups mushrooms
2 tablespoons lemon pepper
2 tablespoons garlic powder
Cut mushroom stems o and wash. Sprinkle lemon pepper
and garlic powder lightly over mushrooms. Smoke at
225°F for 45 minutes. Cool; serve immediately.
Manuka Smoked Trout
120 g x 4 portions Trout
Brown sugar
Salt & Pepper
2 handfuls Manuka chips
Coriander
Fillet trout taking care to remove all bones. Tie 2 llets
together at a time with string, having placed a sprig of
coriander inside each. Sprinkle trout with the brown
sugar, salt and pepper. Place Manuka wood chips into
Smoker and place seasoned sh onto the grill above the
chips.
Starting with a high heat to get a strong scent of Manuka,
then turning down to allow a slow consistent cooking
with the Manuka smoke. This results in a beautiful
caramel colour and tender pink centres. When cooked,
remove string and serve as required.
Smoked Corn on the Cob
6 to 12 ears of corn with husks on
1/2 cup olive oil
1 bunch nely chopped green onions (including tops)
Gently pull back the husks on the each ear. Remove the
silk but not the husks. Place the ears in a large pot and
cover with water. Let sit for several hours.
Remove from water and brush each ear of corn with olive
oil, then sprinkle about 2 teaspoons green onion over.
Cover corn with husks. Repeat with each ear of corn.
Prepare smoker. The ears of corn will need to smoke at
225°F for about 1 1/2 hours.
When done smoking, remove husks and eat.
CHARMATE
CHARMATENZ
@CHARMATENATION
is a registered trademark of: Sitro Group Australia Pty Ltd - www.sitro.com.au & Aber, Hamilton, N.Z - www.charmate.co.nz

12
Table of contents
Other Charmate Grill manuals

Charmate
Charmate Marshall CM155-029 User manual

Charmate
Charmate Shogun CM155-055 User manual

Charmate
Charmate Kamado CM155-024 User manual

Charmate
Charmate Lawson 470 User manual

Charmate
Charmate CM160-011 User manual

Charmate
Charmate Kamado CM155-024 User manual

Charmate
Charmate Corona CM155-028 User manual
Popular Grill manuals by other brands


 manual")


MasterChef
MasterChef T405 Safe use, care and assembly manual

Beef Eater
Beef Eater Clubman 16440 Assembly and operating instructions

Kalorik
Kalorik GR 40824 user guide

Silvercrest
Silvercrest SRGP 1300 A1 operating instructions

Proficook
Proficook PC-GG 1256 instruction manual

Twin Eagles
Twin Eagles TE1BQ36RS Installation use and care manual