Chefood CFK12/13 User manual

Instruction Manual
Instructions de montage Instrucciones de
uso y de montaje
CERAMIC KAMADO GRILL
Model# CFK12/13 CFK15/16
2
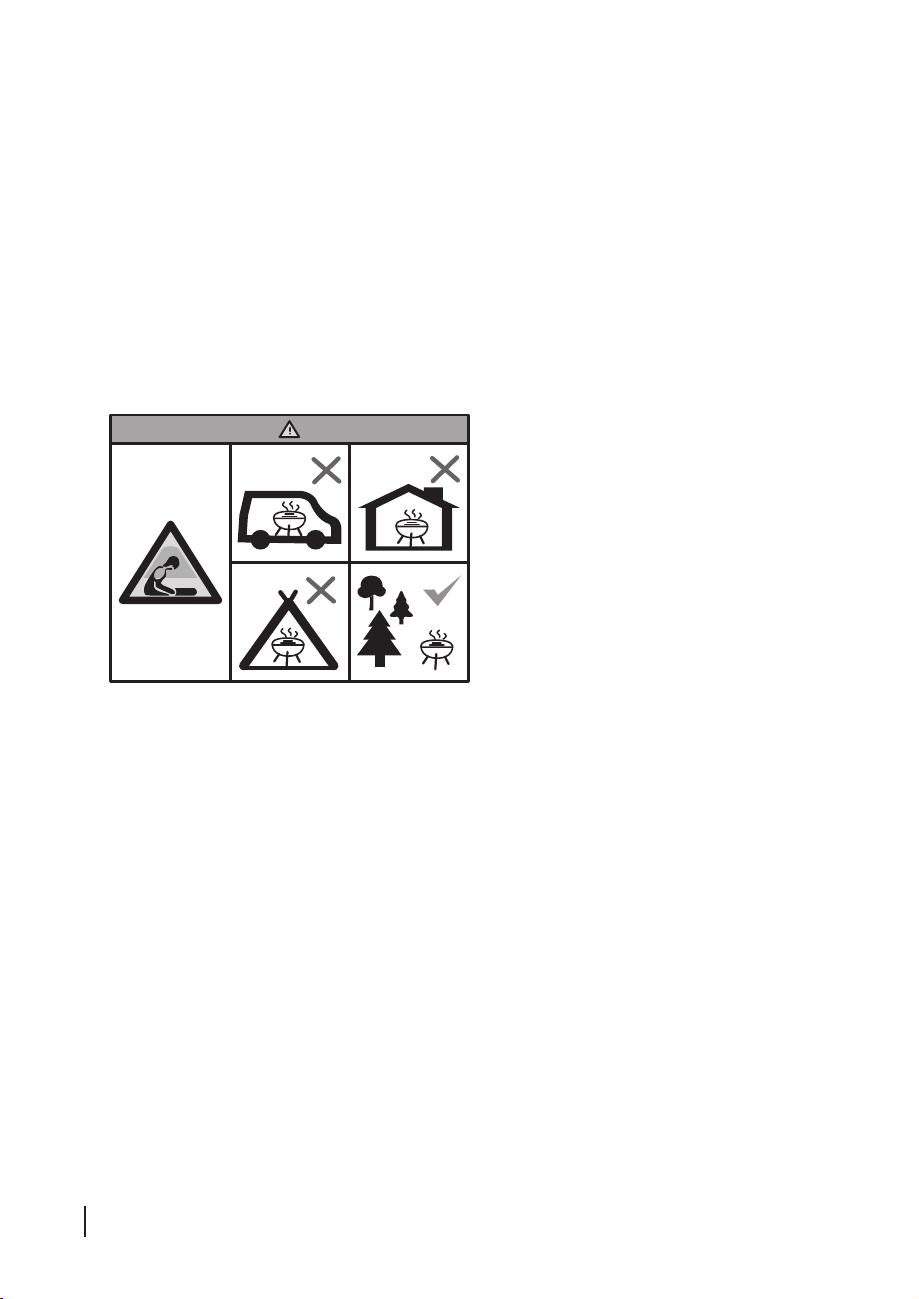
WARNING! Do not use the barbecue in a confined and
/ or habitable space e.g. houses, tents, caravans, motor
homes, boats. Danger of carbon monoxide poisoning
fatality.
ATTENTION ! Ne pas utiliser le barbecue dans un espace
confiné et/ou habitable par exemple des maisons, tentes,
caravanes, camping-cars, bateaux. Risque de décès par
empoisonnement au monoxyde de carbone.
1E S ¡ATENCIÓN! No use la barbacoa en un espacio cerrado
y/o habitable, p.e. vivienda, tienda de campaña, cara-
vana, autocaravana, embarcación. Peligro de envenena-
miento mortal por monxido de carbono.

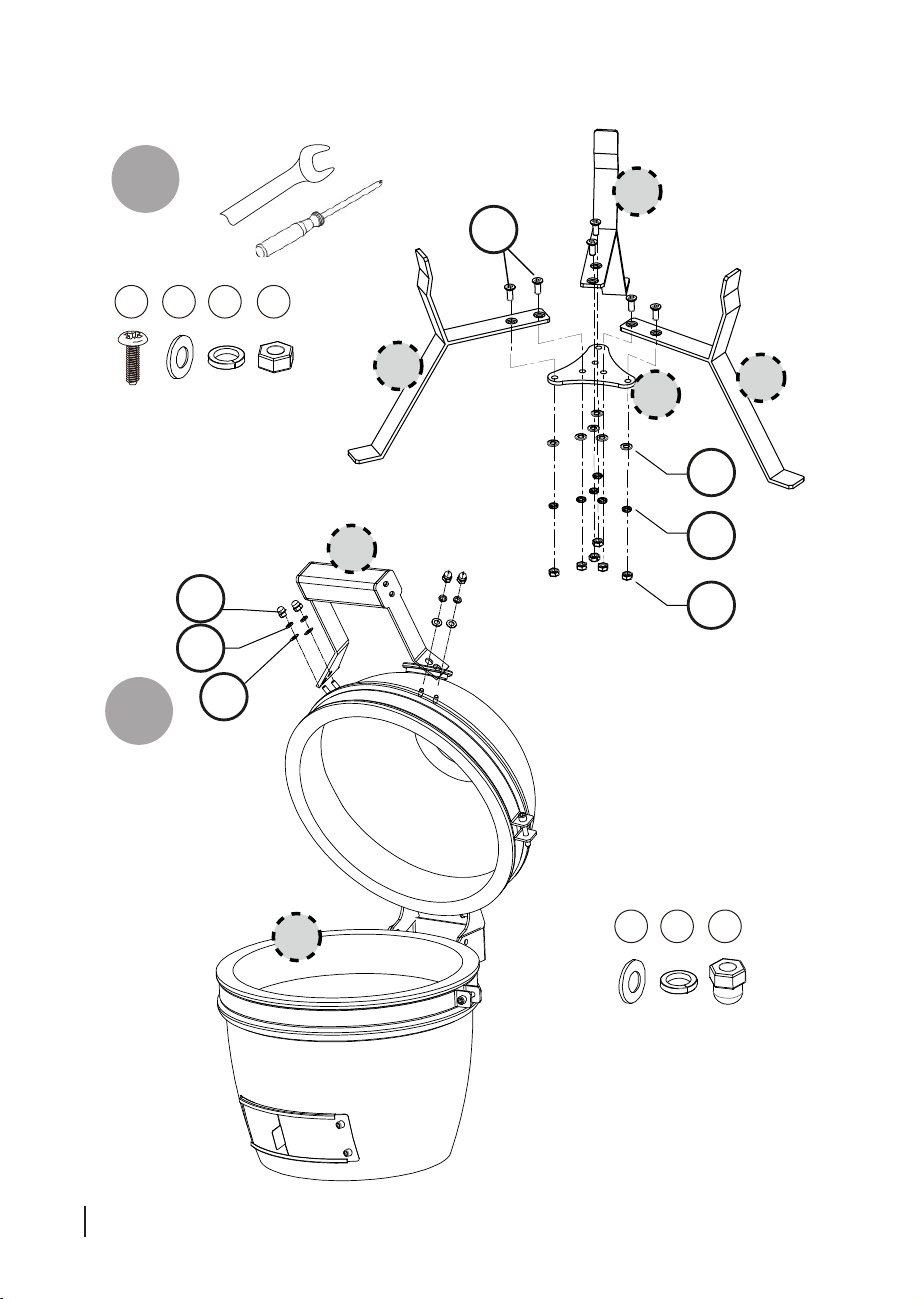
3
1
2
3
4
5
6
7
8
8
8
M6
10x
M6
10x
M6
6x
M6x12
6x
M6
4x
AB C D E

4
General safety precautions .......................................................................................5
Consignes de sécurité générales ...............................................................................6
1ES Instrucciones generales de seguridad.......................................................................7
........................................................................................................................................26
5
Preface
Please read this assembly and operation manual carefully before you start
using your Chefood grill.
You will quickly determine:
Proper utilisation
The barbecue may only be used for preparing suitable foods. All
requirements of this assembly and operation manual must be complied
with.
Safe operation of the barbecue
The barbecue should be heated up for approximately 30 minutes
before it is used for the rst time.
General information for successful assembly
Please read the assembly instructions carefully and follow the safety
precautions. Allow sucient time for assembly. Before starting assembly,
clear an area measuring approximately two to three square metres.
Remove the item from the packaging. Lay out all of the parts and any
necessary tools so that they are within easy reach.
Please note: Only tighten all of the screw connections rmly when you
have nished assembly. Otherwise this can result in unwanted tension.
Information for safe operation of the barbecue
The barbecue must be positioned in a stable and secure surface when it
is in use.
Do not use in enclosed areas or on covered areas.
Only use safe lighting materials (such as LANDMANN solid relighters).
The fuel container has a capacity of approximately
0,6 kg
. The barbecue
should be heated up for approximately 30 minutes before it is used for the
rst time.
Igniting the fuel
WARNING - risk of burning!
When petrol or white spirits are ignited uncontrollable heat can
develop as a result of deagration. You should therefore only
use harmless fuel, such as relighters. The barbecue must be
positioned on a stable and secure surface when it is in use.
3. Place one or two solid relighters on top of the layer of charcoal or
briquettes. Ignite these relighters using a long match.
4. Allow the solid relighters to burn for 2 to 4 minutes. Then ll the
charcoal grid (5) slowly with more charcoal or briquettes .
5. A white layer of ash should develop on the fuel after approximately
15 to 20 minutes. This indicates that the optimal grilling condition
has been reached. Distribute the fuel evenly in the charcoal grid (5)
using a suitable metal tool.
6. Insert the greased grill and then you can start barbecuing.
Cleaning / care
WARNING - risk of burning!
Allow the barbecue to cool down completely before cleaning it.
Never use water to quench the hot barbecue. This could result in
burning or scalding.
Occasional cleaning is necessary to preserve the beautiful appearance of
the barbecue. Do not use any scouring agents.
1. A rinsing cloth and some water with a commercial detergent is
sucient for the normal cleaning process.
2. If the enamelled parts are heavily soiled, use a commercial enamel
cleaning agent (oven cleaner). Observe the manufacturer‘s
instructions for the cleaning agent being used.
3. Clean the grill using some washing-up liquid and a rust proof
cleaning pad.
Environmental Protection & Disposal
Pay attention to cleanliness when using the barbecue and dispose of waste
in a clean and safe manner. As a general rule, only dispose of waste in
designated metal or non-ammable containers.
The local regulations for disposal apply.
Warranty
We grant a warranty for the barbecue grill for the duration of two years,
starting with the date of purchase, please provide proof of purchase.
The warranty includes manufacturing deciencies and defective parts; it
extends to the replacement of these parts. The warranty excludes rusting
and general wear and tear’. For full terms and conditions of our warranty
please visit our website www.landmann.co.uk/warranty. The warranty
lapses in case of mishandling and if any kind of unauthorized use.
General safety precautions
WARNING - risk of burning!
•Make sure that the barbecue is standing on a at and reproof surface that is not made of glass or plastic.
•CAUTION!This barbecue becomes very hot and should not be moved while it is being used!
•Wear oven gloves (tested according to DIN EN 407) or use grilling tongs when barbecuing .
•Allow the barbecue to cool down completely before cleaning it.
•CAUTION! Do not use any spirits or petrol to ignite or re-ignite the re!
•CAUTION! Only use relighters that correspond to the European Standard for relighters (EN 1860-3)!
•Never use water to extinguish the charcoal.
WARNING - risk of suocation!
•Do not use in enclosed areas!
DANGER to children and pets!
•Never leave the hot barbecue unattended.
•WARNING! Keep children and pets at a safe distance!

6
Consignes de sécurité générales
RISQUE de brûlures !
•Veiller que le barbecue se trouve sur une surface plane et résistante au feu qui n'est ni en verre, ni en plastique.
•Attention ! Ce barbecue va devenir très chaud. Ne pas le déplacer pendant son utilisation.
•Porter des gants spéciaux (certiés selon DIN EN 407) ou utiliser une pince pour barbecue pendant la cuisson.
•Avant de le nettoyer, laissez le barbecue refroidir complètement.
•PRUDENCE ! Ne pas utiliser d'alcool, d'essence ou autre liquide analogue pour allumer ou réactiver le feu !
•PRUDENCE ! Veuillez exclusivement utiliser des produits d'allumage conformes à la norme européenne (EN 1860-3) !
•N'utilisez jamais de l'eau pour éteindre du charbon de bois.
RISQUE d'étouement !
•Attention ! Ne pas utiliser dans des locaux fermés !
DANGER pour enfants et animaux domestiques !
•Ne laissez jamais pas un barbecue brûlant sans surveillance.
•ATTENTION ! Maintenir les enfants et les animaux domestiques à
l'écart!
Avant-propos
Avant de monter et de mettre en service le Chefood grill., commencez par
lire avec attention les instructions de montage et de service.
Vous constaterez rapidement:
Le montage et le fonctionnement sont faciles et simples.
Utilisation conforme
N'utiliser le barbecue que pour la préparation d'aliments prévus pour le
barbecue.Toutes les instructions de ce mode d'emploi sont à respecter.
Uniquement pour l'utilisation privée.
Utilisation sûre du barbecue
Avant la première utilisation, il faut chauer le barbecue pendant
30 minutes env.
Consignes générales pour un montage réussi
Veuillez lire avec attention les instructions de montage et respectez les
consignes de sécurité. Réservez susamment de te mps à l' assemblage
du barbecue. Prévoyez auparavant une surface de travail plane de deux à
trois m². Retirez l'appareil de l'emballage ! Déposez les pièces et les outils
nécessaires à portée de main. Attention : ce n'est qu'une fois le montage
terminé, vous serrerez les vissages fermement. Dans le cas contraire, des
tensions indésirables pourraient se produire.
Consignes pour une mise en service sûre de votre barbecue :
L’appareil doit se trouver en position horizontale, stable sur une surface
solide pendant l’emploi, car il pourrait sinon se renverser.
Ne pas utiliser dans des pièces fermées et dans des endroits
couverts. Utilisez uniquement des allumeurs sans risque (allumeur solide
LANDMANN par ex.). Le récipient à combustible a une capacité de
0,6 kg
env.
Avant la première utilisation, chauer le barbecue pendant 30 minutes env.
Allumer le combustible
RISQUE de brûlures !
Lors de l'allumage avec de l'essence ou de l'alcool, des déagrations
peuvent provoquer des développements de chaleur incontrôlables.
Utilisez uniquement des matériaux de combustion non dangereux,
comme par ex. des alumeurs solides. L'appareil doit se trouver en
positionhorizontale, stablesurune surfacesolidependant l'emploi.
3. Allumez un à deux allumeurs solides à l'aide d'une allumette. Posez-les
sur la couche de charbon de bois ou de briquettes.
4. Laissez l'allumeur brûler pendant 2 à 4 minutes. Ensuite, remplissez
lentement le foyer de charbon (5) de bois ou de briquettes.
5. Avant de commencer la cuisson, attendre qu‘une couche de cendres
recouvre le combustible. La braise a alors atteint un état idéal.
Répartissez régulièrement la braise dans le foyer (5), à l'aide d'un outil
métallique approprié.
6. Suspendez alors le gril badigeonné de graisse puis commencez vos
grillades.
Nettoyage / Entretien
RISQUE de brûlures !
Avant de le nettoyer, laissez le barbecue refroidir complètement.
N'utilisez jamais d'eau pour refroidir un barbecue brûlant. Il y
aurait risque de brûlures et d'échaudures.
Pour conserver son bel aspect, un nettoyage occasionnel est bien sûr
nécessaire. N'utilisez pas de produits abrasifs.
1. Pour le nettoyage normal, une éponge et un produit à vaisselle
usuels susent.
2. Si les pièces émaillées sont fortement salies, veuillez utiliser un
nettoyant à émail usuel (nettoyant pour four). Respectez les
instructions du fabricant du produit à utiliser.
3. Nettoyez le gril à l'aide de produit à vaisselle et d'un tampon de
nettoyage inoxydable.
Environnement et élimination des déchets
Lors de l'utilisation du barbecue et lors de l'élimination des déchets, veillez à
travailler proprement. D'une manière générale, il faut éliminer les déchets dans
des récipients appropriés en métal ou d'un matériau non inammable.
Respecter le règlement local en vigueur concernant l'élimination des
déchets.
Garantie
Nous accordons une garantie de deux années à partir de la date d‘achat
pour le barbecue. La garantie englobe les vices de nition et les pièces
défectueuses, elle s’étend au remplacement de ces pièces. Les frais de
transport, de montage, de remplacement de pièces usées (foyer, gril)
ou autres n‘entrent pas dans la garantie. Elle sera annulée en cas de
manipulation incorrecte et si des modications de quelque type soient-
elles, ont été exécutées arbitrairement sur l‘appareil.

7
Instrucciones generales de seguridad
Prefacio
Antes de utilizar Chefood grill. lea atentamente estas
instrucciones de uso y de montaje. Comprobará rápidamente que
el montaje y el manejo son sencillos y fáciles.
Utilización conforme a la nalidad prevista
La barbacoa deberá utilizarse exclusivamente para la preparación de
alimentos que puedan ser asados. Para ello deberán observarse todas las
indicaciones de este manual de instrucciones.
¡Sólo para el uso doméstico!
Funcionamiento seguro de la barbacoa
Antes del primer uso debe ponerse a calentar la barbacoa durante
30 minutos aprox.
Indicaciones generales para un montaje correcto
Lea detenidamente las instrucciones de montaje y observe las indicaciones
de seguridad. Tómese el tiempo necesario para efectuar el ensamblaje.
Anteriormente, deberá preparar una supercie de trabajo plana de dos
o tres metros cuadrados aproximadamente. ¡Extraiga el aparato del
embalaje! Deje a su alcance las piezas y las herramientas necesarias.
Tenga lo siguiente en cuenta: Apriete todas las uniones roscadas
únicamente después de terminar con el montaje. De otro modo, se pueden
producir tensiones desfavorables.
Indicaciones para el funcionamiento seguro de la barbacoa
La barbacoa debe estar colocada de forma estable sobre una base sólida
durante su funcionamiento.
No se debe utilizar en lugares cerrados ni en supercies cubiertas.
Utiliceúnicamente combustibles seguros(como p.ej. pastillas deencendido
LANDMANN). El recipiente de combustible (5) tiene una capacidad de 0,6
kg aprox. Antes del primer uso debe ponerse a calentar la barbacoa durante
unos 30 minutos.
Encender el combustible
¡ATENCIÓN! ¡Peligro de quemadura!
Al encender con gasolina o alcohol pueden producirse
calentamientos incontrolados a causa de las deagraciones.
Utilice únicamente material de combustión seguro, como p.ej.
pastillas de encendido. La barbacoa debe estar sobre una base ja
y estable durante su funcionamiento.
Coloque una parte del carbón vegetal o de las briquetas en el fogón.
3. Encienda una o dos pastillas de encendido con una cerilla. Colóquelas
sobre la capa de carbón vegetal o briquetas.
4. Deje que las pastillas de encendido ardan de 2 a 4 minutos. Después
llene lentamente el fogón con carbón vegetal o briquetas. ¡Tenga en
cuenta la capacidad!
5. Después de 15 a 20 minutos aparece una ceniza blanca sobre el
material de combustión. La brasa ha llegado a su punto ideal. Reparta
homogéneamente el material de combustión con una herramienta
metálica adecuada en el fogón.
6. Coloque la parrilla de cocción engrasada y comience a asar.
Limpieza / cuidados
¡ATENCIÓN! ¡Peligro de quemadura!
Dejeenfriarcompletamente labarbacoaantesde limpiarla.Nunca
emplee agua para enfriar la barbacoa caliente. Podrían producirse
quemaduras o escaldaduras en caso contrario.
Para mantener su buen aspecto, es evidente que necesita una limpieza de
vez en cuando. No utilice medios abrasivos.
1. Para una limpieza normal basta un trapo de fregar y agua con un
detergente convencional.
2. Si las piezas esmaltadas estuvieran más sucias, deberá utilizar un
limpiador de esmalte convencional (limpiador para hornos). Tenga
en cuenta las indicaciones del fabricante del detergente que está
empleando.
3. Limpie la parrilla con detergente y un estropajo inoxidable.
Indicaciones medioambientales y medidas
de eliminación de residuos
Tenga en cuenta la limpieza y la seguridad al utilizar la barbacoa y al
eliminar los residuos producidos. Elimine los residuos convenientemente
sólo en los recipientes metálicos o de materiales no inamables previstos
para tal n.
Deben tenerse en cuenta las normativas locales para la eliminación de
residuos.
Prestación de saneamiento
Ofrecemos una garantía de dos años a partir de la fecha de compra de la
barbacoa. La garantía cubre defectos de fabricación y piezas defectuosas
y comprende la sustitución de estas piezas. Los costes de carga, montaje,
sustitución de piezas deterioradas (fogón, parrilla) y otros no forman parte
de la garantía. La garantía se extinguirá en caso de utilización inadecuada
y si se realizan modicaciones de cualquier tipo en la barbacoa por cuenta
propia.
¡ATENCIÓN! ¡Peligro de quemadura!
•Preste atención a que la barbacoa se encuentre sobre una supercie plana y resistente al fuego que no sea de vidrio ni de plástico.
•¡ATENCIÓN! ¡Esta barbacoa se calienta mucho y no deberá moverse durante su funcionamiento!
•Póngase guantes de barbacoa (probados según DIN EN 407) o utilice unas pinzas de barbacoa mientras esté asando.
•Deje enfriar completamente la barbacoa antes de limpiarla.
•¡PRECAUCIÓN! ¡No utilizar alcohol o gasolina para encender o reavivar el fuego!
•¡PRECAUCIÓN! Utilizar únicamente sustancias de encendido que cumplan la normativa europea sobre sustancias de encendido (EN 1860-3).
•Bajo ningún concepto deberá utilizar agua para apagar el carbón vegetal.
¡ATENCIÓN! ¡Peligro de asxia!
•¡No utilizar en espacios cerrados!
¡PELIGRO para niños y animales domésticos!
•Nunca deje la barbacoa caliente sin vigilancia.
•¡ATENCIÓN! ¡Mantenga alejados a los niños y a los animales
domésticos!
1ES
8
1.
2.
A
B
C
D
7
8
8
8
1
3
B
C
E
AB C D
E
A
B C
D E
AB C D
E
6x
4x 4x 4x
6x 6x 6x

9
3.

10
4.
6

11
5.
5
4

1 2
6.
2

13

LIGHTING YOUR KAMADO GRILL
Use a Charcoal Fire Starter to start your grill. Burns the charcoal up to 1300°F
for 8-12 minutes to ensure that you’re ready to cook in 15 minutes.
CHARCOAL & AIR FLOW
1. Build a mound of charcoal that starts just below
the holes in the side of the fire box with the peak
of the mound just below the top of the fire ring.
2. Build the mound with large chunks at the
bottom and smaller ones as you build it.
Dumping charcoal directly into the fire box will
allow small pieces to block the air holes in the fire grate,
which can prevent you from reaching grilling and searing temperatures.
3. Charcoal can be relit 2-3 times for multiple cookings. Use the ash tool to
stir the used charcoal, so the ashes will drop through the fire grate. Add 1/3
new charcoal to the existing charcoal and build a new mound. This works
for well for roasting and grill temperatures. A full fire box of only fresh
charcoal is recommended for smoking and searing temperatures.
Charcoal Tip: You can’t have too much charcoal, but you can have too little.
LIGHTING
1. Light the charcoal with a fire starter cube or two, chimney starter, electric
starter or other method.
2. Open the bottom draft door and leave the dome up.
3. Wait 8-10 minutes for the charcoal to build a small bed of embers.
4. Close the dome, open the top vent fully and adjust the air flow as needed as
you near the target temperature.
Lighting Tip: Never use lighter fluid or any other combustible liquid.
CAUTIONS
Do not use lighter fluid, gas or other combustible liquids. Liquid
chemicals are a fire hazard and they will impregnate the ceramic material and
impart an undesirable taste to food.
Do not use “Instant Light” briquettes. It will impart an undesirable taste.
Do not use briquette charcoal. This type of charcoal cannot reach
temperatures above 500°F and it does not offer true charcoal flavor.
14 |
| 15
CONTROLLING THE TEMPERATURE
Achieving a consistent temperature as high as 750°F or as low as 225°F is easy
on your Kamado Grill. In fact, you can maintain low temperatures for up to 12
hours without adding any 100% Natural Lump Charcoal.
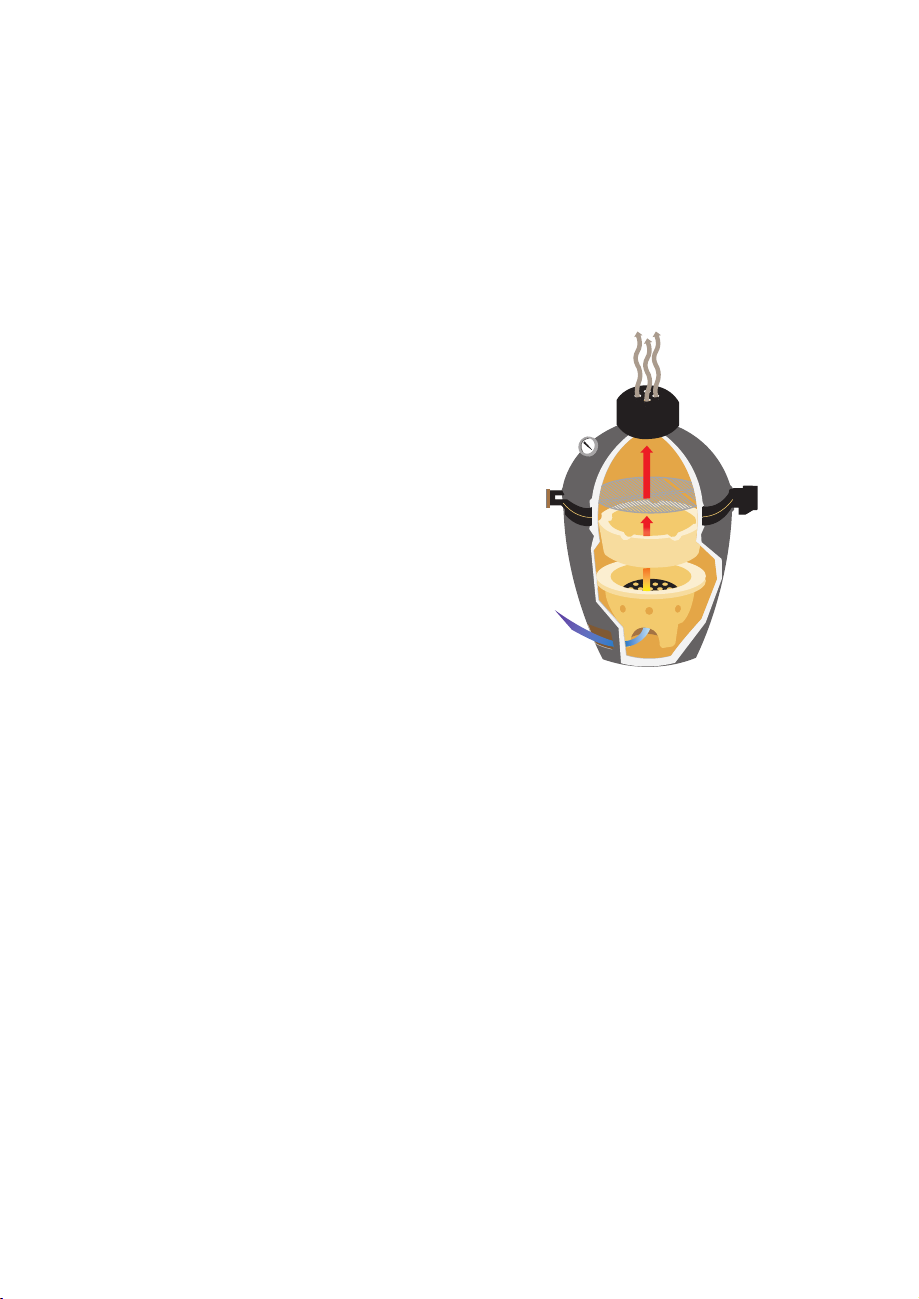
CONTROLLING THE TEMPERATURE
1.Close the dome and fully open the top vent.
2.When you are 25°F from your target
temperature, close the top vent down to
about 1/4 open.
3.Wait one minute and close or open the top
vent to lower or increase the temperature. A
1/4” can change the temperature by as
much as 25°F.
Temperature Tip: Use all fresh charcoal
for high temperature searing.
ACHIEVING LOW TEMPERATURES
1.For“low and slow” temperatures like 225°F,
start with a very small fire in one area of the
charcoal.
2.Close the dome and allow the temperature to come up slowly with the
draft door open 2” and the top vent open 1/2” and the daisy wheel holes
fully open.
3.This method may take 30-45 minutes to reach your target temperature, but
it will ensure a long and slow cooking period.
Low Temperature Tip: It is easy to raise the temperature, but very difficult
to lower the temperature if you go over your target temperature.
Diagram of air flow.

COOKING TEMPERATURE GUIDE
Grill Temperature Ranges
Internal Temperatures for Food
* Includes: chicken, duck, goose, turkey and all other foul.
16 |
Meat Type Rare Medium
Rare Medium Medium
Well Well
Beef, Lamb, Veal
Chops, Roasts & Steaks 120°F 125°F 135°F 145°F 155°F
Beef, Lamb, Veal
Ground Meat – – 140°F 150°F 160°F
Pork
Chops, Roasts & Steaks 125°F 130°F 140°F 150°F 155°F
Pork Ground Meat – – 140°F 150°F 160°F
Pork Ham (Fresh)
Use smoking or roasting temperatures.
140°F
Pork Ham (Precooked)
Use smoking or roasting temperatures.
135°F
Pork Shoulder
(Boston Butt) Use smoking temperatures. 200°F
Poultry* Whole & Pieces Use smoking, roasting or grilling
temperatures. 160°F
SeafoodFin Fish Cook until flesh is opaque, firm and separates
easily with a fork.
Seafood
Crab, Lobster & Shrimp Cook until flesh is opaque and pearl white.
Seafood
Clams & Oysters Cook until shells open during cooking.
SeafoodScallops
Cook until flesh is milky white, opaque and firm.
Smoking
Baking/Roasting
Grilling Searing
225-275°F 275-350°F 350-500°F 500-750°F

This manual suits for next models
1
Table of contents
Languages:
Popular Grill manuals by other brands


Rinnai
Rinnai RGA-404B RGA-406BRGA-408B Operation manual

Küchenprofi
Küchenprofi LUZERN 2133002800 Operating and care instructions

Napoleon
Napoleon BIPT750RBI Instruction guide

Expo Börse
Expo Börse 613-401326 instruction manual

Camp Chef
Camp Chef SmokePro PG24 Instruction booklet

camry
camry Premium CR 6612 user manual


