Cheftronic SM-1086 User manual

INSTRUCTION MANUAL
MULTI-FUNCTION STAND MIXER
SM-1086
Before operating this unit, please read these instructions completely
Multi-Function Stand Mixer (Configuration )
1. Hopper plate
2. Mincing tube
3. Mixing bowl
4. Unlock lever
5. Sausage Holder
6. Front cover
7. Sausage tube
8. Speed controller
9. Cover
10. Mixing beater
11. Balloon whisk
12. dough hook
13. Blender jug
1
2
1
3
2
1
4
3
2
1
5
4
3
2
1
6
5
4
3
2
1
7
6
5
4
3
2
1
8
7
6
5
4
3
2
1
9
8
7
6
5
4
3
2
1
10
11
12
13

Blender Jar Assembly
Food mincer Assembly
1 Measuring cup
2 Lid
3 Glass Jar
4 Jar base
5 Sealing ring
6 Blade base
1 Fixing nut
2 Mixing disk
3 Mincing blade
4 Worm shaft
5 Hopper plate
6 Mincing tube
7 food pusher
7

Important safety advice
The operating instructions are a constituent part of this product. They
contain important information about safety, use and disposal. Familiarize
yourself with all the operating and safety instructions before using the
product. Use the product only as described and for the stated spheres of
application.
If you pass the product on to a third party, always pass on all the
documentation as wall.
Read this instruction carefully and use the product under the directions of
instruction. There is a potential injury from the misuse.
Appliance is not intended for use at altitudes exceeding 2000m.
Under no circumstances should water or other liquids get into the base unit.
For this reason:
- Never use it outdoors
- Never immerse the base unit in water
- Never place containers filled with liquid, such as drinking glasses, vases
etc. on the appliance
- Never use in very humid environments
- Never use in immediate vicinity of a kitchen sink, bath, shower or a
swimming pool, as water may splash into the appliance.
If liquid should enter the appliance, unplug the mains plug immediately and
have the appliance repaired by a qualified technician.
Ensure that the mains cable is not kniked, twisted or crushed.
Ensure that the mains cable is not damaged on sharp edges.
Keep the mains cord away from hot surfaces (such as stove eyes).
Always pull the mains cord out by the plug. Never pull it by the cord itself.
Insert the mains plug into a wall socket that complies with the technical
data.
The appliance must only be set up on a firm, level, dry and non-flammable
surface.
Check that the power socket is easily accessible so that you can pull out the
mains plug quickly if necessary.
If there should be any malfunctions, the appliance may only be repaired by
our Service Centre.
Repairs should only be carried out in a qualified workshop.
Children shall not play with the appliance.
This appliance shall not be used by children. Keep the appliance and its
cord out of reach of children.
The appliance may only to be used for its intended purpose according to
these operating instructions.
Never operate the device empty.
During operation, avoid contact with the moving parts of the appliance such
as the blades of the blender jug, the dough hook, balloon whisk or beater.
Your hands or hair could be drawn into the appliance, leading to injuries.
Only ever switch the appliance on if you have correctly fitted the splash
guard when using the mixing bowl or the lid when using the blender jug.
If you are not going to use the appliance for a while, remove the plug from
wall socket. Only then is the appliance completely free of current.
Always remove the power supply plug from themains socket before starting
to clean the appliance.
If the supply cord is damaged, it must be replaced by the manufacturer or its
service agent or a similarly qualified person in order to avoid a hazard.
Use caution when handling the sharp cutting blades, when emptying the jar
and when cleaning.
Switch off the appliance and disconnect from supply before changing
accessories or approaching parts that move in use.
Only use one function at a time!
The mixing bowl is only to be used with stand provided.
Caution –Ensure that the mixing bowl is switched off before removing it
from its stand.
There is potential injury from misuse.
Always disconnect the appliance from the supply if it is left unattended and
before assembling, disassembling or cleaning.
The care shall be taken when handling the sharp cutting blades, emptying
the bowl and during cleaning.
Caution: Ensure that the blender jug is switched off before removing it from
the stand.

Always operate the device with a closed lid. Always wait for the blades to
come to a standstill before removing the lid.
Appliances can be used by persons with reduced physical, sensory or
mental capabilities or lack of experience and knowledge if they have been
given supervision or instruction concerning use of the appliance in a safe
way and if they understand the hazards involved.
WARNING: AFTER DETACHING THE ACCESSORY, DO NOT TOUCH
THE MOVING SHAFT.
This appliance is intended to be used in household and similar applications
such as:
–staff kitchen areas in shops, offices and other working environments;
–farm houses;
–by clients in hotels, motels and other residential type environments;
–bed and breakfast type environments.
Never operate the appliance continuously for more than 4 minutes at rated
power.
The appliance should be cool down to the room temperature after each
process.
Be careful is hot liquid is poured into the mixing bowl or blender Jug as it
can be ejected out of the appliance due to a sudden steaming.
Technical information
Voltage/frequency/power: 220-240V ~ 50/60Hz 800W
Mixing bowl capacity: 5.0liters
Glass jar capacity: 1.5 liters
Rated operation: Maximum operating time is 4 Minutes of each use then the
appliance to cool down to ambient temperature after each use.
Before first use
All parts of the Multi-Function Stand Mixer are to be thoroughly cleaned before
being used for the first time. (See section: Cleaning).
Take out the required length of cable from the cable tidy on the base of the
stand mixer and connect the device to the mains supply.
Trial use
1. Revolve the Shaft knob, then lift the machine arm.
2. Put the mixing bowl and mixing bowl cover onto the base, and lock it as the
arrowhead denotes.
3. Revolve the Shaft knob, then push theupper cover down and make the arm down.
Makesure the arm is fixed together the base, then Revolve theShaft knob up tolock
the arm solidly.
4. Plug-in the cord, and turn the rotary konb to P, then try every speed for a few
seconds.
5.After the trial, turn the rotary konb to Speed 0.
6. Turn the Shaft knob and lift the arm, then take apart the mixing blade from the
blade connector.
7. Take off the caudal cover from the upper housing.
8. Pure acup of water into the blender jar, set the blender jar onto the machine, then
repeat step 4, 5 and 6.
9.Take off the blender jar, and set the Caudal cover to the machine.
Assembling the appliance
1. Press the unlock lever and swing up the drive arm.
2. To fit the mixing bowl, insert it in the base unit.
3. Lock the mixing bowl by rotating it slightly anti-clockwise until it engages.
Caution!
Never use the mixing bowl without the splash guard in position. Otherwise food
might be ejected.
4. Fit the splash guard onto the drive arm from below. The filling opening with flap
should point towards the speed controller.
5. Press on the splash guard until it engages.
6. Select the appropriate attachment:
Dough hook: for heavy dough, e.g. bread dough
Balloon whisk: for whipping cream, beating egg whites, etc.
Beater: for medium to light dough / batter, e.g. batter for (pan)cakes.
7. Fit the attachment into the appropriate opening in the drive arm from below.
When doing so, make sure that the little lugs on the shaft of the attachment are
inserted into the crosswise slot of the opening.
8. Press the attachment lightly in and turn clockwise until it engages.
9. Press the unlock lever and swing the drive arm down into the working position.
The appliance is now ready to use.
Fitting the blender jug:
Caution!
Do not use the blender jug and the mixing bowl at the same time.This might
overload the appliance.
1. The cover off.
2. Position the blender jug so that the little nib points to the open padlock symbol.
3. Turn the blender jug clockwise until it engages. The little nib is now pointing to
the closed padlock symbol.
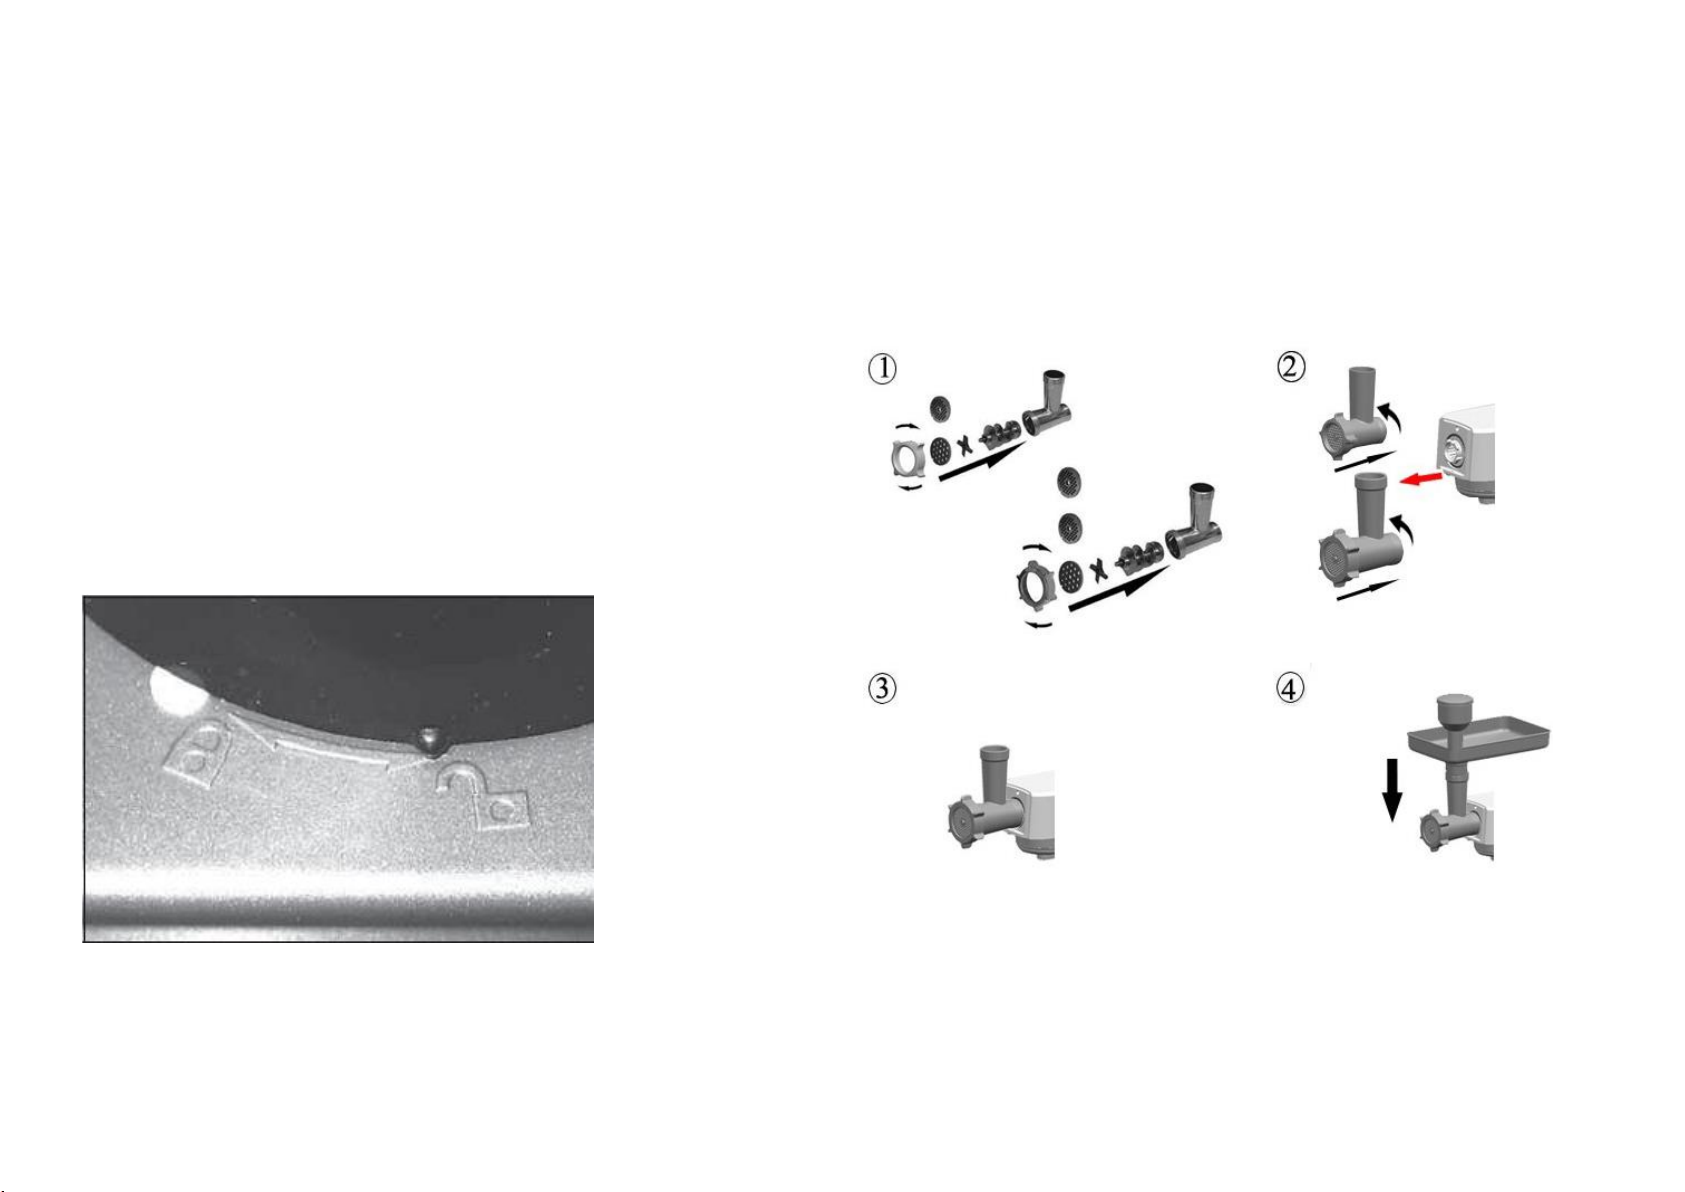
Fitting mincing Tube:
1. Hold the body of the cutter housing, and be sure that the largest opening of the
feed tube is upward.
2. Insert the worm shaft into the cutter housing.
3. Fit the cutter blade on the shaft with the cutting edge upward.
3. Place the medium grinding disc, fine grinding disc or coarse grinding disc
(depending on your need) onto the worm shaft.
4. Install the screw tightly.
5. Put the assembled cutter housing into the outlet of the multifunction head by
turning it anti-clockwise in the vertical position (a click should be heard).
6. Place the tray on the upright part of the cutter housing.
7. Now the appliance is ready for mincing.

Making sausages
1. Mince the meat.
2. Insert the worm shaft into the cutter housing, the plastic end first.
3. Place the separator in the cutter housing.
4. Place the sausage horn on the cutter housing and screw the ring on the cutter
housing. (Makesurethe notchesof the separator fit onto the projections of the
mincer head).
5. Put theCutter housing intothe multifunction head by turning it anticlockwisein
the vertical position (a click should be heard).
6. Place the tray on the upright part of the cutter housing
7. Now the appliance is ready for making sausages.
1) Put the ingredients in the tray. Use the pusher to gently push the meat into the
utter housing.
2) Put the sausage skin in lukewarm water for 10 minutes.Then slide the wet skin
onto the sausage horn. Push the (seasoned) minced meat into the cutter housing.
3) If the skin gets stuck onto the sausage horn, wet it with some water.
4) When you dissembled the body (Cutter housing, you must press the Release
button for Cutter housing button to up.
Dismantle appliance
1. Press the unlock lever and swing up the drive arm.
2. To remove an attachment, press lightly in again and unlock by turning
anticlockwise slightly.
3. Remove the attachment.
4. To remove the splash guard, pull it downwards.When doing so, first pull the
splash guard down at the back slightly.
5. Unlock the mixing bowl by rotating slightly in a clockwise direction.
6. Remove the mixing bowl.
7. Press the unlock lever and swing the drive arm down into the working
position.
Removing the blender jug:
1. Turn the blender jug anti-clockwise until that the little nib points to the open
padlock symbol.
2. Remove the blender jug.
3. Put the removeable cover back on.
Removing the mincing Tube:
Reverse operation in step “Fitting mincing Tube ” above.
Operation Guide
To mix or knead dough:
1. The dough hook should be used.
2. Suggestion flour and water at ratio of 5:3.
3. When filling the mixing bowl, please ensure that the maximum quantity is not
exceeded.
4. Maximum quantity of flour is 1500g.
5. From speed 1 for mix 20 second, and speed 2 for mix 20 second, afterwards speed 3
for about 3 minutes.
6. No longer use than 4 minutes continuously at a time.

Whipping egg whites or cream:
1. Switch on speed 4 to speed 6, whip the egg whites without stopping for about 4
minutes, according to the size of the eggs, until stiff.
2. Maximum quantity 24 eggs.
3. For whipped cream, whip 250ml fresh cream at speed 4 to 6 for about 4
minutes.
4. When filling the mixing bowl with fresh milk, cream or other ingredients, please
ensure that the maximum quality is not exceeded.
5. The egg beater should be used.
6. Use No longer than 4 minutes continuously at a time.
Mixing shakes, cocktails or other liquids:
1. Mixtheingredients according to theavailable recipe,from speed 1 to 6 for about
4minutes.
2. Do not exceed the maximum quantity for the mixing bowl.
3. The mixing beater should be used.
4. Use No longer than 4 minutes continuously at a time.
Mincing meat
1. Cut all foods into pieces ( Sinewless, boneless and fatless beef or pork is
recommended, approximately size :(20 mm x 20 mm x 60 mm) so that they fit easily
into the hopper opening.
2. Plug the unit on and then turn the rotary knob to Speed 4-6.
3. Feed foods into the hopper plate. Use for it only the food pusher
5. After use switch the unit off and unplug it from the power supply.
6. Use No longer than 4 minutes continuously at a time.
Use Blender function
1. Place the food stuff you wish to process into the glass jar.
2. This appliance operates at max. power for the blender function with mixture of
600g carrots + 900g water in the speed setting 6.
3. Put the lid on the glass jar and close securely. Place the measuring cup into the
hole in the lid and turn clockwise to lock.
Speed setting Use
“3-4 “setting for light usage with liquids
“5-6” setting for more solid consistency – for mixing liquids and solid
foodstuffs
“P” setting for ice crushing & short, powerful impulse movements
(The rotary knob does not permanently engage in the “P”
setting. You have to hold it in the “P” setting or turn it
repeatedly into the “P” setting)
After using the blender, always move the switch into the ”0” setting and pull out the
mains plug, and to remove the glass jar just lift it up.
Cleaning
1. Before using for the first time, clean all parts of the accessories with
soapy water. Rinse and dry.
2. Before you clean the appliance, switch the appliance off and remove the
plug from the socket.
3. After the stainless steel bowl cool down, remove the bowl. Clean the
inside and outside of the bowl. Always keep the contact pins at the
bottom of the bowl clean and dry. Only Wipe the contact pins with a wet
cloth!
4. Unscrew the screw ring and remove all parts of the attachment. Don’t
clean the metal bowl and blade in the dishwasher!
5. Never use pointed or sharp objects for cleaning as this may damage
functional parts or affect the safety of the appliance.
6. The blade is very sharp! Handle it with care!
7. Wash all parts except main body and mixing bowl in hot soapy water.
Clean them immediately after use. Rinse them with clear hot water and
dry them immediately.
8. We advise you to lubricate the blade with some vegetable oil.
9. Only wipe the main appliance with a damp soft cloth!
10. If the bowl and blade is hard to clean. You may add some hot soapy
water in the bowl and run the appliance at speed 1 for few seconds.
11. How to clean the main body and mixing bowl.
Please pull out the plug from the outlet before cleaning.
Clean it with soft cloth and moderate detergent. Use the water carefully
so as to prevent the inside of the appliance from moisture.

Packing list
SM-1086:
Main body 1 set
Mixing bowl 1 pc
Mixing beater 1 set
Dough hook 1 set
Balloon whisk 1 set
Sausage holder 1 pc
Sausage tube 1 pc
Blender Jug 1 set
Food mincer 1 set
Instruction manual 1 pc
Food pusher 1 pc
SAVE THESE INTRUCTIONS
THIS PRODUCT IS FOR HOUSEHOLD USE ONLY!
Correct disposal of this product
This marking indicates that this product should not be
disposed with other household wastes throughout the EU. To
prevent possible harm to the environment or human health
from uncontrolled waste disposal, recycle it responsibly to
promote the sustainable reuse of material resources. To return
your used device, please use the return and collection
systems or contact the retailer where the product was
purchased. They can take this product for environmental safe
recycling.
Table of contents
Popular Mixer manuals by other brands


Behringer
Behringer XENYX X1204USB quick start guide

Black & Decker
Black & Decker MX20356 manual

Belle Group
Belle Group Minimix 150 Operator's manual

Bestron
Bestron SWEET DREAMS AHM300P instruction manual

Cuisinart
Cuisinart SmartPower 0CU6515 INSTRUCTION AND RECIPE BOOKLET

Scarlett
Scarlett SC-HM40S03 instruction manual