Chibli CleanStar T1 User guide

Use and Maintenance
T1
T1
II
I
0 - 2
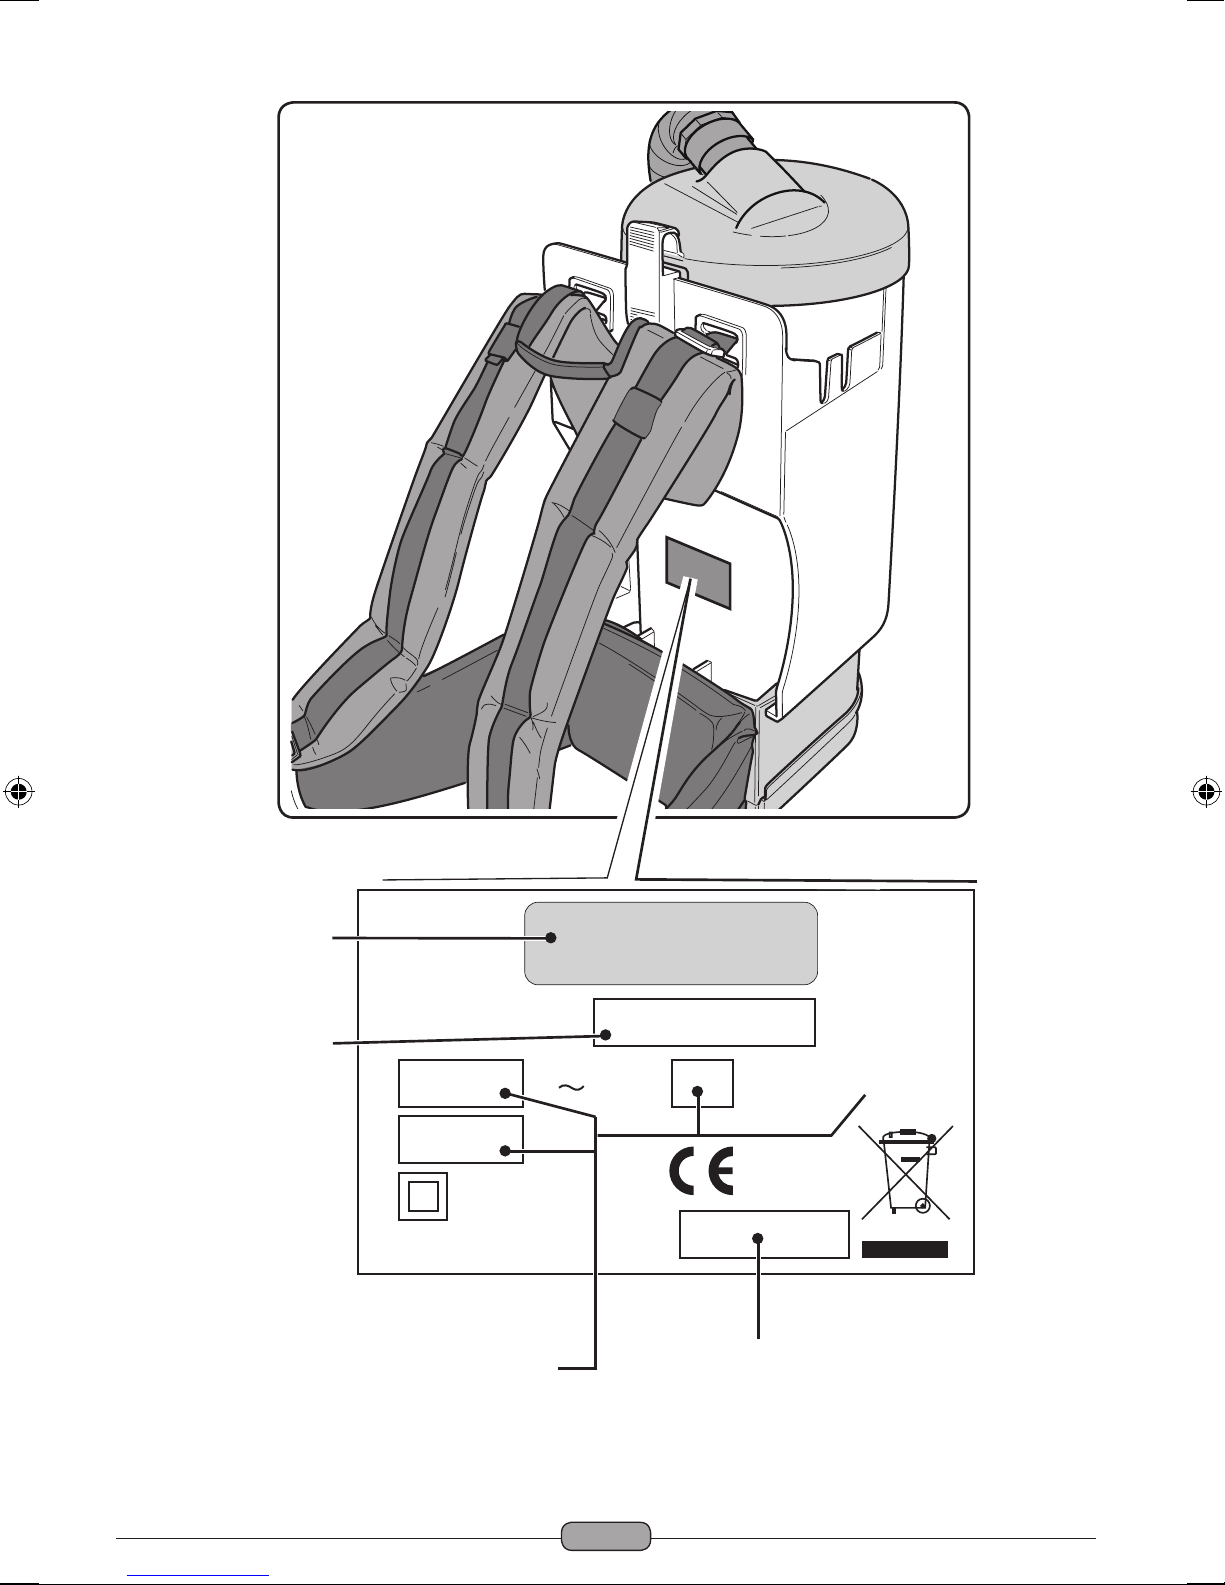
Mod.
V A 50 Hz
W
N°
Model ....................
Serial N° ....... ........................
Manufacturer
Electrical characteristics
0 - 3
12
4
5
Fig. 4
Fig. 7
Fig. 8
Fig. 9
10
11
Fig. 10
Fig. 1
Fig. 3
3
2Fig. 5 Fig. 6
9
8
11
1a
3
2
Fig. 2
1
1
2
12a
25
0 - 4
1
13
14
16
Fig. 11
Fig. 12
Fig. 14
Fig. 15
Fig. 16
Fig. 18
18 19
20
21
10
22
23
5
5
24
Fig. 13
17
22
Fig. 17

0 - 5
Technical features Measurements units
Tension V 240
Motor power W 1350
Noise level dB (A) 60
Depression mmH2O 2900
Paper bag capacity l 3,3
Dimensions mm 240x495h - 202Ø
Weight Kg 4,8
Accessories Ø32 mm
(1450 watt max. power)

0 - 6
EN
EN - 1
GENERAL WARNINGS
-
This booklet is an integral part of the ap-
paratus and must therefore, be preserved
carefully.
-
Plastic bags, polystyrene, paper clips,
etc. must not be left within the reach of
children, as these are potential sources
of danger.
-
Ensure that the voltage matches that indi-
cated on the data plate before turning the
unit on.
- To unplug the unit from the socket, pull
the plug itself and NOT the cable.
- Unwind the entire power cable when us-
ing the unit.
- Solely approved extension cables can
be used. These must be adequate for
the power of the unit and must also be in
good condition.
- Do not use the unit if either the plug or
power cable is not in good condition.
- If the power cable is damaged, this can
only be replaced by a technical support
centre that is authorised by the manufac-
turer.
- Do not slide the power cable on sharp
edges.
- Do not pinch or crush the power cable.
- Do not use the unit with wet or damp
hands.
-Do not leave the unit exposed to the ele-
ments.
- Do not use the unit if its operation is
faulty. Take this to an authorised techni-
cal support centre.
- Should an anomaly arise, contact an au-
thorised technical support centre and al-
ways request original spare parts.
-The plug must be removed from the sock-
et before any maintenance or cleaning
procedures are implemented.
-Do not wash the unit with jets of water.
- Do not immerse the unit into water or
other liquids.
- Clean the unit with a cloth dampened with
water;
do not use abrasive detergents, trichloro-
ethene or solvents.
- When depositing the unusable unit at
appropriate collection points, the power
cord must be removed in order to ensure
it is not used.
TYPE OF USE
This unit must solely be used to vacuum
dust, crumbs, etc. as it is designed solely for
this purpose.
HAZARD:
The manufacturer cannot be held liable
for any damage caused by improper or
incorrect use.
Any other use relieves the Manufacturer
from all responsibility of damage caused
to persons and/or things and renders the
warranty null and void.
This appliance is not intended for use by
persons (including children) with reduced
physical, sensory or mental capabilities,
or lack of experience and knowledge, un-
less they have been given supervision or
instuction concerning use of the appliance
by a person responsible for their safety.
Children should be supervised to ensure
that they do not play with the appliance.
INCORRECT USE
Do not use the unit to:
- vacuum any type of liquid;
- vacuum ammable, explosive, corrosive
and toxic substances.
- vacuum hot substances.
Do not use the unit in explosive atmos-
pheres.
DISPOSING OF
THE UNIT
Proceed in accordance with local legislation
in order to protect the environment.
When the unit is unusable and cannot be re-
paired, the components are to be disposed of
accordingly and separately.
Electrical equipment cannot be disposed of
as urban waste and relative standards per-
taining to collection, which have been intro-
duced by specic legislations, must be ad-
hered with (Legislative Decree No. 151 dated
25/7/05 - 2002/96/CE - 2003/108/CE)

ITEN
EN - 2
Electrical equipment has a symbol
bearing a crossed out wheeled bin.
The symbol indicates that the appa-
ratus was introduced on the market
after 13 August 2005 and must be
disposed off separately.
Improper or illegal disposal of such equip-
ment or using it incorrectly, can be hazard-
ous to persons and the environment due to
the substances and materials contained.
Administrative and criminal penalties will be
imposed for non-compliance with standards
pertaining to the disposal of electrical waste.
REFERENCE
LEGISLATIONS
The apparatus has been designed in accord-
ance with the Machinery Directive in force
and with the standards set out in the EC Dec-
laration of Conformity supplied with the unit.
UNPACKING
After removing the package as indicated in
the instructions shown on the package itself,
check the integrity of the unit and all compo-
nents supplied.
If any evident damage is noticed, contact the
retailer or an authorised technical support
centre.
PREPARING THE
UNIT
Checking the lter systems
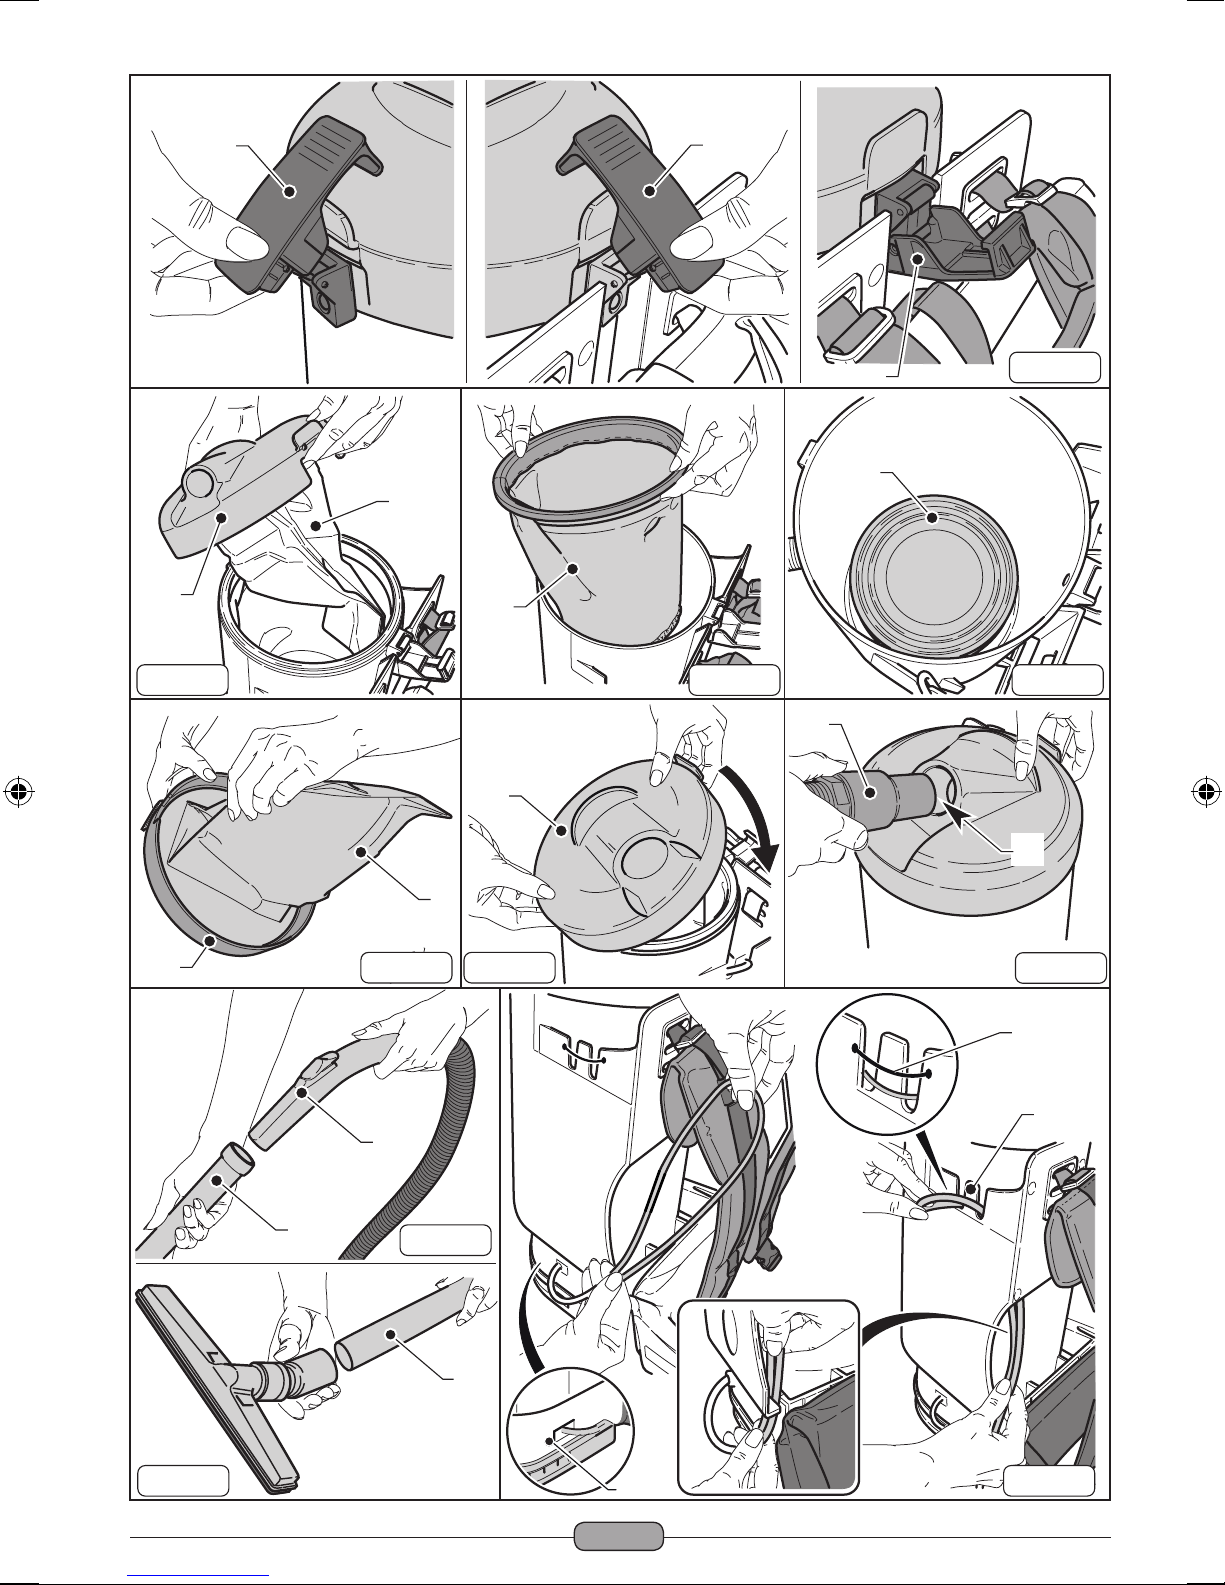
- Release the lever (1a/1 Fig.1) and re-
move the cover (2 Fig.2) together with the
paper bag (3 Fig.2).
- Removetheclothlter(4Fig.3)anden-
sure that the lter cartridge is mounted
insidetheunit(5Fig.4).
- Settheclothlterbackinplace(4Fig.3)
and remount the paper bag (3 Fig.5) on
the cover (2 Fig.5). Whilst keeping this
in place, put back the cover (2 Fig.6) by
hooking the slot (6 Fig.7) found on the
cover onto the metal strip (7 Fig.7) found
on the body of the unit.
- Block the cover in place by means of the
lever (1 Fig.1).
Assembling the pipes
- Insertthesleeve(8Fig.8)oftheexible
pipe supplied into the air suction hole (9
Fig.8).
-
Hook the rigid extensions (11 Fig.9) to the
ergonomichandle (10 Fig.9)of the ex-
ible pipe.
-
Hook the accessory required (suction in-
let, brush, crevice tool, etc.) to the rigid
extensions (11 Fig.9).
Positioning the power cable
-
Connect a cable (25 Fig. 10) to the
IEC socket.
-
Form a ring with the power cable, hook it
onto the tooth (12 Fig.10) and place it as
shown in picture 10, block it through the
rubber band (12a Fig. 10).
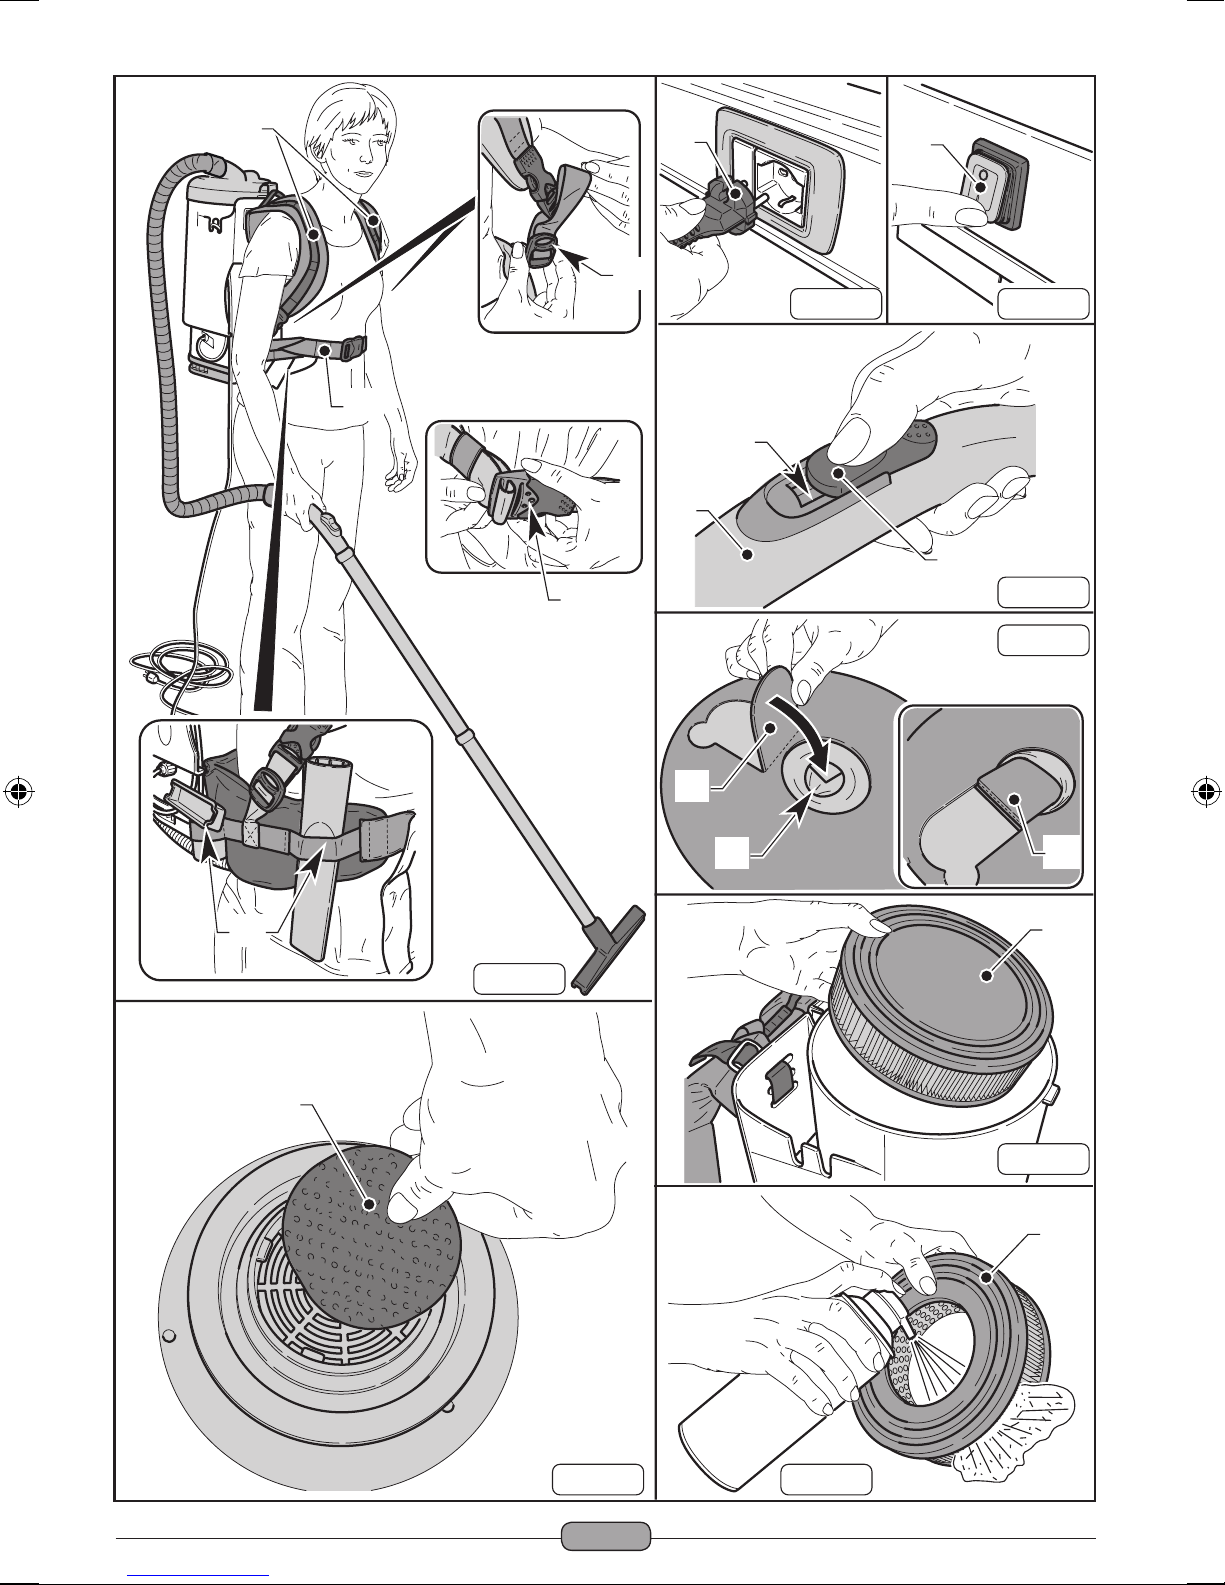
Positioning the unit onto your shoul-
ders
-
Lift the unit and place it on your shoul-
ders.
- Usethebuckle(14Fig.11) to adjust the
shoulder straps (13 Fig.11).
-
Use the buckle (16 Fig.11) to adjust the
belt (15 Fig.11).
NOTE:
Elastic straps (17 Fig.11) are found on the
belt (15 Fig.11) and these are used when
placing accessories such as the brush, the
crevice tool, etc.

EN
EN - 3
USING THE UNIT
Starting-up the unit
-
Insert the plug (18 Fig.12) into the socket.
- Press the “I” on the switch (19 Fig.13)
and this will light up.
NOTE:
You can adjust the suction force by sliding
the selector (20 Fig.14) found on the ergo-
nomic handle (10 Fig.14).
The suction force is decreased by opening
the window (21 Fig.14).
Turning the unit off
- Press the switch (19 Fig.13) to turn the
unit off and the light will also go off.
- Remove the plug (18 Fig.12) from the
socket.
CLEANING AND
MAINTENANCE
HAZARD:
The plug must be removed from the sock-
et before any maintenance procedure is
implemented.
Remove the dust bag paper lter and
replace it
- Release the lever (1 Fig.1) and remove
the cover (2 Fig.2) together with the pa-
per bag (3 Fig.2).
-
Remove the paper bag (3 Fig.2) from the
cover(2Fig.2),lifttheap(22Fig.15)and
fold it into the hole (23 Fig.15), blocking it
onto the rubber edge, then throw it away.
- Replace the paper bag and remount all
the parts by following the reverse proce-
dure of the dismantling process.
Checking and cleaning the cloth lter
- Release the lever (1 Fig.1) and remove
the cover (2 Fig.2) together with the pa-
per bag (3 Fig.2).
- Removetheclothlter(4Fig.4)andclean
it by removing the dust.
NOTE:
The cloth lter (4) can be washed with warm
water and soap, bearing in mind that it must
be completely dry before re-using it.
- Remount all the parts by following the re-
verse procedure of the dismantling proc-
ess.
Checking and cleaning the lter cartridge
- Release the lever (1 Fig.1), remove the
cover(2Fig.2),thelterbag(3Fig.2)and
theclothlter(4Fig.4).
- Remove the lter (5 Fig. 16) from the
unit.
- Clean the lter from the inside out with
a jet of air. If this is too dirty, it must be
changed.
- Remount all the parts by following the re-
verse procedure of the dismantling proc-
ess.
Checking and cleaning the safety lter
- Release the lever (1 Fig.1), remove the
cover(2Fig.2),thelterbag(3Fig.2),the
clothlter(4Fig.4)andtheltercartridge
(5 Fig.16).
- Removethelter(24)andcleanitunder
running water.
WARNING:
- Ensure that the lter (24) is completely
dry before remounting it.
- Remount all the parts by following the re-
verse procedure of the dismantling proc-
ess.
Cleaning the shoulder straps and belt
- Clean the shoulder straps (13 Fig.11) and
the belt (15 Fig.11) with a cloth dampened
with water or a neutral detergent.

ITEN
EN - 4
Cleaning the unit body
- Clean the unit body with a cloth damp-
ened with water or a neutral detergent.
HAZARD:
Do not wash the unit with jets of water.
SPARE PARTS
PROBLEM CAUSE REMEDY
Vacuum cleaner does not
work.
Switch is not pressed.
Plug is not inserted.
Power cut.
Press the switch.
Insert the plug into the
socket.
Check the power line.
Unsatisfactory suction. Paper bag is full.
Filter components are
clogged.
Clogged accessories or
pipes.
Replace the dust bag.
Clean the lter compo-
nents.
Check andcleantheex-
ible pipe and the suction
outlet.
Cloth Filter Bag # CB-T1v2
Synthetic Dust Bags # AF924S
Antibacterial Dust Bags # AF924AB
Carbon Anti-Odour Dust Bags # AF924C
HEPA Filter Cartridge # T1-HEPA
Pre-Motor Filter # T1-9
Exhaust Filter # T1-25
Complete Hose # HBCOM-T1
Orange Safety Compl.Hose # HOCOM-T1
Wire Reinforced Compl.Hose # HWCOM-T1
Motor # T1-20

Cod. 8050559 - 2^ ed. - 02 /2014

&OHDQVWDU3W\/WG
$%1$&1
5DGIRUG5RDG5HVHUYRLU9,&725,$
3KRQH)D[
(PDLOVDOHV#FOHDQVWDUFRPDX:HEZZZFOHDQVWDUFRPDX
&21',7,2162):$55$17<
7KLVGRFXPHQWRXWOLQHVWKHWHUPVDQGFRQGLWLRQVRIZDUUDQW\IRU\RXU*KLEOLSURGXFW7KLVLVDQLPSRUWDQWGRFXPHQWWKDWVKRXOGEH
NHSWZLWK\RXUSURRIRISXUFKDVHGRFXPHQWVLQDVDIHSODFHIRUIXWXUHUHIHUHQFHVKRXOG\RXUHTXLUHVHUYLFHIRU\RXUSURGXFW
7KDQN\RXIRUSXUFKDVLQJ\RXUQHZ*KLEOL7%DFNSDFN9DFXXP&OHDQHU:HDUHFRQILGHQWWKLVSURGXFWZLOOJLYH\RXWURXEOHIUHHXVHDQG
H[FHOOHQWVHUYLFHSURYLGHGWKHRSHUDWRUXVHVDQGPDLQWDLQVWKHSURGXFWLQDFFRUGDQFHZLWKWKH,QVWUXFWLRQ0DQXDO3OHDVHUHDGWKH,QVWUXFWLRQ
0DQXDOFDUHIXOO\EHIRUHXVLQJWKHSURGXFWIRUFRUUHFWRSHUDWLRQDQGPDLQWHQDQFHSURFHGXUHVDQGVWRUHLWLQDVDIHSODFHIRUIXWXUHUHIHUHQFH
7KLVLVDSDUWVDQGODERXUZDUUDQW\DJDLQVWIDXOW\RUGHIHFWLYHSDUWVPDWHULDOVRUZRUNPDQVKLSLQPDQXIDFWXULQJZKHQWKHSURGXFWLVXVHG
DQGRSHUDWHGLQDFFRUGDQFHZLWKWKH,QVWUXFWLRQ0DQXDO
7KLVSURGXFWFDUULHVDPRQWK\HDUZDUUDQW\SHULRGWKDWFRPPHQFHVIURPWKHRULJLQDOGDWHRISXUFKDVHE\WKHILUVWXVHUSXUFKDVHU
DQGLVQRWWUDQVIHUDEOH
7KHZDUUDQW\RQO\FRYHUVXVHRIWKHSURGXFWWRUHPRYHGU\GLUWDQGGXVWIURPIORRULQJDQGRWKHUVXUIDFHV
7KLVZDUUDQW\RQO\DSSOLHVWRSURGXFWVSXUFKDVHGDQGXVHGLQ$XVWUDOLD
$WDOOWLPHVGXULQJWKHZDUUDQW\SHULRG&OHDQVWDUVKDOODWLWVVROHGLVFUHWLRQGHWHUPLQHZKHWKHUUHSDLUUHSODFHPHQWRUUHIXQGZLOODSSO\LI
WKHSURGXFWKDVDYDOLGZDUUDQW\FODLPDSSOLFDEOHWRLW
7KHUHSDLURUUHSODFHPHQWRIWKHSURGXFWXQGHUWKLVZDUUDQW\GRHVQRWH[WHQGWKHRULJLQDOSHULRGRIZDUUDQW\
3OHDVHQRWHWKDWWKLVZDUUDQW\ZLOOEHYRLGHGLQWKHIROORZLQJFDVHVZKLFKDUHQRWH[KDXVWLYHDQGWKHZDUUDQW\GRHVQRWDSSO\WRWKHFRVW
RIUHSODFLQJDQ\SDUWVRIWKHSURGXFWUHVXOWLQJIURP
x $FFLGHQWDOGDPDJH
x 1RUPDOZHDUDQGWHDU
x 1HJOHFWPLVXVHRUSK\VLFDODEXVHE\WKHRSHUDWRULQFOXGLQJIDLOXUHWRSURSHUO\PDLQWDLQRUVHUYLFH
x $Q\DOWHUDWLRQVPRGLILFDWLRQVRUWDPSHULQJZLWKWKHSURGXFWZLWKRXWWKHSULRUZULWWHQFRQVHQWRI&OHDQVWDU
x ,QFRPSOHWHRULPSURSHULQVWDOODWLRQ
x ,QFRUUHFWLPSURSHURULQDSSURSULDWHRSHUDWLRQ
x ,QVHFWRUYHUPLQLQIHVWDWLRQ
x 3RZHUVXUJHVHOHFWULFDOVWRUPGDPDJHRULQFRUUHFWSRZHUVXSSO\YROWDJH
x ([FHVVLYHXVHRUXVHIRUZKLFKWKLVSURGXFWKDVQRWEHHQGHVLJQHG
x 9DFXXPLQJXSZDWHUOLTXLGVWRQHUSRZGHUVJODVVKD]DUGRXVIODPPDEOHRUFRUURVLYHPDWHULDOVSODVWHUGXVWFRQFUHWHGXVWDQG
RWKHUVLPLODUEXLOGLQJRUFRQVWUXFWLRQPDWHULDOV
x )DLOXUHWRFRPSO\ZLWKWKHRSHUDWLQJLQVWUXFWLRQVFRQWDLQHGLQWKH0DQXDOVXSSOLHGZLWKWKHSURGXFW
x ,IWKHSURGXFWLVUHQWHG
x ,IWKHSURGXFWLVXVHGRXWVLGHRI$XVWUDOLD
x ,IWKHSURGXFWZDVVHUYLFHGRUUHSDLUHGE\DQ\RQHRWKHUWKDQ&OHDQVWDURURQHRI&OHDQVWDU¶V$XWKRULVHG6HUYLFH$JHQWV$6$
&OHDQVWDULVXQDEOHWRDFFHSWDQ\UHVSRQVLELOLW\XQGHUWKLVZDUUDQW\IRUDQ\UHSDLUZRUNQRWFDUULHGRXWE\DQ$6$RUIURPWKHXVHRI
QRQJHQXLQHSDUWV
7KLVZDUUDQW\GRHVQRWFRYHUVHUYLFHFDOOVWUDYHOOLQJWLPHRUFRQVXPDEOHSDUWVVXFKDVEHOWVGXVWEDJVILOWHUVKRVHRUKRVHSDUWVURGV
DQGZDQGVIORRUWRROVDQGDFFHVVRULHVPRWRUEUXVKHVDQGRWKHUOLNHFRQVXPDEOHLWHPVXQOHVVGHIHFWLYHLQPDQXIDFWXUH,QRUGHUWR
SURORQJWKHOLIHRIDFFHVVRULHVDQGFRQVXPDEOHVUHJXODUFDUHDQGPDLQWHQDQFHLVUHFRPPHQGHG
3OHDVHUHWDLQ\RXURULJLQDOSURRIRISXUFKDVHZKLFKZLOOEHUHTXLUHGEHIRUH\RXFDQPDNHDFODLPXQGHUWKLVZDUUDQW\,ISURRIRISXUFKDVH
FDQQRWEHSURYLGHGDWWKHWLPHRIDZDUUDQW\FODLPRUVHUYLFHDQ\ZRUNFDUULHGRXWRQWKHFOHDQHULVFKDUJHDEOH
$Q\WUDQVSRUWDWLRQDQGGHOLYHU\FRVWVLQYROYHGLQWKHUHSDLURIGHIHFWLYHSDUWVVKDOOEHERUQHE\WKHFODLPDQW,QDOOLQVWDQFHVXQOHVVWKH
SURGXFWLVWUDQVSRUWHGE\&OHDQVWDURUD&OHDQVWDUDXWKRULVHGUHSUHVHQWDWLYHWKHSURGXFWLVWUDQVSRUWHGDWWKHRZQHU¶VFRVWDQGULVNZKLOH
LQWUDQVLWWRDQGIURP&OHDQVWDURULWV$6$
2XUJRRGVFRPHZLWKJXDUDQWHHVWKDWFDQQRWEHH[FOXGHGXQGHUWKH$XVWUDOLDQ&RQVXPHU/DZ<RXDUHHQWLWOHGWRDUHSODFHPHQWRUUHIXQGIRUD
PDMRUIDLOXUHDQGIRUFRPSHQVDWLRQIRUDQ\RWKHUUHDVRQDEO\IRUHVHHDEOHORVVRUGDPDJH<RXDUHDOVRHQWLWOHGWRKDYHWKHJRRGVUHSDLUHGRU
UHSODFHGLIWKHJRRGVIDLOWREHRIDFFHSWDEOHTXDOLW\DQGWKHIDLOXUHGRHVQRWDPRXQWWRDPDMRUIDLOXUH7KHEHQHILWVFRQIHUUHGE\WKLVZDUUDQW\
DUHLQDGGLWLRQWRRWKHUULJKWVDQGUHPHGLHVXQGHUODZLQUHVSHFWRIWKHSURGXFWWRZKLFKWKLVZDUUDQW\UHODWHV
72,148,5($%2870$.,1*$&/$,081'(57+,6:$55$17<3/($6()2//2:7+(6(67(36
D FDUHIXOO\FKHFNWKH,QVWUXFWLRQ0DQXDODQGWKHWHUPVRIWKLVZDUUDQW\
E KDYHWKHQDPHDQGPRGHOQXPEHURIWKHDSSOLDQFHDYDLODEOH
F KDYHWKHSURRIRISXUFKDVHDYDLODEOHLHLQYRLFHUHFHLSWHWFVKRZLQJZKHUHWKHDSSOLDQFHZDVSXUFKDVHGIURPDQGGDWHRI
SXUFKDVH
G FDOO&OHDQVWDURQWRVSHDNWRRQHRIRXUFXVWRPHUVHUYLFHVWDII
Table of contents


