Royal Appliance AiroPro 2000 User manual

OWNER'S
MANUAL
Operating and Servicing
co
Instructions
APPLIANCE
MFG.
CO.
before using your
RY2000
Can Vac?
Let us helpyou put your
cleaner together or
answer any questions, call:
1-800-321-1134
(USA
&
Canada)
*Website:
www.royalvacuums.com
AWARNlNG
For quick reference, please record your
vacuum information below.
Cleaner assembhr mav include
I
I
Q2001
All
rightsreserved
dl-1
13080-000
11/01
-
-
small parts. Small parts can
present a choking hazard.
Model
#:
Mfg.
Code:
(Mfg.
code located on
the
lower backside of cleaner)

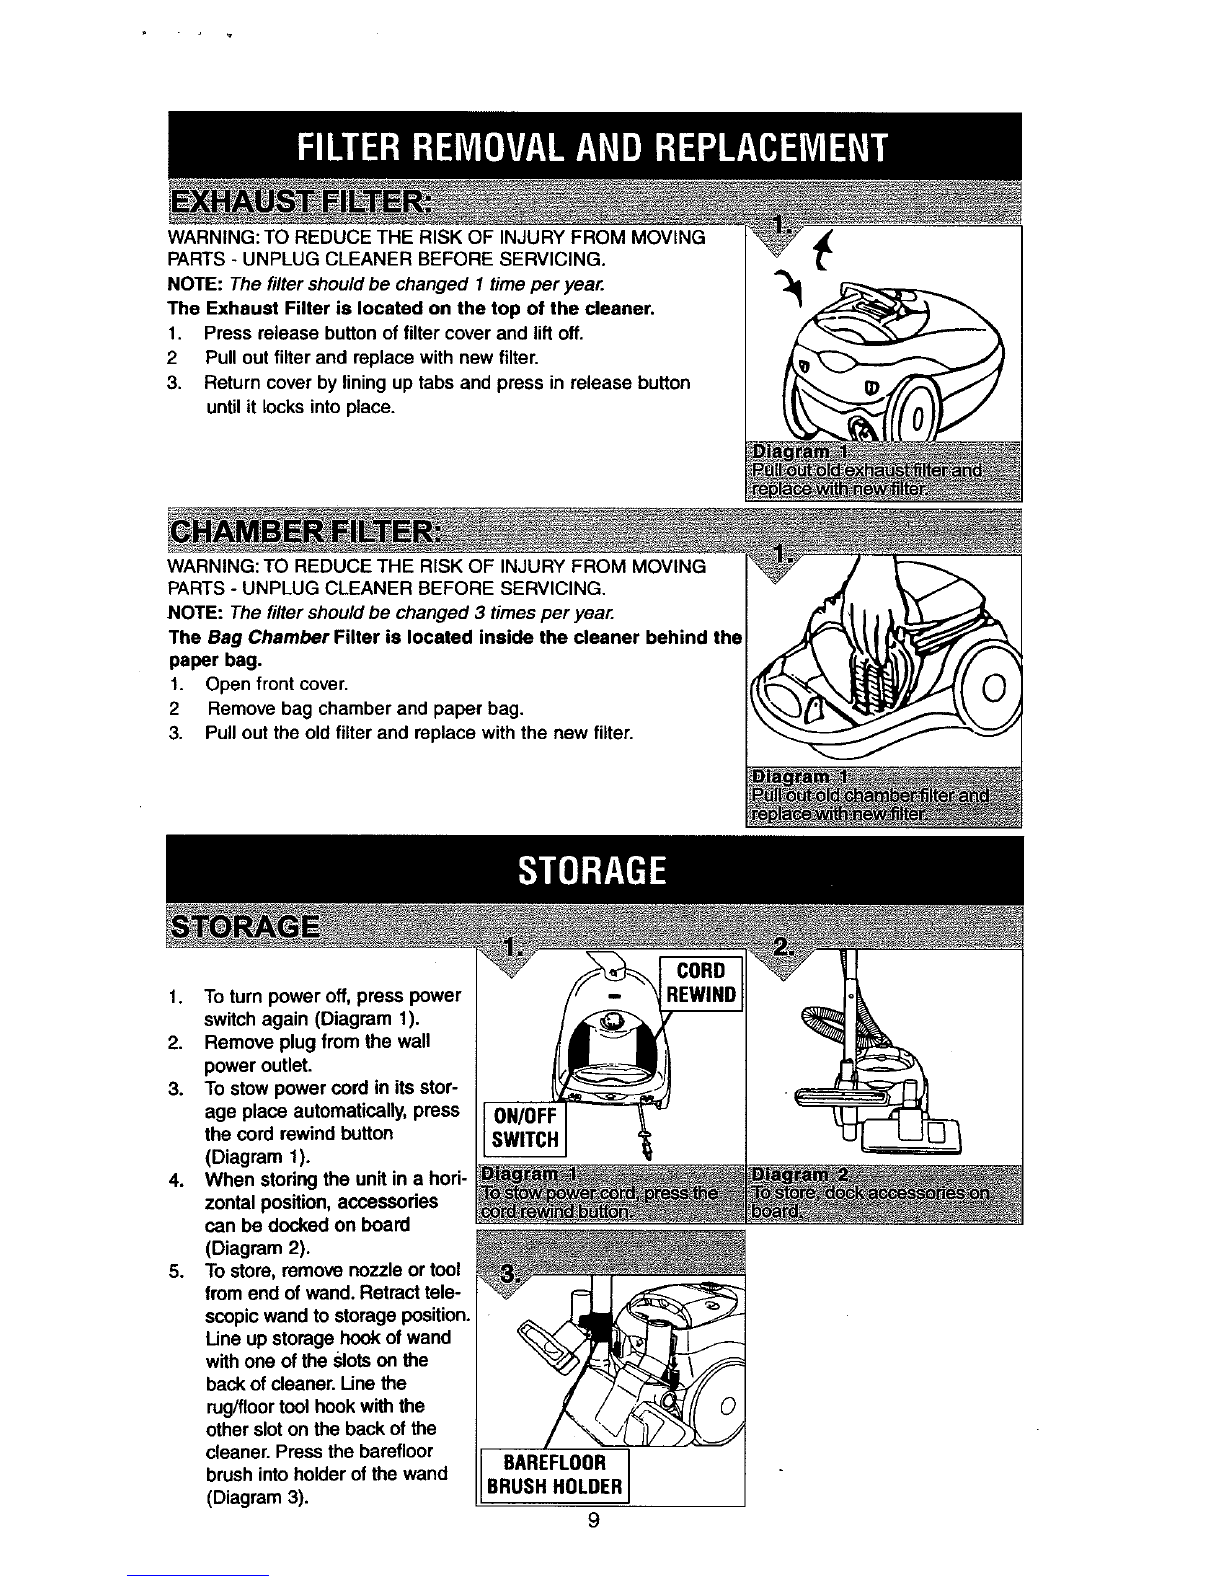
CONSUMER INFORMATION
THlS VACUUM IS INTENDED FOR HOUSEHOLD USE ONLY.
IMPORTANT SAFETY INSTRUCTIONS
When you use an appliance, basic precautions should always be
followed, including the following:
READ ALL INSTRUCTIONS BEFORE USING THlS APPLIANCE
ALWAYS FOLLOW THESE SAFETY INSTRUCTIONS
DO NOT LEAVE CLEANER UNATTENDED
WARNING
-
FULLY ASSEMBLE CLEANER BEFORE OPERATING
WARNING: THE CORDS, WIRES AND/OR CABLES SUPPLIED WITH
THlS PRODUCT CONTAINS CHEMICALS, INCLUDING LEAD OR
LEAD COMPOUNDS, KNOWN TO THE STATE OF CALIFORNIA TO
CAUSE CANCER AND BIRTH DEFECTS OR OTHER REPRODUCTIVE
HARM. WASH HANDSAFTER USING.
WARNING: TO REDUCE THE RISK OF
FIRE, ELECTRIC SHOCK OR INJURY:
Do not leave appliance when plugged in. Unplug from outlet when not in
use and before servicing.
Do not use outdoors or on wet surfaces.
Do not allow to be used as a toy. Close attention is necessary when used
by or near children.
Use only as described inthis manual. Use only manufacturer's recom-
mended attachments.
Do not use with damaged cord or plug. If appliance is not working as it
should, has been dropped, damaged, left outdoors, or dropped into water,
return it to a service center for inspection. Call 1-800-321-1134 for the
nearest service center.
Do not pull or carry by cord, use cord as a handle, close a door on cord,
or pull cord around sharp edges or corners. Do not run appliance over
cord. Keep cord away from heated surfaces.
Do not unplug by pulling on cord. To unplug, grasp the plug, not the cord.
Do not handle plug or appliance with wet hands.
Do not put any object into openings. Do not use with any opening
blocked; keep free of dust, lint, hair and anything that may reduce air flow.
Keep hair, loose clothing, fingers, and all parts of body away from
openings and moving parts.
Turn off all controls before unplugging.
Use extra care when cleaning on stairs.
2

Do not use to pick up flammable or combustible liquids, such as gasoline,
or use inareas where they may be present.
Look on your vacuum cleaner and follow all label and marking instructions.
Do not use an extension cord with this cleaner.
Keep end of hose, wands and other openings away from your face and body.
Keep your hands, feet, hair and clothing away from moving parts.
Do not use the vacuum cleaner without dust bag and/or filters in place.
Store the vacuum cleaner indoors. Put the vacuum cleaner away
after use to prevent tripping accidents.
Do not pick up anythingthat is burning or smoking, such as cigarettes,
matches, or hot ashes.
Hold plugwhen rewinding onto cord reel. Do not allow plug to whip when
rewinding.
Do not use cleaner inavertical position.
Approved bythe Vacuum Cleaner Manufacturer'sAssociation Executive
Committee, April 29, 1987.
SAVE THESE INSTRUCTIONS
WARNING:
To reduce the risk of electric shock, this appliance has a polarized plug (one blade is
wider than the other). This plug will fit in a polarized outlet only one way. If the plug does not fit fully in
the outlet, reverse the plug. If itstill does not fit, contact a qualified electrician to install the proper out-
let. Do not change the plug in any way.

CONGRATULATIONS
You are now the proud owner of the Royal' RY2000. We trust your new pur-
chase will bring you many years of satisfaction.
We are very proud of our products and hope that you are equallysatisfiedwith
their quality and performance.
Thank you for your support of ~o~al~products.
Visit our website at www.royalvacuums.com
TABLE
OF
CONTENTS
Safety
Instructions
..........................................................
Page
2
&
3
...........................................................
Feature Description
Page
5
How
To
Assemble
..............................................................
Page
6
Hose
Installation
..........................................................
Page
6
Attachment
Installation
................................................
Page
6
Shoulder
Strap
Installation
.........................................
Page
6
How
to
Operate..
...............................................................
Page
7
......................................................
T6
Reduce Suction
Page
7
Bag:
Removal
and
Replacement
......................................
Page
8
Filter:
Removal
and
Replacement
.....................................
Page
9
Storage
............................................................................
Page
9
Troubleshooting
Guide
......................................................
Page
10
LIMITED
WARRANTY
To the consumer, RoyalApplianceMfg. Co. warrants this vacuum cleaner to be free of defects inmate-
rial orworkmanship for2 yearsfrom the date of the original purchase. Save your original sales receipt
to validate start of warranty period.
Ifthe vacuum cleanershould becomedefectivewithin the warranty period, we will repair or replaceany
defective parts free of charge. The complete machine must be delivered to any ROYALm
Authorized Sales
&
Warranty ServiceStation. Please include complete description of the problem, day
of purchase, copy of original sales receipt and your name, address and telephone number. Ifyou are
not near a Warranty Station, call the factory for assistance at USA
&
Canada: 1-800-321-1134. Use
only genuine Royal" replacementparts.
The warranty does not include unusual wear, damage resulting from accident or unreasonableuse of
the vacuum cleaner. This warranty doesnot cover brushes, flat belts, filters, bulbs. This warranty does
not cover unauthorized repairs. This warranty gives you specific legal rights and you may also have
other rights. (Other rights mayvary from state to state inthe USA).
4

Carpet and Rug Nozzle
Barefloor Brush
Wand Release Button
TelescopicWand
Storage Hook
Handle
Air Flow Slider
Hnso
13. VariableSpeed Dial
14. Full Bag Indicator
15. Front Cover
16. Carrying Handle
17. Hose Connection
18. Hose Connection Inlet
.
.---
Automatic Cord Rewind
19.
Tool Caddy
10.
Exhaust Filter 20. CreviceTool
11. Power Switch 21. UpholsteryTool
12.
Power Cord
22.
Dusting Brush
5

CLEANER BEFORE REMOVING OR INSTALLINGHOSE.
1.
Insert hose and press until it locks into place (Diagram
1).
1.
The hose
can
be
used
alone or
with
many combinations
d
wands
andtools.
2.
Attachments are packagedsep-
arately inthe box.To store on
the unit, pressthe tool caddy
ontothe wand and slidetools
intotheir respective locations
(Diagram
1).
3.
Chooseany of the handy
accessoriesto meet your vari-
ous cleaning needs.Then sim-
ply push it firmly onto the hose
or wand end until it issecured
in place(Diagram
2).
4.
To removethe tool, pull apart
gently.You may gently rotatethe
attachmentbackand fortha lit-
tle to makethe removaleasier.
I~i.~~.i
-
-.-
-
(
Inserthoseandpressuntil
it
locksintoplace.
riedfrom room to room
11
I
@-
-
(Dtagram
2).
Diagram
1
Diagram
F-
Presstabsinandupontothe Thecleanercanbecarriidfrom
bottomofcanrster. roomto room.

1.
Connect metal telescopic wand
to the hose handle.Extend
lengthby pressing down on
release buttonandpullingthe
bottom portionof the wand
down (Diagram 1).
2. Pushopen end of wand into
desired cleaningnozzle
(carpethugnozzleor barefloor
brushor attachment).
a.
Car~etlRuacleanina
-
Select ~ilesettina toloor hi.
b.
Bare Floor Cleanina
-
Anach Floor Nozzleand
use.
3.
Pullcordfrom itsstorage position
and plugintoa power outlet.
4.
Pushpower switch to turn unit
on (Diagram 2).
NOTE: Forcleaningdrapes,
throw rugs, or otherlooseitems,
youmayneedto reducethe suc-
tion to preventsuckingthe item
intothe cleaningtool.
1. Dialthe variable speed control
until desired suction is achieved
(Diagram 1).
2. To reducesuct~oneven further,
''Ide
the
flow
''Ider
until
desired
suction
Is
achieved
(D~agram2).
--\
-
\
..-
--'L
-
--
!~I%":dable speedcontrol
untildesiredsuction
is
achieved._slidethe
JJ-..
.L
--
---,---
Diagram
2:
TO
&dtb
suctione&"fu&r,
airfiow'siid&
,
-'

OF INJURY FROM MOVING
I
"
a/-
PARTS
-
UNPLUG CLEANER
BEFORE SERVICING.
1.
When the full bag indicator
turns'red, you must replace
your bag.
2.
Removethe hoseby pressing
the
2
buttonsat the end of the
hose and pullupward.
3
Pull up on the front cover
(D~agram
1).
.
..
--
4
L~flout baq chamber w~thbaq
attached,
by
pullingon the bag
chamber handle(Diagram
2).
5.
Removefull bagfrom chamber
by pressingthe releaselatch
(hinge)of the bag chamber
(Diagram
3).
v~~~i~~~~
LATCH (HINGE)
(
I

NOTE: The filtershouldbechanged
1
time peryear.
The ExhaustFilter islocatedon the top of the cleaner.
1. Pressreleasebuttonof filter cover and lift off.
2
Pull out filter and replacewith new filter.
3. Returncover by lining up tabs and press in release button
until it locks into place.
WARNING:TO REDUCETHE RISK OF INJURY FROM MOVING
PARTS
-
UNPLUG CLEANER BEFORE SERVICING.
NOTE: The filtershouldbechanged
3
timesperyear.
The BagChamberFilter islocated insidethe cleaner behindthe
paper bag.
1.
Open front cover.
2
Removebag chamber and paper bag.
3. Pullout the old filter and replacewith the new filter.
To turn poweroff, presspower
switchagain (Diagram
1).
Removeplugfrom the wall
power outlet.
To stow powercord inits stor-
age place automatically, press
the cord rewindbutton
(Diagram 1).
When storingthe unit ina hori-
zontal position, accessories
can be
docked
onboard
(Diagram
2).
To store, removenozzleor tool
from endof wand. Retracttele-
scopic wand to storage position
Lineupstorage
hook
of wand
with one of the slots
on
the
backof cleaner. Line the
rug/floor tool hook with the
other slot on the back of the
cleaner. Pressthe barefloor
brushinto holderof the wand
(Diagram3).
BRUSH HOLDER
I

(-reuaep
ma
loruouoqeq) uowaeddsreqlunuleporue~u.)
w~ed
8uerueaalder 6uyeprorouo~~eruro~u~
6up3nber ueqmapoa 6u~rnpe~nuerupuareqrunuppoueqg Aq reuse13rnohb~ueplshemlv wallmar
rorelaw JEAOU pezlroqtne ua
WOJ)
alqallrna Al!pee~pua peaalder Allsue ere Hun s1q) u! pesn
wed
eqrues eql'reurn0 eq8
4
plad
eq
08
ere li8d0~loeaald hue
UIW)
pua
08
UO~)EUO~~UEJ~
Aua lo
SJS-
.relaw JEAOMpez~roqmauarolse6admolla~rnollees'pe~tnber61 eoums!sse requnjteq) auerre eqt ul
(PC
11-
1
ZB-008-
1)
1V
~IISEI~M
tlno
USIA
'noA tlv3~tl31vaa
v
31v3oio1
3AllVlN3S3tld3tl331At13S a3ZltlOHlflV
NV A9 3NOa 39QlnOHSDNl31Atl3Stl3HlOANV
PEL
L-
LZCOOB
c
IP
tlo
E
fb~suo!
.pruisu!hajesjo wouoq Ma!Aetl
'P
'%LC-IZErn8-1
~lm
JO
~aiua3aqhlas 01 aye1
'E
.JayeaJqlasaJ/asnjaoelde~
.awoq
u!
JayeaJq
JO
esnjymq3
'Z


This manual suits for next models
1
Table of contents
Other Royal Appliance Vacuum Cleaner manuals

Royal Appliance
Royal Appliance Infinity VS8 Loop User manual

Royal Appliance
Royal Appliance Upright Vacuum Cleaner User manual

Royal Appliance
Royal Appliance Skuppy User manual

Royal Appliance
Royal Appliance COMMERCIAL User manual

Royal Appliance
Royal Appliance Dirt Devil antiinfective R9 User manual

Royal Appliance
Royal Appliance COMMERCIAL User manual

Royal Appliance
Royal Appliance M2012-1 User manual