Chinavision CVUK-TR34 User manual

User Manual

Contents:
Preaution rnd Notice
In the Box
Bssic Intmduction
1. OverView
2. Accessory
2.1 Charging by AC adapter
2.2 Charging by Cr Chargr
2.3 USB Cable uage
2.4 Iostall lhe Cil Mout Svstem
Mein frracdon lntroducdon "
I . Starting up
2. Powo uving
3. Main Fuctious
3.t GPS
3.2 Muic
3.2.1 Music Play
3.2.2 Music List
3.2.3F4ual;rer
3.3 Movie
3.3.1 vidrc
3.3.2 video [st
3.4 Photo
3.4.1 photo
3.4.2 phoio list
3.4.3 firll screen
3.5 Ebook
3.5.1Eb@k
3.5.2 Ebook Lisr
3.5.3 Foot Settitrg
3.5.4 Color Setting
3.5.5 bmlmrk
3.5.6 b@l@rk list
3.6 Flsh
3.6.1FlrohList
3.7 Blwtmth
3.7.1DiaI
3.7.2 Dail R@ord
3.7.3Pat
3.7.4 Setting
3.7.5 Pair Devices
3.7.6 Outgoitrg cau
3-7.7 callfail
3.7.8 incoming call
3.7.9 a*irye call
3.8 Gmes
3-8.1Memory

3.8.2 Linlink
3,8.3 Russia Block
3.8.4 JawBrea(er
3.8.5 BoxMm
3.8.6 Breakout
3-8.7 Snake
3.9 Tools
3.9.1 Calculator
3.9.2Uilt
3.10 Setting
3.10.1 Volume
3.10.2 Backlight
3.10.3 Lmguage
3.10.4 FM Tmsmitter
3.10.5 DateTime
3.10.6 Calibmtion
3.10.7 System Info
3.10.8 usB
3.10.9 Factory Reset
3.10.10 Nav Path
3.ll GPS Info
Precaution and Notice
> cis l, operated md controlled mdq the sole responsilility of the Govemmetrt of the united
States of ^America, who ue lesponsible for its av;itability md accurcy. Any chmees in GPS
avaitability md accurcy, or in enviromental conditions, my impact the opeBtion of you
device .Wi cm not accep my liability for the availability and accurcy of GPS'
> rt " pNo i, u."a only as a navigation aid. It is not for precise measwemenl of direction, distmce,
tocation or topogmphy. The user-must follow atl traffic signs md local regulations along the roads'
> CiS ,"t"ttit" .ilrdh cmot pass tkough solid mterials (except glass)' When you ue inside a
tumel or building, GPS position is not available.
> a aini*u. of +-'Gps mtellite signals ue rceded to detemine cwent location. signal reception
"", U" ,fr"t"a ty situations suclias bad weather or wireless devices or dense overhead obstacles
(e.g. tall buildings).
> ilden yo, get oit ofthe cu, do not leave you PND on the dashboard or subject to direct smtight'
The overheiting of the battery may cause mlfunctions md./or dmgerous conditions'
> i- yo* o* .if"ty, do not operaie the controls ofthe PND while driving Do not mout where the
driver's field ofvision is blocked
h the Box
In the box you will find
ffim
ru&
M
( 1 ) Chuger Indicator Light
(2) Power Switch
(3) Speaker
(4) SD Cud Slot
(5) Earphone Jack
(6) Reset Key
(7) USB Comector
2. Accessory
2.1 Charging by AC adapter
Please use the AC adapter to chtrge the device for the fist time. To mximize the life of the battery
device must be fu[ of chilge for the fist time.
Plug the adapter's DC port into the device's USB port on its right-side pmel
Plug the adapter into the main supply socket.
The chaging indicator will light. When the uit is fulty charged, the red indicator will tum blue.
ry,
2.2 Charging by Car Charger
The cil charyer supplies power to you device when you re using the device in a cr.
l. OvGNiew

vacuu seal
Caution: To protect you device against sudden surges in cunent, comect the cil charger only after the
car engine has been started. Comect one end ofthe car chilger to the power comector ofyour device.
Comect the other end to the cigarette lighter in the car to power and charge you device.
a)
Bl
EI ,
tl
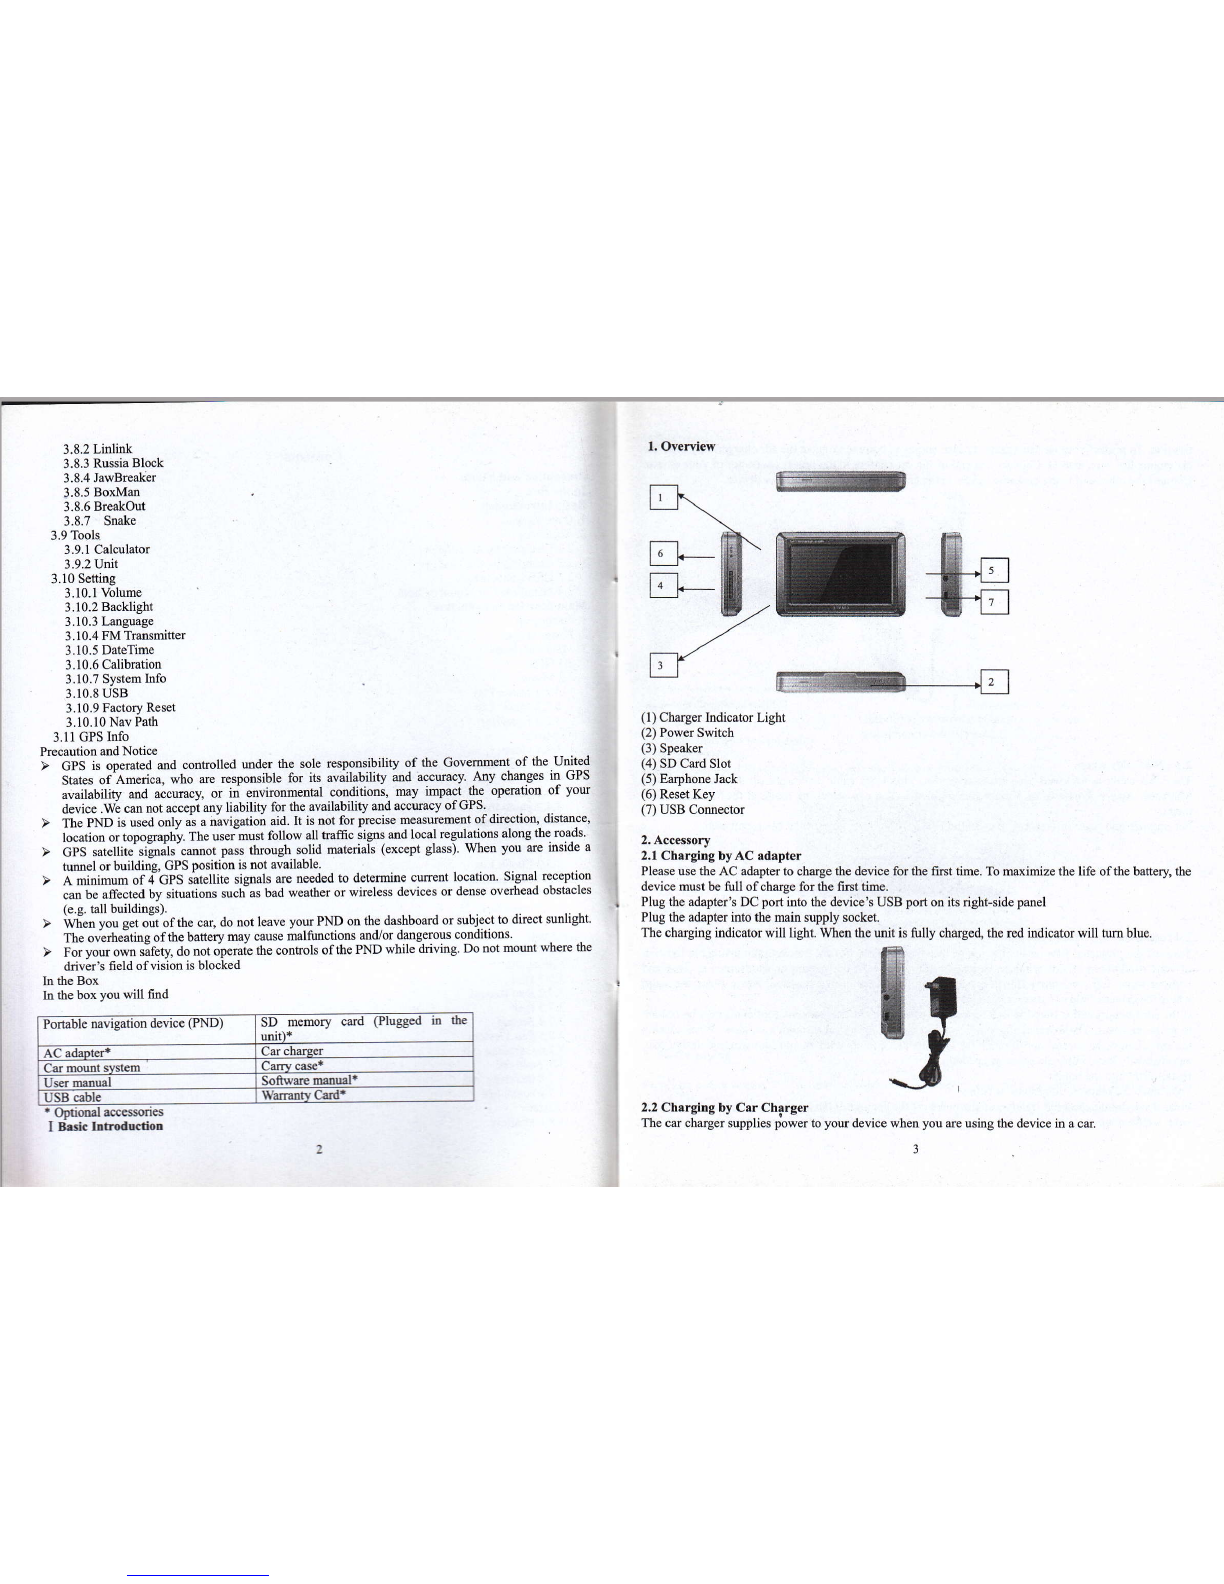
1. Device power comector
2. Vehicle power comector
2.3 USB Cable usage
The USB cable is provided for system upgrudes. This USB cable will work on the PC either with
Microsoft Active Sltc@ or as a mass stonge media. You cm select the mode itr the "Setting-USB"
meou.
For upgrade and more infomation about Microsoft Active Slac, please visit Microsoft web.
Use the tuo screr to adiust the
angle and directiotr ofthe PND Step2r lnstsll the holder itrto the
Crrcrrdle bvthe sockets
II Main function introduction
l. Starting up
Insert the supplied SD card (optional) into the slot at the bottom ofdevice.
2.4 Instalt the Car Mount System
Take offthe protected film on the bottom ofthe suction. Then put the bracket onto a suitable location
of your windscreen or side window, make sue the window or the suction or windscreen is clean md
without water and some dity things inside, flL\itrg the stmd on that position. Never place the stmd
where the ddve/s held ofvision is blocked.
Ifthe ca's windshield is tinted with a reflective coating, m extemal antema (optional) may be needed
to route the rcads. The extemal antema is stick to the top of the car though a window. When closing
the car window, be careful not to pinch the antema cable (Ca$ with m mti-jam window design may
automatically leave adequate space as needed.).
Install PND into the holder
To remove the bracket, three steps as below:
Press 2 side button, pull left lightty md then take offthe suction. Ifthe bracket still doesn't detach ftom
you windscreeq tug gently on the clear plastic tab at the edge of the suction momt, to break the
ro-&
2. Power saving i]/l\'i
Press the power buttotr :--: on the top side of you device to tm off you device, the device actMlly
enterc a suspeod state md the system stops operation. Once you tm on the system again, it resmes.

3. Main Functions
Prcss the powq button to tum on the GPS unit. The Main Menu screen will be displayed as below:
'Iap the icon 5!S or *S* can choose functiorl
3.1 GPS
Double tap the "GPS" icon
3.2 Music
Tap the icon "Music" on the main menu and enter into following interface.
3.2.1 Music Play
Tap the "Music" icon m ". &8 on the main menu again md enter jnro following interface
C
D
E
w
FGHIJK
A: rc1um to the main menu
B: minimize
C: order ofplay: mndom, repeat, single, play all, repeat all
D: equalizer
E: previous
F: speed bar
G: pause/play
H: next
I: stop
J: music list
K: volume control
3.2.2 Music List
Tap the "Music List" icon md enter into the following interface
A: prcvlous
B: increase single
C: increase all
D: delete single
1l;i:i
or lt*!,. to startprogram.

F: delete all
3.2.3 Equalizer
Tap the "Equalizer" icon and enter into the following interface
A: previous
Br tap it and can select play style as blew interface
C: tap it and can use the equalizer
D: reset the equalizer
3,3 Movie
Tap the icon "Video" on the main menu and enter into following interface
G
3.3.1 video
Tap the "video" icon
A:pause/play A B C D E F
B: speed bar
C: stop
D: video list
E: rctum to the main menu
F: volume control
3.3.2 video list
Tap the S&tti$ icon and entei into the following interface
3.4 Photo
Tap the icon "Photo" on the main menu and enter into following intedace
C
D
i:13 ". S,& on the main menu again and enter into following interface 3.4.1 photo

s"I ".64{
Iap rhe 'Photo" icon or 6{ifiX on the main menu again and enter into following interface
,4.BC
A: previous
B: next
C: zoom irt
D: zoom out
E: rotate
Fi full screen
G: photo list
H: retum to the main menu
3.4.2 photo list
Tap the ;l.!.t** icon and enter i
3.4.3 full screen
Tap ihe "photo lisf icon and enter into the full screen.
Then tap the screen again and enter into the following interface
A: set time for playing picture. ls-'l0s. A
Previous: tap the screen once more
3.5 Ebook
Tap the icon "Ebook" on rhe main menu and enter into following interface
3.5.1 Ebook
Tap the icon W ", M on the main menu again and enter into following interface
H3ry Pofts xx: highlt unuflal boy in many r.yj- tur oDe
thino, he hid the sunlg holid:rs @re th.n any oths tie oa
yBr. to. another, h. r€lly !a.td to do has ho.:ifi* bur
to do r in sd, in rhe dd oi nisht. And heJe h.ppmd to
tEr{ L}raEr@r r&
+++J+++
HBCDEFG
1l
icon and enter into the

A: renm to the maln menu
B: previous
C: next
Di font setting
E: color setting
F: bookmark
G: bookmark iisl
H: ebook list
3.5.2 Ebook List
Tap the icon "ebook list" and enter into following interface
3.5.3 Font Setting
Tap the icon "font setting" md enter into following interface
A: previous
B: saving
3.5.4 Color Setting
Tap the icon "color setting" and enter into following interface
.\: previous
B: saving
3.5.5 bookmark
Choose to add as part ofthe bookmark texr, click on the / icon. and enrer into following interface
Choose "OK" or "Cancel"
3.5,6 bookmark list
Tap the icon "bookmark list" md enter into following interface-
A: previous
B: enter into bookmark
C: delete bookmark
3.6 Flash
Tap the icon "Flash" on the main menu ed enter into following interface

on the main menu again md enter into foilowing interlace.
AB
A: pause/play
B: stop
C: speed bar
D: flash list
E: return to the maiD menu
F: volume control
3.6.1 Flash List
Tap the icon "flash list" and enter into fol
on the main menu and enter into following interface
1.7.1 Dial
Iap the icon K! or the Bluetooth menu and enter into the following interface
Ai retum to the Bluetooth menu
B: backspace
C: pair and connect with the mobile you wmt
D: call Record
3.7.2 Dail Record
Tap the icon ffi o. th. gtr"tooth meou and enter into the following interface
H
B
C
D
I
t
t
:
I
B
C
D
3-7 Rluetooth
Tap the icon "Bluefooth"
E<-
F

iA: retum to the Bluetooth menu
B: connect with the mobile you want
C: delete the recorded number you chose
D: delete all the call records
E: incoming call record
F: outgoing call record
G: missed call record
H: previous
I: next
3.7.3 Pair r:t
Tap rhe icon ;il on the Bluetooth menu and enter into the tbllowitrg interface 1.7.5 Pair Devices
Tap the icon W on rn" Blueiooth menu and enter lnto the following interface
B
3.7.4 Setting
Tap the icon Kl on tne ntretooth menu and enter rnto the lbllowing intedace -\: retum to the Bluetooth menu
B: comect the Devices you chose
C: disconnect the Devices you chose
D: dclete all the Devices infomation
A: PIN setting
B: music selecting
Tap "PtN setting" button and enter into the following interface

3.7,8 incoming call 3.7.9 active call
3.8 Games
Tap the icon "Games" on the main menu and enter into following interface
-*
?.4 JK,
Taprhercon or'{l' " onthemainmenuagainandenterintofollowinginteface
1.8.1 Memory r
lEd
fap the icon l!!! and enler into [ollowing interface
3.8.2 Linlink
i; !
Tap the icon kS and enter into following interface
3.8.3 Russia Block
i,Xl
Tap the icon Si* and enter into following interface
3,8.4 JawBreaker

Tap the icon W md enter into following mtedace
3.8.5 BoxMan
tffitl
Tap the icon ffQ${$ and enter into following intertace
3,9 Tools
Tap the icon "Tools" on the main menu and enter into the following interface
3.8.6 Breakout
:ttt:
Tap the icon ':":'-: and enter into following interfacc
m rfir
Tap the icon !p'{ or yF ii on the main menu again and enter into following interl'ace
3.9,1 Calculator
Tap the icon W and enter into foilowing intertace
3.8.7 Snake

-'&::,::..O-.-. 4,.:.;i,- -:.,i..a.... .+..,.-.-
'_--'.'-''t . ,'.._{''-tIr' } _
,'r{&: -.4 .5.:.r-!,:r:a.,. -S,.i .t. ,::i::r.-J.;
1'_1'.
'.4!-q9:r..ir:.-....%. lrxr t1: r I i.: ,.-
'...'.'' ':
i:,nt- . .. €--.. .-:G. ,. . M.
3.9.2 Unit
Tap the icon K and enter into followitrg intedace.
Unil:Length, Weight Mass, Cubic Capacity, Square Area, Circular Angulat Power, pressure, Speed,
Tempelatue
Tap the icon A on the main meun or B on the system as belos'
B+
And enter into following interface
3.10 Setting
Tap the icon "Setting" on the main menu and enter into the following interface
g
ir3 a!
Tap the icon lr:' o. llt*9.&! on the main again menu and enter into following interface

A: previous
B: saving
C: volume cotrtrol
D: cm select "Enable somds for taps" or not
E: stil-up music
3,10.2 Backlight
rI
Tap the icon t on the system meuD aod enler inlo lbllowing interlace.
CBA
A: previous
B: saving
C: backlight control
D: select auto of time
3.10.3 Language
II
Tap lhe icon l!!l on rhe system mem md enter inlo follou ing interface.
3.10.4 FM Transmilter
Tap the icon A on the main mew or B on the system meu as below
And €nter into following intedace
A: previous
B: saving
C: select use FM
D: select emissive ftequency ofFM
E: tap "+rror 'r-'r icon to increase or decrcase the emissive fiequency ofFM
3.10.5 DateTime

Tap the icon A on the maiq meu or B on the system meun as below
B-
And enter into following inteface.
A: previous
B: saYing
C, tup K or ffi icontoadjustthetime
D: tap m or ffi icon to adjust the date
E: tap "<" or '>" icon to adjust the time zone
3.10.6 Calibratiotr
3,10.7 System Info
Iap the icon A or the main meu or icon B on the System meu 6 below
And enter into the following display
3.10.8 USB
Tap the icon ffil o. th" System -eu , to set the UsB working mode
w
ffi

T
3.10.9 Factory Reset
n
Iap the icon l!l{ on the System meu ild enrer inlo following interface.
;: "o,
***
on the system mem md enrer into rouowing interrace.
Tap the icon A or B or C on the main meuo 6 below
And enter into the
This docment is for guidme only md des Dot fom part of ily coutBct, md my be subject to
chmge without notice.
3.11 GPS Info
Tap the icon "GPS Info" on the min menu md enter into the following interface.
Table of contents
Popular Car Navigation System manuals by other brands

Magellan
Magellan RoadMate 6000T - Automotive GPS Receiver Användarhandbok

Pioneer
Pioneer AVIC-S1 Hardware and bluetooth manual

Toyota
Toyota HIGHLANDER 2014 manual

Garmin
Garmin VIEO RV 850 Series owner's manual

Magellan
Magellan Magellan eXplorist 300 Instructions for operating

Nextar
Nextar X3-01 quick start guide