Chiroform DF-1688F User manual

Chiroforms Massage Chair
The Wellness and Massage Expert
User Manual

Thanks you for purchasing our Popular Massage Chair. Before operating the Massager, please read
this User’s Manualthoroughly for the correct
methods of usage, especially the notes on Safety.
This manual should be kept available for future reference after you have read it through.
Contents
Important Safety Instructions…………………………………………………….1-4
Names of Parts and Functions……………………………………………………5-8
Preparation before Massage………………………………………………………9-14
Massage Programs………………………………………………………………. 15-17
Care and Storage………………………………………………………………... 18
Specifications…………………………………………………………………….18
Troubleshooting…………………………………………………………………. 19
Important Safety Instructions
DANGER
-To reduce the risk of electric shock:
1. Always unplug this appliance from the Electrical Outlet immediately after using and before
cleaning.
WARNING
-To reduce the risk of burns, fire, electric shock, or injury to persons:
1. This appliance should never be left unattended when plugged in. Unplug from outlet when not
in use, and before putting on or taking off parts.
2. Close supervision is necessary when this appliance is used by, on, or near children, invalids, or
disabled persons.
3. Use this appliance only for its intended use as described in this manual. Do not use
attachments not recommended by the manufacturer.
4. Keep the cord away from heated surfaces.
5. Never operate the appliance with the air openings blocked. Keep the air openings free of lint,
hair, and the like.
6. Never drop or insert any object into any opening.
7. Do not use outdoors.
8. Do not operate where aerosol (spray) products are being used or where oxygen is being
administered.
9. Connect this appliance to a properly grounded outlet only. See Grounding Instruction.
GROUNDING INSTRUCTIONS
This product must be grounded. If it should malfunction or breakdown, grounding provides a path
of least resistance for electric current to reduce the
risk of electric shock. This product is equipped with a cord having an equipment-grounding
conductor and a grounding plug. The plug must be plugged
into an appropriate outlet that is properly installed and grounded in accordance with all local codes
and ordinances.
DANGER
Improper connection of the equipment-grounding conductor can result in a risk of electric shock.
Check with a qualified electrician or serviceman if you
are in doubt as to whether the product is properly grounded. Do not modify the plug provided with
the product if it will not fit the outlet, have a proper
outlet installed by a qualified electrician.
This product has a grounding plug. Make sure that the product is connected to an outlet having the
same configuration as the plug. No adapter should
be used with this product.

1. Usage Environment
●Do not use your Chair in an excessively humid or dusty environment, as it may cause electrical
shock or machine trouble.
●Do not put your Chair in room temperature higher than 40C.
●Do not expose your Chair to heaters, stoves or direct sunlight.
●Do place and use your Chair on a flat floor level.
You should use the Chair in a cool room, do not increase the room temperature abruptly. It is
recommended that you increase the
temperature gradually to a normal Level. If you want to move the Chair that stored in a cold place
to a warm place, it is advisable to
use it one hour later. Machine trouble may be resulted when a cold machine is being used in a warm
room suddenly.
2. Unsuitable Users
The following users must consult their doctor before use:
●Those who are under medical care or feel unwell.
●Those who are suffering from malignant tumours.
●Those who are suffering from heart diseases.
●Women who are pregnant or menstruating.
●Those who are under medical rest or rest cure ordered by doctors.
●Those with spinal disorders, bent or abnormal spinal conditions caused by past accident or illness.
●Those who have high fever.
3. Safety Precautions During Use
●To ensure safe and correct use of the Chair, do not operate the Chair without reading this
operation manual carefully.
●Do not use the Chair with other therapeutic equipment or electric blanket, etc, as it may result in
inefficacy or injury.
●Do not allow children or pets to play around the Chair, i.e. behind the Backrest, under the seat or
Footrest of the Chair. It may result in injury during operation of the Chair.
●Do not rest or place heavy objects on the Armrests, Footrest or Backrest. It may result in machine
trouble or injury to the user should these objects topple.
●Do not use the Chair when your body is wet.
●Do not operate the Chair with wet hands.
●Continuous long application of the massage at a position of your body may result in excessive
stimulation and may be counter-effective.
●Do not insert your hand or foot along the paths of the Massage Nodes during the operation of the
Chair, as it may cause injury to the user.
●Always sit in an upright position during the operation of the Chair.
●You may place a blanket or towel over the Backrest if you prefer a softer massage.
●Using the Massage Chair as a bed is not encouraged.
●Do not apply Massage Nodes directly on the head, joints of elbows and abdomen , etc.
●The recommended usage time is 15 minutes, however, you are encouraged not to use more than 5
minutes on the same spot.
4. When the Chair Should Not be Used
In the following events, please switch the power OFF immediately and disconnect the AC power
cord from the Electrical Outlet.
Contact our centre for servicing:
●If the Chair is spilt accidentally with water or not in operation, continuous to use under these
conditions may result in electrical shock.
●If abnormal or severe pain is felt during massage, stop operation immediately and consult your
doctor.
●If you find any malfunction or any other abnormal condition during operation.
●If there is a power failure, injury may be caused when power is back unexpectedly.
●If there is severe lightning.
NOTE: Lift the Backrest Pad regularly to check for tears in the upholstery of the Central
Cloth
Do not use the Chair where the upholstery of the Central Cloth is torn. Remove the AC Plug from
the Electrical Outlet immediately.
If it is still using in this condition may cause injury or electric shock to the user.
5. Assembly and Repair of the Chair
●Do not disassemble the back cover from the Chair, touching the inside mechanisms of the Chair
may result in electrical shock.
●The Chair must only be serviced or repaired by our Service Centre, and user must not disassemble
or repair the Chair oneself.
6. Things to Note about Power Plug and Cord
Check that the voltage corresponds with the specifications indicated for the Chair (only for
alternative current).
●Do not disconnect the AC Plug from the Electrical Outlet roughly.
●Do not connect or disconnect the AC Plug from the Electrical Outlet with wet hands. It may
result in electrical shock or machine troubles.
●When disconnecting the AC Plug, pull it out by holding the plug and not by the cord.
●Although the operation will be stopped automatically by the Auto-Timer function, do not fail to
switch off the Main Switch after operation.
●Do not place the AC cord under the Chair as it may damage the cord and result in fire or electrical
shock.
●Do not use the Chair if the power cord/pulg is damaged, use attachments that recommended by
our company only .

●Do not use the Chair if the Electrical Outlet is excessively loose.
. Caution for the Remote Controller
●Do not sit, step or place heavy objects on the Remote Controller.
●Do not drop the Remote Controller. It is recommended to place it in the Remote Controller
Support when not in use.
●Do not exert excessive force on the Remote Controller.
●Do not operate the Remote Controller with wet hands.
●Do not operate the Remote Controller using sharp-edged or hard objects, this may result in
damage.
PLEASE SAVE THESE SAFETY
Names of Parts and Functions
Headrest
Backrest
Backrest Pad
Moving Castor
Chair Base
Seat Cushion
Footrest
Remote Controller
Remote Controller Support
Front Footrest
Armrest

M ain Power Swi cht
AC Plug
Line of Connection to
Remote Controller
Line of Connection
from Plug to
lectrical Box
lectrical Outlet
Backrest Folding Lever
LCD Display
Calf Air Massag e
Air Massag e Level
Auto matic Pro g ram
Calf/Fo o t Trac tion Ai r Massag e
Kn ead ing Massag e
Heating Massag e
Selec t Ti mer
Up / d o wn Ad ju stment
Footrest Adjustment
To adjust the recline angle of the Footrest
Footrest & Backrest Reset
To adjust the Footrest down and the Backrest up
Kn ead ing Speed
Swayin g Speed
Swayin g Massage
Selec t Massag e Parts
Fi nger-P ressing Massag e
Bac krest Ad justment
To s im ultan eou s ly adj u s t th e rec lin e
an gle of th e Backrest an d Footres t.
S to p/ S tart
Hip Air Massag e
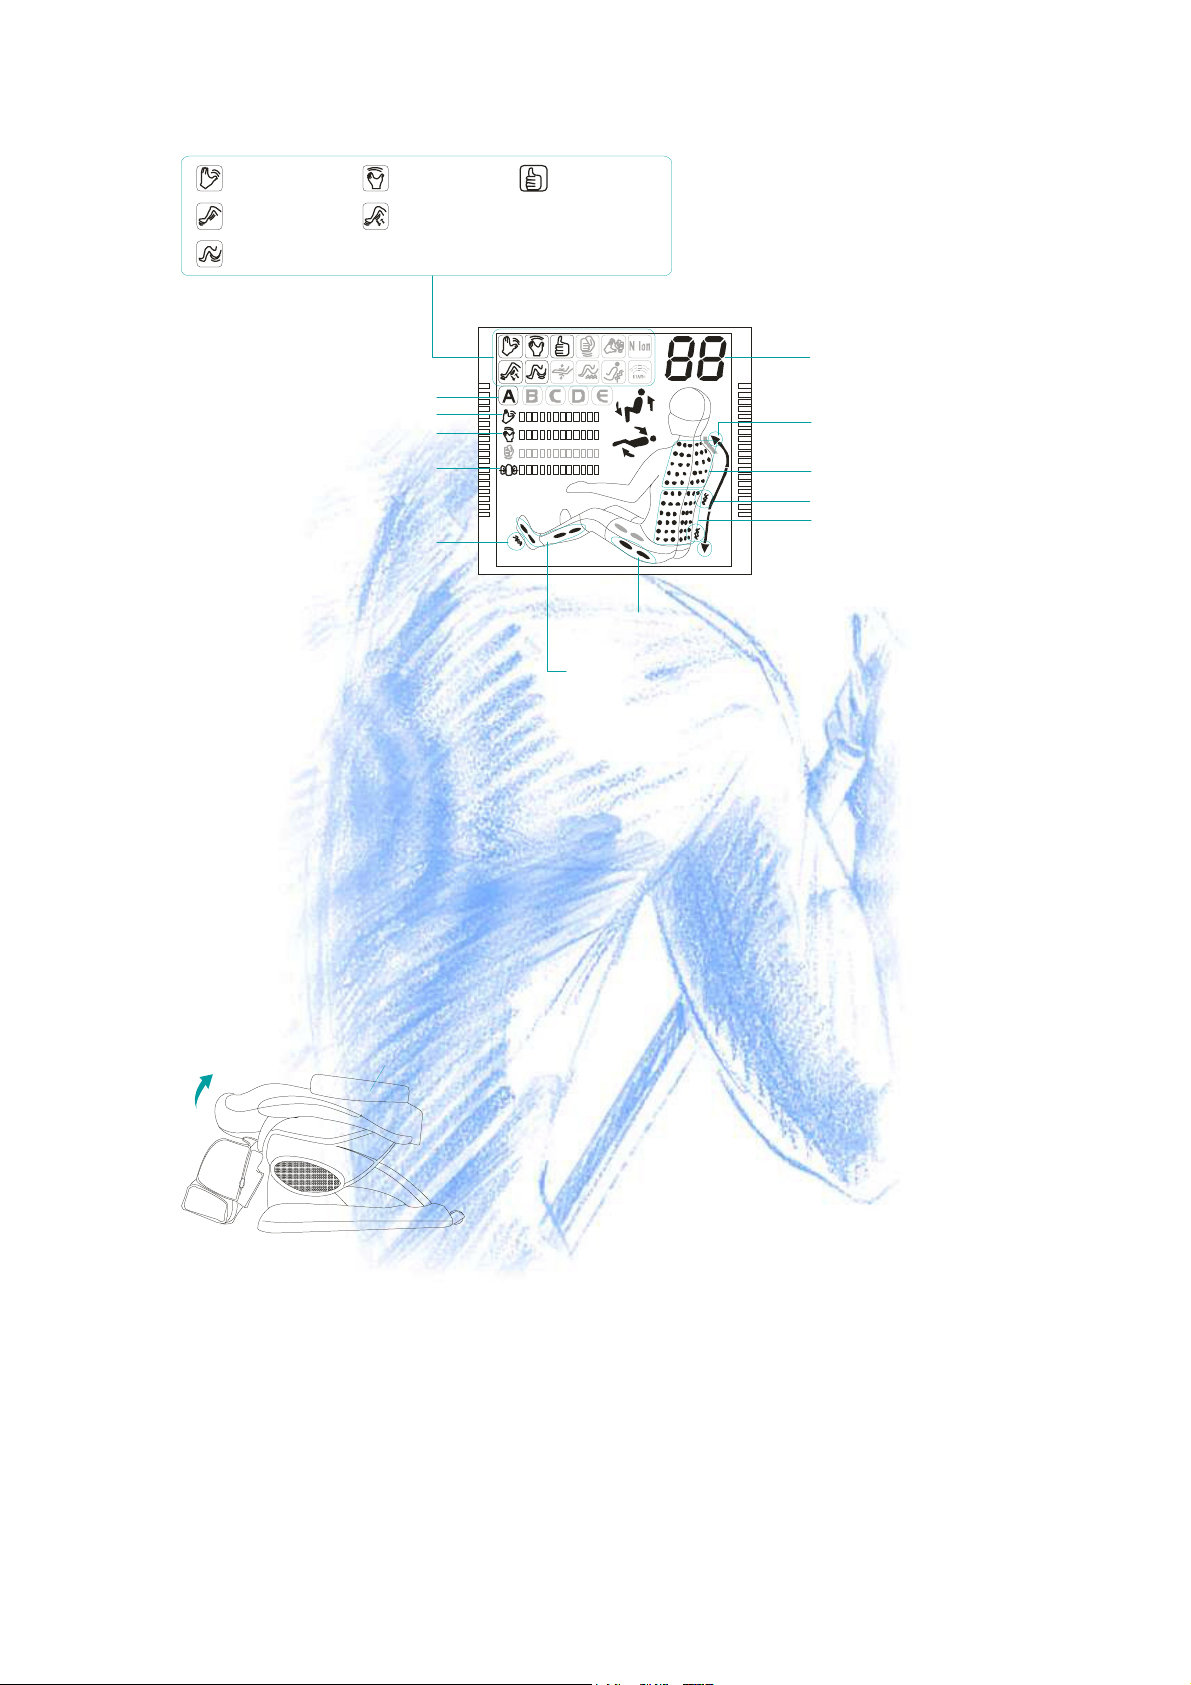
Hip Air Massage Region
2.Calf/Foot Traction Air Massage Region
Footrest Adjustment
Backrest Adjustment
Timer
Back Massag e Part
Waist Massage Part
Up/down the Back Massage Part
Back Heating Massag e Region
Air Massage Level
Kneading Speed
Automatic Program
Swaying Speed
Foot Heat ing Massage Region
1.Calf Air Massage Region
Kneading
Calf Air massage
Finger-PressingSwaying
Calf/Foot Tract ion Air massage
Hip Air massage
Preparation before Massage
Unpacking and Folding the Chair
●The Massage Chair is packed with the Backrest folded forward. Please raise the Backrest to an
upright position until a “click”sound is heard.
●To fold it for storage:
1. Remove the Headrest and Backrest Pad.
2. Press the Backrest Folding Lever down.
3. Push the Backrest forward.
1. Raise Backrest to an upright position.
Seat Cushion
2.Press the Backrest Folding Lever down to release it from lock position.
3.Push the Backrest forward to fold.
Backrest Folding Lever
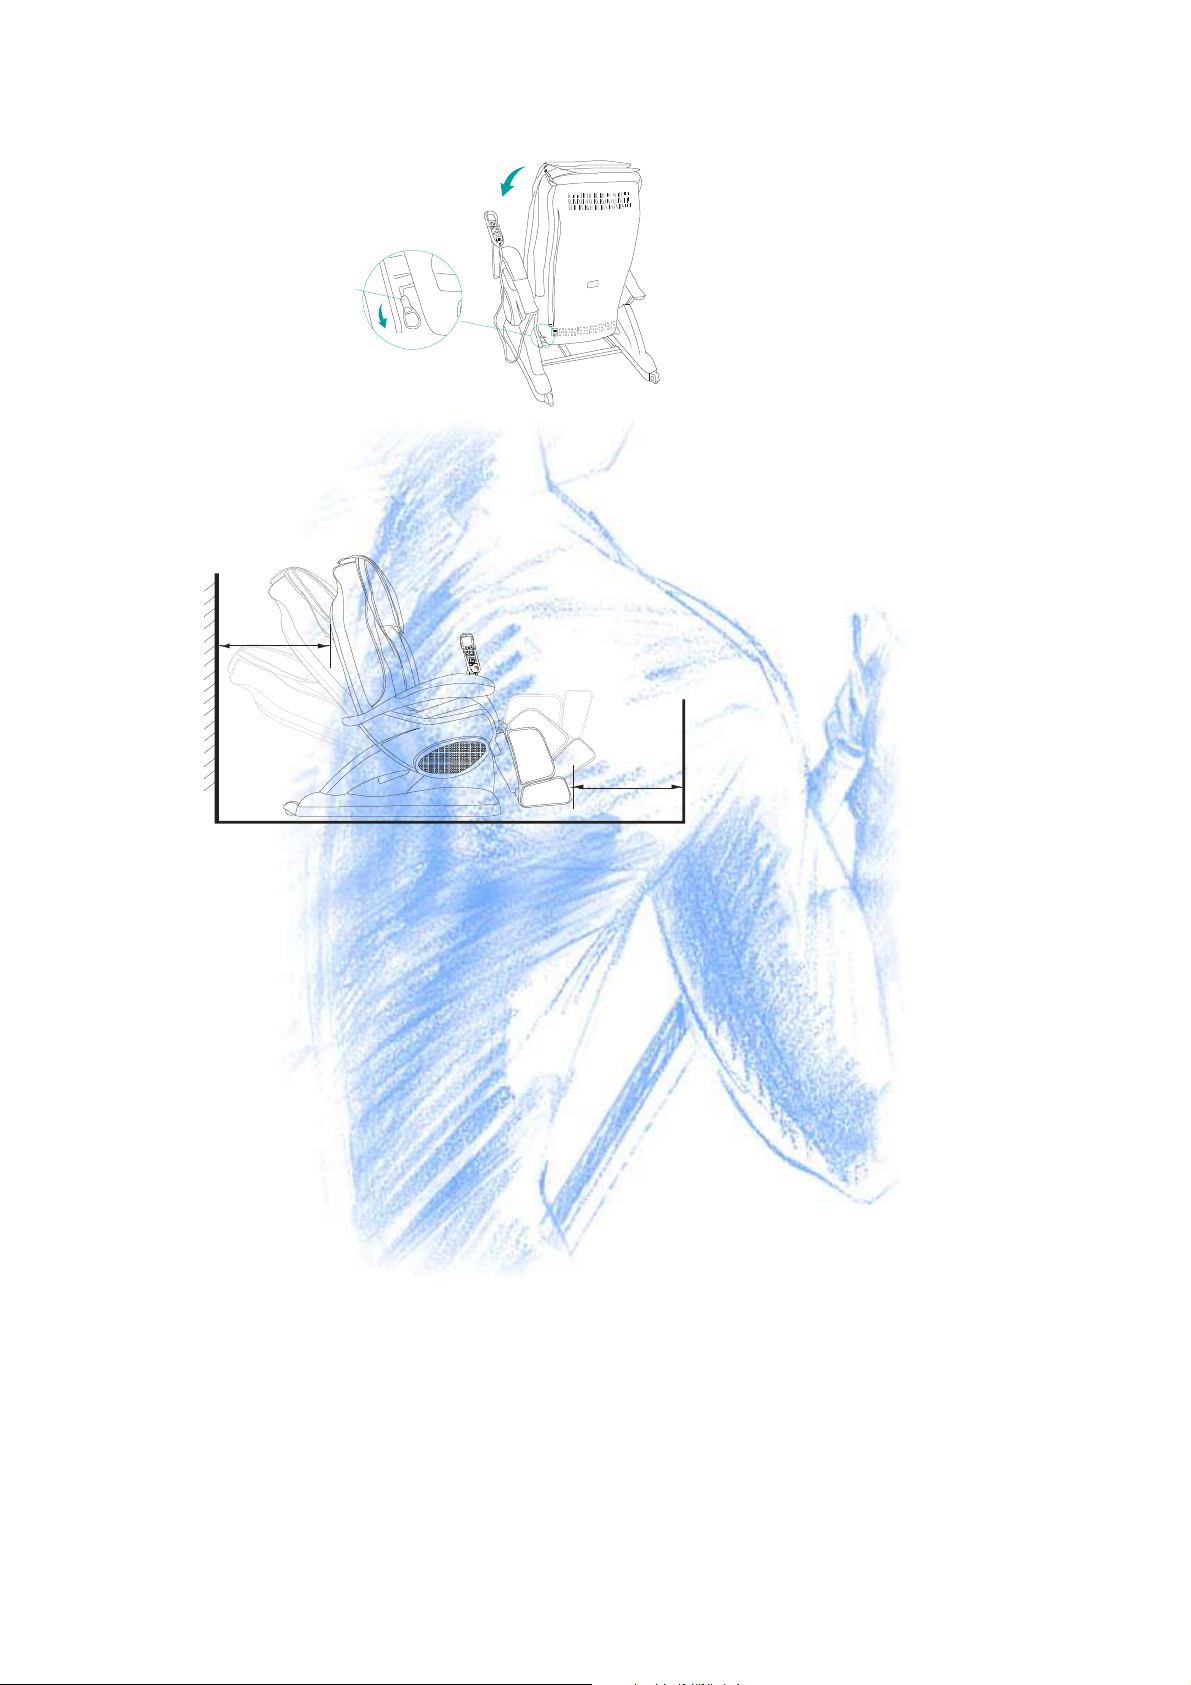
Placing of the Chair
●Secure sufficient space around the Chair for reclining purpose.
●Make sure that there is an allowance of more than 60cmboth in the front of and behind the Chair.
60cm
at lea st
60cm
at lea st
●Put a carpet under the Chair to prevent
scratching of the flooring.
●Make sure that there is no obstruction
behind the Chair for a safe recline during
operation.
Installation of the Remote Controller Support
●Install the Remote Controller Support at the left side of Chair and fix securely at two places with
screws. Finally finish up the work by installing the Cap.
●Adjustment of Remote Controller Support: In normal times, adjust it freely and if it is loose,
tighten it by the Fixing Screw securely.
●Installation/Removal of Remote Controller: 1. Installation: insert it from the top.
2. Removal: hold the top and pull it upward.

Back of Remote Controller Support
Fixing Screw Remov al
Installation
Ca p
Screws
Screwdriver
Loosen
Tighten
(2 piec es)
Seat Cushion Installment
●When installing the Seat Cushion, insert one air hose in it to another one of the seat support end
to end, align with the tie-in port of air hoses to avoid air leaking.
●When separating the air hoses, pull them out only.
●The Seat Cushion is attached to the seat support with two velcro tapes.
Connect the air hoses
Separate air hoses
Pull out
Headrest
●Headrest is stuck to the Backrest Pad with velcro tapes.
a. In bonding, stick them together.
b. To separate, take it away directly(A).
Backrest Pad
●Backrest Pad is attached to the Backrest by zipper, to load or unload Backrest Pad, only need to
zip the zipper(B).
●Installing Heating Massage:
a. Insert one plug with another plug end to end only.
b. To separate, pull them out .
●Turn the Backrest Pad to behind the back of the Chair if you prefer a more intense massage(C).
A C B
Velcro tapes
Zipper
Inse rt the plugs for
Back Heating M assage
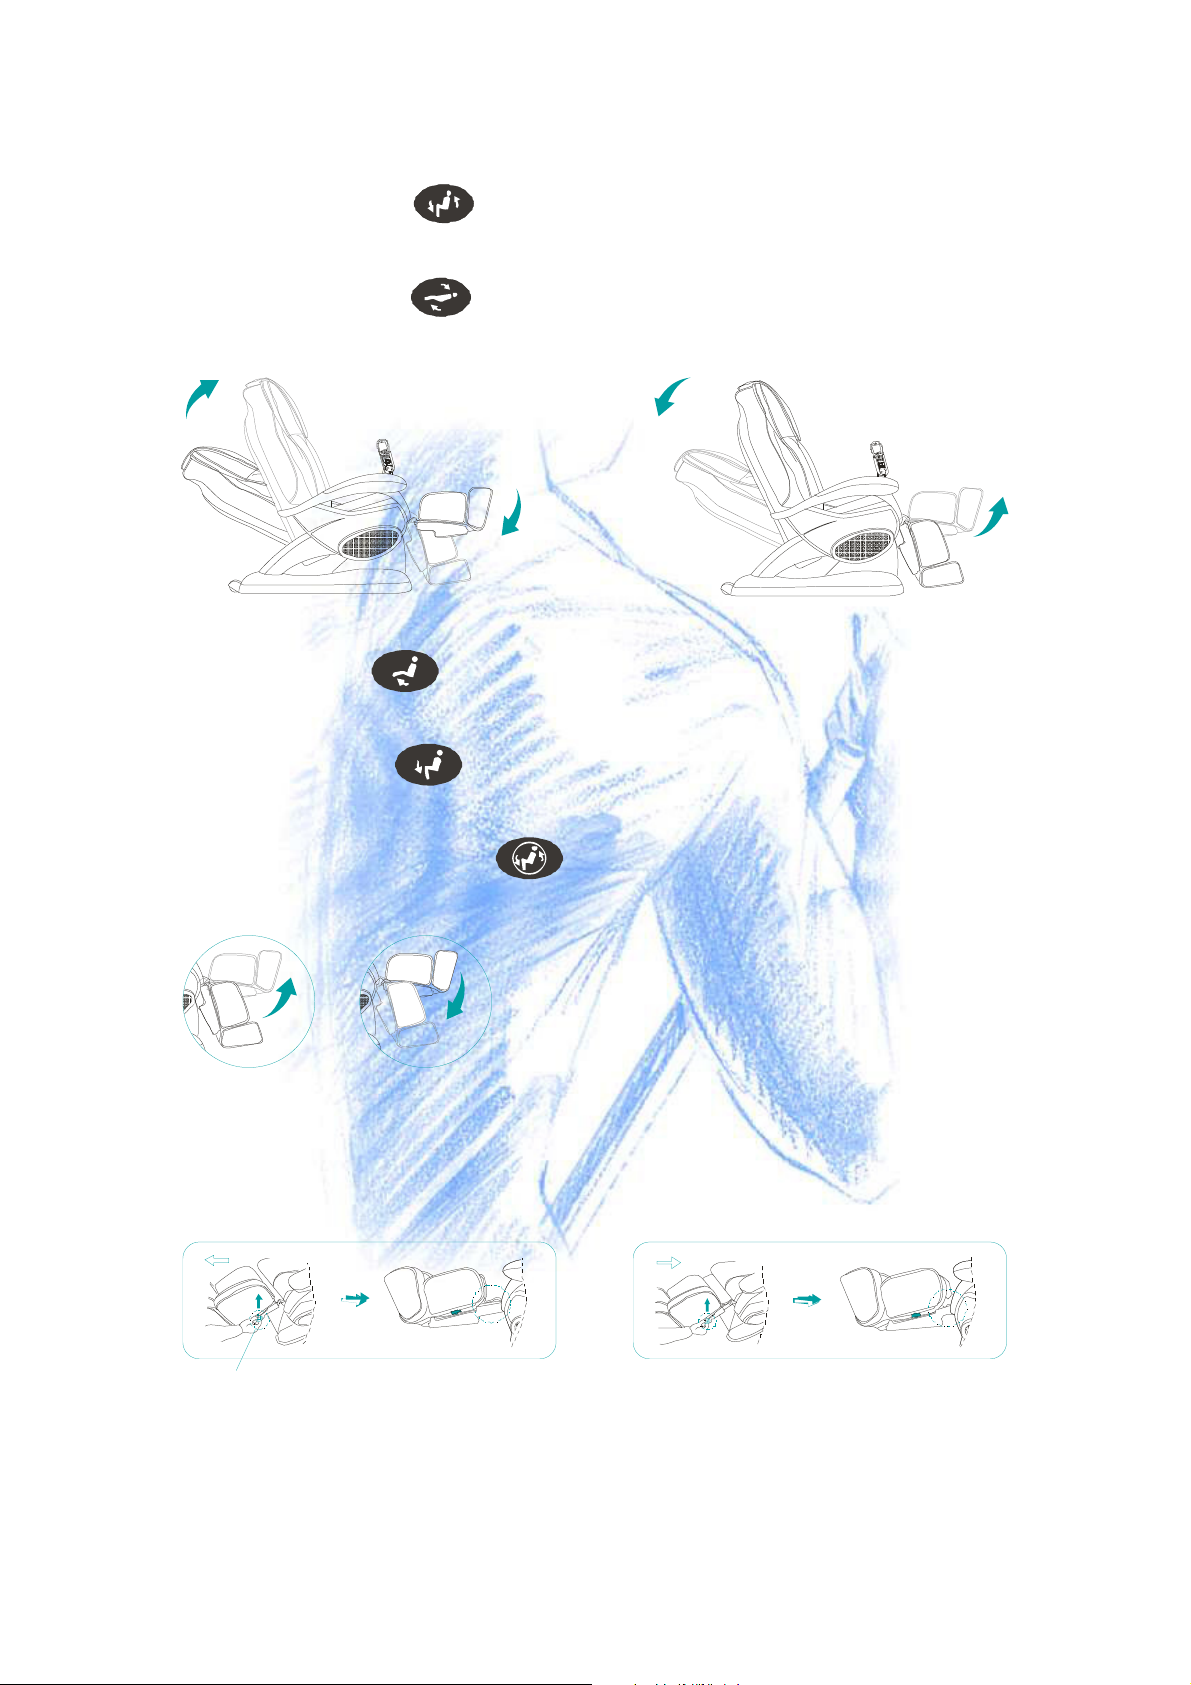
How to Use the Reclining System
●To recline the Backrest : Press the reclining up button until the Backrest is at your
desired angle.
●To incline the Backrest Press the reclining down button until the Backrest is at your
desired angle.
●To lift the Footrest : Press the Footrest Up button until the Footrest is upward to your
desired height.
●To lower the Footrest : Press the Footrest Down button until the Footrest is downward
to your desired height.
●To reset the Backrest and Footrest : Press the Reset button, the Backrest and Footrest is
to the initial position.
How to Adjust the Length of the Footrest
●The length of the Footrest can be adjusted to the comfort of the user. Lift the Footrest
Adjustment Lever, push or pull the Footrest to get the desired position (lengthen/shorten about 8cm)
and loosen the lever to lock the position.
Footrest Adj ustment Lever (Lengthen) (Shorten)
Moving the Massage Chair
●Adjust the Backrest to its fully upright position.
●Convey: There should be two more persons at the each side of the Chair, one catching hold of the
groove on the one side of Armrest and the other catching hold of the other side to take the Chair
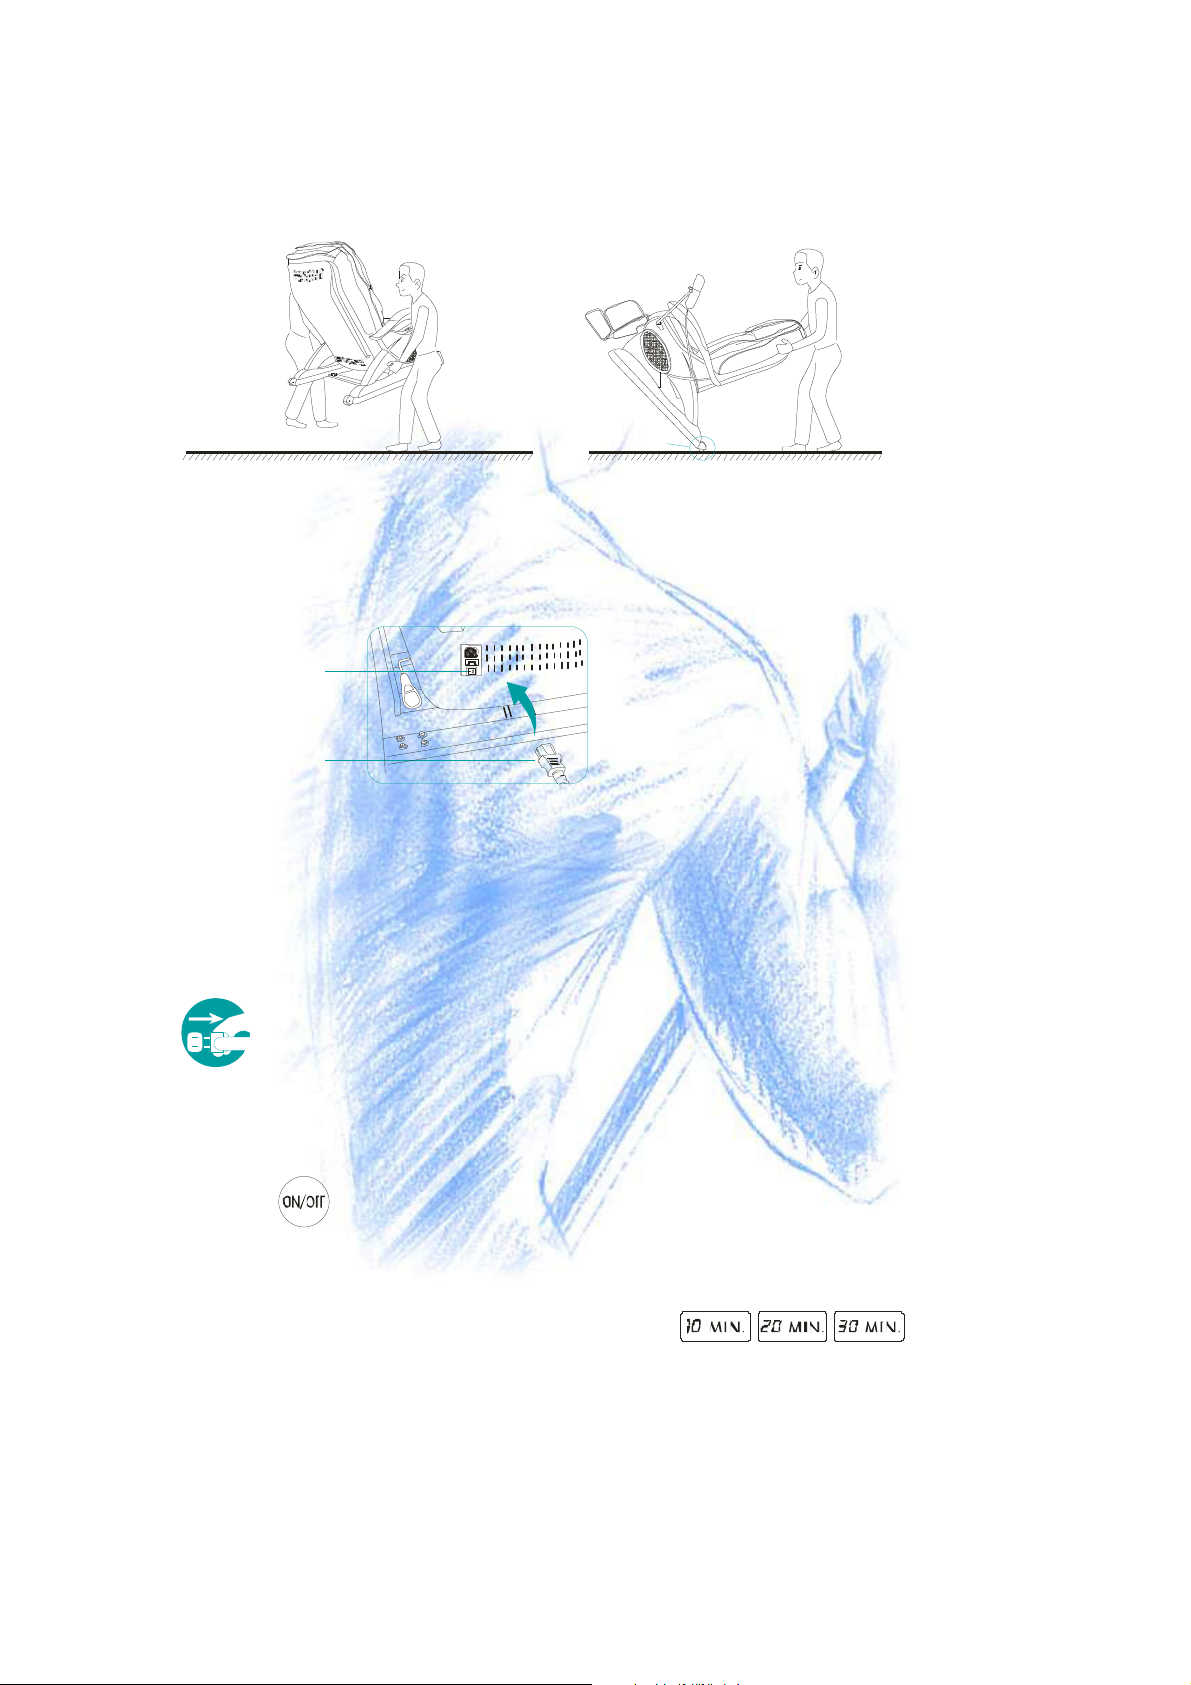
together.
●Move: Hold down on the top of Backrest and causes the Moving Castors to be well-grounded
then push it to move.
(C onv ey ) ( M ov e)
Ca stors
Power On
1. Connect the AC Plug to the Electrical Outlet.
2. Turn on the Main Power Switch located at the back of Backrest.
AC Plug
M ain Power Switch
After Use
●Return the reclining Backrest to the upright position and lower the Footrest completely after use.
●With the Timing Function, the Chair will automatically stop after 30 minutes of operation and
switch off the Main Power Switch after it.
●To avoid malfunction of the Chair and accidents with children, do remember to switch off the
Main Power Switch and disconnect the AC Plug from the Electrical Outlet after use.
Massage Programs
Timing Function
●Press the button, and you can set the time.
●The default massage time is 30 minutes. If you don't choose timing, massage procedure will be
closed automatically after 30 minutes.
●You can also select massage time through timing buttons according to
your desire. After setting of the time, the machine will begin to count down till the remaining time
is zero, and then the procedure will be closed automatically.
&In the changing of automatic procedure and individualized procedure, the remaining time won't
be changed, namely, the change of massage procedure won't affect the original time. If it's
necessary to reselect the time, please press one of the 3 timing buttons for setting.

●If you want to stop massage, press button again.
Automatic Massage Programs
●Press the button on the Remote Controller, the Massage Chair begins to Automatic
Massage Programs and the correspond symbol is lighting on the LCD. Under this condition,
you can enjoy a continuous massage on the whole course of back and adjust the speed, level and set
up time to suit individual needs.
●Press button again to end any of the automatic programs.
Manual Massage Programs
●It allows you to mix and match from a choice of massage actions, you can adjust massage
action,s speed, level or position to suit yourself.
●3 Back Massage Programs:
- Kneading Massage
- Swaying Massage
- Finger-Pressing Massage
●3 Air Massage Programs:
- Hip Air Massage
- Calf Air Massage
- Calf/Foot Traction Air Massage
●1 Additional Massage Program:
-Heating Massage
-
Please see the following form for detail.(CHART1
Foot Heating Massage
K n e a d in g
F inge r-P re s s i ng
Massage Programs LCD Speed Adjustment Level
Hip Air Massage
S w a y in g
Parts Up/down
Calf Air Massage
Back Heating Massage
Calf/Foot Traction Air Massage
How to operate Back Massage Programs
-1.kneading Massage
-●Press the
KNE
AD
button, it begins to Kneading Massage and the correspond
icon is lighting on the LCD.
-●Press button to select one of 3 massage parts.
-●Press or button continuously, the Massage Nods will move up or down.
Release the button, the nods will stop on your desired part.
-●To adjust the speed, press the button and the correspond icon will
show on LCD Screen: .
●Press the button again to stop massaging.
-
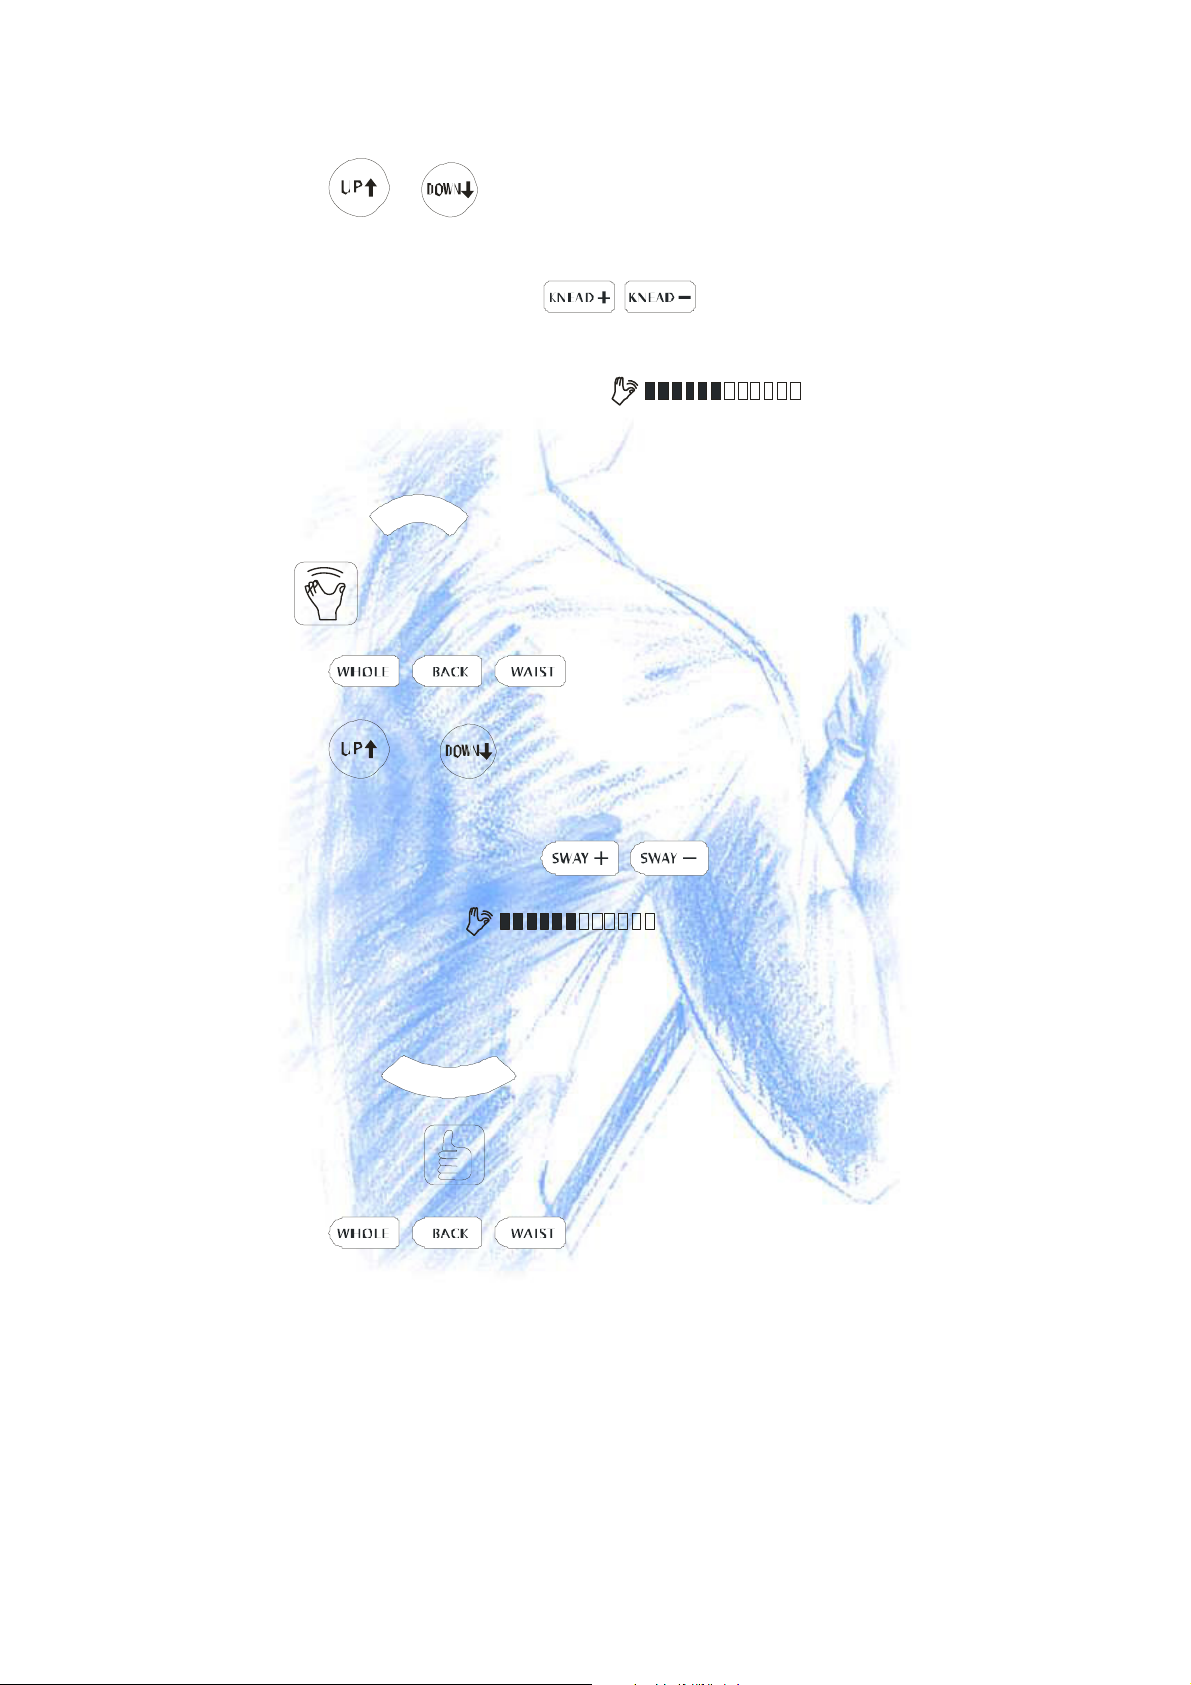
-2.SwayingMassage
-●Press the
S
W
AY
button, it begins to Swaying Massage and the correspond icon
is lighting on the LCD.
-●Press button to select one of 3 massage parts.
-●Press or button continuously, the Massage Nods will move up or
down. Release the button , the nods will stop on your desired part.
-●To adjust the speed, press the button and the correspond icon will
show on LCD Screen: .
-●Press the button again to stop massaging.
-
-3.Finger-Pressing Massage
-●Press the
PRE
S
S
button, it begins to Finger-Pressing Massage and the
correspond icon is lighting on the LCD.
-●Press button to select one of 3 massage parts.
-●Press the button again to stop.
-
-Following illustration shows the Back Massage Areas for quick reference.
-
bac k part waist partthe whole c ourse
-How to operate Air Massage Programs
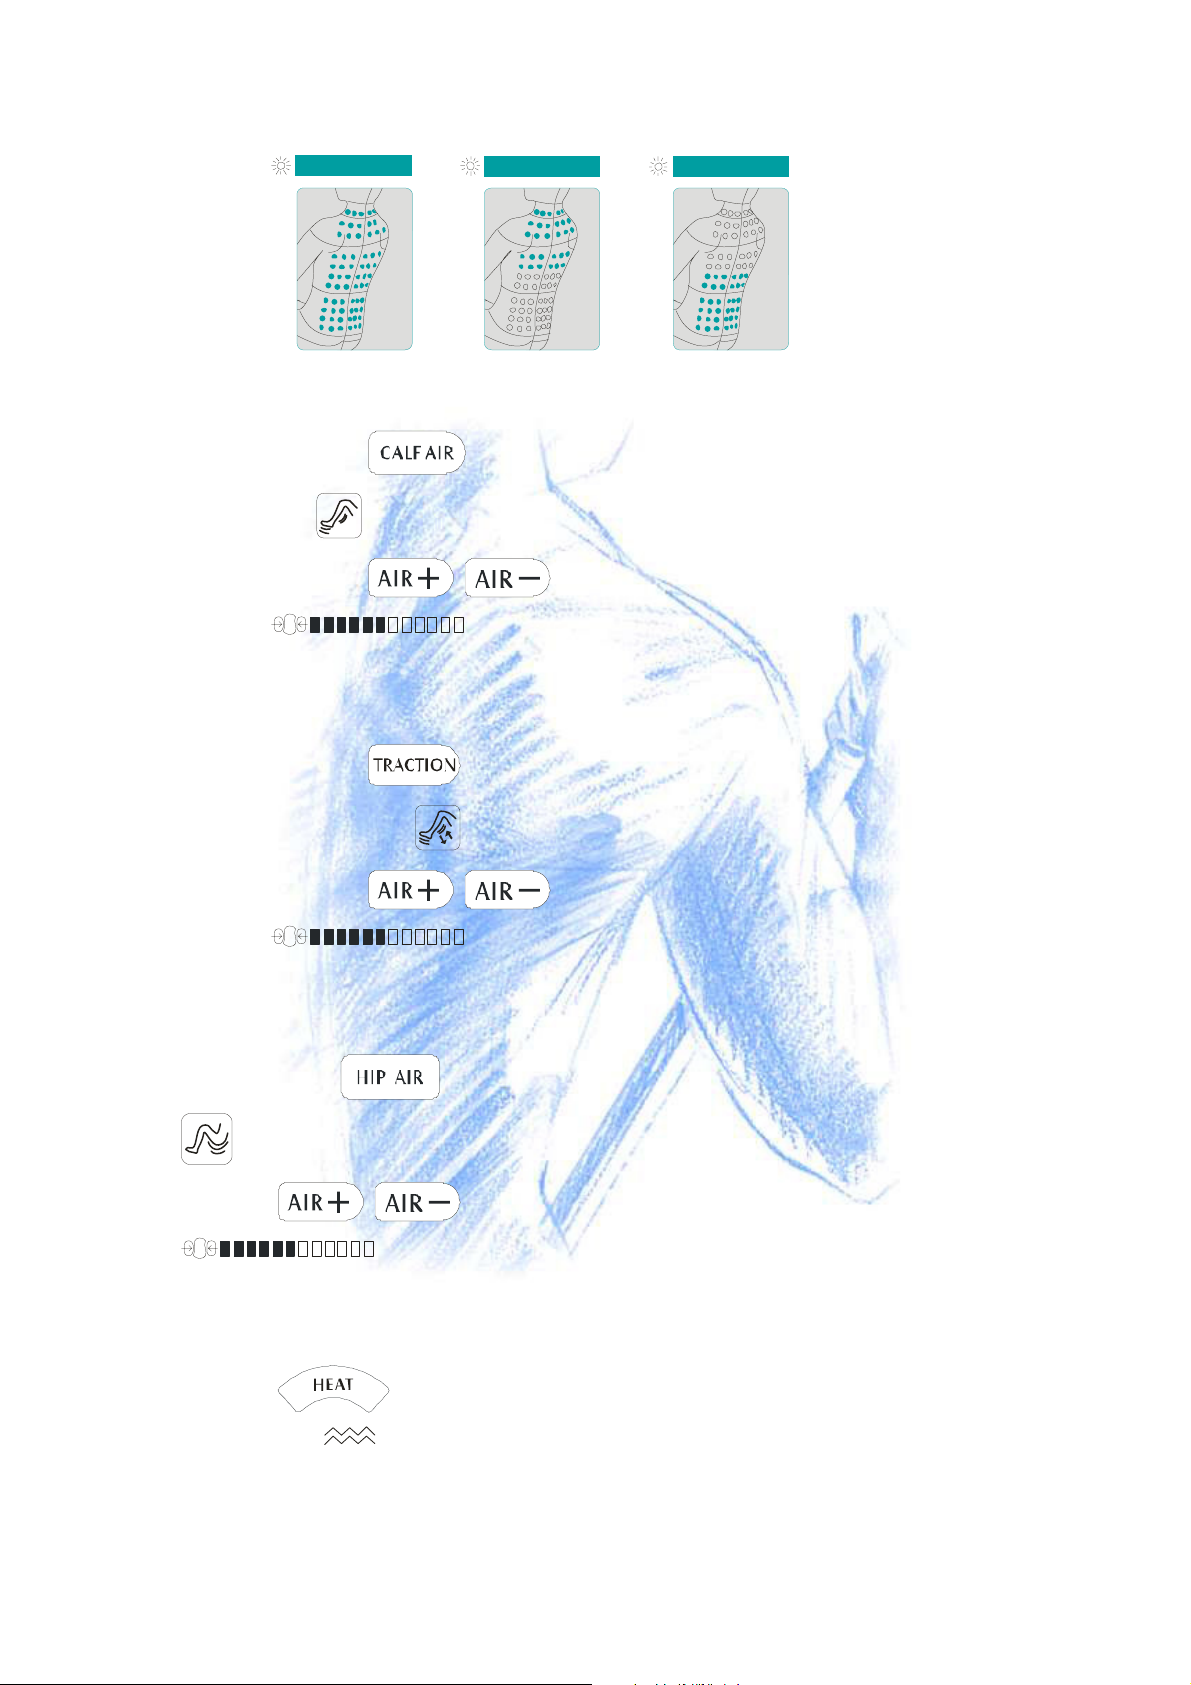
-1.Calf Air Massage
-●Press the button, it begins to Air Massage on Calf and the corresponding
icon is lighting on the LCD.
-●Press the
button to adjust the level and the corresponding icon
is lighting on the LCD. There are 4 levels can be selected.
-●Press the button again to stop massaging.
-
-2.Calf/Foot Traction Air Massage
-●Press the button, it begins to Air Traction Massage on Calf/Foot and the
correspond icon is lighting on the LCD.
-●Press the
button to adjust the level and the corresponding icon
is lighting on the LCD. There are 4 levels can be selected.
-●Press the button again to stop massaging.
3.Hip Air Massage
●Press the button, it begins to Air Massage on Hip and the corresponding icon
is lighting on the LCD.
●Press the button to adjust the level and the corresponding icon
is lighting on the LCD. There are 4 levels can be selected.
●Press the button again to stop massaging
Heating Massage
●Press the button, it begins to Heating Massage on Foot and Back parts and the
correspond icon is lighting on the LCD.
●Press the button again to stop massaging.
Finishing
●To stop, press the button again and Massage Nods will move upwards to their original
position at the Backrest.
●Avoid malfunction of the Chair and accidents with children, do remember to switch off the Main
Switch and disconnect the AC Plug from the Electrical Outlet after use..
Care and Storing
1.Storing the Chair
●Make sure the power is turned off and pull out the plug from the outlet when it is kept.
●Wipe off dust and dirt from the Chair. Keep the Chair clean and away from places of high
humidity.
Damp and dust will shorten the machine's life and may become the causes of mouldy or dirty
marks.
●If the Chair is not in use for a long period of time, cover the Chair with a dustproof cover to
protect it from dust.
Please keep away from direct sunlight or heating appliances like heat stove.
It could cause discolouration or deterioration.
2.Cleaning of Remote Controller
●Remove fouling on the Remote Controller with a piece of dry cloth. As a wet cloth may cause
damage.
3.Cleaning of Leather
●To clean the leather sections, wipe with a piece of cloth impregnated with neutral detergent at first.
Then remove the detergent with a soft cloth wetted with water and air dry.
●Use a piece of dry cloth to wipe over the painted areas.
Don't use diluents, volatile oil or bleaching powder will cause discolouration or cracks.
Do not use the iron.
Specifications
Name: Chiroform Massage Chair
Rated voltage: AC 220-240V
Rated frequency: 50/60Hz
Power consumption: 180W
Working time: 30minutes
Packing size: 1465x840x750mm
Net weight: 79kg

Troubleshooting
If you encounter problems with the operation of the Chair, Please check the following points to see
if they can be rectified. If the Chair still does not work or malfunctions, please switch off the Chair
and remove the AC Plug from the Electrical Outlet. Contact our Service Centre for servicing at
+4586613611.
Do not disassemble or attempt to repair the Chair by yourself.
C onditions Possi ble C ause or A ction
Loud sound during Kneading, Swaying or Finger-Pressing
Knocking sound at the change of function from/ to Kneading and Sway ing
Sound of the air pump
T hese sounds are results of mechanical structure and are
not indicators of machine trouble.
Check the AC plug is firmly connected to the lectrical Outlet.
Confirm that the main power is switched on.
The Chair does not operate using the Remote Controller
Do not lean too hard against the Backrest.
Working is time out (Timer) or power off.
Working too long to mak e the mechanical structure.
T he temperature is too high.
Stop working during the massage
M assage N ods stop moving
Tingvej 7
8800 Viborg
Denmark
Tel. +45 8661 3611
Fax. +45 8661 3911
www.chiroform.dk
Table of contents
Other Chiroform Massager manuals


