JETRICH CANADA LTD: 3270 Orlando Dr., Mississauga, Ontario, L4V 1C6, CANADA
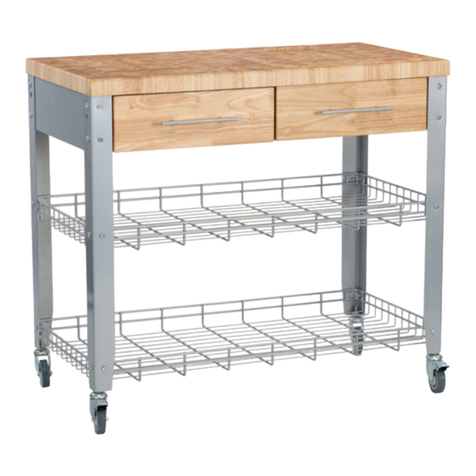
Thank you for purchasing the Chris & Chris Pro Chef series kitchen work station.
With proper assembly, maintenance, and cleaning, your work station will give you
many years of service.
NOTE: IF THERE ARE ANY PARTS MISSING; OR THERE IS SLIGHT SHIPPING DAMAGE TO
YOUR UNIT, DO NOT RETURN TO THE STORE. PLEASE CONTACT OUR CUSTOMER SERVICE
DEPT. FOR HELP, OR VISIT OUR WEBSITE
FOR MORE INFORMATION REGARDING OUR KITCHEN CART LINE OF PRODUCTS PLEASE
REACH OUT TO US:
CUSTOMER SERVICE: Toll free number: 1-800-569-4201
E-MAIL: customerservice@chrisandchrishome.com
WEBSITE: chrisandchrishome.com
TOOLS NEEDED: PHILLIPS HEAD SCREWDRIVER
•Unpack all parts carefully.
•Cover work surface with soft blanket or similar substance so as not to damage the
unit or your work surface.
Step 1:
Locate part (Y1) 2 each and (C2) 1 EACH. Assemble with medium bolt (YM) and barrel nut (BN) per step 1
drawing. Put aside for now.
Step 2:
Locate the 4 legs (A) which are identified as (LB) left back, (LF) left front, (RB) right back, and (RF) right
front. Assemble (LB) to (LF) using (M) bottom side frame and (E) side shelf frame. Just press together per the
drawing in step 2. No bolts are necessary in this assembly. NOTE the shelf bracket on part (E) should face to
the inside and be to the top side.
Step 3:
Repeat the same procedure as in step 2 using (RB) and (RF).
Step 4:
Lay the top assembly (TF) upside down on your work surface. Attach the right and left leg assemblies to
the top Frame (TF) using long bolts (YL) and barrel nuts (BN). Also using the bolt (M) to secure the top frame
(TF) from inside to the left leg assembly. NOTE: Attach one side first, to allow for the installation of the pre-
assembled shelf support (C) and the bottom slat shelf(B). Secure the pre-assembled shelf support (C) with
long bolts (YL) and barrel nuts (BN). Repeat the procedure with the slat shelf (B). Now attach the remaining
leg frame by lining up the dowels on top (TF), pre-assembled shelf support (C) and slat shelf (B) with the
corresponding holes in the leg frame. Secure with barrel bolts (YL) and barrel nuts (BN).
Step 5:
Install 2 brake wheels (BW) into the threaded brackets on the 2 legs facing the front of the cart and 2
wheels (W) on the 2 legs facing the rear of the cart. Tighten firmly using caster wrench (Q). Slide the 4 “S”
Hooks (K) on to the towel bar (F) so that the open ends of the hooks are facing outward. Now mount the
towel bar (F) into the holes on either end of top frame (TF), you may choose on which side you prefer the
towel bar to be mounted. Secure the towel bar in place using short bolts (SM) with the allen key (RM). Turn
the kitchen work station over.
tep 6:
ow install the drawer handle (H) to the drawer using the screws supplied. The drawer handle and screws
re mounted on the inside of the drawer for shipping. The speed rack (S) can be set in the towel bar (F) at
his time. Install the 2 basket shelves (AS).
nife holder (KH) (CAN BE PURCHASED AT WWW.CHRISANDCHRISHOME.COM) will fit on top of the speed
ack for use and in the drawer when not in use.
tep 7:
he chef pan (P) mounts in the back side of the cart and can be interchanged with trash ring (L) by
nserting a standard plastic grocery bag up through the center of the trash ring (L) and wrapping it over
he edges of the ring and sliding it into the chef pan glides. (G) the tablet and phone holder can be used
o hold your tablet or phone upright hands free while you work so you can easily follow your favorite
ecipes. Use wood plugs (WP) to cover the bolt holes in the legs and wood Plugs (NP) to cover the 2
emaining hole in the top.
ASSEMBLY TIPS: JET9328-T01, JET9329-T01, JET9330-T01, JET11462-T01 PROCHEF "BIG BLOCK" WORKSTATION
