Christini AWD 300 User manual
Service Manual
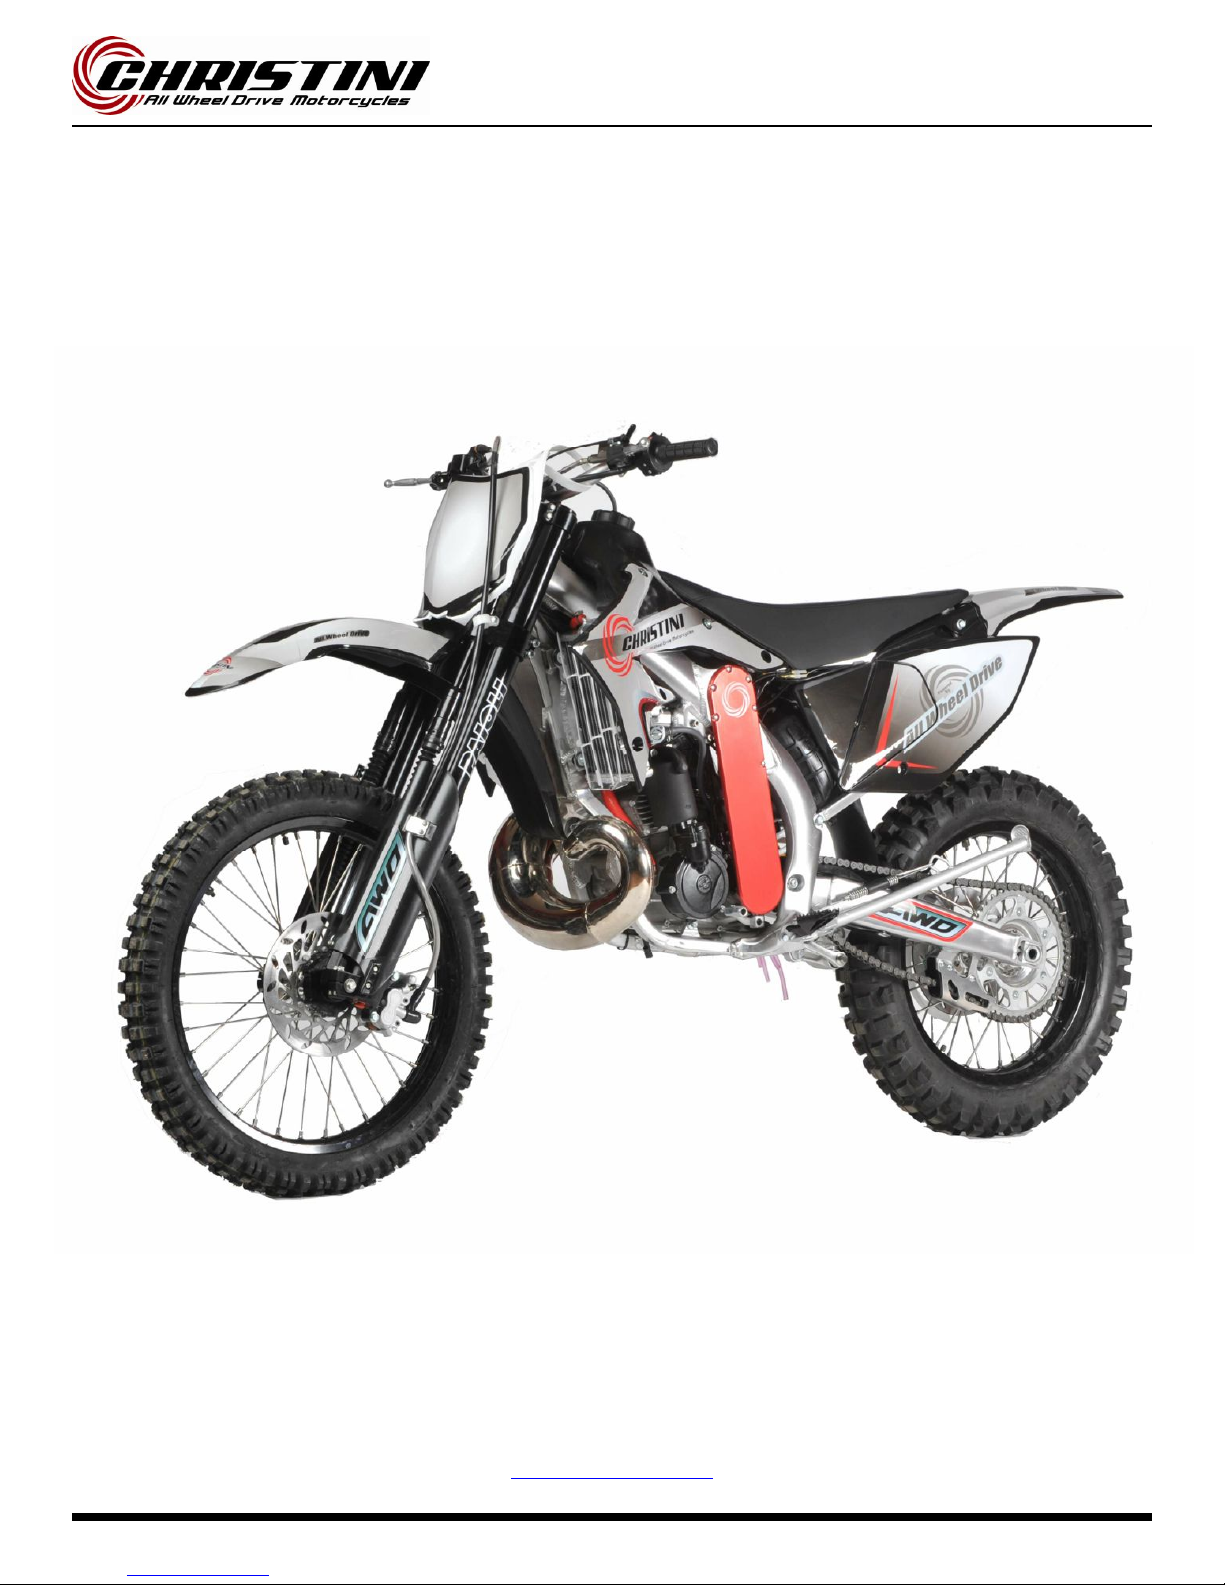
CHRISTINI AWD 300/250
CHRISTINI AWD 300/250CHRISTINI AWD 300/250
CHRISTINI AWD 300/250
Christini Technologies, Inc.
tech@christini.com
Version 2012.1


Page 2
HOW TO USE THIS MANUAL
HOW TO USE THIS MANUALHOW TO USE THIS MANUAL
HOW TO USE THIS MANUAL
Read this Manual carefully. You will find it contains all the necessary information for your safety, and that of other per-
sons, as well as guaranteeing the correct conservation and maintenance of the GAS GAS motorcycle that you have
just acquired. You will find all the necessary instructions for the correct riding and control of this vehicle are set out
below. Each message is preceded by a symbol with the following meaning:
WARNING
WARNINGWARNING
WARNING
This warning symbol identifies special instructions or procedures which, if not correctly followed, could result in per-
sonal injury or even death.
CAUTION
CAUTIONCAUTION
CAUTION
This symbol identifies instructions or procedures which, if not followed strictly, could result in damage to or destruc-
tion of equipment.
NOTE
NOTENOTE
NOTE
This note symbol indicates points of particular interest for more efficient and convenient operation.
Motorcycle riding, if improperly conducted, has the potential to cause environmental problems as well as conflicts with
other people. Responsible riding use of your motorcycle will ensure that these problems and conflicts do not develop.
TO PROTECT THE FUTURE OF YOUR SPORT MAKE SURE YOU USE YOUR MOTORCYCLE WHITHIN THE LAW, SHOW CON-
CERNFOR THE ENVIRONMENT, AND RESPECT THE RIGHTS OF OTHER PEOPLE.
Motorcycle riding is a wonderful sport, and we hope you will enjoy it to the fullest.

Page 3
General Bike Service
Specifications 5
Location of Components 6
Fuel 7
Basic Operating Instructions 9
Maintenance Schedule 12
Ignition 13
Cooling System 14
Spark Plug 17
Transmission Oil 18
Air Filter 20
Throttle Cable 21
Carburetor 21
Clutch 22
Exhaust System 22
Primary Chain 23
Handlebar 25
Brakes 25
Wheels 27
Washing Bike 28
Lubrication 31
Tune-Up 32
Storage 35
Nut and Bolt Tightening 29
Torque Values 30
Troubleshooting 36
Wiring Diagram 39
Table of Contents
Page 4
AWD Service
Required tools 41
AWD detailed illustration 42
Routine maintenance schedule 44
AWD clutch test 45
AWD sprag test 46
AWD chain removal 47
AWD engagement switch 51
Front wheel removal 56
Front wheel service 58
Fork removal and installation 65
Dropout service 67
Fork spline bearing service 76
Boot Replacement 81
Triple clamp removal 83
Triple clamp service 85
Main drive shaft removal 100
Head tube bearing service 101
Triple Clamp Installation 104
Gearbox removal 108
Gearbox service 109
AWD clutch removal 114
AWD clutch Service 115
Troubleshooting 119
Warranty 120
Main drive shaft installation 103
Table of Contents

Page 5
Specifications

Page 6
Location of Components
1- Clutch lever
2– Stop/Start
3- Fuel tank cap
4– Brake fluid reservoir
5– Front brake lever
6– Throttle
7– Clutch fluid reservoir
8– Choke trigger
9- Brake disc
10– Front brake caliper
11- Radiator
12– Shift pedal
13– Primary chain
14– Chain guard
15– Front suspension
16- Gasoline petcock
17– Gas tank
18– Carburetor (behind
AWD chain cover)
19– Muffler (behind panel)
20– Seat
21– Rear shock
22- Rear brake caliper
23- Suspension linkage
24- Rear brake pedal
25- Kick-start
26– Exhaust
Page 7
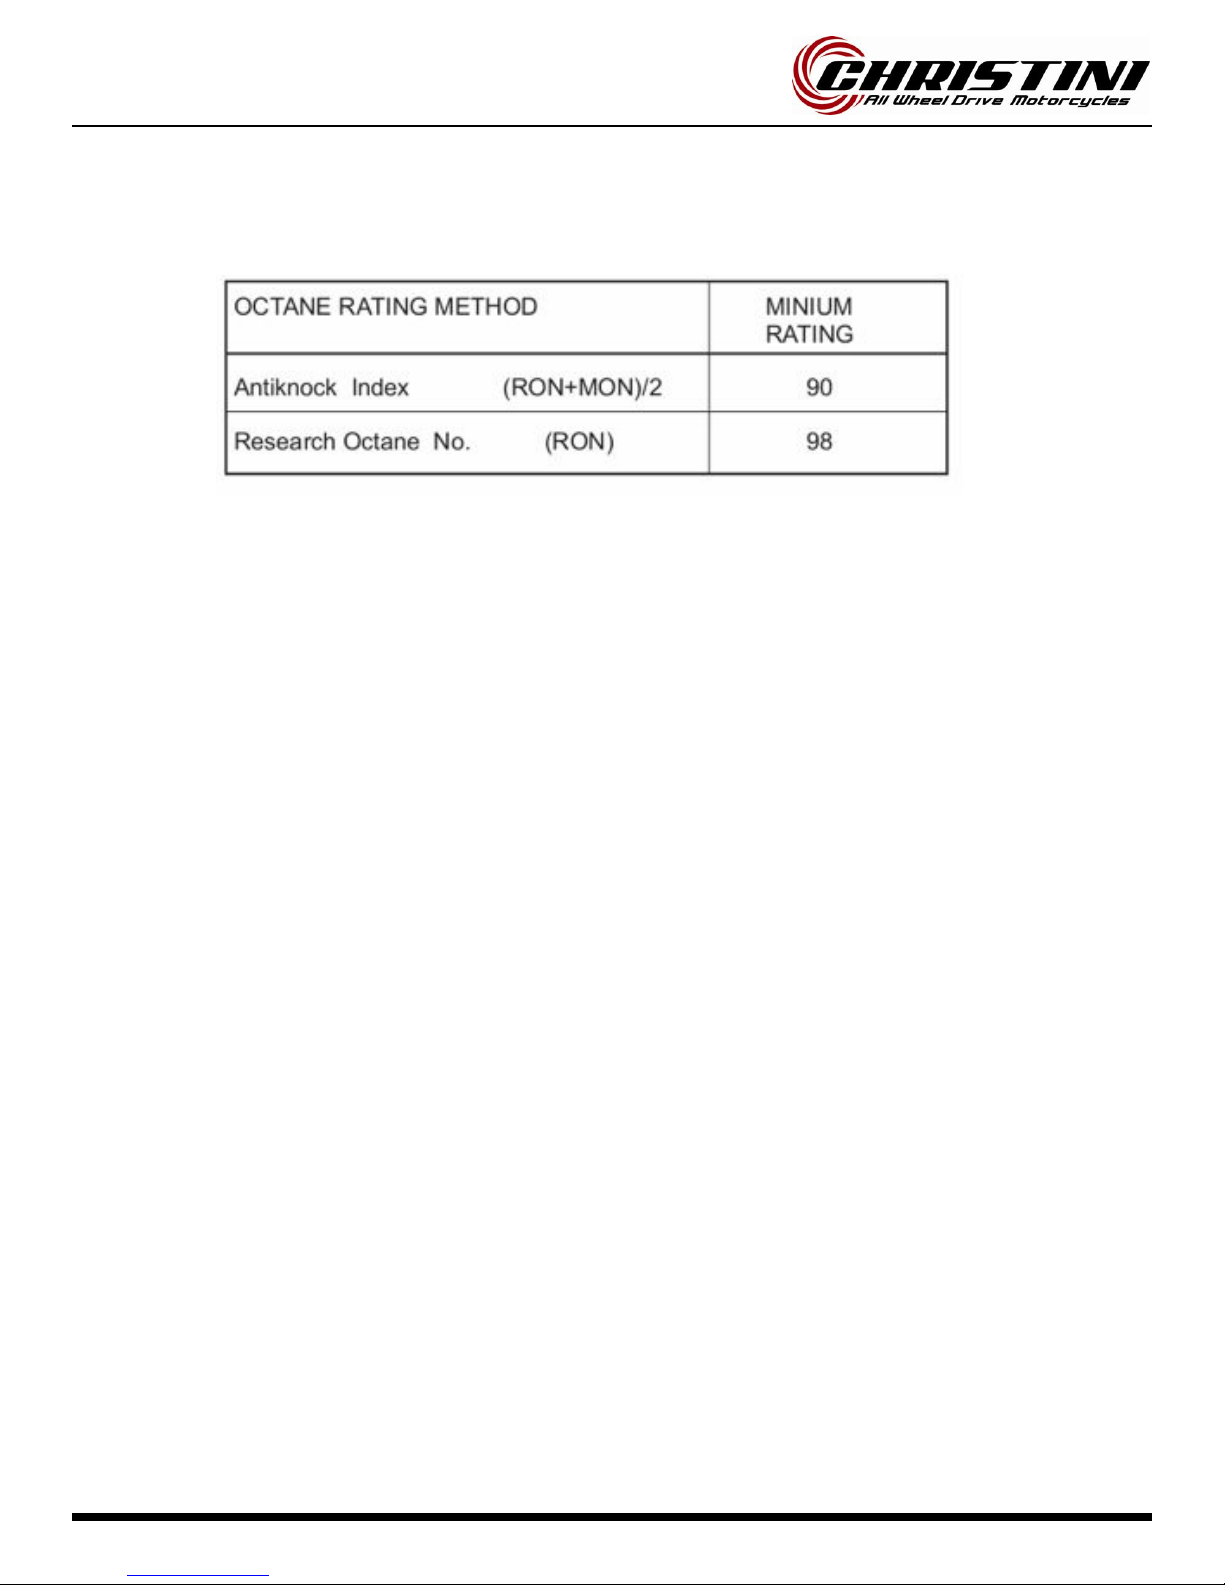
The GAS GAS EC 2-cycle engines require a mixture of gasoline and oil. Use gasoline with an octane rating
equal to or higher than that shown in the table.
NOTE
NOTENOTE
NOTE
If knocking or pinging occurs, try a different brand of gasoline
or higher octane grade.
WARNING
WARNINGWARNING
WARNING
Gasoline is extremely flammable and can be explosive under certain
conditions. Always stop the engine and do not smoke. Make sure
the area is well ventilated and free from any source of flame or
sparks; this includes any appliance with a pilot light.
Mixing oil inside the engine
Mixing oil inside the engineMixing oil inside the engine
Mixing oil inside the engine
Oil must be mixed with gasoline to lubricate the piston, cylinder, crankshaft, and connecting rod bearings.
Recommended oil:
Recommended oil:Recommended oil:
Recommended oil:
2-CYCLE SYNTHETIC
NOTE
NOTENOTE
NOTE
If the recommended oil is not available, use only oil designed
for racing with 2-cycle engines.
Gasoline and engine oil mixing proportions:
Synthetic oil 100%: gasoline 50, engine oil 1 = 2%
Semi-synthetic oil: gasoline 50, engine oil 1 = 2%
Mineral oil: gasoline 32, engine oil 1 = 3%
Fuel

Page 8
CAUTION
CAUTION CAUTION
CAUTION
Do not mix vegetable and mineral based oils.
Too much oil will cause excessive smoking and spark plug fouling.
Too little oil will cause engine damage or premature wear.
CAUTION
CAUTION CAUTION
CAUTION
Below 0 ºC do not use 100% synthetic oil.
To prepare the mixture, first pour oil and half of the gasoline used into a container and stir the mixture thor-
oughly. Then add the rest of the gasoline and stir the mixture well.
NOTE
NOTE NOTE
NOTE
At low temperature, oil will not easily mix with gasoline. Take
time to ensure a well-blended mixture.
The lubrication quality of this mixture deteriorates rapidly; use
a fresh mixture for each day of operation.
Fuel
Page 9
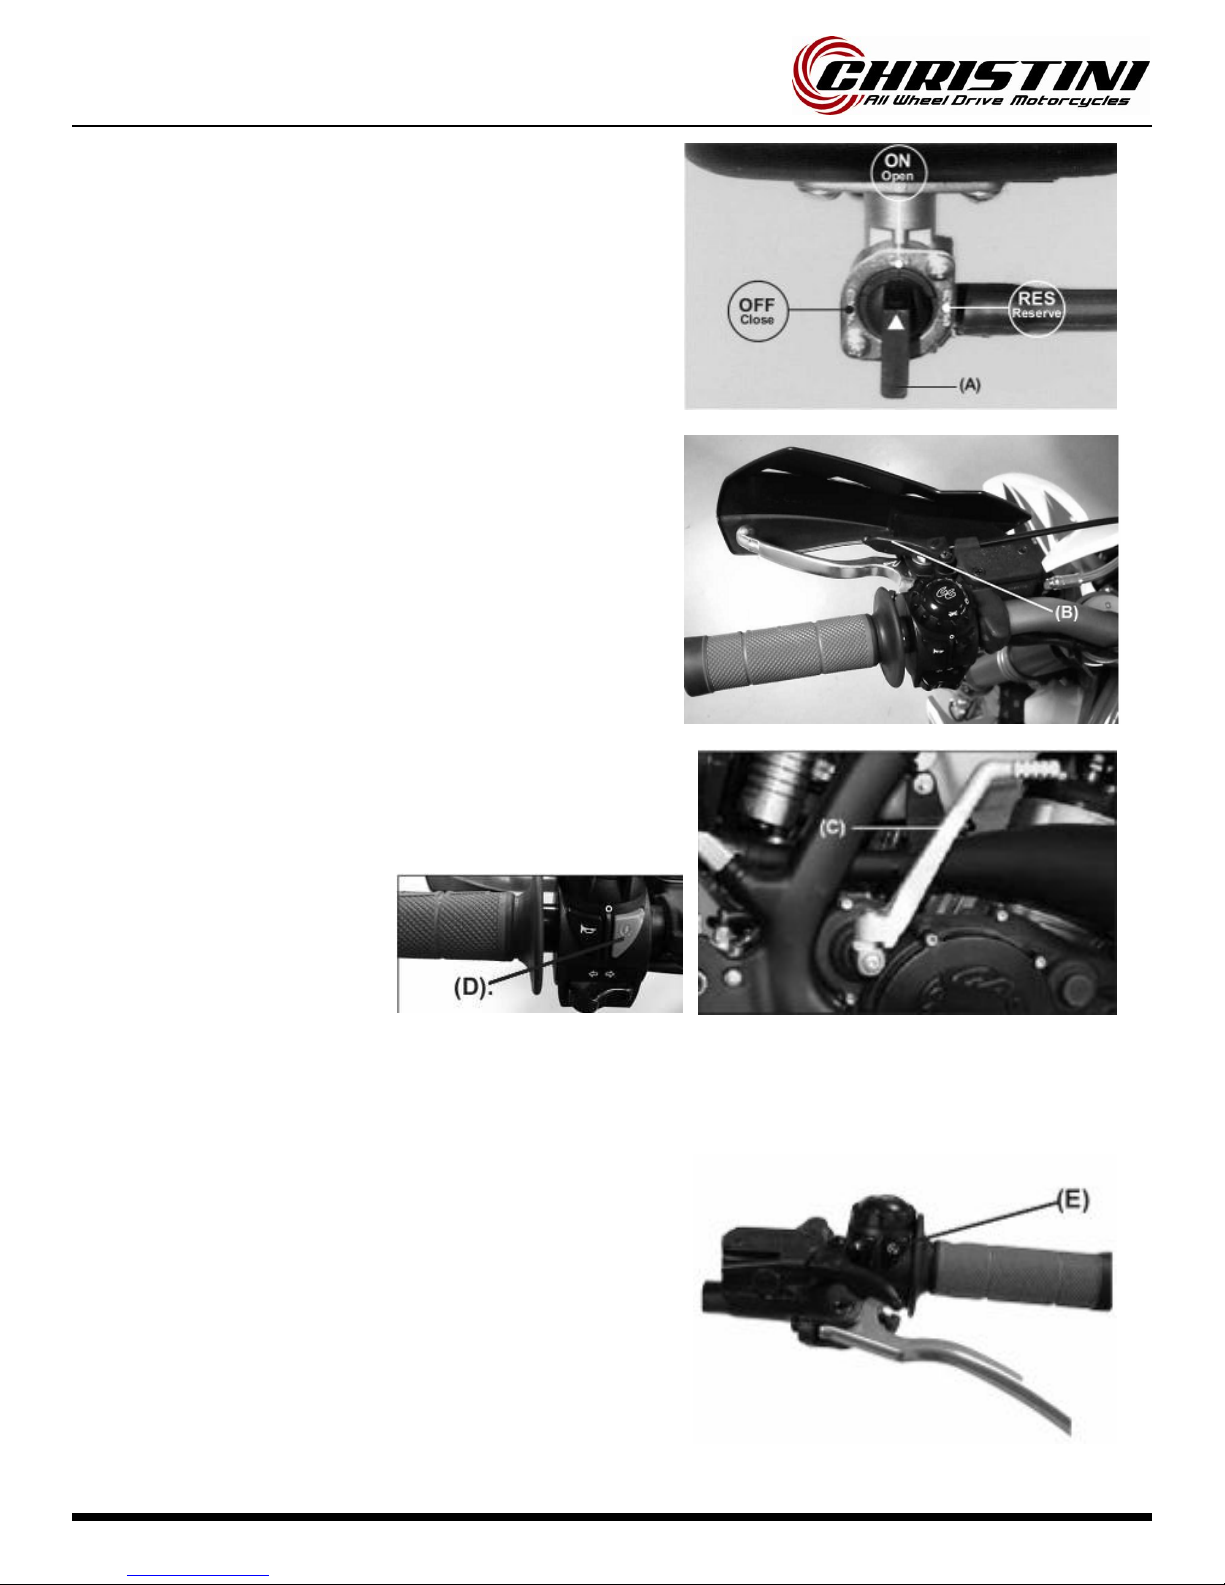
1. Make sure the motorcycle is in the neutral position.
2. Turn the gasoline cock (A) clockwise to the "ON" position.
3. If the engine is cold, pull up the choke trigger (B).
NOTE
NOTE NOTE
NOTE
- When the engine is already warm or on hot days, open
the throttle instead of using the choke knob.
- If the engine is flooded, kick with the throttle fully open.
- If the clutch lever is pulled, the motorcycle can be
started while in any gear.
4. Start the motorcycle with kick-start pedal (C) or push the
start button ( D).
5. Even after the engine starts, keep the choke knob pulled
up.
Stopping the engine
Stopping the engineStopping the engine
Stopping the engine
1. Shift the transmission into neutral.
2. After racing the engine slightly, close the throttle com-
pletely and depress the engine stop button (E).
Basic Operating Instructions

Page 10
Shifting Motorcycle
Shifting MotorcycleShifting Motorcycle
Shifting Motorcycle
The transmission is a 6-speed, of the return shift type. A return shift
means that to go from first gear to third gear it must go first through
the second gear, that is to say that it upshifts gears one by one. To
engage first gear from neutral, pull the clutch lever in and push
down on the gearshift pedal (A), then release the gearshift pedal
and gently release the clutch lever.
CAUTION
CAUTIONCAUTION
CAUTION
When shifting gears, press firmly on the gearshift pedal to ensure a positive shifting. Careless, incomplete
shifts can cause the transmission to jump out of gear and cause engine damage.
Stopping Motorcycle
Stopping MotorcycleStopping Motorcycle
Stopping Motorcycle
For maximum deceleration, close the throttle (A) and apply both
front and rear brakes. Disengage the clutch as the motorcycle
comes to a stop. Independent use of the front or rear brake may be
advantageous under certain conditions.
Downshift progressively as speed is reduced to ensure good engine
response when you want to accelerate.
Break
BreakBreak
Break-
---In
InIn
In
A break-in period is necessary to ensure a smooth operation and obtain an optimum engine and the trans-
mission responses. During the first hour or 20 km of operation, run the engine at low and moderate speeds
and revolutions per minute (RPM).
NOTE
NOTENOTE
NOTE
The slow riding necessary during the break-in period may cause carbon deposits to build up on the spark
plug and foul it.
Basic Operating Instructions

Page 11
If inspection of the spark plug shows this to be the case, replace the standard spark plug with another of a
higher heat range.
Perform the break-in period following these steps:
1. Start the engine and let it run at idle until the engine is warm.
2. Stop and let the engine cool completely.
3. Start the engine and ride for 10 minutes at moderate speed -NEVER ACCELERATE HARD.
4. Stop and let the engine cool completely. Be sure to check and
adjust chain slack and spoke tightness and carry out a general inspection.
5. Start the engine and ride for 20 minutes at moderate speed. -NEVER ACCELERATE HARD.
6. Stop and let the engine cool completely. Check and adjust as needed (Refer to the table of adjust-
ments).
7. Install the removed parts.
8. Fill the radiator with the recommended coolant. Before starting the motorcycle, bleed the air from the
cooling system.
9. Start the engine and ride for 30 minutes at moderate speed.
10. Stop and let the engine cool completely. Check and adjust.
11. After the break-in procedure has been properly carried out, the motorcycle is ready for regular opera-
tion.
CAUTION
CAUTIONCAUTION
CAUTION
However, avoid accelerating recklessly which can lead to engine failure. Be careful to use the necessary
skills and techniques while operating the motorcycle.
NOTE
NOTENOTE
NOTE
After the break-in period, install a new set of standard spark plugs.
Basic Operating Instructions
Page 12
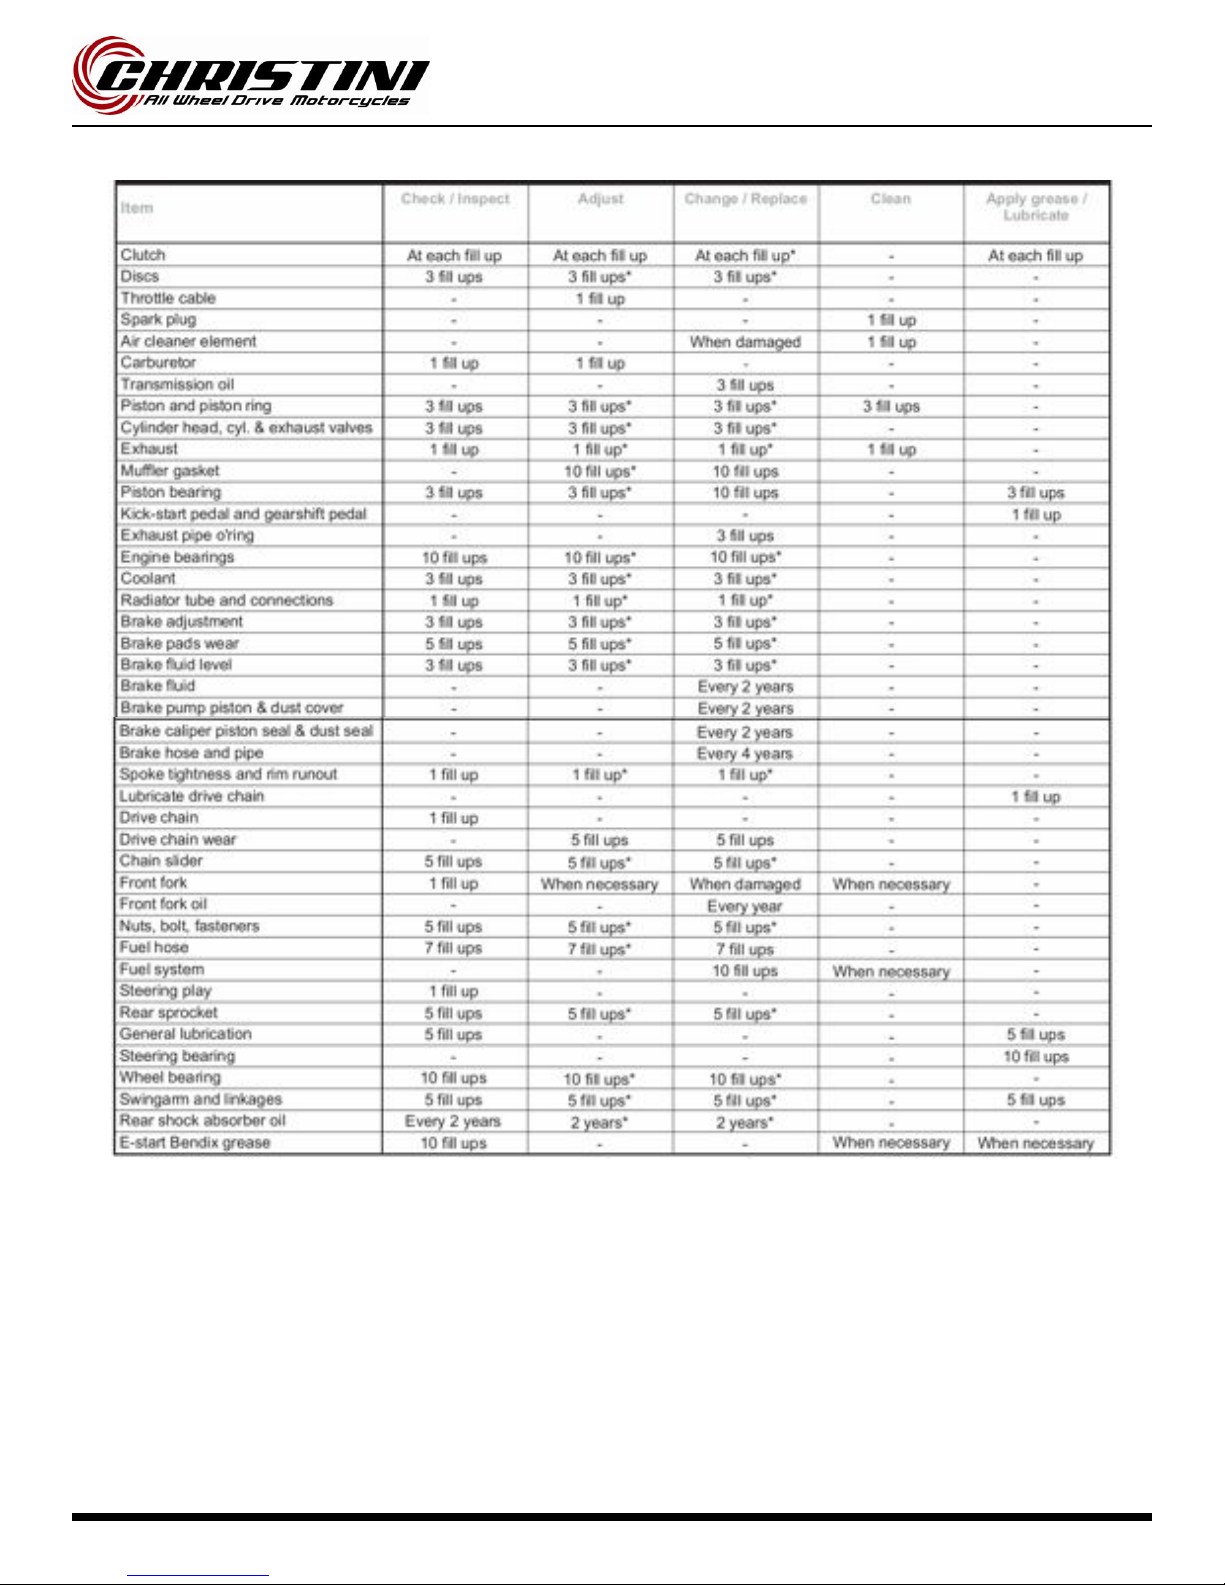
Maintenance Schedule
The maintenance and adjustments in this table are easy to follow and must be carried out to keep the mo-
torcycle in good running condition.
NOTE: (*) Inspect and carry out these operations only if it is necessary.

Page 13
This motorcycle uses a capacitor discharge ignition system
(CDI). The ignition system should never require adjustment
unless the stator of the magnetic flywheel was incorrectly
installed during engine reassembly. If necessary, inspect
and adjust as follows:
Adjustment
AdjustmentAdjustment
Adjustment
- Remove the magnetic flywheel cover.
- Make sure that the mark on the stator plate is aligned with
the mark on the crankcase.
- If the marks are not aligned, loosen the magnetic inertia
wheel screws and turn it.
- Tighten the screws securely.
- Install the magnetic flywheel cover.
NOTE
NOTENOTE
NOTE
Engine tune-up can be adjusted to match the rider´s preferences and skills.
- Remove the magnetic flywheel cover.
- Loosen the stator screws.
- Adjust the engine tune-up by changing the position of the stator within prudent limits
NOTE
NOTENOTE
NOTE
For the best engine performance, it is very important to adjust the engine tune-up within the set of limits
described.
- Tighten the stator screws.
- Install the magnetic flywheel cover.
- Test ride the motorcycle and readjust the engine tune-up, if necessary.
Electronic Ignition

Page 14
Cooling System
Radiator Hoses
Radiator HosesRadiator Hoses
Radiator Hoses
Check the radiator hoses for cuts or deterioration, and the connections for looseness and leaks.
Radiator
RadiatorRadiator
Radiator
Check the radiator fins for obstructions (insects or mud). Remove any obstructions with a stream of low wa-
ter pressure.
CAUTION
CAUTIONCAUTION
CAUTION
If high water pressure is used the radiator fins could be damaged and impair the radiator effectiveness.
Do not obstruct or deflect airflow through the radiator by installing unauthorized accessories. Any interfer-
ence with the radiator airflow can lead to engine overheating and damage.
Coolant information
Coolant informationCoolant information
Coolant information
To protect the cooling system aluminum parts (engine and radiator) from rust and corrosion, the use of cor-
rosion and rust inhibitors chemicals in the coolant is essential. If rust inhibitors were not used, over a pe-
riod of time the radiator will be corroded. This will clog the tubes of the cooling system.
CAUTION
CAUTIONCAUTION
CAUTION
Use of incorrect coolant solutions will cause engine and cooling system damage. Use coolant containing
corrosion inhibitors made specifically for aluminum engines and radiators in accordance with the instruc-
tions of the manufacturer.
WARNING
WARNINGWARNING
WARNING
Chemical liquids are harmful to the human body. Follow manufacturer instructions.
CAUTION
CAUTIONCAUTION
CAUTION
Distilled water must be used with corrosion inhibitors and the antifreeze in the cooling system. If tap water
is used in the system, the cooling tubes can be clogged and reduce the cooling system
efficiency.
If the lowest ambient temperature encountered falls below the freezing point of water, protect the cooling
system. Use a permanent type of antifreeze in the cooling system (distilled water and ethylene glycol and
corrosion inhibitors for aluminum engines and radiators). For the coolant mixture ratio under extreme con-
ditions, choose the mixture ratio listed on the container for the lowest ambient temperature.
CAUTION
CAUTIONCAUTION
CAUTION
Permanent types of antifreeze have anticorrosion and anti-rust properties. When it is diluted excessively, it
loses its antifreeze and anticorrosion properties. Mix in accordance with the instructions of manufacturer.
Liquid recommended
Liquid recommendedLiquid recommended
Liquid recommended
Permanent type of antifreeze (distilled water and ethylene glycol) plus corrosion inhibitors for aluminum
engines and radiators.
NOTE
NOTENOTE
NOTE
Initially, at the factory a permanent type of antifreeze is installed in the cooling system. It is colored green,
it contains a 50% solution of ethylene glycol, and has a freezing point of –35 ºC.

Page 15
Coolant recommended
Coolant recommendedCoolant recommended
Coolant recommended
Coolant absorbs excessive heat from the engine and transfers it to the air at the radiator. If the coolant
level is low, the engine overheats and may suffer severe damage. Check the coolant level each day
before riding the motorcycle. Add liquid recommended if the level is low (see next page).
WARNING
WARNINGWARNING
WARNING
To prevent severe scalding do not remove the radiator cap or try to change liquid, when the engine is still
hot. Wait until it cools.
Coolant level
Coolant levelCoolant level
Coolant level
- Place the motorcycle in riding position.
- Turn the radiator cap counterclockwise and wait a few sec-
onds until vapors inside are released. Then push and turn it
further in the same direction and remove the cap.
NOTE
NOTENOTE
NOTE
Check the level when the engine is cold.
Check the level when the engine is cold.Check the level when the engine is cold.
Check the level when the engine is cold.
- Check the coolant level. The coolant level should be just at a level below the cap rubber seal.
- If the coolant level is low, add the correct amount of coolant through the filler opening.
Total quantity
Total quantityTotal quantity
Total quantity
Mix antifreeze and distilled water 1:1 (distilled water 50%, antifreeze 50%).
Capacity: 1.1 L
Coolant Replacement
Coolant ReplacementCoolant Replacement
Coolant Replacement
Coolant should be changed periodically to ensure long engine
life.
- Wait for the engine to cool completely.
- Place the motorcycle in riding position.
- Remove the radiator cap.
- Place a container under the coolant drain screw, and drain
the coolant from the radiator and engine by removing the drain
screw (B) at the bottom of the water pump cover (A). Wash off
immediately any coolant spilled on the chassis, engine, or
wheels.
Cooling System

Page 16
Cooling System
WARNING
WARNINGWARNING
WARNING
If coolant gets on the tires will make them very slippery and can cause an accident.
- Visually inspect the old coolant. If whitish spots are observed in the liquid is a clear indication that the
aluminum parts in the cooling system are corroded. If the coolant is brown, iron or steel parts of the system
are rusting. In both cases, flush the cooling system.
- Check the cooling system for damage, leaks or missing gaskets in the cooling system.
- Install the water pump cover drain screw with the specified torque values shown in the table. Always re-
place the gasket with a new one.
Drain plug tightening torque (refer to torque table)
Drain plug tightening torque (refer to torque table)Drain plug tightening torque (refer to torque table)
Drain plug tightening torque (refer to torque table)
Water pump screw: 9 Nm
Water pump screw: 9 Nm Water pump screw: 9 Nm
Water pump screw: 9 Nm
- Fill the radiator up to the edge of the cap with coolant, and install the radiator cap.
- Inspect the cooling system for leaks.
- Start and warm up the engine, then stop the engine.
- Check the coolant level after the engine cools down. Add coolant up to the cap.
Page 17
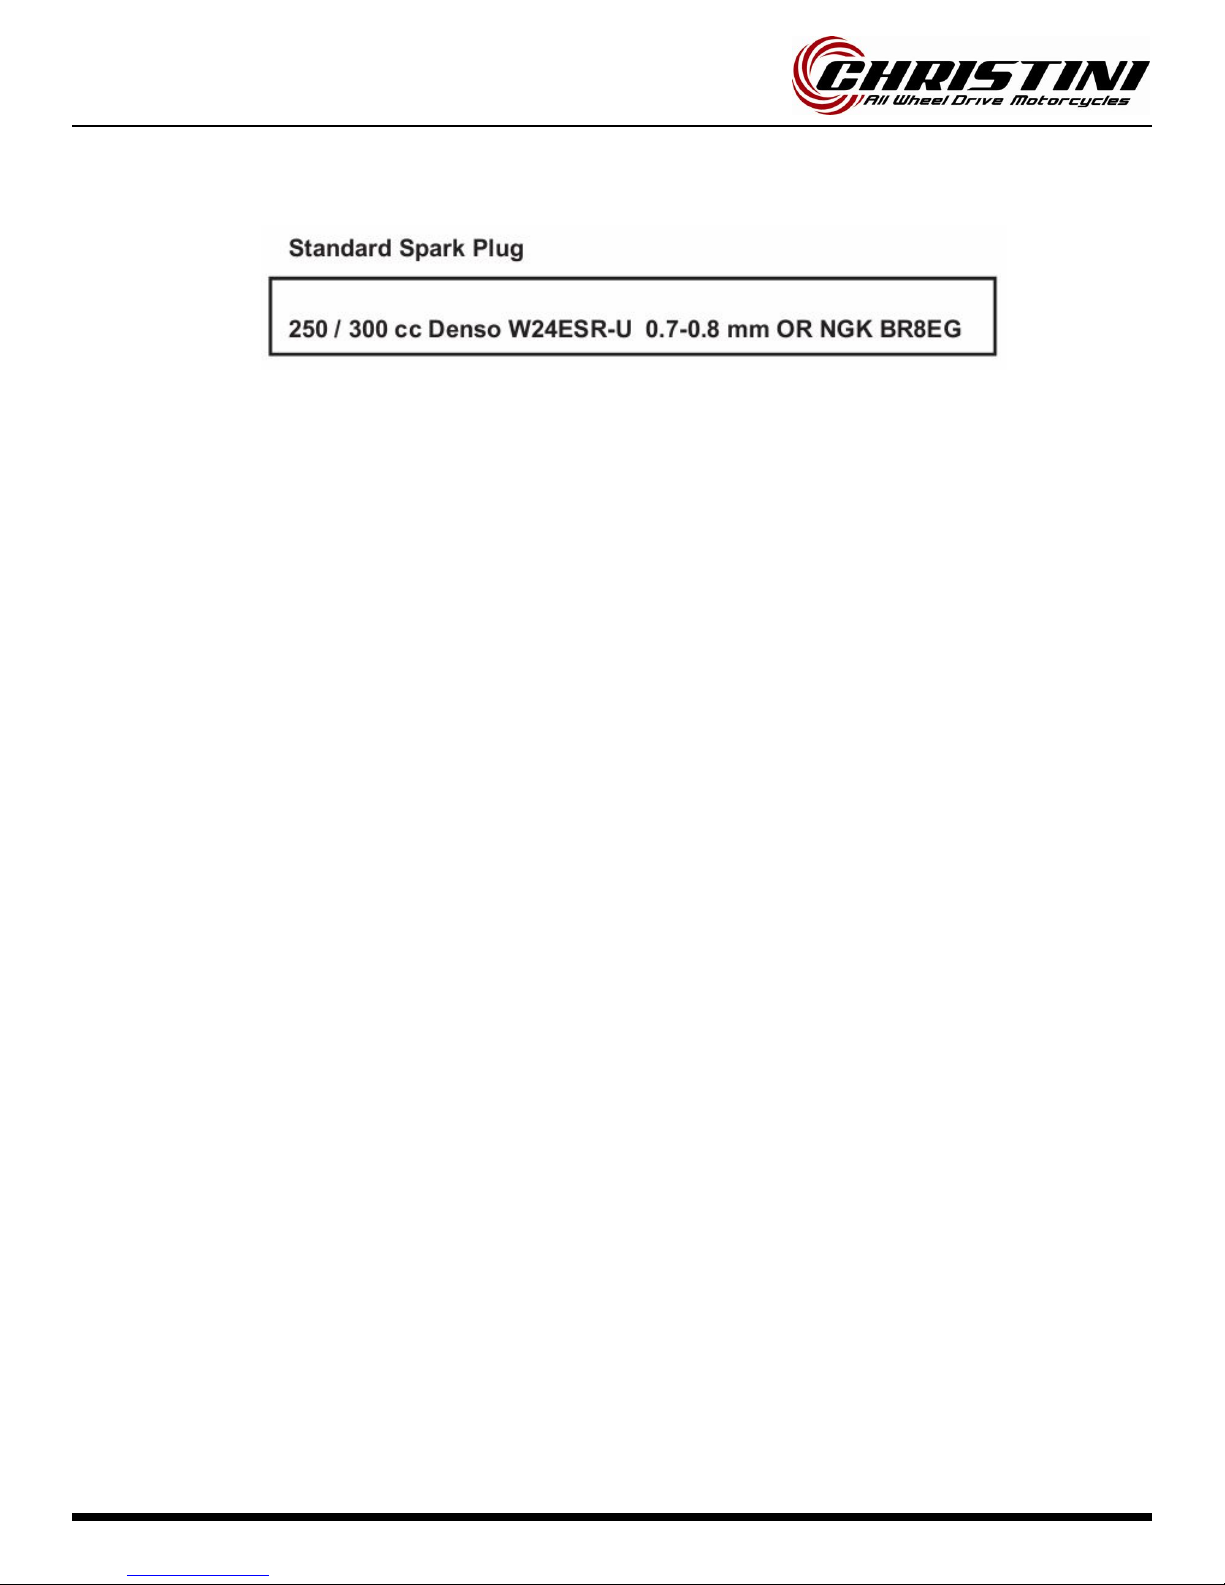
The standard spark plug is a shown in the table and should be tightened to 27 Nm.
The spark plug should be removed periodically to check its gap. If the plug is oily or has carbon deposits,
clean it with a sandblaster. After removing the abrasive particles, the spark plug must be cleaned using a
wire brush or a similar tool. Measure the gap with a feeler gauge, if incorrect adjust the gap by bending the
side electrode. If the spark plug electrodes are corroded or damaged, or if insulator is cracked, replace the
plug.
NOTE
NOTENOTE
NOTE
Inspect every 30 hours and change every 60 hours.
Inspect every 30 hours and change every 60 hours.Inspect every 30 hours and change every 60 hours.
Inspect every 30 hours and change every 60 hours.
To find out whether the right heat range plug is being used, remove it and inspect the ceramic insulator
around the center electrode. If the ceramic is light brown, the spark plug is correctly matched to engine
temperature. If the ceramic is white, the spark plug should be replaced with the next colder plug. If the ce-
ramic is black, the spark plug should be replaced with the next hotter plug.
NOTE
NOTENOTE
NOTE
If the engine performance drops, replace the spark plug first to recover its output.
Spark Plug

Page 18
Transmission Oil
For the transmission and clutch to function properly, maintain the transmission oil level at the optimum
level and change it periodically. A motorcycle with insufficient transmission oil, deteriorated or contami-
nated can accelerate wear and tear and cause transmission.
Oil level inspection
Oil level inspectionOil level inspection
Oil level inspection
- Wait a few minutes if the motorcycle has been operating.
- Check the oil level through the inspection window in the lower
right hand side of the engine (A).
- Oil level must be kept between the maximum and minimum
marks.
- If the lever is too high, you have to remove the excess oil through
the drain plug (B).
- If the level is low, add the necessary quantity of oil by opening the plug (C). Use the same type and oil
manufacturer used currently with the engine.
Transmission Oil
Transmission Oil Transmission Oil
Transmission Oil
Viscosity: SAE 10W30
Capacity:900 cc (EC250-300)

Page 19
Oil change
Oil changeOil change
Oil change
NOTE
NOTENOTE
NOTE
The engine must be completely cool and then warm up the engine again for a few minutes to normal oper-
ating temperature, to register the correct engine oil temperature and to obtain an accurate oil level meas-
urement.
- The transmission oil should be changed periodically to ensure
long engine life.
- Warm up the engine for 5 minutes so any oil sediment will float.
- Stop the engine, and place an oil pan under the engine.
- Remove the drain screw (B) and place the motorcycle in riding
position to allow the oil to drain out.
- Clean the drain screw magnet of any iron particles.
- Tighten the oil drain screw with its O-ring to 20-Nm.
- Remove the oil filler opening plug (C) and pour 900 cc of new
transmission oil for the models 250 / 300.
- Check the oil level, after kicking the kick-start pedal 3 or 4 times.
- Install the oil filler opening plug.
Transmission Oil
This manual suits for next models
1
Table of contents
Other Christini Motorcycle manuals


Popular Motorcycle manuals by other brands

MV Agusta
MV Agusta Brutale 675 Workshop manual

APRILIA
APRILIA RSV MILLE - PART 1 1999 User manual content

Royal Enfield
Royal Enfield Himalayan 2018 owner's manual

SSR Motorsports
SSR Motorsports Lazer5 owner's manual

MOTO GUZZI
MOTO GUZZI 2005 Griso 1100 Use and maintenance book

KTM
KTM 85 SX 19/16 owner's manual


