manuals.online logo
Brands
  1. Home
  2. •
  3. Brands
  4. •
  5. CIK
  6. •
  7. Accessories
  8. •
  9. CIK Doorbell Camera User manual

CIK Doorbell Camera User manual

CIK Doorbell Camera
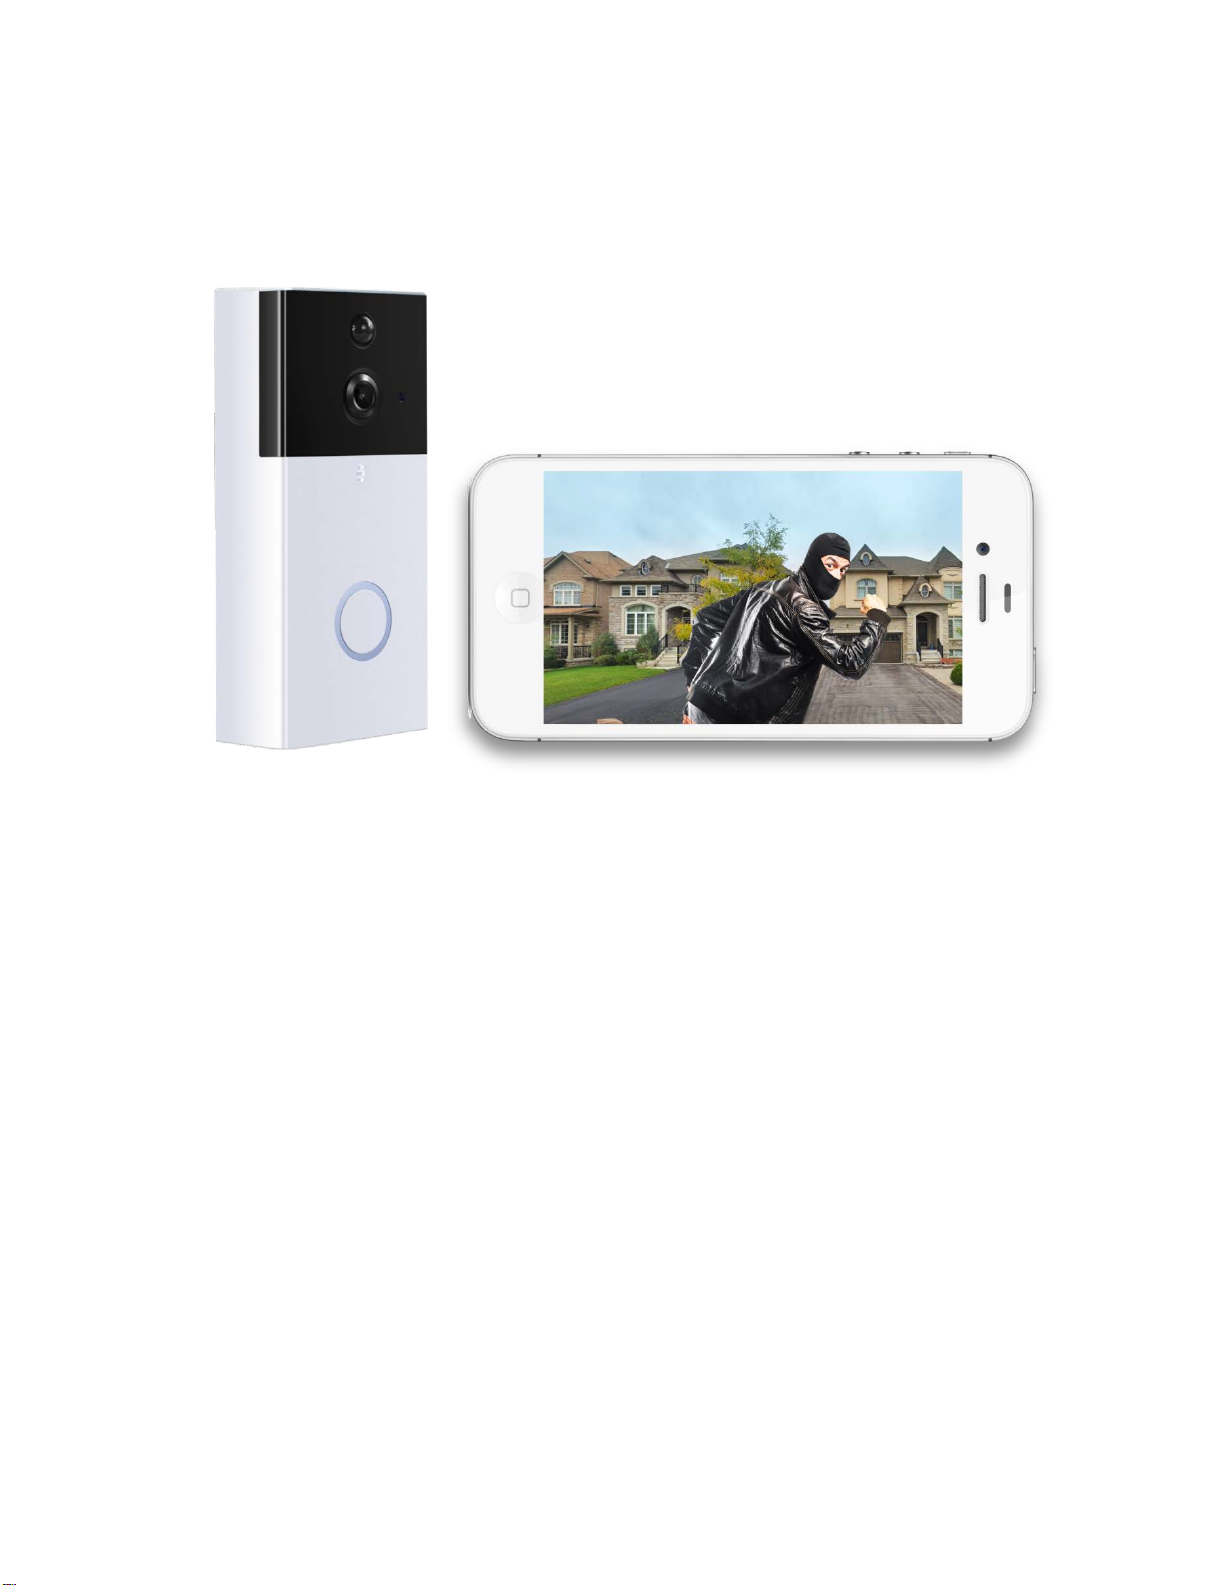
Home monitoring without monthly costs
The CIK Doorbell Camera lets you answer your door from anywhere using your smart phone. It comes
with a wide-angle HD camera with night vision, providing a clear view from your front door, day and
night.
The CIK Doorbell Camera is easy to install. If you require help you can always call us for installation.
Motion detectors are activated and alerts are sent via the app (iOS or Android) to notify you of arriving
guests and/or deliveries. Never miss any activity at your front door. Answer and monitor your front
door from anywhere with the CIK Doorbell Camera.
CIK Home Security 24/7 Toll Free Support Number: 1-888-353-5867
Details and Specifications
Video: HD 1280*720@25fps
Angle View: 120°Video width
Compression: H.264/ Motion JPEG
Waterproof rating: IP55
Night Vision Distance: 6Pcsx850nm IR LED, 5M IR-Cut distance
Storage: Micro SD Card support, 64GB max. (Micro SD Card not included)
Supporting OS: iOS, Android
Battery: Supports 2x (5800mAh) 18650 Rechargeable Batteries (not included)
Connection: Wi-Fi 2.4Ghz IEEE 802.11 b\g\n / AP hotspot connection
Dimensions: 5.2 x 2.8 x 1.0 inches, 14.2 x 7.7 x 2.6 cm
Features
Audio: Two-Way voice, extra in-home speaker included for doorbell chimes
Recording: Video recording storage in the cloud (coming soon)
Notification function: Notifications of the doorbell through the app, email or sms($1.99/m)
Motion detection: Motion detector built-in with notifications through email (notifications
through SMS $1.99/m per phone number), or app
Installation: Installation kit included for easy set-up in just a few minutes ( if you
require installation by us, costs may range from $0-200)
2
CIK Doorbell Camera Installation Guide
Step One: Remove Your Old Doorbell Button
! MAKE SURE TO TURN OFF THE POWER AT THE BREAKER BEFORE INSTALLATION !
Video installation guide: https://www.youtube.com/watch?v=xRCeb0ErkzA
•Remove your doorbell from the wall using a screwdriver, and disconnect the wires.
Step Two: Line Up the Mounting Bracket/Holder
To properly line up the mounting bracket:
•Place the mounting bracket next to your door at about chest height.
•Level the mounting bracket using the level tool if you have one.
•Mark the positions of the for mounting holes with a pencil.
3
Step Three: Drill Holes
•Use a drill to drill holes where you marked the position of the mounting holes.
•If you are mounting the bracket on brick, concrete, or stucco put plastic anchors into the
holes. You may need to use a hammer to get the anchors in.
•If you are mounting the bracket on wood or vinyl, just use the included screws.
4
Step Four: Connect Your Doorbell Wiring to the Terminal Screws
Located on the Mounting Bracket.
•Tighten the screws to make sure the connection is secure
5
Step Five: Place Your Ring Video Doorbell on the Mounting
Bracket
Make sure it is clicked into the mount/holder
Step Six: Tighten the Security Screw
•You are now ready to set-up your doorbell alarm using your smart phone and Wi-Fi
Connection.
6
CIK Video Doorbell Camera Pairing instructions
Pairing video guide: https://www.youtube.com/watch?v=8cEpMRPs8WI
Description
Function
Infrared Lamp
When it gets dusky outside, this lamp will turn on automatically for Night Vision mode
Micro SD card
Slot
Supports TF/ MICRO SD cards (Max. 64GB)
Reset Key
Press and hold the reset button for 6 seconds to restart the device and restore
default settings
Download and install the JJhome app:
1. Download the JJhome APP in the Google Play or Apple Store.
2. Create an account using your email or phone number, and log-in.
3. Make sure to allow JJHome to have access to your device and settings.
4. Make sure to update the JJhome app to the latest version.
5. Start the JJhome app, register an account using your phone number + country
code , and log-in.
7
Pairing your CIK doorbell camera to the JJhome App:
1. Click on the + on the upper right corner of the JJhome menu.
2. Click on the + in the middle to add a device.
3. Click the icon: "Doorbell".
4. Select the option: "Add new device".
5. Please choose your Wi-Fi for the doorbell to connect to, and enter your -Wi-Fi
password.
6. After pairing with the sound wave is successful, you will hear and see a prompt:
"Connect Successful".
7. After pairing, the app will ask you to set a private password for your device.
8
Monitoring and using your CIK doorbell camera
1. Using the doorbell camera
When someone presses the doorbell your phone will receive a call/notification
You can then answer the call and see the person in front of your doorbell and speak to each
other using your doorbell camera and phone.
2. Motion detection
When someone nears your frontdoor or doorbell camera, the motion detector will detect the
movement and notify you through the app or email.
9
3. Share the device
Users can share the device with their family and friends.
Click on the share icon (first icon on the bottom) to share the device with your family or any household
member. After that, select or input the person's phone number, whom you want to share the device
with.
Note: Shared users need to download the JJHome app and register an account before they can use this
function.
10
4. View Events
If you click on the view events icon on the bottom right, you will be able to see a log of all the times
your doorbell has been activated by someone triggering the motion detector or someone pressing the
doorbell or the time that your doorbell camera might have been disconnected. The camera will save
events up to 60 days.
11
5. Delete device
If you want to delete the device or unpair it from your phone. Find the device in "Device list".
Slide the note box to the left. The delete key will appear on the right side. Click on it to delete the device
from your phone.
12
6. My device
If you click on your device in the 'Device list" screen, you will enter "My Device", where you can do
the following:
•Monitor and record videos at any time
•Listen to sounds in handset mode
•Take screenshots
•Check screenshots or recordings in your album
•Talk through your phone to anyone outside your door
13
7. Settings
If you press the gear on the "My Device" screen icon it will bring you to the settings menu
where you can adjust the following:
In this menu you can change the time, password, recording mode, Wi-Fi settings, device name, video
resolution etc.
We always recommend to upgrade the firmware of your device to the latest version. Simply click on
"Device upgrade" and follow the prompts to upgrade the firmware, when your device firmware has
been upgraded you will hear "connect successfully"
14
Setting up the indoor speaker
1. Make sure your doorbell camera is powered on.
2. Plug the speaker in to a power socket.
3. Press and hold the volume button on the speaker for about 5 seconds to put it in pairing mode.
(speaker will flash)
4. Press the button on your doorbell and the doorbell will sync with the speaker.
•You can change the ringtone with the forward or backward buttons
•Change the volume by pressing the volume button ( 5 levels of volume)
•To reset/unpair the speaker hold down the downward arrow for 5 seconds until you hear one
"ding"
15
CIK 智能监控门铃
1. 自我监控,无月租费
使用 CIK 智能监控门铃,让您随时随地使用智能手机对门口情况进行监控。它配有广角高清夜视
摄像头,可以 24 小时为您提供前门的清晰视野。
CIK 门铃监控安装方便,但如果您需要协助,可以随时致电我们为您提供安装帮助。
如遇亲友来访或快递投送,运动探测器一旦触发,警报将通过应用程序(IOS 或Android)为您
发送通知。您永远不会错过门口的一举一动!使用 CIK 智能监控门铃, 让您随时随地监控一切!
CIK 7*24 家庭安全免费热线:1-888-353-5867
16
规格参数:
视频分辨率:高清 720P
角度视图:120°人眼广角
视频编码格式:H.264 动态影像
防水等级:IP55
夜视距离:850 纳米红外灯,5M IR-Cut
存储:支持 Micro SD,最大 64GB (不包含 Micro SD)
支持操作系统:IOS/Android
电池:支持 2x (5800mAh) 18650 蓄电池 (不包含在内)
连接:Wi-Fi 2.4Ghz IEEE 802.11 b \ g \ n / AP hotspot
外形尺寸:14.2 x 7.7 x 2.6 cm
产品功能:
语音传输:双向语音,室内响铃扬声器
视频录制:云端视频录制存储(即将推出)
通知功能:通过应用程序、电子邮件或短信方式($1.99/月)通知
运动检测:内置运动检测器,可通过应用程序或电子邮件发送通知(每绑定一个号码月费$1.99)
设备安装:随附安装工具,只需几分钟便可轻松安装(如需要上门服务,安装费为$0-$200)
17
CIK 智能监控门铃安装指南
第一步:拆除旧门铃
!安装前务必关掉电源!
请参考安装视频: https://www.youtube.com/watch?v=xRCeb0ErkzA
用螺丝刀将门铃从墙上取下,并断开连接线。
第二步:校准安装支架
•将安装支架放置在门旁边至胸膛高度。
•如果您有水平校准器,可以用来调平安装支架。
•用铅笔标出安装孔的位置。
合理放置支架
18
第三步:钻孔
•使用钻头在标记安装孔的位置钻孔。
•如果您需要将支架安装于砖块、混凝土或石灰结构的墙体上,请将塑料锚固件放入孔中。
您可能需要用锤子来固定锚。
•如果是安装于木材或塑料材质上,只需使用螺丝刀就能固定。
19
第四步:将门铃连接线与支架上的接线螺柱相连接
•拧紧螺丝,确保连接安全。
20

Popular Accessories manuals by other brands

Lakeland PLATE WARMER Instruction booklet

Lakeland

Lakeland PLATE WARMER Instruction booklet

Bair Hugger 505 Operator's manual

Bair Hugger

Bair Hugger 505 Operator's manual

Oregon Scientific ST228 instruction manual

Oregon Scientific

Oregon Scientific ST228 instruction manual

A-oneTech Air Halo Sanctuary AHS01 user manual

A-oneTech

A-oneTech Air Halo Sanctuary AHS01 user manual

Lambrecht 15188 operating instructions

Lambrecht

Lambrecht 15188 operating instructions

Notifier FSI-851 Installation and maintenance instructions

Notifier

Notifier FSI-851 Installation and maintenance instructions

Omron ZFV Series user manual

Omron

Omron ZFV Series user manual

Denkmeier BINOTRON-27 owner's manual

Denkmeier

Denkmeier BINOTRON-27 owner's manual

Venstar ACC0401 user manual

Venstar

Venstar ACC0401 user manual

Siemens SIMATIC RF640T Gen 2 operating instructions

Siemens

Siemens SIMATIC RF640T Gen 2 operating instructions

ROSE DISPLAYS ANOMULTI ROUND WITH MULTICLIPS instruction sheet

ROSE DISPLAYS

ROSE DISPLAYS ANOMULTI ROUND WITH MULTICLIPS instruction sheet

INNOLIVING INN-302 user manual

INNOLIVING

INNOLIVING INN-302 user manual

Ubiquiti mFi-DS quick start guide

Ubiquiti

Ubiquiti mFi-DS quick start guide

Tellur TLL331081 user manual

Tellur

Tellur TLL331081 user manual

Rice Lake Ranger Series Operation manual

Rice Lake

Rice Lake Ranger Series Operation manual

Wenglor P1NE Series operating instructions

Wenglor

Wenglor P1NE Series operating instructions

PCB Piezotronics IMI SENSORS 642A00 Installation and operating manual

PCB Piezotronics

PCB Piezotronics IMI SENSORS 642A00 Installation and operating manual

SICK LFC operating instructions

SICK

SICK LFC operating instructions

manuals.online logo
manuals.online logoBrands
  • About & Mission
  • Contact us
  • Privacy Policy
  • Terms and Conditions

Copyright 2025 Manuals.Online. All Rights Reserved.