Cimsun CimFAX User manual

CimFAX Fax Server
User Manual
(V5.0)

1
Copyright © 2021 Cimsun Technology Co., Ltd.
All rights reserved.
CimFAX Fax Server User Manual (V5.0)
This publication is subject to changes without notice. Changes or revisions of the publications will be
included in the latest version. Cimsun Technology Co., Ltd. makes no representations or warranties with
respect to the contents hereof and specifically disclaims any implied warranties of merchantability or
fitness for any particular purpose. Please visit CimFAX official website (at www.cimfax.com) for the
latest versions or our product documentations.
Please write down the serial number, model and purchase information in the blank area. Model and
serial number can be found on the bottom of the product.
No part of this publication may be copied, reproduced or transmitted in any form, or by any means,
electric or mechanical, including photocopying and microfilm, without prior expressed written
permission of Cimsun Technology Co., Ltd.
CimFAX Fax Server
Product model: ______________________________________
Product serial number: _________________________________
Date of purchase: ______________________________________
Place of purchase: ______________________________________
Distributor: ___________________________________________
Cimsun and CimFAX are registered trademarks of Cimsun Technology Co., Ltd.
All the other products and trademarks are used only for illustration and are the property of their respective
owners.

2
Safety precautions
Please read the following information before deploying the products.
Beware of the warnings and use the product in accordance with instructions labelled on the hardware.
Warnings:
● Do not expose the equipment to liquid, moisture or high humidity.
● The equipment must be placed on a stable platform in case of sliding and breaking.
● Overheating prevention: slots on equipment are for cooling and circulating. Please do not jam or
cover these slots. Besides, please keep the equipment away from warming or heating objects.
● Nothing but the specified accessories could be inserted into the ports of the equipment.
● Please use the supplied power adapter. Uncertified third-party adapter may cause short circuit, even
fire or electrical shock.
● Do not splash liquids of any kind on the equipment.
● To avoid damaging or loosening of internal elements, do not place the equipment on vibrating surface.
Power Supply Requirements
● This equipment works only with the voltage stated on the label. If you are not sure about what the
voltage is in your office or home, please consult local distributor or electric power department.
● Do not use the power adapter in moisture environment.
● Power adapter for this product could be plugged in two- or three-wired grounding receptacle. Please
make sure that the receptacle is correctly grounded.
Caution! Ground pin guarantees safety. Using ungrounded receptacle may cause interference, electric
shock and/or injuring.
Note: Ground pin also helps shield the products from possible interference noise generated by other
electronic devices nearby.

3
Maintenance
Do not repair the equipment by yourself. Unappropriated disassembly may cause short circuit or other
dangerous consequences. If there is any problem, please contact our technical. In any of the following
cases, unplug the power adapter and contact our technical support:
● Power cable or receptacle is broken.
● There is liquid penetrated into the equipment.
● Rain or water dripped into the equipment.
● The equipment falls onto the ground or the shell is broken.
● The equipment malfunctions and needs maintenance.
● The equipment doesn’t work though deployed and handled in compliance with the manual.
Brief introduction of the user manual
Thank you for buying CimFAX fax server. CimFAX fax server is designed for SMEs and branches of
large companies. It works independently as a network server, supports one or multiple PSTN lines and
makes users send and receive faxes simultaneously from different workstations. It’s an ideal choice for
enterprises with large amounts of fax tasks to improve productivity and reduce daily costs.
CimFAX fax server is very easy to deploy and configure. Before installing, please read the manual
carefully so that you can use all the features.
Usage: This manual helps to familiarize appropriate use of CimFAX fax server.
Note: All the servers mentioned in this manual are CimFAX fax server, if not specified otherwise.

4
Contents
Package Contents.......................................1
1. Product Description ...................2
1.1 Product Introduction ...................... 3
1.2 Functions........................................ 4
1.3 Technical Specification.................. 5
2. Equipment Setup......................10
2.1 Setting up Environment ...............11
2.2 Setting up CimFAX Fax Servers..12
2.2.1 Standard Edition
A5/B5/C5/C5S........................... 12
2.2.2 Professional Edition H5/H5S
...................................................15
2.2.3 Professional Two-line
Edition T5/T5S and Ultimate
Two-line Edition W5/W5S.........16
3. Software Installation (on
Windows) ..................................................19
3.1 Disc Contents...............................20
3.2 System Requirements...................20
3.3 Software Installation Steps....20
4Software Installation (on MacOS)
25
4.1 Disc Contents...............................26
4.2 System Requirements...................26
4.3 Software Installation Steps...........26
5Configuration Guide for
CimFAX on Windows ..............................32
5.1 Administrator Login..................... 33
5.2 Server Network Settings ..............35
5.3 Server Datetime Settings..............37
5.4 Fax Options..................................38
5.5 SMTP Settings ............................. 40
5.6 User Accounts Management ........ 41
5.7 System Upgrade...........................42
5.8 Temporary Factory Reset.............43
5.9 Servers Binding............................44
5.10 Fax Queue..................................46
5.11 Fax History.................................47
6Instructions for CimFAX on
Windows 48
6.1 User Login ...................................49
6.2 Changing Password......................50
6.3 Import Contacts............................51
6.4 Signature Library .........................52
6.5 Fax to Email.................................55
6.6 Program Options..........................56
6.7 Scan Settings................................58
6.8 Fax Format Conversion................59
6.9 Sending Faxes..............................60
6.9.1 Send fax from printing
documents ..................................60

5
6.9.2 Send fax from selecting
document....................................61
6.9.3 Send fax from scanning.....61
6.9.4 Choose or enter recipients.62
6.9.5 Signature and stamps ........64
6.9.6 Add a page.........................65
6.9.7 Rotate Page .......................65
6.9.8 Fax options........................66
6.9.9 Outbox and sending status 67
6.10 Receiving Faxes.........................68
6.10.1 View faxes.......................68
6.10.2 Reply and forward...........68
6.10.3 Save faxes .......................68
6.10.4 Print faxes .......................68
6.10.5 Add a contact...................69
6.10.6 Add remarks....................69
6.10.7 Send fax by email............70
6.10.8 OCR options....................71
6.11 Public Faxes Distributing...........72
6.12 Faxes Auto Export......................73
6.13 Language Configuration ............74
7. Instructions for CimFAX on Mac
75
7.1 Check CimFAX Server Version and
Status..................................................76
7.2 Set up User Accounts................... 77
7.3 Fax Settings..................................78
7.4 Fax to Email Settings...................79
7.5 Network Settings..........................80
7.6 Set up Time and Region............... 81
7.7 Check Fax Queue.........................82
7.8 Check Fax History .......................83
7.9 Create Device Voice Log .............84
7.10 Check Device Log......................85
7.11 Add Advanced Variables ............ 86
7.12 Update Firmware .......................87
7.13 Create and Import Contact.........88
7.14 Send Fax ....................................90
7.15 Receive Fax..............................101
7.16 Change Software Language .....103
7.17 Set up Automatic Export..........104
8. Fax Mode ................................105
8.1 Auto Answer ..............................106
8.2 Manual Answer..........................106
9. FAQ .........................................107

1
Package Contents
Please open the package carefully and take out the contents.
If any of the followings is missing, please contact the seller immediately.

2
1. Product Description
This chapter describes features, functions and technical specifications
of CimFAX fax server.

3
1.1 Product Introduction
CimFAX is a new generation fax server based on embedded technology and designed to meet the fax
requirement of small- and medium-sized companies and branches of large companies. CimFAX fax
server integrates fax, telephone and network technology, capable of all the work of traditional fax
machine. With a processor and fast Ethernet, it is an IP enabled server that runs independently. It
supports multiple users sending and receiving faxes simultaneously and has models of one or more
ports.
CimFAX sends and receives e-documents, which helps cut down large amount of costs on paper.
Besides, desktop faxing can improve the productivity to a great extent. Paperless faxes have high
resolution. What’s more, it automates archiving on PC, making it easy to backup, archive and retrieve.
Compared with other fax software, our software- and hardware-integrated CimFAX fax server is more
stable, has better compatibility and works flawlessly for longer time while consumes less power.
CimFAX has capabilities equivalent to large-size fax servers but costs less. Therefore, CimFAX is the
ideal choice for enterprises with large amount of fax businesses.
Send fax
Receive fax
Fig. 1.1 Fax sending and receiving diagram

4
1.2 Functions
● Network sharing
With a CimFAX fax server installed on your local network, multiple fax users in your office can send
faxes from their workstations simultaneously.
● Auto distributing
Administrator can set up extensions for all users. When the caller dials the fax number + extension of
the user, the server will auto route the incoming fax to the right user.
● Fax queue
Multiple faxes submitted to the server will auto queue up for sending. Users don’t have to wait or
manually resend. Faxing status will be marked in real-time.
● Virtual print
CimFAX can virtually print the doc, pdf, excel, png or jpg files out as fax you selected.
● Digital signature
Users can create a signature library with password protection in CimFAX client and sign the
e-documents directly on computer or phone.
● Scan to send
Put the paper in the scanner connected to the computer and choose scan to send in CimFAX client
software, then the paper will be sent out as fax.
● Fax scheduling
Users can schedule to send fax and receive faxes at a designated time range.
● Fax broadcasting
Users can send faxes to multiple contacts at one click.
● Auto IP dialing
The server can auto dial IP for distance numbers, reducing users’ communication costs.
● Auto fax to email
Users can set up fax to email and receive faxes through email when not on site.
● Auto answer
When there’s an incoming fax call, the server will auto answer to either receive or voice to prompt the
callers to enter extension number.
● Manual answer
Connect a telephone to the server by a telephone cable and you can initiate manual answer mode. Faxes
can be sent to the extension number the answering personnel pressed.
● Fax export
With 128-bit encryption protection of the fax database, your business privacy is strongly secured. Faxes
can also be auto export to local or network shared folder as tif or pdf files.
● API *
API interface and SDK are provided to seamlessly integrate with companies’ information system.
Note: Function with icon “*” is available only on W5 and W5S Editions.
To learn more, please visit: www.cimfax.com

5
1.3 Technical Specification
Spec/Models Standard Edition A5 Standard Edition B5
Storage ◇ 256MB 1GB
Users △510
Line Port 1 port 1 port
Fax Speed ▲ 14.4kbps 14.4kbps
Resolution 98/196DPI 98/196DPI
Caller ID Format DTMF, FSK DTMF, FSK
Power Adapter Specification 12V AC/DC 12V AC/DC
Maximum Power Consumption 5W 5W
Network Port Ethernet RJ45x1Ethernet RJ45x1
Fax Port PSTN RJ11×1 PSTN RJ11×1
Dimension 18×10.5×2.8 cm 18×10.5×2.8 cm
Weight 495g 495g
Ambient Temperature 0℃~40℃0℃~40℃
Ambient Humidity 5%~90% RH 5%~90% RH
Storage Temperature -40℃~80℃ -40℃~80℃
Fax to Email SMTP SMTP
C/S Mode √ √
B/S Mode
Software API Port
Local Server Binding
Distant Servers Binding
⌬The number of users licensed is stated on the outer package.
△Storage is slightly different in accordance with software versions.
▲ Fax speed is subject to the quality of the fax line.

6
Specs/Models Standard Edition C5 Standard Edition C5S
Storage ◇ 2GB 4GB
Users △20 20
Line Port 1 port 1 port
Fax Speed ▲ 14.4kbps 14.4kbps
Resolution 98/196DPI 98/196DPI
Caller ID Format DTMF, FSK DTMF, FSK
Power Adapter Specification 12V AC/DC 12V AC/DC
Maximum Power Consumption 5W 5W
Network Port Ethernet RJ45x1Ethernet RJ45x1
Fax Port PSTN RJ11×1 PSTN RJ11×1
Dimension 18×10.5×2.8 cm 18×10.5×2.8 cm
Weight 495g 495g
Ambient Temperature 0℃~40℃0℃~40℃
Ambient Humidity 5%~90% RH 5%~90% RH
Storage Temperature -40℃~80℃ -40℃~80℃
Fax to Email SMTP SMTP
C/S Mode √ √
B/S Mode
Software API Port
Local Servers Binding
Distant Servers Binding
⌬The number of users licensed is stated on the outer package.
△Storage is slightly different in accordance with software versions.
▲ Fax speed is subject to the quality of the fax line.

7
Specs/Models Professional Edition Professional Edition
H5 H5S
Storage ◇ 4GB 8GB
Users △100 100
Line Port 1 port 1 port
Fax Speed ▲ 33.6kbps 33.6kbps
Resolution 98/196DPI 98/196DPI
Caller ID Format DTMF, FSK DTMF, FSK
Power Adapter Specification 12V AC/DC 12V AC/DC
Maximum Power Consumption 6W 6W
Network Port Ethernet RJ45x1Ethernet RJ45x1
Fax Port PSTN RJ11×1 PSTN RJ11×1
Dimension 19×25×6 cm 19×25×6 cm
Weight 1.3kg 1.3kg
Ambient Temperature 0℃~40℃0℃~40℃
Ambient Humidity 5%~90% RH 5%~90% RH
Storage Temperature -40℃~80℃ -40℃~80℃
Fax to Email SMTP SMTP
C/S Mode √ √
B/S Mode
Software API Port
Local Servers Binding √√
Distant Servers Binding √ √
⌬The number of users licensed is stated on the outer package.
△Storage is slightly different in accordance with software versions.
▲ Fax speed is subject to the quality of the fax line.

8
Specs/Models Professional Two-line Professional Two-line
Edition T5 Edition T5S
Storage ◇ 8GB 16GB
Users △200 200
Line Port 2 port 2 port
Fax Speed ▲ 33.6kbps 33.6kbps
Resolution 98/196DPI 98/196DPI
Caller ID Format DTMF, FSK DTMF, FSK
Power Adapter Specification 12V AC/DC 12V AC/DC
Maximum Power Consumption 6W 6W
Network Port Ethernet RJ45x1Ethernet RJ45x1
Fax Port PSTN RJ11×1 PSTN RJ11×1
Dimension 19×25×6 cm 19×25×6 cm
Weight 1.3kg 1.3kg
Ambient Temperature 0℃~40℃0℃~40℃
Ambient Humidity 5%~90% RH 5%~90% RH
Storage Temperature -40℃~80℃ -40℃~80℃
Fax to Email SMTP SMTP
C/S Mode √ √
B/S Mode
Software API Port
Local Servers Binding √√
Distant Servers Binding √ √
⌬The number of users licensed is stated on the outer package.
△Storage is slightly different in accordance with software versions.
▲ Fax speed is subject to the quality of the fax line.

9
Specs/Models Ultimate Two-line Ultimate Two-line
Edition W5 Edition W5S
Storage ◇ 16GB 32GB
Users △400 400
Line Port 2 port 2 port
Fax Speed ▲ 33.6kbps 33.6kbps
Resolution 98/196DPI 98/196DPI
Caller ID Format DTMF, FSK DTMF, FSK
Power Adapter Specification 12V AC/DC 12V AC/DC
Maximum Power Consumption 6W 6W
Network Port Ethernet RJ45x1Ethernet RJ45x1
Fax Port PSTN RJ11×1 PSTN RJ11×1
Dimension 19×25×6 cm 19×25×6 cm
Weight 1.3kg 1.3kg
Ambient Temperature 0℃~40℃0℃~40℃
Ambient Humidity 5%~90% RH 5%~90% RH
Storage Temperature -40℃~80℃ -40℃~80℃
Fax to Email SMTP SMTP
C/S Mode √ √
B/S Mode
Software API Port √√
Local Servers Binding √√
Distant Servers Binding √ √
⌬The number of users licensed is stated on the outer package.
△Storage is slightly different in accordance with software versions.
▲ Fax speed is subject to the quality of the fax line.

10
2. Equipment Setup
This chapter illustrates how to set up the server
and connect it correctly.

11
2.1 Setting up Environment
Connection requirements
● RJ45 Ethernet connectors
● RJ11 telephone line
● Power adapter
● 2-line or 3-line grounding receptacle
Environment requirements
● Please put the server on flat surface.
● Please keep the server away from heating equipment.
● Do not put the server in dusty, overheating or under heating or damp places or places that are directly
sunlit.
●Keep the server away from any devices that can generate electromagnetism or unwanted radio
frequency such as radio transmitter, television, copier, warming devices or air conditioner.
● We suggest you put the server under protection in case of unexpected power off and system
restoration.
12
2.2 Setting up CimFAX Fax Servers
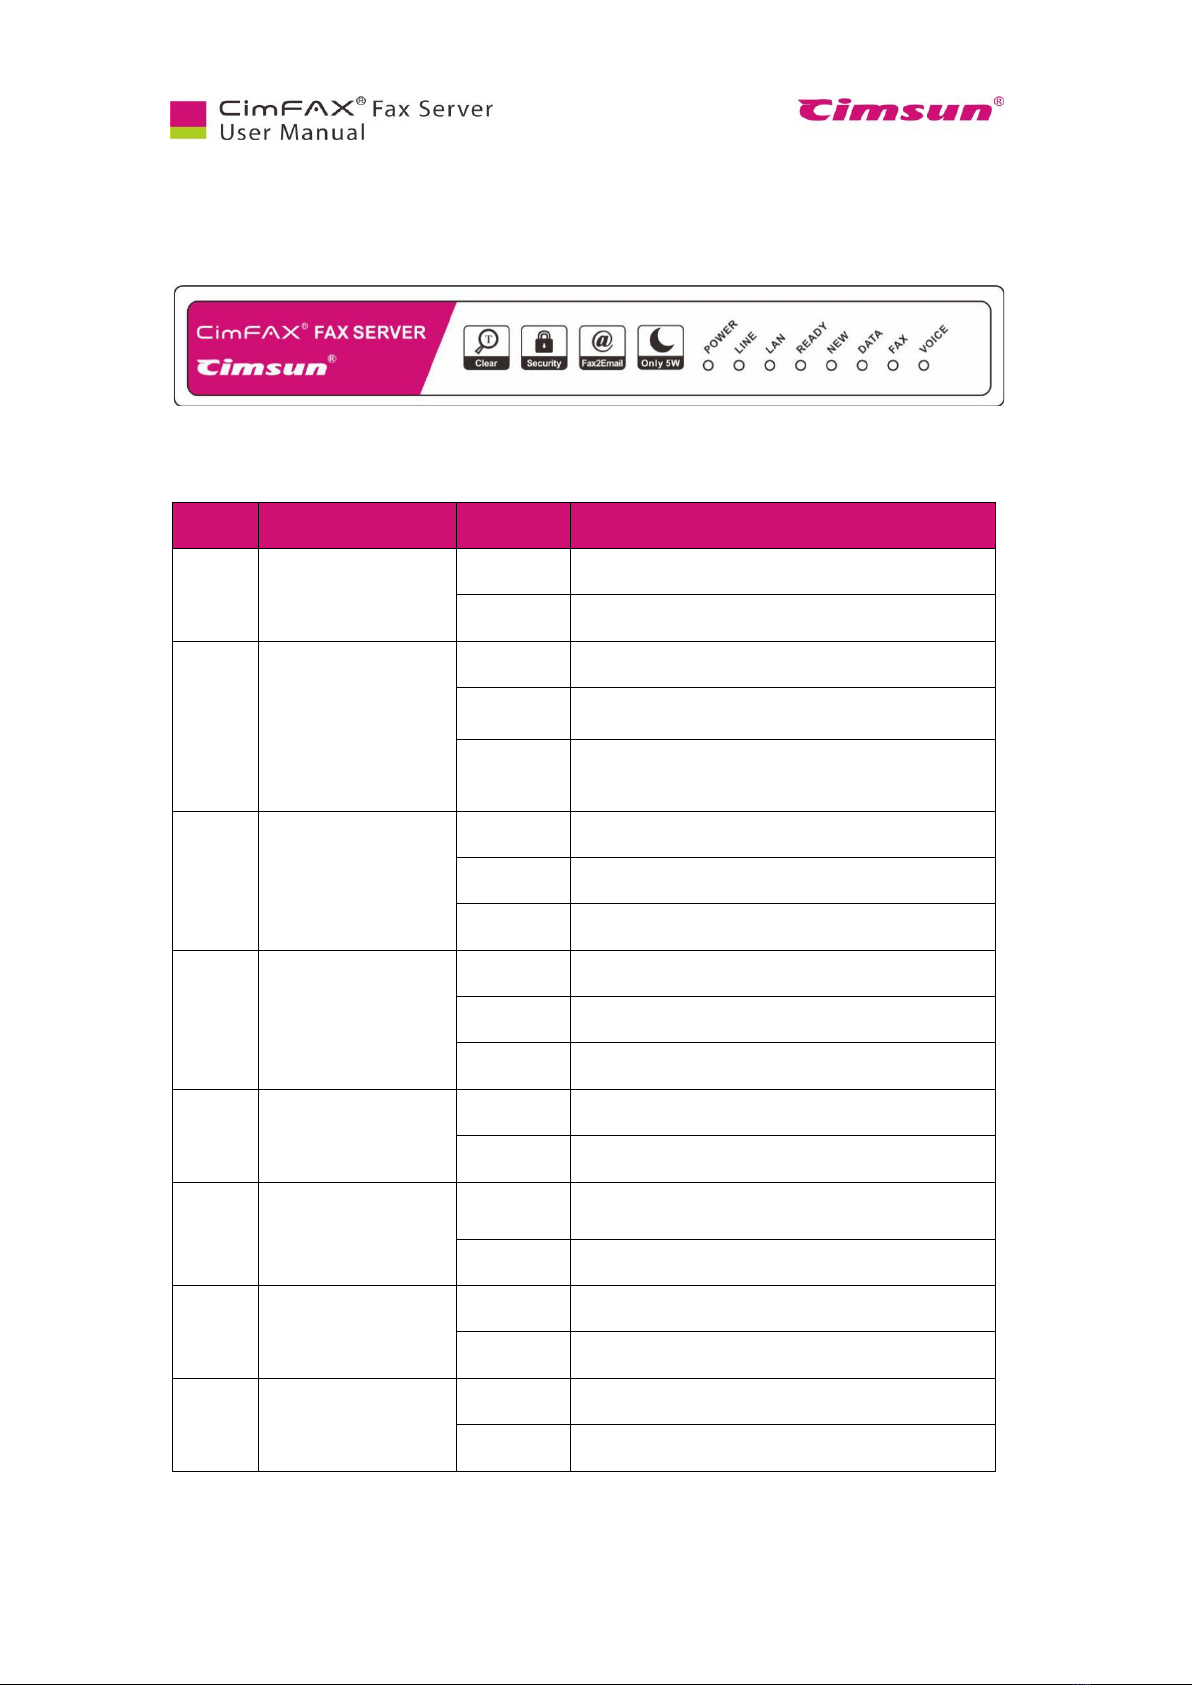
2.2.1 Standard Edition A5/B5/C5/C5S
Fig 2.1 Standard Edition front panel
LED
Item
Status
Description
PWR
Power state
On
Power on.
Off
Power failure.
LINE
Telephone
Line status
On
The port is connected to a telephone line.
Flash
The port is connected to a telephone line.
Off
The port is not connected to a telephone line, or in
off-hook status.
LAN
Network status
On
The port is connected to network.
Off
The port is not connected to network.
Flash
Sending or receiving network data packets.
READY
Server status
On
Server is running.
Flash
Server is initiating.
Off
Server failure.
NEW
New fax notification
Off
No notification.
Flash
Notifies you have new fax(es).
DATA
Storage status
On/Flash
The storage is reading or writing data. Power off at
this time may cause data loss.
Off
The storage is idle.
FAX
Fax status
On
Server is receiving or sending fax.
Off
Server is not in fax mode.
VOICE
Voice Status
On
Server is playing voice.
Off
Server is not in voice mode.

13
Four steps to start
Fig 2.2 4-step cable connection
Port
Item
Description
PWR
Power in
Connects to a power adapter.
RST
Reset button
Restores settings to factory default. Details refer to “5.8 Restore
Factory Settings”.
EXT
External function
Reserved.
LAN
Ethernet (RJ-45)
Connects to an Ethernet 10/100M based network.
UPLINK
Ethernet (RJ-45)
Connects to another network device.
USB
USB (Master)
Reserved.
LINE
Telephone line (RJ-11)
Connects to a telephone line.
PHONE
Telephone device (RJ-11)
Connects to a telephone or fax machine. Details refer to “8.2 Manual
Answer”
Fig 2.3 Rear panel

14
Setting up steps
Step 1: Connecting telephone line
Plug the line in a telephone and dial to test line function, then plug this line into server’s LINE port.
Once correctly connected, LINE LED on the front panel of the Server will be on (if FAX LED or
VOICE LED on, LINE LED off is normal), otherwise it will be off and the Server will beep every 3
seconds.
Step 2: Connecting network line
Plug one end of the RJ-45 Ethernet cable in LAN port and the other end in LAN wall jack or Ethernet
switch (including routers with connectors or function of switch) to connect the server to local network.
Once correctly connected, the LED LAN will be on or flash.
Step 3: Connecting a telephone or fax machine (optional)
If you don’t have to use extra telephone, fax machine or manual answer (see 8.2 Manual Answer), you
can skip this step. Plug one end of the RJ11 telephone cable in the PHONE port and the other end in a
telephone or fax machine (RJ11 of telephones or fax machines of different models and brands is
generally labelled as LINE or other). When there is an incoming call, the telephone or the fax machine
will ring and function normally in the event of that fax server is not in need.
Note: when a fax machine is connected to the Server and is set on auto answer mode, please
make sure that the fax machine’s auto answer rings more times than that of the Server,
otherwise the Server will fail to receive faxes.
Step 4: Connecting power adapter
Please use the provided power adapter. Connect the power cord with the adapter first and then plug the
power adapter in a two-line or three-line grounding receptacle and the circular connector in the PWR
port of the Server. With this done, the Server will initiate and the READY LED on the front panel will
be on.
Other manuals for CimFAX
2
Table of contents


