Cinegy Cinegize 20 User manual

Cinegy Cinegize 20
© Cinegy GmbH
Document version: dab1621

Table of Contents
Preface . . . . . . . . . . . . . . . . . . . . . . . . . . . . . . . . . . . . . . . . . . . . . . . . . . . . . . . . . . . . . . . . . . . . . . . . . . . . . . . . . . . . . . . . . . . Ê1
User Manual . . . . . . . . . . . . . . . . . . . . . . . . . . . . . . . . . . . . . . . . . . . . . . . . . . . . . . . . . . . . . . . . . . . . . . . . . . . . . . . . . . . . . . . Ê2
1. Installation . . . . . . . . . . . . . . . . . . . . . . . . . . . . . . . . . . . . . . . . . . . . . . . . . . . . . . . . . . . . . . . . . . . . . . . . . . . . . . . . . . . . Ê3
1.1. License Management . . . . . . . . . . . . . . . . . . . . . . . . . . . . . . . . . . . . . . . . . . . . . . . . . . . . . . . . . . . . . . . . . . . . . . . . Ê9
2. Interface . . . . . . . . . . . . . . . . . . . . . . . . . . . . . . . . . . . . . . . . . . . . . . . . . . . . . . . . . . . . . . . . . . . . . . . . . . . . . . . . . . . . . Ê11
2.1. System Tray . . . . . . . . . . . . . . . . . . . . . . . . . . . . . . . . . . . . . . . . . . . . . . . . . . . . . . . . . . . . . . . . . . . . . . . . . . . . . . Ê11
Dashboard. . . . . . . . . . . . . . . . . . . . . . . . . . . . . . . . . . . . . . . . . . . . . . . . . . . . . . . . . . . . . . . . . . . . . . . . . . . . . . . . . Ê12
Settings. . . . . . . . . . . . . . . . . . . . . . . . . . . . . . . . . . . . . . . . . . . . . . . . . . . . . . . . . . . . . . . . . . . . . . . . . . . . . . . . . . . Ê12
Exit . . . . . . . . . . . . . . . . . . . . . . . . . . . . . . . . . . . . . . . . . . . . . . . . . . . . . . . . . . . . . . . . . . . . . . . . . . . . . . . . . . . . . . Ê12
3. Settings . . . . . . . . . . . . . . . . . . . . . . . . . . . . . . . . . . . . . . . . . . . . . . . . . . . . . . . . . . . . . . . . . . . . . . . . . . . . . . . . . . . . . Ê13
3.1. General Settings . . . . . . . . . . . . . . . . . . . . . . . . . . . . . . . . . . . . . . . . . . . . . . . . . . . . . . . . . . . . . . . . . . . . . . . . . . . Ê13
3.2. Quality Settings. . . . . . . . . . . . . . . . . . . . . . . . . . . . . . . . . . . . . . . . . . . . . . . . . . . . . . . . . . . . . . . . . . . . . . . . . . . . Ê14
3.3. Ports Settings . . . . . . . . . . . . . . . . . . . . . . . . . . . . . . . . . . . . . . . . . . . . . . . . . . . . . . . . . . . . . . . . . . . . . . . . . . . . . Ê16
3.4. Service Settings . . . . . . . . . . . . . . . . . . . . . . . . . . . . . . . . . . . . . . . . . . . . . . . . . . . . . . . . . . . . . . . . . . . . . . . . . . . Ê17
3.5. Info . . . . . . . . . . . . . . . . . . . . . . . . . . . . . . . . . . . . . . . . . . . . . . . . . . . . . . . . . . . . . . . . . . . . . . . . . . . . . . . . . . . . . Ê18
4. Operating . . . . . . . . . . . . . . . . . . . . . . . . . . . . . . . . . . . . . . . . . . . . . . . . . . . . . . . . . . . . . . . . . . . . . . . . . . . . . . . . . . . . Ê20
Client Mode . . . . . . . . . . . . . . . . . . . . . . . . . . . . . . . . . . . . . . . . . . . . . . . . . . . . . . . . . . . . . . . . . . . . . . . . . . . . . . . . . . Ê20
Host Mode . . . . . . . . . . . . . . . . . . . . . . . . . . . . . . . . . . . . . . . . . . . . . . . . . . . . . . . . . . . . . . . . . . . . . . . . . . . . . . . . . . . Ê22
4.3. Windows Service Mode . . . . . . . . . . . . . . . . . . . . . . . . . . . . . . . . . . . . . . . . . . . . . . . . . . . . . . . . . . . . . . . . . . . . . Ê23
System Recommendations . . . . . . . . . . . . . . . . . . . . . . . . . . . . . . . . . . . . . . . . . . . . . . . . . . . . . . . . . . . . . . . . . . . . . . . . . . . Ê24
.1. Software Only . . . . . . . . . . . . . . . . . . . . . . . . . . . . . . . . . . . . . . . . . . . . . . . . . . . . . . . . . . . . . . . . . . . . . . . . . . . . . . . . Ê24
.2. Disclaimer . . . . . . . . . . . . . . . . . . . . . . . . . . . . . . . . . . . . . . . . . . . . . . . . . . . . . . . . . . . . . . . . . . . . . . . . . . . . . . . . . . . Ê24
.3. No Damage . . . . . . . . . . . . . . . . . . . . . . . . . . . . . . . . . . . . . . . . . . . . . . . . . . . . . . . . . . . . . . . . . . . . . . . . . . . . . . . . . . Ê24

Preface
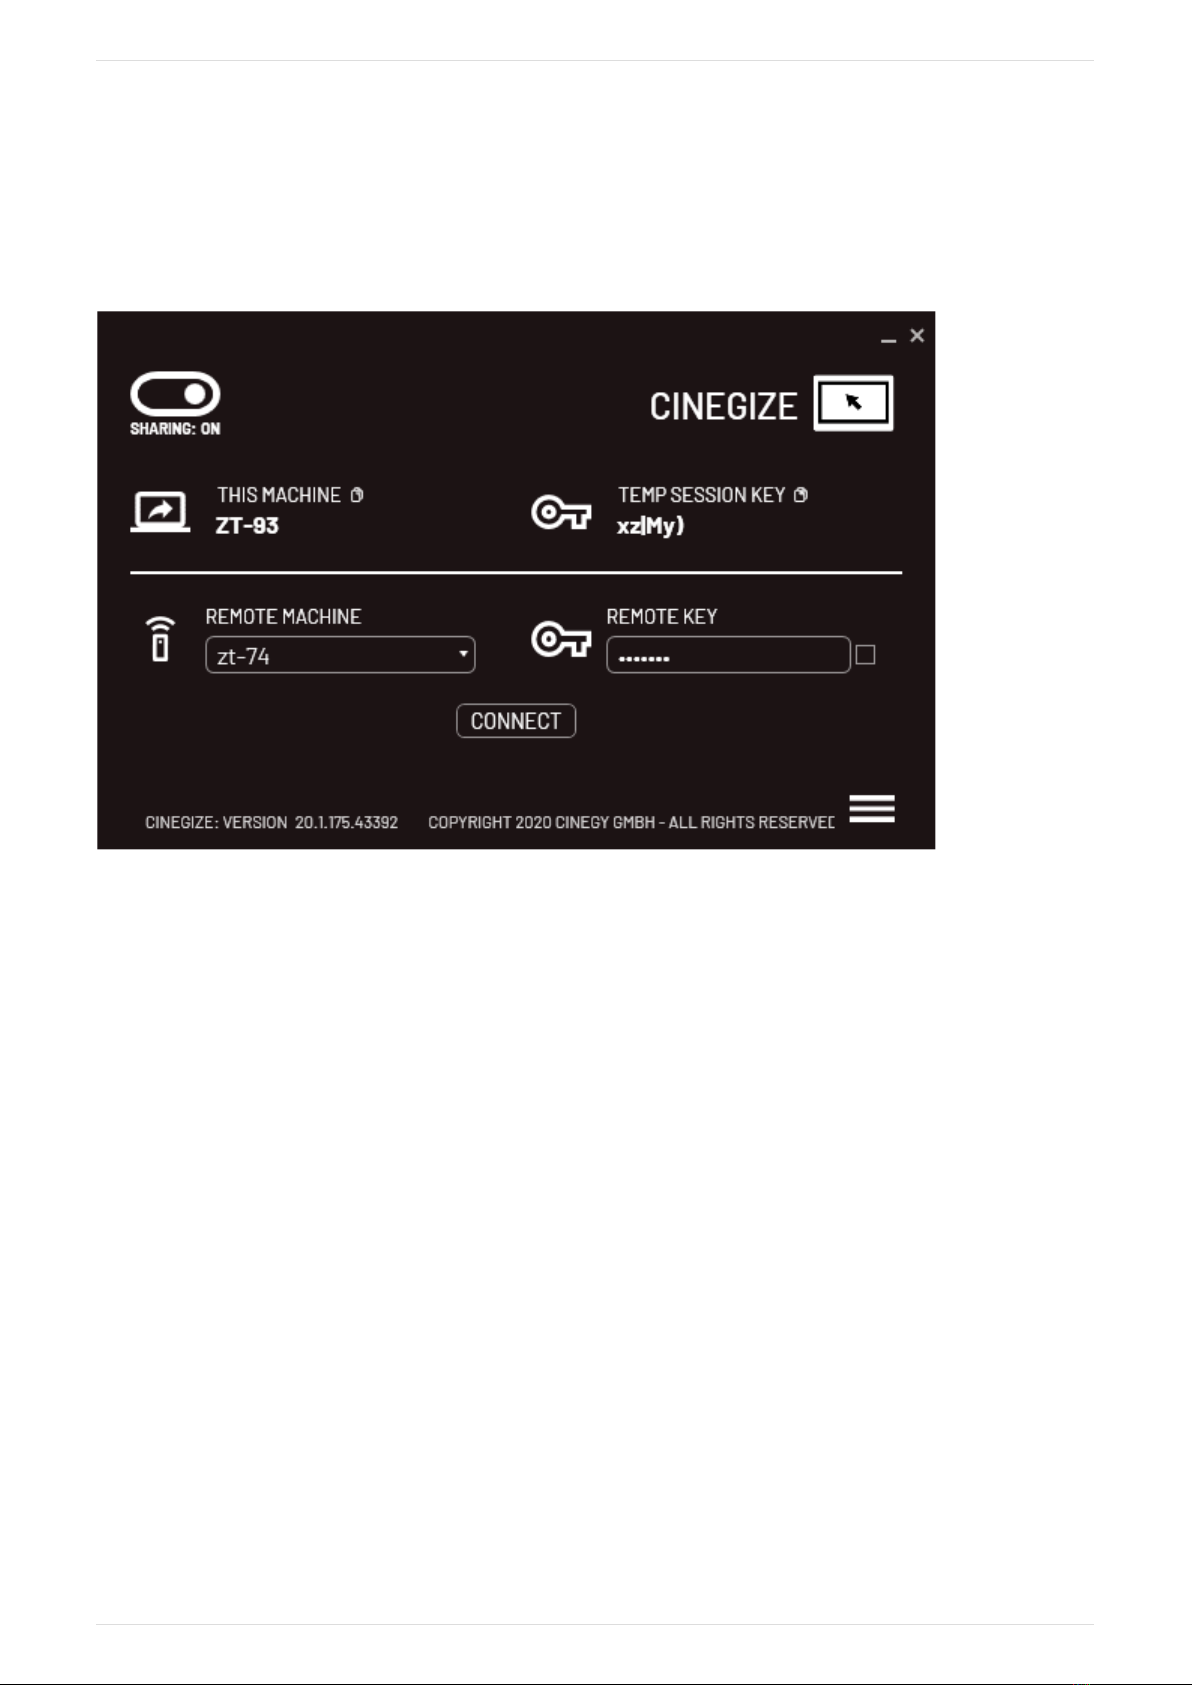
Cinegy Cinegize is an encrypted software-only KVM solution for remotely viewing or accessing computers over an existing
LAN infrastructure, providing the highest quality and lowest-latency access possible. It is specifically designed to deal with
high resolutions, high frame rates and full screen A/V playback while having minimal impact on both the host and client
machines. The host can be broadcast using IGMP multicast to viewers, or keyboard / mouse and clipboard integration can be
added over a dedicated control channel allowing interactivity with the host.
Preface
Page 1 | Document version: dab1621

User Manual
Cinegy Cinegize 20
Page 2 | Document version: dab1621

Chapter 1. Installation
Cinegy Cinegize is currently an early beta version, and access is currently provided at no cost pending
release. Visit the official Cinegy Cinegize website to review the most important features and download the
latest version.
Administrator rights are required to complete the installation, but this ensures that any host sessions will
allow full access to any elevated application windows.
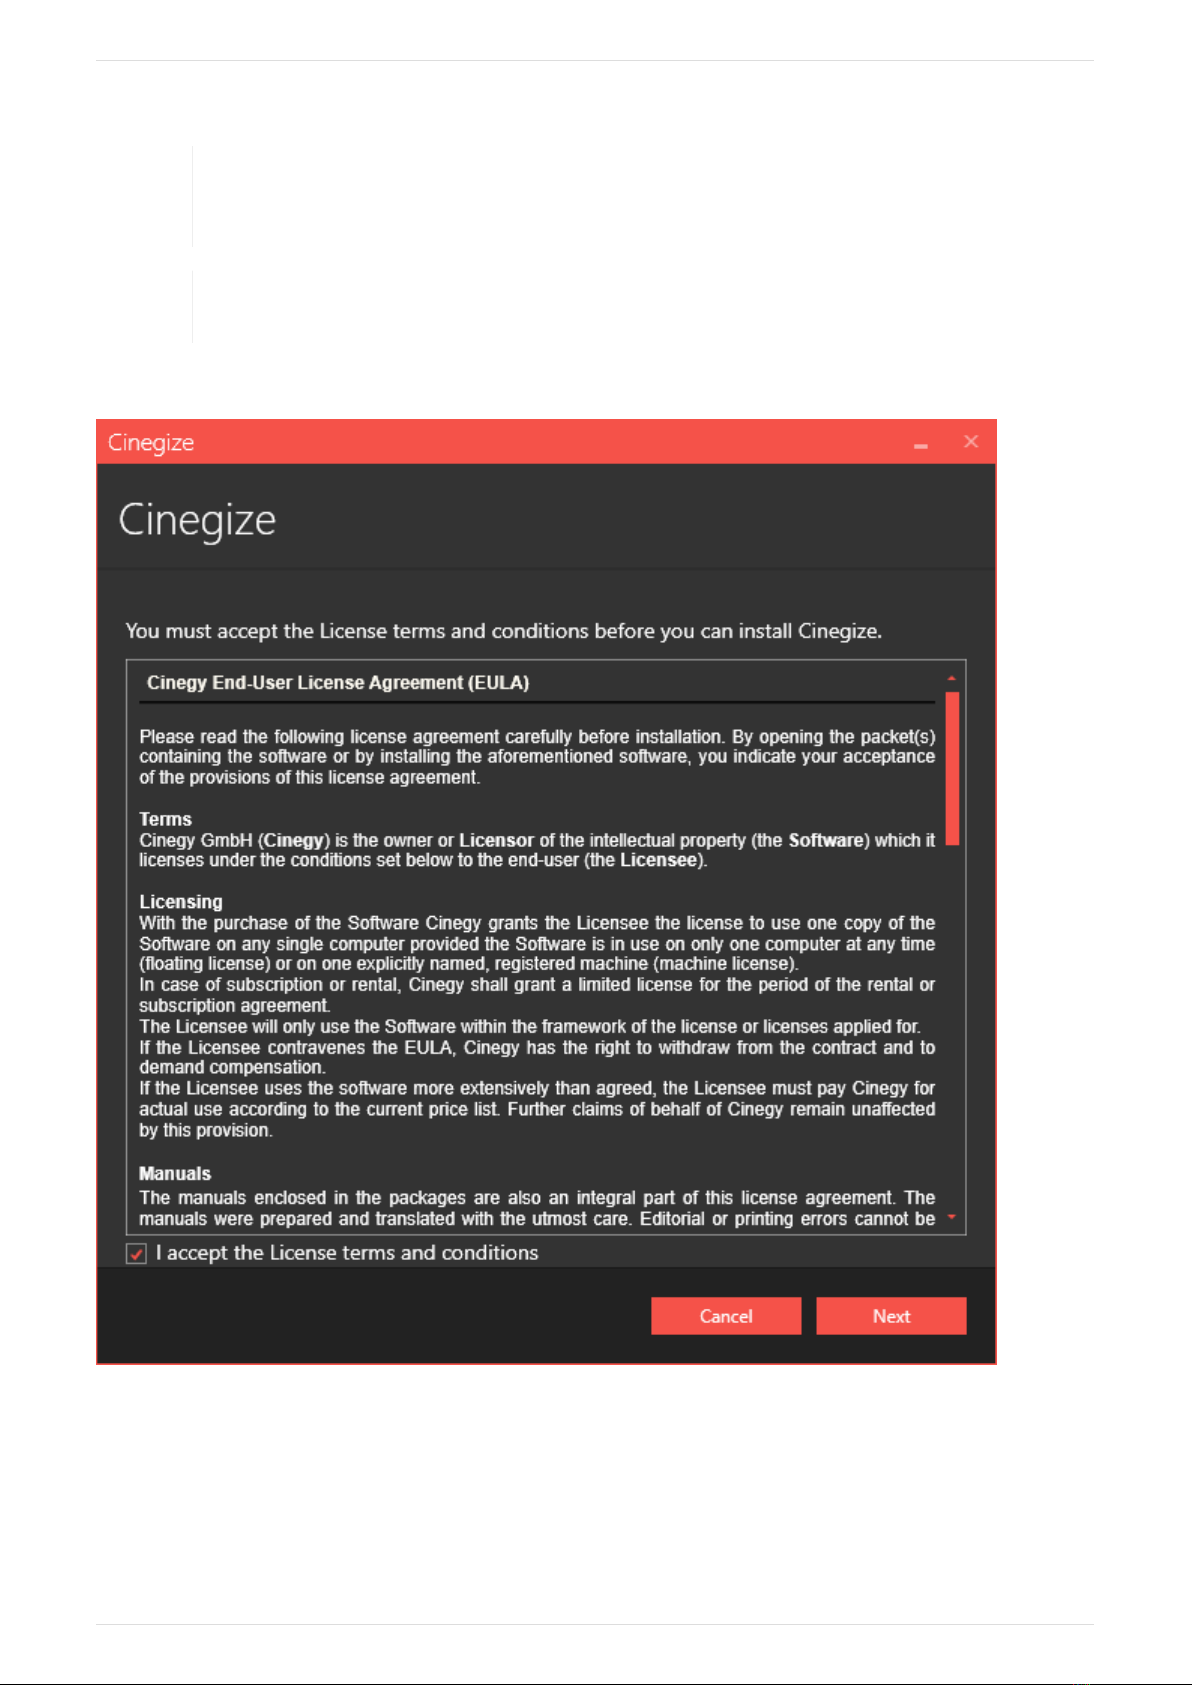
To start the installation, run the Cinegize-Installer.exe file. The setup wizard will be launched:
Read and accept the license agreement and press "Next" to proceed with the installation.
All available components are listed in the following dialog:
Chapter 1. Installation
Page 3 | Document version: dab1621

Enabled installation of the package component(s) is indicated by the "Install" option selected and highlighted
with red.
Select the "Skip" option next to the relevant component to disable its installation.
The default installation directory, which is indicated underneath the package component name, can be changed by clicking
the path:
Cinegy Cinegize 20
Page 4 | Document version: dab1621

In the "Browse for folder" dialog that appears, select the required folder for your installation:
Chapter 1. Installation
Page 5 | Document version: dab1621

You can also create a new folder by pressing the "Make New Folder" button and entering a new folder
name. Once the folder is selected, press the "OK" button.
Press the "Next" button to proceed with the installation.
Check whether your system is ready for installation in the following dialog:
Cinegy Cinegize 20
Page 6 | Document version: dab1621

The green tick indicates that the system resources are ready and no other processes may prevent the
installation. Clicking the validation entry field displays its detailed information.
If any validation reveals that installation cannot be started, the respective field becomes highlighted and
the red cross is displayed with the detailed information on the failure reason below.
Chapter 1. Installation
Page 7 | Document version: dab1621

The explanation differs depending on the reason why the installation cannot be proceeded.
Press the "Refresh" button for the system to recheck installation availability. Once the reason of
prevention is excluded, you can proceed with the installation.
Press the "Back" button to change the installation settings.
Press the "Cancel" button to abort and exit the setup wizard.
Press the "Next" button to begin the installation.
The progress bar indicates the progress of the installation process.
The following dialog informs that the installation is completed successfully:
Cinegy Cinegize 20
Page 8 | Document version: dab1621

Press the "Close" button to exit the setup wizard.
After the installation, the Cinegy Cinegize icon appears on your Windows desktop. Double-click it to start the
application.
1.1. License Management
The Cinegy Cinegize installer contains the Cinegy License Manager application intended for managing serial numbers and the
resultant software licenses used by Cinegy applications when no license dongles are used. If installed, Cinegy License
Service will be installed as a Windows service:
Chapter 1. Installation
Page 9 | Document version: dab1621

The software license is activated by the system automatically during Cinegy Cinegize installation.
After installation, the license file is automatically placed by the installer to the following location on your computer:
C:\ProgramData\Cinegy\Software Licenses\
Cinegy Cinegize searches for software licenses first, but when no local software license is found, it reverts to using the
normal licensing mechanism used by other Cinegy applications through Cinegy License Service.
The license is required when host is running – either in application mode or as a service.
If the host machine is running without a license, the client machine cannot connect to the host and the corresponding error is
displayed:
Cinegy Cinegize 20
Page 10 | Document version: dab1621

Chapter 2. Interface
Cinegy Cinegize started for the first time looks as follows:
•Sharing - in the "ON" position this slider is used for working in host mode, while client mode requires the slider to be in
the "OFF" position.
•This machine - indicates the name or IP address of the currently operated machine.
•Temp session key - randomly generated session key used for access to the currently operated machine.
•Remote machine - indication of the remote machine name or IP address.
The drop-down list contains names / IP addresses of the most recently connected clients.
•Remote key - a key to connect to the remote machine in client mode. This password is one-time session password,
effective until Cinegy Cinegize is closed.
Press this button to open the Cinegy Cinegize configurator.
Refer to the Settings article for details on how to set up Cinegy Cinegize.
2.1. System Tray
Once Cinegy Cinegize is launched, the application icon appears in the notification area of the taskbar and
remains there, even if the application is minimized to the system tray using the button.
Right-click on the system tray icon opens the following menu:
Chapter 2. Interface
Page 11 | Document version: dab1621

Dashboard
Use the "Dashboard" command to open the "Dashboard" window. When the connection is established, the detailed
information about the Client and the Host current settings is displayed:
Settings
The "Settings" command navigates to the "Settings" menu when the current settings need to be changed.
Exit
The "Exit" command prompts to close the application with the following confirmation message:
Cinegy Cinegize 20
Page 12 | Document version: dab1621

Chapter 3. Settings
To open the configurator, press this button. The following "Settings" dialog appears:
The "Settings" menu contains five configuration tabs. In the right lower corner of each tab there is a set of buttons:
To apply the changes, press the "Apply" button.
To discard the changes, press the "Discard" button.
To close the "Settings" menu, press the "Close" button.
3.1. General Settings
Chapter 3. Settings
Page 13 | Document version: dab1621

•Color Theme – select the "Dark" or "Light" application color theme.
•UAC – activate this switcher to receive notification about User Account Control settings on start-up.
3.2. Quality Settings
Cinegy Cinegize allows manual adjustment of the video quality parameters, allowing adaptation to meet requirements.
In the host settings, encoding mode allows selection of 4:2:2, 4:4:4 and RGB color as well as specification of a maximum
ceiling bitrate.
The encoding works with self-contained frames, meaning error recovery times are always low whilst the transmission runs at
a variable bitrate between 5 and 60 frames per second as the required by host screen updates. This ensures quick updates
and no tearing effects whilst saving up to 90% bandwidth at idle.
The "Quality" tab provides the opportunity to select necessary quality preset:
Cinegy Cinegize 20
Page 14 | Document version: dab1621

By default, HD, UHD and 8K preset qualities are available. Hovering the cursor over the preset name shows the current preset
settings – the bitrate and the chroma format:
To add a new preset, press the button.
Chapter 3. Settings
Page 15 | Document version: dab1621

In the "Create preset" dialog box that appears define a new preset name, maximum bitrate, chroma format (RGBA, 422 or
444), and grabber mode.
Having made all the necessary changes, confirm your choice by pressing the ✓button.
When it is necessary to make changes to the existing preset or remove it, use the "Edit" or "Delete" command from its
context menu:
Deletion of existing preset requires additional confirmation:
The use of audio is determined by the corresponding switcher and is enabled by default.
Define the number of encoders by using the buttons or entering the desired value via the keyboard in the corresponding
field.
3.3. Ports Settings
Cinegy Cinegize 20
Page 16 | Document version: dab1621

By default the "TCP general port" is set to 51140. To change this value, as well as to define the "UDP video port" and "UDP
audio port" on the host machine, use the buttons or enter the desired value via the keyboard in the corresponding field.
For proper work of Cinegy Cinegize the TCP general port value on the client machine must be the same as
on the host machine.
If the specified ports are blocked on application startup, the appropriate error is logged to log files for service mode, or
reported to the console for application mode.
3.4. Service Settings
To manage the service, the user must have administrator rights and Cinegy Cinegize must be launched
using the "Run as administrator" command.
Cinegy Cinegize can operate as a Windows service. This mode provides automatic hosting after machine startup.
Chapter 3. Settings
Page 17 | Document version: dab1621

In the "Service" tab, press the "Install" button to install the Cinegy Cinegize service as a Windows service. Then press the
"Start" button to start the service:
The service can be uninstalled, stopped or restarted by pressing the corresponding buttons in the "Service" tab of Cinegy
Cinegize.
In the "Password" field, set a personal password for unattended access when Cinegy Cinegize operates in host mode.
Refer to the Windows Service Mode paragraph for details on operating Cinegy Cinegize as a Windows
service.
3.5. Info
The "Info" tab contains copyright and licensing information:
Cinegy Cinegize 20
Page 18 | Document version: dab1621
Table of contents
Popular Switch manuals by other brands

ALFAtron
ALFAtron ALF-WU4K HUB manual

ESYLUX
ESYLUX CU-DIN KNK Series user manual

Edimax
Edimax ES-5808PHG Specifications

H3C
H3C S12500R-2L installation guide

HP
HP 316095-B21 - StorageWorks Edge Switch 2/24 release note

Planet Networking & Communication
Planet Networking & Communication WGSW-50040 Configuration guide