Cintre 335U2 User manual

Hi-Speed USB External Drive (OTB)
User’s Guide
RW335U2_VIA6204_022007_Rev3

Table of Content
1. Information
2. Limited Warranty
3. Technical Support and Service
4. Installation Procedures
Windows Vista
Windows XP
Windows 2000
Windows Millennium Edition
Windows 98 Second Edition
5. Button Triggered Copy Utility
6. FAQ (Frequency Asked Questions)
7. Tips
8. Troubleshooting

1. Information
Trademark
All of the company or product names mentioned in this manual are the trademarks or
registered trademarks of their respective holders.
Disclaimer
All of the contents in this manual, product specifications, size and shape are subject to
change without prior notice.
The manufacturer makes no representations or warranties with regard to the contents
hereof and reserves the right to revise this manual without obligation to notify any person.
The manufacturer shall not be liable for any technical or editorial errors or omissions
contained in this manual, or for any damage, direct or indirect, from discrepancies
between the manual and the product it describes.
The manufacturer assumes no responsibility, directly or indirectly, for financial losses or
claims from third persons resulting from the use of this product and any of its functions.
For purposes of storage capacity, a gigabyte (GB) equals 1,000,000,000 bytes.
Total accessible capacity varies depending on operating environment.
All references to speed are for comparison purposes only. Actual data throughput will
vary.
Precautions
Please follow the precautions listed below. Failure to do so may cause damage to the
device and void the warranty.
* Read this User’s Guide carefully and follow the procedures for installing and using
the device.
* Do not open the device or attempt to disassemble or modify it. If it appears to be
malfunctioning, contact Technical Support.
* Never expose the device to water or other liquids or in damp or wet conditions in
order to avoid danger of electric shock, short-circuiting or personal injury.
* Place the power adapter and the power cord such a way that people cannot step
on it.
* Do not use a third-party AC adapter or power cord.
* Do not cover the openings; the openings on the equipment are for air convection
hence protects the equipment from overheating.
*If any of the following situations arises, have the equipment checked by service
personnel:
-The USB connector is damaged.
-The power adapter, power cord or power connector is damaged.
-Liquid has penetrated into the equipment.
-The equipment has dropped and damaged.
-The equipment has obvious sign of breakage.

Copyright Notice
The material in this document is the intellectual property of Samtack Computer Inc. We take
every care in the preparation of this document, but no guarantee is given to the correctness of its
contents. Our products are under continuous improvement and we reserve the right to make
changes without notice.
2. Limited Warranty
This product is warranted against manufacturing defects for the period of one year.
The warranty period commences on the date of purchase from the authorized
reseller/retailer.
Your original purchase invoice, showing the date of purchase of the product is your proof of
the date of purchase.
During the warranty period, defective parts will be repaired or replaced. There will be no
charge for labor or parts during the one-year warranty period from the date of purchase.
Any shipping or other cost such as customs incurred costs, etc… is customers’ responsibility.
This warranty does not cover any failure resulting in loss to software, data, lost profits, lost
savings, any incidental damages or other economic consequential damages due to accident,
abuse, misuse, negligence and acts of God.
3. Technical Support and Service
If you experience problem please first refer to the relevant sections in this User’s
Guide, answers to the most common questions can be found in the FAQ section.
For technical support please Email stsupport@samtack.com or
call 1-800-255-8048 (09:00am to 08:00pm Eastern Time).
System Requirements
PC
Pentium 233 MHz processor or higher
Microsoft Windows 98SE / ME / 2000 with Service Pack 4 / XP with Service Pack 2 / Vista
Available USB port (Hi-Speed USB recommended)
File-Copy-Utility ONLY supports Windows Vista (32-bit), XP (32-bit), 2000 and ME).
Your computer’s OS will auto sense your computer’s USB controller and adjust
between Hi-Speed USB and USB speed. Performance will be reduced if your
computer does not support Hi-Speed USB.

NOTE: Due to various models the product images may not be exactly the same as the product you received.
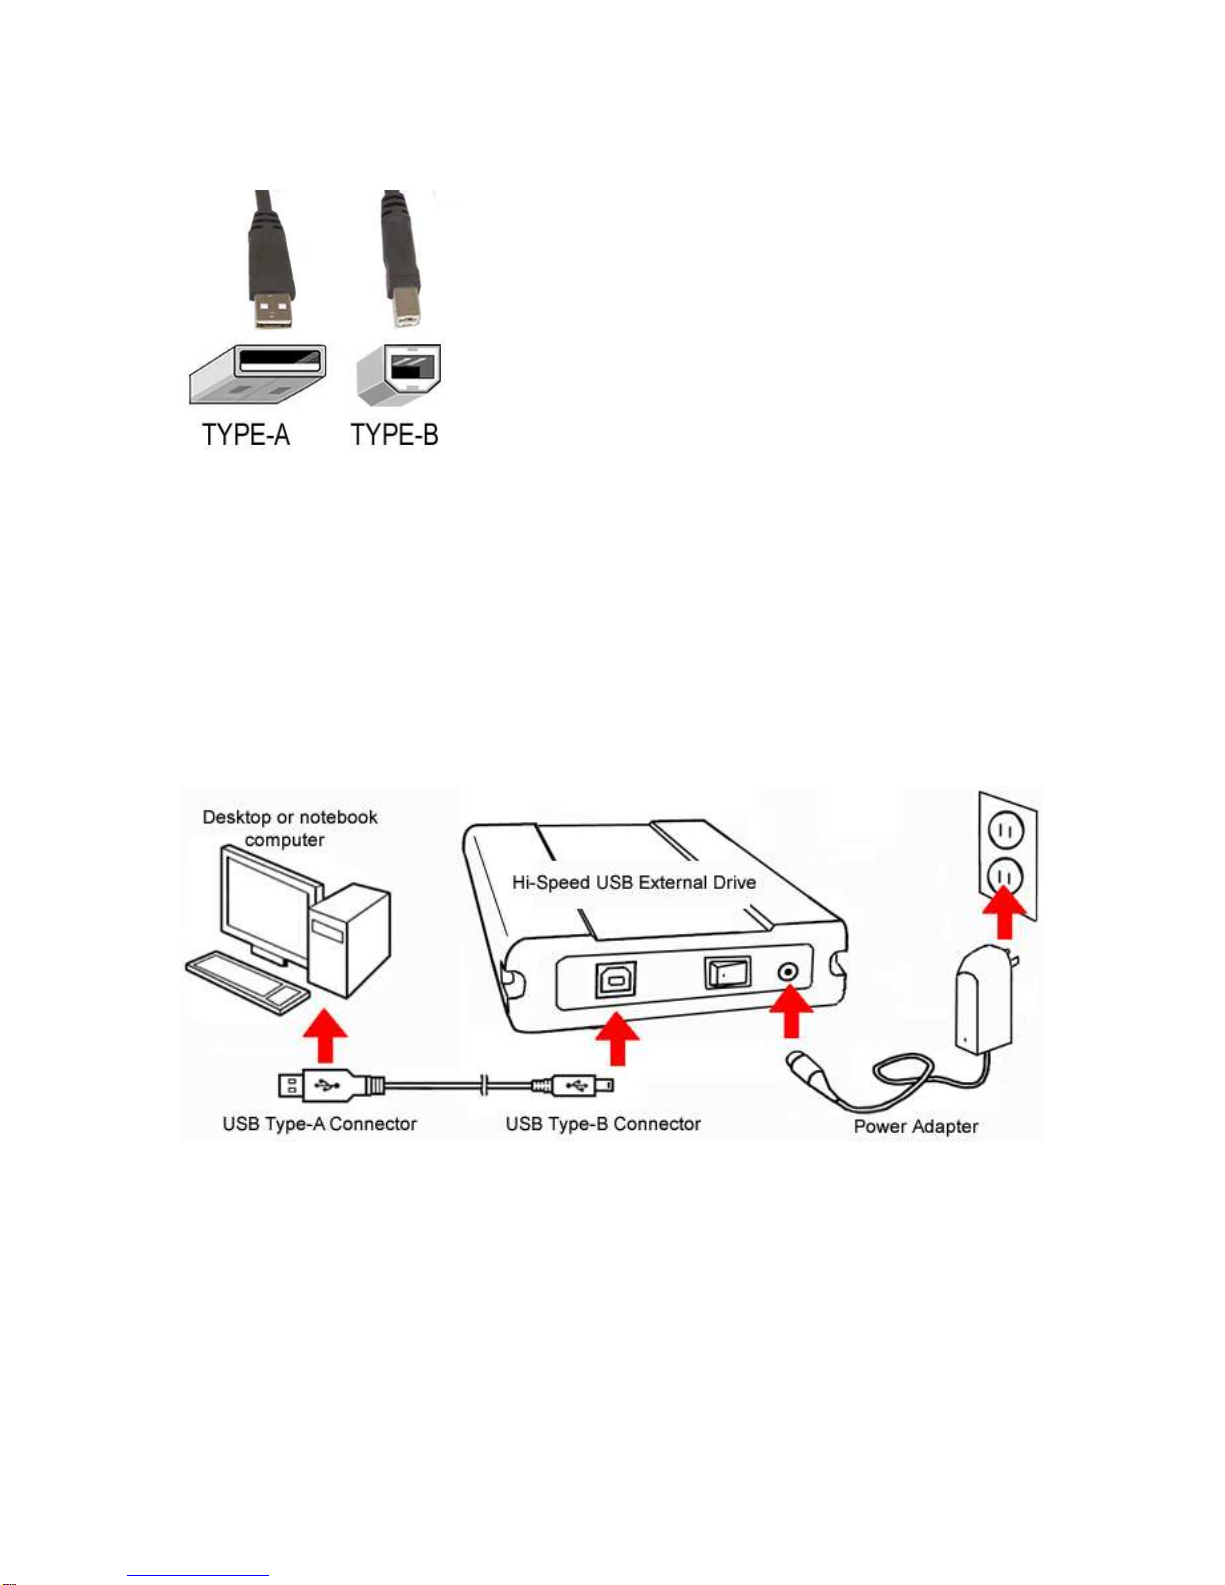
An USB TYPE-A to TYPE-Bcable comes with the drive:
USB TYPE-A connector (rectangular profiles) is for your computer’s USB port and
USB TYPE-B connector (square-like profiles) is for the external hard drive.
NOTE: Due to various models the product images may not be exactly the same as the product you received.

4. Installation Procedures
Windows Vista / XP / 2000 / ME
I. Make sure your USB host adapter is working properly
Make sure your computer’s USB host devices are setup properly.
Please refer to your computer and/or USB host adapter manual.
Windows will auto sense your computer’s USB controller and adjust between Hi-Speed
USB and USB speed. Performance will be reduced if your computer does not support Hi-
Speed USB.
II. External Drive Device Drivers
Windows Vista/XP/2000/Me will automatically detect the external drive and installs
appropriate drivers. No other drivers are required.
III. Connect the External Drive
1. Connect power cord from Power Adapter to DC INPUT of the external drive.
2. Connect the Power Adapter to a wall outlet.
3. Connect USB cable’s TYPE-Bconnector to your external drive.
4. POWER-ON the external drive.
5. Connect USB cable’s TYPE-Aconnector to USB host device on your computer.
6. Window OS should auto detect and setup the external drive.
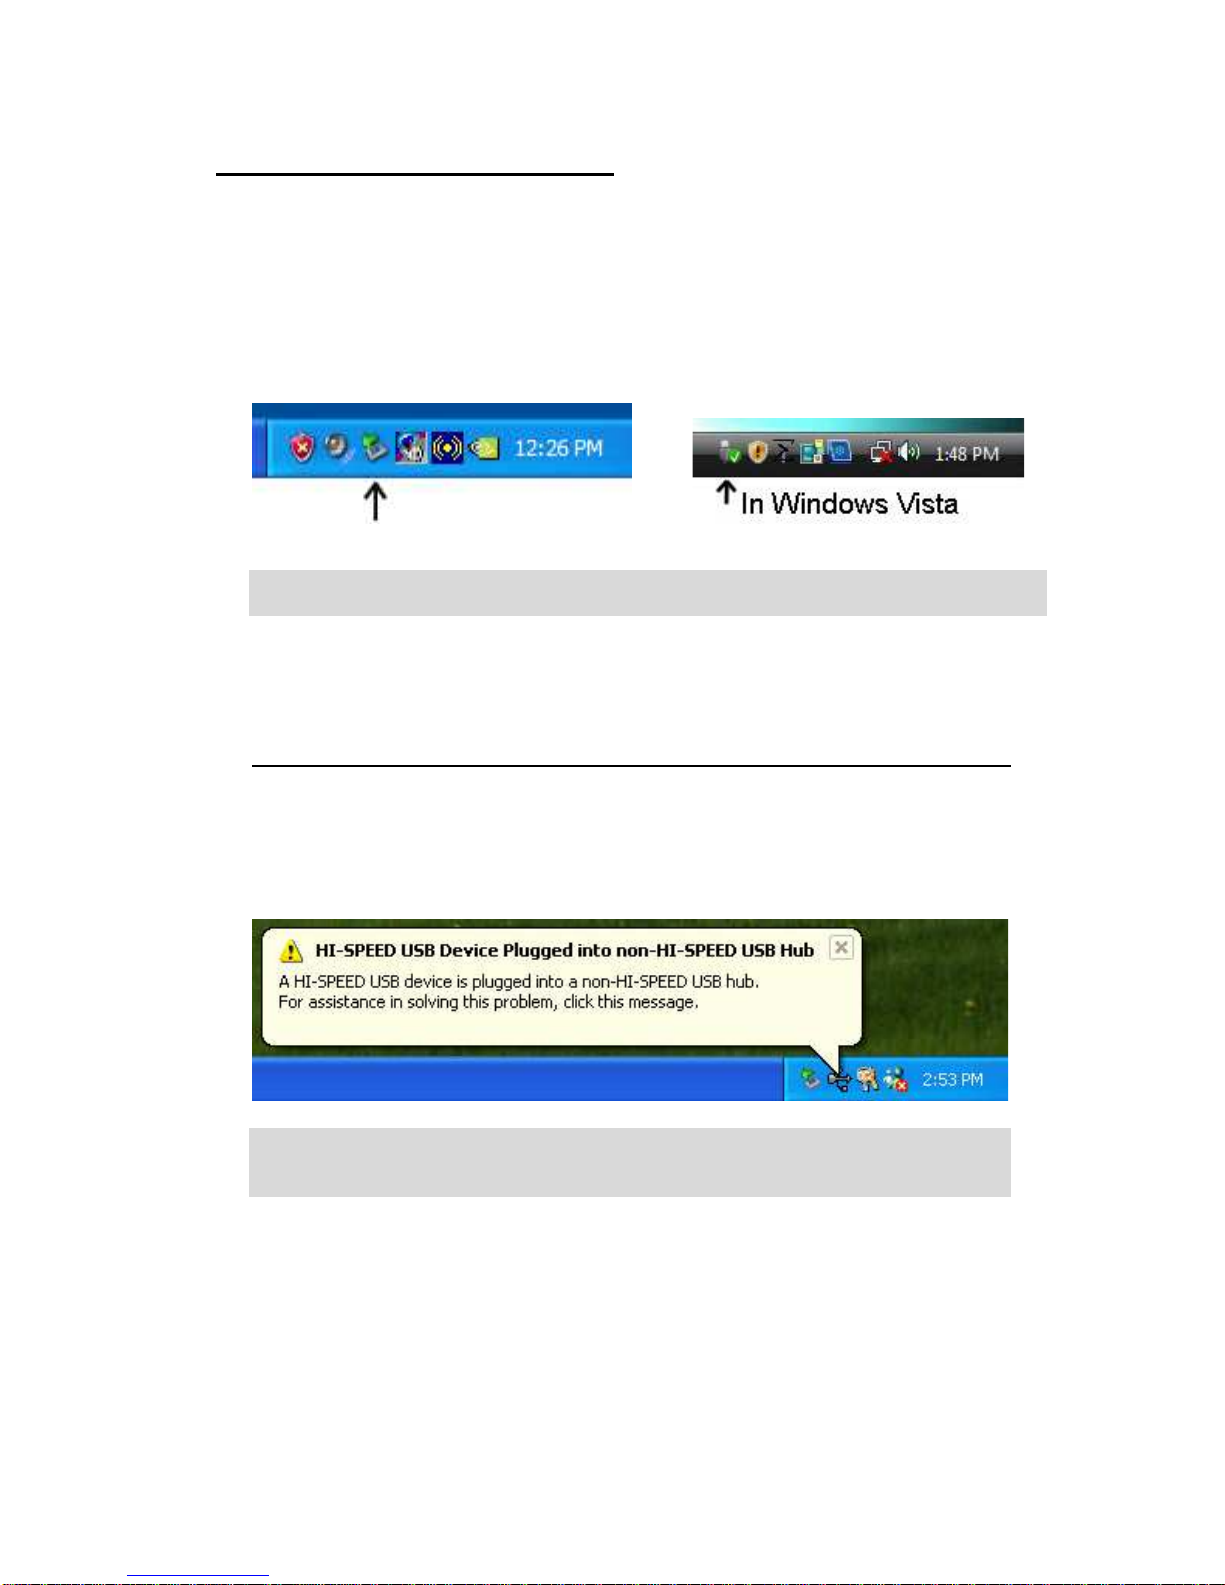
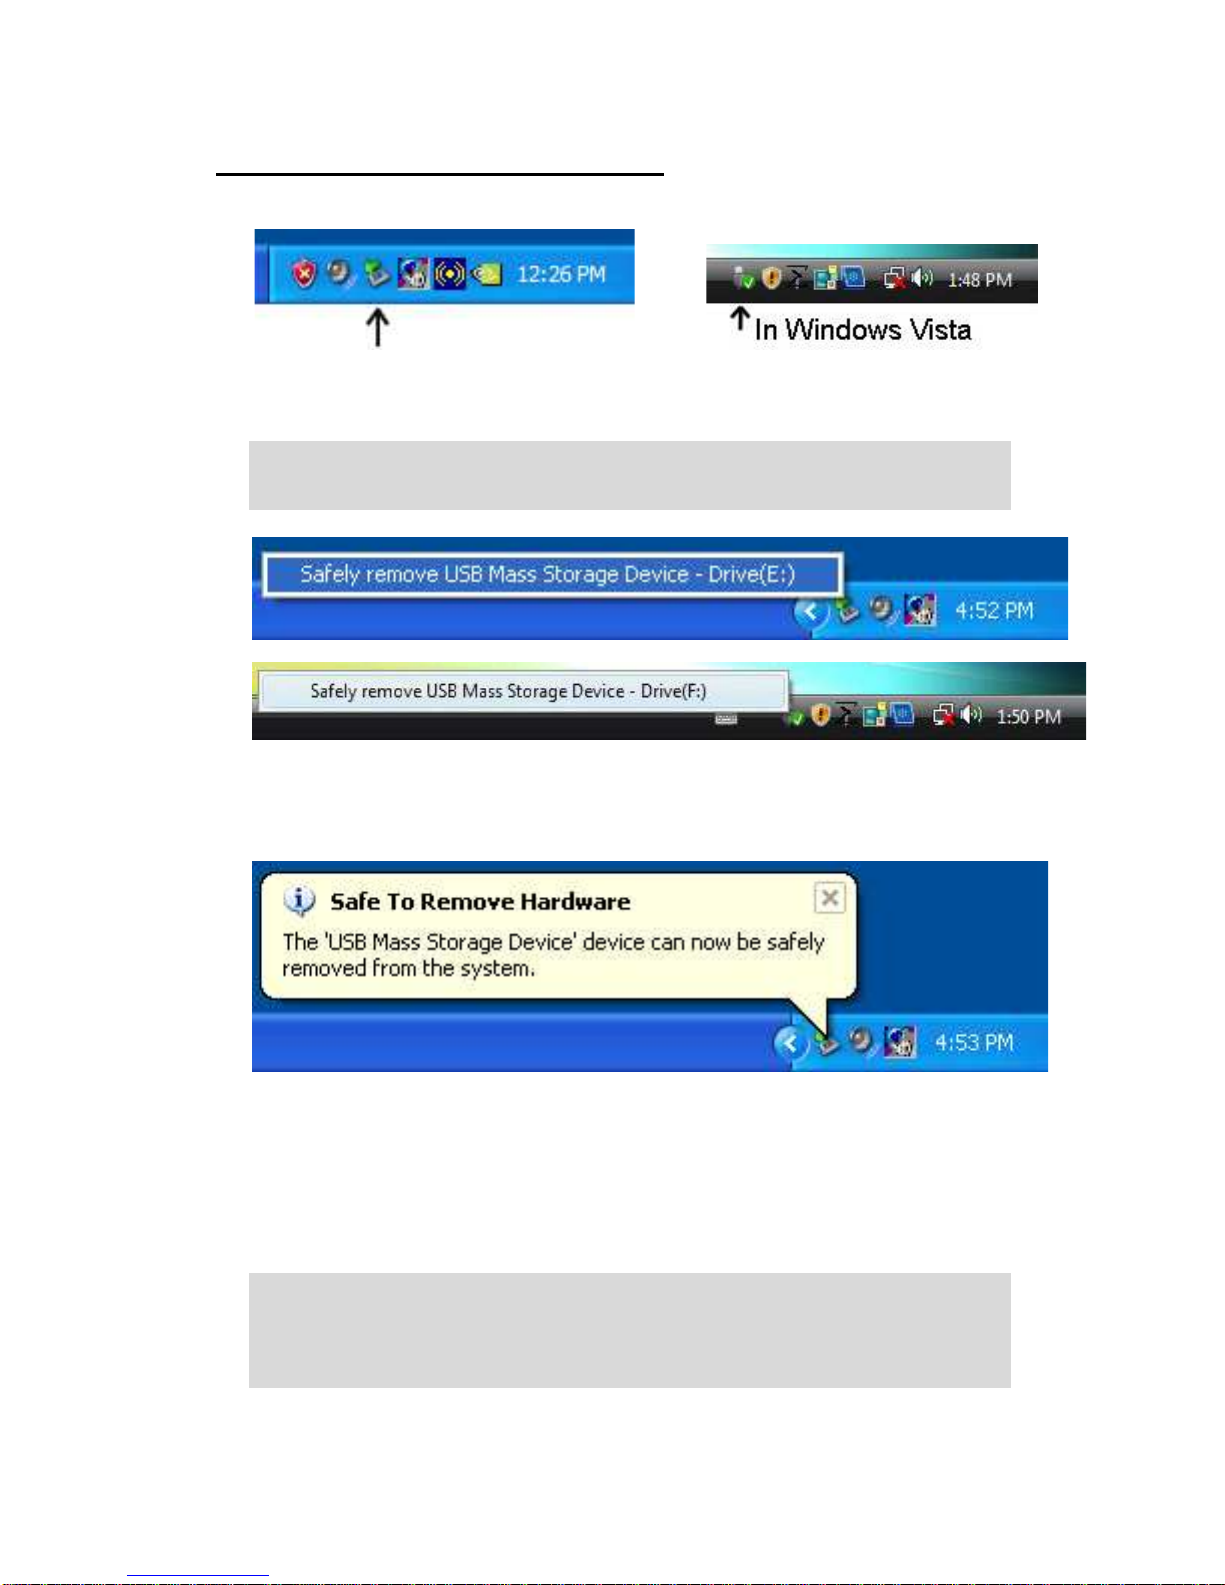
7. A REMOVE DEVICE ICON will appear on Taskbar.
It is recommended to connect the external drive while the system is in an idle state, so
that critical operations will not be interrupted.
For Windows XP users with non-Hi-Speed or USB 1.1 host adapter
If you connect the external USB drive to non-Hi-Speed or USB 1.1 host device,
Windows XP will prompt a HI-SPEED USB Device Plugged into non-HI-SPEED
USB Hub warning, which is normal.
Windows will auto sense your computer’s USB controller and adjust between Hi-
Speed and USB speed. Performance will be reduced if your computer does not
support Hi-Speed USB.
IV. Disconnect the External Drive
1. Left-click on REMOVE DEVICE ICON on Taskbar.
2. Click on the drive unit you wanted to disconnect.
Please note the drive letter may vary.
If you have more than one USB storage device connected, make sure you have
selected the CORRECT device to disconnect.
3. Windows OS will prompt SAFE TO REMOVE HARDWARE.
4. POWER-OFF the external drive.
5. Disconnect USB cable from your computer.
After disconnected, wait at least 30 seconds before reconnect. Otherwise your
computer might not re-detect the unit or lock-up due to no chance to re-enumerate
the USB bus.
It is recommended to connect the USB cable to your computer while the computer is
in an idle state, so that critical operations will not be interrupted.

Windows 98 Second Edition
I. Make sure your USB host adapter is working properly
Make sure your computer’s USB host devices are setup properly.
Please refer to your computer and/or USB host adapter manual.
II. Driver Installation (Windows 98SE only)
Please install drivers before the first time you connect the USB External
Storage Drive.
1. Insert INSTALLATION CD.
2. An INSTALLATION MENU will auto start.
3. Click INSTALL WIN 98SE DRIVER button.
4. Follow the on-screen instructions to complete the installation.
5. Please RESTART your computer after installation completed.
NOTE: Please do not install the File Copy software because it
does not support Windows 98SE.
III. Connect External Drive
1. Connect power cord from Power Adapter to DC INPUT of the external drive.
2. Connect the other end to a wall outlet.
3. Connect USB cable’s TYPE-Bconnector to your external drive.
4. POWER-ON the external drive.
5. Connect USB cable’s TYPE-Aconnector to USB host device on your computer.
6. The first time you connect the device to your computer, Windows 98SE will
detect and setup the external drive.
7. A REMOVE DEVICE ICON will appear on Taskbar.
It is recommended to connect the external drive while the system is in an idle state, so
that critical operations will not be interrupted.
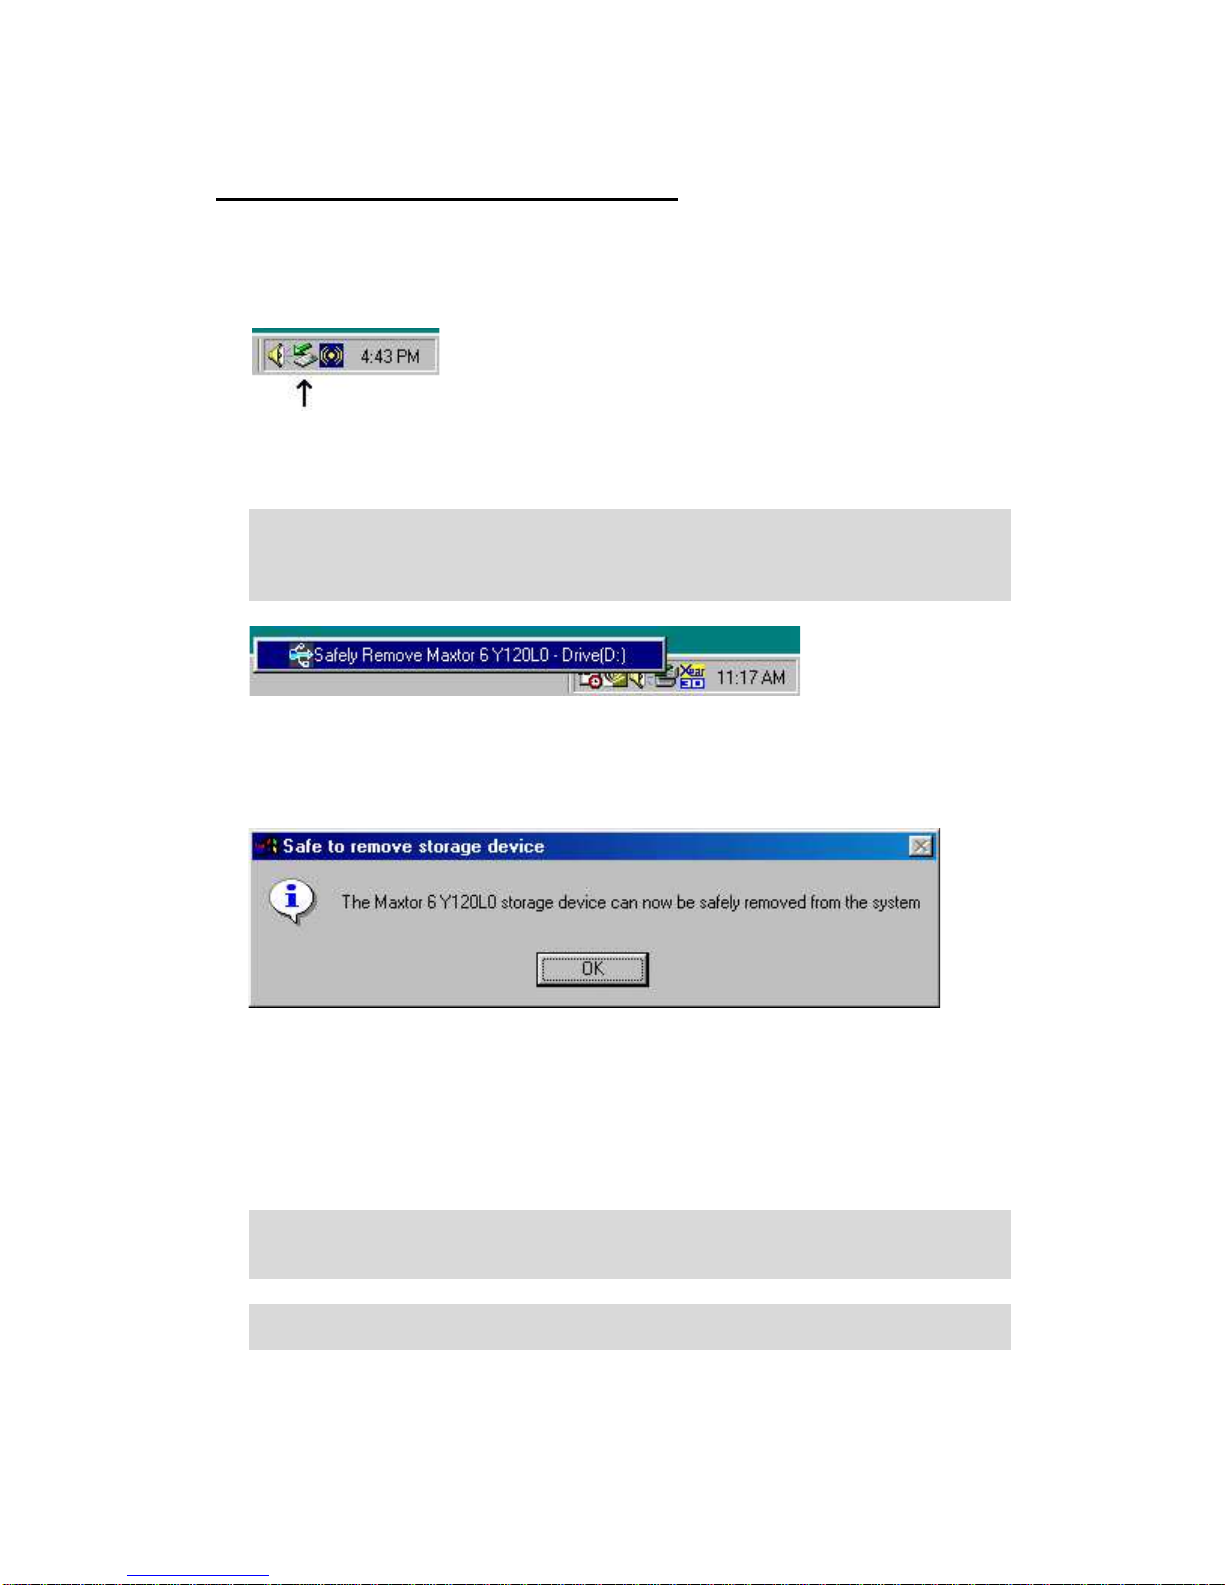
IV. Disconnect External Hard Drive
1. If you want to disconnect your external drive.
2. Make sure you have completed all access to the device to prevent data-loss.
3. Left-click REMOVE DEVICE ICON on the Taskbar.
4. Left-click on Safely Remove (model and drive letter)
Please note the drive letter may vary.
If you have more than one USB storage device connected, make sure you have
selected the CORRECT drive to disconnect.
5. Windows 98SE should prompt SAFE TO REMOVE STORAGE DEVICE.
6. Click OK button.
7. POWER-OFF the external hard drive.
8. Disconnect USB cable from your computer.
After disconnected, wait at least 30 seconds before reconnect. Otherwise your
computer might not re-detect the unit or lock-up due to no chance to re-enumerate
the USB bus.
It is recommended to connect the USB cable to your computer while the computer is
in an idle state, so that critical operations will not be interrupted.

5. Button Triggered File Copy Utility
(for Microsoft Windows Vista/XP/2000/ME ONLY)
Install File Copy Utility
1. Make sure the external drive was connected.
2. Insert INSTALLATION CD.
3. An INSTALLATION MENU will auto start.
4. Click INSTALL COPY UTILITY button.
5. Follow the on-screen instructions to complete the installation.
6. Restart your computer.
7. A BUTTON TRIGGERED COPY UTILITY ICON will appear on Taskbar.
After backup software has been successfully installed, it will run automatically whenever
the OS boots up, an ICON will appear in the TASKBAR.
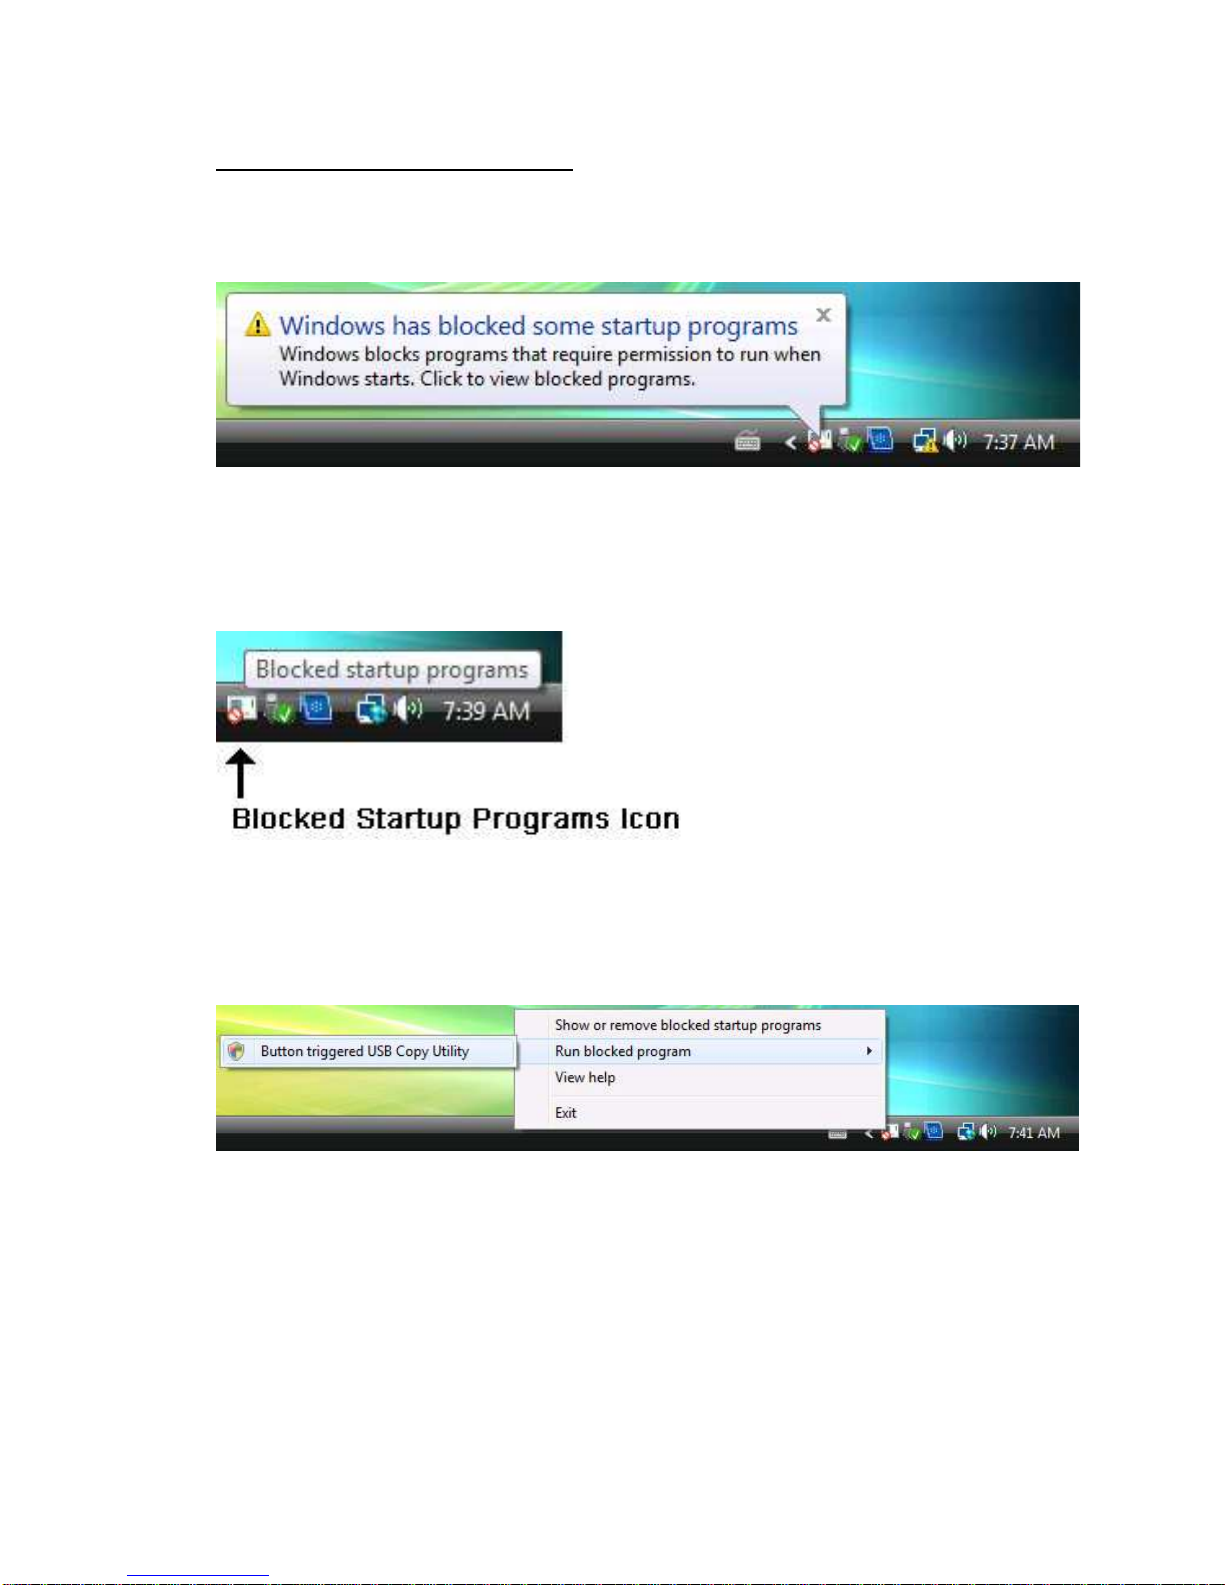
Note: For Windows Vista ONLY
Due to new security features, Windows Vista might block the utility from auto
run after Vista boots up.
(1) Click on “Blocked Startup Programs” Icon.
(2) Select “Run blocked program”.
(3) Select “Button triggered USB Copy Utility”.
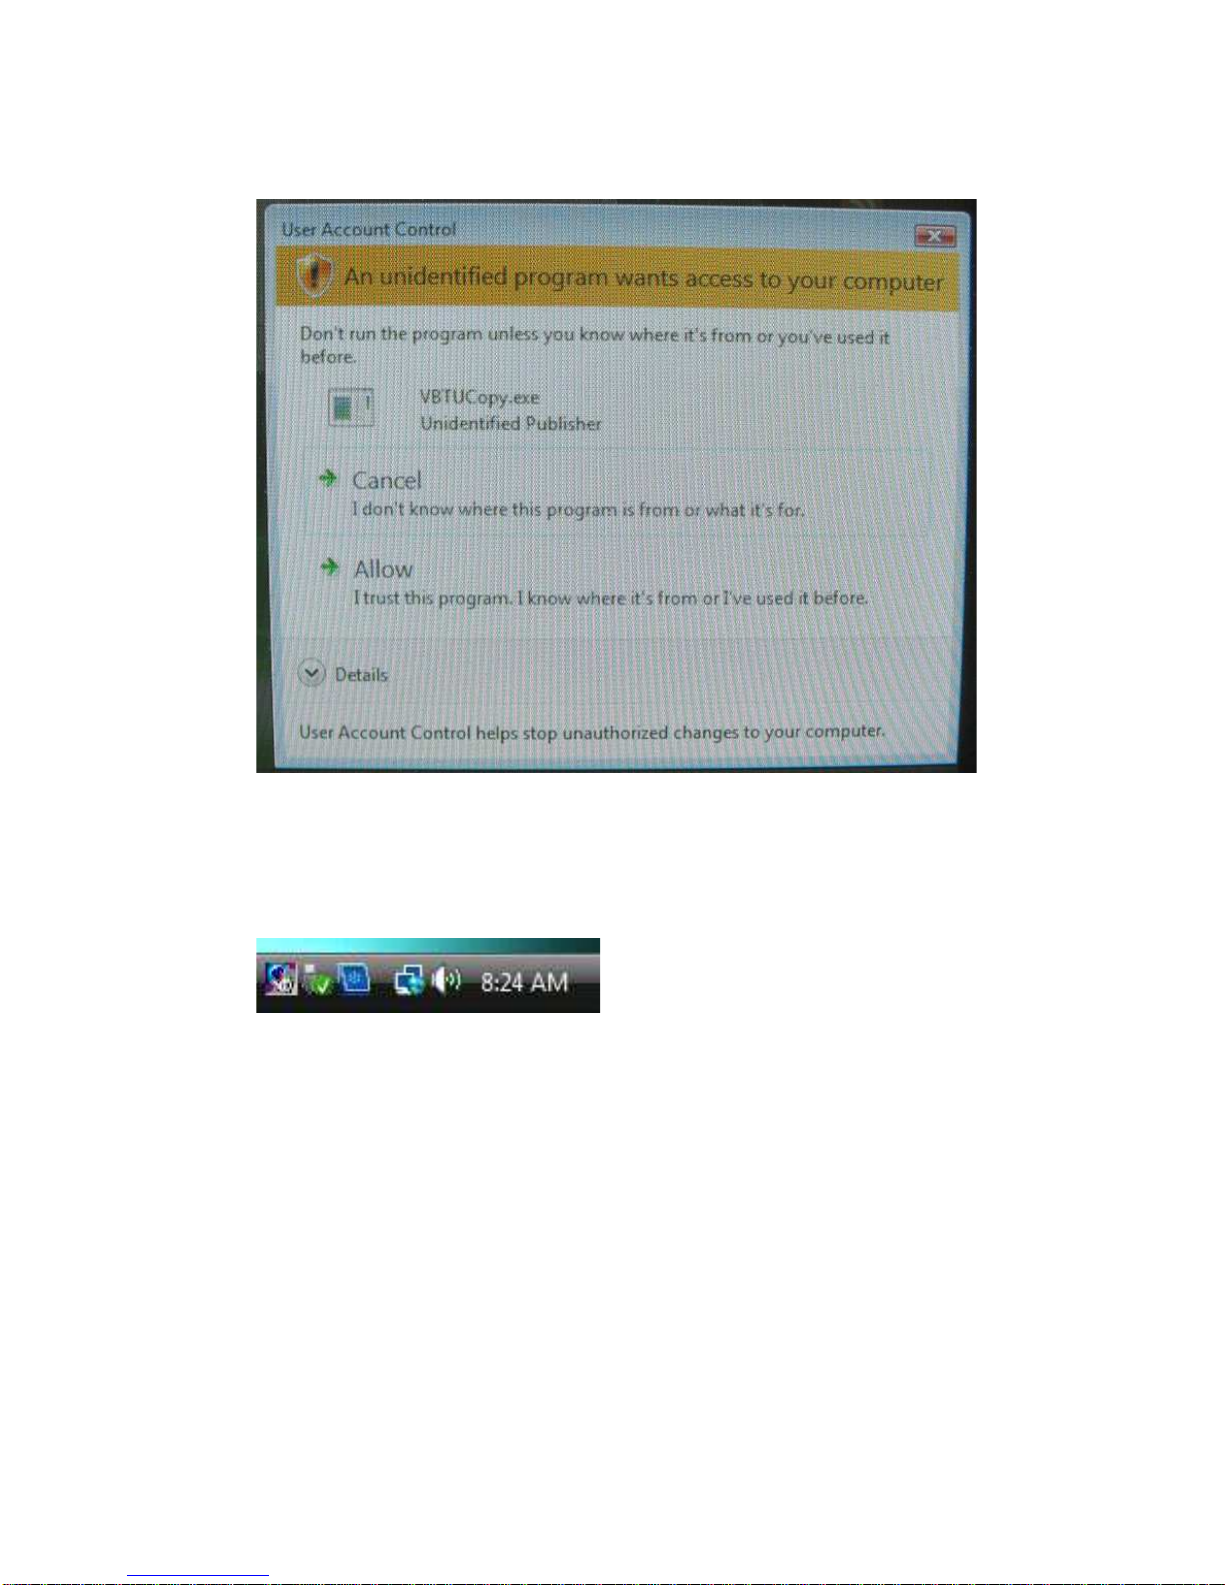
(4) Select “Allow”.
(5) The Copy Utility Icon will show on Task bar.
Following are some examples on how to use the copy utility:
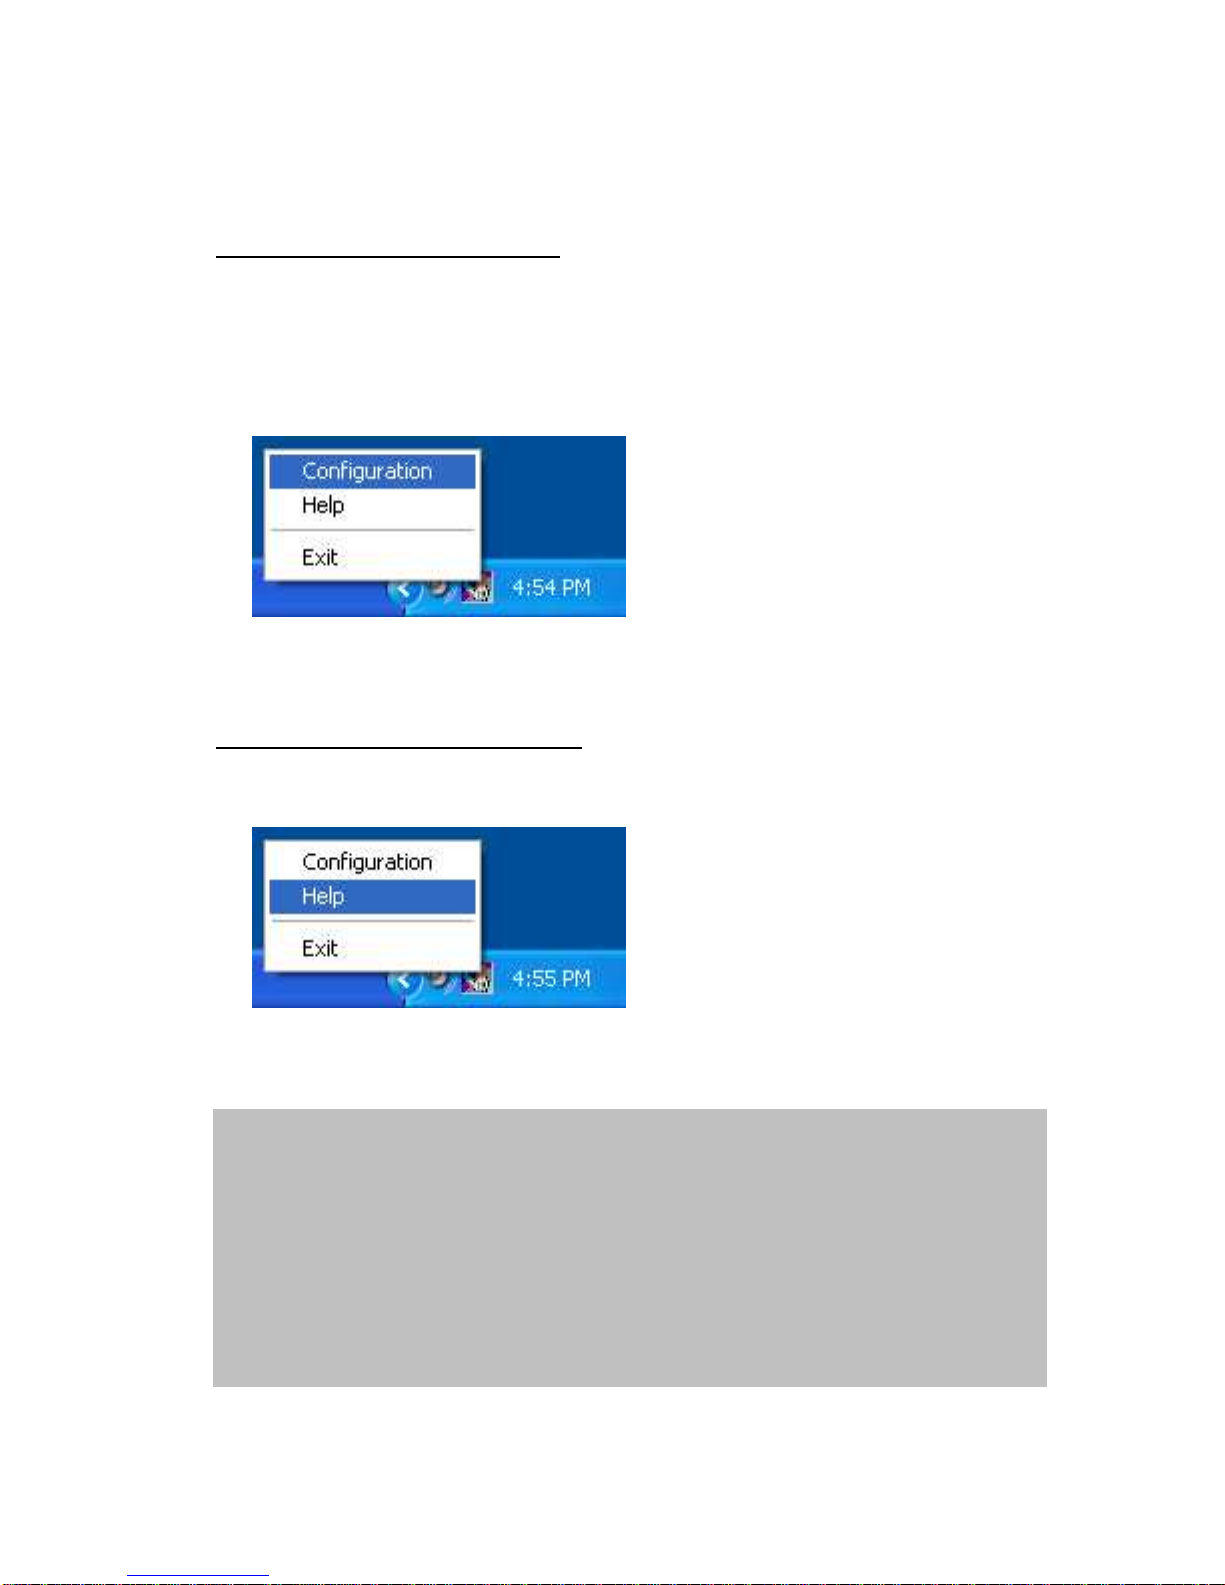
Access/Setup File Copy Utility
To open the UTILITY MENU, make sure the external drive was connected and
running properly or you will not see the external drive in the menu.
-DOUBLE-CLICK on the Icon -or -
-RIGHT-CLICK on the Icon and select CONFIGURATION.
Getting help for File Copy Utility
RIGHT-CLICK on the UTILITY ICON and select HELP.
Note: For Windows Vista Only
Refer Microsoft knowledge base (KB917607)
Windows Vista does not included winhlp32.exe therefore cannot open
the 32-bit .hlp help file of the utility.
Please visit Microsoft Download Center and check if the utility to read
32-bit .hlp files is ready for download.
Or use “Copy Utility Help File” in “Setup Menu” on the Driver/Utility CD
to read the help file.

Uninstall File Copy Utility
1. Make sure the external drive was connected.
2. Insert INSTALLATION CD.
3. An INSTALLATION MENU will auto start.
4. Click INSTALL COPY UTILITY button.
5. Select REMOVE.
6. Follow the on-screen instructions to complete the un-installation.
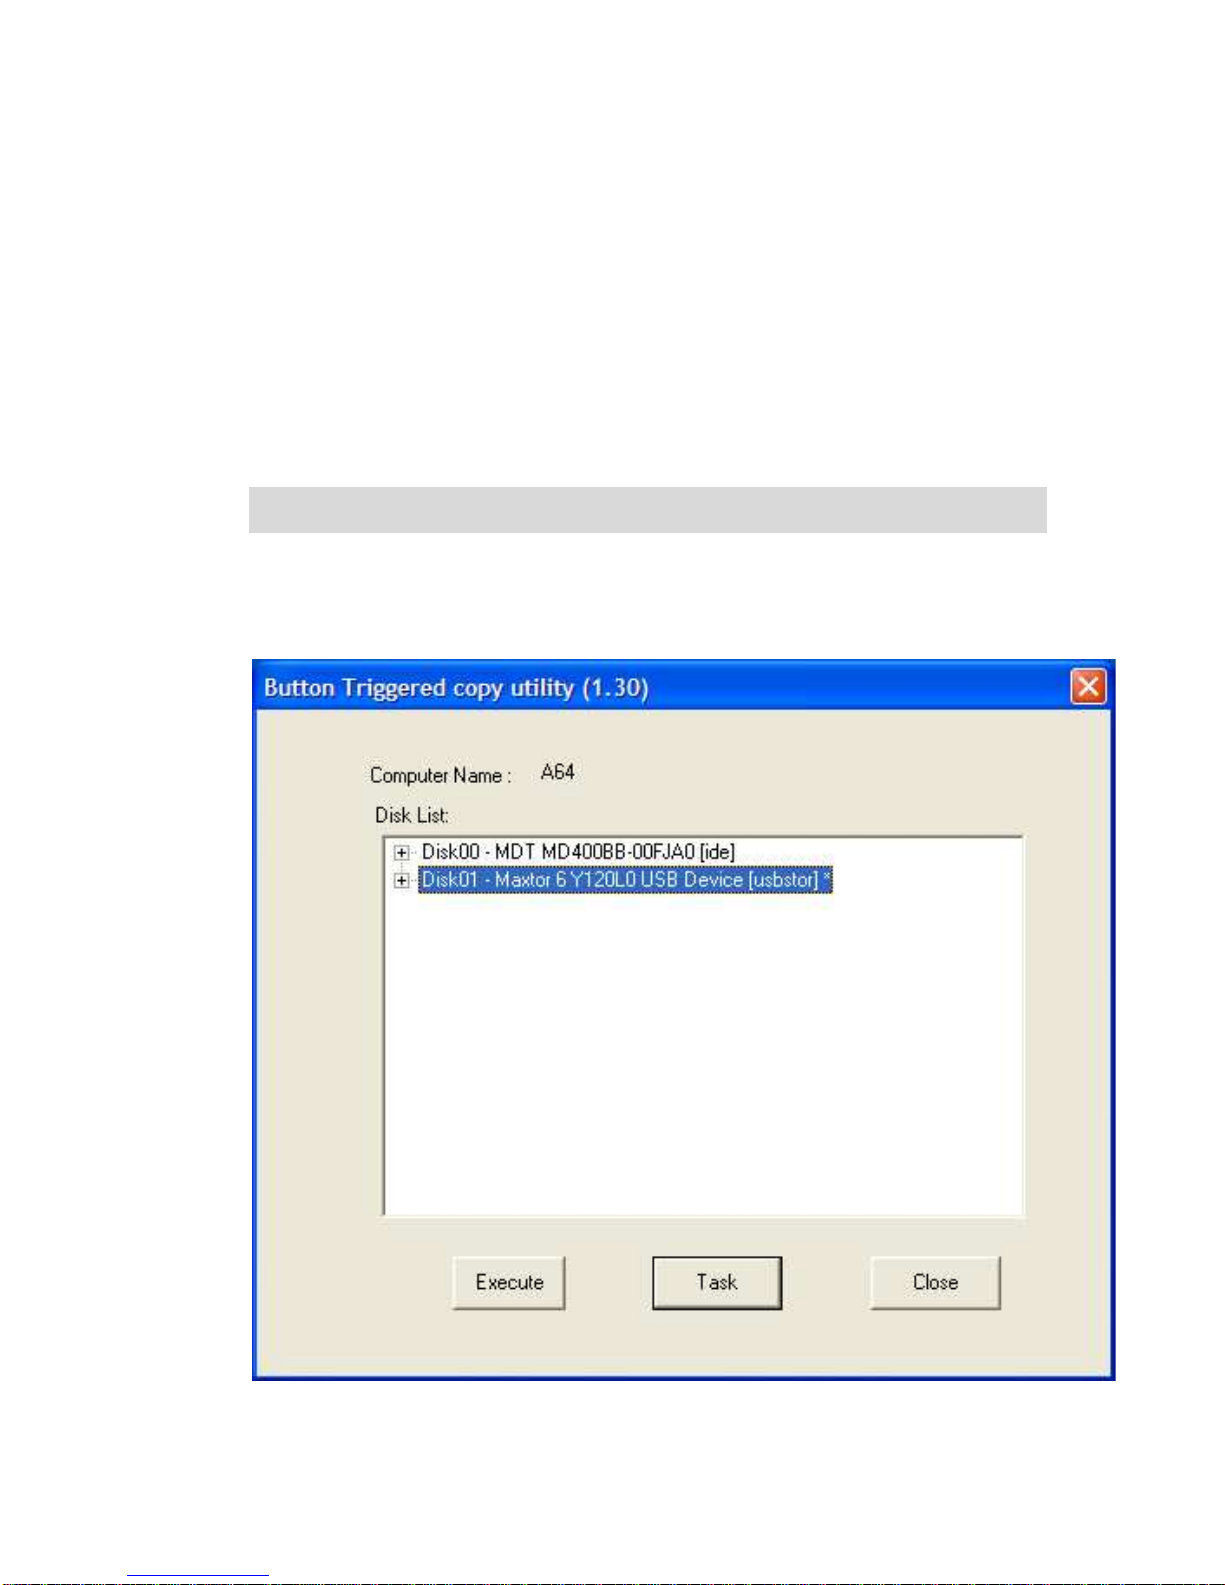
How to set up a Backup Task (a quick example):
1. Make sure the external drive is connected and running properly.
2. Please first create a folder named TEST on your external drive.
3. DOUBLE-CLICK on the UTILITY ICON -or-
RIGHT-CLICK on the UTILITY ICON then select CONFIGURATION.
4. The MENU will display the computer name and disks on the system.
5. The external drive will be displayed with an ” *” (ASTERISK) at the end.
Drive letter and model number may vary depend on your computer’s configuration and
external hard drive’s model).
6. Select the external drive.
7. Click TASK button.
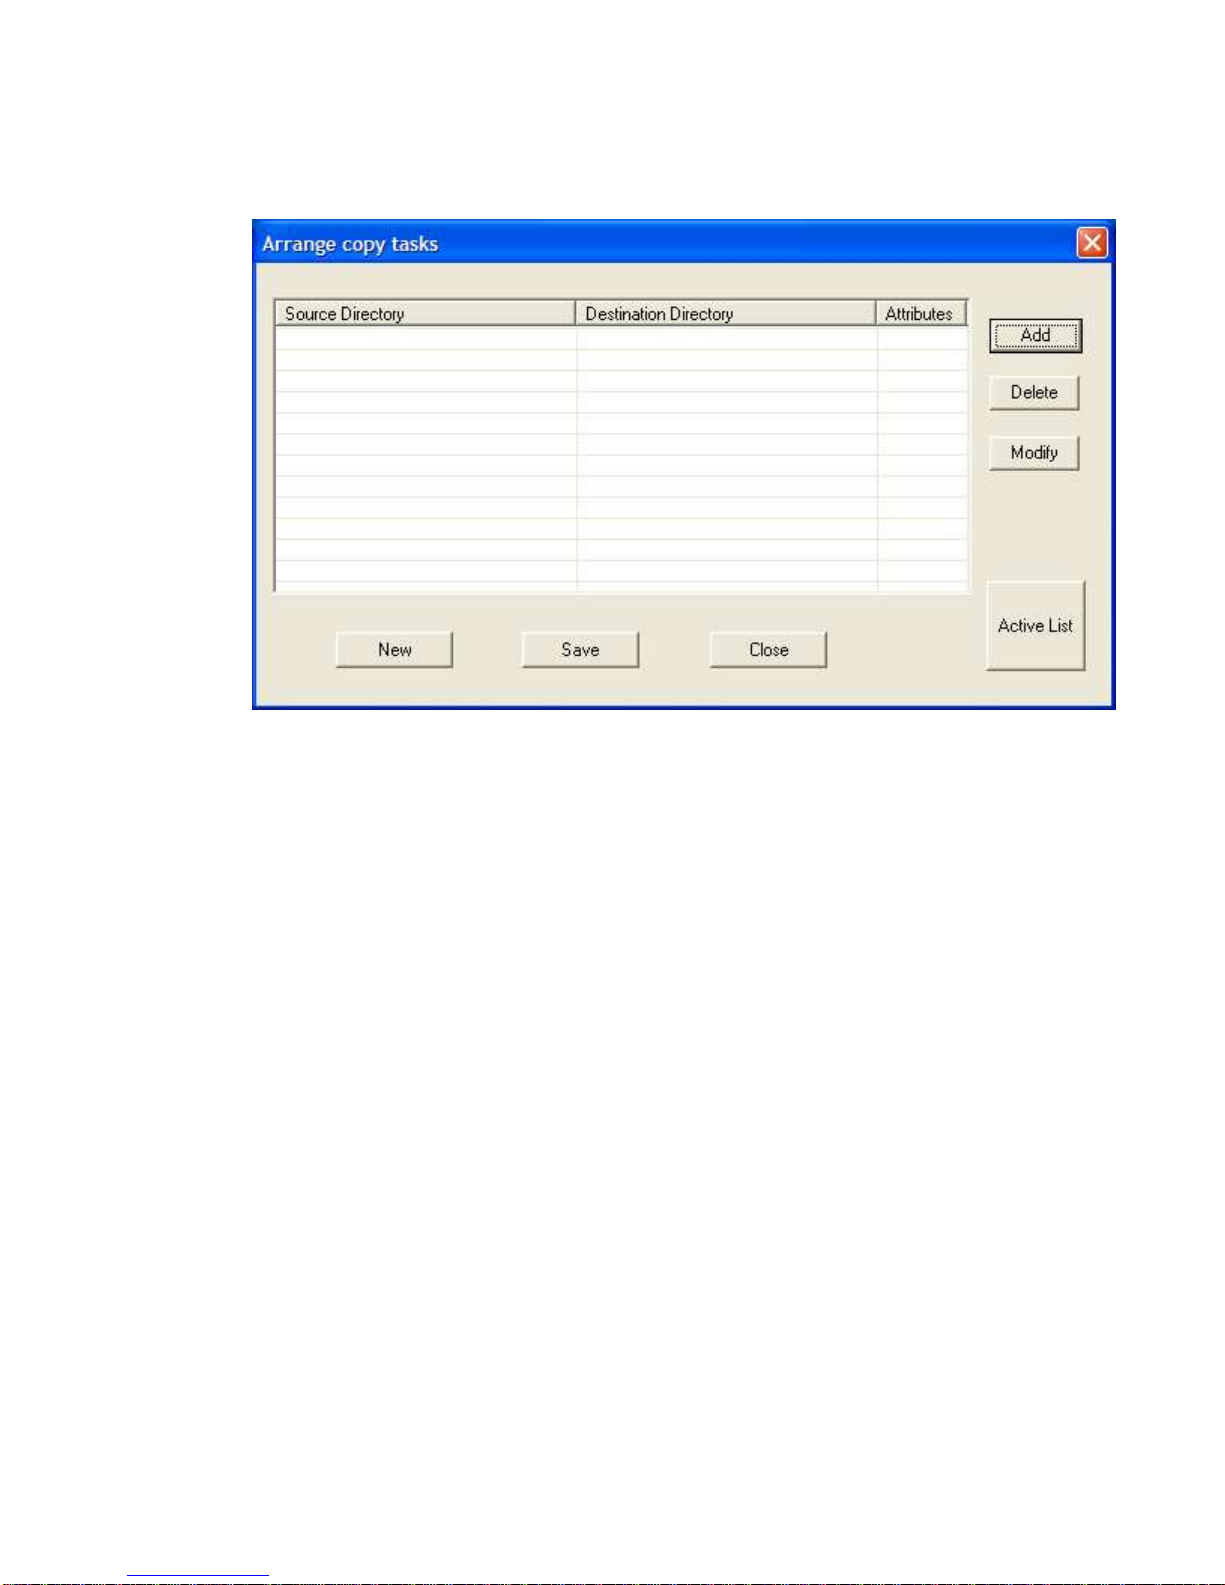
8. Click ADD button.

9. SOURCE DIRECTORY: click BROWSE and select folder or file you want to
backup.
DESTINATION DIRECTORY: click BROWSE and select folder TEST (created in
step 2) on the external drive.
Remember to select BACKUP in TASK DIRECTION section.
Click OK button.

10. Click SAVE button.
11. Click YES button to save the task.
This message will not prompt the first time you save the tasks.
Table of contents
Other Cintre Storage manuals

Popular Storage manuals by other brands


HP
HP AD510A - StorageWorks Modular Smart Array 1500 cs 2U Fibre Channel SAN Attach Controller Shelf Hard... Replacement instructions

Quantum
Quantum LTO3 A-Series user guide

Denios
Denios drum transporter DT EX instructions

Maxtor
Maxtor OneTouch III FireWire 800GB quick start guide

HP
HP DW017B - StorageWorks Ultrium 448 Tape Drive Start here

Lakewood Instruments
Lakewood Instruments 3175 Using


