Circe Cycles Atlas Trailer User manual

Atlas Trailer Owners Manual

Introduction
Congratulations on becoming a new Circe Atlas owner. The Atlas is an innovative, and functional product that oers a
convenient way of carrying that ‘bit extra’ on your bike. We are condent that it will give you many years of good and
enjoyable service.
This manual is written to enable you to get the best from your trailer. The latest version of the manual is always available as a
downloadable PDF document on our website - please make sure you read it thoroughly.
Contents
1.0 Introduction.............................................................................................................................................................................................................1
1.1 Contents List...........................................................................................................................................................................................2
1.2 Assembly..................................................................................................................................................................................................3
1.3 Fitting the hitch to the bike...............................................................................................................................................................4
2.0 Ridng with your trailer..........................................................................................................................................................................................4
2.1 Before every ride...................................................................................................................................................................................4
2.2 Loading.................................................................................................................................................................................................................4
2.3 General.....................................................................................................................................................................................................5
3.0 Maintenance ...........................................................................................................................................................................................................5
3.1 Service and maintenance..................................................................................................................................................................5
3.2 Adjusting axle length..........................................................................................................................................................................5
4.0 Warranty....................................................................................................................................................................................................................6
4.1Liability information.............................................................................................................................................................................6
4.2 Legal requirements..............................................................................................................................................................................6
4.3 Contact information............................................................................................................................................................................6
Page 1

1.
2.
2.
3.
4.5.
6.
7.
8.
9.
1.1 Contents List
1 - Wheels (x2)
2 - Q/R axles (x2)
3 - Axle (x1)
4 - Trailer hitch arm (x1)
5 - Bike hitch
6 - Wooden platform (x1)
7 - Thumbwheel bolts (x3)
8 - Hitch safety pin (x1)
9 - Frame cross member (x1)
10 -Carry bag (x1) Not shown in picture
Page 2
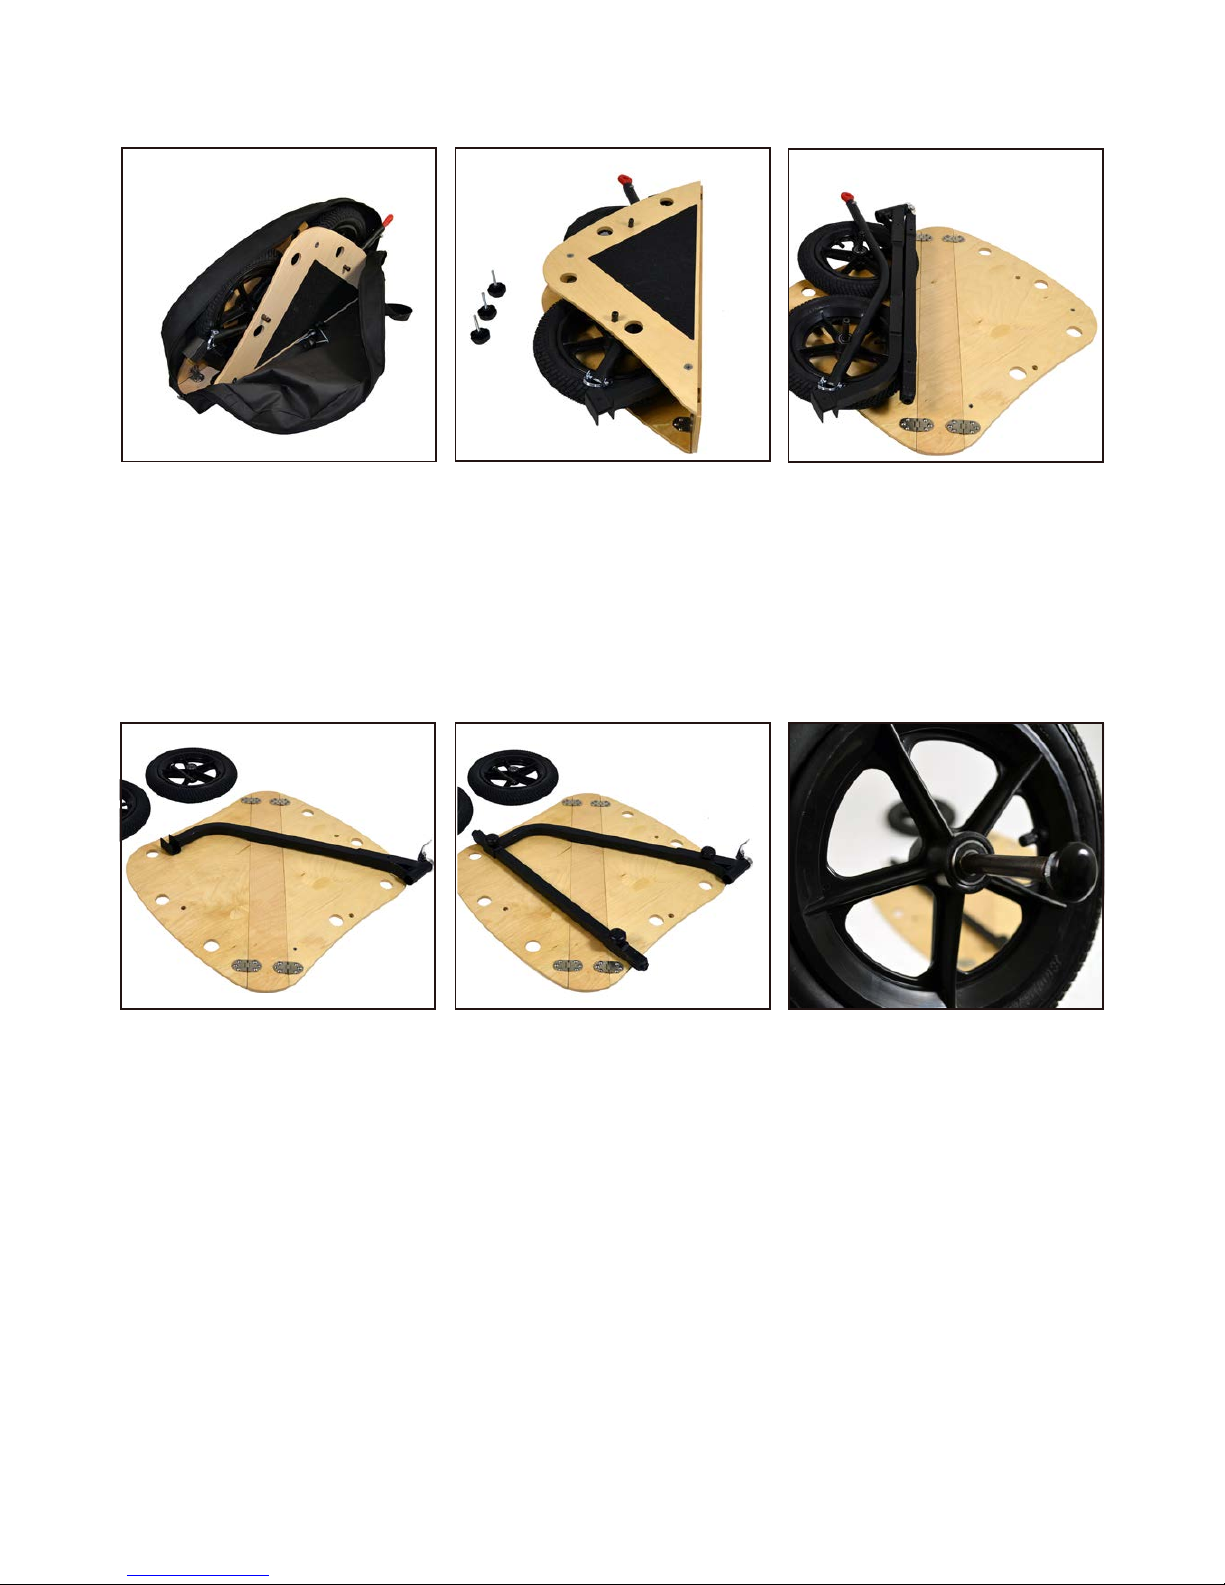
1.2 Assembly
Pic 1. Pic 2. Pic 3.
Step 1. Remove the Atlas from its bag and lay it on its side. This should be the side that has the the Q/R buttons for the axles
protruding from it.
Step 2. Lightly press on the lower section of the trailer, i.e. the side that is nearest the oor, this will depress the Q/R buttons
on the axles allowing you to unfold the top section of the trailer.
Step 3. You can now remove the frame parts and the wheels. Lay these to one side so that the underside of the trailer platform
is left fully exposed. Then place the cross member into the position shown in the pic 4. with the U channel at the end facing
up.
Pic 4. Pic 5. Pic 6.
Step 4. Lay axle in place (NOTE the axle should be orientated so that the end with the single reinforcement plate should t in
the U of the cross member, with the re enforcement plate facing out of the U).
Step 5. Now screw the thumbwheels through the frame into the trailer platform, making sure the holes in the frame are
aligned to the holes in the trailer platform. (IMPORTANT make sure the thumbwheels are done up tightly, these should be
checked regularly)
Step 6. Install the Q/R axles in the wheels and t the wheels to the trailer axle, making sure the wheels have secured properly
by pulling on them. If the wheels can be pulled o, then the Q/ R axles will need adjusting (see section 3.2 Adjusting Q/R
axles).
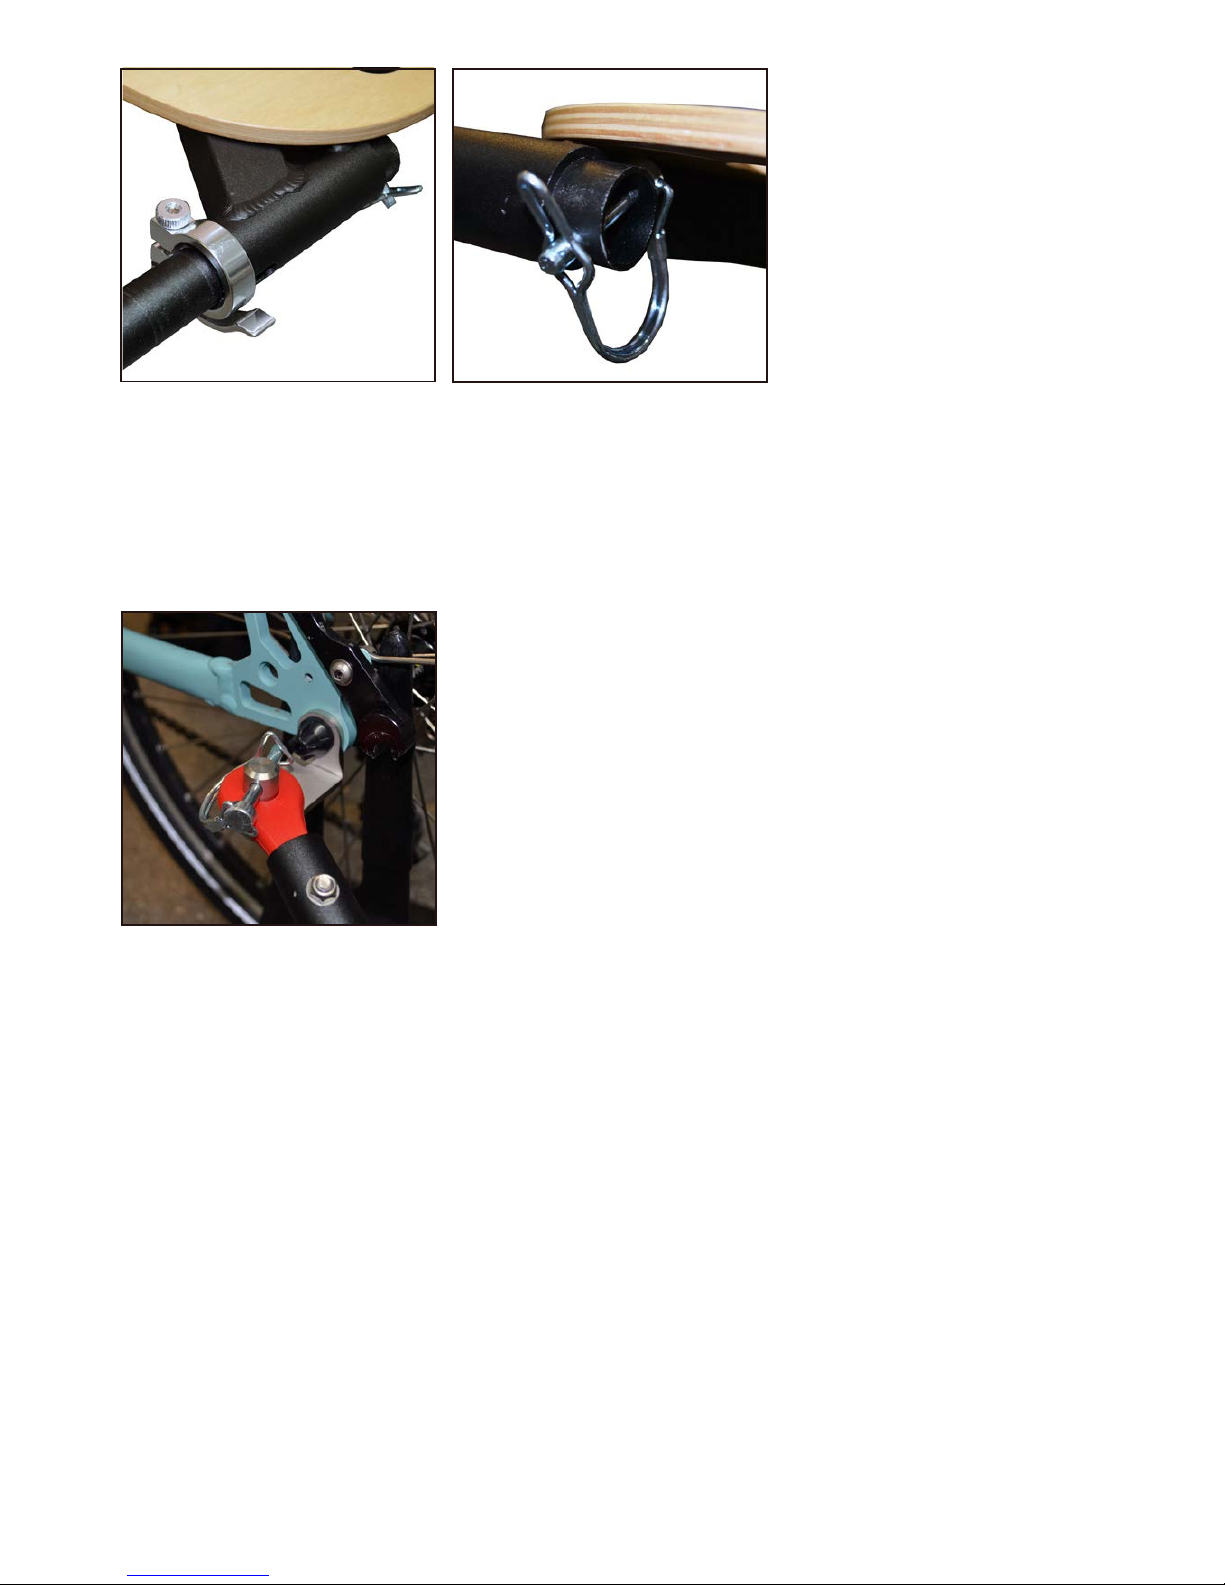
Step 7. Push the trailer hitch arm into the locating tube and t the safety pin, orientate the safety pin in such a way that it does
not restrict turning the hitch to the correct angle for the bike to which it is to be attached (see Pic 8).
Step 8. Hitch Up! See section 1.3 Fitting hitch to bike, and adjust angle of hitch arm so that the trailer platform is roughly level
and then re tighten the Q/R to lock it in place.
Page 3
Page 4
Pic 7. Pic 8.
1.3 Fitting the hitch to the bike
The hitch ts to the axle of the rear wheel on the left hand, non drive side. It will work with both solid threaded axles and Q/R
axles. If you are tting it to a Q/R skewer make sure you have enough thread on the Q/R (you will need an extra 4mm). If you
don’t have enough thread then longer skewers are available. The hitch needs to be installed with the hitch pin facing up verti-
cally, and secured rmly in place.
Pic 9.
2.0 Riding with your trailer
2.1 Before every ride
- Check the trailer is correctly assembled, especially if you have just assembled it from folded.
- Check the hitch is properly connected and the safety pin is installed, at both ends of the hitch arm.
- Make sure the wheels are secure.
- Make sure the trailer is properly loaded (see loading for details)
2.2 Loading
- The trailer has a weight limit of 30kg. This should not be exceeded.
- Secure the load to the top deck using good quality luggage straps
- The load should be kept within the drilled holes to keep the trailer stable and to prevent the load going into the wheels.
- Make sure the brakes on the tow bike are working, and adjust your stopping distance to suit the load.
- Adjust the tyre pressure in the trailer wheels to suit the weight of the load, higher pressure for more weight. The pressure in
the tyres should not exceed the pressure stated on the tyre wall.

Page 5
2.3 General
- It can be easy to forget you are towing a trailer, so be aware at all times.
- The trailer turns on a tighter radius than the bike, so be careful on corners.
- With a heavy trailer it will take longer to stop.
3.0 Maintenance
3.1 Service and Maintenance
The Atlas does not need a lot of maintenace, but to insure long service and safety, it is advisable to follow these basic tips on a
regular basis:
- Keep the tyres inated.
- Regularly clean and lightly grease the wheel axles.
- Check for damage on the trailer platform, particularly around the hinges.
- Check for damage on the frame and hitch.
- Make sure the axles are adjusted correctly so that the wheels can not be pulled o (see step 6)
3.2 Adjusting the Q/R axle
The Q/R axles have a degree of length adjustment, so that they engage correctly with the trailer axle, Q/R axles have a degree
of length adjustment. If the Q/R axle is too short the wheel could fall o, if it’s too long it will rattle.
Pic 10.
For correct adjustment use a 10mm and 19mm spanner, place the 10mm spanner on the ats of the axle (end furthest from
the button) and the 19mm spanner on the lock nut at the other end. By tightening the lock nut the axle will be shortened and
vice versa. Make the adjustments in small increments checking regularly until you have the correct t.

Page 6
4.0 Warranty
Cyclecentric warrants, to the original owner of each new Circe Atlas, that the frame is free of defective materials
and workmanship for two(2) years from original date of purchase. Component parts are limited to one (1) year from the
original date of purchase. Warranty is conditional upon the trailer being operated under normal conditions and being properly
maintained. Warranty is oered to the original owner only, and is not transferable. This warranty does not apply to:
•damagethroughnormalwearandtear
•neglect(inadequatecareandmaintenance)
•damagefromcrashesorjumping
•overloadingthroughexcessweight
•incorrectassembly
•modicationstothetrailer(additionalorchangedcomponents)
•theft
•useasapowerdrivenvehicle
•failuretofollowinstructionsorwarningsintheowner’smanual
•Activitiesforwhichtheywerenotdesigned.
Cyclecentric reserves the right to make sole determination of whether any failure or damage claimed under warranty was
caused by material or manufacturing defect, and reserves the sole discretion to repair or replace any parts covered by this
warranty. The owner shall be responsible for all labour, shipping, and travel costs connected with the repair or replacement
of warranted parts. Cyclecentric will, at our sole discretion, normally consider compensation for reasonable labour, shipping,
and travel costs associated with warranty claims. Cyclecentric shall in no event be liable for incidental or consequential losses,
damages or expenses in connection with its bicycle products.
4.1 Liability waiver
Taking part in any sporting activity can result in injury or death. Cycling is no dierent in this regard.
Nevertheless, the riders (that’s you) is expressly assuming the risk for any injury and/or property damage that may result from
using our product, as well as for any and all injuries and/or property damages caused by someone using your trailer. We have
no control over how the trailer is used or maintained. It’s your trailer; it is up to you to be responsible for yourself. You need to
ensure that the trailer is safe each time before you use it. You need to ensure that it is maintained to a proper standard. Read
and understand this manual; it has warnings and suggestions that will help you to use the trailer safely. If you are in any doubt
about any of the advice or procedures in this manual, please contact your dealer or Cyclecentic. It is up to you to know and
obey trac laws of the country or state where you will be using your trailer.
4.2 Legal requirements
Legal requirements vary from country to country and you should always comply with them.The important areas you need to
consider are lighting, and helmet use. Consult your local bike dealer for information about what is required in your area. Please
also remember that even if not required by law, some equipment (such as helmets and lights) can increase your personal
safety and should be carefully considered.
4.3 Contact information
Cyclecentric Ltd
37 High Street
Longstanton
Cambridge
CB24 3BP
tel. +44 (0) 1954 782020
email. info@circecycles.com
Table of contents


