Circle Specialty Klip Posterior KP410B User manual

Klip Posterior Walker
User Manual
Item #s
Two-wheeled Klip Walker
KP210, KP220R, KP230
Four-wheeled Klip Walker
KP410, KP420R, KP430, KP440B, KP410B, KP420B
Four-wheeled Klip Walker with Seat
KP510, KP520R, KP530, KP540B, KP510B, KP520B
Four-wheeled Klip Walker with 8” wheels
KP418, KP428R, KP438, KP448B
Four-wheeled Klip Walker with 8” wheels and Seat
KP518, KP528R, KP538, KP548B
www.circlespecialty.com
Thank you for purchasing the Klip Posterior walker!
To safely operate and maintain your walker properly,
please read this User Manual carefully before using
and save it for future reference. Taking proper care of
your walker will ensure longevity and that you fully
benefit from its features.
UNFOLD WALKER: Grasp front and rear legs and pull
away from each other. Continue to unfold the frame
until the latch push pins snap into place and fully
protrude from the hole.
ASSEMBLY: Match numbered markings on leg with
frame, press in the pushpins and slide into the leg frame.
HEIGHT ADJUSTMENT: To determine the correct
height for the walker, the length measured from the
crease of wrist-to-floor should be the handle height. To
INTRODUCTION
GENERAL USE

adjust height, press the push pin on each leg and slide
the leg to the proper position. Always check that all 4
legs are the same height and that the push pins fully
protrude from the holes.
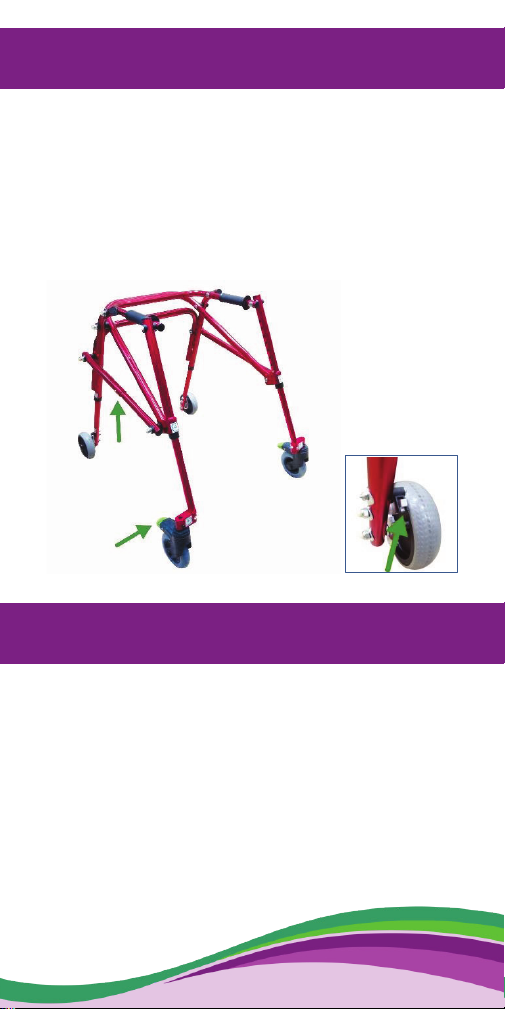
LOCK/UNLOCK SWIVEL WHEELS: Press down on the
green lever to lock wheel and lift to unlock. Make sure
that wheel clicks into place when locking the wheel.
NOTE: This feature is not available on models with 8” wheels.
ONE-DIRECTIONAL REAR WHEELS: To disengage
directional lock, raise aluminum pin and place into
override bracket.
ANTERIOR/POSTERIOR SETUP: Front and rear legs
can be interchanged to switch from posterior to
anterior use for all walkers other than KP210R, KP410R
and KP510R.
FOLD WALKER: Face walker from the open end, raise
front wheels so that walker is resting on rear
wheels/legs, press in latch push pins and push front legs
towards rear legs.
SEAT: Flip up seat when standing and walking. Fold
down seat for sitting and resting. When folding walker,
seat must be raised
Inspect your walker by checking all screws, nuts and
bolts regularly.
Keep your walker clean to ensure longevity and
comfort while using it. Mix warm water with a mild
detergent and gently scrub your walker. Wipe clean
with a dry soft cloth.
MAINTENANCE AND CARE

This warranty is solely for the benefit of the original
consumer purchaser and is in effect from date of
purchase.
Circle Specialty Inc. warranties that the Klip walker
frame will be free from defect for a period of three (3)
years.
The warranty does not extend to non-durable
components; such as, rubber accessories and grips.
This warranty does not cover device failure due to
owner misuse or negligence. It only applies when
product is used according to the specified conditions
and for the intended purposes.
If within the warranty period any such product shall be
proved defective, such product will be repaired or
replaced at Circle Specialty’s option.
If you have a question about your Circle Specialty
walkeror this warranty, please contact an authorized
dealer.
Circle Specialty, Inc.
Brooklyn, NY 11232, USA
718.943.6452
info@circlespecialty.com
2020/Rev 3-20
3 YEAR LIMITED WARRANTY

Thank you for purchasing the Klip Posterior walker!
To safely operate and maintain your walker properly,
please read this User Manual carefully before using
and save it for future reference. Taking proper care of
your walker will ensure longevity and that you fully
benefit from its features.
UNFOLD WALKER: Grasp front and rear legs and pull
away from each other. Continue to unfold the frame
until the latch push pins snap into place and fully
protrude from the hole.
ASSEMBLY: Match numbered markings on leg with
frame, press in the pushpins and slide into the leg frame.
HEIGHT ADJUSTMENT: To determine the correct
height for the walker, the length measured from the
crease of wrist-to-floor should be the handle height. To
INTRODUCTION
GENERAL USE

adjust height, press the push pin on each leg and slide
the leg to the proper position. Always check that all 4
legs are the same height and that the push pins fully
protrude from the holes.
LOCK/UNLOCK SWIVEL WHEELS: Press down on the
green lever to lock wheel and lift to unlock. Make sure
that wheel clicks into place when locking the wheel.
NOTE: This feature is not available on models with 8” wheels.
ONE-DIRECTIONAL REAR WHEELS: To disengage
directional lock, raise aluminum pin and place into
override bracket.
ANTERIOR/POSTERIOR SETUP: Front and rear legs
can be interchanged to switch from posterior to
anterior use for all walkers other than KP210R, KP410R
and KP510R.
FOLD WALKER: Face walker from the open end, raise
front wheels so that walker is resting on rear
wheels/legs, press in latch push pins and push front legs
towards rear legs.
SEAT: Flip up seat when standing and walking. Fold
down seat for sitting and resting. When folding walker,
seat must be raised
Inspect your walker by checking all screws, nuts and
bolts regularly.
Keep your walker clean to ensure longevity and
comfort while using it. Mix warm water with a mild
detergent and gently scrub your walker. Wipe clean
with a dry soft cloth.
MAINTENANCE AND CARE

This warranty is solely for the benefit of the original
consumer purchaser and is in effect from date of
purchase.
Circle Specialty Inc. warranties that the Klip walker
frame will be free from defect for a period of three (3)
years.
The warranty does not extend to non-durable
components; such as, rubber accessories and grips.
This warranty does not cover device failure due to
owner misuse or negligence. It only applies when
product is used according to the specified conditions
and for the intended purposes.
If within the warranty period any such product shall be
proved defective, such product will be repaired or
replaced at Circle Specialty’s option.
If you have a question about your Circle Specialty
walker or this warranty, please contact an authorized
dealer.
Circle Specialty, Inc.
Brooklyn, NY 11232, USA
718.943.6452
info@circlespecialty.com
2020/Rev 3-20
3 YEAR LIMITED WARRANTY
This manual suits for next models
22
Other Circle Specialty Mobility Aid manuals


Popular Mobility Aid manuals by other brands


aidapt
aidapt VM977 Usage and maintenance instructions

Mopedia
Mopedia RS992 Series instruction manual

Caremart
Caremart EZ-lite user manual

Drive DeVilbiss
Drive DeVilbiss Genesis 10444SL manual

Lumex
Lumex 616270A Instructions & warranty information

Invacare
Invacare 7714P Installation and operating instructions


