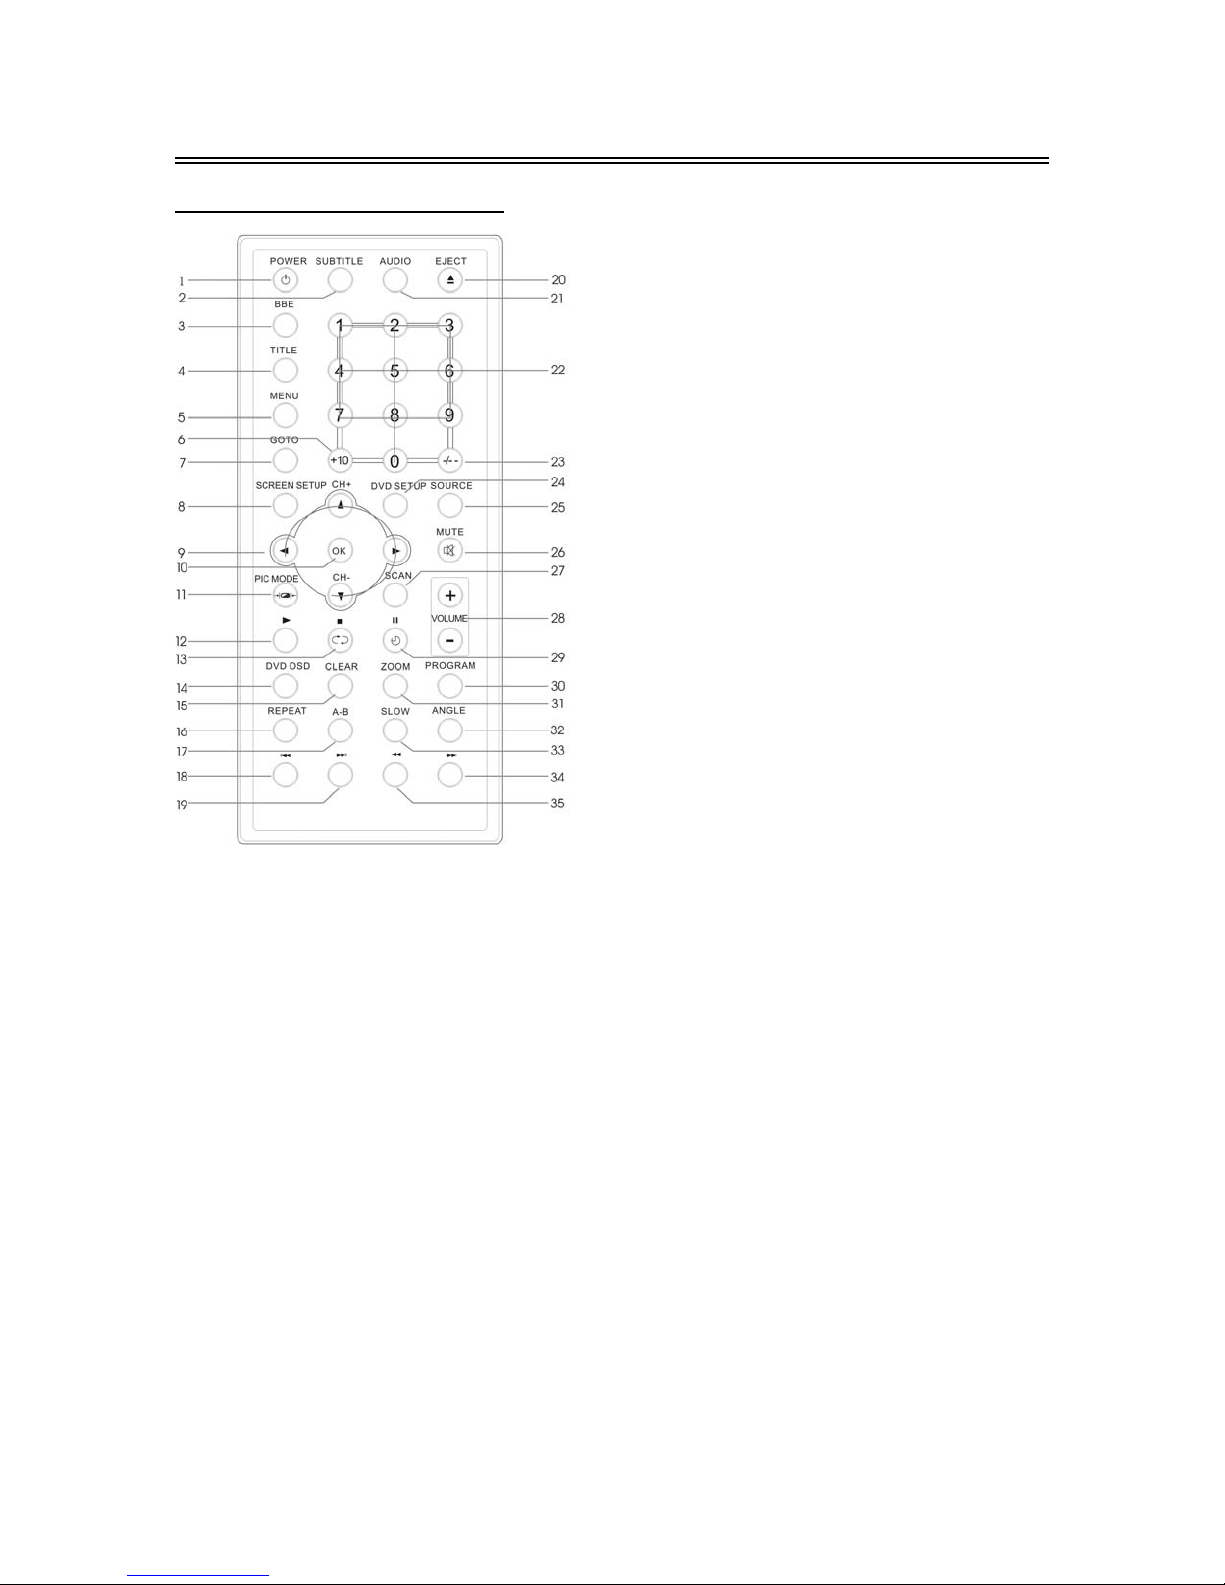
Citizen LTD1510 User manual

PROGRAM RATING
TV-PG
LTD1510
15" LCD/DVD COMBO

Table of Contents
Table of Contents --------------------------------------------------------------------------
Safety Instructions ------------------------------------------------------------------------
2
3
Features -----------------------------------------------------------------------------------------
Disc Information ----------------------------------------------------------------------------
Front View --------------------------------------------------------------------------------------
Rear and Right View-------------------------------------------------------------------------
Remote Control ----------------------------------------------------------------------------
Preparation Of Remote Control -------------------------------------------------------------
Using Of Remote Control ---------------------------------------------------------------------
Connecting Other Equipment--------------------------------------------------------
Connecting to Another Audio/Video Source------------------------------------------------
Connecting to TV Signal Input ---------------------------------------------------------------
4
5
6
7
8
10
10
11
11
12
- -
2
Connecting to a Personal Computer ---------------------------------------------------------
Connecting to Power Adapter ----------------------------------------------------------------------
Connecting to Headphones--------- --------------------------------------------------------------
TV Function ----------------------------------------------------------------------------------------
AUX Function -------------------------------------------------------------------------------------
S-VIDEO Function------------------------------------------------------------------------------
Computer Screen Function --------------------------------------------------------------
Disc Playback- -----------------------------------------------------------------------------------
DVD Playback -----------------------------------------------------------------------------------------
CD Playback -------------------------------------------------------------------------------------------
JPEG Playback --------------------------------------------------------------------------------------
Playback Functions -------------------------------------------------------------------------
12
13
13
14
19
20
21
22
22
23
23
25
System Setup ----------------------------------------------------------------------------------- 28
Placement of the Unit --------------------------------------------------------------------
Troubleshooting -------------------------------------------------------------------------------
Specifications -----------------------------------------------------------------------------------
Warranty -------------------------------------------------------------------------------------------
32
33
34
35

ImportantSafetyInstructions
The lightning flash with arrowhead symbol, within an equilateral triangle, is
intended to alert the user to the presence of un-insulated “dangerous voltage”
within the product’s enclosure that may be of sufficient magnitude to constitute a
risk of electric shock.
The exclamation point within an equilateral triangle is intended to alert the user
to the presence of important operating and maintenance (servicing) instructions
in the literature accompanying the appliance.
IMPORTANT FOR LASER PRODUCTS
CLASS 1 LASER PRODUCT
DANGER: visible laser radiation when open. Avoid direct exposure to beam.
CAUTION:
These servicing instructions are for use by qualified service personnel only. To reduce the risk
of electric shock, do not perform any servicing other than that contained in the operating
instructions unless you are qualified to do so. Refer to service manual for servicing
instructions.
POWER SUPPLY:
Connect the supplied adapter to the side of the DVD player in the slot marked “DC 12V IN”.
Plug the two-prong end of the power cord to an AC100-240V outlet. If you have difficulty
inserting the plug, turn it over and reinsert it, if the unit will not be used for a long time,
disconnect the plug from the outlet.
NOTE:
Before plugging the power cord into an AC outlet, make sure that all the connections have
been made.
- -
3

SafetyInstructions
NOTES:
1. Read these instructions.
2. Keep these instructions.
3. Heed all warnings.
4. Follow all instructions.
5. Do not use near water.
6. Clean only with dry cloth.
7. Do not block any ventilation openings. Maintain well ventilated conditions around the
product. Do not put product on bed, sofa or anything that blocks ventilation. Install
in accordance with the manufacturer’s instructions.
8. Do not install near any heat sources such as radiators, heat registers, stoves, or
other apparatus (including amplifiers) that produce heat.
9. Do not defeat the safety purpose of the polarized or grounding-type plug. A polarized
plug has two blades with one wider than the other. If the provided plug does not fit
into your outlet, consult an electrician for replacement of the obsolete outlet.
10. Protect the power cord from being walked on or pinched particularly at plugs,
convenience receptacles, and the point where they exit from the apparatus.
11. Only use attachments/accessories specified by the manufacturer.
12. Use only with the cart, stand, tripod, bracket, or table specified by
the manufacturer, or sold with the apparatus. When a cart is used,
use caution when moving the cart/apparatus combination to avoid
injury from tip-over.
13. Unplug the unit during lightning storms or when it will not be used for
time.
long periods of
14. Refer all servicing to qualified service personnel. Servicing is required when the
apparatus has been damaged in any way, such as power-supply cord or plug is
damaged, liquid has been spilled or objects have fallen into the apparatus, the
apparatus has been exposed to rain or moisture, does not operate normally, or has
been dropped.
15. Apparatus shall not be exposed to dripping or splashing and no objects filled with
liquids, such as vases, shall be placed on the apparatus.
Copyright Protection
This product incorporates copyright protection technology that is protected by U.S. patents and
other intellectual property rights. Use of this copyright protection technology must be authorized
by Macrovision, and is intended for home and other limited viewing uses only unless otherwise
authorized by Macrovision. Reverse engineering or disassembly is prohibited.
- 4 -

- 4 -
Features
This product has incorporated a DVD player,
LCD display, TV receiver and computer
monitor.
Television Features
HighResolution
Adopts a MPEG2 decoding format to achieve
more than 500 lines of resolution.
Superior sound
Built-in Dolby Digital decoder outputs high
quality sound effects.
Screen
Support the picture size of a normal screen
(4:3) and wide screen (16:9).
SpecialFunctions
Support multi angle, multi language and multi
subtitle playback.
AV and VGA Input
External Audio/Video input and VGA input can
be connected to AV source and PC (Personal
Computer).
Coaxial Digital Audio Output
Can be connected to most amplifiers with
coaxial digital audio jack for Digital Audio
Sound.
LCD (Liquid Crystal Display)
Designed with a colour TFT liquid crystal
display for maximum clearly.
BBE
By correcting the phase delay and distortion
naturally generated by audio systems, BBE
ensures that the sound that reaches your ears
is as natural as the original recording. By
enhancing the mid-range sound frequencies,
BBE increases the presence and clarity of
dialog and music tracks. High frequencies
are clearer, vocals are crisper, and
low-frequency bass is tight and well-defined.
DVD Features
Compatibility
DVD, CD, CD-R, CD-RW, JPEG
Zoom Function
You can zoom in/out the picture to enhance
your enjoyment.
All Playback Functions
Fast forward and reverse, repeat playback.
Search By Time
Ability to search disc contents via time code.
Last Memory Playback
Continue to play from where you stopped
previously while still in POWER ON status.

DiscInformation
Discs Formats Supported By This Player
DISC LOGO CONTENTS SIZE MAXIMUM TIME
133min(SS-SL)
242min(SS-DL)
266min(DS-SL)
DVD
Audio+Video
(active picture) 12cm
484min(DS-DL)
CD
Audio 12cm 74min
JPEG Still high resolution 12cm
•The operating method of some DVD discs is specified by the software maker. Please refer
to the instruction manual of the disc.
•The DVD Player will play most recordable (CD-R) or erasable (CD-RW) CDs, but playback
of CD-R or CD-RW discs created on a computer requires proper formatting and
finalization of the disc for audio playback. Some computers and/or software programs
may not be capable of creating compatible discs.
About Disc Terms
Title
Generally, pictures or music compressed on a DVD are divided into several sections, “title”.
Chapter
The smaller section unit of picture or music in a DVD under the title, usually one title is comprised of
one or more chapters and each of them is numbered for easy searching. But some discs may not
have a recording chapter.
Track
A segment of picture or music on a CD. Each track is numbered for searching.
- 5 -

FrontView
Front View
1. LCD screen
Presents high resolution
pictures.
2. POWER button
Press to enter or exit the
STANDBY mode.
3. EJECT button
Press to eject the disc
while in the DVD mode.
4. Play/Pause button
Press to start or pause
playback under DVD mode.
5. Stop button
Press to stop playback,
then press the PLAY button
to resume normal playback
under DVD mode.
Press the STOP button twice repeatedly to stop completely.
6. Previous Skip button
Press to skip to the previous chapter/track for some discs under DVD mode.
7. Next Skip button
Press to skip to the next chapter/track for some discs under DVD mode.
8. Speakers
Two speakers produce stereo sound.
9. SOURCE button
Press to shift modes among DVD, TV, AUX, S-Video and PC. The player is designed with the
function of power stop memory function. The player will resume from the same mode, before the
power was stopped.
10. VOL-/+button
Press to decrease/ increase the volume, the same function as ◄/►direction button when in screen
setup menu.
11. Power On indicator
Green light when operating. Red light in STANDBY mode. Yellow light when there is no input signal.
12. Remote Sensor
Receives the remote control signal for operation.
13. CH Λ/ V button
Press to select channels backward/forward, while in TV mode, the same function as ▼/▲direction
button when in screen setup menu.
14. MENU button
The same function as the SCREEN SETUP button on the remote control.
- 6 -

RearandRightView
Rear View
- 7 -
1. DC 12V power supply Jack
Connecting to the power adapter.
2. Coaxial digital audio out jack
Connecting for coaxial digital audio output.
3. S-Video input jack
Connecting for S-Video signal input.
4. VIDEO input jack
Connecting for VIDEO input.
5. L-AUDIO input jack
Connecting for audio input.
6. R-AUDIO input jack
Connecting for audio input.
7. PC AUDIO INPUT jack
Connecting to the PC audio output.
8. Headphone jack
For headphone connection. When headphones
are connected to the unit, the internal speakers
will cease operation.
9. Computer VGA in jack
Connection to the personal computer.
10. Antenna in jack
Connected to external antenna to receive the
TV program in TV mode.
Right View
1. Disc Tray slot
Insert disc into the slot.

RemoteControl
Remote Control Drawing
- 8 -
1. POWER button
Press to enter or exit STANDBY mode.
2. SUBTITLE button
When a DVD is playing, press to select a
subtitle language, if the DVD disc contains
multiple subtitles.
3. BBE button
Press to shift between BBE 1, BBE 2, and BBE
OFF.
BBE is available for activating high quality
sound effects.
4. TITLE button
While a DVD is playing, press this button to
enter into the Title menu if available.
5. MENU button
Press to access the disc menu during DVD
playback.
6. +10 button
Select track number greater than 9, in DVD
mode.
7. GOTO button
Press to access or exit from the search menu
under DVD mode.
8. SCREEN SETUP button
Press to access to LCD functional setup menu.
9. direction buttons
Press to select menu items or settings.
Under TV mode, use the, buttons to
advance to the next channel or to go back to
the preceding channel.
10. OK button
Press to confirm the selection.
Press to exit from the SCREEN SETUP menu.
11. PIC MODE button
Press to change the current picture mode from
Manual, Standard, Mild or Fresh.
12. Play
Press to play the disc under DVD mode.
13. Stop
Press to stop playback, then press the PLAY
button to resume normal playback under DVD
mode.
Press the STOP button twice repeatedly to
stop completely.
Under TV mode, press to return to the channel
last viewed.
14. DVD OSD button
Press to display the current playback status of
DVD discs.

- 9 -
RemoteControl
15. CLEAR button
Press to clear incorrect input under DVD
programming status.
16. REPEAT button
Press to repeat a chapter, track, title, or all
content under DVD mode.
17. A-B Repeat
Press to mark a segment to repeat between A
and B.
18. Previous Skip
Press once to go to the beginning of the
current chapter/track, press twice repeatedly to
skip to the previous chapter/track for some
discs under DVD mode.
19. Next Skip
Press to skip to the next chapter/track for some
discs under DVD mode.
20. EJECT button
Press to eject the disc under DVD mode.
21. AUDIO button
Press to access various audio languages, if the
DVD disc contains multiple audio languages.
22. 0-9 number buttons
Select numbers by pressing these buttons.
23. -/--
Under TV mode, press to choose the channel.
For example: If you want to select channel 123,
you can press the button three times
repeatedly until OSD display ---, and then input
number buttons 1, 2, 3.
24. DVD SETUP button
Press to access the DVD setup menu under
DVD mode.
25. SOURCE button
Press to shift modes among DVD, TV, AUX,
S-Video and PC. The unit can memorize the
last mode when you restart the player.
26. MUTE button
Press to turn on/off the speaker output.
27. SCAN button
Under TV mode, press the button to scan
channels.
28. VOLUME+/-
Press to increase or decrease the speaker
volume level.
29. PAUSE button
Press to pause the playback.
Press the PLAYbutton to resume normal
playback.
Under TV mode, press to select the sleep time.
Press once, “SLEEP 0” will be displayed on the
screen, press again, “SLEEP 120” will be
displayed, repeatedly press the button, the
number will decrease accordingly per 15 every
time. The maximum time is 120. After finishing
the setting, press the button again to display
the remained time on the screen. When the
sleep time comes to the end, the unit will enter
standby mode automatically.
30. PROGRAM button
Allows the player to play the contents in a
programmed sequence under DVD mode.
31. ZOOM button
When a DVD is playing, press this button to
activate zoom function.
32. ANGLE button
Press to access various camera angles, if the
DVD disc contains multiple camera angles.
33. SLOW button
Press to activate slow forward under DVD
mode.
34.
Press to search forward under DVD mode.
35.
Press to search backward under DVD mode.
NOTE:
While in DVD mode, if the LCD set up menu
is in use, the DVD operation buttons on the
remote control are not available.

RemoteControl
Preparation Of Remote Control
Insert the battery while observing the correct (+)
and (-) polarities.
- 10 -
1. Refer to the drawing; take off the empty
battery receptacle.
2. A separating film was applied to the battery
for shipment. Remove this film.
3. Insert the battery into the receptacle and
insert the receptacle into the remote.
4. Under normal use the battery will last for
six months.
5. Take out battery when the remote is not in
use for a long time.
6
. The battery type is CR2025.
Using Of Remote Control
Point the remote control unit from no more than
about 7m from the remote control sensor and
within about 60 degrees of the front of the unit.
The operating distance may vary depending
to the brightness around.
Notes:
Do not point bright lights directly at the
remote control sensor.
Do not place objects between the remote
control unit and the remote control sensor.
Do not use this remote control unit while
simultaneously operating the remote
control unit of any other equipment.

Connecting Other Equipment
•Do not connect the power cord until all other connections have been made.
•Each time you start the unit, it will begin from the last playback function that was used.
Connecting to Another Audio/Video Source
•Use the supplied audio/video cable to connect the unit and the external AV signal input
source.
•For Digital sound, connect a Digital Coax cable to the jack marked "COAXIAL OUT" to the
"COAXIAL IN" jack on a digital amplifier. (not supplied)
•Connect the S-Video input jack of the unit to the S-Video output jack of the external signal
source, if the external signal source has the S-Video output jack. (not supplied)
Press the SOURCE button to shift to the S-Video or AUX modes depending on the input signal,
which will let you enjoy external signal source.
NOTE: If the amplifier has Dolby Digital decoding function, set the digital audio output format in the
Set Up menu to "SPDIF/RAW".
- 11 -

Connecting Other Equipment
Connecting to TV Signal Input
Plug the TV signal cable to the jack marked with ANT INPUT on the rear panel of the unit. After
connecting, press the SOURCE button to shift to TV mode.
Connecting to a Personal Computer
The unit can be used as a display screen, when connecting to a personal computer. Connect the
unit and the computer via the VGA jack. Use an audio cable to connect the Audio input jack on the
rear panel of the unit to the audio output of the computer.
NOTE:
Press the SOURCE button to shift PC mode and set the PC’S resolution to 1024×768@60Hz.
- 12 -

Connecting Other Equipment
Connecting to Power Adapter
Power is supplied through the provided appropriative power adapter, one end of which is connected
to the DC 12V IN jack on the rear panel, another to wall outlet with AC100-240V.
- 13 -
Connecting to Headphone
Plug the headphones to the jack on the rear panel of the unit. When headphones are
connected to the unit, the internal speakers will mute.
TVFunction

Basic Operation
Connect the antenna to the antenna jack on the unit rear panel.
After connection, plug in the power supply. If the player is in standby mode, press the POWER
button to turn on the power.
Press the SOURCE button to select the TV mode.
Press the ▼/▲(direction buttons) on the remote control, or use the number buttons directly, to
select the channel that you wish to view.
It is recommended to perform the following General Set Up steps during the first time in operation:
General Setup
Press the SCREEN SETUP button three times repeatedly on the remote control to access the TV
setup menu.
GENERAL
►LANGUAGE ENGLISH
RESET
CAPTION OFF
V-CHIP SETTING
- 14 -
In this menu, use the▼/▲buttons to select items you want to set. Press the ►/◄buttons to enter
the submenu. Press OK to exit from the menu.
Language
Press the ►/◄buttons to select the menu language.
Reset
Select RESET and press the►/◄buttons to resume the default status.
Caption
This setting is used to set captions on or off for the hearing impaired.
Press the ▼/▲button to select the CAPTION, use the ►/◄button to select among
CC1,CC2,CC3,CC4,T1,T2,T3,T4 and OFF.
V-Chip Setting
The V-Chip setting is a parental control rating function. Depending on the program, you can edit
violence, language and explicit content.
Use the ▼/▲buttons to select the V-CHIP SETTING, press the ►button to enter, “PIN _ _ _ _” will
be displayed on the lower portion of the screen, use the number buttons to enter your PIN.
(continued next page…)
TVFunction
GENERAL
►LANGUAGE ENGLISH
RESET
CAPTION CC1
V-CHIP SETTING
PIN:____

NOTE: The default password is 3308. This password will always be effective even after you
change the PIN.
When you input the password, the following menu will be displayed:
V
-CHIP SETTING
►V-CHIP ON
TV RATING
MPAARATING
CHANGE PIN
In this menu, use the▼/▲buttons to select items you want to set, press the OK button to exit from
the menu.
V-Chip
Use the ▼/▲button to select the V-CHIP, use the ►/◄button to select ON or OFF.
TV Rating
Use the ▼/▲button to select the TV RATING, press the ►button to enter, there will be a menu
displayed on the screen:
- 15 -
U = UNBLOCKED, L =BLOCKED,
D- SUGGESTIVE DIALOGUE, L- INDECENT LANGUAGE,S- EXPLICIT CONTENT,
V- VIOLENCE, FV- FANTASY VIOLENCE
In the menu, use the ▼or▲button to select the items, press the ►button to change, press the
◄button to return to the V-CHIP SETTING menu.
TVFunction
TV RATING
L/U FV D L S V
TV-Y U - - - - -
TV-Y7 U U - - - -
TV-G U - - - - -
TV-PG U - U U U U
TV-14 L - U L U U
TV-MA L - - L U U
:PREVIOUS :NEXT
:CHANGE :EXIT

MPAA Rating
In the V-CHIP setting menu, use the ▼/▲button to select the MPAA RATING, press the ►button
to enter and the following menu will be displayed:
MPAA RATING
G U
PG U
PG13 U
R U
NC17 U
X U
:PREVIOUS :NEXT
:CHANGE :EXIT
Use the ▼/▲button to select items, and then press the ►button to change the settings, press
the ◄button to return to the V-CHIP SETTING menu.
Change Pin
In the V-CHIP setting menu, use the ▼or▲button to select the V-CHIP SETTING press the ►
button to enter and the following menu will be displayed:
V
-CHIP SETTING
V-CHIP ON
TV RATING
MPAARATING
►CHANGE PIN
NEW PIN: _ _ _ _
CONFIRM: _ _ _ _
Use the number buttons to input the new password and input again for confirmation.
When the rating level of the input signal matches with the set rating, “PROGRAM RATING” will be
displayed on the blue screen. Until the rating is reset, the program can be played.
TVFunction
Picture Parameter setup
- 16 -

Press the SCREEN SETUP button once on remote control to enter picture setup menu, the
following menu will be displayed:
PICTURE
►BRIGHT 050
CONTRAST 050
SATURATION 070
HUE 050
SHARPNESS 000
Use the ▼/▲buttons to move cursor to the item you want to set (Bright, Contrast, Saturation, Hue
and Sharpness).
Use the ►/◄buttons to select the desired values.
Press the OK button on the remote control to exit from the setup menu.
TV System Setup
Press the SCREEN SETUP button twice repeatedly on the remote control to enter the tuning setup
menu, the following menu will be displayed:
TUNING
►CHANNEL 002
AFC OFF
SKIP OFF
TVMODE AIR
FINE TUNING ◄◄◄
AUTO MEMORY
VHF-L 7%
In this menu, use the▼/▲buttons to select items you want to set, press the ►/◄buttons to select,
press the OK button to exit from the menu.
Channel
To display the current channel number. Use the▼/▲buttons to select CHANNEL, use the ►/◄
buttons to change the number.
TVFunction
AFC
(Auto Frequency Control) Use the▼/▲buttons to select AFC, press the ►/◄buttons to select ON
- 17 -

or OFF. When ON, the player will automatically fine tune the frequency.
Skip
Use the▼/▲buttons to select SKIP, press the ►/◄buttons to select ON or OFF.
When ON, it will skip the current channel, when using the ▼/▲buttons to select channel under
normal playback status.
When select OFF, it will play the channels in sequence when selecting under normal playback
status.
TV MODE
Use the ▼/▲button to select TV MODE, press the ►/◄buttons to select AIR or CABLE. There
are 68 channels (2 to 69) for AIR and 124 channels for CABLE (2 to 125).
The unit supports HRC and IRC cable TV signal systems.
Fine Tuning
Press the ▼/▲button to move cursor to FINE TUNING.
Press the ►/◄buttons to fine tune forward and backward.
For a better effect it is recommended to activate the fine tuning function, AFC will turn OFF
automatically after the function is complete.
Auto Memory
Press the ▼/▲button to move the cursor to “Auto Memory”.
Press the ►direction button to enter auto memory mode, and screen will display as below:
SEARCHING CH:002
EXIT:
VHF-L 22%
The auto memory will take a few minutes. When the tuning operation is complete, the unit will exit
and memorize the programs by sequence.
During tuning, press the ◄button to exit the auto memory.
- 18 -

AUX Function
AUX Function
The player has some other AUX functions. You can enjoy programs from external input sources by
pressing the SOURCE button on the remote control. Change to AUX mode after connecting to an
AV signal such as a VCR, camcorder, game system, etc.
After connection, you can go on with following setups:
Picture Parameter setup
Press the SCREEN SETUP button once on remote control to enter picture setup menu, and the
following menu will be displayed:
PICTURE
►BRIGHT 050
CONTRAST 050
SATURATION 070
HUE 050
SHARPNESS 000
Use the ▼/▲button to move cursor to the item you want to set (Bright, Contrast, Saturation, Hue
and Sharpness).
Use the ►/◄button to select the desired values.
Press the “OK” button on the remote control to exit the setup menu.
General Setup
Press the SCREEN SETUP button on the remote control twice to enter the general setup menu.
GENERAL
►LANGUAGE ENGLISH
RESET
CAPTION OFF
V-CHIP SETTING
NTSC-358 60Hz
Use the ▼/▲button to highlight Language item.
Use the ►/◄button to select menu language.
Select RESET and press the ►/◄buttons to resume the default status.
Select CAPTION and V-CHIP SETTING, refer to the operations on the TV mode to set the items.
- 19 -
Table of contents
Other Citizen TV DVD Combo manuals