CJ2 Innov ZELOS 1648 User manual

ZELOS
by
Installation manual
You just purchased this radiant heating unit ZELOS
by CJ2 Innov and we thank you for your choice.
This unit has been studied, designed and built with
care for your complete satisfaction
.

This product
MUST
be connected to a
timer or to a
thermostat

This product
MUST
be connected to a
timer or to a
thermostat

3
INSTALLATION MANUAL
GENERAL INSTRUCTIONS
Before installing and using the unit, please read carefully this notice.
1.
ZELOS is a heating unit made with glass, it is therefore sensitive to shock.
2.
The installation must meet the standards of public safety.
3.
The electric installation on which the heating unit will be connected must be
protected with a circuit-breaker
.
4. This unit is compliant with current standards (see technical sheet if required).
5.
Heating solution ZELOS may be used indoor, in every room, including
bathrooms
(comply with installation areas).
Do not use outdoors
.
6.
You may use this heating unit as described in this manual. Other uses not
recommended by the manufacturer may cause fire, electric shock or hurt
someone.

4
INSTALLATION MANUAL
PRECAUTIONS FOR USE
1.
The electric connection must be done by a qualified electrician. To unplug the
heating unit, turn off the controls and power of the circuit to the main panel.
ZELOS is a radiant heater. Do not install anything less than 25 cm (10 inches)
from its emitting area.
NOTICE : Do not cover to avoid overheating.
Never obstruct the top of the heater
in any way
.
2.
This unit is hot while used. To avoid burn, do not touch hot surfaces with bare skin.
Keep flammable material like furniture, pillows, linen, paper, clothes, curtains, etc. at
minimum 50 cm (20 in.) in front of the unit and keep them far from each side and the
back (side and back restrictions apply for permanent electric units).
3.
Note that the emitting surface can go up to 80°C (176 F). Maintain the minimum
distance between ZELOS and surrounding objects.
4.
It is mandatory to connect ZELOS to a control system (Thermostat,
timer, …)
5.
The emitting surface must be towards the room and object to heat.
6.
ZELOS is a certified unit for its efficiency and its security. Like all heating units,
prolonged contact can cause burns.
7.
If the power cable is damaged, it has to be replaced by a qualified electrician. In
any case, use a type SJOOW 14/2 cable.
8.
Do not try to take the unit apart, you will lose your warranty. Do not use the unit
after a failure. Disconnect from main panel and have it inspected by a qualified
electrician before using it again.
9.
To clean ZELOS, turn it off and wait until it has cooled down. Clean with a soft damp
cloth.
10.
ZELOS is not designed to be used by children unless instructions and security rules
have been given and understood. A greater caution is necessary when unit is used
by or close to children and when the heating unit is working unattended.
COMPOSITION
ZELOS is made of :
Ø
2 sides Tempered glass
Ø
Heating film
Ø
Towel hanging rails*
* (sold separately)

5
INSTALLATION MANUAL
INSTALLATION OF ZELOS HEATING UNIT
Tools
required
for the
installation.
Accessories included
with ZELOS
.
You may not
have to use
them,
depending on
the type of
walls.
MARKING AND DRILLING
Installation and activation. To facilitate the installation of your ZELOS
heater, the wall bracket will be used as the installation template
.
REMINDER OF THE DISTANCES FOR DRILLING
HORIZONTAL ORIENTATION
Horizontal
spacing ( X )
Vertical
spacing ( Y )
ZELOS 1648 940mm 102mm
ZELOS 1672 1549mm 102mm
ZELOS 2448 940mm 305mm
ZELOS 2472 1549mm 305mm
VERTICAL ORIENTATION
Horizontal
spacing ( X )
Vertical
spacing ( Y )
ZELOS 1648 102mm 940mm
ZELOS 1672 102mm 1549mm
ZELOS 2448 305mm 940mm
ZELOS 2472 305mm 1549mm

6
INSTALLATION MANUAL
Choosing where to install the heating unit
Position the template (wall bracket) on the wall to choose the best place for your
ZELOS heater and rely on indicated mark. Make sure you comply with the
minimal distance around the heater of 25 cm (10 in) with an obstacle or wall
angle. Adjust the position with your level. Identify the drilling marks depending
on the size of the heater. Drill the wall.
TOWEL HANGING RAILS INSTALLATION (Sold separately)
1.
Insert the bars at the top
of the ZELOS heater
.
2.
Align the bar with the
desired fixing holes.
3.
Insert washer and hex
screw and tighten
securely
WALL INSTALLATION
1.
Fix the wall bracket
to the wall with 4 screws and
4 plugs adapted to your type of wall
2.
Position your ZELOS on the wall mount
by sliding it into the appropriate slots.
3.
The heater must be properly installed before use.
INSTALLATION MANUAL
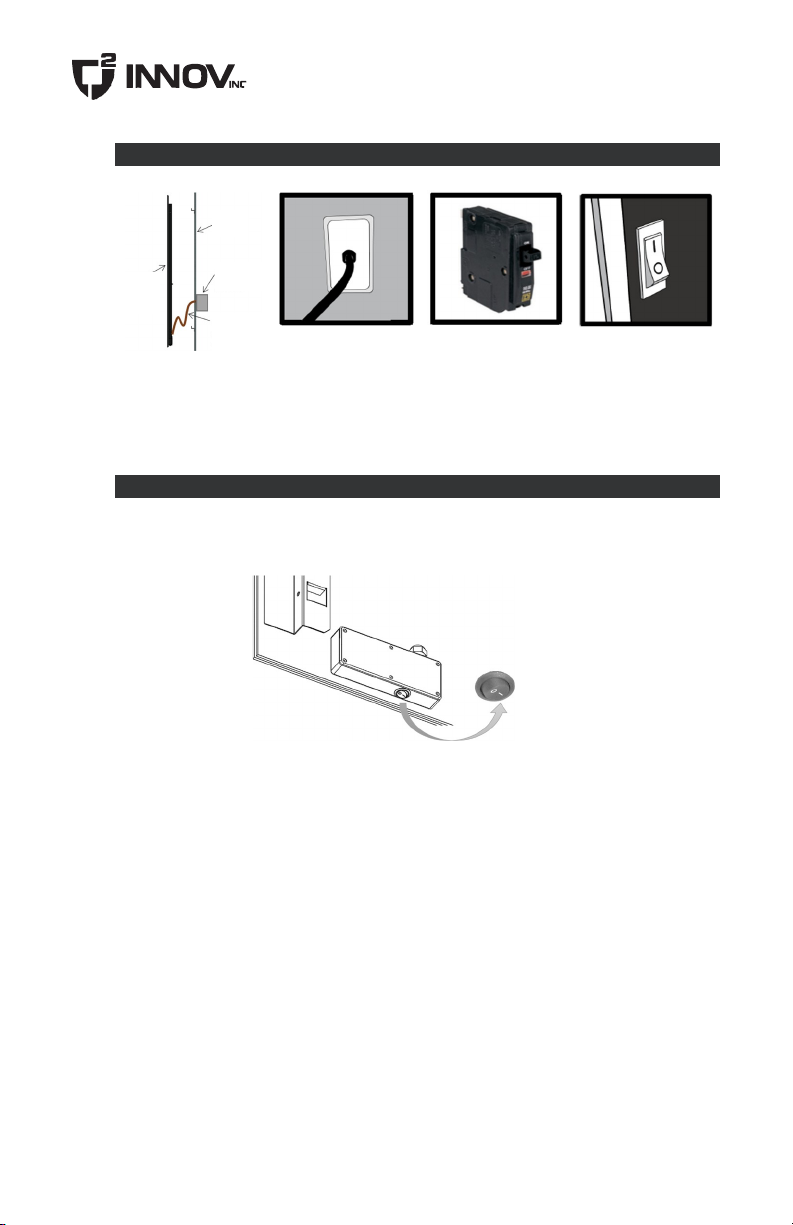
ELECTRIC CONNECTION AND FUNCTION
Direct connection to the
line
Protect the line with
a breaker
Switch on
BEFORE SWITCHING ON - IMPORTANT
Once the installation is complete, turn the switch located under the electrical box of the
heater to
position I.
wall
Electrical
box
Power
cord
Front
Radiant
Surface
7
INSTALLATION MANUAL
SAFETY INFORMATION
•
Use ZELOS unit only for recommended applications.
•
For effective guarantees, ZELOS heater should always be mounted with
elements provided (bars, control, …
).
•
The electrical connection must meet the electrical standards.
•
The electrical installation on which will be connected ZELOS must
necessarily be protected by an RCD (25 or 30 mA).
•
The ZELOS heater must be connected to the mains (240V AV 50/60 Hz)
by an electrical circuit protected by a 15A overcurrent circuit breaker
placed in an electrical distribution board. The whole installation is
protected by a circuit breaker.
•
The electrical connection must be performed by a qualified electrician.
•
ZELOS heating solution is suitable for indoor use, in every room, even the
bathroom (comply with installation area),
•
Do not install ZELOS if the product is damaged or shows signs of impacts.
•
ZELOS must be connected to a control system (Thermostat, timer, …)
•
The top of the ZELOS should never be obstructed in any way.
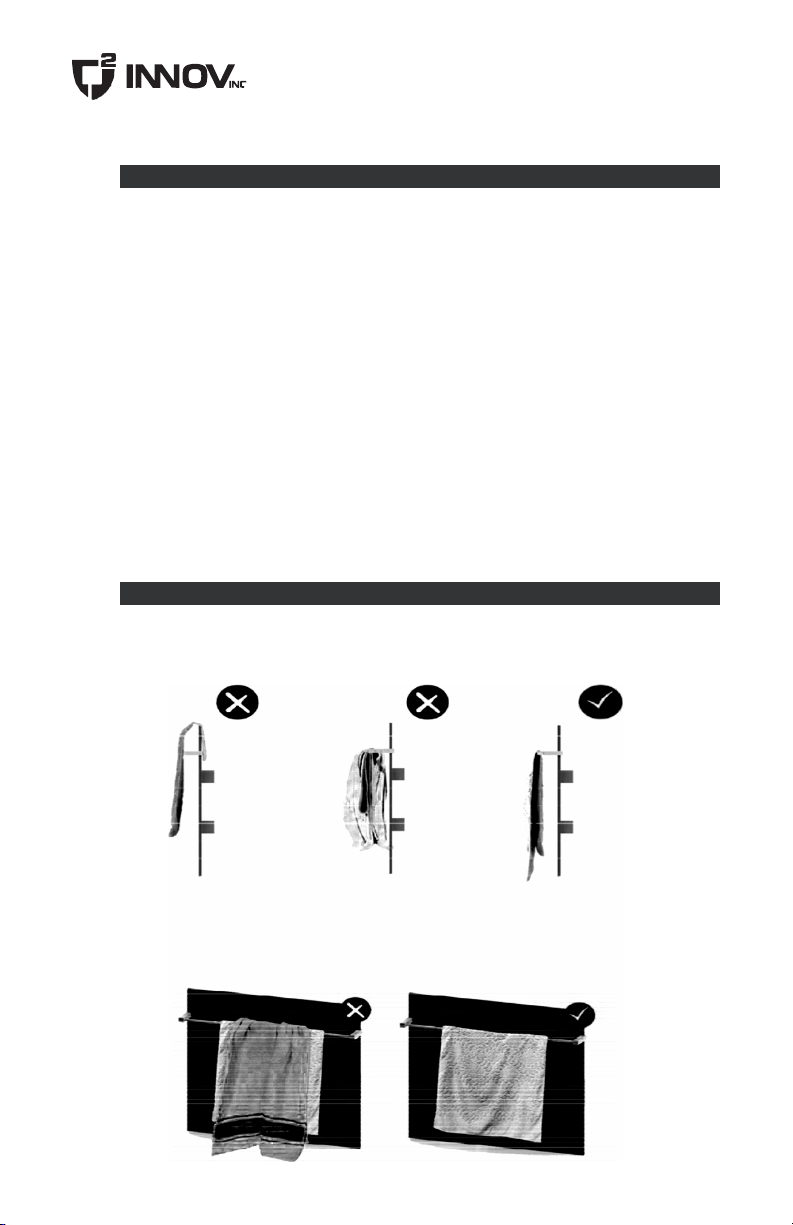
SPECIFIC INSTRUCTIONS
1.
ZELOS must be connected to a control system (Thermostat, timer, …).
2.
Towels need to be hanged correctly and NEVER obstruct the top of the heater in
any way.
8
INSTALLATION MANUAL
TECHNICAL CARACTERISTICS
ZELOS HEATER
Voltage 120 / 240 V
Maximum current 10A
Class II
IP Protection IP 44
Power 500W / 750W / 1100W
Indicative Power for a ceiling
height of 2,5 meters 54W / m3
ZELOS RANGE
See brochure for the complete list
of products
POWER
(Watt)
WIDTH
(mm)
HEIGHT
(mm)
Range 500 / 750 / 1100 400 / 600 1200 / 1800
Standard Colors White / Black
Pantone Colors Upon request
REPAIR
In case of damage during the warranty period and after, contact your dealer or
manufacturer below :
MANUFACTURER :
CJ
2
INNOV INC.
info@cj2innov.com
www.cj2innov.com
9

INSTALLATION MANUAL
WARRANTY
•
3 years for ZELOS heater.
•
The warranty period starts from the date of purchase shown on the
invoice or receipt
.
•
The warranty applies in addition to any statutory rights
.
OUR COMMITMENT
THE FIRST 3 YEARS :
•
If a defect covered by this warranty is found, CJ²INNOV will replace the
product with a new one for free.
•
This warranty is limited to the repair or the replacement of the product. The
product repaired, with the written authorization of CJ2INNOV within the
warranty period, will be guaranteed for the remaining period of the warranty.
This warranty will not be valid and CJ2INNOV could refuse a claim if the
product has been modified in any way without written consent by CJ2INNOV
or if the numbers shown on the label have been removed or modified. This
warranty does not cover scratches, bumps, corrosion or discoloration caused
by excessive heat, chemical cleaning products or abrasive agent.
Furthermore, it does not cover damages or breakage during transportation.
•
NB : Our commitment is limited to providing a new product. Installation costs and
other expenses in connection with such work are not covered.
10

WARRANTY
WARRANTY CONDITIONS
Any request under the guarantee is subject to the terms and
conditions set out below:
•
The warranty is only valid in the context of interior use.
•
The warranty covers defects arising during the manufacture of the equipment.
It does not cover damage caused by third parties (damages during
transportation or installation).
•
No warranty is offered for damages arising from misuse, abuse, accidents or
natural disasters, or for damages resulting from other unusual circumstances
under residential applications.
•
The guaranty does not apply if the products are not installed according to the
recommendations of CJ²INNOV.
•
Damage resulting from maintenance or improper cleaning, overloading,
damage due to the influence of moisture are also excluded from
coverage under this warranty.
•
The warranty is void if the products are installed despite visible
defects.
•
CJ2INNOV reserves the right to inspect the damage on site after
agreeing a reasonable inspection date to verify the conformity of the
situation in the terms and conditions of warranty.
•
This warranty supersedes all other warranties. The warranty coverage
is subject to the version of the warranty in effect at the time of the
purchase.
•
Please note: our commitment is limited to providing a new ZELOS.
Installation costs and other direct or indirect, incidental or
consequential costs related to this work are not covered and CJ²
INNOV disclaims any liability related thereto.
•
Damage resulting from improper maintenance and cleaning, overloading,
inadequate structure or damage due to the influence of mechanical stress is
also excluded from coverage under this warranty.
•
No agent or representative or distributor has the authority to modify this
warranty.
•
Please fill the information card « Warranty Certificate » and return it to us
without delay by email at info@cj2innov.com or by phone at
819 960-
3357 to take advantage of your warranty.
11


WARRANTY
WARRANTY CERTIFICATE
To preserve your rights, please fill in and return the certificate to the
manufacturer at info@cj2innov.com
DISTRIBUTOR
WARRANTY CERTIFICATE
Product :
Serial number :
Name :
Street :
City :
Province :
Postal Code :
Country :
Phone :
Email :
Date of purchase :
Installer :
Installation date :
Problems
encountered :
CAUTION
Risk of electric
shock. Do not open.
No user-serviceable
parts inside.


By:
info@cj2innov.com
|
819 960-3357
|
cj2innov.com
This manual suits for next models
3
Table of contents
Popular Indoor Furnishing manuals by other brands

ROUILLARD
ROUILLARD PLAQUE CONNEXION / SEAT TO SEAT BRACKET installation guide

Ironwood
Ironwood Glacier G42SA quick start guide

Rauch
Rauch MZ210 Assembly instructions

PHI VILLA
PHI VILLA E02GF142 Use and care guide

Cooper Lighting
Cooper Lighting LTC2 Series Specification sheet

FourStarGroup
FourStarGroup 11211851 Assembly instructions

VIPACK
VIPACK DREAM LIBRARY KIBI 8014 Assembly instructions

Seville Classics
Seville Classics WEB524 quick start guide

Inspire
Inspire 203-576 Assembly instructions

Sunsitt
Sunsitt ST23007-010 Assembly instructions

Cattelan Italia
Cattelan Italia CHANTAL Assembling instructions

Fulltime System
Fulltime System FTS-5500 Series user manual


