Clapiel RO BASIC User manual

User’s Manual
RO BASIC
RO ADVANCED
Clapiel SLIM
This manual is intended to be used only for MFP
-
1320A/MFP
-
1440A
Please make sure to read this manual before use.
Design and color may differ from the picture.
Product appearance, specification, etc. are subject to change without
prior notice if necessary for improving product performance.
The rated voltage of this product is 100
-
240V~. 50/60Hz. (MFP
-
1440A)
Rev,No.00

Content
Characteristic
Countertop water purifier with compact design
Compact size makes it easy install anywhere necessary thus utilizing given space effectively.
Water spout
Detachable water spout for periodical cleaning.
Easy filter replacement
Quick and easy filter replacement.
1
2
3
LED indicator
The LED color on the dial allows you to check the operational status of UV filters.
-
Green : UV off
-
Blue : UV on
-
Red : UV filter replacement period
* UV filter only applied advanced types.
4
1. Characteristic
2. Safety Precaution
3. Installation Precaution
4. Installation Method
5. How to Use
6. Usage Precaution
7. Cleaning Method
8. How to Manage Product's Hygiene
9. Filter Function & Filter Service Life
10. Filter Replacement
10
-
1. Pre-complex filter / RO Membrane filter / Post Carbon Block filter
5.0
10
-
2. UV sterilizer
11. Standard & Flow Diagram
11
-
1. Standard
11
-
2. Flow diagram
12. Troubleshooting
2
3~4
5
6
7
8
9
10
11
12~13
12
13
14
14
14
15
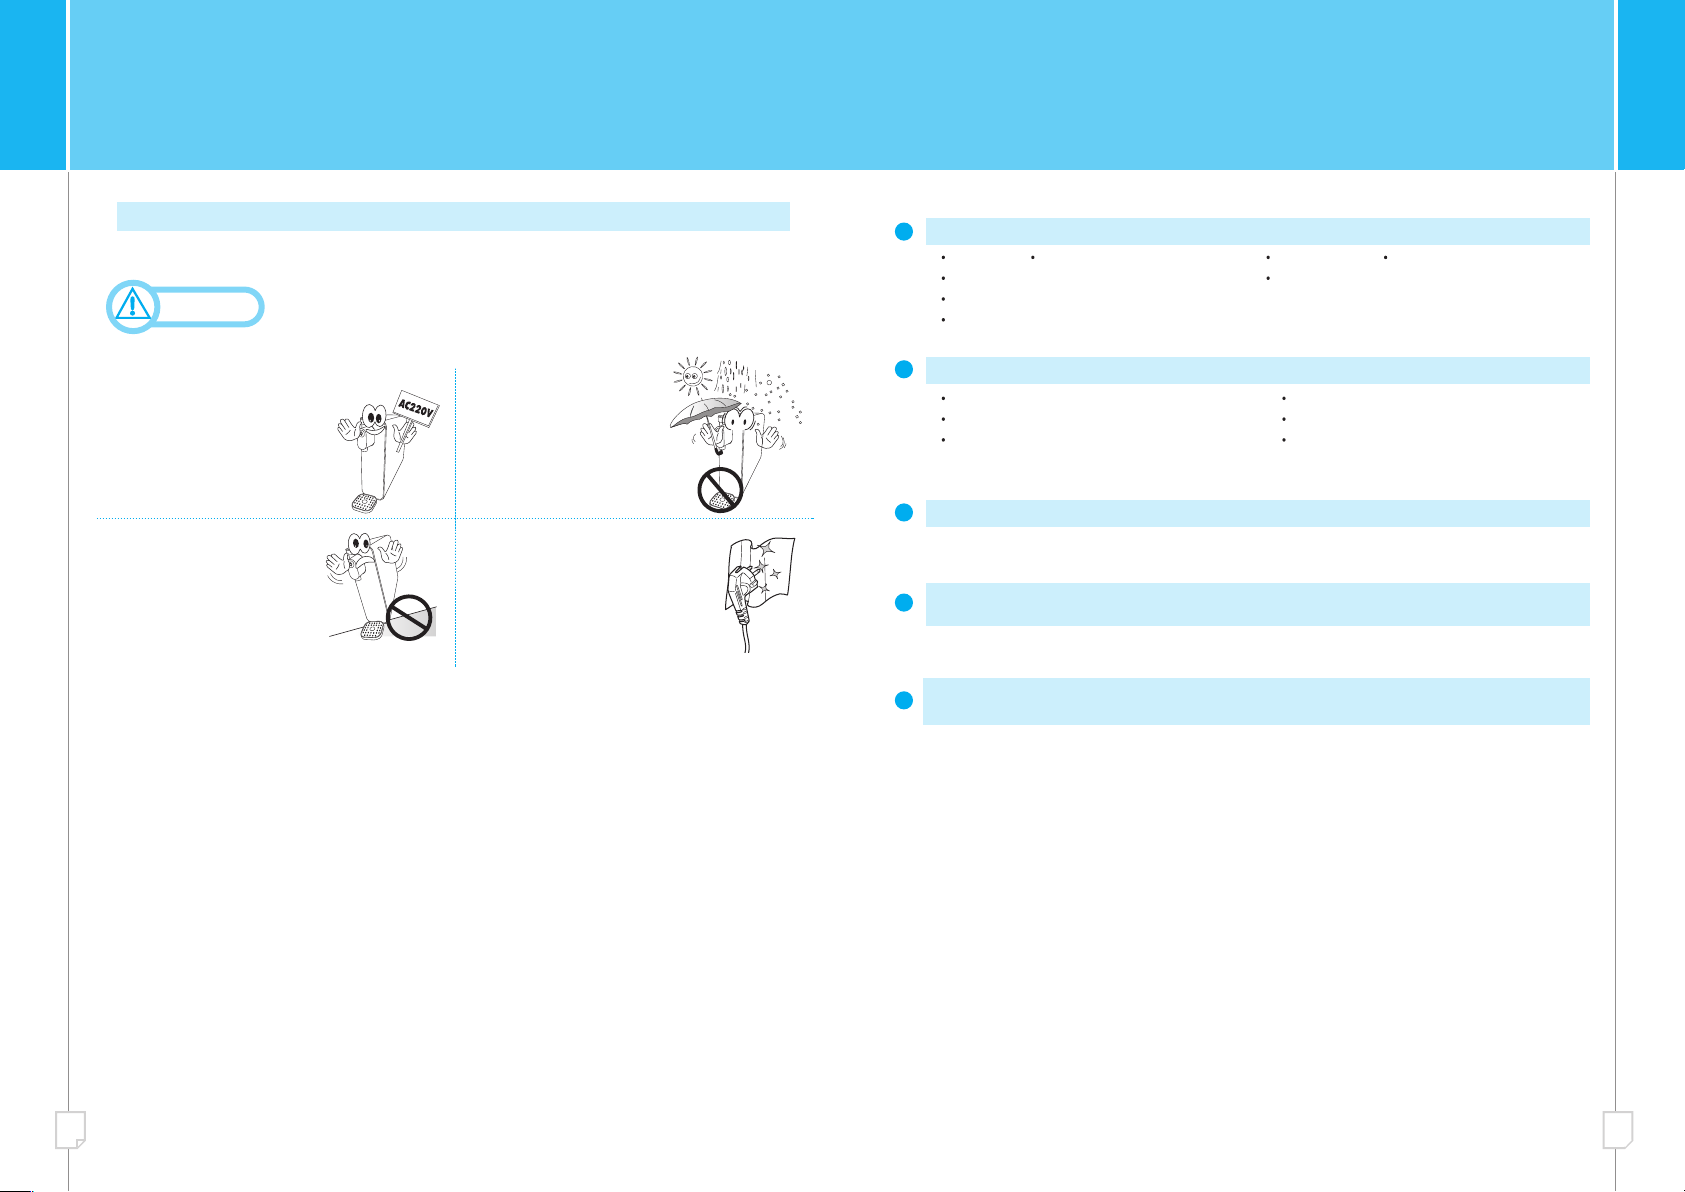
2. Safety Precaution
Do not touch the power
plug with wet hands.
An electric shock may occur.
Unstable connection may
cause a fire.
When the power cord has
been damaged, exchange
the power cord in order to
prevent danger such as an
electric shock, etc.
Do not use damaged or loose
wall outlets. An electric shock
or fire may occur.
An electric shock or fire
may occur.
Insert the power plug
in a stable position
properly in order to
avoid swinging.
Use the single power supply.
Damage to the power cord
can cause an electric shock.
To disconnect the unit,
be sure to pull by the
plug and not the cord.
Damage to the power cord
can cause an electric shock.
To disconnect the unit, be
sure to pull by the plug
and not the cord.
Do not put a bowl containing water,
chemicals, small metals, etc. on the unit.
If these materials drop into the inside of the
unit,this may cause an electric shock or fire.
Do not put candles, lit cigarettes, etc. on the
unit and do not install the unit near a
heating appliance. Move after
removing all water and plug
when it replaces.
There is a danger of a fire.
An electric shock or fire
may occur.
An electric shock or fire
may occur.
Do not bend the power
cord excessively or put
heavy objects over the
power code.
An electric shock or fire
may occur.
If the unit is damaged or
malfunctioned, do not
disassemble, repair, or
remodel it on your own.
※ Cautions are divided into 2 categories : 'Danger' and 'Caution'
Associated with the possibility for serious injury or death.
Caution
-
Information on the plug for electricity power is not applicable for MFP
-
1320A model since it has no UV sterilizer.
03
2. Safety Precaution
Be aware that the total current of multiple
outlet is 110
-
240v~, 50/60Hz.
Do not install the unit in a
place where the tempera
-
ture may drop below
32°F (0 °C).
There is a danger of an
electric shock or fire.
Do not install the unit in a
sloped or unstable position.
This can cause a performance
degradation, system damage
or overall trouble
There is a danger of an
electric shock or fire.
If there is dust, water or etc on the
power plug pin, wipe it off well.
Associated with the possibility of injury, property damage
and performance degradation.
Caution
※
This content includes precautions in preventing any unexpected events. Please read through this carefully.
-
Information on the plug for electricity power is not applicable for MFP
-
1320A model since it has no UV sterilizer.
3. Installation cautions
Use the unit at the following conditions
Water pressure :
1.4~7kgf/㎠
(137.3~686kPa)
Water temperature : 39
-
100℉(4~38℃)
pH : 5.8~8.5 Water hardness : 300 ppm or less
TDS : 0.5 NTU or less Water quality : Biologically safe
※If tubes are bent or pressed, water does not flow well and could cause problems.
Do not install the unit at the following places.
Near fire Near flammable materialNear air conditioner or heater Wet places
To a place being exposed to rain or snow To a place being exposed to direct sunlight
Near chemicals(volatile material, organic solvent, etc.)
To a place below 32℉(0℃) or a place with the possibility of dropping below 32℉(0℃).
1
2
Do not connect to hot water over (38℃) to this unit.
※It could cause problems.
When connecting tubes, ensure that the tubes are not bent or pressed down by heavy
objects, etc.
※If tubes are bent or pressed, water does not flow well and could cause problems.
When installing more than one unit(water purifier, dishwasher, etc.), source water tube
and brine water tube need to be independent for one another.
3
4
5
0504

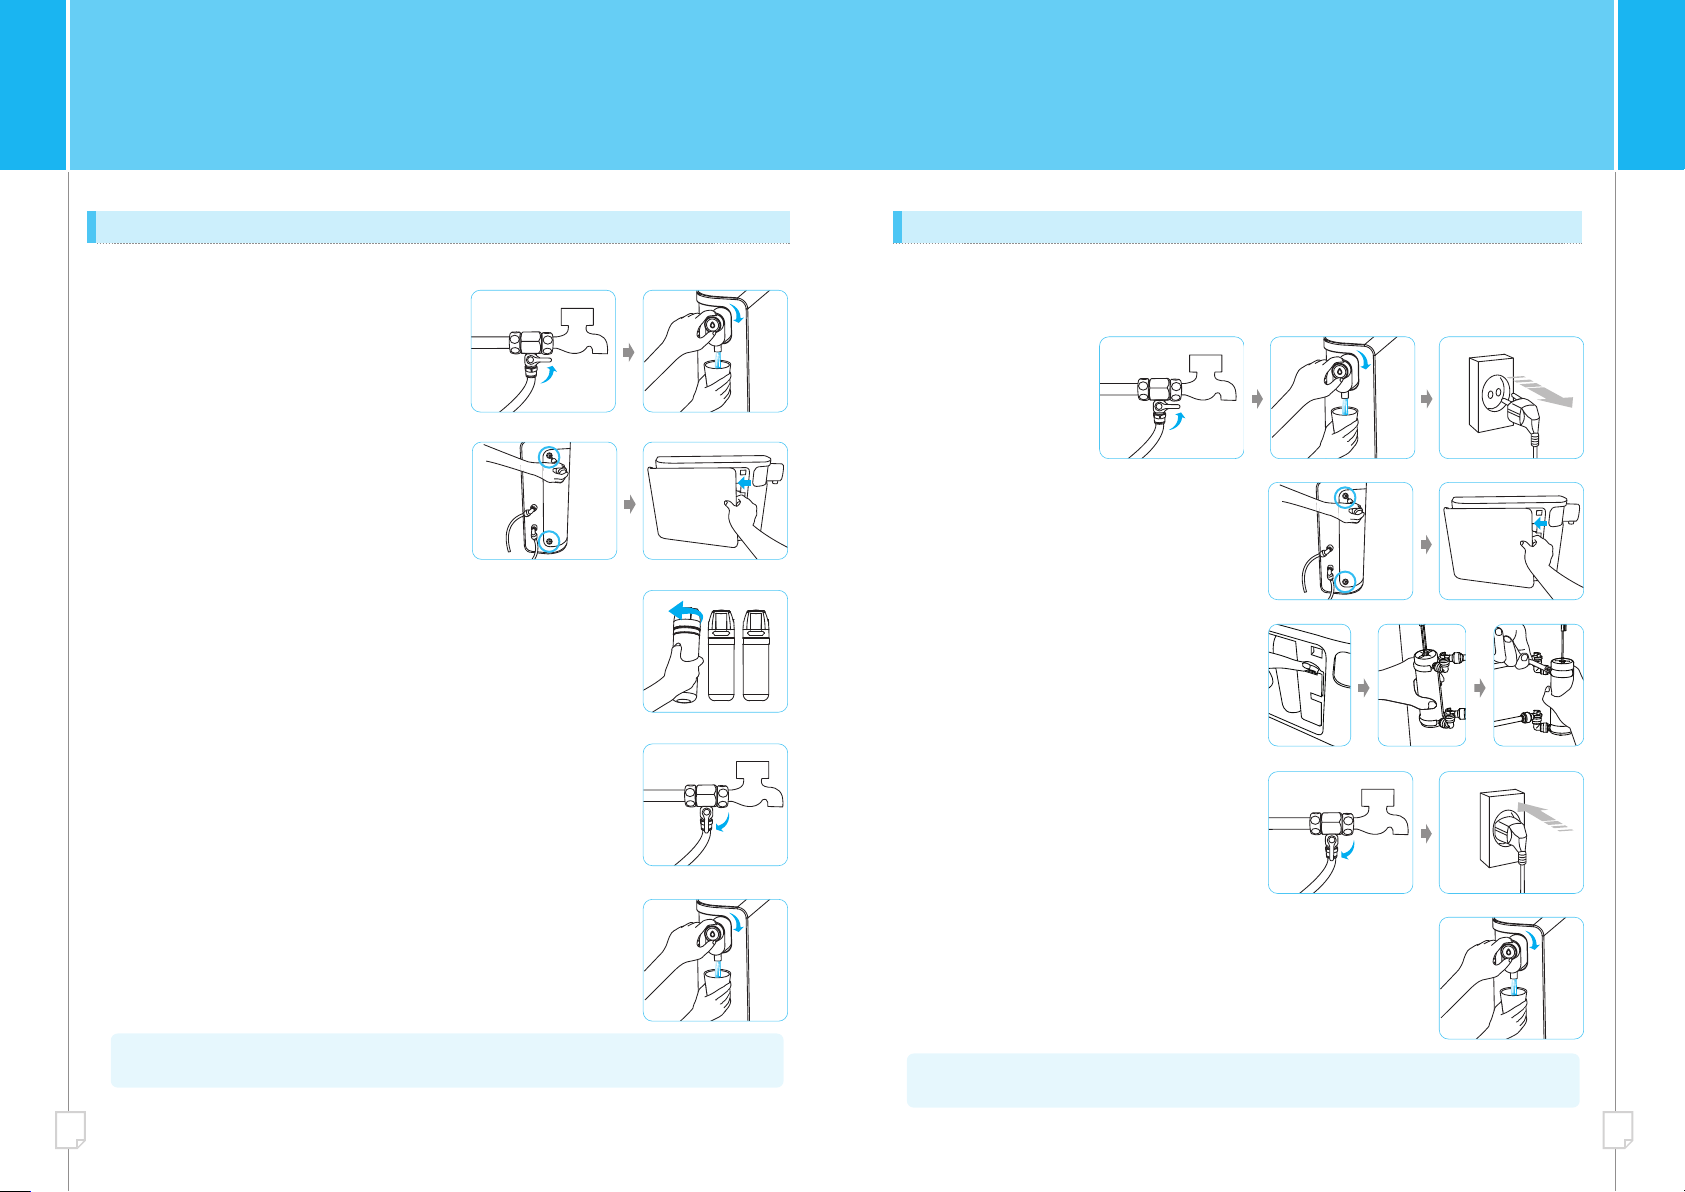
4. Installation
1
2
3
5
7
4
6
Open the water supply valve and inlet adapter valve which supplies water into the system.
Connect the adapter into the system and plug into the power supply. Electricity for this
system 100
-
240V~, 50/60 Hz.
Check whether there is no leakage on the connecting areas and also the water is being
supplied.
Check out the leakage.
The product is installed vertically. (Use level to make sure its level degree.)
Turn off the water at the cold-water shutoff valve underneath the sink where you connect
this filtration system. Disconnect the water line from the shutoff valve by loosening the
nut and removing the tubing from the valve fitting. Use a basin wrench to loosen the nut
holding the tubing on the faucet stem. Connect the inlet water adapter valve.
※Be careful, there may be leakage if the sealing rubber (O-ring) is dropped or screw is damaged.
※ It is recommended to install it on the counter top 80cm higher from floor.
Attach hoses to the filtration system connect the hose from the valve to the inlet on the
backside of the system, and connect the hose from the faucet to the filter outlet.
※
Information on the plug for electricity power is not applicable for MFP
-
1320A model since it has no UV sterilizer.
5. Usage
Reverse Osmosis
membrane filter
Pre
-
complex
filter
Post carbon
block filter (5㎛)
Dial of water intake
Water spout
Dial of water intake : Dial clockwise to take water.
(Dialing rotation range : 0~90 degree)
-
Green : Working
-
Blue : Water intake & UV on
-
Red : UV inability (alarm time of replacement)
UV sterilizer
(MFP
-
1440A)
0706

6. Cautions during use
This product is 110
-
240v~.50/60Hz Product.
Do not use multiple electrical appliances simultaneously in a power outlet.
(Abnormal heat of outlet may cause fire.)
Never move the product while in operation.
Do not place product in subzero temperatures.
Avoid the use of chemicals around the product (volatile material, organic solvent, etc.)
and do not place chemicals near the product.
In case of no water flow, check if source water can be shut off or if the machine is
malfunctioning.
(In case of water cut
-
off, unplugging is recommended.)
Plug out the power prior to cleaning inside and do not apply the water to the product
directly.
(An electric shock and fire may occur.)
In case the product is not used for long of period time, shut off the adapter (source
water valve) and pull out the power plug. Do not touch the power plug with wet hands
(Fire or electric shock can occur.)
Since the filter of the water purifier is a consumable item, please keep the filter
replacement period so that you always receive clean water.
If there is a strange sound, smell or smoke in the product during use, unplug the power
plug immediately, lock the water adapter valve, and contact us
1
2
3
4
5
6
7
8
9
10
※
Information on the plug for electricity power is not applicable for MFP
-
1320A model since it has no UV sterilizer.
7. Cleaning method
Wipe it with soft dry cloth
●
Product appearance
Remove the water inlet by turning it clockwise and then
wash it with running water
※Do not use detergent, thinner, benzene, or wax when cleaning.
※This may cause discoloration or peeling of the product,
damage to the product, and health problems.
●
Water intake
Remove the water tray from the product and wash it
with flowing water.
※If there is heavy contamination of the water, please wash
with 1~2 drops of neutral detergent. After rinsing with a
mild detergent, rinse thoroughly with tap water until
bubbles are removed.
※When cleaning, be careful not to drop the water tray or
subject it to external impact. Failure to do so may cause
leakage.
※Do not use hot water or alcohol for cleaning. It may cause
deformation and breakage.
Water spout
0908
8. How to manage a product's hygiene
Division Contents
Area
Environment
Installation
Water intake
(Cork)
Water spout
Using a water
purifier
-
Be careful not to spill foreign material on the water inlet, and if it splashes,
wipe it off immediately.
-
Clean it regularly with non-woven fabric, cotton swabs, etc. once a week.
-
Do not put your hands or mouth on the water inlet, and keep the cup you
are using out of the water intake.
<Installation Restricted Area>
-
Outdoor or direct sunlight
-
Can be installed in our recommended water quality range
(Water pressure: 1.4~7kgf/㎠)
-
Place close to toilet
-
Near air conditioner or heater
Self
-
management
Water purifier
check
-
If the water intake (caulk), water trap etc. are dirty, your own self-
management is required.
-
If there is water, immediately discard, please wash at least once a week
Period of use Long term
unused
-
When it is not used for a long time. Please use after flowing water for 5 minutes.
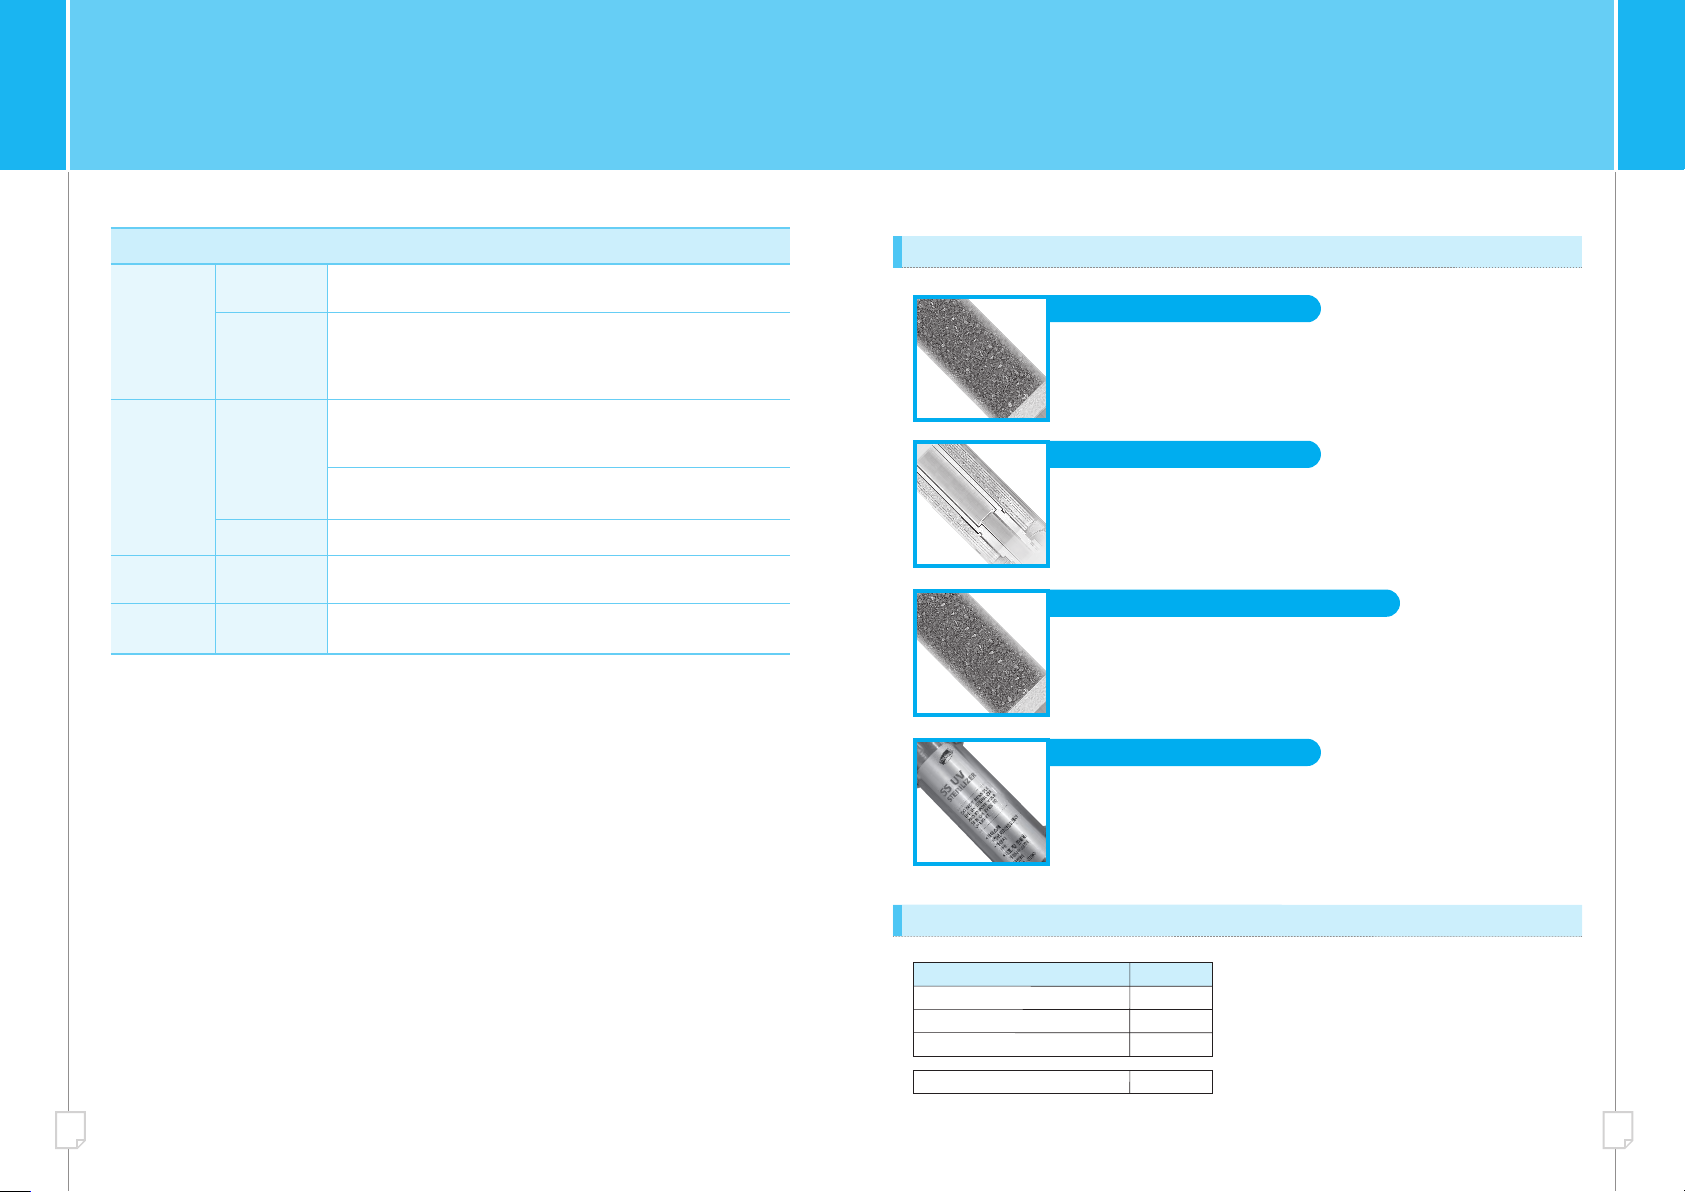
Step1 : Pre
-
complex filter
-
Filter out rust & particulate contaminants
-
Remove residual chlorine & organic chemicals
-
Protect RO membrane by removing particulate contaminants that passes
through the pre-filter
9. Filter function & Filter service life
9
-
1. Filter function
9
-
2. Filter service life
Step 4 : UV sterilizer
-
E.Coli and various kinds of bacteria
※
Information on the plug for electricity power is not applicable for MFP
-
1320A model since it has no UV sterilizer.
Step 2 : RO membrane filter
Soluble foreign substances with molecular weight of over 200 such as heavy
metals, bacteria, organic chemicals, etc. are treated by the separation method
through super precision semipermeable membrane and exert the water
purification effect.
Step 3 : Post Carbon Block filter (5
㎛
)
-
Remove dissolved gas and odor
-
Provide fresh water taste
※We recommend that you replace the filter immediately
because the UV sterilizer filter is inoperable when the dial
is illuminated red.
※Filter service life is varied depending on environment
such as location, water conditions (quality, temperature),
amount of water used and seasons (summer, winter).
※You can take clean water by replacing filters according to
the recommended filter service life.
Filter Service life
Pre
-
complex filter
6 months
RO membrane filter
24 months
6 months
Post Carbon Block filter (5
㎛
)
UV sterilizer
16 months
1110
10. Filter Replacement
③For filter replacement, use the screw driver
to loosen two fixed screws and then open
the side cover.
④Uphold the filter and turn left, then pull it out.
⑤Get the replacement filter and insert into the head and turn right
to fix it.
※Check the leakage occurrence after water supplied. If leakage occurs plug out and turn off the system
from water supply valve.
①Close the inlet water supply valve.
②Dial of water intake to unlock the pressure
of the inside of filter.
⑥Open the inlet water supply valve.
⑦Flush 1 minute.
※ Information on the plug for electricity power is not applicable for MFP
-
1320A model since it has no UV sterilizer.
10
-
1.
Pre-complex filter / RO Membrane filter / Carbon Block filter (5㎛)
※Check the leakage occurrence after water supplied. If leakage occurs plug out and turn off the system
from water supply valve.
10. Filter Replacement
③For filter replacement, use the screw driver
to loosen two fixed screws and then open
the side cover.
④Open the cover of UV filter.
⑤Replace the filter after taking out the old
one by using the fitting tools which is
connected to the replacement UV filter.
⑥Close the cover of UV filter and also side
cover of the system.
⑦After opening inlet water, supply valve plug
into the power supply.
①Close the inlet water supply valve.
②
After dialing of water intake to unlock the pressure of the inside of filter, plug out from the
power socket.
⑧Flush 1 minute before usage.
※ Information on the plug for electricity power is not applicable for MFP
-
1320A model since it has no UV sterilizer.
10
-
2. UV sterilizer
1312
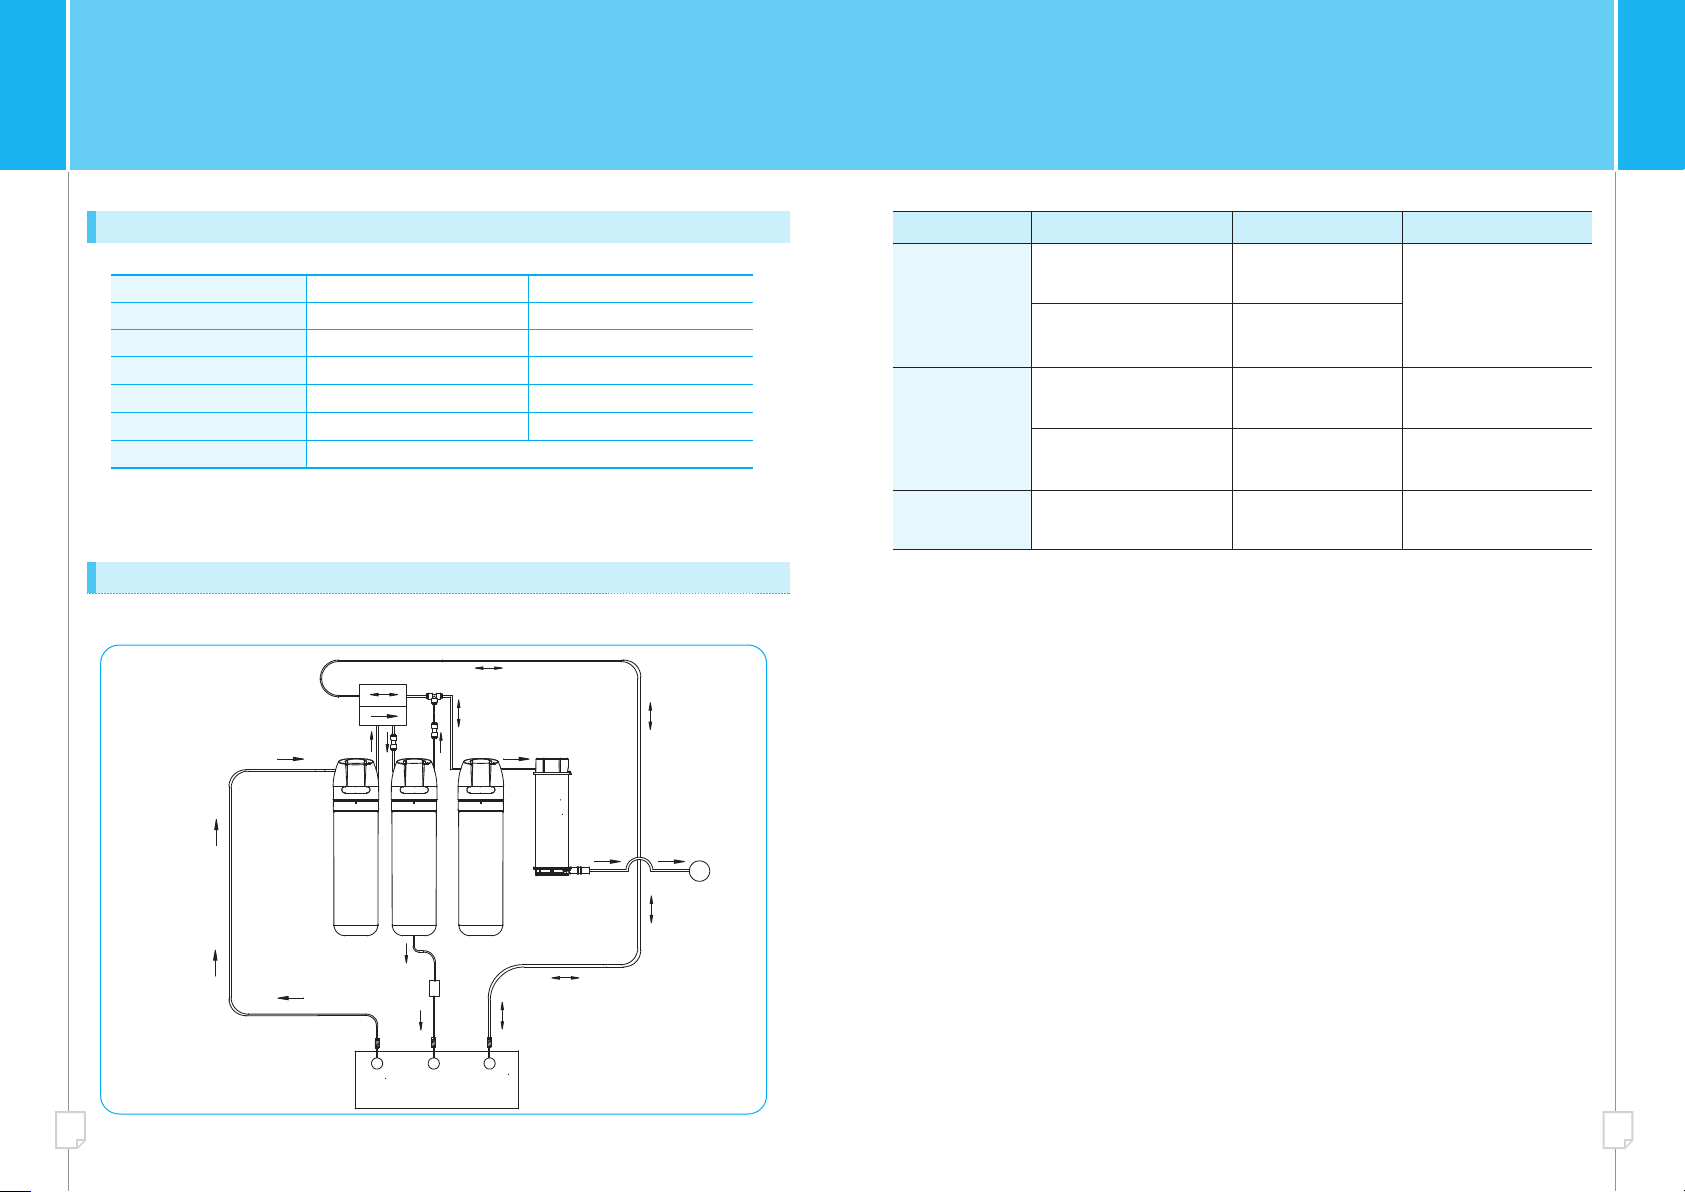
11. Standard & Flow diagram
RO BASIC
MFP
-
1320A
4.0 kg
-
-
-
500WX115DX310H(mm)
※ Information on the plug for electricity power is not applicable for MFP
-
1320A model since it has no UV sterilizer.
11
-
1. Standard
11
-
2. Flow diagram
Product
Model name
Net weight
Rated voltage
Power consumption
UV sterilizer
Dimention
RO ADVANCED
MFP
-
1440A
4.2 kg
O
100
-
240V~, 50/60Hz
5W
RO
Membrane
filter
Tap
Water
Drain
Water
RO
TANK
Flow regulator
Water intake
(Cork)
AUTO SHUT OFF V/V
CHECK V/V
CHECK V/V
TEE EQL 1/4”
Pre
-
complex
filter
Post
Carbon
Block
Filter
(5m)
UV
Sterilizer
12. Troubleshooting
Symptoms Symptoms No
When ambient
water is not
served
Is tap water being supplied?
Request A/S
Wait until the tap water
stops flowing.
Is the adapter (source
water valve) open?
Has not it been used for a
long time?
Is it time to replace
the filters?
Place the water source
valve opened.
Request A/S Use after draining water
Request A/S Request filter replacement
Is the leakage coming from
inside the purifier? -Request A/S after closing
water source valve.
When purified
water tastes
strange
When water
leakage occurs
Yes
1514
This manual suits for next models
3
Table of contents
Popular Accessories manuals by other brands


FIRST TEAM SPORTS
FIRST TEAM SPORTS POP-A-SHOT PREMIUM Assembly instructions

LMI Technologies
LMI Technologies Gocator 2600 quick start guide

Vega
Vega VEGAFLEX 86 operating instructions

AR
AR AP-21 instruction manual

Philips
Philips SH91/51 quick start guide

Minebea Intec
Minebea Intec Maxxis 5 Count PR 5900/82 operating instructions