Clarion ARX7370R User manual

e
Owner’s
manual
/
Mode
d’emploi
¢€
la
[
ion
Bedienungsanleitung
/Istruzioni
per
l'uso
©
,
Gebruiksaanwijzing
/
Manual
de
instrucciones~
_
Bruksanvisning
/
Manual
de
instrugdes
-
ARX7370R
ARX7370RW
RDS-EON/FM-MPX/MW/LW
RADIO
CASSETTE
COMBINATION
WITH
og
CHANGER
CONTROL
COMBINE
RADIO-
CASSETTE
RDS-EON/FM-MPX/
P0/GO
AVEC
CONTROLEUR
DE
CHANGEUR
DE
CD
UKW-MPX/MW/LW-RADIO-KASSETTEN-
KOMBINATION
MIT
CD-WECHSLER-STEUERUNG
MIT
RDS-EON
SINTOLETTORE
A
CASSETTA
RDS-EON/FM-MPX/
MW/LW
CON
CONTROLLO
DEL
CARICATORE
CD
RDS-EON/FM-MPX/MW/LW
TUNER
MET
CASSETTESPELER
EN
BEDIENINGSEENHEID
VOOR
CD-WISSELAAR
COMBINACION
DE
RADIOCASETE
DE
RDS-EON/
FM/MW/LW
CON
CONTROL
DE
CAMBIADOR
DE
DISCOS
COMPACTOS
KOMBINERAD
RDS-EON/FM-MPX/MV/LV-RADIO
OCH
KASSETTSPELARE
MED
CD-VAXLARKONTROLL
COMBINACAO
DE
AUTO-RADIO-LEITOR
DE
CASSETES
RDS-EON/FM-MPX/0M/OL
COM
CONTROLO
DE
CAMBIADOR
DE
CDs
Thank
you
for
purchasing
the
Clarion
ARX7370R/ARX7370RW.
*
This
owner’s
manual
is
for
both
the
ARX7370R
and
the
ARX7370RW.
The
only
difference
between
these
models
is
the
colour
of
the
front
panel.
The
operating
methods
are
the
same.
*
Please
read
this
owner’s
manual
in
its
entirety
before
operating
this
equipment.
*
After
reading
this
manual,
be
sure
to
keep
it
in
a
handy
place
(e.g.,
glove
compartment).
*«
Check
the
contents
of
the
enclosed
warranty
card
and
keep
it
carefully
with
this
manual.
*
This
manual
includes
the
operating
procedures
of
the
CD
changer
that
is
connected
via
the
C-BUS
cable,
of
the
Digital
Sound
Processor
(DSP)
and
of
the
Equalizer
(EQ).
The
CD
changer,
DSP
or
Equalizer
has
its
own
owner’s
manual,
but
no
explanations
for
operating
it
are
described.
Contents
43
CCASSETTE
PRECAUTIONS
3255
poceiia
esate
tis
sateen
wtp
evicewes
se
ee
vases
tiaemcnan
Geces
Sau
oe
Gav
in
eee
aaa
pawiaetea
asa
2
Pik
OP
assets
ocean
Pos
eases
chase
saiiay
uke
wu
nsession
bsaes
a
dt
hada
eta
aaaaana
det
cemb
vans
ace
mmo
taned
lnaadaasuceyeeains
3
32;
PEIPSDOWN
PANE
335.5
ot
coripsiedee
teed
saenecaiies
vce
ented
irdeyaenesaonatswtaeaeia
i
haan
een
aaa:
4
A
ARSON
TOES
acoso
gaecon
tutes
xs
tted
testcase
epee
rade
ss
ea
aneaereeos
Aden
a
RE
5
5.
BUTTON
TERMINOLOGY
5
sewisceacsttedsnncdvisbonavtehskusnuiepercaivclsdhs
usiaiiemsesssaate
na
ouiitaabesoevdaa
dante
caeane
ene
6
INERTIGS
OF
NEO
S
ded
ce
oe
at
ds
hae
ated
ds
wie
Na
a a
taunt
aanscead
Seda
coven
tueuneds
taneudsheaineawetts
6
C=SCISCIO
OP
SKAUNOM
cicsesicds
cexcccaeadinmcpdina
thvecaccale
savin
samebaes
toys
steed
gels
cao
nmpe
wraith
aaa
basins
av
ancenns
ivlenaes
7
G2
REMOTE:
CON
PRO
E
6.4
oo
scced
crccweisucecs
Sua
ctestean
la
acat
ss
ostertueusasitn
ous
paacseatan’Getdakenan
wenngauccuaneensnle
ea
eaen
oes
8
INISSFHING
NG:
BAThOry
ctw
dos
chee
acento
sat
as
sancti
eh
tuata
crates
Statice
ete
d
eda
ouyasseseanayaaanioas
adel
aw
ponss
cudual
Seseene
8
Eunctions
of-
Remote
Control
UA
BOON
asec
oii
ed
sds
oa
yine
tees
oe
saat
igea
Gs
eects
9
Fs
OPERATION
yi
asia
awstats
cc
cases
aes
eos
em
gc
omen
tacawien
Raa
chang
Sean
eng
en
ass
10
BASIC
QPOrAtiOn
is:
escinssiteacsurtnaled
sausectecaacenalecis
ducdss
ep
acuta
sanivadhavedaseauuauna
doeasanataleoeaalamesaaued
veateebyluticciate
10
FRACIO
TOD
OFATOIS
i
aiiiea
tats
icricn
Ceieha
crn
eked
aca
Sas
ears
uassa
vie
dhaley
deena
«Big
Sos
Sj
anne
wasaleioa
dau
stabaiasududep
tupndoeaases
12
PRES?
OTROS
ea
sts
cs
fahetacectigs
ce
Sten
alates
aioe
sou
tuto
wc
apts
muden
nse
baneadistinwmane
vale
araiemeait
14
TADS
WIP
SIAUONS
sasha
ute
ele
aay
ea
eleRtevG
Ghas
sleds
oa
orelaa
han
Paaae
aoe
ised
henatohdareaeiaadtaducd
manumeutes
18
CD
Changer
Operaons
ssxcctt
nas
cets
se
acsaannnue
dy
eaten
yee
diane
ead
i
taetmemiion
wae
nanaaiions
21
OINER
Hany
RUMCHONS:
onticcatstabnensitaasatecedssulauhg
evs
cadcesaasiesseavarsasaasbanusgnlenGaan
aha
eeiernys
23
DSP.
and
Equalizer:
ODSrations
cass
evi
denneho
eres
tiegst
somantuagis
deacas
wsnen
vo
cioduastass
du'enca
ve
oavbavedela
in
esdvobedes
25
8>
IN
CASE
-
OF
DIPRICUED
YY
sitisctcisteincastoratencenvanattoves
betvinceucitsdbasivas
geisedadepteran
son
tuctrucanl
aatlmedsyetates
29
S..
-BRROA
DISPLAYS
oscciss2cscesine
eects
ise
eee
eee
seg
adn
Lene
pad
watdegaaahbanad
wena
aeleseaae
ddan
30
16.
SPECIFICATIONS
siseie8
6
casecetarsit
tenia
haan
Gactaieiandaisa
oka
taee
aaa
Wuacaia
adieu
227
1.
Tape
slack
can
lead
to
operating
difficultiés.
4.
Do
not
oil
the
cassette
mechanism.
Remove
tape
slack
before
inserting
a
cas-
5.
Always
remove
the
cassette
from
the
mecha-
sette,
particularly
when
using
C-90
or
prere-
nism
when
not
in
use.
Exposure
to
direct
sun-
corded
cassettes.
light,
extreme
temperatures
or
high
humidity
2.
Avoid
use
of
C-120
or
longer
cassettes
(The
may
damage
cassettes.
-
very
thin
tape
may
stretch
or
break).
3.
Clean
the
head
periodically
by
playing
a
clean-
ing
cassette
in
the
player.
Avoid
touching
the
head
with
magnetic
or
hard
objects.
2
ARX7370R/ARX7370RW
Clarion
a
A
ALPHA
(OZ
CAR'D'S
S80)
—.
AON)
TED
"(250
\)
(|
Se
||
|\
|
pe
|e
wee
ee
eee!)
Ae!
Owner’s
manual
/
Mode
d’emploi
~~
Bedienungsanleitung
/Istruzioni
per
l'uso
Gebruiksaanwijzing
/
Manual
de
instrucciones
Bruksanvisning
/
Manual
de
instrug6es
SRO
oom
Meas
SETAE
Ra
Becki
ARX7370R
ARX73/O0RW
RDS-EON/FM-MPX/MW/LW
RADIO
CASSETTE
COMBINATION
WITH
CD
CHANGER
CONTROL
e
COMBINE
RADIO-CASSETTE
RDS-EON/FM-MPX/
PO/GO
AVEC
CONTROLEUR
DE
CHANGEUR
DE
CD
UKW-MPX/MW/LW-RADIO-KASSETTEN-
KOMBINATION
MIT
CD-WECHSLER-STEUERUNG
MIT
RDS-EON
SINTOLETTORE
A
CASSETTA
RDS-EON/FM-MPX/
MW/LW
CON
CONTROLLO
DEL
CARICATORE
CD
RDS-EON/FM-MPX/MW/LW
TUNER
MET
CASSETTESPELER
EN
BEDIENINGSEENHEID
VOOR
CD-WISSELAAR
COMBINACION
DE
RADIOCASETE
DE
RDS-EON/
FM/MW/LW
CON
CONTROL
DE
CAMBIADOR
DE
DISCOS
COMPACTOS
KOMBINERAD
RDS-EON/FM-MPX/MV/LV-RADIO
OCH
KASSETTSPELARE
MED
CD-VAXLARKONTROLL
COMBINACGAO
DE
AUTO-RADIO-LEITOR
DE
CASSETES
RDS-EON/FM-MPX/OM/OL
COM
CONTROLO
DE
CAMBIADOR
DE
CDs

Thank
you
for
purchasing
the
Clarion
ARX7370R/ARX7370RW.
*
This
owner’s
manual
is
for
both
the
ARX7370R
and
the
ARX7370RW.
The
only
difference
between
these
models
is
the
colour
of
the
front
panel.
The
operating
methods
are
the
same.
*«
Please
read
this
owner’s
manual
in
its
entirety
before
operating
this
equipment.
*
After
reading
this
manual,
be
sure
to
keep
it
in
a
handy
place
(e.g.,
glove
compartment).
*
Check
the
contents
of
the
enclosed
warranty
card
and
keep
it
carefully
with
this
manual.
*
This
manual
includes
the
operating
procedures
of
the
CD
changer
that
is
connected
via
the
C-BUS
cable,
of
the
Digital
Sound
Processor
(DSP)
and
of
the
Equalizer
(EQ).
The
CD
changer,
DSP
or
Equalizer
has
its
own
owner’s
manual,
but
no
explanations
for
operating
it
are
described.
Contents
Lvs
“CASSETTE
PRECAUTIONS
ssc
cesecseccteidiesunitaescasrewseeedcetaatn
acca
Avsaeenanaeadutaacnsaceectoutaeatade
eee
2
i
CP
scree
aes
ik
aetiseass
wacten
cod
catecuteea
chante
we
ean
Gaecancs
i
asoe
a
A
sa
csecavedondeehaasuaptanadteadeltazgyneadtanetteeeiiaieuncbitineen
3
3.
(FLIP
DOWN
PANEL
«sssccncice
cise
detesso
cite
chara
am
cecoseitiaia
tee
eheuelsacte
sth
adage
eiendmaactia
aes
4
Are
MC
ON
VOUS
crseo
sacs
be
siesdssernateuces
an
tesdtd
fossthneinssthuedtaautalsancehesn
cede
named
acl
ce
hace
see
dldeal
aes
edviurtes
5
Be
BUTTON
FE
RIMINOL
OG
Y
is
css
ees
cna
tse
ta
te
erinced
Sa
saiica
gh
x
csinds
rncsnae
aves
eneie
bs
taasulie
dadboaoorioahes
6
Wammies
OF
BUTONS
i
jaiecs
os
derecientotecnusteatsastanten
tes
auic
ney
anaxeyrse
dusaremmuaadddgacdeieeneeahdsSuease
auseata
tas
6
PES
SISCIOR
CDE
CALIONN
es
oapiaecews
ce
ces
deh
casas
cae
cerca
tS
yas
ue
Sado oacw
sca
cae
ais
bis
aac
atgahens
Jeaeni
added
7
Be
EMO
FE
CONT
pre
saat
co
gateeas
ean
to
eatewtcti
echt
cca
eet
etree
cactcnc
tanith
reek
sinmetioceas
haa
a
8
IASSMUAG
NE
BAT
CY
ctind
ct
tcaca
dod
pesctvaceweriepusshostoetues
steadiness
hebiacandeacataanaty
iil
ence
Wa
aetexnde
dvb
Secdeavnsasiees
8
Functions
of
Remote
Control
Unit
Buttons
Schl
Suh
che
eady
Shee
Bc
Actas
gah
tes
ca
ad
wad
oases
aie
tat
stall
9
Tae
OPERATIONS
gscchocistn
es
cmitycets
sccsutacdsuterecucasevouis
ansauanese
cone
unicatnanns
uatuairalantiareiatiara
maar
ats
Santee
10
PASO
COTO
IS
2
caectiv
cuts
sdaay
crue
svowdutanesntsetuacoabratcsauevawnsains
dis
va.
tapnaileunina
si
Seyyasesocned
caatanavesepaucraneeseeads
10
PRACHO
CDC
OINS
tet
rec
eneus
raed
aakaweats
eta
erenctaaMecaccte
etek
ARC
tee
hay
ih
atten
Atal
de
12
FRED
S
20
PATON
Ss
aa
has
ace
ot
SO
ine
eet
sea
ust
cae
hala
Tu
gatalssby
patente
nie
scoatya
suniaiGlt
14
TADS
ODS
TAU
ONS
eid
rseste
occe
rev
Ssce
suet
a'asat
tune
a
ctete
nanan
teice
nbn
Daas
anlieneeh
tucae
ah
euieat
utd
ca
becoes
ident
Causal
meaaaieanrn
18
CDi
CH
anGGr
ODE
AlOMS
-vc.sescivtscertual
nest
navvialscrisodetautbrnitnadoantelantiias
ivuaaateeudatvaa
reser
eosaisel
wonenadmeneebad
21
OIRER
HAMGY
(PURCIIONS:
sini
festa.
pun
eile
stags
si
ces
ayia
tn
odahenadoueaverieabattuaciniunniehers
dicen
nisl
w
ee
oaa
23
DSP-and
Equalizer
Operations
5:9.
.csi2o
cys
caves
dasacs
etuacatensesGaanwenssaaecas
chases
andanday
nares
aenietenes
25
Bi-
INSCASE
‘OF
DIB
ICU
BD
Moet
saiesechiene
soon
Secten
ats
cava
nnpianasasanatecch
saviane
diet
amediencceelts
Meaede
date:
29
Sut
ERROR:
DISPLAY
Siiiviccictscatsaver
tacrevalidegsvalieans
ta
odenisboni
aegis
nl
hdeeeuiate
Seas
eee
annnsanvarg
tae
aia?
30
10,
SPECIFICATIONS
-siiciecssaccecteedsunelsenstsineceanvhaschacpteeiteaticbasnuaderdivecue
nines
sndnaeuaa
saute
awieneras
227
4.
CASSETTE
PRECAUTIONS
1.
Tape
slack
can
lead
to
operating
difficultiés.
4.
Do
not
oil
the
cassette
mechanism.
Remove
tape
slack
before
inserting
a
cas-
5.
Always
remove
the
cassette
from
the
mecha-
sette,
particularly
when
using
C-90
or
prere-
nism
when
not
in
use.
Exposure
to
direct
sun-
corded
cassettes.
light,
extreme
temperatures
or
high
humidity
2.
Avoid
use
of
C-120
or
longer
cassettes
(The
may
damage
cassettes.
very
thin
tape
may
stretch
or
break).
3.
Clean
the
head
periodically
by
playing
a
clean-
ing
cassette
in
the
player.
Avoid
touching
the
head
with
magnetic
or
hard
objects.
2
ARX7370R/ARX7370RW

5.
BUTTON
TERMINOLOGY
—
Note:
e
Be
sure
to
read
this
chapter
referring
to
the
front
diagrams
of
chapter
“4.
CONTROLS”
on
page
5
(unfold).
Names
of
Buttons
[1]
POWER
button
FUNC
(function)
button
‘{2)
cv
-selector
(ALPHA-TOUCH
CONTROLLER)
[3]
OPEN
button
[4]
DCP/FLIP
DOWN
PANEL
[5]
Display
[6]
DISP
(display)
button
PS/AS
(preset
Scan/auto
store)
DUTION
.......
ee
eee
cere
eees
[Cm]
SCNi:(scan)
DUTON
itdnsesidcasheninnannse
ens
[(e3),
(@
AF
(alternative
frequencieS)
DUttON
.........
cee
ececeeeeeeeeeeenes
[Gm]
BES
(bia
Skib)
DUTOM
eigscaicacccoussdossicaupanvodadedsdocteccengauhtseus
[(e9)]
RPT
(repeat)
DUtION
.....cecececessesessesstessessessesseseeesneeees
(ea),
(SI
[9]
PTY
(programme
type)
DUtION
0...
cece
eeececeeseeteeseeeeeeeeeeees
[Cm]
Dolby
NR
button
(B-C
NR)
....sssssssssssssssssssesseesscsssenssssnneeees
(eal
RDM
(random)
buttons
susie
ice
anni
tated:
jw)
TA
(traffic
announcement)
DUTION
.......c.ecceeseeeseesteeeteeteseees
(Gm)
]
A)
SEAN
Bilt
ittvcz2)
vasactesinca
Ges
soceiacdeiniteameenuiacte
Gindaandete
[Gat]
PROG
(programme)
ButtON
j..cci
cs
ccessnsseressseesesesoeesatecteecees
[e9)]
MAG
(magazine)
DUHON
dcaiiscpemioriectxinieretiaawantened
[S}
fi2]
Preset
bUtONS.
(1:
tO.6)
scseeccssssaericisisnndtacctaonwemaeriersienns
(Oa)
DiFeSCtDUR
ONS
11696)
vor
cote
nsaihepe
acetone
resaeenveettenside
[SI
[13]
A-M
(audio
mode)
button
LOUD
(loudness)
button
Tel
TRE
DUMORG
aceaensc
ea
tclvetla
shied
anlar
eleeiecl
ined
(we)
15]
ADJ
(adjust)
button
DSP
(digital
sound
processor)
button
[17]
EQ
(equalizer)
button
[8]
Eject
button...
ee
secesssseesntescssssetesseesssnneeessnnessssnsesesssneensnes
[eal]
Gasestte
Insertion
Slot
x22
sessca
esata
soaheaden
[(e)]
[Gar}]:
In
the
radio
(RDS)
mode
[(g)}]:
In
the
tape
mode
(wr
In
the
CD
changer
mode
6
ARX7370R/ARX73
70RW

The
control
panel
can
be
detached
to
prevent
theft.
When
detaching
the
control
panel,
store
it
in
the
DCP
(DETACHABLE
CONTROL
PANEL)
case
to
prevent
scratches.
We
recommend
taking
the
DCP
with
you
when
leaving
the
car.
Removing
the
DCP
1.
Turn
the
power
off.
2.
Deeply
push
in
the
OPEN
button
and
open
the
FLIP
DOWN
PANEL.
OPEN
button
aN
le.
FLAP
Be
sure
to
close
the
HOLD
FLAP
for
safety
when
removing
the
DCP.
Attaching
the
DCP
1.
Insert
the
right
side
of
the
DCP
into
the
main
unit.
2.
Insert
the
left
side
of
the
DCP
into
the
main
unit.
place.
*
The
DCP
can
easily
be
damaged
by
shocks.
After
removing
it,
be
careful
not
to
drop
it
or
subject
it
to
strong
shocks.
¢
If
the
FLIP
DOWN
PANEL
is
kept
open,
the
DCP
may
drop
due
to
vibration
of
the
car.
This
results
in
damage
to
the
DCP.
So
close
the
FLIP
DOWN
PANEL
or
remove
the
DCP
to
store
into
the
case.
(See
figure
below.)
DCP
case
¢
The
connector
connecting
the
main
unit
and
the
DCP
is
an
extremely
important
part.
Be
careful
not
to
damage
it
by
pressing
on
it
with
fingernails,
screwdrivers,
etc.
Note:
¢
/f
the
DCP
is
dirty,
wipe
off
the
dirt
with
a
soft,
dry
cloth
only.
ARX7370R/ARX7370RW
3
3.
FLIP
DOWN
PANEL
The
ARX7370R
and
the
ARX7370RW
use
a
flip-down
structure
that
makes
possible
large-size
dis-
plays.
eee
ee
eee
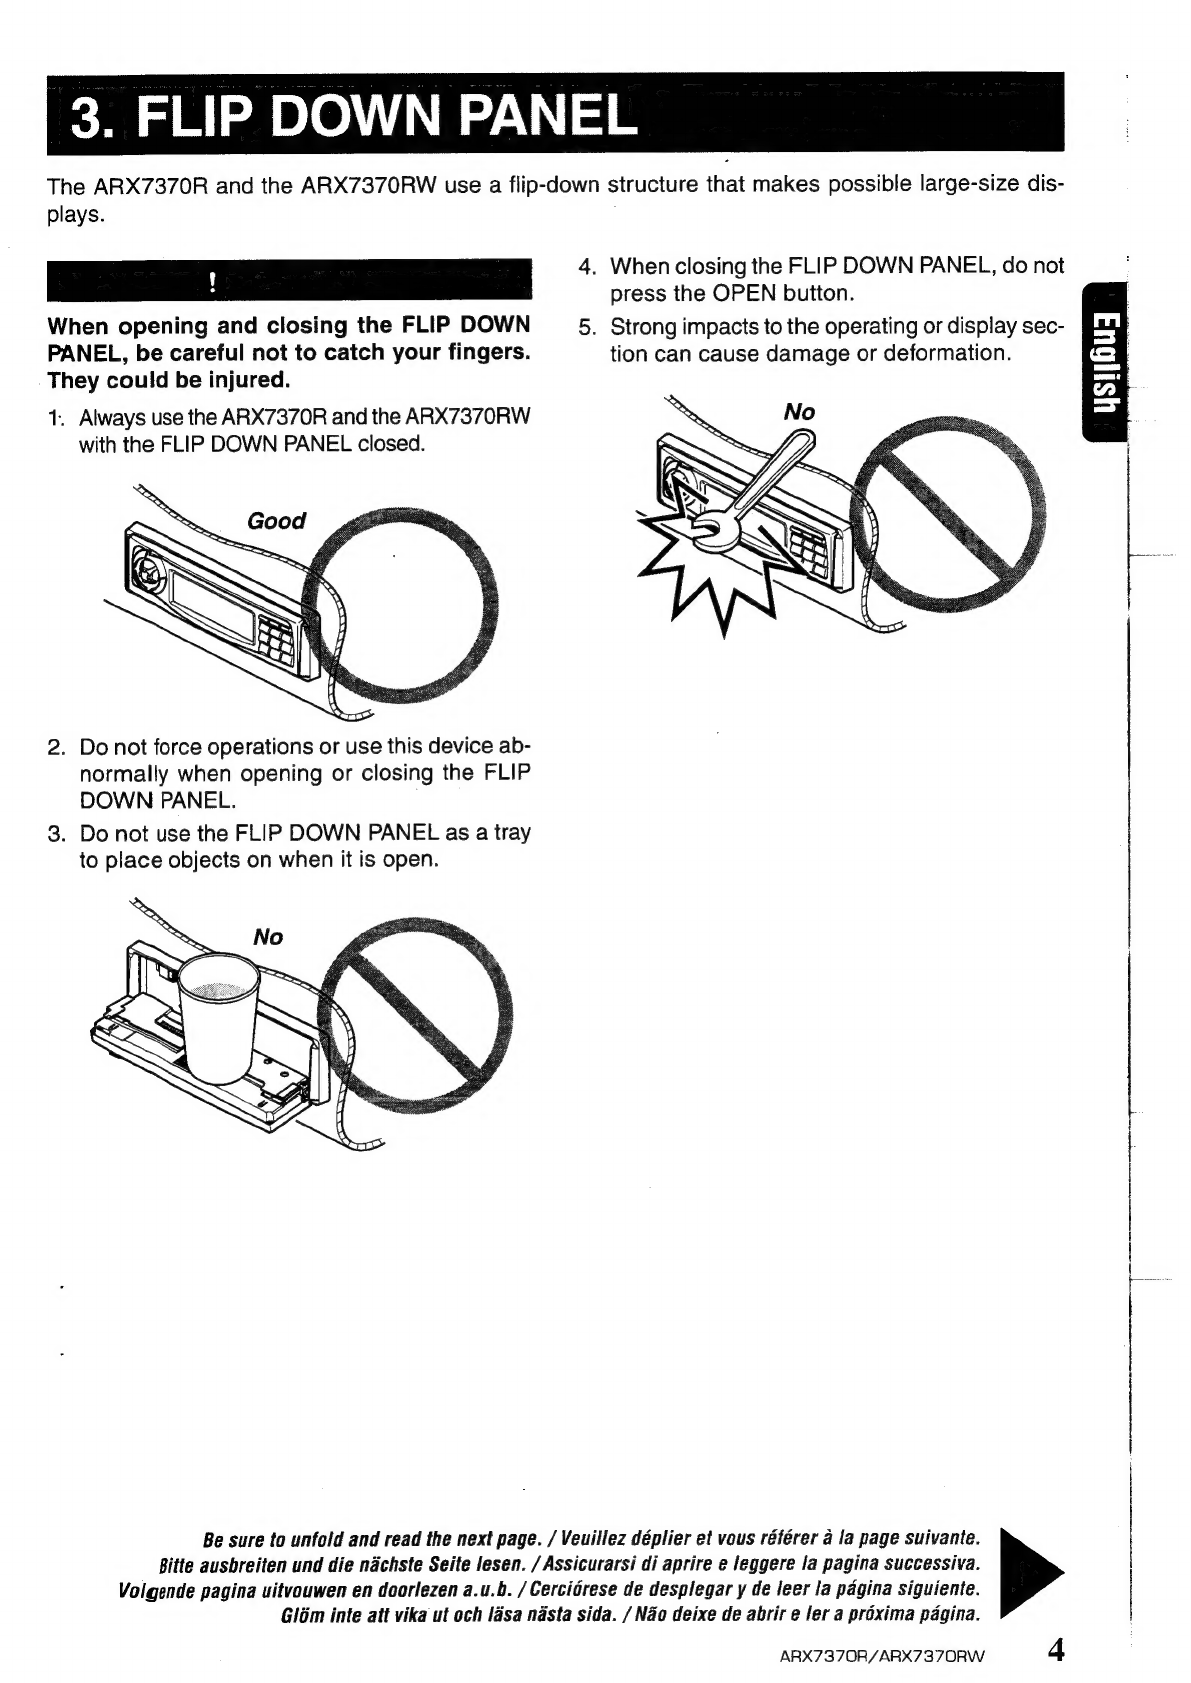
4.
When
closing
the
FLIP
DOWN
PANEL,
do
not
press
the
OPEN
button.
When
opening
and
closing
the
FLIP
DOWN
5.
Strong
impacts
to
the
operating
or
display
sec-
PANEL,
be
careful
not
to
catch
your
fingers.
tion
can
cause
damage
or
deformation.
They
could
be
injured.
1.
Always
use
the
ARX7370R
and
the
ARX7370RW
with
the
FLIP
DOWN
PANEL
closed.
2.
Do
not
force
operations
or
use
this
device
ab-
normally
when
opening
or
closing
the
FLIP
DOWN
PANEL.
3.
Do
not
use
the
FLIP
DOWN
PANEL
as
a
tray
to
place
objects
on
when
it
is
open.
Be
sure
to
unfold
and
read
the
next
page.
/
Veuillez
déplier
et
vous
référer
a
la
page
suivante.
Bitte
ausbreiten
und
die
nachste
Seite
lesen.
/
Assicurarsi
di
aprire
e
leggere
la
pagina
successiva.
Volgende
pagina
uitvouwen
en
doorlezen
a.u.b.
/
Cerciérese
de
desplegar
y
de
leer
la
pagina
siguiente.
Glém
inte
att
vika
ut
och
lasa
nasta
sida.
/
Nao
deixe
de
abrir
e
ler
a
préxima
pagina.
ARX7370R/ARX7370RW
4
4,
CONTROLS
/
REGELAARS
/
|
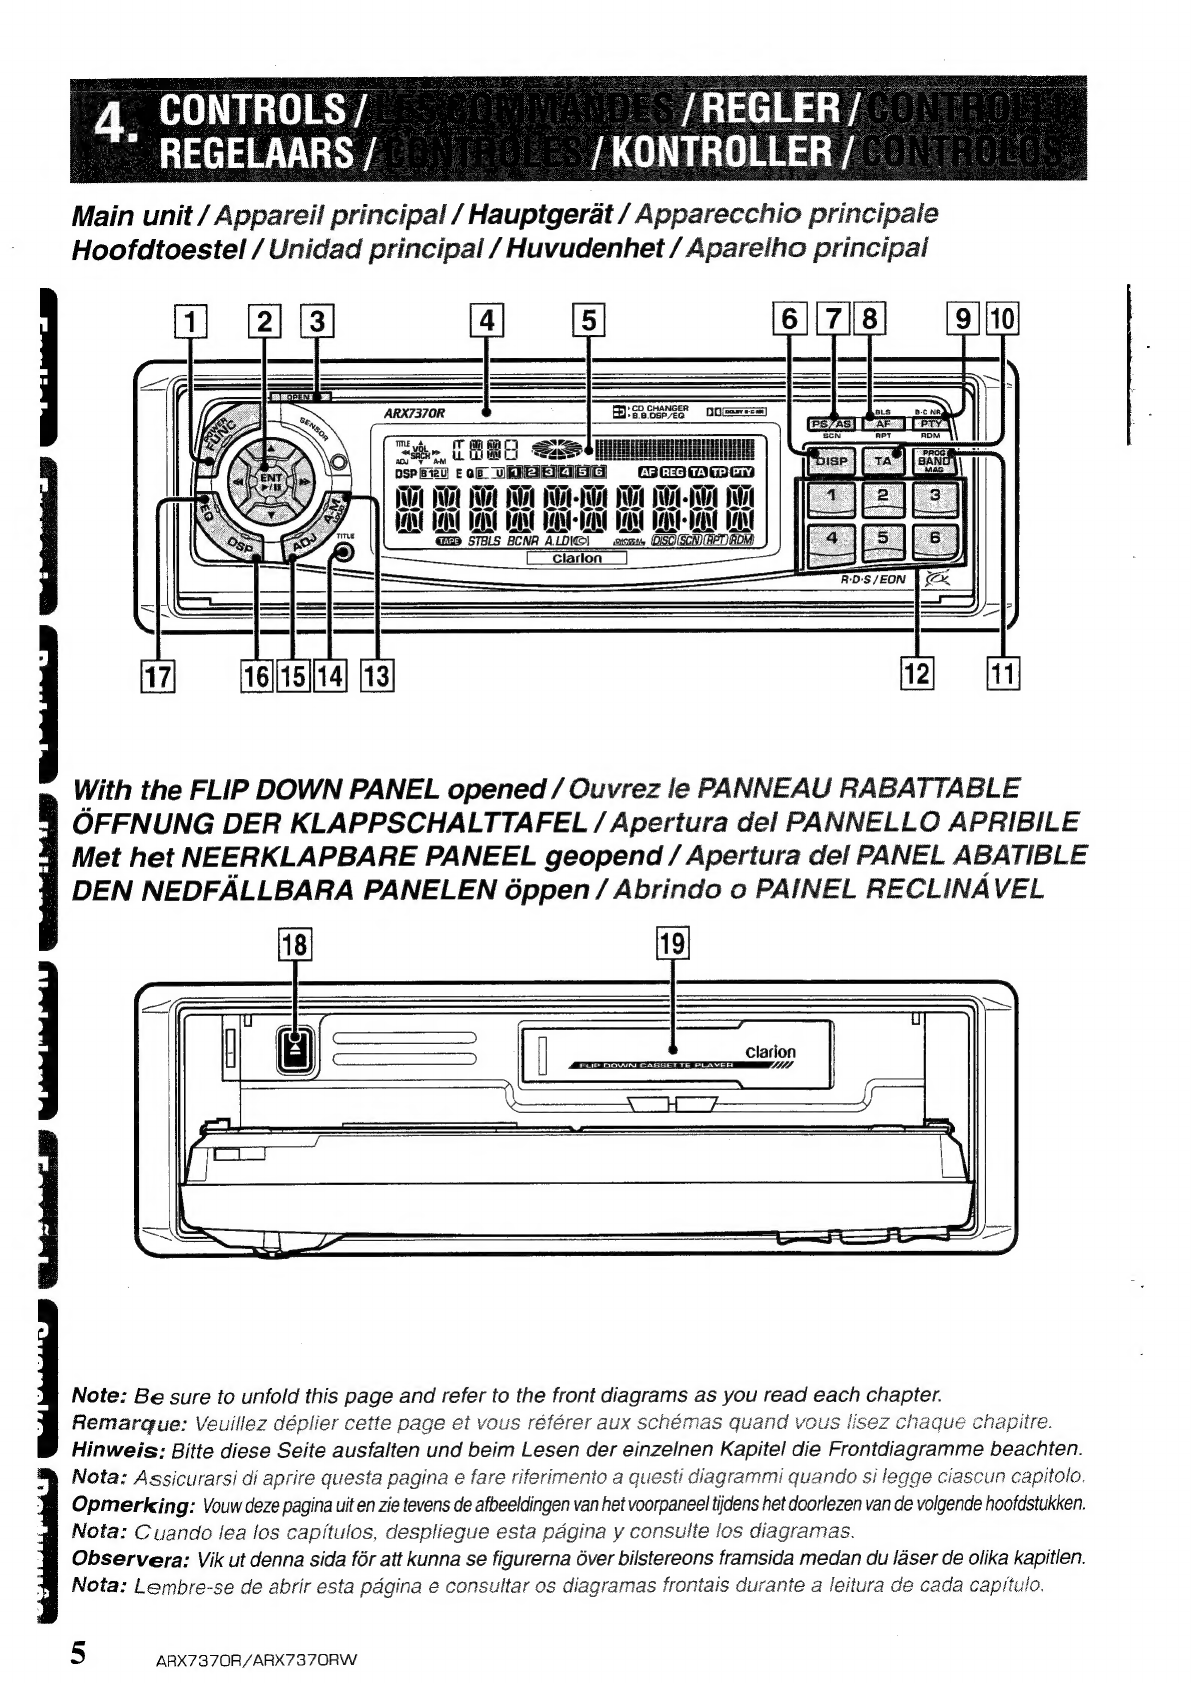
Main
unit
/
Appareil
principal
/
Hauptgerat
/
A
Sena
principale
Hoofdtoestel
/
Unidad
principal
/
Huvudenhet
/
Aparelho
principal
ARX7370R
Heese
O0menses)
So,
TABS
Sct
psP
8120)
Eon
UR
aefreclTaTiey
Pry)
NUM
it.
iui
NUM
OT
AUT
UT
FANE
VANE DEAN
VANE
HEANA-
VAAN
VANE
VAAN
Mit
|
lit
GSD
STBLS
BCNA
ALDIC|
acm,
OSOISEN)
[clarion
_]
With
the
FLIP
DOWN
PANEL
opened
/
Ouvrez
le
PANNEAU
RABATTABLE
OFFNUNG
DER
KLAPPSCHALTTAFEL
/
Apertura
del
PANNELLO
APRIBILE
Met
het
NEERKLAPBARE
PANEEL
geopend
/
Apertura
del
PANEL
ABATIBLE
DEN
NEDFALLBARA
PANELEN
6ppen/
Abrindo
o
PAINEL
RECLINAVEL
Clarion
LAYER
Lik
Note:
Be
sure
to
unfold
this
page
and
refer
to
the
front
diagrams
as
you
read
each
chapter.
Remarque:
Veuillez
déplier
cette
page
et
vous
référer
aux
schémas
quand
vous
lisez
chaque
chapitre.
Hinweis:
Bitte
diese
Seite
ausfalten
und
beim
Lesen
der
einzelnen
Kapitel
die
Frontdiagramme
beachten.
Nota:
Assicurarsi
di
aprire
questa
pagina
e
fare
riferimento
a
questi
diagrammi
quando
si
legge
ciascun
capitolo.
Opmerking:
Vouw
deze
pagina
uit
en
zie
tevens
de
afbeeldingen
van
het
voorpaneel
tiidens
het
doorlezen
van
de
volgende
hoofdstukken.
Nota:
Cuando
lea
los
capitulos,
despliegue
esta
pagina
y
consulte
los
diagramas.
Observera:
Vik
ut
denna
sida
fér
att
kunna
se
figurerna
Over
bilstereons
framsida
medan
du
[laser
de
olika
kapitlen.
Nota:
Lembre-se
de
abrir
esta
pagina
e
consultar
os
diagramas
frontais
durante
a
leitura
de
cada
capitulo.
iahtLii)
Cadateidiiah
A
Ceiieteinie
2)
Gibtiee
ay
i
Na
3
a
7o\\\.
;
Ea
5
ARX7370R/ARX73
7ORW
@
-Selector
Operation
(ALPHA-TOUCH
CONTROLLER)
*
The
ALPHA-TOUCH
CONTROLLER
is
called
“a-selector’
in
this
owner's
manual.
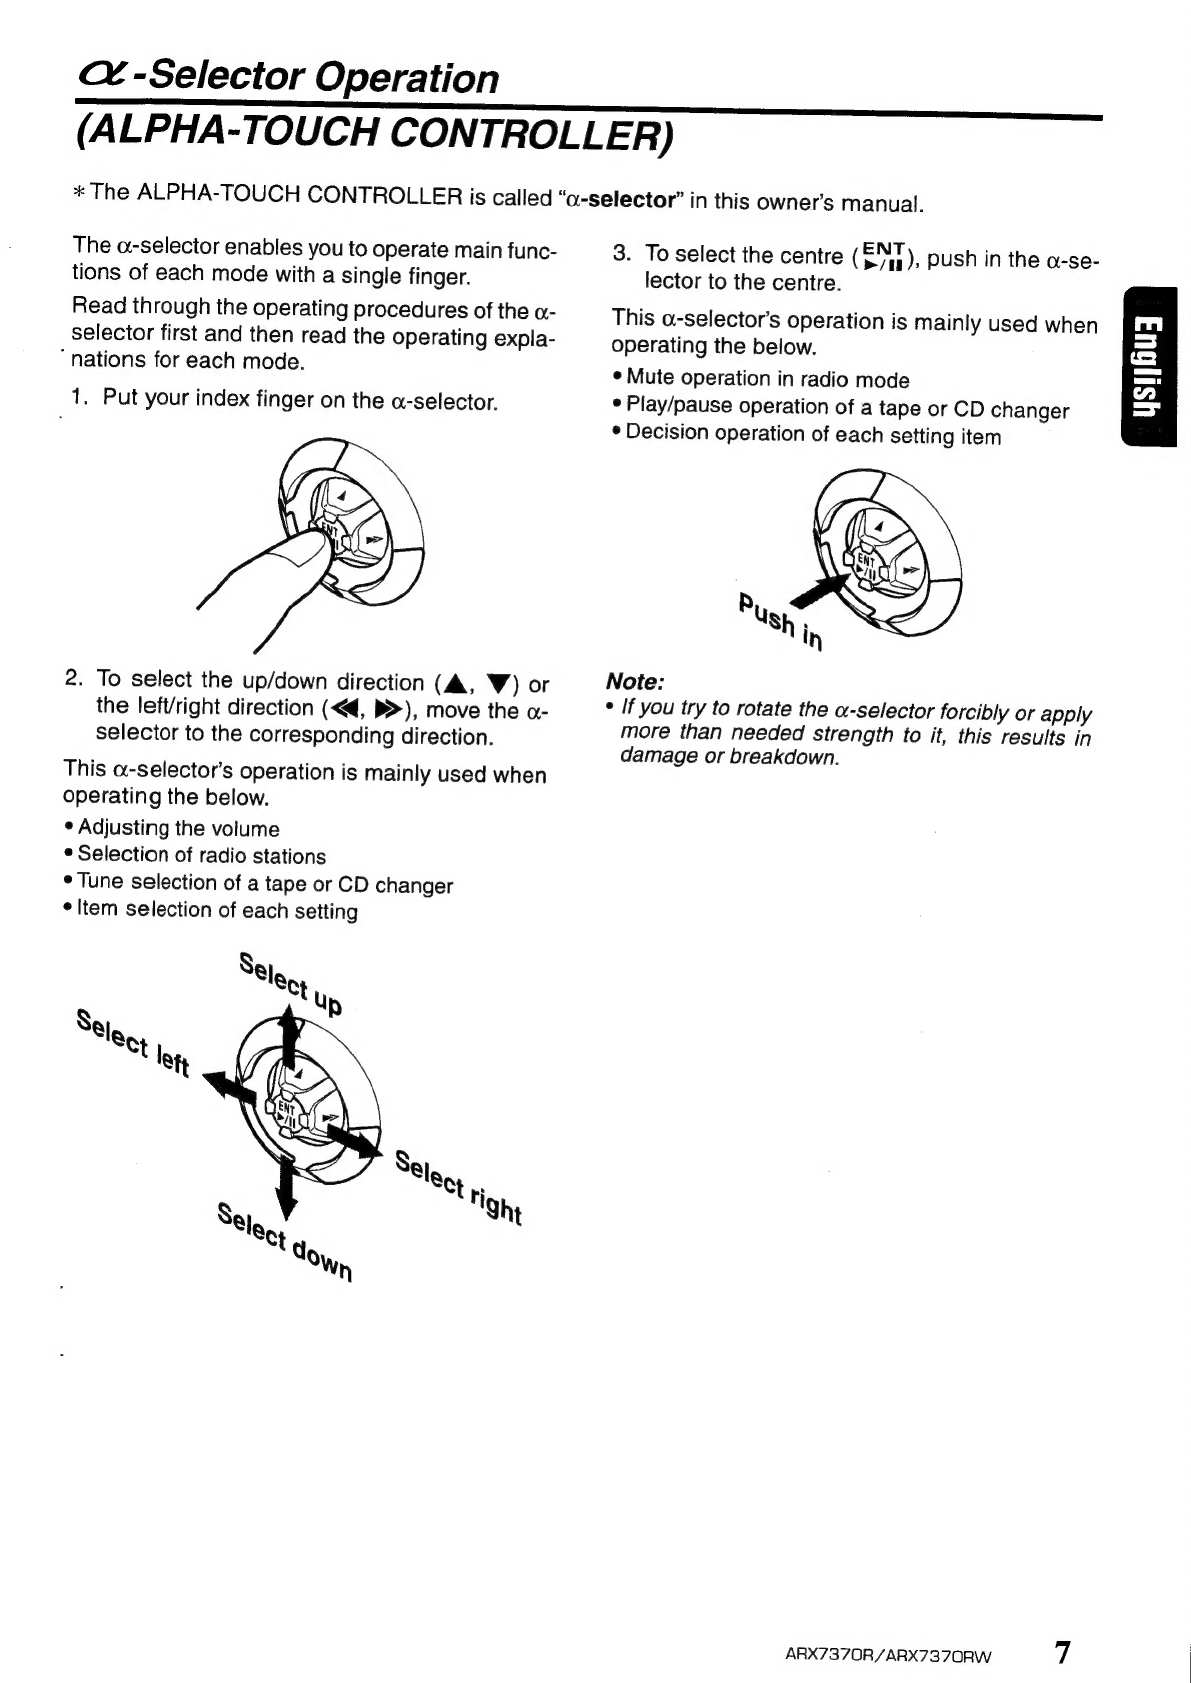
The
a.-selector
enables
you
to
operate
main
func-
3.
To
select
the
centre
(ENT)
push
in
the
a-se-
tions
of
each
mode
with
a
single
finger.
lector
to
the
centre.
Read
through
the
operating
procedures
of
the
a-
This
o-selector’s
operation
is
mainly
used
when
selector
first
and
then
read
the
operating
expla-
operating
the
below.
“Nations
for
each
mode.
*
Mute
operation
in
radio
mode
1.
Put
your
index
finger
on
the
a-selector.
*
Play/pause
operation
of
a
tape
or
CD
changer
;
*
Decision
operation
of
each
setting
item
2.
To
select
the
up/down
direction
(A,
W)
or
Note:
the
left/right
direction
(<<,
b>),
move
the
a-
¢
If
you
try
to
rotate
the
a-selector
forcibly
or
apply
selector
to
the
corresponding
direction.
more
than
needed
strength
to
it,
this
results
in
damage
or
breakdown.
This
a-selector’s
operation
is
mainly
used
when
operating
the
below.
¢
Adjusting
the
volume
*
Selection
of
radio
stations
¢
Tune
selection
of
a
tape
or
CD
changer
*
Item
selection
of
each
setting
ARX7370R/ARX7370RW
7

6.
REMOTE
CONTROL
|
Receiver
for
remote
control
unit
Operating
range:
30°
in
all
directions
Remote
control
unit
Signal
transmitter
Inserting
the
Battery
Remote
control
unit
1.
Turn
the
remote
control
unit
upside
down,
push
the
lock
in
the
direction
of
the
arrow,
and
pull
out
the
battery
holder.
2.
Insert
the
enclosed
battery
(CR2025)
with
the
“+”
side
facing
up.
3.
Push
the
battery
holder
back
in
securely
until
a
click
is
heard.
Rear
side
Enclosed
battery
(CR2025)
Notes:
Using
batteries
improperly
can
cause
them
to
ex-
plode.
Take
note
of
the
following
points:
©
When
replacing
the
battery,
be
sure
to
set
the
new
battery
with
the
“+”
side
facing
up.
©
Do
not
short-circuit,
disassemble
or
heat
batter-
ies.
®
Do
not
dispose
of
batteries
in
flames.
°
Dispose
of
spent
batteries
in
the
proper
place.
Battery
holder
8
ARX7370R/ARX7370RW

Functions
of
Remote
Control
Unit
Buttons
Moves
the
next
disc
in
increasing
order.
Switches
the
side
of
the
tape.
[22]
VOLUME
(W
A)
|
Increases
and
decreases
volume
(in
all
modes).
[23]
SEARCH
(<4 p>)
|
Moves
preset
channels
up
|
Fast-forwards
and
rewinds
|
Moves
tracks
up
and
down.
and
down.
tape.
When
pressed
and
held
for
APC
fast-forward
and
1
second:
Fast-forward/fast-
rewind.
backward.
m/l
Turns
mute
on
and
off.
Switches
between
playback
|
Switches
between
playback
and
pause.
and
pause.
[25]
DISP
Switches
between
main
display,
sub
display
and
clock
(CT)
display.
[26]
DSP
PROGRAM
|
Moves
the
DSP
programme
up
(in
all
modes).
[271
EQ
PROGRAM
|
Moves
the
equalizer
programme
up
(in
all
modes).
[28]
PS/AS
Preset
scan.
Fast-forward
scan.
Scan
play.
SCAN
When
pressed
and
held
for
When
pressed
and
held
for
2
seconds:
Auto
store.
2
seconds:
Disc
scan
play.
[29]
PTY
PTY
standby
mode
on
and
|
Selects
Dolby
Noise
Random
play.
DOLBY
NR
off.
Reduction
mode.
When
pressed
and
held
for
RDM
2
seconds:
Disc
random
play.
Repeat
play.
When
pressed
and
held
for
AF
function
on
and
off.
When
pressed
and
held
for
Repeat
play.
When
pressed
and
held
for
2
seconds:
REG
function
2
seconds:
Blank
skip
2
seconds:
Disc
repeat
on
and
off.
function
turns
on
and
off.
play.
TA
on/off
(in
all
modes).
*
Some
of
the
corresponding
buttons
on the
main
unit
and
remote
control
unit
have
different
functions.
ARX7370R/ARX7370RW
9

7.
OPERATION
Basic
Operations
Be
sure
to
set
the
volume
to
the
minimum
level
before
turning
off
the
power
to
the
unit.
Loud
sounds
when
turning
on
the
power
may
impair
your
hearings
or
cause
damage
to
the
unit.
Turning
on
the
power
Note:
e
Be
sure
to
start
the
engine
before
using
the
unit
to
prevent
the
battery
from
running
down.
.
Press
POWER
button
[1].
The
illumination
and
display
on
the
unit
light
up.
The
unit
starts
in
the
function
mode
it
was
in
when
the
power
was
turned
off
last.
Press
and
hold
POWER
button
[1]
for
1
sec-
ond
or
longer
to
turn
off
the
power.
po
—
&
Selecting
a
mode
1.
Press
FUNC
button
[1]
to
select
a
function
mode.
2.
The
function
mode
changes
in
the
following
order:
Radio
-
Tape
-
CD
changer
~
Radio
...
*
If
the
CD
changer
is
not
connected,
the
CD
changer
mode
cannot
be
selected.
Adjusting
the
volume
Select
up
or
down
to
increase
or
decrease
using
a-selector
[2].
*
Selecting
up
or
down
and
holding
for
1
second
or
longer
on
the
a-selector
[2]
continuously
increases
or
decreases
the
volume
respectively.
*
The
volume
level
(step
0
to
33)
appears
in
the
dis-
play.
10
ARX7370R/ARX7370RW
Note:
Be
sure
to
read
this
chapter
referring
to
the
front
diagrams
of
chapter
“4.
CONTROLS’
on
page
5
(unfold).
Adjusting
audio
mode
(use
o&
-selector)
Press
A-M
bution
[13]
to
select
an
item
to
be
ad-
justed.
Each
time
you
press
the
button,
the
item
changes
~
in
the
following
order:
Bass/Treble
-
Balance/Fader
-»
Mode
display...
*
The
display
returns
to
the
previous
mode
7
sec-
onds
after
the
adjustment.
Adjusting
the
tone
Select
“BA:TR”
(bass/treble)
in
the
display.
@BASS
adjustment
(step
—6
to
+6)
Select
right
or
left
to
increase
or
decrease.
@TREBLE
adjustment
(step
—6
to
+6)
Select
up
or
down
to
increase
or
decrease.
TOL
ary
oe
LIN
|
Note:
e
When
the
expand
DSP
(Digital
Sound
Processor)
or
EQ
(Equalizer),
sold
separately,
is
connected
to
the
unit,
the
tone
adjustment
mode
cannot
be
selected.
To
adjust
the
tone,
see
the
section
“DSP
and
Equalizer
Operations”.
Adjusting
the
balance
(step
L9
to
R9)
1.
Select
“BA:FA”
(balance/fader)
adjustment
in
the
display.
2.
Select
right
or
left
to
balance
the
right
or
left
sound
level.
Adjusting
the
fader
(step
F9
to
R9)
1.
Select
“BA:FA”
(balance/fader)
adjustment.
2.
Select
up
or
down
to
balance
the
sound
to-
ward
the
front
or
rear
of
the
vehicle.
aa:
oe
rm
Ct
\~
m
ny
a
te
4
Basic
Operations
a
Loudness
The
loudness
effect
emphasizes
the
bass
and
treble
to
create
a
natural
sound
tone.
When
you
are
listening
to
music
at
a
low
volume,
it
is
recommended
to
use
the
loudness
effect.
@Turning
on
and
off
the
Loudness
Effect
_Pressing
and
holding
LOUD
button
[13]
for
2
sec-
onds
or
longer
turns
the
loudness
effect
on
and
off.
When
the
loudness
effect
is
turned
on,
“LD”
“appears
in
the
display.
When
the
DPH9100/DPH9300
are
connected,
the
Auto
Loudness
effect
(high
grade
type)
be-
comes
available
instead
of
the
loudness
effect
(ordinary
type).
For
further
detail
of
the
Auto
Loudness,
see
the
subsection
“Turning
the
auto
loudness
func-
tion
on
and
off’.
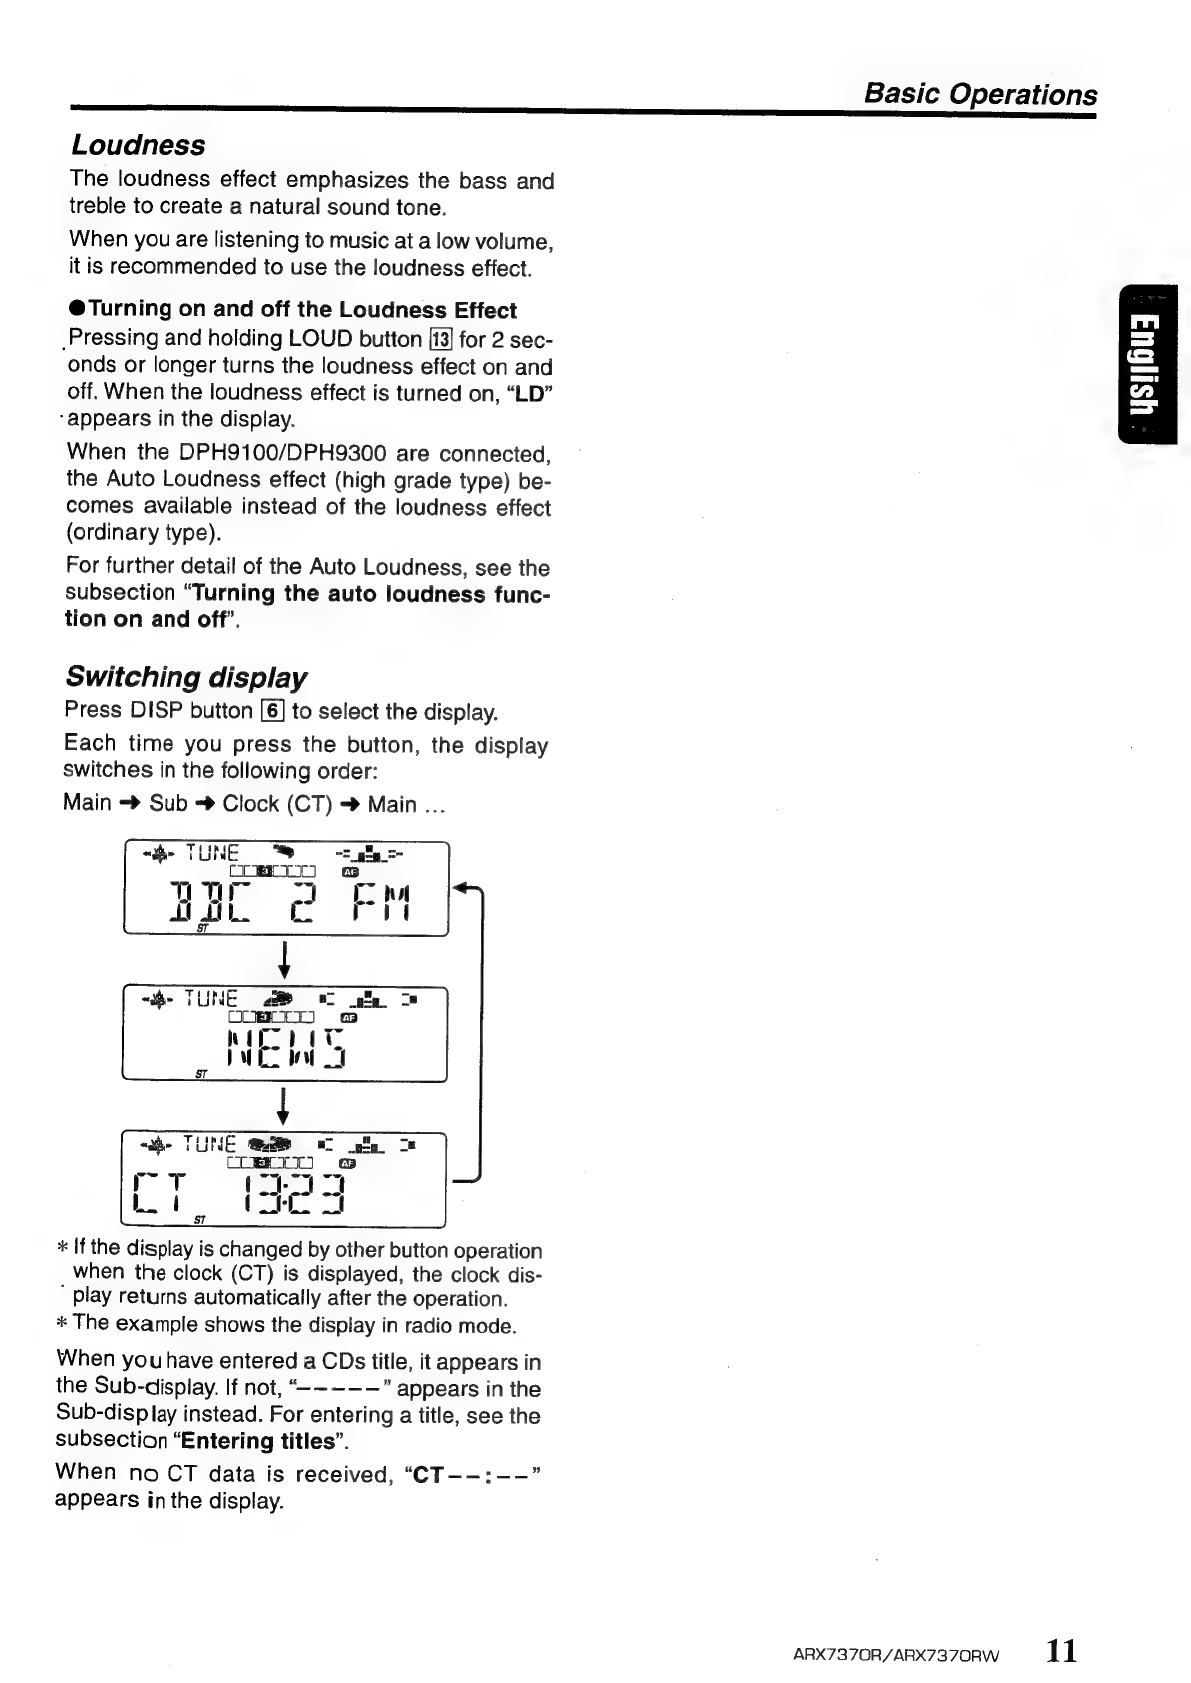
Switching
display
Press
DISP
button
[6]
to
select
the
display.
Each
time
you
press
the
button,
the
display
switches
in
the
following
order:
Main
->
Sub
->
Clock
(CT)
>
Main
...
“the
TUM
"ap
~=_gily
=
OO
ls
TT
i
ot
pa
a
*
If
the
display
is
changed
by
other
button
operation
when
the
clock
(CT)
is
displayed,
the
clock
dis-
"
play
returns
automatically
after
the
operation.
*
The
example
shows
the
display
in
radio
mode.
When
youhave
entered
a
CDs
title,
it
appears
in
the
Sub-display.
If
not,
“----—
”
appears
in
the
Sub-display
instead.
For
entering
a
title,
see
the
subsection
“Entering
titles”.
When
no
CT
data
is
received,
“CT--:--”
appears
in
the
display.
ARX7370R/ARX7370RW
1
1
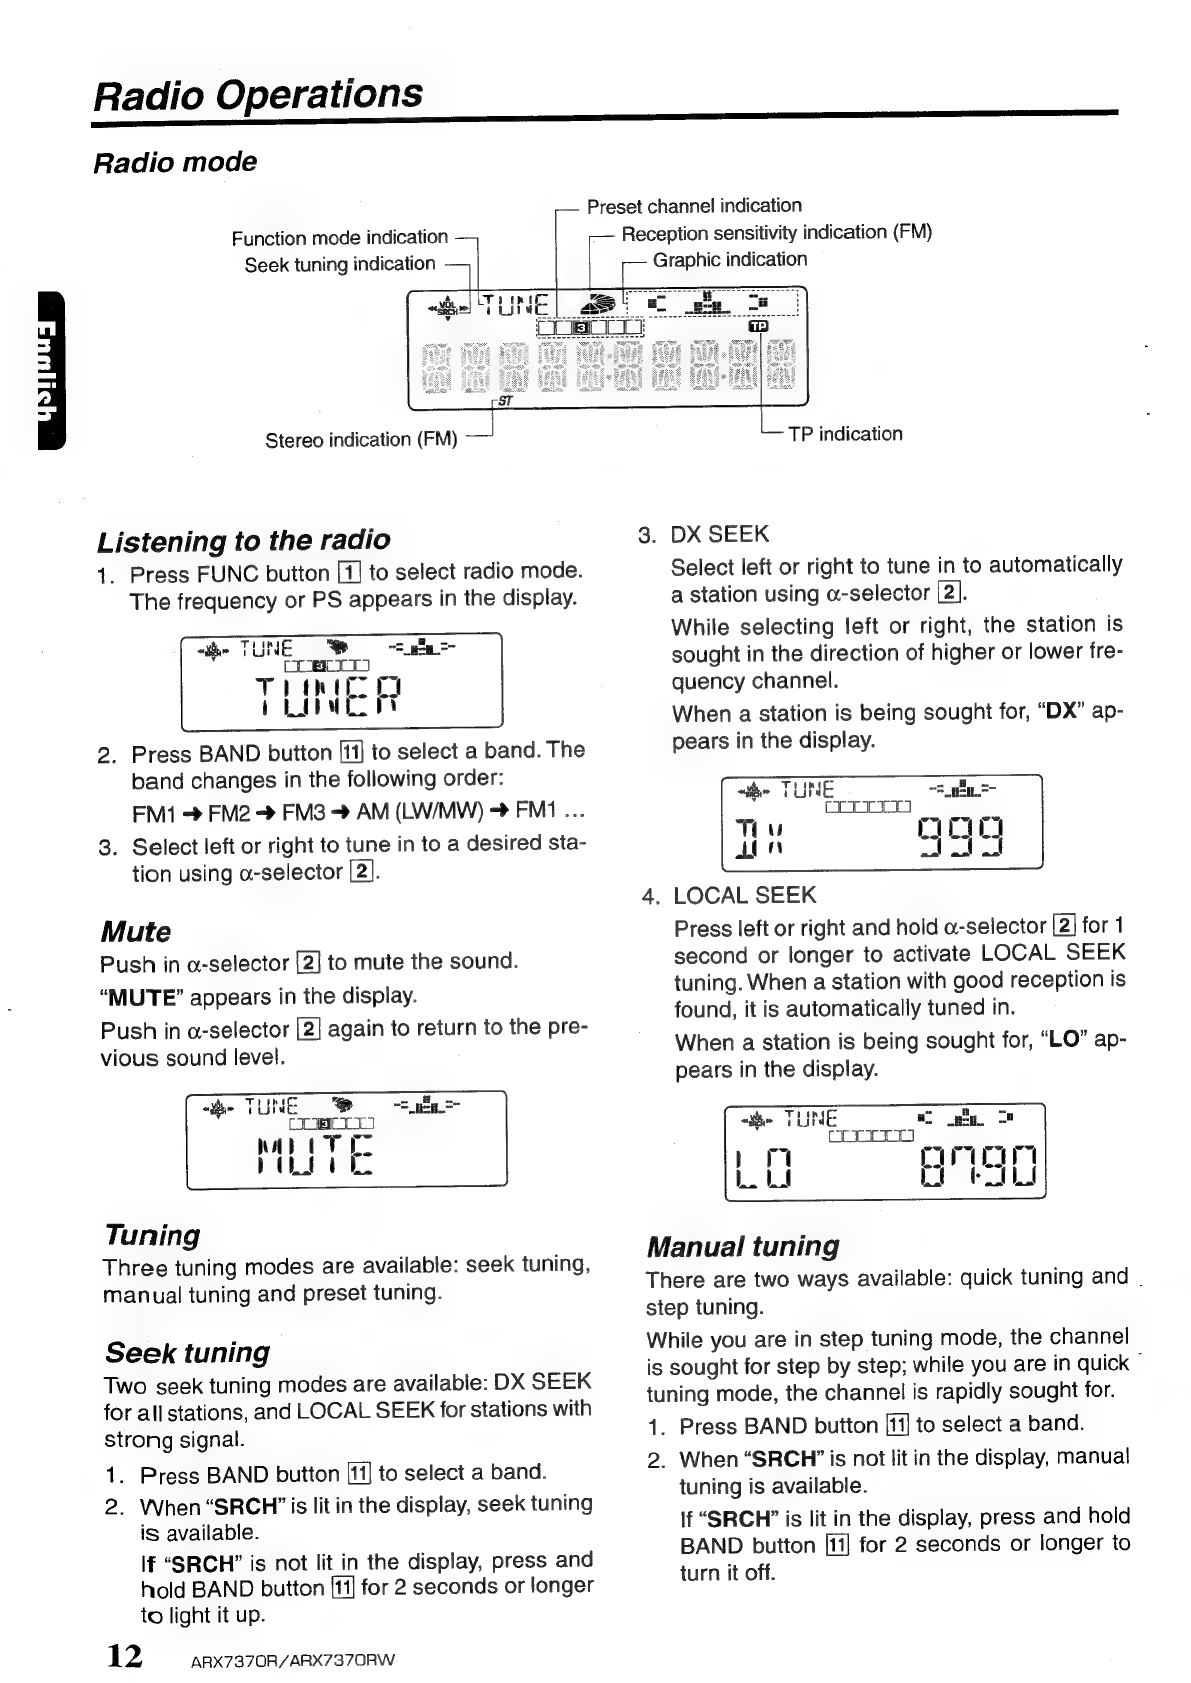
Radio
Operations
Radio
mode
Function
mode
indication
Seek
tuning
indication
Stereo
indication
(FM)
Listening
to
the
radio
1.
Press
FUNC
button
[1]
to
select
radio
mode.
The
frequency
or
PS
appears
in
the
display.
Kk)
~n_plg
=~
aS
a
Press
BAND
button
[11]
to
select
a
band.
The
band
changes
in
the
following
order:
FM1
<>
FM2
<>
FM3
=
AM
(LW/MW)
>
FM1
...
Select
left
or
right
to
tune
in
to
a
desired
sta-
tion
using
a-selector
[2].
Mute
Push
in
o-selector
[2]
to
mute
the
sound.
“MUTE”
appears
in
the
display.
Push
in
a-selector
[2]
again
to
return
to
the
pre-
vious
sound
level.
Tuning
Three
tuning
modes
are
available:
seek
tuning,
manual
tuning
and
preset
tuning.
Seek
tuning
Two
seek
tuning
modes
are
available:
DX
SEEK
for
all
stations,
and
LOCAL
SEEK
for
stations
with
strong
signal.
1.
2.
Press
BAND
button
[11]
to
select
a
band.
When
“SRCH’
is
lit
in
the
display,
seek
tuning
is
available.
if
“SRCH’”
is
not
lit
in
the
display,
press
and
hold
BAND
button
[11]
for
2
seconds
or
longer
to
light
it
up.
12
ARX7370R/ARX7370RW
Preset
channel
indication
Reception
sensitivity
indication
(FM)
Graphic
indication
TP
indication
3.
DX
SEEK
Select
left
or
right
to
tune
in
to
automatically
a
station
using
a-selector
[2].
While
selecting
left
or
right,
the
station
is
sought
in
the
direction
of
higher
or
lower
fre-
quency
channel.
When
a
station
is
being
sought
for,
“DX”
ap-
pears
in
the
display.
4,
LOCAL
SEEK
Press
left
or
right
and
hold
«-selector
[2]
for
1
second
or
longer
to
activate
LOCAL
SEEK
tuning.
When
a
station
with
good
reception
is
found,
it
is
automatically
tuned
in.
When
a
station
is
being
sought
for,
“LO”
ap-
pears
in
the
display.
OCI
Manual
tuning
There
are
two
ways
available:
quick
tuning
and
.
step
tuning.
While
you
are
in
step
tuning
mode,
the
channel
is
sought
for
step
by
step;
while
you
are
in
quick
©
tuning
mode,
the
channel
is
rapidly
sought
for.
1.
Press
BAND
button
[11]
to
select
a
band.
2.
When
“SRCH’
is
not
lit
in
the
display,
manual
tuning
is
available.
lf
“SRCH’
is
lit
in
the
display,
press
and
hold
BAND
button
[ii]
for
2
seconds
or
longer
to
turn
it
off.

Radio
Operations
3.
Tune
in
to
a
station.
@
Quick
tuning:
Press
left
or
right
and
hold
a-selector
[2]
for
1
second
or
longer.
@Step
tuning:
Press
left
or
right.
*
“SRCH”
appears
in
the
display
7
seconds
after
manual
tuning,
and
seek
tuning
becomes
avail-
able.
Recalling
a
preset
station
Preset
tuning
is
a
function
for
storing
stations
to
Preset
buttons
(1
to
6)
which
enables
you
to
se-
lect
a
station
by
pressing
the
corresponding
pre-
set
button.
1.
Press
BAND
button
[11]
to
select
a
band.
2.
Press
one
of
Preset
buttons
[12]
to
select
a
stored
station.
Note:
©
Press
and
hold
Preset
button
|12]
for
2
seconds
or
longer
to
store
the
station
currently
being
received
(preset
memory).
Manual
memory
Up
to
24
stations
(6
each
for
the
FM1, FM2,
FM3
and
AM
stations)
can
be
preset
in
the
Preset
buttons.
1.
Press
BAND
button
[11]
to
select
a
band.
2.
Select
left
or
right
to
tune
in
to
a
desired
sta-
tion
using
a-selector
[2].
3.
Press
and
hold
one
of
Preset
buttons
[12]
for
2
seconds
or
longer
to
store
the
station
currently
being
received.
Auto
store
Auto
store
is
a
function
for
storing
up
to
6
sta-
tions
that
are
automatically
tuned
in
sequentially.
Notes:
¢
The
only
FM
band
that
can
store
stations
is
FM3.
’
If
you
try
to
store
stations
in
FM1
or
FM2,
the
sta-
tions
will
automatically
be
stored
in
FM3.
¢
When
the
auto
store
is
performed,
the
station
pre-
viously
stored
in
the
memory
at
that
position
is
overwritten.
If
there
are
fewer
than
6
stations
with
good
recep-
tion,
the
stations
previously
stored
at
the
remain-
ing
Preset
buttons
are
not
overwritten.
e
A
station
already
stored
in
one
of
Preset
buttons
cannot
be
stored
in
another
Preset
buttons.
1.
Press
BAND
button
[11]
to
select
a
band
(FM3
or
AM)
of
the
desired
station.
2.
Press
and
hold
AS
button
[7]
for
2
seconds
or
longer.
The
stations
with
good
reception
are
stored
automatically
to
Preset
buttons
[12].
Preset
scan
This
function
scans
through
each
preset
station
for
7
seconds
sequentially.
This
is
useful
when
you
want
to
search
for
a
de-
sired
station.
Note:
¢
Take
note
that
if
you
press
and
hold
PS
button
for
2
seconds
or
longer,
the
auto
store
function
goes
into
effect
and
the
unit
starts
storing
stations.
1.
Press
PS
button
[7].
2.
When
a
station
that
you
want
to
listen
to
is
tuned
in,
press
PS
button
[7]
again
or
the
cor-
responding
Preset
button
[12]
to
stop
preset
scan.
*
A
station
that
cannot
be
tuned
in
to
is
skipped
and
the
next
preset
station
is
tuned
in.
ARX7370R/ARX7370RW
13

RDS
Operations
RDS
mode
Function
mode
indication
Seek
tuning
indication
Stereo
indication
(FM)
RDS
(Radio
Data
System)
This
unit
incorporates
an
RDS
system
decoder
for
use
with
stations
broadcasting
RDS
data.
This
system
enables
the
radio
to
display
the
name
of
the
station
being
received
(PS),
and
also
to
automatically
switch
to
a
better
frequency
when
one
is
available
while
you
are
traveling
great
dis-
tances
(AF
switching).
It
can
also
interrupt
a
CD
or
tape
with
traffic
in-
formation
or
the
programme
type
broadcast
by
an
RDS
station.
Additionally,
if
EON
information
is
received,
this
information
enables
automatic
switching
of
other
preset
stations
on
the
same
network
and
inter-
ruption
of
the
station
being
received
with
traffic
information
from
other
stations
(TP).
This
func-
tion
may
not
work
in
some
regions.
To
use
the
RDS
function,
be
sure
to
set
the
radio
to
FM
mode.
*AF:
Alternative
Frequencies
°PS:
Programme
Service
Name
*PTY:
Programme
Type
¢
EON:
Enhanced
Other
Network
°TP:
Traffic
Programme
*
If
an
RDS
station
can
no
longer
be
received
clearly
(at
the
current
location),
“AF”
flashes
in
the
dis-
play.
When
reception
is
restored,
“AF”
stops
flash-
ing.
AF
function
The
AF
function
enables
the
unit
to
maintain
op-
timum
reception
by
switching
to
different
frequen-
cies
on
the
same
network.
*
The
factory
setting
is
“on”.
14
ARX7370R/ARX7370RW
AF
indication
REG
indication
—
Preset
channel
indication
Reception
sensitivity
indication
(FM)
Graphic
indication
PTY
indication
TP
indication
—
TA
indication
@Turning
AF
function
off
When
“AF?”
is
lit
or
flashing
in
the
display,
press
AF
button
[8].
“AF”
in
the
display
goes
off
and
AF
turns
off.
@Turning
AF
function
on
When
“AF”
is
not
lit
in
the
display,
press
AF
button
again.
“AF”
lights
in
the
display
and
AF
turns
on.
If
the
receiving
condition
of
a
station
being
tuned
is
getting
worse,
“AF”
starts
flashing
and
the
unit
tries
to
switch
to
an
alternative
frequency.
If
switching
cannot
be
performed,
the
display
switches
to
“SEARCH”
and
the
unit
searches
for
the
same
programme.
Tv
[7
m
rm
t~
=
wo
oe
woo
>
REG
(Regional
Programme)
function
When
REG
function
is
on,
regional
station
re-
ception
is
optimized.
If
this
function
is
off,
the
unit
switches
in
to
the
regional
station
in
the
next
local
area
when
you
enter
the
next
area
while
receiving
the
regional
station
in
the
previous
local
area.
*
The
factory
setting
is
“off”.
Notes:
e
This
function
is
ineffective
when
a
national
station
such
as
BBC
2
FM
is
being
received.
¢
The
on/off
setting
of
REG
is
effective
when
AF
is
on.
-
@
Turning
REG
function
on
When
“REG’
is
not
lit
in
the
display,
pressing
and
holding
AF
button
for
2
seconds
or
longer.
“REG?”
lights
in
the
display.
@Turning
REG
function
off
Pressing
and
holding
AF
button
[8]
for
2
seconds
or
longer
again.
“REG”
in
the
display
goes
off.
Manual
tuning
of
related
regional
stations
1.
This
function
works
when
AF
is
on
and
REG
is
off.
Note:
*
This
function
is
effective
when
related
regional
sta-
tions
are
received.
‘2.
Press
one
of
the
Preset
buttons
[12]
to
recall
a
regional
station.
-3.
If
the
receiving
condition
of
a
recalled
station
is
bad,
press
the
same
Preset
button
[12].
The
unit
switches
to
a
related
regional
station.
TA
(Traffic
Announcement)
When
the
unit
is
in
the
TA
standby
mode,
you
can
listen
to
traffic
announcements
preferentially
when
they
start,
irrespective
of
the
function
mode.
You
can
also
tune
in
to
TP
(traffic
programme)
stations
automatically.
@To
set
the
TA
standby
mode
If
you
press
TA
button
[10]
when
only
“TP”
is
lit
in
the
display,
“TP”
and
“TA”
light
in
the
display
and
the
unit
is
set
to
the
TA
standby
mode
until
traffic
announcements
start.
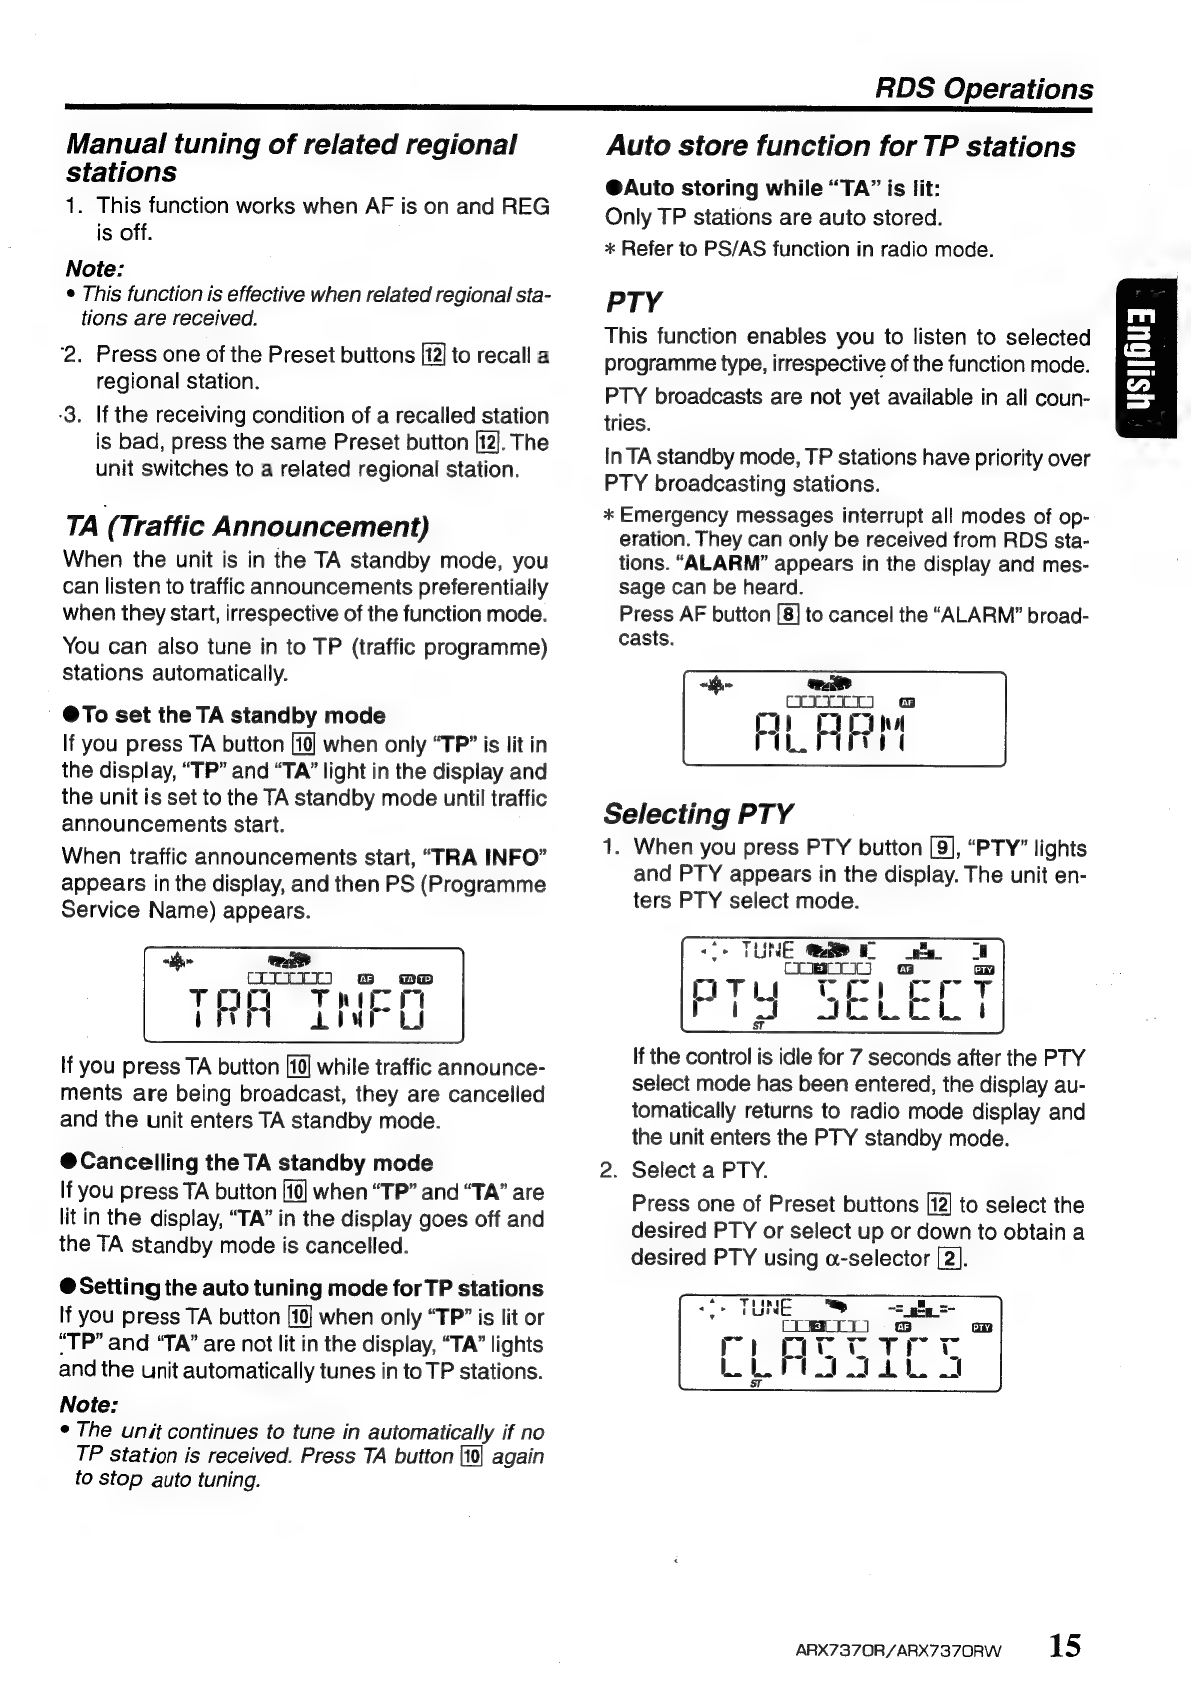
When
traffic
announcements
start,
“TRA
INFO”
appears
in
the
display,
and
then
PS
(Programme
Service
Name)
appears.
«i
we
CLIT
Trem
LI
bs
=
TRA
If
you
press
TA
button
[10]
while
traffic
announce-
ments
are
being
broadcast,
they
are
cancelled
and
the
unit
enters
TA
standby
mode.
@Cancelling
the
TA
standby
mode
If
you
press
TA
button
[10]
when
“TP”
and
“TA”
are
lit
in
the
display,
“TA”
in
the
display
goes
off
and
the
TA
standby
mode
is
cancelled.
@
Setting
the
auto
tuning
mode
for
TP
stations
If
you
press
TA
button
[10]
when
only
“TP”
is
lit
or
“TP”
and
“TA”
are
not
lit
in
the
display,
“TA”
lights
and
the
unit
automatically
tunes
in
to
TP
stations.
Note:
¢
The
unit
continues
to
tune
in
automatically
if
no
TP
station
is
received.
Press
TA
button
[10]
again
to
stop
auto
tuning.
RDS
Operations
Auto
store
function
for
TP
stations
@Auto
storing
while
“TA”
is
lit:
Only
TP
stations
are
auto
stored.
*
Refer
to
PS/AS
function
in
radio
mode.
PTY
This
function
enables
you
to
listen
to
selected
programme
type,
irrespective
of
the
function
mode.
PTY
broadcasts
are
not
yet
available
in
all
coun-
tries.
In
TA
standby
mode,
TP
stations
have
priority
over
PTY
broadcasting
stations.
*
Emergency
messages
interrupt
all
modes
of
op-
eration.
They
can
only
be
received
from
RDS
sta-
tions.
“ALARM”
appears
in
the
display
and
mes-
sage
can
be
heard.
Press
AF
button
[8]
to
cancel
the
“ALARM”
broad-
casts.
«i
bad
OOOO
«a
ey
PIL.
vcr
Selecting
PTY
1.
When
you
press
PTY
button
[9],
“PTY”
lights
and
PTY
appears
in
the
display.
The
unit
en-
ters
PTY
select
mode.
If
the
control
is
idle
for
7
seconds
after
the
PTY
select
mode
has
been
entered,
the
display
au-
tomatically
returns
to
radio
mode
display
and
the
unit
enters
the
PTY
standby
mode.
2.
Select
a
PTY.
Press
one
of
Preset
buttons
[12]
to
select
the
desired
PTY
or
select
up
or
down
to
obtain
a
desired
PTY
using
a-selector
[2].
ARX7370R/ARX7370RW
15

RDS
Operations
*
The
following
stored
already
into
the
preset
but-
tons
for
your
convenience.
PTY
Seto)
es
7
Oe
ENGLISH
(English)
Pa
|News
[ews
|
2
|INFO.
(Information)
|
3
|POPM
|
(Popular
music)
[4
[sPont
[Sper
CLASSICS
|
(Classic
Music)
(Middle
of
the
Road
Music)
3.
Press
PTY
button
[9]
again
to
enter
standby
mode
for
the
selected
PTY.
When
a
selected
PTY
broadcast
starts,
the
selected
PTY
appears
in
the
display.
If
you
press
PTY
button
[9]
during
PTY
broad-
casts,
PTY
broadcasts
are
temporarily
can-
celled
and
the
unit
enters
PTY
standby
mode.
@Cancelling
PTY
standby
mode
Press
and
hold
PTY
button
[9]
for
2
seconds
or
longer
to
turn
off
“PTY”
in
the
display.
16
ARX7370R/ARX7370RW
Preset
memory
of
PTYs
1.
Press
PTY
button
[9]
to
enter
PTY
select
mode.
If
the
control
is
idle
for
7
seconds
after
the
PTY
select
mode
has
been
entered,
the
display
au-
tomatically
returns
to
radio
mode
display
and
the
unit
enters
the
PTY
standby
mode.
2.
Select
up
or
down
to
get
obtain
a
desired
PTY
using
a-selector
[2].
The
following
15
PTYs
are
selectable.
ENGLISH
SPORT
EDUCATE
DRAMA
CULTURE
SCIENCE
VARIED
(Popular
music)
LIGHT
M
CLASSICS
OTHER
M
3.
Press
and
hold
one
of
the
Preset
buttons
1
to
6
for
2
seconds
or
longer
to
put
it
into
memory.
After
PTY
is
stored
in
memory,
“PTY
MEMORY”
appears
in
the
display.
ROCK
M
nA
WAT
UI
PULL)
CL
al
Seek
tuning
of
PTYs
1.
Press
PTY
button
[9]
to
enter
PTY
select
mode.
2.
Select
a
PTY.
z
3.
Select
left
or
right
using
a-selector
[2],
when
a
receivable
and
desired
PTY
is
found.
It
is
automatically
tuned
in.
If
you
select
left
or
right,
the
PTY
is
sought
in
the
direction
of
a
higher
or
lower
frequency
channel.
If
no
stations
broadcasting
selected
a
PTY,
seek
tuning
stops
at
the
previous
station
and
the
unit
stays
in
PTY
standby
mode.

RDS
Operations
Switching
PTY
display
language
The
PTY
characters
shown
in
the
display
can
be
selected
from
4
languages
(English,
German,
Swedish,
French).
*
The
factory
setting
is
“ENGLISH”.
1.
Press
ADJ
button
[15].
2.
Select
left
or
right
until
“PTY
LANG?”
is
dis-
played
using
a-selector
[2].
*.
TUNE
Mosc
wate
=e
«
ANY
Ce
aes
»
Lowe
:
oe
2
j
Lowe
3.
Select
up
or
down
to
select
the
desired
lan-
guage
using
a-selector
[2].
wl?
TUNE
|
at
es
Ponth.
0
oe
Ree
ST
4.
Press
ADJ
button
[15]
to
return
to
radio
mode.
Note:
¢
Special
characters
other
than
alphabet
characters
may
not
be
displayed
properly.
Volume
setting
of
TA,
emergency
(ALARM)
and
PTY
You
can
set
the
volume
of
TA,
ALARM
and
PTY
to
a
desired
level.
*
The
factory
setting
is
“TA
VOL
9”.
1.
Press
and
hold
TA
button
|10|
for
2
seconds
or
longer
to
enter
TA
VOL
ADJ
mode.
If
the
control
is
idle
for
7
seconds
after
the
TA
VOL
ADJ
mode
has
been
entered,
the
display
returns
to
radio
mode
display
automatically.
2.
Select
up
or
down
to
set
the
volume
level
us-
ing
a-selector
[2].
oo
“-_f-i_-~
as
>
a
mrt
a
*
The
volume
remains
unchanged
if
the
volume
before
the
TA,
ALARM
and
PTY
broadcasts
are
received
is
higher
than
the
previously
set
vol-
ume.
If
it
is
lower,
the
volume
changes
to
the
level
set
in
TA
VOL
ADJ
mode.
3.
Press
TA
button
to
complete
volume
set-
ting.
M/S
(Music/Speech)
function
While
receiving
speech
programme
with
speech
data
and
this
function
is
on,
this
enables
you
to
set
the
bass/treble
to
a
constant
level
so
that
you
can
listen
to
the
speech
programme
clearly.
When
speech
is
finished,
the
sound
returns
to
the
original
bass/treble
adjustment.
"*
The
factory
setting
is
off.
1.
Press
ADJ
button
[15].
2.
Select
left
or
right
until
“M/S
ACT”
is
displayed
using
a-selector
[2].
hal
pee
3.
Select
up
or
down
to
turn
“ON”
or
“OFF”
us-
ing
a-selector
[2].
4.
Press
ADJ
button
[15]
again
to
return
to
radio
mode
display.
Note:
e
When
you
receive
speech
data
with
the
M/S
func-
tion
set
to
“on”
while
a
DSP/EQ
such
as
DPH9300,
DPH7300
and
EQH5100
etc.
is
connected
to
this
unit,
the
unit
invalidates
the
DSP/EQ
adjustments.
*
When
receipt
of
speech
data
has
finished,
the
sound
quality
returns
to
the
original
bass/treble
adjustment
level
or
the
sound
level
set
on
the
DSP/
Equalizer.
CT
(Clock
Time)
function
The
CT
function
enables
you
to
display
clock
time
only
when
CT
data
is
received.
Press
DISP
button
[6]
to
switch
the
display
to
the
CT
indication.
*
When
CT
data
is
not
received,
“CT——:-——”
is
dis-
played.
Note:
e
There
are
some
countries
and
stations
where
clock
time
data
are
not
transmitted.
In
some
areas,
the
CT
may
not
be
displayed
correctly.
ARX7370R/ARX7370RW
17

Tape
Operations
Tape
mode
Function
mode
indication
Tape
in
indication
Blank
skip
indication
Dolby
B
NR/C
NR
indication
Loading
a
cassette
1.
Press
OPEN
button
[3]
to
open
FLIP
DOWN
PANEL.
Note:
e
When
opening
and
closing
FLIP
DOWN
PANEL,
be
careful
not
to
let
your
hand
or
fingers
get
caught
in
FLIP
DOWN
PANEL.
2.
When
acassette
tape
is
inserted
into
the
cas-
sette
insertion
slot,
it
enters
into
the
slot
and
the
play
starts
automatically.
Cassette
insertion
slot
*
The
metal
tape
setting
is
set
automatically
when
a
metal
or
chrome
tape
(70
sec)
is
loaded.
3.
Close
FLIP
DOWN
PANEL.
4.
Each
time
you
press
DISP
button
[6],
the
dis-
play
changes
in
the
following
order:
Main
-
Sub
->
Clock
(CT)
>
Main
...
“8
TAPE
a
oc.
ray
Cat
reun
{4
enree
Notes:
*
Do
not
leave
FLIP
DOWN
PANEL
open.
Make
sure
to
close
it.
18
ARX7370R/ARX7370RW
Circle
indication
Graphic
indication
Fee
ainda.
aes
|
Sees
|
aeiaiaT
Repeat
indication
Scan
indication
¢
Do
not
put
your
hand,
fingers
or
foreign
object
into
the
cassette
insertion
slot.
e
/f
a
cassette
tape
has
already
been
loaded,
an-
other
tape
cannot
be
inserted.
Do
not
insert
an-
other
one
forcefully.
Listening
to
a
tape
already
loaded
Press
FUNC
button
[1]
and
select
tape
mode
to
start
play.
If
no
cassette
tape
is
loaded,
“NO
CASS’
appears
in
the
display.
*
“NO
CASS”
appears
in
the
display
for
4
seconds
and
the
mode
changes
to
the
next
function
mode
automatically.
Pausing
play
1.
Push
in
a-selector
[2]
to
pause
play.
“PAUSE”
appears
in
the
display.
«th
TAPE
ages
ollie
alee
2.
To
resume
play,
push
in
«-selector
[2]
again.
Ejecting
the
cassette
tape
1.
Press
OPEN
button
[3]
to
open
FLIP
DOWN
PANEL.
Note:
¢
When
opening
and
closing
FLIP
DOWN
PANEL,
be
careful
not
to
let
your
hand
or
fingers
get
caught
in
FLIP
DOWN
PANEL.
2.
Press
Eject
button
to
eject
the
cassette
tape.
*
The
radio
mode
is
set
automatically
4
seconds
after
Eject
button
[18]
is
pressed.
3.
Take
out
the
cassette
tape
and
close
FLIP
DOWN
PANEL.
Note:
*
Do
not
leave
FLIP
DOWN
PANEL
open.
Make
sure
to
close
it.
This manual suits for next models
1
Table of contents
Other Clarion Cassette Player manuals


