Clarke DORCHESTER User manual

Parts & Service: 020 8988 7400 / E-mail: Parts@clarkeinternational.com or Service@clarkeinternational.com
CAST IRON FIREPLACE
MODEL NOS: CCF1 • CCF3 • CCF4 • CCF5
DORCHESTER • GLOUCESTER • BERKELEY • CHELTENHAM
INTRODUCTION
Thank you for purchasing this Clarke cast iron fireplace.
It is essential that the fireplace be installed correctly (fully in accordance with building regulations),
and we strongly recommend therefore that this is carried out by a qualified installer, in order to
ensure installation conforms to all relevant building regulations.
The fireplace is designed for use with solid fuels - primarily wood, but coal or coke may also be used.
GUARANTEE
This product is guaranteed against faulty manufacture for a period of 12 months from the date of
purchase, Please keep your receipt which will be required for proof of purchase.
This guarantee is invalid if the product has been found to have been abused or tampered with in
any way, or not used for the purpose it was intended.
Faulty goods must be returned to their place of purchase. No product can be returned to us without
prior permission.
This guarantee does not effect your statuary rights.
DIMENSIONS
MODEL NO:NAME ABCDEFG
CCF1 Dorchester 140 660 400 977 745 720 180
CCF3 Gloucester 140 595 343 895 580 715 126
CCF4 Berkeley 250 800 755 1120 910 855 160
CCF5 Cheltenham 225 620 500 980 850 725 135

Parts & Service: 020 8988 7400 / E-mail: Parts@clarkeinternational.com or Service@clarkeinternational.com
FIXING INSTRUCTIONS
• We recommend that an experienced installer fits your fireplace securely using metal fixings.
Adhesive alone is not sufficient!
• If you have any doubts about the installation of your fireplace or about local building
regulations, we recommend you use a competent builder or chimney specialist.
BEFORE YOU BEGIN
1. Ensure the cavity is sufficient for the fireplace to fit, and sufficient solid surface is available to allow
the holes to be drilled and plugged for its attachment to the wall.
2. First ensure that your flue is in good condition and not blocked.
3. If there are any packing bolts in the packaging, these may be discarded.
4. Make sure that you have an appropriate fireproof area (hearth) in front of your fireplace.
MARKING OUT
If the fireplace is to be fitted on top of the hearth, the thickness of the hearth must be allowed for in
assessing how big to make the cavity in the chimney breast.
1. Measure and mark the centre of the chimney breast on the wall.
2. Stand the fireplace and manteliece together. You should now be able to measure the size of the
opening that you need to make in the wall in order to accommodate the fire insert.
3. Draw roughly on the chimney breast the size of the opening that you will need.
MAKING THE HOLE AND FITTING A HEARTH
1. Open up the chimney breast using a club hammer and bolster chisel.
2. If there are skirting boards fitted, try to remove them intact or cut it at the centre of where the
fireplace will be and remove it in two pieces.
3. Once you have opened up the chimney breast it is a good idea to position the hearth into
position for a test fit.
4. Assemble the fireplace and mantelpiece and place it into position on the hearth.
• You should check that there is a clear path for the fumes and smoke from the firebox to
escape up the main flue before you begin. The firebox must align with the existing flue and be
sealed correctly using fire cement.
5. If everything now looks correct, remove the fireplace and fix the hearth in place by bedding it on
a thin layer of mortar. About 1/4 “- 1/2 “thick should be adequate.
6. The gaps around the edge of the hearth will need to also be pointed using the same mortar.
7. The space immediately behind the hearth can be now filled up to the same level as the hearth
with mortar or broken brick etc with a mortar layer over it.
WARNING: ONCE FITTED MAKE SURE THE FIREPLACE/MANTELPIECE IS FULLY SECURE AND CANNOT FALL
AWAY FROM THE WALL.

Parts & Service: 020 8988 7400 / E-mail: Parts@clarkeinternational.com or Service@clarkeinternational.com
TILES (IF USED, E.G BERKLEY)
If the fireplace has a set of tiles incorporated (e.g Berkley), the tiles must be fitted before the
fireplace is put in and cannot be easily changed afterwards.
1. Insert the tiles into the carrier, and seal with fire clay or suitable heat resistant sealer.
2. Screw the carrier - with tiles, into place from the back of the fireplace,
3. Do not over tighten, as this could cause the tiles to crack.
FIREPLACE
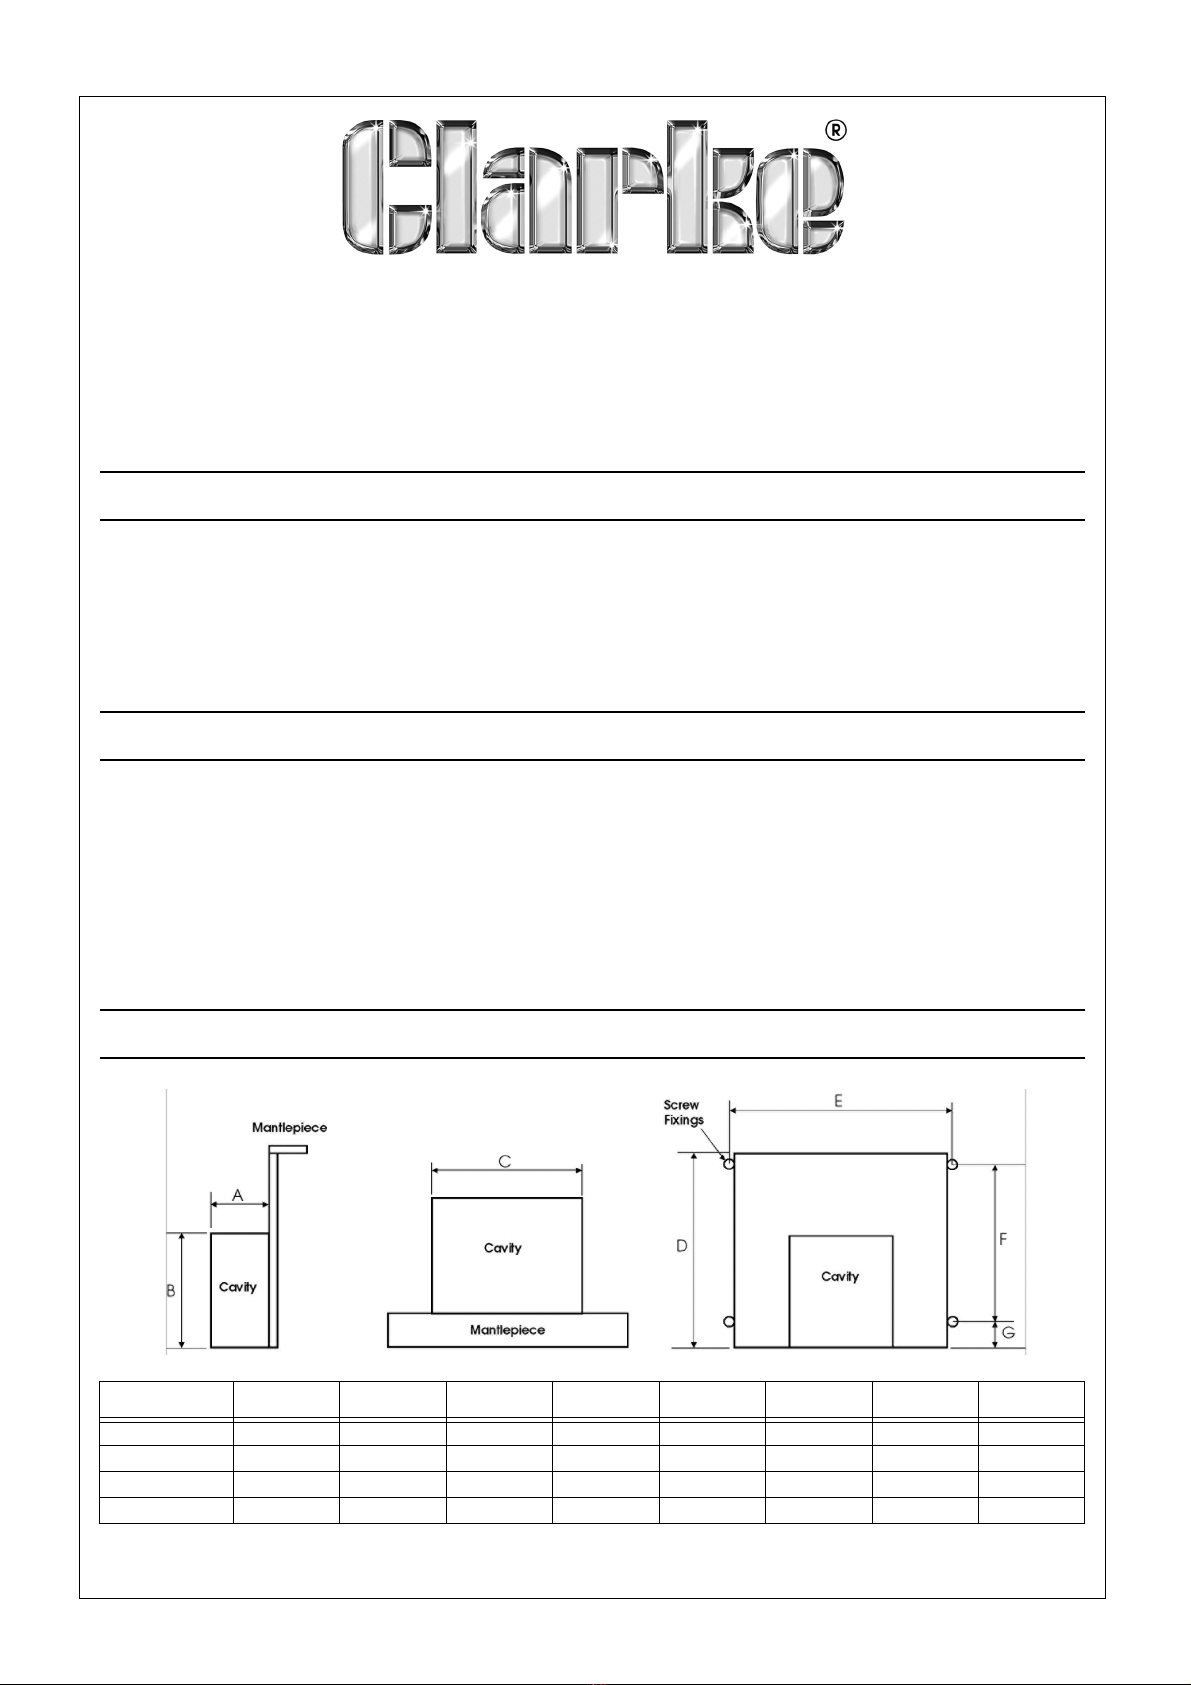
1. Offer up the body of the fireplace to the wall cavity, ensure it fits snugly, and is firmly located on
the hearth and against the wall, then mark out the four mounting holes on the chimney breast.
NOTE: If any gaps were apparent between the wall and body of the fireplace, the wall should be levelled
before proceeding.
2. Remove the fireplace and use an 8mm drill bit, drill the holes in the brickwork and insert rawl plugs.
3. Apply a suitable heat resistant sealant to the mating surfaces - wall and fireplace, then replace
the fireplace and screw firmly to the wall. remove any excess sealant before it dries.
4. Place the grate into position, and position the front cover etc.
MANTELPIECE
1. Secure the mantelpiece using the countersunk screws provided.
The fireplace is now ready to use.
SEASONING
As cast iron is porous, it is possible that the fireplace contains moisture. It is important that this moisture
is removed gradually. This involves lighting and maintaining a small fire only, for approx. 6 hours. Do
not light a full fire until this process is complete, as it could cause the fireplace to crack.
MAINTENANCE
Keep the fireplace clean by using a suitable brush, and buff up the relief work with a clean cloth.
Black grate polish, available from hardware stores, should also be used at regular intervals.
WARNING: THE FIREPLACE MUST BE ANCHORED TO THE WALL SECURELY USING RAWL PLUGS AND SUITABLE
SCREWS AT LEAST 3” (75MM) LONG, IDEALLY INTO BRICKWORK
WARNING: ONCE FITTED MAKE SURE THE FIREPLACE/MANTELPIECE IS FULLY SECURE AND CANNOT FALL
AWAY FROM THE WALL.
Replacement grates are available from your Clarke dealer
MODEL PART NUMBER MODEL PART NUMBER
Berkeley HMMB01 Cheltenham HMMC01
Dorchester HMMD01 Gloucester HMMG01
WARNING: ONCE FITTED MAKE SURE THE FIREPLACE/MANTELPIECE IS FULLY SECURE AND CANNOT FALL
AWAY FROM THE WALL.
CAUTION: BEFORE LIGHTING A FIRE, PLEASE READ THE IMPORTANT INSTRUCTIONS ON ‘SEASONING’

Parts & Service: 020 8988 7400 / E-mail: Parts@clarkeinternational.com or Service@clarkeinternational.com
This manual suits for next models
7
Table of contents
Popular Indoor Fireplace manuals by other brands

Pacific energy
Pacific energy SPND.BODYB Installation and operating instructions

Valor
Valor STONEFIRE SF10BL installation instructions

Ecoflam
Ecoflam BLU TS 7000.1 PR HT manual

RUSTA
RUSTA NARVIK manual

IN & OUT HOUSE
IN & OUT HOUSE EF223A instruction manual

ORTAL
ORTAL Stand Alone 75 Hood Installation & operation manual

Jøtul
Jøtul F 105 R Series Installation and operating instructions

Cavalier
Cavalier 9830 specification

Jøtul
Jøtul FS 173- I 520 Installation and operating instructions

Travis Industries
Travis Industries DVS EF Fireplace owner's manual

Valor
Valor Portrait 530ILN/ILP Installation & operating instructions

Woodfire
Woodfire EX Series Operation and installation manual